
Last Seen Blogs

collectionmax2000
Auto & Girls

gxdoka
YOU ARE N✰T ALONE

untristeverso-blog
Un Triste Verso

yourgoodfrienddevinweston
That awkward moment between birth and death

jokrsjoke
JOKRSJOKE
Text
Grilled BBQ Chicken with Homemade BBQ Sauce (Video!)
Grilled BBQ Chicken enveloped in a tantalizing spice rub, slathered with Homemade Barbecue Sauce and grilled to perfection for the best juicy, smokey flavorful chicken every single time!
Grilled BBQ Chicken is super quick and easy and doesn’t require a marinade so it is perfect for last minute dinners or entertaining. You can use my insanely delicious Homemade Barbecue Sauce or your favorite store-bought barbecue sauce. I’ve included tips and tricks and cooking times for different cuts of chicken so you are fully quipped to make Grilled Barbecue chicken in all its juicy, saucy, caramelized-edged glory.
GRILLED BBQ CHICKEN RECIPE VIDEO
What Makes the Best BBQ Chicken on the Grill?
Grilled BBQ Chicken is always a crowd pleaser – when it’s done right. And this Grilled BBQ Chicken is done right. Both Patrick and I were expecting to love this Barbecue Chicken but we were inhaling this chicken. This Grilled BBQ Chicken deserves to become a dinner time staple along with favorites Nashville Hot Chicken and Baked Fried Chicken.
What sets this Grilled BBQ Chicken recipe apart from the rest is the homemade spice rub and homemade Barbecue Sauce. I’ve scaled down both the rub and barbecue sauce from my BBQ Brisket, BBQ Ribs, and BBQ Brisket Sandwiches because you don’t mess with perfection. If you haven’t tried any of these barbecue recipes yet, then it’s time, starting with this Barbecue Chicken! Here are just a few comments regarding the Homemade Barbecue Sauce (on my ribs post):
“Absolutely incredible!! My husband is a huge BBQ rib fan. He’s been to rib competitions always looking for the best BBQ sauce. He was blown away. I haven’t even finished digesting and felt the need to leave this comment asap. Lol thank you...” – Danielle
“The BBQ sauce is some of the best I have tasted!” -Beth
“….The best part is your BBQ sauce. That is the best I have ever had and I will be making my own (your recipe) from here on out. I was skeptical reading all the posts about how good it was and I now know why. Absolutely amazing…” – Terry
“…That bbq sauce is amazing, I will definitely be using that sauce from now on!” – Kristen
So while it’s easier and more convenient to squeeze a bunch of store-bought barbecue sauce on your grilled barbecue chicken, I promise the homemade barbecue sauce is very simple to make and tantalizingly delicious!
What Should I Season Grilled BBQ Chicken with?
Along with the homemade barbecue sauce, your chicken needs a dynamite rub. If you just slather a piece of grilled chicken in barbecue sauce, I promise you will be disappointed. If you just marinate your chicken in barbecue sauce, I promise you will be disappointed. If you want multi-dimensional restaurant delicious Grilled Barbecue Chicken, then it needs a spice rub and barbecue sauce.
I am a huge believer in the elevating power of spice rubs. I use a spice rub in my Carne Asada recipe and I use a spice rub in my Buffalo Hot Wings which I believe transforms them into some of the best out there.
For this Grilled BBQ Chicken spice rub we whisk together:
smoked paprika
chili powder
chipotle chili powder
onion powder
garlic powder
dried thyme
salt
pepper
brown sugar
Once you rub your chicken with olive oil and the spice rub, you can let it sit at room temperature for 30 minutes, or cover or transfer to a freezer size bag and refrigerate for up to 24 hours. 24 hours is optimal but even with just 30 minutes of resting, your chicken will be taken to a whole new level of YUM.
Grilled BBQ Chicken Breast
If you want to make Grilled BBQ Chicken Breasts, you might want to consider using a brine because chicken breasts can easily dry out when cooked due to their low fat content.
WHY BRINE CHICKEN BREASTS? In short, brining is the quickest way (15 minutes) to ensure juicy chicken every single time because the salty brining bath increases the moisture capacity of the chicken. It does this by breaking down the proteins of the bird so they can no longer contract when cooking. This means less water will be squeezed out and lost, resulting in juicier chicken.
HOW TO BRINE CHICKEN: Combine 8 cups warm water and 1/2 cup kosher salt together in a glass dish. Stir until the salt dissolves. Add chicken and let sit at room temperature for 15-30 minutes. Rinse chicken and pat dry – that’s it!
How long does it take to BBQ chicken on the grill?
I chose to use chicken drumsticks in this Grilled BBQ Chicken recipe because they are always the first to fly off the plate (pun intended). Chicken drumsticks are inherently juicy, hard to overcook and easy to eat with just one hand without any utensils required.
That being said, you can certainly use any part of the chicken to grill. I have outlined the different cooking times for each cut of chicken below, but keep in mind these will be slightly different for each individual due to grill variables and the actual size of each cut of chicken. The only certain way to know if your chicken is done is to use an instant read thermometer. If you don’t own one, they are available at every grocery store, so add it to your list today :)!
You will note below that I say some cuts of chicken are done when an instant read thermometer reads 165°F and on some cuts I say 165-180° F. While 165° is safe, some cuts of chicken, such as the drumsticks and leg quarters, actually taste better when they are cooked closer to 180°F because they (unlike chicken breasts) will become more tender.
HOW LONG DO I GRILL CHICKEN DRUMSTICKS?
Grease and preheat grill to high heat.
Season chicken and add to hot grill and sear for 5 minutes, uncovered, flip and sear an additional 5 minutes, uncovered.
Cover, and turn heat down to low so the temperature stays around 325°F when the lid is CLOSED.
Cook 5 minute then flip and cover; cook an additional 5 minutes.
Check chicken temperature. It should register 165-180°F. If chicken is not cooked to this temperature yet, flip and repeat steps until chicken is fully cooked through.
HOW LONG DO I GRILL CHICKEN THIGHS?
Grease and preheat the grill to medium heat, 375-450°F.
Season chicken thighs and grill undisturbed for 5-7 minutes per side, or until chicken is cooked through. An inserted thermometer should read 165° F.
HOW LONG DO I GRILL BONE-IN CHICKEN THIGHS?
HOW LONG DO I GRILL CHICKEN BREASTS?
Grease and preheat grill to medium heat, 375-450°F.
Pound chicken breasts to an even thickness.
Season chicken breasts and grill undisturbed for 5-7 minutes per side, depending on thickness, or until chicken is cooked through. An inserted thermometer should read 165°F.
HOW LONG DO I GRILL CHICKEN LEG QUARTERS?
Preheat grill with lid closed. Preheat your grill with the lid closed so your grill gets nice and hot but sear with the lid open. Follow specific instructions on whether grill should be open or closed. If instructions do not specify, then that means to grill uncovered, with the lid open.
Use a instant read thermometer! When it comes to checking the temperature of chicken, there is no accurate way to check without cutting your chicken open and loosing juices, other than an instant read thermometer! They are fast, highly accurate, and save you all the guesswork and possibly food poisoning
Close lid. With the exception of chicken breasts, and thighs, keep the grill lid closed as much as possible after searing. Drumsticks, leg quarters and bone-in chicken thighs need to be roasted which is accomplish when the lid is closed causing heat to surround the chicken.
Cook to 165°F for LIGHT meat or 180°F for DARK meat. While 165°F is a safe internal temperature for all chicken, 180°F will produce more tender, fall-off-the-bone dark meat.
What Should I Serve with Grilled BBQ Chicken?
Want to try this Grilled BBQ Chicken Recipe?
Pin it to your CHICKEN, GRILL or DINNER Board to SAVE for later!
Find me on Pinterest for more great recipes! I am always pinning :)!
©Carlsbad Cravings by CarlsbadCravings.com
Print Recipe
Grilled BBQ Chicken with Homemade BBQ Sauce
Grilled BBQ Chicken enveloped in a tantalizing spice rub, slathered with Homemade Barbecue Sauce and grilled to perfection for the best juicy, smokey flavorful chicken every single time!
Votes: 0
Rating: 0
Rate this recipe!
Ingredients
8-10 skinless chicken drumsticks approx. 3 pounds
1 tablespoon olive oil
SPICE MIX
2 teaspoons smoked paprika
1 1/2 teaspoons salt
1 tsp EACH chili powder, onion, powder, garlic powder, brown sugar
1/2 tsp EACH chipotle chili powder, dried thyme, pepper
Barbecue Sauce
1 cup ketchup
1/4 cup molasses
1/4 cup packed brown sugar
2 tablespoons seedless blackberry preserves
2 1/2 tablespoons apple cider vinegar
1 1/2 teaspoons reserved Spice Rub (from above, in directions)
Votes: 0
Rating: 0
Rate this recipe!
Instructions
Whisk together all of the Spice Mix Ingredients. Remove 1 1/2 teaspoons to a saucepan to use later in your Barbecue Sauce.
Drizzle chicken with 1 tablespoon olive oil and rub it all over the chicken. Sprinkle the chicken with half of the Spice Mix and rub into chicken. Flip chicken over and sprinkle with remaining spice mix (it will seem like a lot but use it all). Rub spice mix into chicken. Let chicken sit 30 minutes at room temperature OR you can cover and refrigerate up to overnight and cook later. (If you refrigerate chicken and grill later, let chicken sit at room temperature for 30 minutes prior to grilling for more even cooking.)
Meanwhile, add all of the Barbecue Sauce ingredients to the saucepan with the reserved 1 1/2 teaspoons spice mix. Whisk together and simmer for 5-10 minutes for the flavors to meld.
TO GRILL
Grease grill and preheat grill to high heat. Once hot, add chicken and sear, uncovered, for 5 minutes, flip chicken over and sear an additional 5 minutes.
Cover, and turn heat down to low so the temperature stays around 325 degrees F when the lid is closed. Cook 5 minutes with the lid closed, flip and cook an additional 5 minutes with the lid closed.
Baste chicken with barbecue sauce and cook 1 minute, flip and cook an additional minute. Using an instant read thermometer, check temperature of chicken at the thickest part without touching the bone. Chicken is done when it registers 165-180º F on an instant read thermometer. If chicken isn’t done, continue to grill (covered) and flip chicken and baste with barbecue sauce every 3 minutes until it reaches temperature.
Remove chicken to a serving platter brush with barbecue sauce. Let rest 5 minutes before serving. Serve with additional barbecue sauce.
TO BAKE
Line a baking sheet with foil (for easy cleanup) and top with a baking/cooling rack if you have one. Lightly spray rack with nonstick cooking spray. Line drumsticks on the baking rack without touching. Let chicken set at room temperature for 30-60 minutes. Meanwhile, preheat oven to 425 F degrees. Bake chicken at 425 F degrees for 30-35 minutes or until cooked through.
Remove chicken to a serving platter brush with barbecue sauce. Let rest 5 minutes before serving. Serve with additional barbecue sauce.
Recipe Notes
TIPS AND TRICKS
Remove Skin. I remove the skin from my chicken drumsticks because I am not a fan of soggy skin. Even if the skin is crispy initially when grilled, it gets soggy when coated in the barbecue sauce. It is also more prone to cause flare-ups and burn. If you want to grill with the skin on, eat it with the skin on or you will losoe the flavor from the rub. Also be prepared with some water nearby the grill in case of flare ups.
Use all the seasonings. The spice mix might seem like a lot of seasonings, but I promise it is the perfect amount, use ALL of it!
Let chicken rest. After you rub the chicken with seasonings, let it rest for 30 minutes on the counter or tightly wrap/transfer to freezer size Ziploc bag and refrigerate up to 24 hours. Letting it rest is life changing!
Don't cook chicken straight from the refrigerator! If your chicken has been refrigerated, let it sit on the counter for 30 minutes, this will allow your chicken to come closer to room temperature so it will cook more evenly.
Preheat grill with lid closed. Preheat your grill with the lid closed so your grill gets nice and hot but sear with the lid open. Follow specific instructions on whether grill should be open or closed. If instructions do not specify, then that means to grill uncovered, with the lid open.
Use a instant read thermometer! When it comes to checking the temperature of chicken, there is no accurate way to check without cutting your chicken open and loosing juices, then by using an instant read thermometer. They are fast, highly accurate, and save you all the guesswork and possibly food poisoning.
Close lid. With the exception of chicken breasts, and thighs, keep the grill lid closed as much as possible after searing. Drumsticks, leg quarters and bone-in chicken thighs need to be roasted which is accomplish when the lid is closed causing heat to surround the chicken.
Cook to 165°F for LIGHT meat or 180°F for DARK meat. While 165°F is a safe internal temperature for all chicken, 180°F will produce more tender, fall-off-the-bone dark meat.
Add BBQ sauce at the end. We want to develop a nice sear on our chicken, so hold the barbecue sauce until the last few minutes of grilling. It is also important to not add barbecue sauce until the end of grilling otherwise the sauce will burn due to the sugars in the sauce. I like to add the barbecue sauce when my chicken is almost done, then let it grill on each side for a minute or so so the barbecue sauce caramelizes slightly then I slather my chicken with more barbecue sauce off of the grill.
©Carlsbad Cravings Original
Never miss a Carlsbad Cravings Creation:
Facebook / Google+ / Instagram / Pinterest / Twitter
Looking for More Barbecue Favorites?
Slow Cooker Barbecue Chicken
Hulu Huli Chicken (Grilled Hawaiian Chicken)
Barbecue Chicken Kabobs
Mesquite Pineapple BBQ Chicken
Source: http://carlsbadcravings.com/grilled-bbq-chicken/
0 notes
Text
Low-Carb Stuffed Peppers with Italian Sausage, Ground Beef, and Mozzarella
posted by Kalyn Denny on February 20, 2019
These Low-Carb Stuffed Peppers with Italian Sausage, Ground Beef, and Mozzarella are delicious and easy to make! And these low-carb stuffed peppers are also gluten-free, Keto, low-glycemic, and South Beach Diet Phase friendly. Use the Diet-Type Index to find more recipes like this one.
Click to PIN Low-Carb Stuffed Peppers with Italian Sausage, Ground Beef, and Mozzarella!
I’m a huge fan of stuffed peppers, and there are a lot of stuffed pepper recipes on this blog, and even a round-up of Ten Low-Carb Stuffed Pepper Recipes. But today I am reminding you about these Low-Carb Stuffed Peppers with Italian Sausage, Ground Beef, and Mozzarella that I first made many, many years ago, and when the stuffed peppers craving hits, this is the low-carb stuffed peppers recipe I make over and over. Maybe it’s because I almost always have ground beef and Italian Sausage in the freezer and most of the other ingredients are things I keep on hand as well, so when I want to make this I usually just have to buy the peppers.
This recipe makes six peppers, and when I was teaching school these Low-Carb Stuffed Peppers with Italian Sausage, Ground Beef, and Mozzarella were just the type of thing I’d make for Weekend Food Prep and keep in the freezer to take for lunch, so even if you’re only cooking for one or two people I recommend making the whole recipe and freezing some or just eating them a few times during the week! And if you haven’t tried this Kalyn’s Kitchen favorite recipe yet, I hope you enjoy!
In very large frying pan, heat a small amount of olive oil and cook hamburger until lightly browned. (I use my turner or a potato masher to break up the meat into smaller bits as it cooks.) While the meat browns, slice off the pepper tops and then slice off the bottom ends of the peppers (just enough so they will stand up) and remove the and seeds. Put peppers in a dish where they fit pretty tightly. Chop up the onion, plus the parts of the peppers you sliced off. When sausage is brown, remove it to a bowl.
Brown the sausage and put it in the bowl with the beef. Saute chopped pepper tops and onions for a few minutes. Then mix the browned meats and a little tomato sauce into the veggie mixture. Let it cool for a few minutes, then mix in most of the grated Mozzarella and the Parmesan.
Stuff peppers with the meat mixture and put a pinch of the remaining Mozzarella on top of each one. Cover with foil, tenting it so it doesn’t stick to the cheese, and bake covered at 375F/190C for about 30 minutes. Then remove the foil and bake about 20 minutes more, or until peppers are piping hot and the cheese on top is nicely browned. Serve hot.
Make it a Meal:
For a delicious low-carb dinner, I’d love these peppers with The Best Easy Cauliflower Rice with Garlic and Green Onion or Twice-Baked Spaghetti Squash with Pesto and Parmesan on the side.
More Delicious Ways to Stuff Peppers:
Southwestern Stuffed Pepperfrom Kalyn’s Kitchen
Cauliflower Stuffed Peppers from Food Loves Writing
Stuffed Pepper Soup from Kalyn’s Kitchen
Italian Style Stuffed Peppers from CopyKat Recipes
Low-Carb Cauliflower Rice Southwestern Stuffed Peppers with Turkey and Poblanos from Kalyn’s Kitchen
Weekend Food Prep:
This recipe has been added to a new category called Weekend Food Prep to help you find recipes you can prep or cook on the weekend and eat during the week!
Low-Carb Stuffed Peppers with Italian Sausage, Ground Beef, and Mozzarella
Yield: 6 servings
Total Time: 1 hour 20 minutes
Prep Time: 30 minutes
Cook Time: 50 minutes
These Stuffed Peppers with Turkey Italian Sausage, Ground Beef, and Mozzarella are low-carb, gluten-free, and so delicious and easy to make!
Ingredients:
6 red or green peppers, or a mixture of colors
1 pound extra lean ground beef (called beef mince outside of the U.S.)
1 pkg. (5 links/19.5 oz) turkey or pork Italian sausage (hot or mild, but I prefer hot)
1 cup diced onion (1 medium onion)
1 cup diced red pepper (tops of peppers)
4-6 tsp. olive oil for browning meat and veggies
Vege-sal to season meat (or use salt)
fresh ground black pepper, to season meat
1 cup (or slightly more) spicy tomato sauce with basil (I use my own Marinara sauce from the freezer so I know it is sugar free. Bottled sauce is fine, but check the label to get the one that is lowest in sugar.)
2 cups grated low fat mozzarella cheese (I used skim milk mozzarella cheese with 5 grams fat per ounce)
1/2 cup grated Parmesan (optional, you could use a little less mozzarella if adding this)
Directions:
Preheat oven to 375F/190C.
In very large frying pan, heat a small amount of olive oil and cook hamburger until lightly browned. (I use my turner or a potato masher to break up the meat into smaller bits as it cooks.) Remove the ground beef to a bowl when it’s done.
Cut tops off peppers, making a deep enough cut that you have some pepper to chop for the filling.
Square off the bottom of each pepper to make them stand up. (It’s nice to have a small hole in the bottom so any extra fat can drain out, and cutting off the bottoms also accomplishes this.)
Clean out inside of peppers and wash if needed.
Choose a pan that will keep the peppers standing upright and spray with olive oil or nonstick spray.
In same frying pan, add a tiny amount of olive oil, squeeze sausage out of links, and cook until lightly brown. Add the browned sausage to the bowl with the ground beef.
While the sausage cooks, chop the peppers and onions. Add a bit more oil to pan and cook chopped peppers and onions for about 3-4 minutes, until barely starting to soften.
Turn off heat and put meat back into pan with peppers and onions.
Add about 1 cup Marinara sauce, or purchased tomato sauce with basil, just enough to barely moisten the mixture. (Be sure to choose a low-sugar sauce for low-carbs.)
Season mixture with salt and pepper to taste.
Let mixture cool slightly, then mix in cheeses, saving about 1/4 cup Mozzarella for the top of the peppers.
Put the peppers in the pan standing upright.
Stuff each pepper with meat/veggie/cheese mixture, using a large spoon and pressing in tightly until you use all the filling.
Put a pinch of Mozzarella cheese on the top of each pepper.
Cover the dish loosely with foil, tenting it up so it doesn’t touch the tops of the peppers.
Bake, covered with foil about 30 minutes.
Take off foil and bake about 20 minutes more, until cheese is melted completely and top is slightly browned.
Serve hot.
Notes:
I love Vege-sal, but you can certainly use regular salt to season the meat. I love to use my own homemade Marinara sauce for this recipe, but there are a few good brands that are low in carbs.
This freezes well, so even if you’re only cooking for one or two I recommend making the full amount and stashing some in the freezer for lunches or easy dinners another time.
This recipe created by Kalyn.
Low-Carb Diet / Low-Glycemic Diet / South Beach Diet Suggestions:
Low-Carb Stuffed Peppers are great for low-carb diet plans, and these are a perfect dish for any phase of the South Beach Diet (with approved meats).
Find More Recipes Like This One:
Use the Recipes by Diet Type photo index pages to find more recipes suitable for a specific eating plan. You might also like to Follow Kalyn’s Kitchen on Pinterest to see all the good recipes I’m sharing there.
Nutritional Information?
If you want nutritional information for a recipe, I recommend entering the recipe into this nutrition analyzer, which will calculate it for you. Or if you’re a member of Yummly, you can use the Yum button on my site to save the recipe and see the nutritional information there.
posted by Kalyn Denny on February 20, 2019
Don’t Miss a Recipe!
subscribe to receive new recipes via email:
We are a participant in the Amazon Services LLC Associates Program, an affiliate advertising program designed to provide a means for us to earn fees by linking to Amazon.com and affiliated sites.
Source: https://kalynskitchen.com/stuffed-peppers-with-italian-sausage/
0 notes
Text
AUNT TINA’S CHECKERBOARD CAKE
I’ve teased my Aunt Tina that her buttermilk cake recipe is the foundation of her cake repertoire, and I’m not wrong. The buttermilk cake is a perfect vanilla cake – moist, not too sweet, and so versatile – so it’s no surprise it has served as the bedrock for most of my aunt’s vintage inspired cakes. In this recipe, it gets a chocolate twist, and a bit of fun geometry, to create a unique and delicious dessert. Just like when you can’t decide between vanilla and chocolate soft serve, and opt for a twist, the checkerboard cake gives you the best of both worlds. As with most things, this cake is best with a scoop of vanilla ice cream.
Note: I was a dummy and only filled 2 of the layers…so, ignore the two layered-ness. This works best as three.
INGREDIENTS (BUTTERMILK CAKE):
For three 8” pans
1 cup of sifted cake flour, plus two tablespoons
2/3 teaspoon baking powder
2/3 teaspoon baking soda
1/4 teaspoon salt
1/4 cup of room temperature butter
3/4 cup sugar
1 egg
1/2 teaspoon vanilla
1/2 cup buttermilk
INGREDIENTS (CHOCOLATE BUTTERMILK CAKE):
1 cup of sifted cake flour
3/4 teaspoon baking soda
1/4 teaspoon salt
1/4 cup of room temperature butter
3/4 cup brown sugar
1 egg
1/2 teaspoon vanilla
1/2 cup buttermilk
1 ounce melted chocolate
DIRECTIONS:
Heat oven to 375 degrees.
In a bowl, mix together the dry ingredients. In the bowl of a mixer, cream together the butter and sugar. Beat in egg. Add vanilla.
Add a third of the dry ingredients, followed by a third of the buttermilk, beating well. Repeat until the dry ingredients and buttermilk are all in the batter. Mix everything 1 more minute.
Pour batter into the 3 pans (I used a vintage checkerboard cake tin like this one) and bake for about 20 minutes. Cool the cakes completely.
Note: If not using a checkerboard cake pan, you’ll have to split the cakes across 4 cake pans and make cardboard stencils.
For the stencils, cut one 6 inch circle and one 4 inch circle. Set aside.
Bake the cakes for 15 – 20 minutes, or until a toothpick comes out clean. Set aside to cool, and transfer to a cooling rack.
To build the cake using stencils, use the stencils as a guide and a sharp knife (I found a paring knife worked best) to cut around the circles. The first layer should be vanilla wide layer, then chocolate 6 inch layer, then a vanilla 4 inch center. Coat with a 1/4 inch layer of chocolate frosting. The second layer should be chocolate wide layer, then vanilla 6 inch layer, then chocolate 4 inch center. Repeat with frosting. Finish with the same sequence as the bottom layer. You’ll have extra layers. Coat the entire cake with a thick layer (like an inch) of frosting.
If using a checkerboard cake pan, build like a typical cake, but with thinner layers of frosting between the cake (about a 1/4 inch thick) and a very thick layer of frosting on the outside (about an inch thick).
INGREDIENTS (CHOCOLATE FROSTING):
8 ounces butter, softened
5 1/3 cups powdered sugar, sifted
2 teaspoons vanilla
2/3 cup of unsweetened cocoa powder
1 cup thawed cool whip
DIRECTIONS:
With the paddle attachment of a mixer, cream the butter until smooth. Blend in the cocoa, vanilla and sugar along with the cream beat until fluffy.
Source: https://www.thekitchykitchen.com/?recipes=/aunt-tinas-checkerboard-cake/
0 notes
Text
10 High-Fiber Breakfasts That Aren’t Cereal
While fiber is a nutrient that’s important to get in your diet all day long, it’s especially important in the morning, as it’s got the staying power to fuel you until lunch and keep you from crashing at 10 a.m. Many packaged breakfast cereals know this well and bombard you with claims of high fiber on their label, making it all too easy to believe they’re the only way to get a large dose in the morning.
But that’s hardly the truth! You likely have the ingredients on hand right at this moment to whip up a feel-good, high-fiber breakfast without having to scan the cereal aisle. Here are 10 great ideas.
1. Breakfast Grain Bowl Mix
This mix of quinoa and steel-cut oats is a blank canvas for toppings. Go savory and top a bowl with leftover roasted vegetables and a fried egg or go sweet and finish it with berries, honey, and a dollop of yogurt.
2. Summer Bean Breakfast Salad with Soft-Boiled Eggs and Green Goddess Dressing
If you can’t get a hold of green beans and snap peas, feel free to swap in whatever you can find — even frozen lima beans and green peas work well.
3. Slow Cooker Breakfast Burrito Bowls
Beans are often forgotten about at breakfast, but they shouldn’t be — they’re a great source of fiber! These hearty bowls can be prepared over your weekend meal-prep session and enjoyed all week long.
4. Hearty Breakfast Fruit Salad
If you think fruit salad is a ho-hum breakfast, you haven’t tried this recipe. Adding whole grains and a tangy vinaigrette makes it something to get excited about.
5. Creamy Orange Date Smoothie
Cooked sweet potato and dates lend tons of fiber and natural sweetness to this hefty smoothie — this is one that definitely won’t leave you hungry.
6. Southwest Quinoa Breakfast Bowl
To make this quinoa and black bean-filled breakfast bowl packable, opt for topping it with a halved hard-boiled egg instead of a fried one.
Think of this Australian-inspired mix as sort of a light and fresh take on granola. It’s great sprinkled on yogurt, cottage cheese, and even whole-grain toast.
8. Sweet Morning Potato with Yogurt, Maple Syrup & Nuts
To save time, roast a handful of sweet potatoes at the start of the week. Then just grab them as you need, rewarm in the microwave, and finish with toppings.
9. Breakfast Barley Bowl with Mango, Coconut, and Banana
Barley has some of the highest fiber content of all whole grains, so this tropical bowl is sure to give you a morning boost.
10. Vegetable Breakfast Hash
If you prepare the vegetable hash ahead of time, all you need to do in the morning is rewarm it in a skillet and drop a few eggs in to cook.
Source: https://www.thekitchn.com/high-fiber-breakfast-recipes-22932019
0 notes
Text
Friday Flotsam
FFFFFFFFFFFleelee.
Okay.
So.
I have a question.
And I’m serious.
Super serious.
Here goes.
When you make a peanut butter sandwich, do you use one knife, or two? One for the peanut butter, and one for the jelly? Or do you use one knife for BOTH the peanut butter and the jelly? And if you use one knife, which jar do you contaminate? Because you have to TAINT A SOURCE. Which is more disgusting? A blob of peanut butter in a jelly jar? Or a wobble of jelly in a peanut butter jar?
IF YOU WERE AT SOMEONE’S HOUSE, what would you do? What are you able to live with? What actions would you take in order to face yourself in the mirror.
These are the things I think about at night and all the time.
Listen to this terrifying thing that happened the other night. Scared me to frickin’ death.
We had just crawled into bed at like, 8:15pm.
Just kidding, you guys! Hahahaha! It was 8:20.
I’m lying there, juuuust starting to drift off, when I hear this strange, distant alarm. It sort of sounded like a BELL almost. Like this chirpy sort of bell. But it was an actual TONE, which scared me, like an alarm does. And then it goes away. AND THEN IT COMES BACK. But louder! And more distinct. This alarm.
And I’m like, “WHAT IS THAT ALARM COMING FROM? Is that your phone, Aaron? Is someone trying to break in? OMG SOMEONE IS TRYING TO ROB US, AARON. Get up! GET UP. What is that sound? What is that ringing alarm? Can you hear that, Aaron? WHAT ON EARTH IS THAT SOUND? It’s coming from the walls, omg. Is it outside? Is someone in our back yard? WHO IS IN OUR BACK YARD? Go check, Aaron! This is serious!”
Aaron, “You mean that cricket?”
Me, “Oh. Ohhhhhh.”
the end.
I want to ask you something.
And this is actually serious.
NO, I SWEAR.
This week the kids are home with me. They start back at school right after Labor Day, but for now, they’re home. Which means they have to go with me to run my errands, right? SO, I dropped into a favorite store to check on something, and I took the kids. And let me interject right here and say, my kids are great. Well behaved (most of the time), polite (most of the time), not overly hyper (most of the time), not over-the-top obnoxious (most of the time).
Except this one tiny, particular moment. Because they are FOUR AND A HALF BLOODY YEARS OLD and life isn’t perfect.
For some strange reason, their inner soul fairies decided to dial up the hyper a few notches once we were in public, and you guys. I got THE STANK EYE from one of the blonde, millennial, jowl-less employees. Even after gathering Will and Nat for one of those cliche “settle down or else” pep talks. Homegirl didn’t say a WORD to me except, “Hmm mmm.” Lips pursed, eyes squinted, as she’s glaring down at them and burning a hole in the floor.
But this is the thing, I don’t have it in me to be confrontational. I do not. I’m way too nice and want to keep the peace, all the time. In every situation. Aaaaaall I could muster was, “Thanks. Sorry. We’ll be out of here in under five.”
“Hmm mmm.”
WHAT WOULD YOU HAVE DONE?
I wish I could have said, “Listen, youngin. Some day you’ll have kids, and you will sympathize with mom moments like these. And guess what, this wasn’t even that bad, sis. Just be nice to moms, okay? And also, who does your hair?”
Tell me, what’s your worst I’m-sorry-my-kids-are-kids-but-you-don’t-have-to-be-mean-to-me story?
Spill it.
I think I want to get into mock necks this fall.
Long weekend plans?
We have zeroooooooo. AND IT IS THE MOST INCREDIBLE FEELING EVAR. It’s going to be lamely hot today and tomorrow, so I’ll probably blow up the pool and get in it with my giant visor and a trough of rosé. I want to watch MOVIES. And get in BED EARLY. And READ. Not sure why I’m YELLING ALL THIS.
Tell me what movies I need to see! I’m so awful about new movies. But is there a good period piece or blockbuster that’s worth the eyeball viewage?
. . . You’re still disturbed by the words mock and neck, aren’t you?
Source: http://bevcooks.com/2018/08/friday-flotsam-175/
0 notes
Text
Favorites List (5.19.19)
A fresh list of links, recipes, reading, and watch-worthy gems for the week ahead. Enjoy!
- Watching This: Street Food - the Jay Fai episode is gold.
- Excited about: Heirloom, Single-Origin, 100% Pesticide-Free Cardamom
- This Podcast
To Cook: Hetty's Gozleme, this, this, this, this, & this.
- Reading this: Normal People (Sally Rooney)
- Watching this: But would recommend reading this first. And then listen to this as you watch the series.
- Wishlist: these, this (update: bought it & LOVE it), this, more of this, & all things this.
- Rick Steves
- A Piece Apart Woman: Elisabeth Prueitt
- Wayne got a Criterion subscription for his birthday (xo Souris! & JP) - Agnes Varda's Uncle Yanco, 1968 Mexico City Olympics, Les Blank's Gap Toothed Women (1987)
Also! I scored a rather large community garden plot(!), and will post more about it over time on my Instagram, but let me know if you have any favorite gardening books, or resources. I need all the help I can get!
Source: https://www.101cookbooks.com/archives/favorites-list-5-19-19.html
0 notes
Text
Lemony Chicken & Rice
This fabulous "small-batch" slow cooker meal is big on flavour but very light on prep and it destined to become a family favourite. (Don't worry if there are more than two of you, you can easily double or triple the quantities with no problem and it will be cooked in the same amount of time, no problem!)
I have relied heavily on Mediterranean flavours for inspiration here . . .
Fresh green baby spinach leaves . . . briny tangy feta cheese . . . fresh lemon . . . oregano . . . onions & garlic . . .
There is a minimum of prep involved . . . you just need to soften the onion and garlic in the microwave . . . takes as long as it takes. It all depends on the strength of your oven.
I have used one pouch of the ready cooked long grain rice you can buy at the shops. I always have several of them in my larder. They are so handy for quickly thrown together meals.
You can use brown rice or regular . . . this gets stirred together in a slow cooker along with the onion and garlic mixture, and a bit of dried oregano. You could use fresh oregano, but I don't see the point when something is going to be cooking for four or five hours in a crock pot . . .
I have the 1.5 litre Andrew James oval slow cooker. It works perfectly in this. Any smaller sized one will work if you are cooking for two.
Don't be tempted to use freshly made or leftover rice. It will turn mushy and blow out in the slow cooking process. Packed, pre-cooked rice IS necessary. It really is.
You nestle 4 smallish boneless skinless chicken thighs down into the rice in the slow cooker. I season them generously first with some salt and pepper.
That's it . . . pop the lid on and let this cook on low for 4 to 5 hours, just until the chicken is cooked through and tender.
At that point you will remove the chicken and shred . . . with two forks. Does a perfect job does two forks.
While you are shredding the chicken, stir fresh baby spinach leaves, some feta cheese and single cream into the rice and pop the lid on just to wilt the spinach leaves and melt the cheese . . .
Give it all a good stir and then stir in the shredded chicken, lemon zest and lemon juice for a lovely citrussy but not tart, with bold bright fresh flavour notes!
Taste and adjust the seasoning and them pile it onto a nice little platter for serving. You sprinkle some more crumbled feta cheese on top and dinner is served! Voila! Like magic.
Yield: 2Author: Marie RaynerPrint Recipe
With ImageWithout Image
Lemony Chicken & Rice
prep time: cook time: 5 hourtotal time: 5 hours
This is a smaller batch slow cooker recipe for two, but can easily be doubled to feed more and cooked in a larger crockpot. Tender lemony chicken with lemon, oregano, feta cheese, spinach and cream. What's not to like? Oh yes, only one pot to clean when done.
ingredients:
1 small onion, peeled and finely chopped
1 1/2 tsp vegetable oil
2 small cloves garlic, peeled and minced
1/4 tsp dried oregano
1 (250g) pouch already cooked long grain rice (2 cups)
4 boneless skinless chicken thighs (small to medium in size), trimmed and any fat discarded
60g fresh baby spinach leaves (2 cups)
85g crumbled feta cheese (3 ounces)
60ml single cream (1/4 cup half and half)
1 tsp freshly grated lemon zest
1 TBS fresh lemon juice
fine sea salt and freshly ground black pepper to taste
instructions:
Place the onion, garlic and oil in a small microwavable container. Cook in the microwave, stirring every 30 seconds until the onion has softened. (Time will vary according to the strength of your microwave.) Remove from the microwave and stir in the oregano. Transfer to a small crock pot. Stir in the rice. Season the chicken pieces with salt and pepper. Tuck them down into the rice. Cover and cook on low, until the chicken is tender, 4 to 5 hours.
Remove the chicken to a cutting board. Cover with a small piece of foil and let cool for a few minutes. In the meantime stir the spinach, 2/3 of the feta cheese and the cream into the slow cooker, stirring to combine all well. Shred the chicken with two forks and stir the chicken meat back into the slow cooker. Cover and let sit until everything is heated through, Stir in the lemon zest and lemon juice. Taste and adjust seasoning as required.
Spoon out onto a small heated platter. Sprinkle with the remaining feta cheese and serve immediately.
This really is so so SO delicious . . . fresh, colourful and easy peasy lemon squeasy!!! You are going to love it! I double-dog-dare you not to!
Source: https://theenglishkitchen.blogspot.com/2019/03/lemony-chicken-rice.html

0 notes
Text
A Glow-promoting, Luminizing Breakfast Beauty Bowl
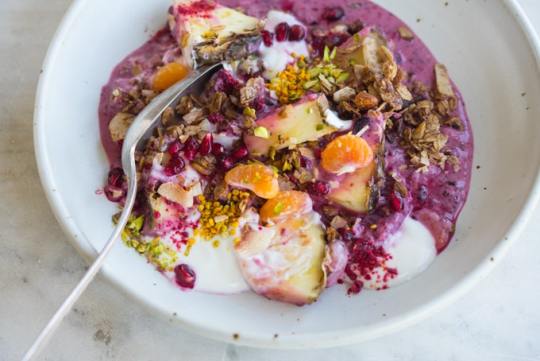
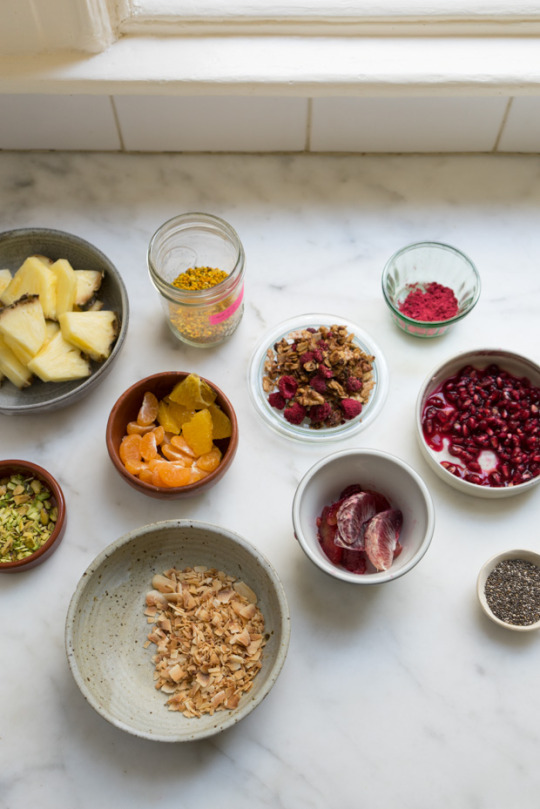
One of the very best ways to work toward beautiful, luminous, glowing skin is through eating well and mindful hydration. Your skin is often a direct reflection of the internal eco-system of your body, and, being nice to your inside is one of the best ways to positively impact your outside. It's the foundation you need to support good skin, bright eyes, strong hair, thick eyelashes, healthy nails, and on and on. Eating a seasonal, plant-centric, whole foods diet is a great place to start, but I thought I'd take today to highlight a few skin-friendly superstars in this Luminizing Breakfast Beauty Bowl - they're extra beneficial and skin-supportive, and quite easy to work into your day to day.

The base of this beauty bowl is a simple mixed berry smoothie boosted with some chia. The berries are compact, anti-oxidant, anti-inflammatory powerhouses, rich in cleansing fiber and collagen-boosting Vitamin C. I use mixed berries (blackberry, blueberry, strawberry) for a bit of diversity (and because they're quite easy to come by in most freezer sections) but if you really want to step up your Vitamin C game, you might trade in acai for the berries now and then. Switch it up - diversity in your is also important.
Use whatever plain, unsweetened, yogurt you prefer - coconut yogurt, Greek yogurt, nut milk yogurt, or sheep or goat milk yogurt - the probiotics here help balance out your digestion and overall internal ecosystem. Use whatever yogurt works for you. Chia helps with tissue repair and skin regeneration. That's the foundation here.
BROWSE ALL VIDEOS
Beyond that, you can boost your beauty bowl with as few or many other ingredients as you have on hand. Pick at least a handful. Here (pictured) you see digestion-friendly pineapple wedges, pomegranate seeds (thought to help reduce UV photo damage), Vitamin C-rich citrus (blood oranges and mandarin segments), a sprinkling of nuts and granola, some crushed dehydrated raspberries, and a sprinkling of bee pollen.

I love serving this sort of thing as a DIY breakfast option. You can make a big batch of smoothie (pourable straight from the pitcher), and then offer up a "buffet" of toppings. Everyone can customize their own bowl to their liking ;)!
browse more:
Breakfast Recipes
A Glow-promoting, Luminizing Breakfast Beauty Bowl
PRINT RECIPE
5 from 1 vote
If you don't have a few of the topping ingredients, no big deal. Start with the smoothie base and build from there, focusing on what is seasonal, fresh and available in your area.
Ingredients
1 cup frozen organic mixed berries (blueberries, strawberries, blackberries)
1 teaspoons chia seeds
1/2 cup preferred unsweetened yogurt or nut milk, plus more for topping
sweetener to taste: coconut nectar, liquid stevia, maple syrup
Toppings (any all): pineapple wedges, citrus segments, pomegranate seeds (and juice), a handful of granola or toasted oats, dehydrated berries (whole & crushed), bee pollen, cacao nibs, toasted coconut, chopped nuts
Instructions
Blend the berries, chia seeds, yogurt or nut milk, until smooth. Sweeten to your liking, and transfer to a serving bowl (or divide between two serving bowls).
Place a few pineapple wedges and citrus segments in each bowl and give a quick toss. Sprinkle with pomegranate seeds, granola, toasted coconut, and any of the other toppings you like and have on hand.
Notes
Serves 1-2.
Serves
1
Prep Time
10 mins
Total Time
10 mins
PRINT RECIPE
nutrition info nutrition info
January 2, 2019 permalink icon
Per Serving: Calories 157
Total Fat 2g
Saturated Fat 0g
Cholesterol 5mg
Carbohydrates 24g
Sodium 38mg
Fiber 5g
Sugars 16g
Protein 11g
instagram icon
If you make this recipe, I'd love to see it - tag it #101cookbooks on Instagram!
Share this...
Pinterest
0Facebook
116
Google+
0email

WEEKNIGHT EXPRESS features 10 Vegetarian, Plant-centric Recipes for Feel-Good Food — Fast!
Subscribe to get 32-pages of recipes to view on your tablet, e-book reader or phone.


Follow Me:
Instagram
Youtube
Facebook
Pinterest
Related Recipes

Mango Breakfast Chia Pudding
Mango Breakfast Chia Pudding is a great way to start the day. This chia pudding is super nutritious. It is vegan, dairy-free, gluten free, and naturally sweetened.
Crunchy Breakfast Magic – One Cereal & Five Ideas
With crispy quinoa, puffed brown rice, chia, hemp, and flax seeds, this is a favorite nutritious homemade breakfast cereal blend. The recipe is written so you dump all the ingredients in a quart-sized jar, shake, and go.
4 o’clock No-bake Energy Bites
My favorite alternative to energy bars - these are a favorite late afternoon snack. The best part is they're simple to make, and you're in control of the ingredients.
More Recipes
Whole Grain
WFPB
Vegetarian
Vegan
Soups
Side Dishes
Sandwiches
Salads
Pasta
Quick
Main Course
Low Carb
Instant Pot
Holiday
High Protein
Gluten Free
Drinks
Dinner Ideas
Desserts
Cookies
Chocolate
Breakfast
Baking
Appetizers
Follow Me:
Instagram
Youtube
Facebook
Pinterest
Popular Ingredients
avocado
egg
herb
kale
lemon
lentil
quinoa
pasta
tomato
turmeric
yogurt
zucchini
arugula
asparagus
basil
broccoli
buttermilk
cauliflower
chickpea
chocolate
curry
tempeh
tofu
ALL
© 101 Cookbooks 2019
Use of this site constitutes acceptance of its User Agreement and Privacy Policy.

Source: https://www.101cookbooks.com/glow-promoting-beauty-bowl/
0 notes
Text
Discover Riga, Latvia
This summer I traveled through the three Baltic states — Estonia, Latvia, and Lithuania. All three of these countries have beautiful, charming capital cities that have been awarded UNESCO World Heritage status because of their well-preserved historic centers.
You can easily visit all three Baltic countries in one week. It is very easy to travel between the cities — they are about 4 hours apart by bus. The buses are super nice with air conditioning, luxury seats, and even WiFI and power outlets at every seat.
I worked with JayWay Travel to plan my trip. They created a custom itinerary just for me so I could see the best of all three countries in one week.
After creating the perfect itinerary, JayWay Travel books everything and takes care of all the little details for you. You just tell them what you want to do and they will do the rest, including booking hotels, transportation, tours, excursions, restaurants, and more! They take care of every little detail. I never had to worry about a thing!
JayWay Travel takes all the stress out of planning — all you have to do is show up and enjoy your perfectly planned itinerary.
During our trip through the Baltics, one city in particular stood out — I absolutely fell in love with the romantic, fairytale town of Riga, Latvia. We weren’t very lucky with the weather — we were only there 2 days and it rained almost the entire time. But somehow I think I ended up taking the most pictures here!!
There are so many photogenic, Instagram-worthy spots in the historic center of Riga. If you’re planning a trip to Latvia, here’s our guide to the most beautiful, must-see places in Riga you won’t want to miss. Save this post to use as a reference for your next trip!
1221 Restorans
TIP: Click the link above to see exactly where it is on the map so you can find it later! :)
Our Lady of Sorrows Church
How beautiful is this turquoise blue church??!
Where to Stay
If you’re looking for the best hotel in Riga, I recommend the Redstone Boutique Hotel. This was the beautiful sunset view from our room! It’s extremely well located in a beautiful square right in the heart of the historic district. Breakfast is included and served to your room every morning. We found it to be very inexpensive compared to the other hotel of similar quality in the area!
House of the Blackheads
Originally built in 1334!!!
Square near Riga Cathedral
Perfect spot for lunch or a drink, eating outside on a terrace, and people-watching!
Colorful Flags
At the end of this narrow, cobblestone alley is the Rozengrals restaurant. It was mentioned in manuscripts dating back to 1293 as the most ancient wine cellar in Riga. There is even a fragment of the first defensive wall of Riga, built in 1201
The Swedish Gate
Part of the original fortification walls that went around Riga during medieval times.
St. Peter’s Church
The bell tower at St. Peter’s Church has the best view in Riga! There’s even an elevator to the top.
Chiesa Russian Orthodox Church
This pink church in Riga looks like a wedding cake!! We went here on a bike tour with Riga Explorers Club.
Our bike tour took us across the river, outside of the old town. We saw a completely different side of Riga! We saw many wooden buildings, like this one. Our guide explained that in medieval times, all buildings and homes outside of the city walls were required to be built out of only wood — no brick or stone was allowed. This was so if the city was ever attacked, they could burn everything to the ground, so the enemies wouldn’t be able to find any supplies or use anything as a weapon.
Omas briljants
Riga has some of the most beautiful architecture I have ever seen!!
Art Nouveau style building
After our bike tour, we also took an Art Nouveau walking tour with Riga Explorers Club.
The Small Guild
Our guide showed us the most beautiful buildings in Riga!! He also explained the history behind the buildings.
Colonel Brew Pub & Kitchen
Fun restaurant street with many outdoor terraces!
Three Brothers
The oldest apartment buildings in Riga!
Art Nouveau style building
*Click on any of the links above to see where they are on the map, or save them to your Google maps for later!
Riga Art Nouveau Museum
How amazingly gorgeous is this staircase??! The staircase is outside the museum, so you don’t actually have to go into the museum to see it. Just step in the foyer to see the staircase!!!
Thanks for exploring Riga with us!
See more of our posts from the Baltics!
Source: http://www.kevinandamanda.com/riga-latvia/

0 notes
Text
OB Bear, Koreatown restaurant
Where has Koreatown been all my life?!
Don’t answer that.
Between the gradual geo-shift eastward over the last few years from the wonder white westside bubble I’d been living in for the previous fifteen, my boyfriend’s insistence that Asian foods must be healthier than all the pasta, pizza, buttered bread, 40-ounce steaks and pancetta-wrapped lardo we’ve been eating since we started dating because look at all us skinny-ass Asian people, and I suppose just boredom, we’ve been more frequently extending beyond our very tight radius for food. We’ve ventured into downtown LA a few times together: Alma when it opened, Bryan Ng’s Spice Table, and The Parish for a wine event. Granted, we have not yet gone back to any of those specifically, which might be more a function of the restaurants themselves rather than downtown LA, but the subject of new, non-ethnic downtown LA dining is weighty enough to deserve its own post.
We have talked about trying any of the various ramen, shabu shabu and sushi restaurants in Little Tokyo, but not actually gone. How not-going is an achievement may not be obvious to you, but for us, merely entertaining the idea of going downtown for 90 seconds then eventually dismissing it is a big step up from previously never thinking about it in the first place because we have versions — albeit horrible versions — of all of that, within two miles of us.
And of course, there is Koreatown, which is closer to us, in both drive-time and taste preference. So far, we have only gone to two restaurants in Koreatown this year. One restaurant makes up 90% of our total visits to Koreatown, but like I said, this, for us, is an achievement.
The other restaurant is OB Bear, which isn’t exactly a restaurant restaurant. It is the Korean version of what a non-Korean gastropub is trying to be. In other words, OB Bear actually IS a gastropub, a place not necessarily lauded for its cuisine, or for anything else for that matter. It’s just a place to go to hang out and drink, that serves food on the side either 1) to comply with some sort of license to continue serving alcohol to patrons who are already sufficiently buzzed from the three other places they were drinking previously, or 2) to make sure those patrons eat something, anything, to counteract some of that alcohol before they head back out, pink and glowing, into the wild, wild Western Avenue to sing, dance or whatever. Not that I would know anything about any of that since the last time I went out out in “K-town” was 1997 which is essentially, never.
So obviously we ate dinner and drank water.
pictured above: Kimchi Tofu. stir-fried kimchi with steamed tofu
Leek Pancake with Spicy Dipping Sauce [$5]
Tong Dak – Small
Small fried chicken, served with pickled jalapenos, pickled radish, and a raw green cabbage salad with a disgusting Thousand Island-like mess of dressing. I forgot about Koreans’ obsession with mayonnaise and Thousand Island dressing.
OB Bear
3002 West 7th Street
Los Angeles, CA 90005
213.480.4910p.s. Free parking in a lot a few storefronts west of the restaurant, valet attended parking in a lot for $8.
Sarah J. Gim · August 28, 2018 · 3 comments
Tagged as: fried chicken, korean restaurants, koreatown, OB Bear, tong dak
Source: http://www.thedeliciouslife.com/ob-bear-koreatown-restaurant/
0 notes
Text
Baked Blueberry Lemon Oatmeal Muffin Cups
Baked Blueberry Lemon Oatmeal Muffin cups make for a healthy way to start the day. They’re hearty and delicious, free of all refined flours and sugars and perfect for meal prep. These nutritious are easy to make (only uses one bowl) and will quickly become a family favorite.
Think of these of these baked blueberry lemon oatmeal cups as a muffin on a mission. They are dense, hearty and lightly sweetened, providing you with a muffin you can feel good about eating for breakfast.
If this recipe seems familiar, it’s because they are a slight twist on my baked apple oatmeal cups, which have become a reader favorite (I’ve also shared my banana chip oatmeal muffin cups and my pumpkin spice oatmeal muffin cups).
Not surprising, that everyone loves the baked muffin cups so much, they are easy to make, super delicious and rather convenient as well.
One thing you’ll probably notice right off the bat as well is that they’re not light and fluffy like a pastry shop muffin. They’re hearty and dense like a bowl of oatmeal, but more convenient.
What’s better than an easy one bowl recipe that comes together fast. Just add all of the ingredients – oatmeal, salt, baking powder, almond milk, plain greek yogurt*, eggs, lemon zest, lemon juice, monk fruit** to a bowl.
Mix everything together until you’ve got a rich, hearty batter, then stir in blueberries and almonds. Divide the batter evenly between a 12-cup muffin pan.
Pop the muffin pan in your 350 degree fahrenheit oven and bake for 25-30 minutes or until the top is just slightly golden. Let them cool and then enjoy!
Yield: 12 muffin cups
Prep Time:10 minutes
Cook Time:30 minutes
Total Time:40 minutes
Ingredients:
3 cups rolled oats
1/2 teaspoon kosher salt
1 teaspoon baking powder
1 cup unsweetened vanilla almond milk
1 cup plain greek yogurt (or apple sauce)*
2 pastured eggs, beaten
2 teaspoon lemon zest
1 tablespoon lemon juice
1/4 cup + 2 tablespoons monkfruit**
3/4 cup blueberries
1/4 cup sliced almonds
Directions:
Preheat over to 350 degrees F.
Spray a 12-cup muffin tin with cooking spray or coat with coconut oil or butter to ensure nothing sticks.
In a large bowl combine oats, salt and baking powder and gently toss together.
Next, mix in milk, greek yogurt, eggs, lemon zest, lemon juice and monk fruit and stir together until everything is incorporated and you have a rich, thick batter.
Add in the blueberries and almonds and stir until just combined.
Evenly divide the oat mixture between all 12 muffin cups and pop in the oven for 25-30 minutes or until the muffins are set through and lightly golden brown on the top.
Cool completely before removing muffins from the pan and enjoy!
*You can sub in applesauce or mashed banana for the milk dairy, if you want to keep the oat cups gluten free.
**Monk fruit is a plant-derived, calorie free sweetener. This is the one I am using. If you prefer, you can sub in coconut sugar (or really any granted sugar) in it’s place.
***I like to store these muffins in an airtight container in the fridge where they will happily last up to one week.
****To reheat the muffins, you can slice them in half and place them in the toaster oven or pop them in the microwave for 20-40 seconds.
NUTRIENTS PER SERVING: Calories 129 | Total Fat 3.2g | Saturated Fat 0.3g | Cholesterol 1mg | Sodium: 142mg | Carbohydrate 19.1g | Dietary Fiber 3.1g | Sugars 2.1g | Protein 6.2g
Source: https://cleananddelicious.com/baked-blueberry-lemon-oatmeal-muffin-cups/
0 notes
Text
Drink this every morning before breakfast for a healthier gut
Everyone’s morning routine is different. Some people like to wake up at the crack of dawn and check things off their to-do list. Others like to sleep in till the last minute and roll right out of bed and off to work. But no matter your morning, if you’re hungry you should eat breakfast. And before breakfast, there’s one thing you definitely should prioritize: drinking water.
17 Protein-Packed Breakfasts That Aren’t Eggs
“Time spent asleep could contribute to slight dehydration,” Suzanne Fisher, dietitian and founder of Fisher Nutrition Systems told The Daily Meal. “It may be of benefit to drink 1 to 2 glasses of water upon awakening to rehydrate.”
When you’re dehydrated, your digestion can actually suffer as a result — among other side effects. That’s what drinking glass of water before you eat has to do with your gut health; your stomach and intestines need water in order to properly digest.
“Adequate water intake is essential for proper bowel function,” Fisher says. In fact, water is one of the tools your body uses to move food through your digestive tract. If you drink water before or with breakfast, your body will be able to digest your morning meal with greater ease.
Fisher also notes that staying hydrated can be helpful in reading hunger and fullness cues. “Studies have shown that drinking water before a meal can reduce excess dietary intake,” Fisher explains. “Thirst can actually mimic hunger.” Not that limiting your intake should be your No. 1 nutrition goal — but overeating can be really uncomfortable and can mess with your meals for the remainder of the day.
If you know you’re adequately hydrated when you eat breakfast, those cues that you’re full could become easier to read. So make sure you pour yourself a nice glass of water before you sit down — or rush out the door — to your meal. Eating while dehydrated could be one of the worst breakfast mistakes you’re probably making.
Source: https://www.thedailymeal.com/healthy-eating/drink-every-morning-before-breakfast

0 notes
Text
Corned Beef Brine Recipe (Nitrate Free!)
Corned Beef is more often purchased already brined than it is made at home, but using this easy Corned Beef Brine Recipe it’s so simple to DIY using our pickling spice mixture and beef brisket. We are skipping the nitrates and using whole ingredients you recognize and the best part is the taste of the final product is far superior than anything store-bought and is SO FUN to accomplish!
Corned Beef Brine Recipe
Did you know that you could make your own corned beef at home, starting totally from scratch? It’s so easy when you use this Corned Beef Brine Recipe, we promise! And honestly it results in the best tasting corned beef that is so incredibly flavorful–and you control what goes it in instead of putting in some strange spice package of unknown ingredients. Plus it’s one of those cool things to be able to say that you know how to brine your own brisket, right?
What exactly is corned beef?
Let’s start here, because some of you may have some questions! Corned beef is really just beef that has been preserved with salt, also known as brining. It’s flavored with the salt, spices and a bit of a sweetener which essentially means that you are pickling it, so think of it like pickled beef! The name corned beef comes from an old English way of referring to large granules of salt as “corns”, and therefor it just means salted beef, and there is not actually corn involved.
Most commercially prepared corned beef contains saltpeter, also known as sodium nitrate. The sodium nitrate is a curing salt that contributes to the pink color and cured flavor of corned beef. It also prevent the meat from spoiling or going rancid while it is curing. However, since the meat is cooked after it is brined it is not essential to use it. The use of nitrates and nitrites are controversial as to whether or not they are harmful in cured meats because cured meats typically contain such a small amount, and on average a person consumes larger amounts of naturally occurring sodium nitrates in vegetables like spinach, beets, celery and others. But in 2010 nitrates were declared a possible carcinogen by the World Health Organization, so when possible we avoid buying meat with added nitrates. So for this recipe we skip the sodium nitrate all together since it is not needed, and instead used beet root powder to color the meat, though this is optional.
Why do we eat corned beef?
Corned beef is popularly cooked during the American celebration of all things Irish on St. Patrick’s Day. It can be called a corned beef dinner or a boiled dinner, which refers to the fact that corned beef is often slowly boiled with some vegetables. But if you dig a little deeper, our American tradition of corned beef actually has little to do with food that you might find in Ireland, and more to do with the corned brisket you would have found in a kosher Jewish deli at the turn of the century. Corned beef can also be thinly sliced and use in sandwiches such as pastrami, or then remade into several different recipes, like corned beef hash.
What is the best cut of meat for corned beef?
For this recipe we’re using a flat cut brisket! That cut of meat is ideal because it is contains a lot of fat (which equals flavor) and is generally tough, so the brining really helps transform it. You can also make corned beef from an eye round roast.
What is in the corned beef spice packet?
Honestly, anything can be in those spice packets that sometimes come with commercially produced corned beef. Which is why we advocate making your own (or buying a high quality one). For our corned beef pickling spice we use:
juniper berries
cinnamon
whole cloves
peppercorn
bay leaves
mustard seed
How long do you brine corned beef?
Traditionally brined corned beef with sodium nitrates can be brined for as long as 10 days. Because we were skipping it, we went with a smaller amount of time brining, about 5-6 days as there is enough salt in the brine to transform the meat in a shorter amount of days.
Why do you rinse corned beef?
This step is important! If the meat has been properly brined it has been infused with not only the flavor, but also the salt. Before you cook the meat you want to rinse it with cool water to remove all the excess salt. Similarly, you want to cook the corned beef in a ton of water to help bring out some of the salt. Don’t worry though ALL of the flavor of the spices is inside of the meat, and a properly brined beef doesn’t need additional spices during cooking because it’s infused inside of it.
How do you cook corned beef?
Traditionally corned beef is brought to a boil on the stove top and simmered for a few hours. Vegetables like cabbage, potato and carrots are added into the pot and they’re boiled in the flavorful stock until just tender. Another method of cooking it would be in the slow cooker on low for 6-8 hours, depending on the size of the beef, and similarly vegetables added in. We’re talking all about how to cook it in the Instant Pot, which is our modern favorite way of cooking it over here in this post.
For this recipe, we used these tools:
Large pot
Plastic bag with a tight seal
Large container to hold curing beef
If you like this DIY recipe, check out these others:
Corned Beef Brisket Brine Recipe
Ingredients
2 quarts water (preferably distilled / filtered)
½ cup coconut sugar
1 cup kosher salt
1 tablespoon mixed peppercorns
1 teaspoon juniper berries
1 teaspoon whole cloves
1 teaspoon whole allspice
3 dried or fresh bay leaves
1 tablespoon beet root powder (optional, see note)
3-4 lb. flat cut beef brisket
Directions
In a large pot add all of the ingredients, except the beet root powder (if using), and bring to a boil. After all of the salt and sugar has dissolved shut off the heat.
Let the mixture cool completely. You can let this happen naturally, or you can place the brine in an ice bath by placing the brine inside of a clean bowl and then placing that bowl inside of another bowl filled with ice water.
Once the brine is cool place the beet root powder (if using) and brisket inside a 2 gallon plastic bag and place the bag inside of a large container that will catch any accidental drips. This container has to be able to fit inside of your refrigerator.
Carefully pour all of the brine inside of the plastic bag and seal it. Lay the plastic bag flat inside of the container and place in your refrigerator for 5-6 days.
Each day carefully turn the bag upside down to stir the brine and make sure all of the beef is submerged.
Once ready to cook discard the brine and the spices and rinse the corned beef thoroughly.
See this post for cooking instructions.
Recipe Notes
Traditionally corned beef is cured using a salt that turns the brisket pink. We are purposefully skipping this salt, also known as sodium nitrate because it's been labeled a possible carcinogen and is not necessary in this recipe. Without the sodium nitrate the corned beef is rather gray. We experimented with adding beet root powder to help counteract that and found that the resulting corned beef wasn't super pink, but it did change the color a bit. This is totally optional, and might not be worth buying a package of beet root powder just for this purpose if you are never going to use it again.
Loading nutrition data...
There may be affiliate links in this post! By clicking on them, or purchasing recommended items I may receive a small compensation, at no cost to you! However, I only recommend products I absolutely love and use in my own home! Thank you for supporting Lexi's Clean Kitchen when you shop! See my privacy policy for more information about this, the information we save, and more!

Source: https://lexiscleankitchen.com/corned-beef-brine/
0 notes
Text
This is How You Step up Your Guacamole Game

I'm all for a straight-ahead, no-fuss, guacamole. Nine times out of ten, that's how I approach it. Let the avocado shine. Don't distract with tomatoes, or pomegranate seeds, or too much lemon, or too much lime. I wrote some thoughts about guacamole basics here. That tenth occasion? I'll work in a wildcard, or take a surprise approach. Something along the lines of what you see pictured here, a recurring favorite.

The Inspiration
It's a recipe I shared years ago in Super Natural Every Day, loosely inspired by a preparation I came across in Julie Sahni's Classic Indian Vegetarian and Grain Cooking. Imagine guacamole topped with fragrant, Indian-spiced onions and garlic, green chiles, and mustard seeds. The creamy, ripe avocado melds beautifully the savory bits, and the vibrant cooking oil works its way into all the little valleys. People love this with chips, toasted pita, or naan bread. If you're in any sort of a guacamole rut, give this a try.
SUBSCRIBE TO VIDEOS
A quick side note - I can also imagine a Thai-spiced version being wonderful (with green curry in place of the Indian curry paste.

browse more:
Quick Recipes
Indian-spiced Guacamole
PRINT RECIPE
5 from 2 votes
Ingredients
2 ripe avocados
2 teaspoons fresh lemon juice
Scant 1/2 teaspoon fine-grain sea salt
1/2 cup coarsely chopped fresh cilantro
1 tablespoon clarified butter or extra-virgin coconut oil
1 teaspoon black or brown mustard seeds
1 small yellow onion, minced
2 cloves garlic, finely chopped
1 teaspoon Indian curry powder
1 small serrano chile, minced
Instructions
Cut each avocado in half, remove the pit, and scoop the flesh into a small bowl. Add the lemon juice, salt, and most of the cilantro. Mash the avocados a bit with a fork, but don't overdo it-- you want the mixture to be quite chunky. Set aside.
Heat the clarified butter or oil in a skillet over medium-high heat. When it is hot, add the mustard seeds. Keep a lid on hand because the seeds will scatter as they pop. When the spattering stops, after about a minute, stir in the onion and sauté for 2 to 3 minutes, until the onion is translucent. Stir in the garlic, curry powder, and chile. Count to ten, and then remove from heat. Stir in the avocado mixture, but just barely, and transfer to a serving bowl. Serve warm or at room temperature. Garnish with remaining cilantro.
Notes
Makes about 2 cups.
Serves
8
Prep Time
5 mins
Cook Time
10 mins
Total Time
15 mins
PRINT RECIPE
nutrition info nutrition info
February 3, 2019 permalink icon
Per Serving: Calories 102
Total Fat 8g
Saturated Fat 1g
Cholesterol 3mg
Carbohydrates 6g
Sodium 17mg
Fiber 3g
Sugars 0g
Protein 1g
instagram icon
If you make this recipe, I'd love to see it - tag it #101cookbooks on Instagram!
Share this...
Pinterest
0Facebook
71
Google+
0email

WEEKNIGHT EXPRESS features 10 Vegetarian, Plant-centric Recipes for Feel-Good Food — Fast!
Subscribe to get 32-pages of recipes to view on your tablet, e-book reader or phone.

Follow Me:
Instagram
Youtube
Facebook
Pinterest
Related Recipes

Avocado Asparagus Tartine
An excellent impromptu springtime lunch tartine: avocado smeared across toasted day-old slabs of sesame bread, layered with arugula and garlicky caraway asparagus + toasted pepitas.
Anna’s California Miso Avocado Salad
A California-inspired Miso, Avocado, & Lima Bean Salad from A Modern Way to Eat, by Anna Jones. Seasonal greens and beans are tossed with an assertive, creamy miso dressing. There are crunchy seeds, and broccoli, and avocado - it all comes together into a brilliant, beautiful, feel-good salad.
Golden Beet Hummus
A lightened-up hummus - reining in the tahini and oil a bit. Billowy and smooth, it's a boosted hummus for everyday, all-day w/ golden beets, turmeric, and chickpeas.
More Recipes
Whole Grain
WFPB
Vegetarian
Vegan
Soups
Side Dishes
Sandwiches
Salads
Pasta
Quick
Main Course
Low Carb
Instant Pot
Holiday
High Protein
Gluten Free
Drinks
Dinner Ideas
Desserts
Cookies
Chocolate
Breakfast
Baking
Appetizers
Follow Me:
Instagram
Youtube
Facebook
Pinterest
Popular Ingredients
avocado
egg
herb
kale
lemon
lentil
quinoa
pasta
tomato
turmeric
yogurt
zucchini
arugula
asparagus
basil
broccoli
buttermilk
cauliflower
chickpea
chocolate
curry
tempeh
tofu
ALL
© 101 Cookbooks 2019
Use of this site constitutes acceptance of its User Agreement and Privacy Policy.
Source: https://www.101cookbooks.com/step-up-your-guacamole-game/

0 notes
Text
Hash Browns, Tacos, and Beyond: 10 Savory Recipes for Breakfast Potatoes
[Photographs: J. Kenji Lopez-Alt, Morgan Eisenberg, Daniel Shumski.]
We love eating potatoes at any meal, but they really can't be beat at breakfast time. Whether you go for sweet potato hash, a Spanish tortilla with thinly sliced potato and onion, or just make the best, crispest roast potatoes, no breakfast spread is complete without at least one potato-centric dish.
[Photograph: J. Kenji Lopez-Alt]
Reheating leftover sweet potatoes can render them dry and sad. Instead, we repurpose them in this recipe, and they give these fluffy pancakes a mild sweetness and beautiful orange hue.
Sweet Potato Pancakes Made With Leftover Mashed Sweet Potatoes Recipe »
[Video: Serious Eats Team]
Shredded hash browns are a breakfast staple for good reason—when they're good, they're really good. But all too often, they're either undercooked or overdone. To get these hash browns just right, we squeeze out any excess moisture in the shredded potatoes, then cook them in the microwave briefly before pan frying to golden-brown perfection.
Crispy, Crunchy, Golden Shredded Hash Browns Recipe »
[Photograph: J. Kenji Lopez-Alt]
A colorful skillet dish is the perfect way to fit an entire breakfast into one pan. This one combines ultra-crisp potatoes, chunks of chorizo, spicy green chilies, and scallions. We top it all off with baked eggs, avocado, and cilantro for good measure.
Crispy Potato, Chorizo, and Green Chili Hash With Avocado and Eggs Recipe »
[Photograph: J. Kenji López-Alt]
We promise these really are the best crispy roast potatoes ever. We tested and retested variables, from the size of the chunks to the boiling and roasting method. The recipe we landed on makes for potatoes that are incredibly crisp and crunchy on the outside, with creamy, smooth centers.
The Best Crispy Roast Potatoes Ever Recipe »
[Video: Vicky Wasik]
Tortilla española is one of Spain's most famous and beloved dishes. It's nothing more than egg, potato, and onion cooked in olive oil until the mixture has formed a thick, golden-brown omelette of sorts. When you pay attention to the technique, and the simple seasoning is properly balanced, the resulting dish is one of the most delicious breakfasts imaginable.
Tortilla Española (Spanish Egg and Potato Omelette) Recipe »
[Photograph: Morgan Eisenberg]
These potatoes don't exactly scream breakfast, but they'll go just as well with a plate of eggs and sausage as they will with a steak or burgers. First they're boiled until creamy, then fried in a skillet until their skins are crisp. The potatoes are finished with Cajun blackening spices, and topped with a cooling buttermilk-herb dressing.
Skillet Potatoes With Cajun Blackening Spices and Buttermilk-Herb Sauce Recipe »
[Photograph: J. Kenji Lopez-Alt]
Crispy potato and chorizo are a classic taco combination—one that's perfect for breakfast. The potatoes should be crisp, salty, and coated in a thin slick of flavorful, slightly spicy oil from the chorizo, and the sausage should be at once tender, moist, and crisp. It's not a complicated dish, but it does take some attention and time to get there.
Crispy Potato and Chorizo Tacos Recipe »
[Photographs: J. Kenji Lopez-Alt]
While we're talking about breakfast tacos, it would be irresponsible not to mention these sweet potato, sage, and fried egg ones. The sweet potato and sage are a match made in heaven, a balancing act of savory and sweet. Piled into warm corn tortillas along with radish, cilantro, crema, and fried eggs, these tacos are warm, comforting, and filling. You might just find yourself eating these tacos for dinner soon, too.
Sweet Potato, Sage, and Fried Egg Tacos Recipe »
[Photograph: Daniel Shumski]
Waffling your mashed potatoes gives them a second life—one that might just be better than their first. The mashed potatoes are mixed with eggs (for structure and browning) along with bacon, cheddar, and a little flour. Cooked into a waffle iron until golden-brown and crisp, these mashed potato waffles perfectly soak up and hold pockets of gravy or other sauce.
Waffled Mashed Potatoes With Bacon, Scallion, and Cheddar Recipe »
[Photograph: J. Kenji Lopez-Alt]
This sweet potato hash is as easy and mess-free as it is delicious. After boiling sweet potatoes, add them to your preheated skillet, along with peppers and onions. Once the vegetables are nicely browned on all sides, thyme leaves and hot sauce are added to the pan. To finish, eggs are cracked into the skillet, and the pan is transferred to the oven until the whites are set and the egg yolks are still runny.
Easy Sweet Potato and Pepper Hash With Eggs Recipe »
This post may contain links to Amazon or other partners; your purchases via these links can benefit Serious Eats. Read more about our affiliate linking policy.

Source: https://www.seriouseats.com/roundups/breakfast-potato-recipes
0 notes
Text
Grilled Brussels Sprouts with Red Grapes and Goat Cheese
Ingredients:
1 1/4 lb Brussels sprouts, halved
1 lb red grapes
1 red onion, cut into quarter moons, 1/4-inch slices
1/4 cup balsamic vinegar
1/4 cup corn oil
salt
freshly ground black pepper
garnish:
2-3 oz soft, crumbled goat cheese (optional)
Directions:
Place all ingredients in a medium bowl and toss to evenly distribute all ingredients. Prepare a charcoal grill according to manufacturers' instructions.
Place the vegetable mixture in a grill basket (I use this one) and cook, turning occasionally until the vegetables are fork-tender, about 10-20 minutes. Pour back into the original bowl and toss again. Garnish with cheese. Serve immediately.
Tip: if your sprouts are very large, quarter them vs halving
My thoughts:
The day we grilled this, it was simultaneously very humid, very sunny and pouring down rain. Then an hour or so later it was clear enough to bust out the grill. The weather of this summer has been driving me insane. I bought two big bags of fancy charcoal back in May and we've barely put a dent in one.
A local restaurant has a Brussels sprouts dish that is always on the menu in some form or on the other. The original was super dark roasted Brussels sprouts, grapes, saba (a grape must reduction), and lardons. It's very good (even though I don't generally like fruit in savory dishes) and I've always wanted to recreate it. I finally did but with a twist. Instead of bacon, I gave it a smoky flavor by grilling it. If you leave off the cheese, it makes a great vegan side. The sprouts and onions caramelize quickly and the grapes get soft and juicy. It's really an amazing mix of flavors and textures.

Source: https://www.coconutandlime.com/2018/09/grilled-brussels-sprouts-with-red.html

0 notes
Text
drop cornbread biscuits
This past Saturday, we hosted our second Friendsgiving, stuffing 17 people in an apartment that has no business holding 17 people, but it’s okay, there’s wine for that. Our first one was in 2016; you can read about it here. I took 2017 off because I was a teensy bit busy book touring for Smitten Kitchen Every Day** It was fun to be back.
When having friends over, I like to get everything done that I can in advance and I do this for completely selfish reasons: I want to enjoy my party, too, and I can’t if I’m scrambling around all day and am bone tired by the time food comes out. But last week was abnormally busy and I only got to grocery shopping on Thursday, only to discover that one week before Thanksgiving, it’s like tumbleweeds, the lull before the weekend stampede, all past-prime rosemary and other sadness. I almost cancelled but my husband miraculously found almost everything that evening, and instead I did a very beautiful, highly recommended thing: I nixed a few things on the planned menu and swapped more complicated ones for simpler recipes with shorter ingredient lists but high reward. Here’s the menu, a few details, and completely random tips:
—
* Herb and garlic baked camembert: This is in Smitten Kitchen Every Day and there will never be an SK party without it. In fact, it’s gotten so popular that my friends and family make it now too, so I outsourced it. My SIL brought three, we heated them here. It was so nice to have one less thing to do.
* Bacon-wrapped dates: No recipe, but there are a gazillion on the web. I don’t stuff them (I did it once and it was way too pesky, especially given that they’re good without stuffing) and no dip. We made a ton and they were gone quickly; my daughter called them “bacon candy.”
* Turkey: In 2016, I did a hybrid wet brine from a bunch of sources. It was delicious but not worth the logistical nightmare. And mopping. This year, I made The Judy Bird, a Thanksgiving application of Zuni Cafe’s famous roast chicken. There are many dry brine recipes out there but this was the simplest and why make something more complicated unless you know it’s necessary? Based on the turkey reviews, I don’t think it needs anything else. My changes are that I baste it with a melted 1/2 cup of butter, and then when I’m out of butter, the pan juices, and this year, I put quartered red and yellow onion wedges in the bottom of the pan (tossed with a little oil, salt, and pepper) and friends, they were glorious after getting caramelized and lightly charred in turkey-butter drippings for a few hours. Here’s a logistical tip I don’t think enough recipes make clear: You want to rest your turkey for 20 to 30 minutes before carving it, tented lightly with foil. It’s then going to take 15 minutes to carve (I had a friend holding a YouTube video tutorial in front of me because I’m very bad at it.) This gives you 30 to 45 minutes of empty oven time where you can reheat sides, which is more than most need. I have a single, not big, not great oven and it was all I needed. [I mean, needs being relative, just in case Nancy Meyers is out there and wants to lend me a set kitchen and the life that goes with it next time.]
* Gravy: I really ought to write up a recipe one day, huh, but I use a basic formula of 1/2 cup butter, 3/4 cup flour, 8 cups chicken or turkey stock, a splash of dry marsala or sherry to deglaze the pan, and a lot of salt and pepper. (You cook this the way you would a bechamel.) When your turkey is done, if you want to separate the drippings, you can replace any of that butter with fat and any of that broth with juices. Or you can skip it! The gravy will have a less nuanced turkey flavor, but it’s still pretty awesome, especially if you have homemade stock. (In a freak bit of luck, I discovered two quarts of this in the freezer from last winter and used them for the gravy, stuffing, and more.) I make the gravy right in the bottom of the roasting pan, stretched across two burners; this way I can scrape up all the good, flavorful bits. If you don’t use the dippings to make gravy, I highly recommend you use them to drizzle over the sliced turkey, to keep it as moist as possible when you serve it.
* Stuffing: I also owe you a recipe for this but although I have two stuffing recipes on this site that I adore, I made a simple challah stuffing instead — although I made it decidedly less simple by making my own challah. Each loaf will make enough bread cubes to easily fill a 9×13-inch dish. I made mine with just celery, onion, and herbs, but you could easily sauté some mushrooms, diced apples, pancetta or crumbled sausage in too. Oh, and definitely make enough to have leftovers; this is important.
* Cranberry sauce: I went old-school with this, with a very early recipe on this site. I wanted something on the sweet side because my friend Ang was bringing a more savory one with tomatillos. Both were delicious.
* Green bean casserole with crispy onions: Don’t knock it until you’ve tried it (homemade). I make the green beans extra firm (just 2 minutes, then into ice water), then the mushroom sauce. Cool them both fully before mixing them. This goes in the fridge overnight. I’ll fry the onions — always make more than you need — and keep those separate until we’re about to eat the warmed casserole.
* Slow-roasted sweet potatoes: Once I realized I’d have no time for the root vegetable gratin I’d originally planned, I added these and 10/10, would recommend because the ingredient list is basically nonexistent. I baked them for the 2 to 3 hours before the turkey goes in, because they need a lower temperature. Broil them to get a good color on the skin. Leave them out while the turkey roasts (they’ll stay decently warm for a couple hours) and rewarm them just before eating. We served these in 2-inch segments, skin and all, and I was texting the recipe to friends demanding it even before going to bed that night. It’s that good.
* Stuffed mushroom casserole: My friend Ang brought this too and it was delicious. (She thinks it needs more cheese, though. I had no complaints!)
I didn’t make any pie at all! (Although my friend Molly brought a mincemeat pie with a cheddar crust and it was wonderful.)
* Bourbon pumpkin cheesecake: I made this in a 9×13-inch pan to cut as bars instead. Same recipe. Same temperature. However, you’ll want 1.5 or even 2x the crust, and it bakes in about 30. Seriously. It’s awesome.
* Perfect Manhattans: Because why not. I made two carafes of them, just scale up the recipe until you run out of an ingredient or carafe space. Friends can pour or shake it over ice; leave cherries or orange peel strips on the side.
* Cranberry crumb bars with mulling spices: This is in The Smitten Kitchen Cookbook.
—
Finally, as always, I have a last minute recipe for people who do things at the last minute. It’s never my intention, but it’s consistently my reality. I made these biscuits the first time over the summer, a season where we eat outside and act like it’s no big deal (waah), for a 4th of July ribs fest along with slaw and corn and all of those summery things. So, they go really well with warm weather. But they’re also a great quickie dinner roll, or even a fun addition to a breakfast-for-dinner night (like we had last night) with scrambled eggs and bacon. They take 5 minutes to put together and 15 to bake and there’s nothing not to love about that. They’re craggy and crisp on the outside and plush within, perfect for splitting open with your fingers, buttering, drizzling with honey, and finishing with flaky salt or nestling into the side of your holiday plate.
Previously
One year ago: Endive Salad with Toasted Breadcrumbs and Walnuts
Two years ago: Root Vegetable Gratin and Cheesecake-Marbled Pumpkin Slab Pie
Three years ago: Kale and Caramelized Onion Stuffing, Apple Cider Sangria and Date, Feta and Red Cabbage Salad
Four years ago: Sticky Toffee Pudding, Pickled Cabbage Salad and Pretzel Parker House Rolls
Five years ago: Perfect Uncluttered Chicken Stock, Cranberry Orange Breakfast Buns, Green Bean Casserole with Crispy Onions, and Apple-Herb Stuffing For All Seasons
Six years ago: Granola Crusted Nuts and Spinach Salad with Warm Bacon Vinaigrette and Gingersnaps
Seven years ago: Sweet Potatoes with Pecans and Goat Cheese, Creamed Onions with Bacon and Chives
Eight years ago: Sweet Corn Spoonbread
Nine years ago: Moroccan-Spiced Spaghetti Squash and Chard and Sweet Potato Gratin
Ten years ago: Mushroom and Barley Pie
Eleven years ago: Roasted Stuffed Onions and Simplest Apple Tart
[New!] Twelve years ago: Cranberries: Candied, Fruity, and Drunk
And for the other side of the world:
Six Months Ago: Pasta Salad with Roasted Carrots and Sunflower Seed Dressing
1.5 Years Ago: Rhubarb Upside-Down Spice Cake and Tall, Fluffy Buttermilk Pancakes
2.5 Years Ago: Failproof Crepes + A Crepe Party and Crispy Tortellini with Peas and Proscuitto
3.5 Years Ago: Crispy Broccoli with Lemon and Garlic, Not Derby Pie Bars, Liege Waffles, and Mushrooms and Greens with Toast
4.5 Years Ago: Strawberry Rhubarb Crisp Bars and Five Egg Sandwiches
** have you bought it? There’s so much great Thanksgiving and holiday stuff in there, like a chocolate pecan slab pie, a kale caesar that we have out at almost every dinner party, a wild mushroom shepherd’s pie, and a few of my favorite cookie recipes, ever. Between now and December 12th you can order either my first book, The Smitten Kitchen Cookbook, or Smitten Kitchen Every Day, my second with a custom inscription of your choice from The Strand and it will arrive by Christmas.
Drop Cornbread Biscuits
Servings: 8 to 12
Time: 20 minutes
Source: Land O Lakes
Print
Shown here are 8 large biscuits; you can make 12 smaller ones, just use the short end of the baking time range.
1 3/4 cups (230 grams) all-purpose flour
2/3 cup (90 grams) cornmeal
1 to 2 tablespoons granulated sugar (use 1 for a more savory biscuit)
1 tablespoon baking powder
1/2 teaspoon fine sea or table salt
1/2 cup (115 grams) cold butter, in cubes
1 cup (235 ml) cold buttermilk (buttermilk substitutes)
Heat oven to 450°F. I covered my baking sheet with parchment paper but it shouldn’t be strictly necessary, and many shouldn’t go in this hot of an oven, so use your own discretion.
Stir flour, cornmeal, sugar, baking powder, and salt in the bottom of a large bowl with a fork or whisk. Add butter and toss to coat cubes in dry mixture. Use your finger or a pastry blender to break the butter into smaller and smaller bits, until the largest is pea-sized. Add buttermilk and stir once or twice, until a dough comes together.
My very scientific method of dividing the dough evenly is to press it gently into the bottom of your mixing bowl into roughly a circle. Cut into 8 or 12 wedges. Pull out one triangle of dough with a soup spoon for each biscuit, pressing it into a craggy, messy ball, then drop it onto your baking sheet. Repeat with remaining dough.
Bake for 12 to 14 or 15 minutes; smaller ones should be done at 12, larger ones at 14 or 15. Remove from oven and serve warm. Biscuits are best on the first day. On the second, gently rewarming them will improve the texture.
Source: https://smittenkitchen.com/2018/11/drop-cornbread-biscuits/
0 notes