amhsims4
[PARKLIAH] Lia Park Heckmann Creations ♥
143 posts
Don't wanna be here? Send us removal request.
Last Seen Blogs

yoi-yoichi
йо-йо!!

congtyluatsiglaw
Công ty luật Siglaw

smartmatpro
Smart Mat Pro

certifiedsidedish
Certified Side Dish Bitch™

lo-fividstudio
Lo-fi Vid Studio
Text
Ariana Grande - Moonlight (Clip made by fan)
Hello everyone! I'm here to show you here a clip I made for Ariana Grande's song "Moonlight"! Hope you like it!
Full video link: https://bit.ly/MoonlightMV
#ariana#ariana butera#ariana grande#arianator#ariana grande butera#vevo#positions#ariana icons#arianagrande#dangerous woman#moonlight#sims4#the sims 3#sims 4 cc#blender#blender3d#the voice#thank u next#ariana grammy#ariana grande icons#ariana layouts#off the table#sweetener#ariana edits#arianaedit#sims4pics#the sims 4#sims#my sims#the sims
4 notes
·
View notes
Text
Chung Ha clips made in the sims! 💜💜
youtube
Hello kpoppers! I am part of an internet community where we record clips of our favorite artists using the sims and the blender program. And as I love Chung Ha I would like to show you the clip I made for the song "Gotta Go". I made lives and also another music video for "Flourishing" that I also love and intend to do more! In case anyone likes it I would love to see you there! Kisses!
#sims 4#blender#blender3d#simblr#simbook#the sims#the sims 4#movies#chungha#kpop aesthetic#kpop#chung ha#render#3drender#the sims 3#the sims gameplay#the sims community#my sims#ts4cc#ts4 simblr#simmer#sims 4 legacy#ts4#singer#kpopidol#bias#kpop idols#mysims#simstagram#3d modeling
6 notes
·
View notes
Photo
❤️

I don’t do many CC shopping tours, but I collected some nice goodies through summer, let me share some of my faves:
Belted Cargo Pants by @waekey
Pearl Barrette by @bedisfull
The Moonchild Palette by @crypticsim
Budded Cross Chain Earring by @thisiskiro
Wrap Tie Top by @waekey
Ina Hair by @marsosims
Paz Dress by @sentate
The Penny Palette by @crypticsim
Meghan Hair by @antosims
Shark Tooth Shoes by @mmsims
2K notes
·
View notes
Photo
❤️

DOWNLOAD
13 SWATCHES
CUSTOM THUMBNAIL
NOT HAT COMPATIBLE
Recolours are allowed but please do not include mesh.
Please feel ENCOURAGED to recolour this hair because for the life of me i can’t do this, mm is hard af when it comes to swatches.
2K notes
·
View notes
Text
Sobre o download do Ryu ! ☺️
Gente. O Ryu até esse presente momento não irá para download por motivos dele ser um personagem da série da Nat e ela querer deixar ele apenas por lá por enquanto.
Mas não fiquem tristes pois eu vou preparar vários sims de diferentes etnias (incluindo os asiáticos) e colocarei para download em breve.
Fiquem bem ❤️🥰
1 note
·
View note
Photo
😘
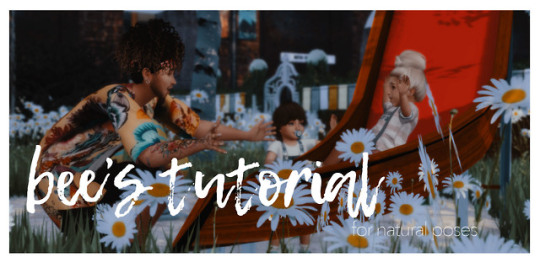
POSING TUTORIAL: NATURAL POSES
Hewwoo!! Welcome to posing tips & tricks with Bee vol. 2! (You can find the first one here [x] ) This time, I gathered up some tips for natural looking poses. Let’s go!
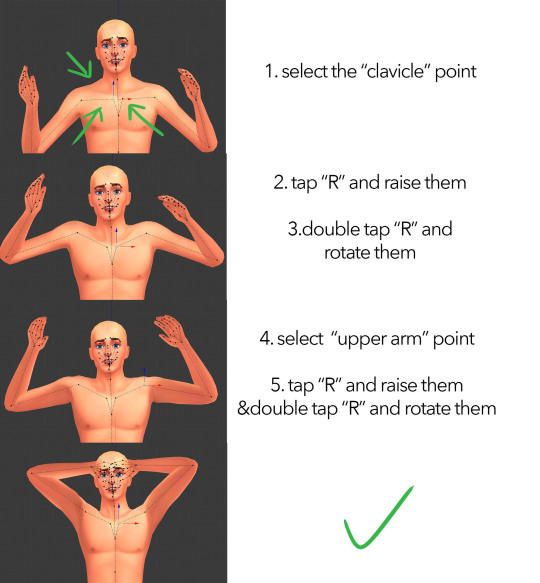
1. Shoulders
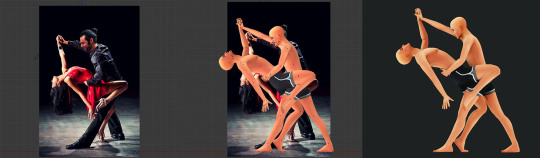
Do you see the difference between this and this?

Yes, I can see that too. The Clavicle points make all the difference my friends. They are your friends, they are nice, they are good for you. So please use them. Let’s start over, step by step:
2. Spine
Bend the spine gradually. That’s all. (At least it’s easy to remember lol)
These points should look like they are bent gradually, I mean, unless you’re into that…


3. Height Difference
When making poses with height difference, the most important thing is stretching multiple points subtly, so the overall proportions can be preserved.
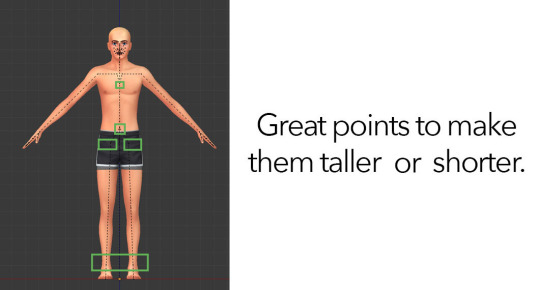
When selecting symmetrical points, like ankles, first select one and then, holding shift, select the other one, then use the blue arrow to stretch them simultaneously (so that they would be even).
4. Reference Pics
I don’t usually do that, but having reference pics are good when you’re making complicated poses.
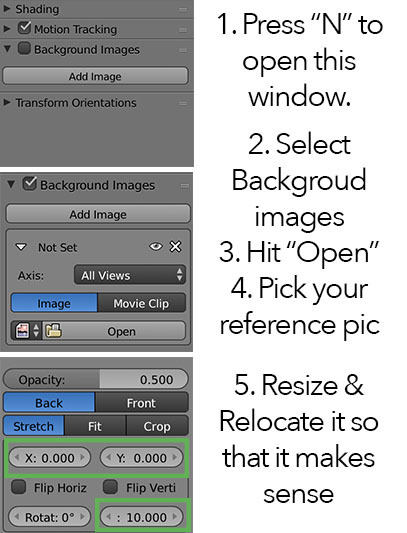
After adding your reference picture, you can make your complicated pose easier.
5. Listen to Blender
Okay, this is maybe the easiest but most crucial tip: If you’re trying to bend or twist something, and Blender makes it look bad, it’s most probably because what you’re trying to do is anatomically incorrect.
Let’s say, if you want to twist a hand, you should start twisting it from the shoulders, again, gradually.

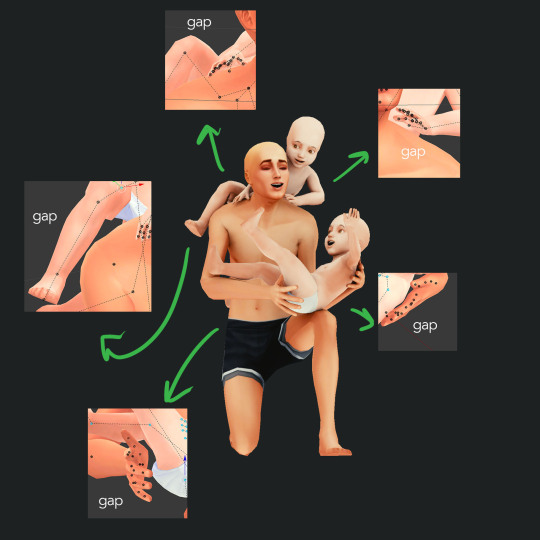
6. Mind the Gap!
Another crucial tip especially for making couple/group poses, don’t make them touch each other tightly. If you leave a subtle gap between them, you can prevent clipping in game.
There are two reasons for that, first, the psychical features of your sims are usually different than these rigs’, and secondly, these rigs are (almost) naked, you gotta leave some space for clothes.
7. Take breaks!
Okay I know it’s not exactly a blender tip but try to rest your eyes in every 30 mins, and by resting, I mean look somewhere else, stand up, take a walk to the kitchen or bathroom, open a window, look at the sky. Staring at all these little dots is tiring for your eyes so try to give them a break once in a while.
–
That’s all for today, hope it was helpful!
Take care guys :)
3K notes
·
View notes
Photo

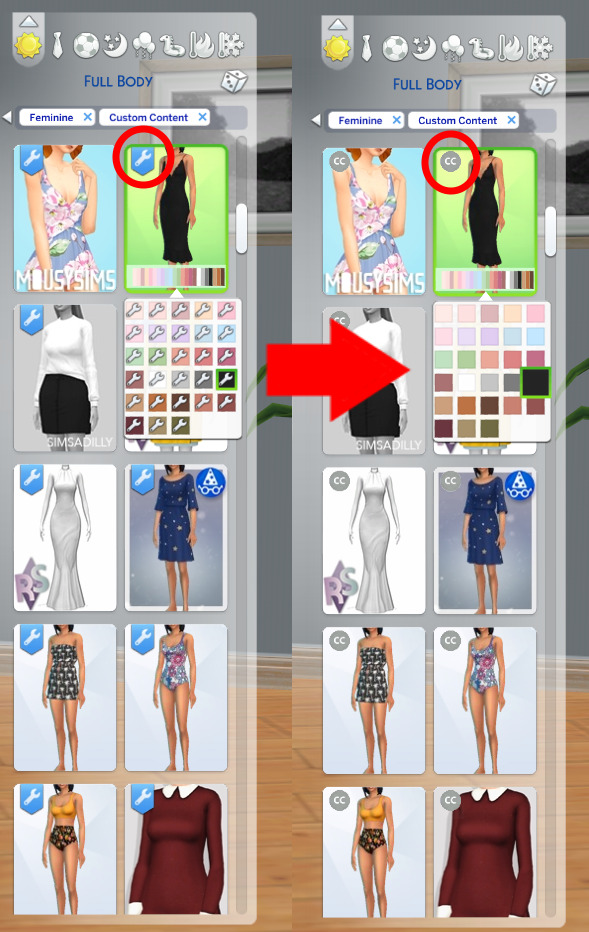

Custom Wrench Icon
Created for: The Sims 4 by Xhallie
Heyo!
I personally never liked the default wrench icon for CC catalogue swatches. I’ve been using AOM’s CC wrench icon hiders in the past but it got confusing when certain CC (specially Buy/Build mode) didn’t have its own custom thumbnail. I still do appreciate, and recommend to check, AOM’s versions but I always wanted something more different. So, needless to say I made my own version and decided to share it for those who feel the same.
It’s nothing special but I hope you like it.
Download: https://modthesims.info/d/628978/custom-wrench-icon.html
Get featured: https://maxismatchccworld.tumblr.com/
4K notes
·
View notes
Text
How To Add Transparency to a Clothing (Adding a New Cut)
note - you can view the images in full resolution here
Hiya, this tutorial is on how to add a transparent part of your clothing (and keep the other part as non-transparent).
I’ll be starting with a dress that only has 1 cut, and I’ll be creating a completely new cut to put the transparent part of the mesh into. This should work for clothing with any number of cuts, but like always I suggest only using 1 cut clothing to make your life easier.
You might want to pick up these skins to show alpha properly in S4S.
Also I’d like to credit @untraditionalnerd as I used their tutorial as a base for this.
For your dress to be transparent, you need two things.
A transparent texture, that’s quite straight forward so I won’t go through that here.
A transparency-enabled mesh/meshgroup - that’s what this tutorial is for!
STEP 1 - blender cuts
Go into edit mode, select the parts of the mesh you want to be transparent and press P to separate to a new mesh.
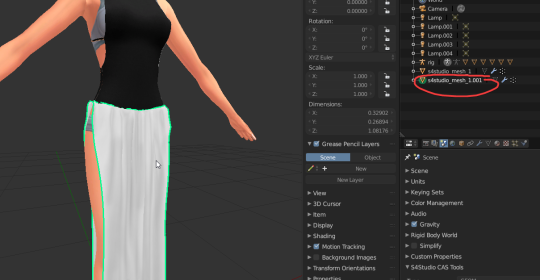
Then change the name (doesn’t affect anything but stops you from going crazy), and change the cut number.
The cut number will be the next number after whatever is already used. For instance, my mesh started with one meshgroup, and its cut number is 0000. Therefore I gave the new mesh a cut of 0001 as it’s the next logical number to use.

If your mesh uses cuts 0000, 0001, and 0002, then you make your new mesh 0003. Simple :-)
STEP 2 - importing geometry & duplicating
Import your .blend with the new meshgroup/cut into s4studio.
Then, go to the warehouse page, and find your LOD0. It’ll be the geometry with the biggest filesize, and you should be able to see your mesh in the preview.
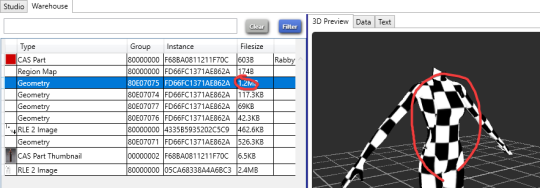
As you can see above, the transparent group is not visible in the mesh preview, don’t worry about this.
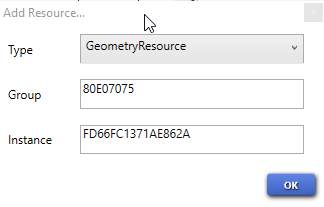
First, you need to duplicate this geometry.
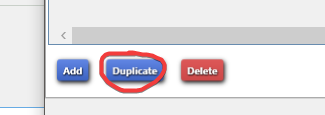
When the box pops up to duplicate, change the last character of the group to ‘1’.
If that doesn’t work, just try any number/character until it’s accepted.
It doesn’t matter that the filesize of the duplicated geometry is 0b
Cool, now we’ve got the base for the transparent geometry.
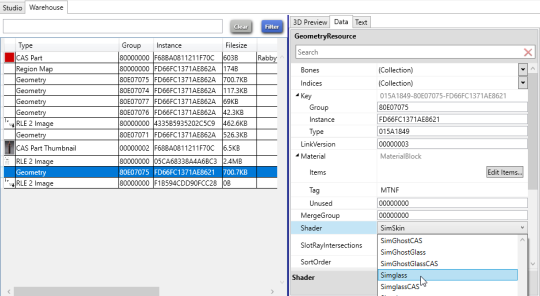
STEP 3 - make new geometry simglass
This is a small but vital step. Go to the data section of your new geometry, and change the shader to simglass. This is the transparency shader Sims 4 uses.
STEP 4 - region map editing
This can be tricky so follow closely.
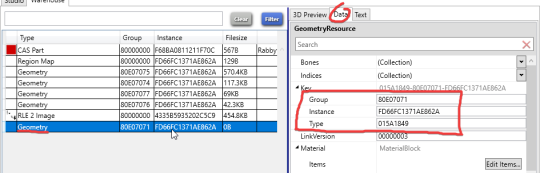
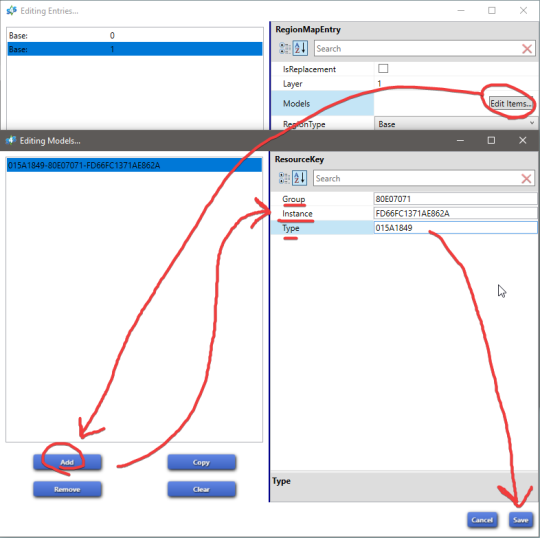
On your duplicated/new geometry, go to the data tab, and copy and paste the group, instance and type somewhere because you need these values.
Find your region map, go to edit items, then add a new entry. Select your new entry, enter the cut number that we gave the new meshgroup earlier in the blender step. Keep the regiontype as base.
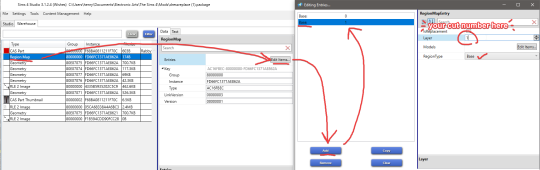
Next, click the edit items button with your new cut selected. Then add a new model entry, and paste the values that you copied earlier for the new geometry you made into the boxes. Then save the models and entry, and save the region map entry.
This step has created the new cut number in the package, and linked the mesh we duplicated earlier to that cut.
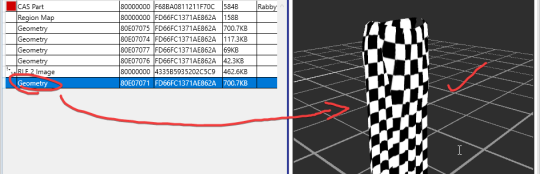
After that, make sure you re-import your mesh.
As you can see the transparent part shows up in the 3d preview again, and it also shows up isolated in the new geometry in warehouse which is good (means you’ve done it right).

STEP 5 - adding new geometry to LODs / swatches
This process is much easier if you only have one swatch for the moment (you can add more swatches after this and that’ll be fine), as if you already have multiple swatches you need to do this process for every swatch.
Go to your swatch (cas part), and scroll down till you find the Lods part, and click edit items.
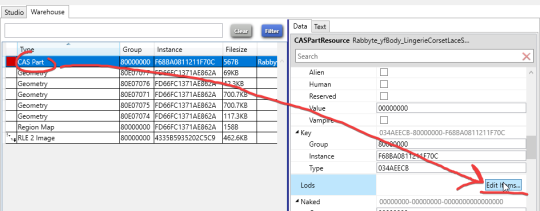
Then, go to level 0 (LOD0), and click edit items. Then add a new entry, and again fill in boxes with the values that you copied earlier for the new geometry (the same ones you used earlier).
Once you enter the values, press save.
Ignore in the image that my entry says -000000000-, it just doesn’t update instantly sometimes.
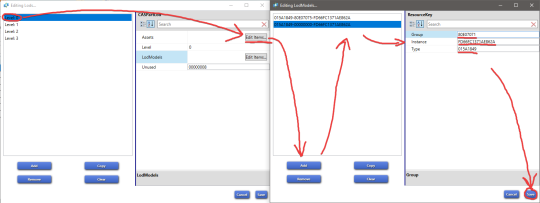
Now your transparent mesh is rendered for LOD0 and you’re actually all done!!…. Except for LOD1, LOD2, and LOD3..
You now have two options to finish up:
(easy) Use the LOD0 transparent mesh for all LODs.
In the LOD entries, for level 1, 2, and 3, do the same thing for what you did level 0, pasting that same information in. This adds the transparent mesh you made to each LOD.
This means that your LODs will be like normal, except the transparent mesh will stay the same throughout all the LODs (it’ll stay high poly in the lower LODs).
This choice is not as good as the next one, but if you’re not really confident with messing around with this stuff, just do this as it’s easier since bad LODs for one item won’t have a major performance hit.
or..
(hard) Make a seperate LODs for the transparent mesh.
This basically means repeating the whole tutorial for each LOD which can be a lot of work (however trust me when you know the process it gets really easy).
It’s all the same but you duplicate the corresponding LOD geometry for the start, and you when you change the last character of the group, instead of 1 you just use a different number. If you remember the numbers you change it to, when you’re entering all the details into the different entry boxes, you can just copy existing entries, and change the last character of the group to the different numbers you used (that’s what I mean it can get easy when you’re doing the process, and you do like 3-4 meshes at a time).
This is superior choice to the first one, as you’ll have proper LODs, so the transparent mesh will get low poly in LOD 1, 2, 3 etc along with the other part of the mesh (if you imported lower poly meshes for lower LODs).
Andd after that, you should be finished! Woo!
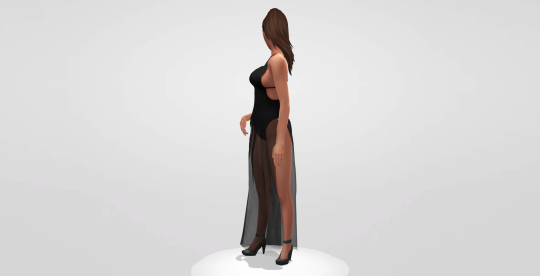
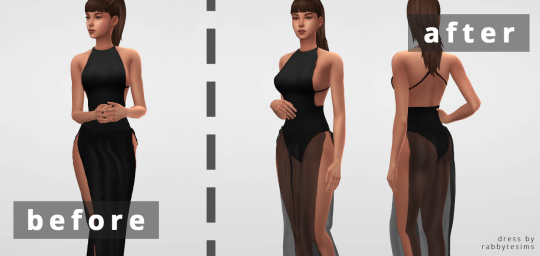
Dress by @rabbytesims / Hair by @notdaniella
EXTRA NOTES
If your transparent mesh in game has triangles/alpha issues, follow this tutorial (u gotta triangulate and do alpha order). There are blender instructions in the replies.
If your transparent mesh in game is shiny, make sure you have a proper spec map (with no shine) and a normal map (can be a blank normal map, just any normal map).
Make sure you have laptop mode turned off, as this setting disables transparency.
Use these skins to show alpha in sims 4 studio.
If something didn’t make sense or you want to ask a question, feel free to reply or contact me :)
548 notes
·
View notes
Note
Oii linda :) Então eu vi no canal da nat o teu sims e achei mega maravilhoso, teria como me desponsabilizar o Ryu?
Ahh sim ! Obrigada 💕
Talvez em breve o Ryu esteja para download por aqui ! 😚❤️
5 notes
·
View notes
Photo
❤️❤️
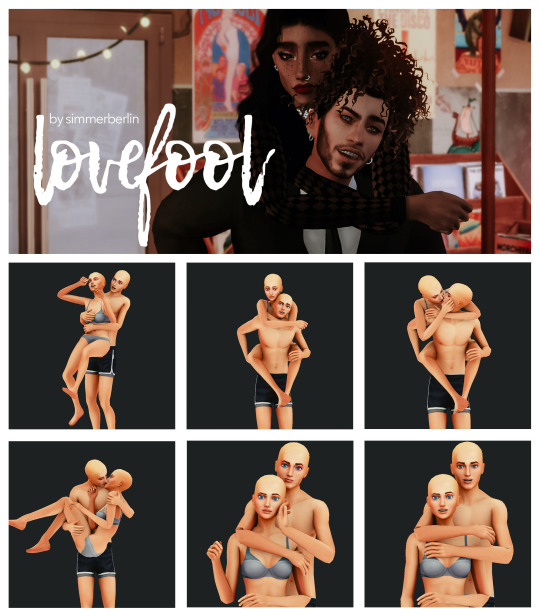
Happy Birthday@neodalesims !!!!
Madddiieeeee Oh my dear God where should I even start!?!?
You are by far one of the loveliest, funniest, kindest people I’ve met and I consider myself lucky to call you my friend! Even if you hurt us with your story on a daily basis, you always find a way to cheer me up with your boundless energy, super smart jokes and of course, your thoughtfulness!
I wish you an amazing year with looots of coffee, kitties and of course RORY!!
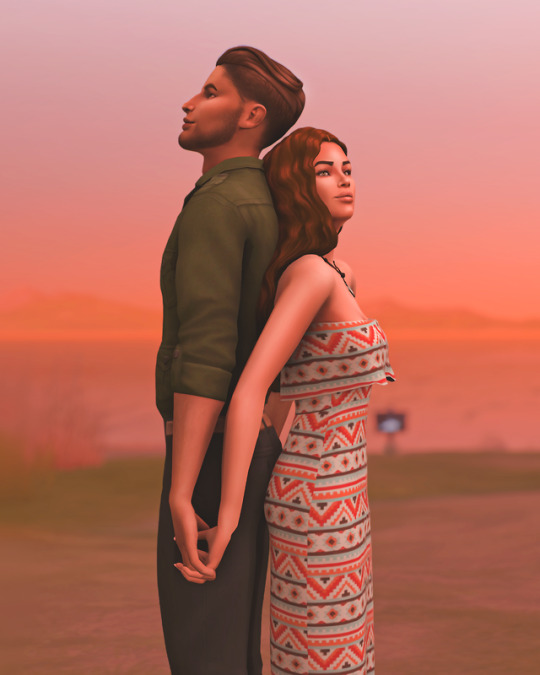
Here is a pose pack I made for you, well, to be honest, we talked with @wonderscotts about this and we decided that I should make a happy couple pack to INSPIRE you, you know, we wouldn’t mind seeing a certain blonde guy happy with his cookie queen *wink wink*
Hope you like it, and, again, HAPPY BIRTHDAY BIIIINCH!!!
Love you <3
[Download]
2K notes
·
View notes
Photo
❤️❤️
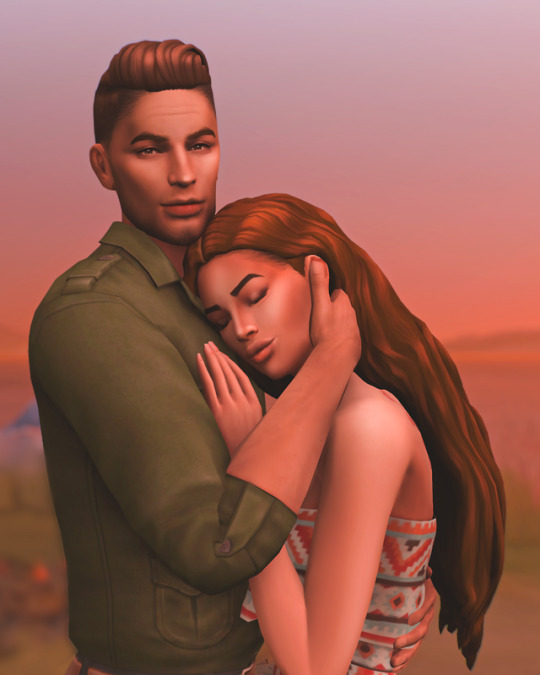

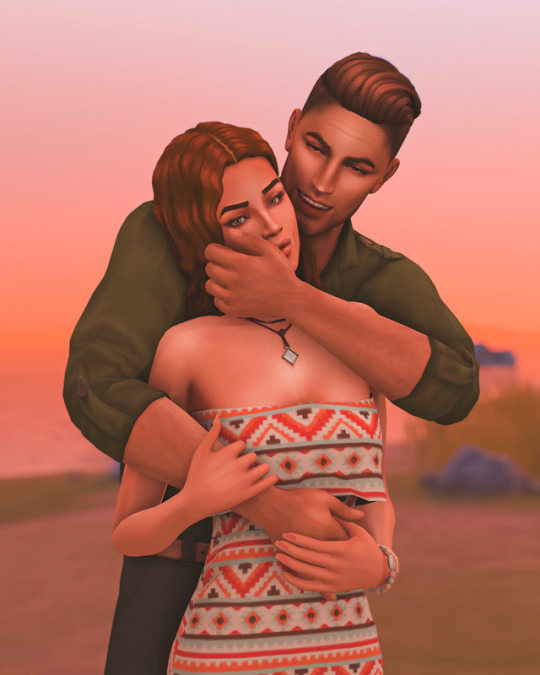
Close to Me Pose Pack
5 poses total
in game The Sims 4 Poses
place two teleporters in the same spot
you’ll need:
pose player
teleport any sim
CAS Leg height slider by @redheadsims-cc
(use the maximum height)
Download: katverse.com
1K notes
·
View notes
Text

(AMH) SEXY BODY
DESCRIPTION:
3 Swatches
All Lods
Adult
HQ Mod Compatible
DOWNLOAD: http://www.simfileshare.net/download/1053586/
#s4#TS4#ts4ccfinds#ts#the sims#sims#simbook#sims 4#the sims 4#simblr#sims4#sims4cc#sims4ccfinds#love#Downloads#sims 4 gameplay#lanaccfinds#S4CC#s4ccfinds#sims 4 cc#cc finds#cc free
23 notes
·
View notes
Text

(AMH) SWEET BODY
DESCRIPTION:
1 Swatch
All Lods
Adult
HQ Mod Compatible
DOWNLOAD: http://www.simfileshare.net/download/1038162/
#the sims#sims 4#sims 4 clothes#s4cc clothes#the sims 4#sims#simblr#s4ccfinds#ts4#ts4ccfinds#simbook#sims4cc#sims4pics#Downloads#s4 download#s4#sims4body
148 notes
·
View notes
Text


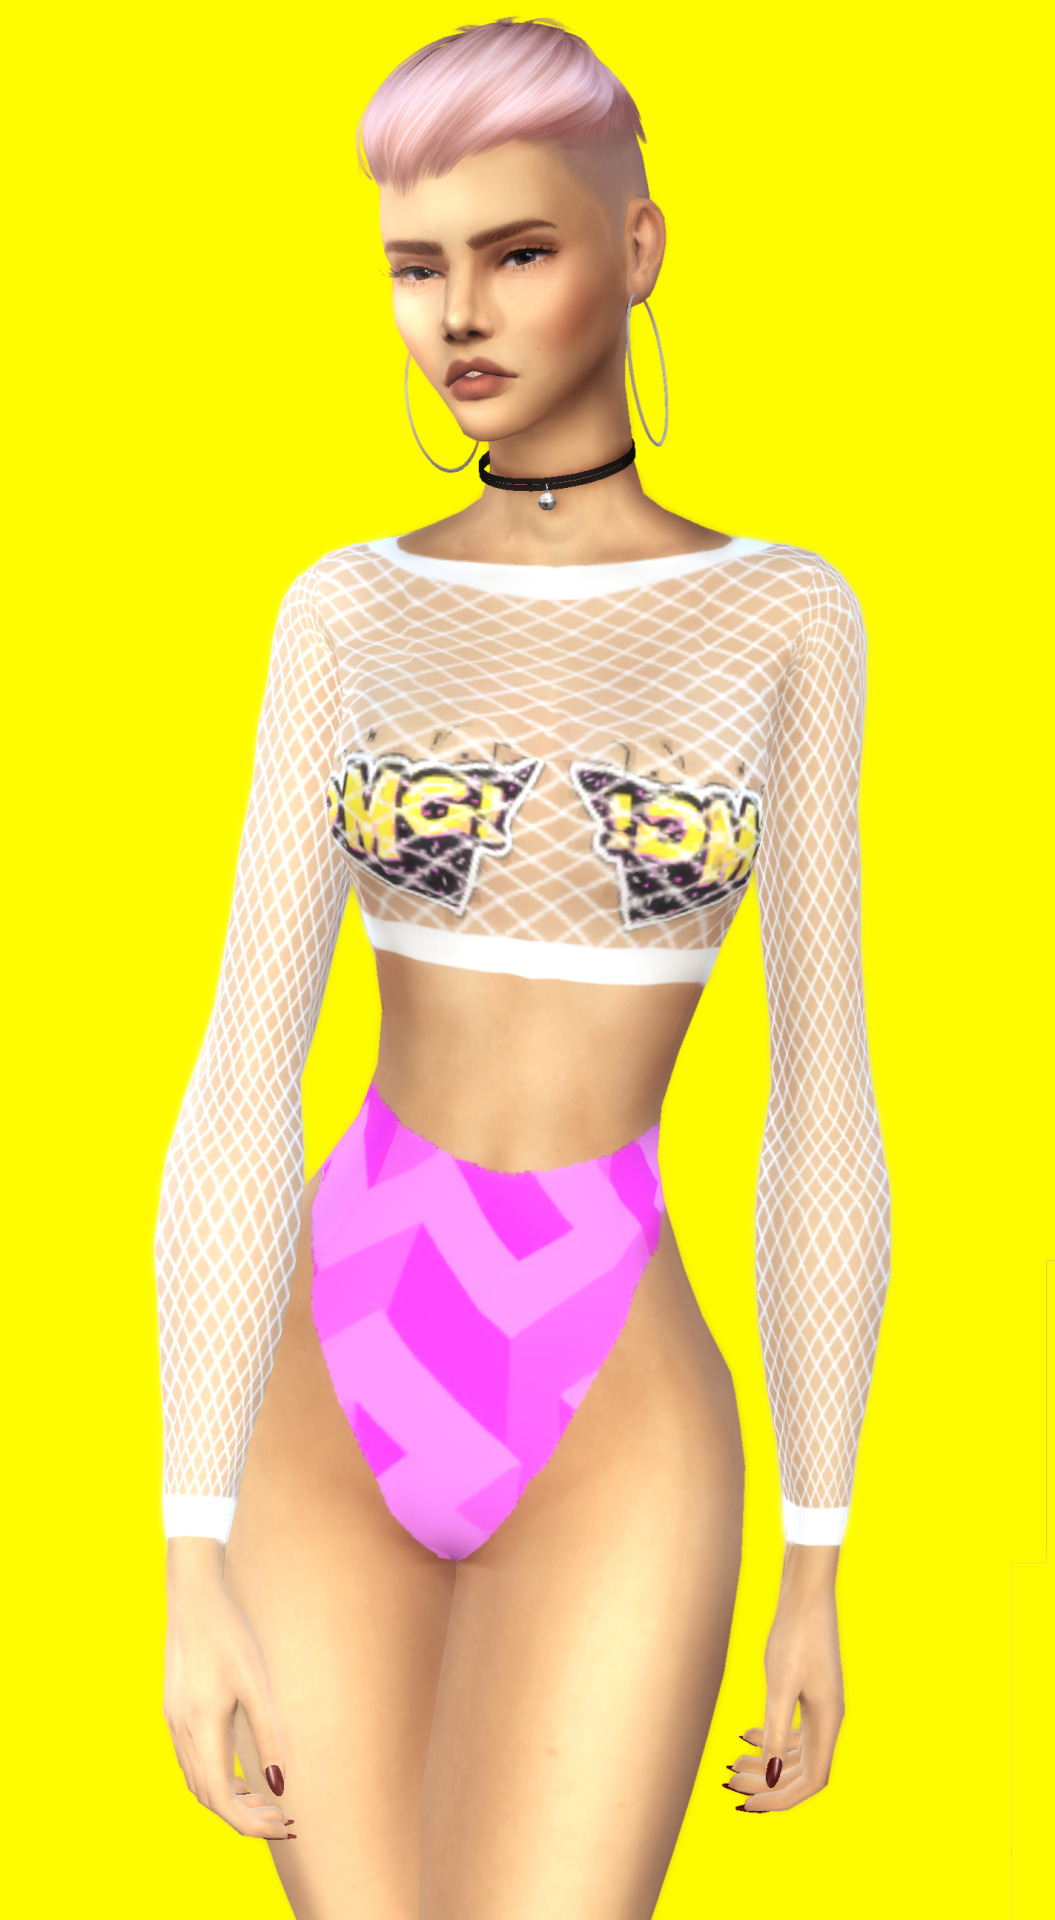
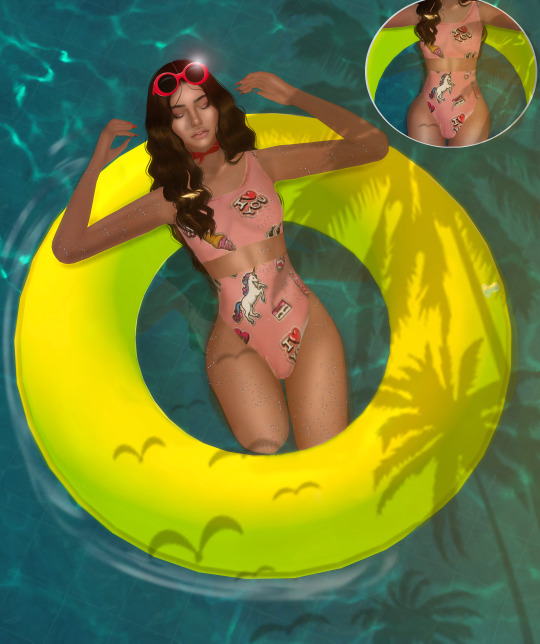
(AMH) ARIANA TOP ♥
DESCRIPTION:
12 Swatches
All Lods
Adult
HQ Mod Compatible
DOWNLOAD:
Simfileshare > http://www.simfileshare.net/download/1038052/
Thank you for @sassycobalto @abandonedlaboratory @azahrasims for this beautiful pic ♥
#downloads#sims4cc#sims 4#sims#simblr#s4ccfinds#S4CC#s4cc clothes#sims 4 clothes#sims 4 custom content#sims 4 custom clothes#ts4#ts4ccfinds#sims4tshirt#ts#sims 4 cc
28 notes
·
View notes
Photo
💕
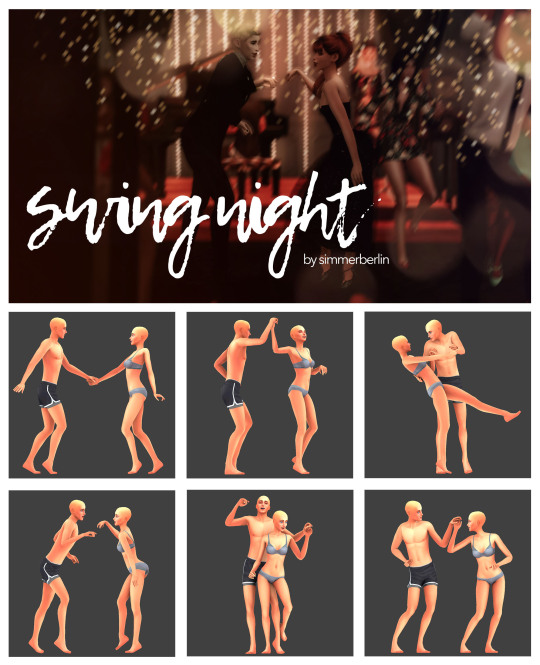
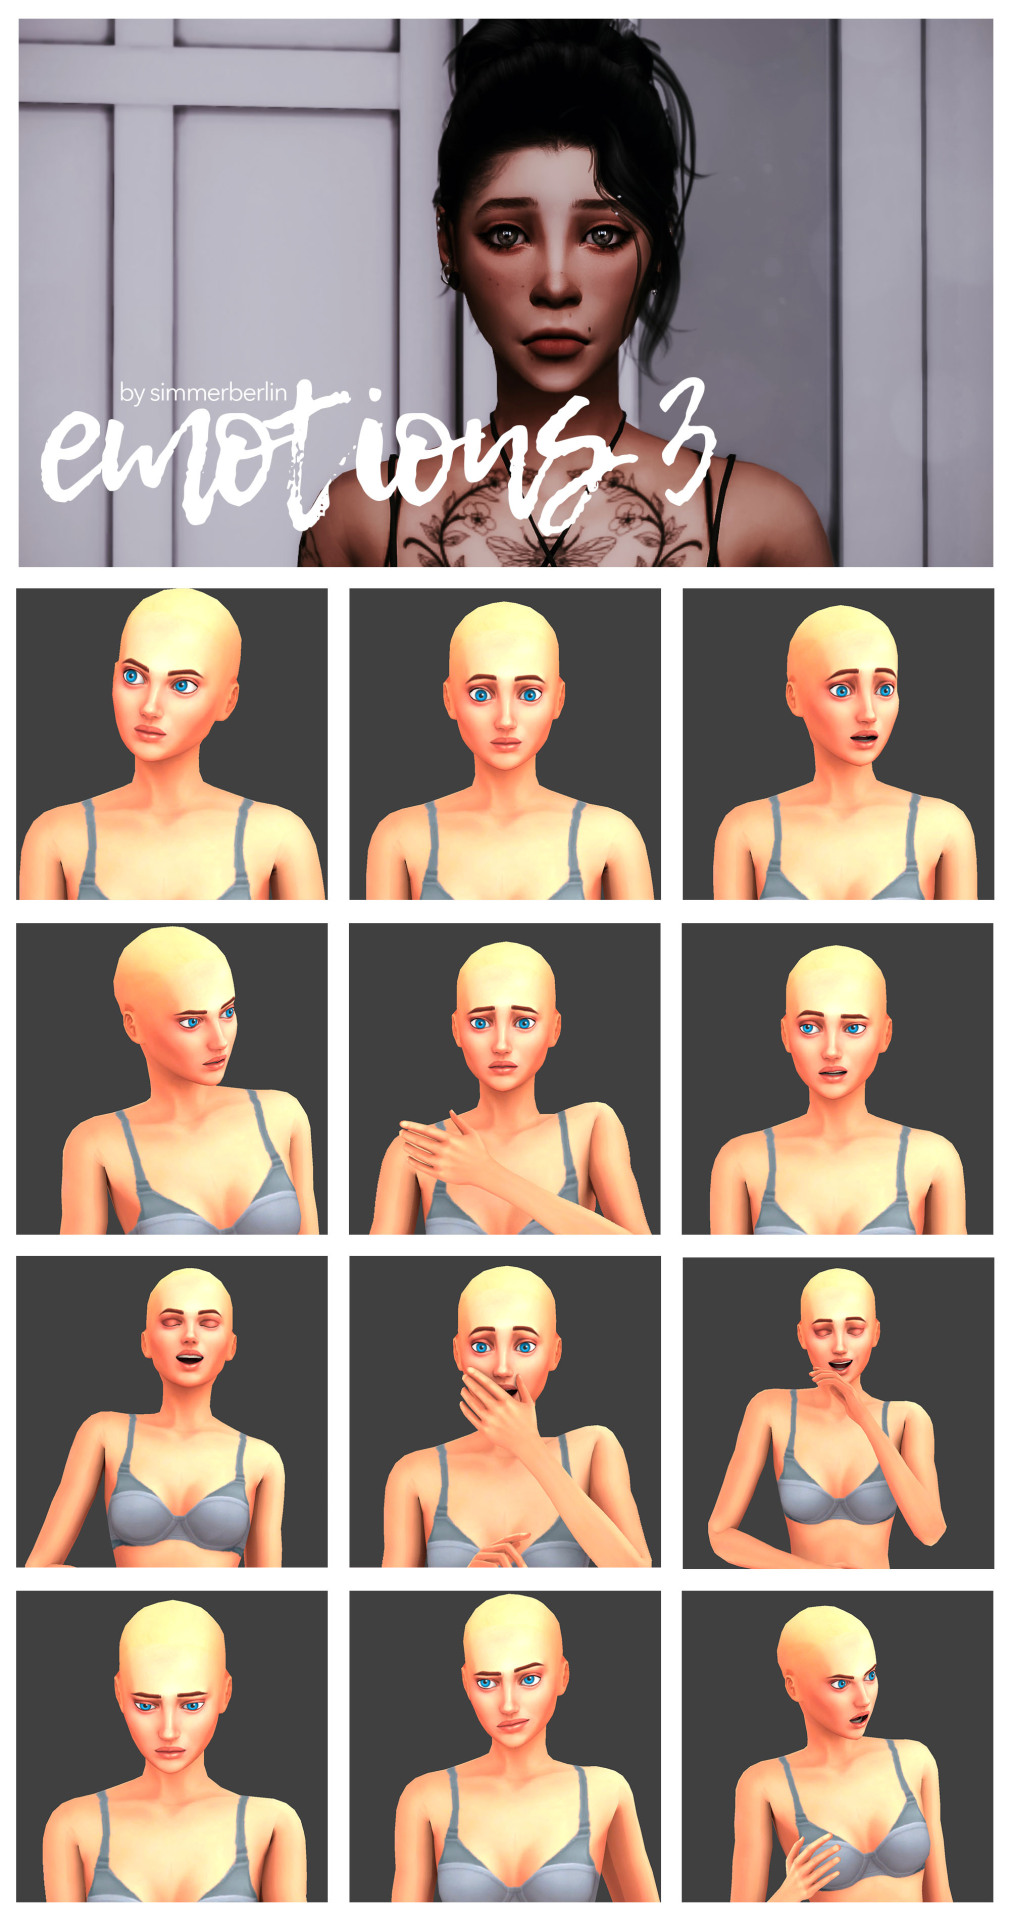

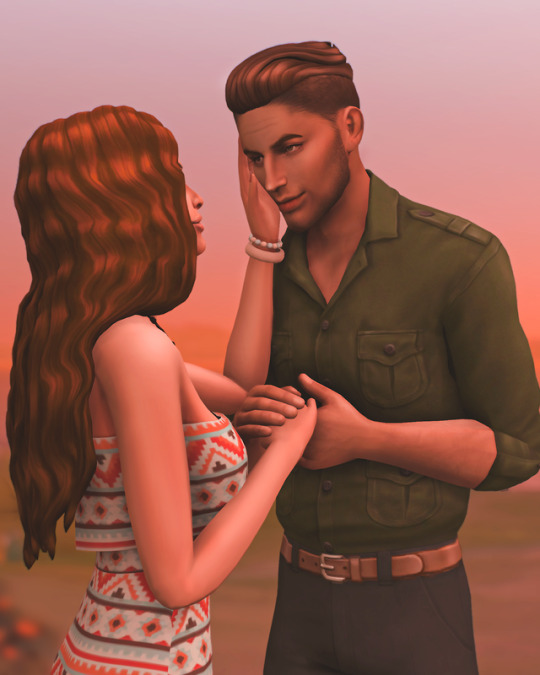
POSE DUMP #8
**Helluuu! So as most of you know, I continue posting my story (& poses) on Discord but I know not everybody has a Discord account, so I thought once in a while I could share the pose packs here too.**
–
Swing Night [x]
Emotions 3 [x]
Lost in you [x]
TOU
x Don’t steal
x Don’t edit
x Don’t reupload
4K notes
·
View notes
Photo
💕
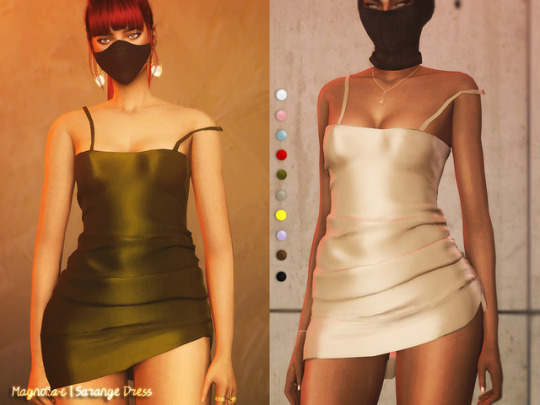
[Magnolia-c] Sarange Dress
10 satin colors.
Custom thumbnail.
Shadow and normal maps.
All LODs.
Enjoy ♥︎
Download (TSR)
2K notes
·
View notes
Photo
💕😻


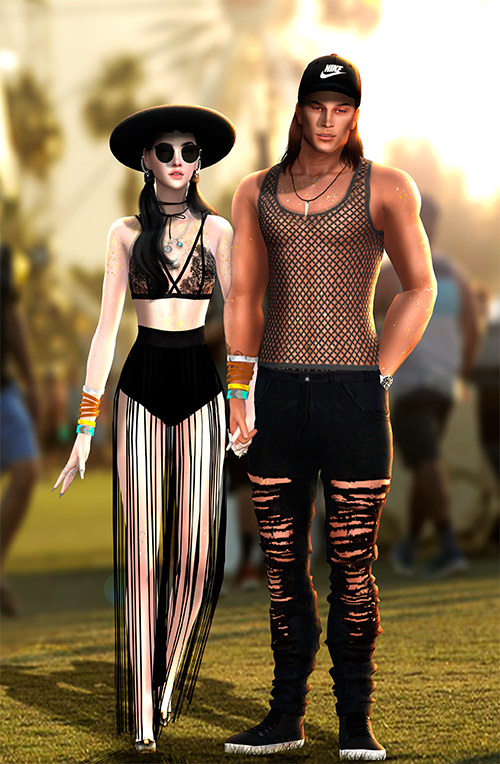
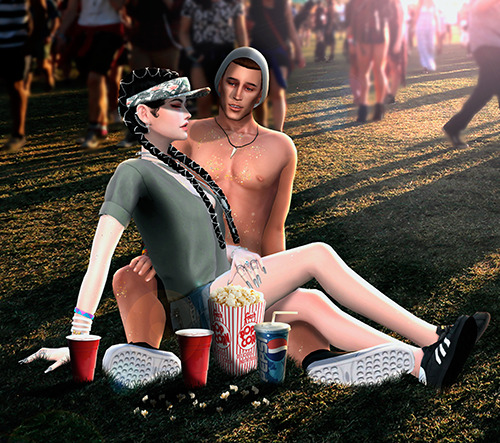
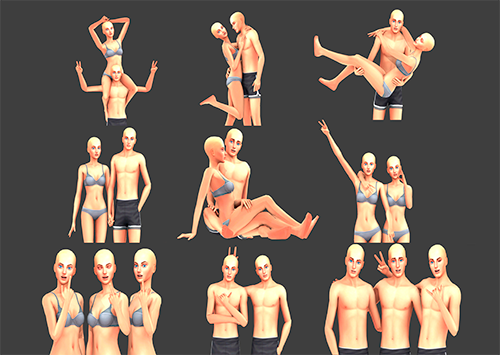
COACHELLA POSE PACK
Info:
- 9 Poses in total (5 couple, 2 friends, 2 group)
- You’ll need ‘Andrew Poseplayer’ and ‘Teleport Any Sim‘ to use
Download
*Open link in new tab*
[Simfile] [Mediafire]
930 notes
·
View notes