botchallthethings
Botch all the things!
A handiworks blog of the trial-and-error, figure-it-out method of learning.
707 posts
Don't wanna be here? Send us removal request.
Last Seen Blogs

thecosmiccrow
god is dead, all hail the nitties

willnhanson
Will N Hanson

corpus-vulpes
We admire what we are

cosmo44
Untitled

Text
so I'm borrowing a single-treadle ashford joy, and the owner told me she didn't use it as much because it was kind of awkward to start unless the treadle was in exactly the right place, and as I started using it, yeah, I agree. It is kind of annoying to start, and any time I have an issue that results in the yarn wrapping around the flyer (which happens a significant number of times), I'd have to pause, do a bunch of stuff to fix it, and re-start. (and often unscrew-rescrew the flyer).
Unlike the Joy, which has a caged-in wheel that makes it super transportable, the Traditional's wheel is open and exposed. It's also much larger, and right in front of your hand, at hand-height, unlike the Joy's wheel, which is definitely a downward reach to access. So it's still got the single-treadle challenge, where it could be difficult to start in a downward position, but it's not, because it's very very intuitive to reach forward and give the wheel a starting push with your hand.
ohhhhhhh I think my new wheel and I are going to get on swimmingly
2 notes
·
View notes
Text
ohhhhhhh I think my new wheel and I are going to get on swimmingly
#tis an ashford traditional and it is...very intuitive to use#though tbh this thing adds a lot of twist to yarn which i kinda wasn't expecting coming into this as a spindle spinner#with the wheels I've tried so far i'm usually fighting to make my wheel go faster#but the smallest ratio on this would easily be enough to spin a fingering or smaller 2-ply already#so the flyers with even tinier flyer whorls? what's that for#cobweb?#granted i pedal unusually fast
2 notes
·
View notes
Text
aaaaaah my spinning wheel repair supplies went in the opposite direction on tracked post. and it could mean nothing BUT I DON'T TRUST IT
#i just really want the supplies yesterday because i am impatient#and it went two states in the opposite direction...
0 notes
Text
miraculously, I may have found a modern wheel in 100% working order for a very affordable price (provided I'm willing to drive 2.5 hours to pick it up).
wish me luck
#i did the math and even if i'm including cost of gas and paying myself my work rate for the driving hours#it's still cheaper than the cheapest modern wheel i've seen on fb marketplace#(don't want an antique yet because i don't need another project and i'm on uneasy terms with wheel spinning as it is)#and with the prevalence of spinning-wheel shaped objects i'm not gonna chance it with most stuff on fb marketplace#but this is an ashford and seems to be solid#though i suspect i'll need to replace the drive band#but it comes with (decorated) hand cards and a lazy kate so i can tell it is indeed genuinely used#looks like someone's clearing out an estate
2 notes
·
View notes
Text
Tailspinning Adventures, Pt.1
So… some may remember that a month ago I bought a huge amount of dyed wool locks, and it is now slowly dawning on me that I can‘t just keep them in my stash and marvel at them but instead should use them in projects!
I have been watching different tutorials on how to spin locks and I think I will try this approach here:
youtube
Most tutorials want you to corespin locks, but currently I lack a suitable core thread (something strong but fuzzy for the locks to grab onto), so I was looking for a more freehand technique that uses locks only.
Now, in the video it‘s shown that the locks just get teased apart at the butt end but the ones I have don‘t really want to be teased apart by hand.
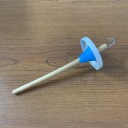
Enter the cleaning process:

This is our lock when it‘s just been separated from the bunch. Note that the butt end is slightly knotted and still contains some debris.

Use a hair comb, wire tooth cat brush or carding comb to gently tease the matted area apart by going over it from all sides, using quick, shallow motions. Be careful of your fingers and don‘t scratch or poke yourself please.

I hold each lock between my fingers like this to minimise pulling on the tip end, as we wanna keep that intact!

Prepare for a looooot of dirt to fall out!!!

Here‘s what my locks look like once combed: Much cleaner, and with a feathery tangle-free part on top that can actually be spun!

Glamour Shot.
@swords-n-spindles @dangerphd I will attempt to show my spinning process later on :)
89 notes
·
View notes
Text

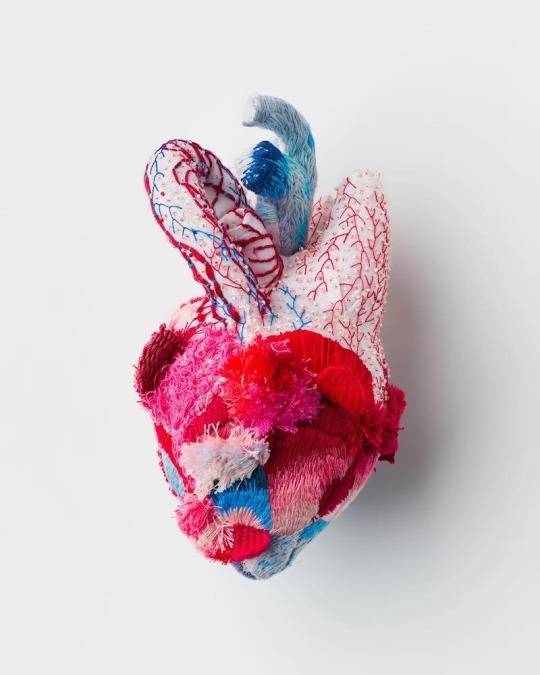

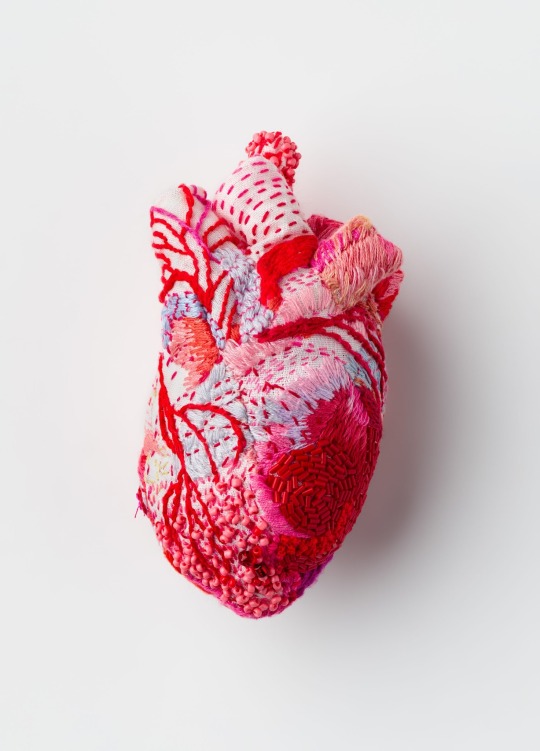


Ema Shin
6K notes
·
View notes
Text
Okay, I still kind of resent the romney (halfway finished! and that's just getting the dirt out, not combed, after hours and hours of work!) but I had enough variety in today's marathon of washing that I didn't feel sucked into a terrible abyss of progresslessness.
The litter box washing method is excellent. And I got some cheap cookie racks to stack on my laundry drying rack and they work perfectly! My two challenges for fleece washing have been how to lift the fleece out of the dirty water while maintaining its shape, and how to dry it effectively, and between the sifting litter box and the cookie sheets, I've just about nailed it.
#got some corriedale from a friend and i'm glad to work with it but also glad i wasn't the one to buy it#because it looks like there's a significant break in the fleece#also the clun forest icelandic is now finally all washed and drying and now that i'm paying attention more#i'm noticing a lot more about it#(just watched a video on primitive fleeces and i think the icelandic side of the cross contributes more than the color)
0 notes
Text
I agree, the sustainability of the cellulose source for rayon can make a big difference to the overall sustainability of the fabric. Another big factor is how much water is required to produce the plants. Theoretically it might also matter whether you're using waste plant matter (biproducts of what the plant is actually being grown for) or purpose-growing the stuff.
The other thing has to do with the actual chemical processes involved, but I'm on the limit of my understanding when assessing how sustainable the two main rayon processes are; I'm skeptical of Tencel because they're so goshdarn brand-y about how they talk about their product that it feels like greenwashing, but it seems like there are pros and cons to both the lyocell and viscose processes and that lyocell did genuinely introduce some improvements by not needing to use carbon disulfide. The traditional viscose process involves a lot of contaminated wastewater, but can directly use woodier stuff with lignin. Unfortunately I lack the industry knowledge/chemistry background to go much further than the basics.
some other good plant fibers that I have no experience with: pineapple, kudzu, banana
“Bamboo is antifungal”
Because it’s rayon
“Eucalyptus fabric is cooling!”
Yeah, because it’s rayon
“We make clothing called seacell out of seaweed!”
Yeah I looked on your website it’s made by the lyocell process, which means-
-wait for it-
It’s fucking rayon!!
Listen. There is a list of actual plant fibers that are directly made into fabric: cotton, linen, ramie, some hemp. I’m sure I’m missing a couple.
But if you’re wondering “huh how did they turn that plant material into fabric,” 99% of the time? It’s RAYON.
All rayon is made by putting plant material in chemical soup, dissolving out everything but the cellulose, and turning the cellulose into filaments/fibers.
The source of the cellulose has zero effect on the eventual fabric.
Rayon made from bamboo or eucalyptus or seaweed is not any better than rayon from any other sources.
Don’t let companies mislead you!
#technically there is a way to get bamboo fiber more akin to the general bast fiber process#but it's labor intensive and not in demand; i think the fiber is also a lot coarser#so pretty much any bamboo you buy is rayon#and alas. why does knit rayon have to be so goshdarn nice feeling and also fundamentally fragile.
14K notes
·
View notes
Text


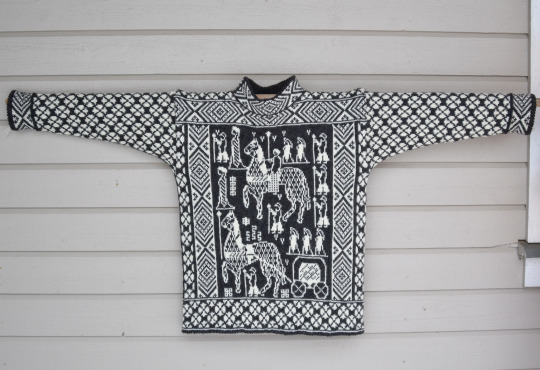


Finally finished my sweater!
Fairly happy with it, a few things i would do differently next time, but such is life when you do things for the first time!
3K notes
·
View notes
Text
FINALLY. The last bit of last year's crossbreed is in the final rinsewater. I have been washing wool like a fiend all week.
#been going back and forth between the dirt-caked romney (SO. MUCH. WORK)#and trying to finish the clun forest cross#i am pleased to report that the clun forest cross is now practically done and all it has to do is dry#fiber is such a process y'all#and you spin so much faster than you comb and washing takes so much work#and I live in a house with electricity and a stove and boiler!#think i might write a letter to the shepherd tomorrow to let him know his fleece was used in an award-winning project#(the romney is work because in addition to the dirt it's all jumbled together.#if i could just unroll it like a blanket it would be A LOT faster)#ETA I AM SO DONE WITH THE ROMNEY (not literally there's still at least half the fleece left to wash)#it BETTER spin up pretty because it is a pain in the butt to process#the worst part is that i lost track of how i got this one batch clean even to the tips#because apparently it was not pre-soaking alone that did the trick as evidenced by tonight'ss failure#also i am fed up with my large mesh fleece washing bag. cat sifting litter box my beloved.#maybe i'll get another...
0 notes
Text
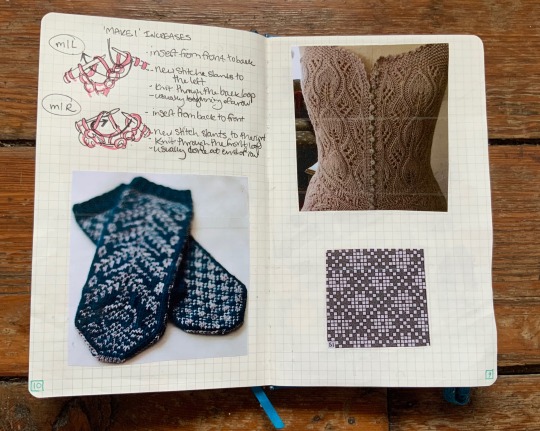


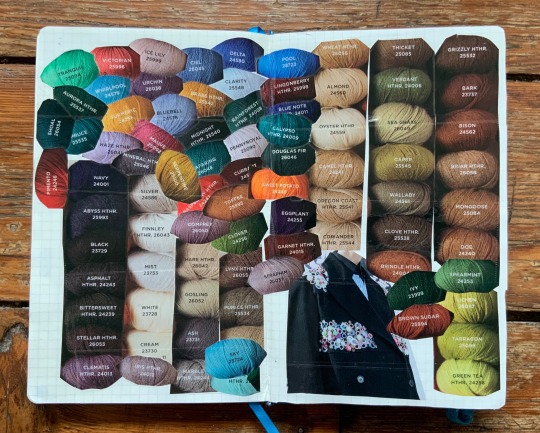
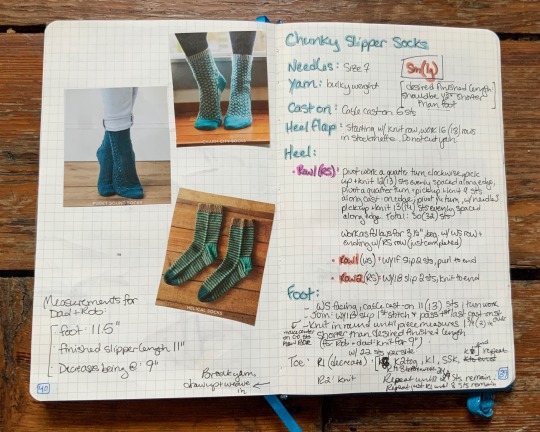


I thought some of you might enjoy a peek at my knitting notebook! Tumblr is so useful but I really love having a physical book for storing all my yarn-related thoughts. This is where I keep cute stitch patterns, color ideas, techniques I’ve learned and even some whole patterns for taking on the go. Perfect for when I don’t have internet access and can’t remember which one is m1r and which is m1l. But mostly, it’s just so nice to sink some time into it once in a while. Taking a moment to draw pictures and make each page something pretty just for me has been so relaxing and rewarding.
#record-keeping#this is the kind of thing that makes my eyes bug out of my head because it's an art unto itself#wow
397 notes
·
View notes
Text
Practicing twined knitting made it a lot easier to figure out Latvian braids!
0 notes
Text
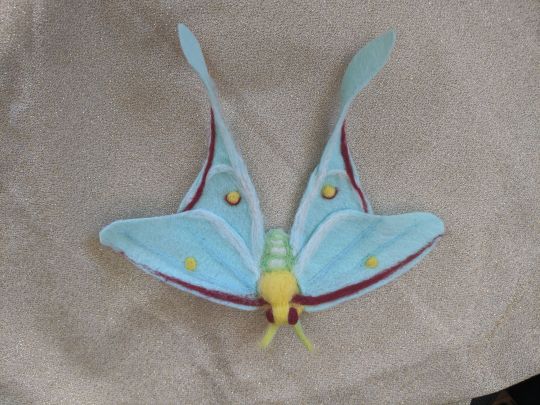

Made a prototype for the needle felted moths program I'm planning for spring. Only gave myself 90 minutes to work on it because that's how long the class is. I'll definitely encourage the students to work smaller than I did, though, since this one is large even compared to real luna moths. Now I want to make a whole flock of these.
4K notes
·
View notes
Text
Sprang installment 3: project, and some decorative stitches
Since sprang is so stretchy, it makes a handy and versatile bag. I've linked a couple options for bag tutorials; one with a drawstring, and another with wooden handles. (Handles can be bought at a craft store, or handmade if you have the tools/skills). If you'd like to get a little fancier, I've also linked a YouTube playlist of many decorative sprang lace stitches you could incorporate into either of these bag tutorials.
Drawstring bag:
https://www.stringpage.com/sprang/sprang1.
html
Wooden handle bag:
https://youtu.be/cFVEVIn1xNw?si=JWWUjBTHOA_igeU5
Sprang lace stitches:
https://youtube.com/playlist?list=PL2hi92f-57umXKE4sPyxgH7NwEG93wm3D&si=TsUkZbNca3eCs2yF
22 notes
·
View notes
Text
I don't think I've posted an update for this specific project but the actual embroidery part's almost done

126 notes
·
View notes
Text
SO MUCH FLEECE PROCESSING!!!!
#this muddy romney will be the death of me#i was at it for about four hours#i think the fastest way to process may be to pull locks out by their muddy tips directly from the unwashed fleece#and go at them wet with the slicker brush#and either dip them in the hot soapy water or else lay them out in my new sifting cat litter system for scouring#will have to see how much grease is left after the dip method vs the standard scour#though i do kinda wonder about the overall cleanliness of working with this fleece without hardcore washing
0 notes
Note
hello! i bought my first ever fleece today and i was wondering if you have any good resources on how to process it? its a jacobs sheep if that factors into anything :-)
Hey congrats on your first fleece ! I don't have a ton of resources to point you towards unfortunately--in terms of fleece prep I'm entirely self taught. The good news is its pretty intuitive and the hard part is mostly getting the tools and having the time to actually do it. I'm happy to walk you through my usual process, which hopefully should help :)
Step 1: assess your fleece. This is an important step. Try to lay out your fleece--some will be rolled neatly and some will be a jumble--and start looking at it. Does it need to be washed ? Even fleeces that are sold as already washed still need another round if they are greasy, brittle, or sticky to the touch, or have lots of dirt, dust, dung, etc. Check your fleece over and determine if it needs to be washed, and start skirting it if necessary; skirting is pulling out the grossest bits--anything covered in dung tags, shot through with vegetable matter, or otherwise way too messy to be processed as is. This can be cleaned later and with special attention to removing all the muck, if you want to.
Step 2: wash your fleece, if necessary. This is grabbed from my comprehensive guide to drop spindling, near the end:
"To wash a fleece, you need a dedicated wool pot (as in, don’t cook in it again), a bit of dish soap, and some time. Put the fleece in--don’t crowd it, just work in batches if your pot can’t easily fit all of the fleece--add cold water and a squirt of dish soap, and let it cook on the stove for about 45 minutes, without a lid. Don’t let it boil--ideally it should be steaming but not quite simmering. You can use a dedicated wool spoon/tongs to gently and infrequently stir the wool. The water should get pretty gross. After 45 minutes, start the tap running (you need to rinse the wool in very hot water--if you let temperature shock happen, it could felt), drain the water, and rinse the fleece. Then repeat--filling up the pot with hot water now--until the water stops looking dirty at the end of the 45 minute cooking time. Rinse it one more time, and then let your wool dry, ideally on a clothesline but over a vent/spread out flat on a towel is fine too.
Yes, it really is that easy. If you’re worried about felting or otherwise ruining the entire fleece, you can always start by washing just a handful, so that way if you ruin it there’s not much waste. But I’ve washed at least a couple dozen fleeces that exact way, and I’ve never ruined one."
Step 3: grading or equalizing. Once it's cleaned and dry, this is a good time to grade your fleece--that is, separate it into the really nice soft wool, the medium wool, the coarser wool, etc. Just work slowly and methodically, and keep an eye out particularly for differences in crimp in the fleece--your finest bits of wool will be much crimpier and typically have shorter locks, whereas your coarse wool will have less crimp than the rest, and is often longer than the rest of the fleece. But if in doubt, just trust your hands and grade by softness.
You may also wish to separate the different colors--Jacob in particular, being a piebald breed, should be sorted by color unless you want a fully random marled effected in your finished yarn. With Jacob I usually sort into black, white, and gray/mixed (for when the color changes mid-lock, or is already somewhat jumbled up), although the specific colors depend of course on your particular fleece.
If you'd rather process the entire fleece into a single batch of yarn, and don't want noticeable grades in your yarn, you will want to equalize your fleece--that is, separate any pieces that are already tearing and make sure the different grades are well distributed in your wool basket. If you plan to comb your wool you'll likely want to avoid doing anything that destroys any lock structure or makes the fleece particularly messy--combing is quickest and most effective if youve got clean locks to start with--but if processing using any other method, feel free to go crazy tearing your wool into handfuls. It's important to note that even if you skip this step, it's unlikely that you'll end up with super noticeable differences inbetween sections of yarn (though it depends on the fleece and how not-equalized it is). But this step doesn't take long and prevents any coarse areas in your finished piece. I would still recommend sorting by color even if you intend to equalize the grades of wool.
Step 3: picking your tools. So, fiber prep tools are expensive, and most people don't have all of them.
Back when I only had hand cards, everything was processed on hand cards. If it was particularly VM-y, I used the No Fleece Left Behind (NFLB) method to individually clean the locks before carding them into rolags. It wasnt ideal for every fleece, but it did work. So, always use what you have.
But here's the possible options (I may be missing a few really esoteric ones like bowing, sorry), and what they do:
~~~Hand Carding: This produces rolags--fluffy rolls of wool that are a woolen prep and will want to turn into a woolen yarn. Hand cards are very fast and versatile--they can handle any staple length under 5 or 6 inches (15 cm) but past that they don't work very well. They also don't usually remove much vm, grit, second cuts, nepps, noils, etc. So if your fleece is very gross, hand cards won't clean it very much, unless you do the NFLB method.
~~~Hand Combing: This can be done on actual hand combs or on palm combs (literally just a cheap plastic hair comb--I have made a tutorial for how to process fiber on a palm comb here). Hand combing is usually much slower than hand carding, which is important to take into account. It also produces a very different prep--hand combed top--which spins into a worsted yarn. It is much more effective at removing vm and whatever else--this is the only way I clean gross fleeces now. It also works particularly well with longer stapled fleeces, but can be used on a fleece of any staple length (just with diminishing returns the shorter it gets).
~~~Flick Carding: These are the cheapest standard fleece prep tool--just a handle with a small tined cloth at the end, for flicking open single locks (or small handfuls of locks). This is a pretty effective way to remove VM and open up the fleece, and results in combed locks. However, combed locks can be tricky to spin evenly--I certainly always process them further into rolags or top--but it's absolutely doable. The speed of flick carding depends heavily on the individual fleece; particularly the amount of VM/second cuts/other debris and the strength of the structure of the lock.
~~~Drum Carding: I'm not speaking from experience here--if anyone who processes fleece on a drum carder wants to chime in, please feel free--but from what I've read this is a very fast method for processing fleece. In most cases you will want to open up the locks a little, and perhaps align them. You'll then feed them through the carder (multiple times, resulting in a more even prep each time) until you have a uniform batt. From there you can pull it into roving or spin strips off the batt. One additional advantage to drum carding is that because it processes much more fleece per batch than any of the methods above, it will also equalize the grades of your fleece--that way, you will have fewer coarse spots.
~~~Willowing: This is a very old and low tech way to open up a fleece and remove VM. I just tried it for this ask, and can confirm that it's pretty good at both of those, and also at least mildly amusing, if not outright fun. (Here's a short video I made demonstrating it, if you want to see !) You lay down a sheet or towel and put your fleece on it. Most fleeces will probably benefit from you pulling it apart with your hands somewhat, and breaking it into small chunks before starting. Then, using one or two willow sticks (or other bendy sticks), hit the wool repeatedly and quickly. This will cause it to fly up in the air, so you need to gather it back up every minute or so. This results in a bundle of fibers that are open and much cleaner, but not at all organized--so not really spinnable. You could refine it by hand picking or layer it and load it onto a distaff. Your next step in processing will determine whether you get a more woolen or worsted yarn--but as it is without further processing, willowing lends itself to irregular woolen yarns. That said, it does also equalize the grades of your fleece, if by no other method than jumbling it all up.
~~~Hand Picking: The no tools approach. This is a pretty good written guide to hand picking. Just open the locks sideways, pick the VM out by hand or manipulate the lock so that it falls out. Make sure to disrupt and smooth out any lock structure for a neater result. This too benefits from an additional step of processing afterwards--even if it's still by hand. I prefer to pull the wool in between my hands until I have a fistful of wool all facing the same general direction, then pre-draft it into a sliver. The pre-drafting cuts down a lot on irregularities, since you encounter those before you start spinning.
Step 4: processing the fiber. As discussed above, there's lots of different methods to process a fleece, and if you have a choice between a few of them, it's good to consider the following two points: 1) how time consuming each method is 2) the preparation that each method results in and how this will work with your fleece. With Jacob fleeces in particular, pretty much any method will result in a usable and attractive yarn, but only a few of them will remove the second cuts that seem endemic to Jacob fleeces (combing and maybe hand picking, if you're attentive), so other methods will result in a lumpy--albeit charming, in my opinion--yarn. Of course you can also pull second cuts off as you see them come up in hand cards or whatever else--but you'll never see all of them, and it's very slow work.
Whatever your method, have fun with it ! If it feels like a slow slog, try breaking it up into shorter sessions (I typically only comb wool for an hour or two at most, and usually under an hour when carding), or doing it with friends. Fleece processing by hand is slow work, much slower than spinning, but also requires a lot less attention than spinning does, so if you can't spin while reading or watching a movie, you may still be able to process fleece.
One thing to keep in mind is that it's also very messy--depending on how much VM is in your fleece, you may want to do it outside to avoid having to clean up your area later. Usually a woven blanket that's smooth and easy to clean is good enough though--just drape it over your lap, and whenever it gets covered in VM, go shake it off outside or into the trash. I would not recommend preparing fleece on your bed or any furniture that's hard to clean. I speak from experience here.
I also highly recommend The Fleece & Fiber Sourcebook (your library may have a copy--if not you can request that they buy one), it's a really good resource to have for anyone who works with fleeces. It has pictures of samples, info on many different breeds of sheep and other fiber animals, and tips on how to process or spin each breed. It's also just a great catalogue for finding what breeds I want to spin next.
Lastly, a few notes about what you can do with fleece that you can't do with already prepared wool.
From multicolored fleeces you can get different colors of yarn without needing to dye anything--great for colorwork, or adding details or edging. In this case it's important to sort your wool by color. Failure to sort a multicolored fleece by color can lead to yarns that all look pretty different from each other, and that don't work together particularly well.
You can also dye in the wool (e.g. dye as fleece) and get several different levels of saturation from one dyejob. This happens naturally without you needing to do anything--different parts of the fleece will accept dye in slightly different amounts, so you end up with a decent range of saturations. You can of course also dye one fleece many different colors with small batch dyeing, and mix them to expand your palette even further.
You can dip or kettle dye either the fleece or picked locks from the fleece, which leads to some great colors as well.
Hope this was helpful ! If you're trying out some new tools for the first time I'd recommend hitting up youtube for demonstrations, and remember that if one method doesn't work, just keep looking. Have fun with your Jacob fleece--they're a great starter breed but also just so fun because of the piebald aspect. One of my favorite breeds for sure.
83 notes
·
View notes