crochet-gifs
Learn to Crochet: Crochet Gif Tutorials
Learn to crochet with gifs!
26 posts
Don't wanna be here? Send us removal request.
Last Seen Blogs


Photo
Learn to Crochet!
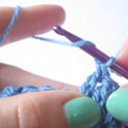
Crochet Gif Tutorials: Crocheting into the Chain
If the first row of stitches after the chain are going to be single crochet stitches (sc’s), you’ll need to crochet one extra chain. If they are going to be double crochet stitches (dc’s), you’ll need two extra, because dc’s are taller and you’ll need more space. Treble crochet stitches (trc’s) require three, etc. A pattern will always tell you what to do!
For a more detailed explanation of the single crochet (sc) stitch used in this example, please see the tutorial here.


3K notes
·
View notes
Photo


Learn to Crochet!
Crochet Gif Tutorials: Crocodile Stitch
A tutorial in 7 parts:
Part 1 - First Foundation Row
Part 2 - Row 1, First Scale
Part 3 - Row 1, Middle Scales
Part 4 - Row 1, Last Scale
Part 5 - Second Foundation Row
Part 6 - Row 2
Part 7 - Third Foundation Row
This tutorial shows my technique for making the crocodile stitch. I've looked at various other tutorials in the past and they all seem to have slightly different methods, but this is what I came up with as the way that works for me. I hope that it will help you too - but as always, play around and see what you like best!
So far, this tutorial only covers making the crocodile stitch in rows - so for things like scarves or anything rectangular. At some point in the future I hope to cover the adaptions you need to make to work this in the round.
Happy hooking! XX
6K notes
·
View notes
Photo


Learn to Crochet!
Crochet Gif Tutorials: Foundation Double Crochet
You may find this easier if you are already familiar with the Foundation Single Crochet - the concept is exactly the same, just with dc's rather than sc's!
The Foundation method is an alternative to the starting chain. It makes a row of chains, and a row of double crochet stitches, all in one go.
3K notes
·
View notes
Photo


Learn to Crochet!
Crochet Gif Tutorials: Star Stitch
This is a tutorial in 4 parts:
Part 1: Row 1, First Star
Part 2: Subsequent Stars
Part 3: Row 2
Part 4: Row 3
The star stitch requires prior knowledge of the half double crochet (hdc) stitch.
How many chains should I make to begin?
Crochet - one example of a ‘real-world’ application of algebra! (Sorry!)
Chain: 2 x (the number of stars you wish to make), + 4 extra chains.
e.g. for a row of 5 stars, 2(5)+4 = 14 chains.
Note: you don’t have to begin with a chain! To start a row of star stitches mid-way through a project, skip straight to part 4.
There are several variations on the star stitch. If you look at another tutorial and compare it to this one, you’ll probably find differences. This is the way I like to do it - but feel free to play around!
2K notes
·
View notes
Photo


Learn to Crochet!
Crochet Gif Tutorials: Changing Colors (and Crocheting Over Ends)
This can be fiddly, but you will get the hang of it!
In this example, the project is made up of rows of single crochet (sc) stitches. But this works for other stitches too. The overall rule is to ‘use the new color when doing the final ‘pull through the loops on your hook’ of the last stitch in the previous color.’ (Let me know if you think a separate tutorial for a different stitch would be useful, though!)
Crocheting over the ends is by no means essential, if you find it easier, you can ignore that step and go back and weave the ends in when you finish the project. But let’s be honest, everybody hates weaving in ends, so this is a great trick to master! Keep crocheting over the ends for the next few stitches of the row, until they’re nicely secured. Then snip off any excess.
For some extra notes on crocheting over the ends, please see this post.
(Also yes, I guess the editing process has made this green yarn slightly yellowish!)
946 notes
·
View notes
Photo


Learn to Crochet!
Crochet Gif Tutorials: Half Double Crochet (hdc)
A variation on the double crochet (dc) stitch - rather than finishing by pulling through the loops on your hook 2 at a time, you do them all at once.
462 notes
·
View notes
Photo


Learn to Crochet!
Crochet Gif Tutorials: Puff Stitch
The version of the puff stitch I’ve demonstrated here is a ‘7 loop puff’ (7 loops on your hook before you wrap the yarn over and pull through them all). This is probably the most common type of puff, but there can be a lot of variation between patterns. Sometimes they’ll require a 9 loops or 5 loops for more or less puffiness. Patterns will generally tell you how many loops to do, but if they don’t, I’d say 7 is pretty standard, or pick the puff level you like best.
Also, some patterns count the securing chain as a stitch on its own rather than as part of the puff - check your pattern so you don't accidentally do it twice!
The trick with the puff stitch is to keep your yarn nice and loose.
Good luck! XX
#puff levels are high#crochet#crochet tutorial#crafts#tutorial#learn to crochet#requested by#bonwiththewind
1K notes
·
View notes
Photo


Learn to Crochet!
Crochet Gif Tutorials: The Treble Crochet Stitch / The Triple Crochet Stitch (tr / trc)
590 notes
·
View notes
Photo


Learn to Crochet!
Crochet Gif Tutorials: Invisible Decrease
The invisible decrease is slightly more difficult than the standard decrease, but it can look great in amigurumi projects - because you can't see it's there!
This stitch works in the front loops of the stitches only, which you should be able to see clearly in the first gif.
Good luck!
CG XX
(P.S. You might notice that the stitch I end up with in this tutorial is very loose. This was so that I could clearly illustrate the technique. Try to crochet a lot tighter than this if you can, especially if you're using this stitch for amigurumi.)
717 notes
·
View notes
Photo


Learn to Crochet!
Crochet Gif Tutorials: Decreasing Double Crochet Stitches (dec / dc2tog)
190 notes
·
View notes
Photo


Learn to Crochet!
Crochet Gif Tutorials: The Foundation Chain / Foundation Single Crochet
The Foundation Chain is an alternative to the starting chain. It makes the starting chain, and a row of sc's, all in one go. It can be tricky to pick up, but once you've mastered it you probably wont go back to the old method! I like it because it gives you a better indication of the finished size of your project, and it's stretchy!
See also: Foundation Double Crochet
1K notes
·
View notes
Note
Can you make a set on increasing and crocheting in the round? Because my rounds always curl up into bowls when they're supposed to be flat.
Increasing in the round is exactly the same as increasing going back and forth in straight line. If your rounds are curling up when they’re supposed to be flat (so you’re trying to crochet a flat circle, right?), it sounds like you’re either not increasing enough times per round (if you’re making up your own pattern), or if you’re following a pattern, your tension might not be consistent?
In case it’s handy for anybody reading, here’s my go-to flat circle pattern/formula.
Working in spirals, in the round:
1) Magic ring 6sc 2) (inc) x6 3) (1sc, inc) x6 4) (2sc, inc) x65) (3sc, inc) x66) (4sc, inc) x6…etc, until it reaches the size you’re after.
CG XX
67 notes
·
View notes
Note
Hi, I really love your tumblr. I'm a beginner crochet geek myself. I was wondering if your page used UK or US terminology. I know they are different but I'm not sure why, or which stitch I am using between the different codes, could you write us up a chart or something. You see I thought I was using treble (which my Mum taught me) but according to your blog I am using double crochet, so I'm a little confused. Regards, TBJG
Hey! Thanks for the kind words!
I use US terminology (even though I’m British! it’s just what most patterns are written in so I find it easier), and yes, the UK version of the US double would indeed be the treble.US terminology names stitches after the number of times you pull yarn through the loops on the hook to finish the stitch, while the UK terms are named for the total number of loops on the hook.
If in doubt, the UK names are always ‘one higher’ than the US. So a US single crochet is a UK double, and a US double is a UK treble :)
I hope that helps! XX
32 notes
·
View notes
Text
Ravelry
Not a tutorial post, but hopefully still a really helpful beginner crochet tip, I hope!
My number one indispensable tip to new hookers: Get a Ravelry account.
Ravelry has too many amazing features to describe at once, but the main reason I'm recommending it is its pattern database.
I found when learning how to crochet that actually making something was the best way to do it. Even if it was a hideous hat I'd never wear because you could barely tell it actually was a hat, or an amigurumi dragon that looked a little worse for wear... You get to practice stitches, and increasing and decreasing, and have something to show for it.
On Ravelry, you can filter pattern searches for free patterns, and patterns that are rated as 'easy,' too, so perfect for finding some beginner stuff to get you started.
And if you have any questions about anything, remember my ask box is always open :)
Lots of love! XX
103 notes
·
View notes
Photo

Learn to Crochet!
Crochet Gif Tutorials: The Double Crochet Stitch (dc)
239 notes
·
View notes
Photo


Learn to Crochet!
Crochet Gif Tutorials: The Magic Loop
Aka: the magic circle, the magic ring, the adjustable ring, witchcraft...
The magic loop is my favourite method for the starting round when crocheting in the round, for projects like hats or amigurumi. The alternative method is to 'chain 2, make x sc's into 2nd ch from hook,' but that will leave you with an ugly hole in the centre of your circle. The magic loop closes up completely, which is especially great for amigurumi - it keeps the stuffing from leaking!
You can also use dc's rather than sc's - so it's great for starting granny squares, too.
2K notes
·
View notes
Photo


Learn to Crochet!
Crochet Gif Tutorials: Decreasing Single Crochet Stitches (dec / sc2tog)
See also: Decreasing Double Crochet Stitches (dc2tog) and The Invisible Decrease
361 notes
·
View notes