#except with access to liquify tool ha ha ha ha ha ha
Text
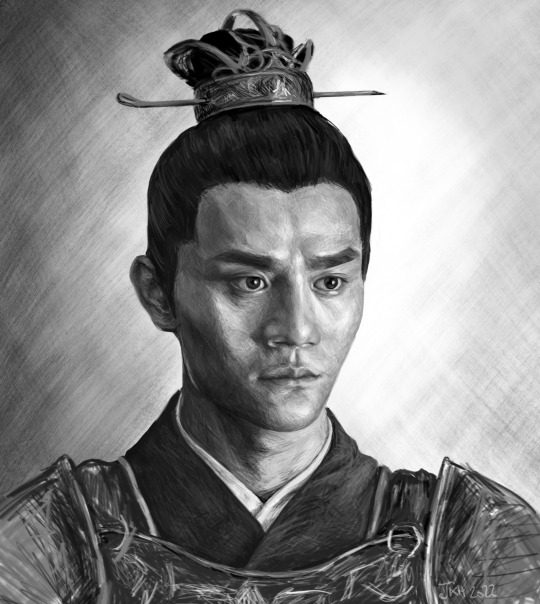
Oh Xiao Jingyan, we’re really in it now.
#my art#digital art#nirvana in fire#fanart#nif#xiao jingyan#so i started this in april or so#then proceeded to have rsi in both hands rendering me unable to draw#or knit or garden or play the flute or try to finally use my journal#until hmm november 2022ish#anyway why not just go back to my old friend#realistic pencil portraits#except with access to liquify tool ha ha ha ha ha ha#sure i can’t draw accurately#but i can sure sculpt things around with liquify until they Feel Right#anyway my hands are fine but my back hurts. how are you i am over 40 years old#exercise and do stretches for your future#langya bang
234 notes
·
View notes
Text
If students from class 1A and 1B were part of the Riordanverse:
Yuga Aoyama: Son of Aphrodite. Not even a good one, unless you need someone blinded by his glitter-gun. Oh yeah, he has a glitter gun with lasers for maximum flare. Is he completely over-the-top? Absolutely. But is he good in a fight? Surprisingly, yes.
Mina Ashido: Daughter of Hermes and legacy of Hecate, capable of inhuman movements and can produce a slime that magically dissolves anything. She also tattooed her eyes black and yellow for some weird masochistic reason.
Tsuyu Asui: She’s a frog-turned-human by Ochako. She still has her tongue, leaps, hops, camouflage, a reversible stomach and poison that can kill a group of whales. And he can still inflate her throat like a balloon, which makes for good scares.Very good scares…
Tenya Iida: Son of Mercury, he never skips leg day. Never. Seriously, have you seen those legs? He could crush a car with those puppies! Or crush monster heads! Which he does do quite often! He doesn’t skimp out on upper body exercises either, but LOOK AT THOSE LEGS OF THUNDER!
Ochako Uraraka: Daughter of Hecate, she specializes in a set of spells that manipulate an individual object’s or being’s gravitational pull. It’s gotten to the point where she makes anything she touches with five fingers on one hand, it will float, no matter what, which is why she wears gloves all the time.
Mashirao Ojiro: Son of Mars, he’s an expert martial artist and very, very good at multiple of them. He’s lost multiple sparring partners because of his profinity with a number of weapons, and his lethality without any weapons.
Denki Kaminari: Legacy of Zeus and Apollo, each by about 50 generations. About as bright as his godly ancestors (not very), but he still makes one Hel of a lightning bolt, and he’s also pretty good with a guitar and lyre.
Eijiro Kirishima: Son of Vulcan, his blood and skin are pure liquid gold, bronze and diamond he can infinitely harden for a period of time. It also obtains unnaturally sharp edges, and given his tendency to go hard when excited, he has made his friends frequent the infirmary for cuts and broken ribs.
Koji Koda: Son of Actaedon, he can talk with wildlife. He’s also a Legacy of Heracles, hence his size. His hugs are nice, war and gentle.
Rikido Sato: Son of Mars, this guy has a serious sweet tooth. He’s also surprisingly gentle for a guy that can decimate an opponent with a single hit.
Mezo Shoji: Son of Ares, he’s surprisingly level-headed. And malicious. Seriously, this guy always has at least ten different weapons on him, on top of him knowing a variety of potentially lethal moves. His arms are known as the Anacondas for a reason.
Kyoka Jiro: Daughter of Apollo, she’s a top-tier musician, singer and is moderate with a bow and arrow. She can whistle in the ultrasonic range, clap like thunder, sing and play like either a sweet little bird or a whole-ass heavy metal choir without ruining her vocal cords, and she gives the opposite amount of fucks that Zeus does (ie. zero).
Hanta Sero: Son of Hermes, he inherited a pair of magical tape dispensers that can dispense any tape in any amount of any properties he chooses. He uses them to swing around like Spider-Man, which made him a regular visitor of the infirmary until Momo made him a special harness to keep his joints from dislocating.
Fumikage Tokoyami: Son of Erebos, he suffers from split-personality disorder, but it’s fixed nicely by his inner demon incarnate made of pure darkness he calls Dark Shadow. They have a strangely healthy relationship for a boy and his literal inner demon.
Shoto Todoroki: A Legacy, descendant of Hel and Surtr, capable of making ice that freezes fire, and fire that burns ice. He gives so little shit he’s actually oblivious to social cues, which makes for more than a few funny moments on quests with him.
Toru Hagakure: Legacy of Iris, she can manipulate light around her to turn invisible or project bright flashes
Katsuki Bakugou: Son of Ares, with rage and instincts of war so strong and powerful he can convert his sheer rage into explosions in the palms of his hands. He generated more than one explosion with the explosive yield of a nuclear weapon in his life. How he hasn’t gone deaf yet is beyond most people, though he does still know a variety of sign languages.
Izuku Midoriya: A mortal, capable of seeing through the mist, was gifted the Spartan Spirit, a spirit formed by Kratos, Nike, Bia and Zelus, to protect humanity in its greatest times of need. He ends up breaking his bones an absolute shitton, and is a regular at the infirmary.
Minoru Mineta: Died on a quest. His quest-mates say ‘by accident’. Everyone knows it was very deliberate, but then again, everyone hated him and is fine with him dead. Some people wanted to be the ones to kill him though.
Momo Yaoyorozu: A Legacy, granddaughter of Hephaestus and Athena, capable of making virtually any machine. She’s also very fidgety, and once made an entire army of fully autonomous grass soldiers that went on to terrorize the other campers for a bit. In thirty minutes.
Class 1B:
Yosetsu Awase: Son of Hephaestus, he also likes to make stuff. Though mostly he combines already existing tools, gadgets and machines, and makes weird amalgamations. He once fused an automaton bull, an automaton dragon and a school bus, and it actually works.
Sen Kaibara: Son of Ares, he’s pretty chill compared to his kin (especially Katsuki and Setsuna), mainly due to him bottling up his anger. Which he can unleash as tornadoes around his limbs, which he can use to drill through walls. Thank gods he doesn’t lose it too often.
Togaru Kamakiri: Son of Ceres, he likes farming tools. Especially ones with blades. That’s lead to him using all kinds of sickles, scythes (both farming tools and war scythes) and even a few lawn mowers, shovels, axes...
Shihai Kuroiro: Son of Nyx, him and Tokoyami get along exceptionally well. Given his ability to shadow-travel and use shadows and darkness as materials to make some pretty nifty weapons only he can use.
Itsuka Kendo: Daughter of Athena, she excels in critical thinking and a variety of martial arts. And knocking out her piers with precise attacks when they start to get exceptionally annoying.
Yui Kodai: Daughter of Trivia. She excels in potions and spells that manipulate the size of objects, so much so that she has to resort to gloves because she now naturally makes things smaller with her left hand, or bigger with her right hand. She’s the calm one.
Kinoko Komori: Daughter of Demeter, she has a soft spot for fungi and mushrooms. Which she can make grow rapidly. Very rapidly. She’s fun at parties.
Ibara Shiozaki: Daughter of Demeter, she dyes her hair green with actual chlorophyll for some reason (“To feel one with the beautiful plants,” she says), but she can also grow and manipulate vines and other vine-like plants, along with trees, quite effectively, and she has some rose and poison oak (she’s immune to it) seeds in her hair. Don’t ask, her answers are just as ridiculous as the chlorophyll-dyed hair.
Jurota Shishida: Son of Mars, he’s been cursed by most likely Hera to be a humanoid boar/dog thing. He’s especially good at wrestling, and is very diplomatic in his approach. Until he gets pissed, then he charges like a boar and yes, he keeps those tusks of his sharp on a regular basis.
Niregeki Shoda: Legacy of Hermes, son of Hephaestus, he likes to make explosives and plant them everywhere. More than a few campers were scared. Except Katsuki, who tried to outdo the ground (Niregeki’s mine) in explosive yield and put skylight access in the roof of Bunker 9. Niregeki had to repair it.
Pony Tsunotori: Legacy of Poseidon, she can shapeshift. She likes to shapeshift into horses, bulls, deer and goats (including mooses and buffalo), and she has a nifty gadget from the Hephaestus and Vulcan campers in the shape of horns that transform with her, giving her detachable remote-control horns.
Kosei Tsuburaba: Legacy of Jupiter, son of Ares, he’s competitive and can make walls and blades out of air. Especially annoying for monsters because they can’t get to him, period, and every time they try, they don’t get past his walls of air for a whole minute before someone either cuts/hacks/slices them to bits, freezes/burns them alive, blows them up with their fists/explosives/expanding stones they previously ingested or some other way of disposing a monster.
Tetsutetsu Tetsutetsu: Son of Vulcan, capable of turning to pure steel over his entire body, also increasing his strength. Because of this, and his tendency to go hard whenever he’s excited, he’s made his friends frequent the infirmary for bruises and broken ribs.
Setsuna Tokage: Daughter of Ares, she’s actually been hurt pretty badly in one of her fights (she went on a Quest with Katsuki, and no, it wasn’t him who hurt her) and had to have automaton grafts to replace her limbs, a part of her lower jaw, her eyes and the muscles around her spine, along with parts of the vertebrae. Which she asked to be detachable and splittable in as many pieces as possible, which she can control telepathically and uses to troll other campers. A lot. Especially two certain sons of Vulcan.
Manga Fukidashi: No one knows what he is, they just know his head is a speech bubble and he can make anything he writes real.
Juzo Honenuki: Legacy of Gaia, he can virtually liquify the ground (does not work on metal or wooden floors). He trolls a lot with this ability. And I do mean a lot.
Kojiro Bondo: A golem? A person? His head makes it hard to tell whether he’s a demigod or a monster to be honest. And his glue-like spit doesn’t help much either.
Neito Monoma: Legacy of, you guessed it, Zeus! He has a superiority complex because of this, and he frequents the infirmary on the basis of Itsuka or whoever he was annoying KOing him constantly. All that brain damage probably isn’t helping his mental issues...
Reiko Yanagi: Daughter of Hecate she can make things she touches float and fly around using some sort of incantation. The biggest she can do is double her own body weight, but that doesn’t stop her from delivering high-speed flying punches and scaring other campers.
Hiryu Rin: Son of Mars and Legacy of Poseidon, he can shapeshift into various animals. Most notably a mix of human, hedgehog and a lizard. Sharp, painful and deadly precise. And also meditating. And a lot of it.
#my hero memes#my hero academia#riordan universe#percy jackson#heroes of olympus#magnus chase#the kane chronicles
46 notes
·
View notes
Text
Transitioning From Adobe Photoshop to Affinity Photo
What You'll Be Creating
Affinity Photo isn't the first photo-editing program to claim it can stand toe to toe with Adobe's Photoshop for a fraction of the price, but it may be the first to actually back up that claim with pure, uncompromising photo-editing power!
And with a one-time fee of $50 USD, it can be much more financially appealing than Photoshop's $10 USD monthly subscription.
Today, I will be comparing and contrasting the basic functions of each program, focusing on the fundamental tools that you would use day to day.
So come take a look at Affinity Photo from the perspective of a long-time advanced Photoshop user!
Follow along with us over on our Envato Tuts+ YouTube Channel:
1. User Interface and Modules
The first thing you may notice is that Photoshop's and Affinity Photo's interfaces are very similar. That's great for anyone looking to possibly make a switch from one to the other, like me!
1.1 Customizing Your Workspace
Just like in Photoshop, Affinity Photo allows you to arrange your different modules however you want, with one exception: you can't move your Tools module in Affinity Photo.
Affinity Photo makes up for it in a big way, however, by letting you customize and arrange the individual tools themselves! Something Photoshop has never allowed you to do, this is a big win for Affinity Photo in my book.
Go to View > Customize Tools to mix and match your own Tools panel. You can even choose how many columns you'd prefer!
This also means you can almost exactly replicate the Photoshop Tool setup in Affinity Photo. I personally have my Photoshop workspace set up in a very specific way, and after 10 years of using Photoshop I am very used to its tool setup, but I was able to mimic my workspace almost exactly in Affinity Photo! That makes the transition much smoother.
I'd like to note that I usually have the top Toolbar in Affinity Photo hidden, which you can do by going to and unchecking View > Show Toolbar. However, I turned it back on for the sake of this article.
Do note that you can also customize the toolbar, which is very handy!
1.2 Creating a New Document
Creating a new document is very similar and equally straightforward in both programs. Both programs open with a New Document prompt, but will also allow you to create a new document by going to File > New.
2. Navigation and Interactions
2.1 Transforming Images
One of my favorite features of Affinity Photo is how it keeps an image's original aspect ratio by default when enlarging or shrinking an image using the Move Tool.
When transforming an image in Photoshop, you would select the Move Tool, click on one of the image's anchor points, hold down Shift, and then drag to either enlarge or shrink the image.
If you don't hold down Shift then the original ratio of the image will not be preserved, leaving the image stretched or squished, which I find you usually don't want to happen.
In Affinity Photo, it's exactly the same, except you hold Shift when you don't want to preserve the image's original aspect ratio. It's a very small but very smart change!
2.2 Personas
Affinity Photo has these things called "personas". You can access them by going to File > Personas and then choosing a persona, or alternatively you can change the persona by clicking the different persona buttons in the top-left corner of the Toolbar.
Each persona serves a different function, almost like some of the more in-depth filters in Photoshop. While there are five personas in total, including the default Photo persona, I am going to be focusing on the Liquify persona as Photoshop also has a liquify function that I use very often.
In Photoshop, to access the Liquify feature, you would go to Filter > Liquify to open the Liquify panel, which opens in a new window.
In Affinity Photo, you go to File > Personas > Liquify, or click the second button in the top toolbar, which will enter Affinity Photo's liquify user interface. You have a lot of the same options and functions as you do in Photoshop.
All of Affinity Photo's personas activate a new user interface, almost like opening a different program altogether. This makes things a bit more organized and user-friendly; however, Affinity Photo is noticeably slower while in the Liquify persona.
In fact, I do want to note that Affinity Photo is all around slower than Photoshop.
3. Layers and Smart Objects
3.1 Layers
Affinity Photo's and Photoshop's Layers panels are almost identical. You have your Opacity and Layer Modes on top and the various layer effects, masks, and a Create New Layer button, or Add New Pixel Layer in Affinity Photo, in the bottom-right of the Layers panel.
You can hide layers in Affinity Photo by hitting the checkmark on the right, similar to hitting the eye icon to the left of layers in Photoshop, and you can arrange the layers by dragging and dropping, just like Photoshop.
You can clip a layer into another layer in Affinity Photo, but it's a bit trickier than Photoshop. You have to drag and drop a layer into another layer—there's no button or a key like holding Alt in Photoshop, and it can be very finicky.
You can collapse clipped images for a cleaner-looking Layers panel, though. This means creating fewer groups, which is a nice feature.
One more disadvantage is that when you double-click on layers in Affinity Photo, no Layer Style panel opens like in Photoshop, leading me to believe there is no Blend If function in Affinity Photo, which is something I use often.
3.2 Smart Objects
One thing Affinity Photo does a bit differently is that every new image brought into a document is automatically a Smart Object. While Photoshop does this if you drag and drop a new image into a document, in Affinity Photo all images are smart objects by default.
Just like in Photoshop, you can Right Click > Rasterize any smart object to rasterize the layer.
Do note that in Affinity Photo, smart object layers and regular rasterized layers look the same. When you rasterize a layer in Affinity Photo, it will crop any part of the image that is not inside the canvas, something Photoshop doesn't do.
3.3 Layer Masks
Affinity Photo's and Photoshop's layer mask features are virtually the same. You can add a layer mask to any layer by hitting the Add Layer Mask (called Mask Layer in Affinity Photo) button at the bottom of the Layers panel.
4. Sections and Layer Masks
4.1 Freehand Selections
Affinity Photo has an exact equivalent to Photoshop's Lasso Tool called the Free Hand Selection Tool, as well as the various "shape" marquee tools that go by the same names in both programs: Elliptical Marquee Tool, Rectangular Marquee Tool, etc.
4.2 Quick and Auto Selection Tools
From what I can tell, Affinity Photo does not have an exact replica of the Magnetic Lasso Tool. And while it doesn't technically have the Polygonal Lasso Tool, instead what you do is hold Shift while using the Free Hand Selection Tool to get the same polygonal effect.
4.3 Refine Edge
While both programs have a Refine Edge, and they are somewhat similar, this is where Affinity Photo differs from Photoshop and lacks a bit for me.
To use the refine edge feature in Photoshop, you'd make your selection and click Select and Mask to open up Photoshop's Refine Edge interface. The options are very straightforward and include Edge Detection with a Smart Radius option, which I find to be a key feature in extracting hair, fur, and cloth.
In Affinity Photo, the process is similar. You make your selection and click Refine in the selection tool's toolbar. The refine options are a bit less clear in what they do, and the tool seems to lack any kind of edge detection options. It does, however, have both the Smooth and Feather options, which are two of the main settings you would use.
5. The Pen Tool
I was very happy to learn that the Pen Tool in Affinity Photo is almost identical to the Pen Tool in Photoshop! It functions exactly the same, which also means you could use a Photoshop Pen Tool tutorial to learn how to use the tool in either program.
6. The Paintbrush Tool
6.1 Brush Settings
Affinity Photo offers all the same bells and whistles as Photoshop does when it comes to its brushes—including a well-sorted array of default brushes.
Affinity Photo has Opacity, Flow, and Hardness settings, as well as a very impressive Stabilizer option, leading me to believe that digital painters would get along very well in Affinity Photo.
6.2 Importing Custom Brushes
While it comes with a high variety of default brushes, Affinity Photo also lets you import brushes just like Photoshop. One of the main questions I'm sure a lot of people have is: "But can I import my current Photoshop brushes? Do I have to find all new brushes?"
I am happy to say yes, you can use Photoshop brushes in Affinity Photo! That's a big plus for someone considering transitioning.
6.3 Pen Pressure
I personally use a graphics tablet, and so do many of you out there, so I was curious how well it would play with Affinity Photo. This is where Affinity Photo really surprised me as I found the Brush Tool to be not only smoother but with a higher level of pressure sensitivity!
Hit the Force Pressure button in the Brush Tool's toolbar to turn on pen pressure.
7. Layer Filters
Affinity Photo has a total of 11 filter types available, located under the Filter menu just like in Photoshop. While this is fewer than Photoshop's 18 total filter groups, Affinity Photo makes sure to give you the filters you really need.
Affinity Photo Filter Groups
Blur
Sharpen
Distort
Noise
Detect
Colors
Frequency Separation
Apply Image
Lighting
Shadow/Highlights
Haze Removal
8. Adjustment Layers
Affinity Photo offers an impressive array of adjustment layers—a few more than Photoshop offers, in fact. Affinity Photo has all the favorites such as Curves, Gradient Map, and Color Balance, and it also brings some new adjustments to the table, with my favorite being the Split Toning adjustment!
9. Exporting and Saving Images
9.1 Exporting Files
One of the personas mentioned before is the Exporting Persona, which is a whole interface dedicated to exporting your images. However, I prefer to just go to File > Export, just as you would in Photoshop.
9.2 Exporting to or From Photoshop
You can export an image to Photoshop from Affinity Photo by exporting the Affinity Photo file as a PSD.
All layers will be preserved, with the exception of adjustment layers. Adjustment layers will be exported, but I find they almost never convert well, even if Photoshop has a similar adjustment layer option.
It's the same with opening a Photoshop file in Affinity Photo, which you can do by dragging and dropping a PSD into Affinity Photo—everything but the adjustment layers will work completely normally.
Conclusion
Affinity Photo proves itself to be just as capable a piece of photo-editing software as Adobe Photoshop, in my opinion! And while Photoshop still beats it in some areas, there are things I believe Affinity Photo actually does better.
Affinity Photo
Pros:
Single payment of $50 USD makes it more affordable.
Very user-friendly controls and interface.
Highly customizable user interface.
Similar to Photoshop in enough ways to make for a smooth transition.
Almost all Photoshop resources are compatible, including .PSD files.
Cons:
All around slower processing speed.
Lacking Blend If function.
I have a hard time getting layers to clip into each other.
Lackluster Refine Edge function.
Photoshop
Pros:
Still the most powerful photo-editing software on the market.
It's been around for 20 years, so many of us are familiar with it and know it well.
More educational resources are available.
Cons:
$10 USD monthly subscription fee.
Unintuitive user interface.
Less interface customization.
Ultimately, I recommend Affinity Photo to beginner and upper intermediate Photoshop users who may be looking to save money but don't want to sacrifice power or who are simply frustrated or overwhelmed with Photoshop's unintuitive user interface.
I would also recommend Affinity Photo to anyone new to photo editing who has yet to dig their teeth into any single photo-editing software.
I'm personally excited to get to know Affinity Photo even more and continue to discover all it has to offer! You can join me by checking out some of our other Affinity Photo tutorials!
Post-Production
Learn Affinity Photo With Our Coffee Break Courses
Andrew Blackman
Post-Processing
New Course: RAW Photo Processing With Affinity Photo
Andrew Blackman
Weekly What's Up
How to Make the Switch to Affinity Photo, With Kezz Bracey
Shruti Shekar
Affinity Designer
Transitioning From Adobe Illustrator to Affinity Designer
Andrei Stefan
from Envato Tuts+ Design & Illustration http://bit.ly/2IftgQQ via http://www.webmasterforum.ws/rankwyz-discount-code-2015-coupons/
0 notes
Text
The men with the right tools!
Plumbing has been a part of our daily lives ever since we can remember, and so have been the plumber. The houses we live in are built over an extensive network of pipes and tubes laid underground to supply us with necessities like running water, both cold and hot. It also ensures that all of our trained water or sewage is removed without us having to do anything except the push of a button. However, their work goes far beyond just your regular house in the community.
Residential and commercial buildings, housing either apartments or offices, also fall under the same plumbing engineers where they lay out their plan, execute and install the necessary network of pipes needed to tackle a much higher use of water and drainage.
Installing these sometimes can be tricky, as in the case of the world’s tallest building, the Burj Khalifa. For any plumber, it was a huge challenge that lay ahead as most of the work had started prior to the construction of the building itself. The groundwork was covered up as after the completion of the building, they knew they would not be able to access the underground anymore.
Furthermore, installing the gigantic network of pipes throughout the apartments, restaurants and commercial suites were no simple task either as the building itself stands at a jaw-dropping height. Matching that was one of the all-time greatest challenges for any engineer, including the plumbing engineers. Eventually, the job was done and done rather well.
youtube
The numbers of plumberare on a significant rise as more and more buildings, industries and houses are being built. Besides, their services extend further than the coastline as well as transporting liquified gases and petroleum over great distances also requires their skills to come into play. Their significance in society is something that can never be denied or disputed.
0 notes
Text
by Tom J Law
You need to capture attention.
This is extremely difficult to do. Especially in the age of social media when attention spans are shrinking to just eight seconds.
Still, photos are an effective way to catch someone’s eye – you know what they say, “A picture is worth a thousand words.” That’s why 32 percent of marketers say visual images are the most important form of content for their business.
But your photos better be good – competition is fierce.
So how can you make sure your images look amazing, catch people’s attention, and lead them to discover your brand?
Use the best photo editing apps available.
And which ones are the best? We’ve got you covered.
The Best Free Photo Editing Apps for iPhones and Android
1. Snapseed
Available on iOS and Android | Free
Best for: Advanced photo editing on a mobile device.
Google’s Snapseed packs a punch, rivaling desktop photo editors with its huge range of features and intuitive interface.
Just like you’d expect, this free photo editing app comes with a range of pre-set filters. However, unlike most apps, you can edit these filters, and even create your own from scratch.
It also has all of the classic tools, such as cropping, straightening, frames, text, vignettes, etc. And the sharpening feature does the job without making the image look grainy.
Then, things get interesting.
Snapseed has precision masking, which allows you to edit the depth of field, Snapseed has precision masking, which allows you to edit the depth of field – photographers often do this to make the background blurry and the foreground in focus.
There’s also a “Selective Adjust” tool. This lets you select a specific area of your photo and adjust the saturation, contrast, and brightness of that single point.
What’s more, the photo editor app saves your edit history so you can amend your previous edits at any point.
2. VSCO
Available on iOS and Android | Free
Best for: Classic-look filters.
Like Instagram, VSCO combines a camera, editing tools, and an online community.
But it’s all about the filters.
This free photo editing app provides a set of stunning filters that make your photos look like they were taken on an analog film camera. These soft and subtle filters add a touch of class to your photos compared to many heavily-filtered Instagram presets.
The apps filters are also adjustable via a simple slider.
Of course, you also get all the standard editing tools, like adjustments, cropping, borders, and vignettes. You can also use VSCO to adjust the exposure, contrast, temperature, or skin tones.
Once you’re done editing your photo, you can share it with VSCO’s community or to another social network – like Instagram!
3. Prisma Photo Editor
Available on iOS and Android | Free
Best for: Turning your photos into artistic “paintings” and “drawings.”
Okay, sure – most filters that turn photos into “drawings” or “paintings” are downright awful.
Prisma is the exception.
This free photo editing app uses artificial neural networks (whatever that means) which “enable users to make photos appear like they were painted by Picasso, Munch or even Salvador Dali himself.”
Give it a go – you might be surprised by how much you like it.
You can pay to access additional filters, but there’s a generous set provided free of charge.
Prisma also has its own online community similar to Instagram’s. So once you’re done editing, you can share your image to your Prisma feed, save it directly to your device, share it on any social media app, or send it via email or messaging.
4. Adobe Photoshop Express
Available on iOS and Android | Free
Best for All-round photo editing.
Adobe Photoshop Express takes many of Photoshop’s best photo editing tools and squeezes them into a mobile app.
And despite providing plenty of advanced features, this free photo editing app is easy to use on a small touchscreen.
Just upload a photo from your device, take a new one with the camera, or use an image from your Adobe Creative Cloud account and then get to work editing.
It has all the tools you’d expect – cropping, red-eye correction, brightness, contrast, saturation, filters, borders, etc.
However, the best part is its selection of smart filters.
These filters automatically correct common issues, such as the color temperature and exposure problems.
Before you can use Adobe Photoshop Express, you’ll need to sign up for a free Adobe ID account.
When you’ve finished editing your photo, save it directly to your device or share it to other marketing and social media apps.
5. Foodie
Available on iOS and Android | Free
Best for: Taking your food photos to the next level.
Everyone is guilty of taking pictures of their food at some point in their life. Foodie embraces this impulse and helps you take your food photos to the next level.
The editor is somewhat similar to Instagram’s – except that all of the 30 filters and editing features are set up with food in mind.
Plus, it helps you line up the perfect bird’s eye top view shot, and makes the colors pop.
Bottom line: If you take pictures of food, you need this free photo editing app.
6. Adobe Photoshop Lightroom CC
Available on iOS and Android | Free
Best for: Professionals and those wanting to make quick pro adjustments.
If you’d like to up your game even further, check out Adobe Lightroom CC.
This app version of the popular desktop software provides access to professional editing tools on the go. Plus, it even works with RAW files – a high-quality image format popular among photographers.
One of the great things about this free photo editing app is that it’s not trying to do everything for everyone.
Instead, it focuses on providing a set of high-quality adjustment tools presented as simple sliders. These allow you to adjust the light, detail, color, distortion, and grain of your photo.
Should you decide to subscribe to Adobe Creative Cloud, you’ll also get access to additional features. These include selective editing and Adobe Sensei – an AI system that auto-tags your images based on their content, allowing you to quickly find the ideal image.
7. Photo Collage
Available on iOS and Android | Free
Best for: Creating the ultimate photo collages.
Many free photo editing apps allow you to create simple collages (like Photoshop Express). However, Photo Collage kicks it up a notch.
This photo collage maker has thousands of layouts, so you can always find the ideal one for your needs.
There’s a wide range of styles and interesting backgrounds. Plus, you can add text and customize the fonts, colors, and sizes.
The app also provides basic photo editing tools so you don’t need to switch between apps to create the perfect collage.
8. Adobe Photoshop Fix
Available on iOS and Android | Free
Best for: Editing portraits.
Adobe Photoshop Fix isn’t for adding filters or effects to your photos. Instead, it’s designed for fixing or removing unwanted aspects of your images.
You can use this intuitive and simple photo editing app to make professional-level edits to your portraits. To start, it covers all of the basics – you can adjust highlights, shadows, colors, and more.
However, it’s the Liquify section that’s truly impressive.
When you upload a portrait, the app will automatically register each of the subject’s facial features. Then you can adjust the size, shape, and position of them.
If you’re a Creative Cloud user, you can also share your edits directly to Photoshop on your desktop computer for further editing.
9. Visage
Available on iOS and Android | Free
Best for: Retouching selfies.
First things first: There’s nothing wrong with pimples, bags under the eyes, or teeth that aren’t perfectly white.
Still, whenever our vanity gets the better of us, Visage is ready and waiting.
This free photo editing app lets you quickly and easily retouch your portrait photos. Specifically, you can smooth skin, reduce skin shine, whiten teeth, apply eye makeup, and more.
The app also includes a set of interesting backgrounds and effects.
The downside is that the free version of the app shows a lot of ads and your finished photo edit will have a branded hashtag applied to the bottom. However, you can always upload to the pro version ($4.99 per month or $9.99 per year) to avoid these drawbacks.
10. Enlight Photofox
Available on iOS only | Free
Best for Artistic photo editing.
Enlight Photofox is the ultimate artistic free photo editing app – it even won the Apple Design Award in 2017.
One of its most popular features is the ability to blend photos together to create dramatic effects. You can also add graphic elements to your images.
It has many of the same features as Photoshop, such as layers. Although, the learning curve isn’t so steep.
That said, to get the most out of Enlight Photofox, you’ll probably need to watch a bunch of their tutorial videos.
The downside is that the free version only allows you to use two layers at once. So you’ll need to subscribe to the pro version ($2.74 per month or a one-time purchase of $64.99) if you want to let your creativity run wild.
11. Instagram
Available on iOS and Android | Free
Best for: Sharing your photos to build an online following.
It should go without saying: If you’re taking photos, Instagram is the place to share them.
The site is the third largest social network in the world after Facebook and YouTube, and as of June 2018, the app has over one billion users.
The platform has all of the basic photo editing tools you might need, including filters, effects, text, stickers, overlays, and more.
However, the app also provides other tools to help you grow your following.
For example, you can harness Instagram Insights to understand how your audience engages with your posts, or you can use Instagram Stories or Instagram Live to connect with your following in a more interactive way.
Whichever app you use to edit your photos, you’re going to want to upload them to Instagram.
The Best Paid Photo Editing Apps
12. Afterlight 2
Available on iOS and Android | $0.99
Best for All-round editing and artsy overlays.
Afterlight 2 dubs itself the “all-in-one feature-packed” photo editing app – which is a fair summary.
It has all the basic features you would expect, including tools to adjust the exposure, hue/saturation, contrast, and tone. And the options to add and customize text are vast.
Plus, there are more than 128 frames to choose from and tons of great filters which you can customize to suit your needs.
Best of all, there’s a set of textures including prism effects, real film light leaks, and dusty film overlays. These allow you to create unique images that stand out and capture people’s attention.
The app also works with RAW files on iOS or Android.
All in all, Afterlight 2 is well worth the $0.99 price tag – especially as there’s no hidden costs or recurring subscription fee.
13. SKRWT
Available on iOS and Android | $0.99
Best for: Adjusting the perspective of your photos.
Ever taken an amazing photo that just wasn’t quite lined up right? Perhaps the perspective was slightly tilted or askew?
SKRWT fixes these issues
This photo editing app lets you adjust the perspective of your images so that everything lines up perfectly.
It has automated cropping and perspective correction. Or if you’d prefer, you can use the “4 Points Correction” to edit the perspective of your image manually.
You can also use the app to correct lens distortion – a common problem with smartphone cameras. No wonder SKRWT says it’s the “missing link in high-end smartphone photography.”
14. Facetune
Available on iOS and Android | $3.99
Best for: Professionally editing selfies.
Do you love taking selfies? Facetune is another portrait photo editing app designed to help you look your best.
It allows you to quickly make professional photo editing adjustments to your images. You can smooth skin, whiten teeth, remove blemishes, and even adjust the position of facial features with just a few swipes and taps.
You can also change the backgrounds of your selfies using their set of fun graphics.
Facetune is best used in moderation – if you get carried away, your selfie can quickly end up looking like a wax doll.
Thankfully, you can tap and hold the blue button at the bottom of the screen to switch between the original image and your edited version. This way, you can easily tell if you’ve gone too far.
15. TouchRetouch
Available on iOS and Android | $1.99
Best for: Removing unwanted objects from your photos.
Have you ever taken a photo that has an object in it you wish you could remove? Well, TouchRetouchis a photo editing app that lets you do just that.
You can use this photo editing app to remove things like telephone wires, posts, power lines, street signs, or trash cans.
You can also remove blemishes, pimples, or even pesky photobombers.
Plus, the app is extremely simple to use. In fact, you can remove most objects with just one tap. However, should you need help, there are tutorials within the app that teach you how to harness its full potential.
16. Pixelmator
Available on iOS only | $4.99
Best for: A huge range of photo editing features.
Pixelmator covers every base.
It blends the tools needed by both photographers and graphic designers into one mobile app.
This is a feature-packed, layer-based photo editing app. You can use it to enhance images, add graphics, text, or create advanced artistic compositions. And the app comes with preset templates, collages, and effects.
The best part? The interface is very simple to use.
The app also works seamlessly with Pixelmator’s desktop software (which costs $39.99,) so you can edit wherever and whenever is most convenient for you.
17. Mextures
Available on iOS only | $1.99
Best for Quick and professional layer editing.
Mextures is a layer-based photo editing app that makes advanced photo editing simple.
You can use the app to stack different edits and adjustments on top of each other and edit them individually.
Plus, the app comes with plenty of beautiful filters for quick editing. And you can save your editing formulas to apply to other photos in the future.
It’s also fantastic for applying dust, film grain, textures, gradients, or light leaks.
Summary
There are so many amazing photo editing apps out there that at times, it can become overwhelming.
For best results, stick to just one or two – it’s better to become highly skilled on one app than to have mediocre skills on many.
Here’s our round up of the best photo editing apps available in 2019:
Snapseed: Best for advanced photo editing on a mobile device.
VSCO: Best for classic-look filters.
Adobe Photoshop Express: Best for all-round photo editing.
Adobe Photoshop Lightroom CC: Best for professionals and those wanting to make quick pro adjustments.
Prisma Photo Editor: Best for turning your photos into artistic “paintings” and “drawings.”
Foodie: Best for taking your food photos to the next level.
Photo Collage: Best for creating the ultimate photo collages.
Adobe Photoshop Fix: Best for editing portraits.
Visage: Best for retouching selfies.
Enlight Photofox: Best for artistic photo editing.
Instagram: Best for sharing your photos to build an online following.
Afterlight 2: Best for all-round editing and artsy overlays.
SKRWT: Best for adjusting the perspective of your photos.
Facetune: Best for professionally editing selfies.
TouchRetouch: Best for removing unwanted objects from your photos.
Pixelmator: Best for a huge range of photo editing features.
Mextures: Best for quick and professional layer editing.
Did we miss any awesome photo editing apps? Which photo editing apps do you use? Let us know in the comments below!
Go to our website: www.ncmalliance.com
The 17 Best Photo Editing Apps for iPhone and Android in 2019 by Tom J Law You need to capture attention. This is extremely difficult to do. Especially in the age of social media when
0 notes
Text
The Complicated Ethics of Photoshop in 2018
http://fashion-trendin.com/the-complicated-ethics-of-photoshop-in-2018/
The Complicated Ethics of Photoshop in 2018
Not long ago, I sat at a dinner table surrounded by influencers of note and observed as they edited a group photo in the FaceTune app. With practiced fingers, they quickly erased the wrinkles in a dress, smoothed out a few tummies and erased a blemish. If you held the original photo and the edited photo next to each other, you might not even be able to spot the differences, not unless you were searching for them. The tweaks were subtle — artful even. Everything just looked slightly more perfect.
A photo editing application that makes photoshop-style retouching easy for non-professionals, FaceTune has been downloaded more than 50 million times since it first launched in 2013. Similarly to how Instagram put photography in the hands of the masses, FaceTune has effectively done so for retouching. Anyone from Kim Kardashian to the barista who makes your coffee can download the app for free (though it costs an additional $5.99 per month for access to all the features). I downloaded it myself as research for this story and tested it out on a recent selfie. Using a sliding tool, I plumped my lips, slimmed my jawline, blurred my pores and narrowed my nose in mere seconds. To say that FaceTune is user-friendly is an understatement. It’s easier than ordering dinner on Seamless.
In a world where the ability to alter your appearance is both accessible and effortless, I’ve started to wonder how the “ethics” of Photoshop are evolving. On principle, I support every individual’s right to do whatever they want to their own bodies cosmetically, but using Photoshop for the purpose of digitally squeezing oneself into the narrow confines of a societal beauty ideal feels like a uniquely slippery slope.
Curious to learn more about the professional side of Photoshop use, I reached out to photographer Aaron Richter. “I use Photoshop on pretty much every image, with very few exceptions,” he told me. “It’s a step in my process, so I’ll have images looking fairly close to how I want them to look, and Photoshop helps me massage them into the exact right colors and balance I’m looking for. I try not to over-retouch my work, but my aesthetic is fairly clean. I’ll get rid of blemishes, but skin should look like skin. Bodies should look like bodies. I use Photoshop a lot to clean up environments, sometimes tidy up some clothes that might be sitting odd.”
Notably, The New York Times has a strict no-photoshop policy. “You can’t alter them in any way,” Aaron told me. “If I’m shooting a celebrity, they’ll often say something like, ‘Oh well you can just fix that in Photoshop.’ But for The Times, I can’t, so I need to pay closer attention to every little bit of the photo. […] For example, like say you’re shooting a woman and she’s wearing a pair of pants that poof unflatteringly at the crotch. For most clients you’ll just shoot through it because it’s easier just to liquify the offending area in post rather than breakup the flow of the photoshoot to wrangle the pant-poof. For The Times, you actually have to fix it or you’re stuck with it.”
When I asked if he’s noticed the ethics of retouching change over the course of his career, he said, “Every now and then I’ll get a request for a Frankenstein where you take one part of the body from one image and combine it with another image, but honestly that request is happening less and less lately. Where before it was kind of expected that we’d be able to do something like that in post, now I think clients recognize the stigma behind creating this kind of fake image, even if all you’re doing is something like changing a raised armed to a lowered arm.”
Ironic though it may seem, it makes sense that outlets are becoming more conservative with Photoshop as the general public becomes savvier with it. Beyond the internet outrage machine’s fascination with retouching scandals (remember when Jezebel controversially offered $10,000 for the unretouched photos of Lena Dunham in Vogue?), people are also simply getting better at detecting traces of Photoshop the more they engage with this kind of technology themselves. But there’s a big difference between, say, color correcting a photo and “Frankenstein” body part swaps — both in terms of a layperson’s ability to detect the changes that have taken place and in terms of how “acceptable” we might deem the changes to be.
“Almost every image you view has had some post-production work done on it, be it just color and grain, or removing tape from the floor and scuffs, dust, fingerprints or clothing clips, or much more,” professional retoucher Kate Coats told me. “There’s a whole world of retouching that happens aside from any alterations to the model. I see retouching as part of the process of taking a photograph, just as with lighting and hair and makeup. They all go together to make the final image.”
Those eyelashes in that mascara ad may have been drawn in, the hair in that shampoo commercial is probably a compilation of five different shots and that reality star’s body probably doesn’t look that perfect in actual reality.
She told me she will happily remove so-called “imperfections” that wouldn’t necessarily be there if a photo had been taken another day — like a visible pimple — but acknowledges that even with personal ground rules it’s easy to go overboard. “Customers generally prefer perfection,” she said. “This drives clients to push for flaws to be removed and so on and so forth. It’s a nasty cycle. We need to rewire our [thinking].”
The solution, from her standpoint, is more transparency: “Our tweens and teens need to be informed that the images they are viewing are edited, that they are not always attainable goals,” she said. “Those eyelashes in that mascara ad may have been drawn in, the hair in that shampoo commercial is probably a compilation of five different shots and that reality star’s body probably doesn’t look that perfect in actual reality.”
I spoke with jewelry designer Pamela Love about the topic, and she echoed Kate’s concerns about how easy it is to take things too far when something as nebulous as perfection is the goal. “I went through a period where I started posting fewer impromptu photos on my Instagram,” she told me. “Instead of just snapping a fun photo and putting it up, I would retouch it and play with the light and the sharpness. That version of perfection had started to look ‘normal’ to me because there are so many Instagram accounts out there that are essentially Pinterest boards — they all just look so perfect and you’re like, is that how mine’s supposed to be?”
Their comments underscored my initial suspicion that the ethics of Photoshop are growing increasingly murky as its usage grows increasingly ubiquitous. The more achievable on-screen “perfection” becomes, the more normal it will start to look, which in turn means anything less than perfection will start to appear abnormal. (A precedent for the normalization of beauty standards is observable in the politics of wearing makeup: People are so used to women wearing makeup that when they choose to forgo it, women often report people asking if they’re tired, or even sick.) This reality felt particularly acute most recently when I saw photos from Outdoor Voices’ Exercise Dress campaign and didn’t realize the model Lil Miquela was actually a CGI robot — literally computer-generated to fulfill a preconceived ideal of aesthetic flawlessness — until someone pointed it out to me.
The murkiness of Photoshop ethics may be daunting, but it isn’t unfamiliar. Technology is the 21st century’s Wild West — an unmapped frontier we can only discover and regulate as we go along. When it comes to Photoshop, though, I think it’s important we tread cautiously and think carefully about its long-term impact on how we see the world. Just because “perfection” is now attainable doesn’t mean it is preferable; more often than not, the wrinkles are the best part.
Feature image by Horst P. Horst/Conde Nast via Getty Images.
0 notes
Text
Actualmente estás en el sitio de Elige otro país región para ver contenido específico según tu ubicación. They enjoyed the remarkable minute at New Age Field prior to the Buffalo Costs played the New York Jets. Nowy Targ has actually had a really rough newer background also, throughout the dividing, Nowy Targ came from the Austrian government. Podhale is the level location in between the Tatra Mountains as well as the Gorce mountains, and its primary community is Nowy Targ, an old settlement that currently functions as an active industrial centre with couple of old homes to have actually survived the disturbance of background. A car, described as a grey or silver Chevrolet Impala with front end damages, appeared around 7 a.m. at the Bates Collision construction website in the 5100 block of Buffalo Road, detectives stated. From the top of capital, the Podhale landscape fans out to the north with its gentle rises and falls, whilst behind, the Tatra mountains control the perspective, Poland's all-natural boundary to the south. Star Taylor Trensch will certainly step into the title duty after Ben Platt's departure. The new mobile labs enable pupils and teachers attach to the net as well as accessibility their coursework from anywhere on campus. Youngsters under 2 have to either being in laps or in seats. San Antonio Spurs Assistant Train Becky Hammon was in community Wednesday night to talk to trainees at Penn State Behrend. Nowy Targ 1 - 3 Day Weather report Recap: Modest rainfall (complete 10mm), heaviest on Sun early morning. . Cassini examined Saturn as well as its several moons for 13 productive and also exceptional years before finally plunging into the ringed world deliberately on Sept You can even pick your favourite locations to obtain personalised bargains. TatrySki Podhale Nowy Targ is minors associate of: Podhale Nowy Targ. Jeśli zastanawiasz się czy dasz radę, odpowiedź brzmi TAK! The nearby flight terminal is Krakow - Balice Airport terminal, 54 miles from the residential property. Objectif: faire de l'usine sochalienne la plus performante d'Europe d'ici 2021. The Emmy victor's acclaimed program will certainly play a limited involvement this fall. On top of that, firms need to provide an appropriate alternative ways of applying and also ought to give any type of extra information concerning the chance that would be useful to a potential applicant who is not able to go to the on-campus event. Hmm, un problème est survenu lors de l'accès au serveur. Despite tales on the contrary from resources not attached to the actual information, if a user opts out of location monitoring on AccuWeather, no GPS collaborates are collected or passed without further opt-in permission from the user. He uncovered if a dog has coccidia break out, they will not use an inoculation properly. Your puppies will certainly be SMALL, loose stamina because of anemia as well as obtain pneumonia. Their residence is wonderfully situated as well as really clean. The substantial majority of the demands Apple gets from police originated from an agency working with behalf of a customer who has actually asked for support finding a taken gadget. Celox A, a syringe-like applicator full of granulated Celox gauze, has actually been utilized by army, injury teams, and law enforcement for taking care of smaller sized surface injuries (it's currently about $20 on Amazon ). Wi-fi is available in public locations and is at no cost. It is carefully located to the surrounding national parks. You'll get quick one-click sign in and be able to quickly share your flights with your friends. ISchool launches new Alternative III masters program in identity monitoring and also protection in collaboration with the Center For Identification. After a trial period, Flytrex and also AHA hope to start delivering packages along multiple paths and directly to customers' backyards in Iceland, and soon the rest of the world (much like the plot of Transformers: Age of Termination). A very nice and also quite apartment in an excellent ubication for visiting the diferent natural parcs in the area. This vulnerability located by Armis was revealed to Apple. For positions that have positive education and learning demands, firms may impose educational needs as they would certainly connect to the OPM certifications basic for the target setting if stated as qualification needs, rather than minimal certification demands. Livrée sans jeu, elle est malheureusement inutilisable. Gronków is a silent town, with superb areas for strolling, biking and cross-country skiing. Hosts saw to it we've had very pleasant Xmas break. This covers a significant portion of all linked tools internationally. The service is a trial run for Flytrex, which intends to make use of drones to earn it possible for mom-and-pop shops to take on Amazon.com when it involves one-hour shipment in a manner that does not include sending out jr careening with the roads in his Toyota Camry. The latest job from The Curious Case of the Pet in the Night-Time playwright debuts at Atlantic Cinema Company. The new system, outlined in 2 memos co-authored by Kelly and Doorperson and dispersed to Cabinet participants and also White Residence staffers in recent days, is developed to make certain that the president will not see any type of outside policy papers, interior policy memoranda, company records as well as news articles that have not been vetted. I like and also advise Slovakia as well as Spiš Slovak city, which once belonged to Polish. Under Section 501( c)( 3) of the United States Internal Income Code. Verification of safety and security demands is one essential job throughout the growth of safety crucial systems. To this end, the Markuts, Zwolaks, Kisluks, Fundalinskis and various other family members affiliated in the very early 1960s and also on July 13, 1967 incorporated the Podhale, Parents and Youth Association Inc CrossFit Percepcja - jest to pierwszy licencjonowany i jedyny CrossFit na Podhalu. Trouvez un sujet qui vous passionne et entrez dans la discussion. No, individuals on Pathways Teaching fellowship consultations are qualified just for factor to consider for non-competitive conversion to placements in the competitive service, and only if all applicable program requirements are met. One Powerball jackpot-winning ticket has been sold in Massachusetts, officials claim, for the huge $758.7 million reward, the second-largest in U.S. history. For targets of identification theft, an extended scams alert will certainly secure your credit for seven years. Nowy Targ is located by the main road from Krakow to Zakopane. Gartner reports that there are 8 billions linked or IoT devices in the world today, a lot of which have Bluetooth. Ils estiment que la mesure va allonger les délais d'attente pour les individuals. A firm should take into consideration the candidates in the highest possible choice group first. Nowy Targ is also famous for the manufacturing of fur layers, which could be bought from any of the furriers, in shops or business at the fair. Steelers fan Naila Foister is one of lots of that are glad that the months without football are over. Articles are optimized for both apple iphone and iPad, so you'll have a fantastic reading experience despite which tool you're making use of. It dedicates optimal screen room to the web content itself, with a minimal toolbar that provides you full control with just a couple of taps. Claim your free company page to have your adjustments published promptly. The outcomes of numerical modelling of heat extraction from the Podhale reservoir exist in the post as a preliminary action to the comprehensive analysis of consolidated warmth as well as power manufacturing with a binary power cycle. The case versus an Erie guy accuseded of fatally shooting one more male within a west side bar, is now moving on. This susceptability is identical to the one located in the Android os, and also affects both systems considering that they shared the same principals in executing several of the Bluetooth method. Among the School of Information's. very own grads has actually returned as the supervisor of occupation development. Texas iSchool granted $635k give to boost credit score for study software program. Agencies should bear in mind 5 U.S.C. 3320 as well as 5 CFR 332.406 in considering reasons for overlooking a choice eligible, as well as ought to talk to their counsel worrying whether an offered factor is likely to satisfy the requirement of making options similarly and under the exact same problems required for the affordable solution" basic set out in section 3320. Dimes for Clients: Loan elevated by kids for children affected by leukemia and also lymphoma. This is the advantage of being an independently held business: You have the choice of launching numbers you desire, when and also if you want. Live Streaming is readily available to customers with credit history on their account. One of the specifying aspects of Twitter has always been the degree to which its very own individuals have actually shaped the solution. Strolling through the Carpathian foothills is an extremely pleasurable means to appreciate a sundown, a time when the villagers are bringing in their animals, and when the shapes of the hills liquify into a dreamy haze. It will recommend 5 million fewer opioid pills every year if Intermountain Medical care reaches its objective. Reduced clouds and also fog are tough to differentiate from ground temperatures and might therefore be imprecise. On Tuesday, Dr. John Leddy, an internationally-known trauma understanding audio speaker, spoke with faculty at Gannon College to increase understanding on the best ways to treat a student that has actually suffered a blast. Marquis WILL CERTAINLY NOT KILL COCCIDIA, just PREVENT it from surge development due to TENSION. Participants marched around the facility to recognize individuals shed by suicide. An agency might assign a Trainee NTE to a different placement, yet first the agency needs to supply minimum public notice (inner to the agency - out USAJOBS) to similarly situated company Interns who may also be interested in the Intern placement. The name Podhale essentially converts as „ below the mountain glen" in English. It occurred on U.S. Path 322 near Sugar Creek Drive in Sugarcreek Borough around 5:15 a.m. Villa Podhale uses lodging in the mountains all year long. In the video clip, Hamilton star, Moana recording artist, and Parks 101 ambassador Jordan Fisher leads you on a 360 tour of Channel Islands National Park The park rests a few miles off the shore of Santa Barbara, California, and its 5 ecologically rich islands are only accessible using boat or aircraft. In previous periods the interplay in the Second Division without the right to be promoted in Extraliga. By penetrating the device, the assaulter could figure out which os his sufferer is utilizing, and change his make use of as necessary. With great deals of help from Cyclone Irma, Ana D'Estrada constructed a shoulder-high wall surface of sticks as well as twigs on the side of her house in Winter Park. When an unranked listing is used all qualified preference eligibles will certainly be listed in order of preference standing (which will consistent of prospects eligible for 10-point experts' choice followed by prospects eligible for 5-point experts' choice), adhered to by all various other professional candidates.
Po spacerze w góry można odpocząć w basenie do którego piechotą jest 10 minut. Piękne widoki na Tatry oraz Gorce, sielski klimat polskiej wsi, bliskość natury. Our research study work includes the indexing of historical essential documents as well as demographics publications, whose outcomes we upload to our searchable online data source. The initial reference of a Jewish citizen in Nowy Targ dates back to podhale 1646 and potentially refers to one of the lessee of the starost's land. Zajęcia mają na celu nauczyć najmłodszych poprawnych wzorców ruchowych, poprzez gry i zabawy. Ranked checklist - This method functions the like the 'rule of three' rating-and-ranking procedure utilized in the competitive service. Tap into a topic to go deeper on subjects you discover fascinating, and also you'll discover even more pointers based upon your surfing as well as analysis practices in the application. All Linux devices running BlueZ are affected by the information leakage vulnerability (CVE-2017-1000250). The German musician responsible, Christoph Schlingensief, is currently preparing to bring the play, Kaprow City, to the London Fart Fair - sorry, the London Frieze Art Fair - in October. The most typical requests we get for information from law enforcement remain in connection to tools and/or accounts. The XStat tools, which supposedly set you back about $100 and are only readily available by prescription, consist of small, expandable cellulose sponges developed to expand to 15 times their size when they come in contact with blood. Tthe vibrant between top-level athletes and the big-money sponsors they back is growing more difficult.
0 notes
Text
Transitioning From Adobe Photoshop to Affinity Photo
What You'll Be Creating
Affinity Photo isn't the first photo-editing program to claim it can stand toe to toe with Adobe's Photoshop for a fraction of the price, but it may be the first to actually back up that claim with pure, uncompromising photo-editing power!
And with a one-time fee of $50 USD, it can be much more financially appealing than Photoshop's $10 USD monthly subscription.
Today, I will be comparing and contrasting the basic functions of each program, focusing on the fundamental tools that you would use day to day.
So come take a look at Affinity Photo from the perspective of a long-time advanced Photoshop user!
1. User Interface and Modules
The first thing you may notice is that Photoshop's and Affinity Photo's interfaces are very similar. That's great for anyone looking to possibly make a switch from one to the other, like me!
1.1 Customizing Your Workspace
Just like in Photoshop, Affinity Photo allows you to arrange your different modules however you want, with one exception: you can't move your Tools module in Affinity Photo.
Affinity Photo makes up for it in a big way, however, by letting you customize and arrange the individual tools themselves! Something Photoshop has never allowed you to do, this is a big win for Affinity Photo in my book.
Go to View > Customize Tools to mix and match your own Tools panel. You can even choose how many columns you'd prefer!
This also means you can almost exactly replicate the Photoshop Tool setup in Affinity Photo. I personally have my Photoshop workspace set up in a very specific way, and after 10 years of using Photoshop I am very used to its tool setup, but I was able to mimic my workspace almost exactly in Affinity Photo! That makes the transition much smoother.
I'd like to note that I usually have the top Toolbar in Affinity Photo hidden, which you can do by going to and unchecking View > Show Toolbar. However, I turned it back on for the sake of this article.
Do note that you can also customize the toolbar, which is very handy!
1.2 Creating a New Document
Creating a new document is very similar and equally straightforward in both programs. Both programs open with a New Document prompt, but will also allow you to create a new document by going to File > New.
2. Navigation and Interactions
2.1 Transforming Images
One of my favorite features of Affinity Photo is how it keeps an image's original aspect ratio by default when enlarging or shrinking an image using the Move Tool.
When transforming an image in Photoshop, you would select the Move Tool, click on one of the image's anchor points, hold down Shift, and then drag to either enlarge or shrink the image.
If you don't hold down Shift then the original ratio of the image will not be preserved, leaving the image stretched or squished, which I find you usually don't want to happen.
In Affinity Photo, it's exactly the same, except you hold Shift when you don't want to preserve the image's original aspect ratio. It's a very small but very smart change!
2.2 Personas
Affinity Photo has these things called "personas". You can access them by going to File > Personas and then choosing a persona, or alternatively you can change the persona by clicking the different persona buttons in the top-left corner of the Toolbar.
Each persona serves a different function, almost like some of the more in-depth filters in Photoshop. While there are five personas in total, including the default Photo persona, I am going to be focusing on the Liquify persona as Photoshop also has a liquify function that I use very often.
In Photoshop, to access the Liquify feature, you would go to Filter > Liquify to open the Liquify panel, which opens in a new window.
In Affinity Photo, you go to File > Personas > Liquify, or click the second button in the top toolbar, which will enter Affinity Photo's liquify user interface. You have a lot of the same options and functions as you do in Photoshop.
All of Affinity Photo's personas activate a new user interface, almost like opening a different program altogether. This makes things a bit more organized and user-friendly; however, Affinity Photo is noticeably slower while in the Liquify persona.
In fact, I do want to note that Affinity Photo is all around slower than Photoshop.
3. Layers and Smart Objects
3.1 Layers
Affinity Photo's and Photoshop's Layers panels are almost identical. You have your Opacity and Layer Modes on top and the various layer effects, masks, and a Create New Layer button, or Add New Pixel Layer in Affinity Photo, in the bottom-right of the Layers panel.
You can hide layers in Affinity Photo by hitting the checkmark on the right, similar to hitting the eye icon to the left of layers in Photoshop, and you can arrange the layers by dragging and dropping, just like Photoshop.
You can clip a layer into another layer in Affinity Photo, but it's a bit trickier than Photoshop. You have to drag and drop a layer into another layer—there's no button or a key like holding Alt in Photoshop, and it can be very finicky.
You can collapse clipped images for a cleaner-looking Layers panel, though. This means creating fewer groups, which is a nice feature.
One more disadvantage is that when you double-click on layers in Affinity Photo, no Layer Style panel opens like in Photoshop, leading me to believe there is no Blend If function in Affinity Photo, which is something I use often.
3.2 Smart Objects
One thing Affinity Photo does a bit differently is that every new image brought into a document is automatically a Smart Object. While Photoshop does this if you drag and drop a new image into a document, in Affinity Photo all images are smart objects by default.
Just like in Photoshop, you can Right Click > Rasterize any smart object to rasterize the layer.
Do note that in Affinity Photo, smart object layers and regular rasterized layers look the same. When you rasterize a layer in Affinity Photo, it will crop any part of the image that is not inside the canvas, something Photoshop doesn't do.
3.3 Layer Masks
Affinity Photo's and Photoshop's layer mask features are virtually the same. You can add a layer mask to any layer by hitting the Add Layer Mask (called Mask Layer in Affinity Photo) button at the bottom of the Layers panel.
4. Sections and Layer Masks
4.1 Freehand Selections
Affinity Photo has an exact equivalent to Photoshop's Lasso Tool called the Free Hand Selection Tool, as well as the various "shape" marquee tools that go by the same names in both programs: Elliptical Marquee Tool, Rectangular Marquee Tool, etc.
4.2 Quick and Auto Selection Tools
From what I can tell, Affinity Photo does not have an exact replica of the Magnetic Lasso Tool. And while it doesn't technically have the Polygonal Lasso Tool, instead what you do is hold Shift while using the Free Hand Selection Tool to get the same polygonal effect.
4.3 Refine Edge
While both programs have a Refine Edge, and they are somewhat similar, this is where Affinity Photo differs from Photoshop and lacks a bit for me.
To use the refine edge feature in Photoshop, you'd make your selection and click Select and Mask to open up Photoshop's Refine Edge interface. The options are very straightforward and include Edge Detection with a Smart Radius option, which I find to be a key feature in extracting hair, fur, and cloth.
In Affinity Photo, the process is similar. You make your selection and click Refine in the selection tool's toolbar. The refine options are a bit less clear in what they do, and the tool seems to lack any kind of edge detection options. It does, however, have both the Smooth and Feather options, which are two of the main settings you would use.
5. The Pen Tool
I was very happy to learn that the Pen Tool in Affinity Photo is almost identical to the Pen Tool in Photoshop! It functions exactly the same, which also means you could use a Photoshop Pen Tool tutorial to learn how to use the tool in either program.
6. The Paintbrush Tool
6.1 Brush Settings
Affinity Photo offers all the same bells and whistles as Photoshop does when it comes to its brushes—including a well-sorted array of default brushes.
Affinity Photo has Opacity, Flow, and Hardness settings, as well as a very impressive Stabilizer option, leading me to believe that digital painters would get along very well in Affinity Photo.
6.2 Importing Custom Brushes
While it comes with a high variety of default brushes, Affinity Photo also lets you import brushes just like Photoshop. One of the main questions I'm sure a lot of people have is: "But can I import my current Photoshop brushes? Do I have to find all new brushes?"
I am happy to say yes, you can use Photoshop brushes in Affinity Photo! That's a big plus for someone considering transitioning.
6.3 Pen Pressure
I personally use a graphics tablet, and so do many of you out there, so I was curious how well it would play with Affinity Photo. This is where Affinity Photo really surprised me as I found the Brush Tool to be not only smoother but with a higher level of pressure sensitivity!
Hit the Force Pressure button in the Brush Tool's toolbar to turn on pen pressure.
7. Layer Filters
Affinity Photo has a total of 11 filter types available, located under the Filter menu just like in Photoshop. While this is fewer than Photoshop's 18 total filter groups, Affinity Photo makes sure to give you the filters you really need.
Affinity Photo Filter Groups
Blur
Sharpen
Distort
Noise
Detect
Colors
Frequency Separation
Apply Image
Lighting
Shadow/Highlights
Haze Removal
8. Adjustment Layers
Affinity Photo offers an impressive array of adjustment layers—a few more than Photoshop offers, in fact. Affinity Photo has all the favorites such as Curves, Gradient Map, and Color Balance, and it also brings some new adjustments to the table, with my favorite being the Split Toning adjustment!
9. Exporting and Saving Images
9.1 Exporting Files
One of the personas mentioned before is the Exporting Persona, which is a whole interface dedicated to exporting your images. However, I prefer to just go to File > Export, just as you would in Photoshop.
9.2 Exporting to or From Photoshop
You can export an image to Photoshop from Affinity Photo by exporting the Affinity Photo file as a PSD.
All layers will be preserved, with the exception of adjustment layers. Adjustment layers will be exported, but I find they almost never convert well, even if Photoshop has a similar adjustment layer option.
It's the same with opening a Photoshop file in Affinity Photo, which you can do by dragging and dropping a PSD into Affinity Photo—everything but the adjustment layers will work completely normally.
Conclusion
Affinity Photo proves itself to be just as capable a piece of photo-editing software as Adobe Photoshop, in my opinion! And while Photoshop still beats it in some areas, there are things I believe Affinity Photo actually does better.
Affinity Photo
Pros:
Single payment of $50 USD makes it more affordable.
Very user-friendly controls and interface.
Highly customizable user interface.
Similar to Photoshop in enough ways to make for a smooth transition.
Almost all Photoshop resources are compatible, including .PSD files.
Cons:
All around slower processing speed.
Lacking Blend If function.
I have a hard time getting layers to clip into each other.
Lackluster Refine Edge function.
Photoshop
Pros:
Still the most powerful photo-editing software on the market.
It's been around for 20 years, so many of us are familiar with it and know it well.
More educational resources are available.
Cons:
$10 USD monthly subscription fee.
Unintuitive user interface.
Less interface customization.
Ultimately, I recommend Affinity Photo to beginner and upper intermediate Photoshop users who may be looking to save money but don't want to sacrifice power or who are simply frustrated or overwhelmed with Photoshop's unintuitive user interface.
I would also recommend Affinity Photo to anyone new to photo editing who has yet to dig their teeth into any single photo-editing software.
I'm personally excited to get to know Affinity Photo even more and continue to discover all it has to offer! You can join me by checking out some of our other Affinity Photo tutorials!
Post-Production
Learn Affinity Photo With Our Coffee Break Courses
Andrew Blackman
Post-Processing
New Course: RAW Photo Processing With Affinity Photo
Andrew Blackman
Weekly What's Up
How to Make the Switch to Affinity Photo, With Kezz Bracey
Shruti Shekar
Affinity Designer
Transitioning From Adobe Illustrator to Affinity Designer
Andrei Stefan
from Envato Tuts+ Design & Illustration https://ift.tt/2Jffnz9 via http://www.webmasterforum.ws/rankwyz-discount-code-2015-coupons/
0 notes
Last Seen Blogs