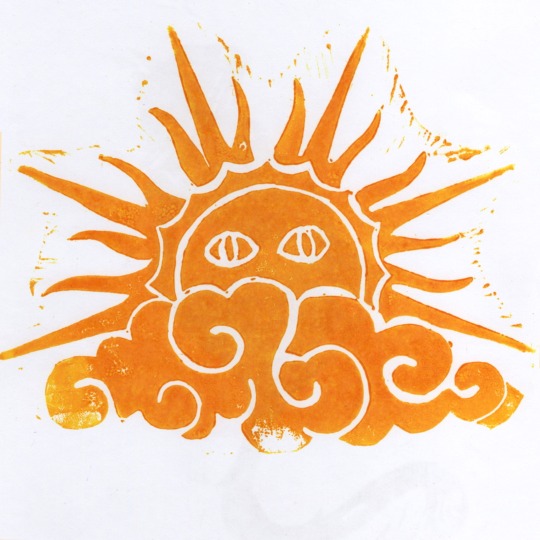
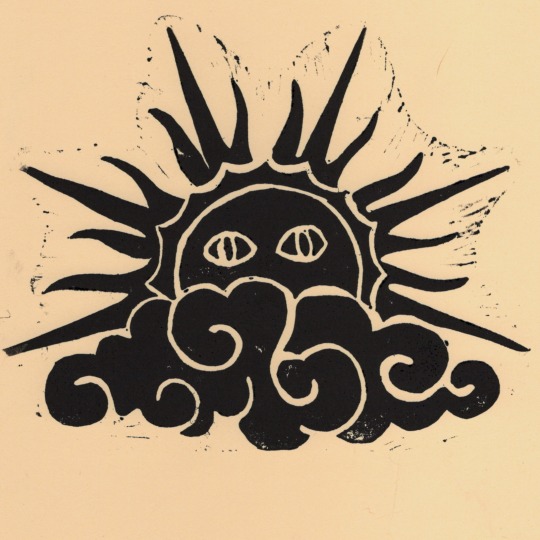
#first one was a tricky one since both my gouache and my printing paint are shit lmao
Text


an ban pet podgan
#joker out#linoprint#linocut#linoart#2023#creating linoprints is my love language#my fav medium but its so hard to manage for me#still i persist#first one was a tricky one since both my gouache and my printing paint are shit lmao#still in love with how it all came out
119 notes
·
View notes
Text
Custom Eli Vanto Funko Pop Tutorial
Since we all want one, and Disney has not released any official Eli Vanto Merchandise, here’s a little how-to on making your own bobble head Eli Vanto Funko figure!

It’s a bit of a long post, so I’ll add a cut here! If you are interested, read on! Also, I’ve never been able to track down how to make a non-bobble head funko bobble so I go into great detail on that process!
You will need:
-A Jim (Trollhunters) and Grand Moff Tarkin Funko Pop figure. However, if you want to cut your price in half, a young Han Solo and First Order Disguise Finn could be a cheaper alternative to create a Chiss Ascendancy Uniform Eli Vanto.
-Paint (I used Turner Acryl Gouache as it dries matte similar to my other Pop figures, but acrylic paints could work fine too, just will dry with a sheen) To make Eli’s skin tone I mixed burnt sienna with a very small amount of cobalt blue and some white.
-Super glue. Personally I had great luck with gorilla super glue gel
-An Exacto knife or similar sharp blade if you want to make your Eli’s head bobble like all other SW Pop! Figures. If you are using 2 bobble heads, you won’t need this, but Jim’s head is not a bobble head so we will need to cut and transplant some of Tarkin’s parts for that.
-A way to boil water and a container deep enough to submerge a figure in hot water.
Let’s get started! Here are the two boys I procured. Jim comes with a cute little gnome, feel free to test your paints on him, that’s what I did. He now has a brown hat! In total, they cost about $35, both are kind of special and priced higher than the normal $8 funko price point which is kind of lame but hey, the things we do for Eli! He’s worth it.

Step one: Disassembly
Tarkin and other bobble heads are very easy to disassemble. You will notice that at the top and bottom of the spring there is a little round tab. Hold the figure firmly and press on that tab and the spring will screw off. You can thus transfer heads very easily between bobble heads. If you have Han and Finn, congrats you are just about finished!
Taking apart standard figures like Jim is a little harder, and the easiest way to do it is to soften the vinyl with a little steam bath. Here is Jim enjoying his dip in a hot tub for 5 minutes. The hot water will not hurt your figure at all, once you paint your figure you cannot heat it again as the paint will crack and peel off.

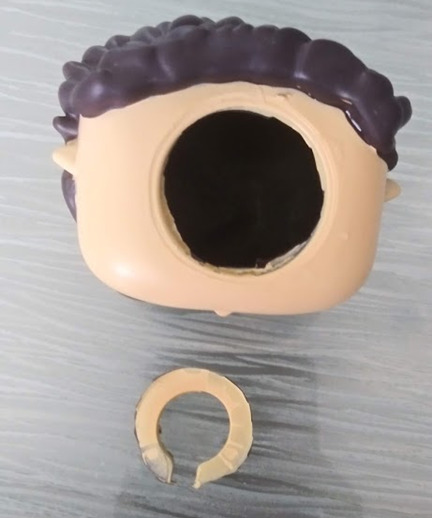
After soaking the head pops right off in two parts, the main head and then a ‘neck plug’ that might be a bit harder to wrestle out of there, take your time and soak him again if he gets hard on you, its worth it going slow to not tear the vinyl.
If you do not want Eli’s head to bobble you can very easily attach this to Tarkin’s neck and call it a day, don’t worry about removing the neck plug. But if you do want him to bobble (which IMO was very worth it) it is time to break that exacto knife out!
Step two: Slice and Dice
You will notice that Jim has a very small neck hole compared to Tarkin, so the spring will not go in. To fix this, soak him again in hot water to soften him and cut long the edge of the insert where the neck plug was attached. Make sure to not leave any potentially dangerous super sharp edges. Once cut out, Jim’s neck will look like this:
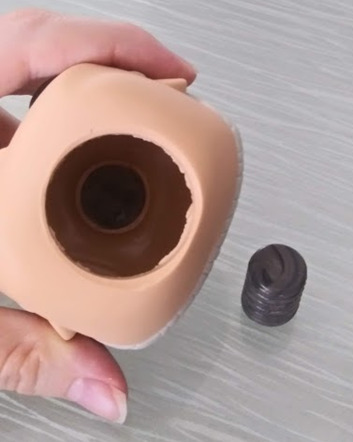
Now it’s Tarkin’s turn for a bath. Pop his head into the hot water for 5 minutes. You will notice that in his head is a grey cork looking nub that the spring was threaded onto. Unfortunately it is permanently attached to his head so we have to cut it out. I found this to be a 2-man operation, my partner using his thumbs to squish Tarkin’s head and shove the grey cork out (Don’t worry about deforming the head shape, put it in hot water and it’ll pop back to its natural shape). Using an exacto knife I carefully cut it out close to the base, it took about 3 cuts. Try and make it straight but it does not need to be a perfectly even cut as the already flat ‘bottom’ side is what we will use in the next steps.
Step three: Reassembly
Threading the grey cork piece back onto the spring ‘upside down’ with the flat side up, only thread it about twice and then re-thread the spring onto Tarkin’s body. Using Jim’s head, test it on the assembly until you are happy with how high his head is above the body. To adjust the height, adjust how threaded the neck and cork are. Pictured below is where I ended up finding my ideal height on the grey cork .

Once you are happy with the height, put a small drop of glue on the cork and press it into Jim’s head. This can be tricky to find the right spot as the inside of his head is not entirely smooth. Mine looks up a little bit due to this and the weight of his hair, but I think it just gives him character!
Step four: Painting and Customization
As I said, I used Turner Acryl Gouache paints. Ended up also painting Tarkin’s head into Thrawn just for fun as well! Remember to also paint the neck and hands of the figure (and remove the spring for painting the neck!). When painting Eli, I found it very useful to use small bits of blue painter’s tape to cover his eyes and eyebrows to keep paint off of it. Be patient and it will turn out well I promise! Watering down the paint a bit also helped keep the texture as smooth as it could be. Of course, we also had to customize Eli’s box as well by cutting all the Jim heads off and printing out new labels! You can see it in the first picture at the top of this post.
Here is the finished product!
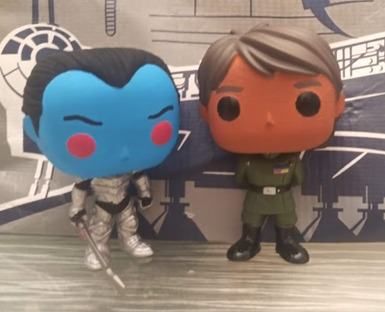
This was a super fun project and I hope this tutorial is helpful!
If such a project is daunting for you, I am opening some commission slots to make some for just the price of materials and shipping unpainted or with a small fee for painting him (in total that step took the longest). Please DM me for information on these commission slots, the price will depend on which figures you want to incorporate and the amount of customization required!
77 notes
·
View notes
Text
Taking This Fine Jewelry–Making Class Taught Me More Than How to Paint a Diamond Necklace

I’ve never had a steady hand. Whenever I hold a pen, a fork, or a delicate glass cup, I tend to shake a bit. It’s been this way ever since I can remember putting my first crayon to my first coloring book and pushing nervously on the paper. I have always been an anxious person. So, when I found out that the class I would be attending at L’École School of Jewelry Arts would involve creating our own detailed rendering, I was, in a word, shook. I thought I would be playing with emeralds or learning how to lacquer, maybe setting stones, too. Making a painting isn’t exactly the jewelry-crafting lesson I’d signed up for when I heard that the school, which is supported by Van Cleef & Arpels, would have a residency and exhibition on New York’s Upper East Side from October 25 through November 9. In hindsight, though, I learned much more than I anticipated, not only about how fine jewelry is first conceived, but also about the value in putting down my phone, softening my grip, and making something from scratch.
After walking into the school at 9:15 a.m. on Monday (slightly tardy due to early-morning work emails and being rushed, as always), I was ushered upstairs and handed a clean white jeweler’s coat to wear over my clothes. Entering the quiet, intimate classroom, I took my seat at the work table along with five others. They were all women, most of whom worked in the jewelry business with the exception of one aspiring designer. Our teachers, a visual artist and a designer for Van Cleef & Arpels, would be lecturing us about gouache, which is a type of watercolor paint used to create highly intricate renderings of high jewelry for the craftspeople of a jewelry house to work off. Outside of the initial process of choosing gemstones, the gouache is the very first step in the process of creating a one-of-a-kind piece of jewelry. It is a craft that has been done since these high jewelry houses were founded, some as long ago as the late 1800s, like Van Cleef & Arpels.
Gouache is still used today, only in the couture jewelry realm, and even as new technologies have been utilized in the workshops, these paintings remain true to their origins. The process begins with a sketch of the brass mock-up from the designer, after which the artist shades in the drawing with a pencil and later, paints a separate sketch, mimicking the lines and shading of the first, with the gouache so that the jewelry appears in an almost 3-D form. It may sound quite simple, but the technique requires training and years of practice to perfect. There is no school for gouache and as such, it’s a profession that often attracts those outside of the jewelry-making realm, like architects and illustrators.
We started our class by studying gouaches of necklaces, rings, and brooches, some that were from Van Cleef & Arpels and others from houses like Cartier and Boucheron. Currently, Van Cleef & Arpels has three in-house artists who specialize in gouache. The teachers asked us to identify the subtle differences in each image. Some were printed on light gray paper as opposed to black or white, both of which were used in the 1940s and ’50s but were later discovered to drown out the color of the stones, whereas the neutral gray lifted everything.
Next, we were prompted to explain where the light was coming from in each picture—the correct answer was the top left corner, which is always the case and is indicated by the small white line detailing on the stone. If there is too much white on the painting, the depth of light cannot be deciphered, and the actual piece won’t be finished with the correct amount of shine. In essence, the beauty of the final necklace, brooch, earring, ring, or bracelet is dependent on this artwork. Also, the table is the main facet of a stone and a jeweler in the workshop will know how to cut it based on the angles and clarity of the one featured in the gouache.
None of these images are altered digitally, save for the copying of gouaches that are now used for marketing purposes. This point the instructors made very clear: Absolutely no computers are used. It takes about a week or more for a gouache artist to sketch and paint a single piece depending on the size and detailing involved. One gouache we observed had an entire forest scene carved into the main diamond pendant, with similar motifs on a few other stones, and probably took close to a month to interpret. Our class was going to make a gouache in a little over an hour, and I, the cynic with the shaky hands, was perplexed as to how.
I took my seat again and we practiced, mixing the correct amount of water and paint (it’s tricky to find the perfect consistency) and with a thin brush, using it to trace minuscule black lines on a page. My straight line was a tad squiggly. I went on to the L-shape and still, not so smooth. I had a tough time at first and one of the instructors could tell. She leaned over my stiff shoulder, which was hunched down almost on top of the table, and whispered: “Remember to breathe.” I laughed, took a second to sigh some out air out of my lungs, and went on to the S-shape. That turned out much better, as did the square, and I realized that in this line of work, patience really is a virtue.
After the tracing, we were given a tiny brass bow, which was placed under our main light source. There was an outline of the bow on our gray paper and we were to shade it in using a pencil. Again, it was about studying exactly where the light was hitting from the top left corner, which dips and curls of that small twisty bow were visible to the light and which weren’t. Then, we went on to paint a smaller outline of the bow just next to the sketch. It required one layer of white watered-down gouache paint first, followed by a mixture of black and white for the shaded edges and later, a stark white for the surface lines. In between each step, the gouache artist must wait for the different layers to dry. We didn’t get into color, but applying the exact pigments of whatever stone or metal is to be used for the final piece would be the final task in the laborious process.
In the end, my bow didn’t look half-bad. A soft bell rang just outside the door and class was over. I was proud of myself for calming my nerves and actually taking three hours to finish something with my hands. Because who has time for that anymore? The art of craft, especially in fashion couture and high jewelry, is about making something pure out of nothing in a world where we depend so heavily on technology to guide us through our overstimulated and overworked lives. I may not ever become a gouache artist for a historic Parisian house, but learning about what goes into this underappreciated art form and how these painters are responsible for the initial concepts of some of the most exquisite pieces of jewelry in the world, I now understand why they do it.
I have never been crafty. I love art and design and fashion, but I’ve never taken up ceramics, knitting, or the like. Maybe it’s because I’m in tune with my shaky nerves, or maybe it’s because I too often refuse to slow down and turn everything else off. The L’École class gave me a chance to use my hands to create something unique, something that didn’t require an iPhone or algorithm or YouTube video. Craft is as prevalent a trend in fashion now as it ever was, and after painting that little bow shape, I realized its value.
If you are in search of necklaces for teen girl then please contact us and send your queries.
1 note
·
View note
Text
Bad at Sports Sunday Comics with Tara Booth
By Krystal DiFronzo
Tara Booth’s work is an assertive clash of color that depicts the most humbling and sticky situations. Some relatable moments include trying to pee while wearing a romper, cutting bangs into near oblivion, and stoned Amazon shopping (with the resulting surprise package hangover). My first introduction to Booth’s comics were through her Tumblr back in the golden age of cartoonists using that platform. Since then she’s had her work published by kuš! and Colorama. She regularly posts comics and in progress work on her Instagram @tarabooth.
Krystal DiFronzo: The first thing I noticed about your comics is the density of information, there’s so much color and pattern all piled on top of each other! Also you use gouache like a painter, not like a cartoonist coloring between lines. The ghost layers of paint create this constant atmospheric movement. The reader is made aware of the hand and medium, unlike traditional pen and ink comics. Do you have a background in painting prior to your comics? If so, why the transition to comics or are they all part of a single practice?
Tara Booth: I studied painting and graduated with a BFA at Tyler School of Art. I used to work on big 4×5 foot canvases that I built, stretched, gessoed, and sanded over and over. This time-consuming preparation, combined with the preciousness of the material gradually grated on me. I appreciate the importance of these processes and I’m happy to have access to this skill set, but it wasn’t something that I ever wanted to include in my everyday art practice (due to my extreme and often debilitating impulsivity). Producing work in art school wasn’t a problem for me, but I wasn’t a great student. It became increasingly difficult to connect to ideas being taught in my painting and art theory classes, which were focused more on abstraction and conceptualism than direct representation or narrative, which is where my interest had always been. The language and concepts we studied felt really inaccessible and detached from my experiences as a highly-dramatic, drunk 21-year-old. I started to focus more on folk art, Lowbrow, and self-taught artists. I began reading more comics, and decided I wanted to make paintings that were direct, accessible, and inexpensive to produce—so I transitioned to working on paper with gouache, with the ambition of eventually making my own comics.
KD: Your comics also have a lot of unusual formatting choices that affect how you read it. They don’t have any formal paneling or gutters, they flow across the page almost like an animation or a Muybridge study. You can read the comic either left to right or as a single-paged composition. They are also predominantly dialogue-less other than their titles. What made you come to these decisions? What’s your planning process like?
TB: The unusual formatting in my comics isn’t something that I had planned. For the longest time I felt really stunted by my background in traditional painting. I bought a bunch of comics, and attempted to mirror the techniques I saw, but working in panels always felt totally awkward. I had little experience with Photoshop, storytelling, principles of design… teaching myself how to make a comic felt like an uphill battle. Five years after graduation, I still hadn’t produced anything solid. I had kind of given up, and finally decided that making a shitty comic was better than not making anything at all—that I should worry less about what I think a comic is supposed to look like, and more on painting within the realm of my own abilities. Once I threw all of my preconceived notions out the window and forced myself to get to work, I actually started to get recognition for what I was doing rather quickly. Embracing some of my naivety and focusing on the painterly qualities in my work has compensated for whatever technical obstacles stood in my way. I still struggle with using text in my work. Until I’m more comfortable with my writing, I’m relying symbols, visual cues, facial expressions, and body language to tell my stories.
I like that you mention Muybridge studies, I look at them all the time. They’re one of my main influences. I love them!
KD: It’s a common trope of comics or animation that characters wear the same outfit. Like opening up a closet to rows of one identical dress. Your stand-in wears such incredible outfits in every comic, they almost become characters themselves. Do you have an interest in design? (Please make Fantomah leggings a reality.)
TB: Ha! I would love to work in textile design. In a failed attempt to simplify my life, I’ve ended up with a pretty boring wardrobe. I like to use my little avatar as a paper doll, dressing her up in outfits that I wish I owned myself. (Does anyone want to offer me a job?) I also use the clothing as a way to explore difference ways of drawing. To find different ways to use line, play around with abstraction and incorporate more surreal subject matter. I spend so much time working on this one body of work, I haven’t been prioritizing stylistic experimentation. It’s nice to have tiny t-shirt shaped opportunities to paint in ways that might feel separate from my comics practice.
KD: I’m emailing you while you’re at Printed Matter’s LA Book Fair, what was the show like for you? Could you talk about your new book with Colorama?
TB: The Art Book Fair was great! Like plenty of other artists I have a lot of anxiety in social situations, so it was stressful for me, but wow—so much of that melted away as the fair went on. It felt amazing to be surrounded by so many talented people, beautiful books, and all of the supporters who make this stuff possible. I was able to spy on a lot of my instragam art crushes. I loved watching how excited people were to buy my work. I got to see them laugh as they flipped through my prints, and I had some fun conversations. A few people even brought me gifts! But the most important and exciting part of the Art Book Fair was finally meeting my publisher, Johanna! She runs Colorama, a publishing house in Berlin. We’ve been communicating through email for months now, and it felt like the best blind date ever. The book she published for me, “D.U.I.I”. is the riso printed story of one of the most awful experiences I’ve had. It was also one of the most beneficial things that has ever happened to me. I got a DUII in February 2016. I’m an alcoholic, and this was the culmination of years of increasingly toxic behavior. Court ordered sobriety seems to be the motivation that I needed to change. I’m incredibly thankful that I didn’t hurt anyone. It’s a humiliating story to tell, but I felt a compulsion to draw it all out. I feel so lucky that Colorama decided to work on this project with me. It’s very different from my more popular, colorful work. I’m still dealing with the stressful and expensive results of that experience. Making the book was a huge part of the process of working through it. I tried to lighten it up a bit and make it silly—but yeah, its all true.
KD: Your work is true to life but veers into the surreal. It feels like it’s in the same vein as work by Julie Doucet, Gabrielle Bell, or Dori Seda. Artists who told confessional stories of humiliation and embarrassment but added fantastical elements for comedic or therapeutic effect. What about writing semi-autobiographical work interests you? Do you see yourself leaning more towards fiction or towards memoir?
TB: I’ve always been drawn to autobiographies, in comics and in literature. I really admire a lot of the artists you mention, and confessional work like theirs is part of what inspired me to make comics to begin with. For years I’ve kept a diary filled with drawings, but its tricky. Really putting yourself out there is scary. The paintings that I post publicly, while totally based on my daily life, are drastically different in tone and content than what you might find in my journals. My comics are embarrassing, funny, absurd, relatable… they can be sad, but I think it’s easy to see how I use humor and fantasy as a way of dodging some of the more raw and dangerous territory that can make autobiography so potent. I’m glad that my drawings make people laugh, I don’t want to take myself too seriously and I’ll always make silly drawings… I guess I just hope that as I continue to make comics, I’ll find a way to add more depth to my practice, whether it’s by working on developing more complex fictional stories, or by being brave enough to express some of the heavier, and maybe less palatable aspects of my life.
KD: Outside of comics, what artists or media makers are inspiring you right now?
TB: Well, first I’d like to say how incredibly inspired I am by artists like Marie Jacotey and Aidan Koch, whose work transcends the world of comics. I want the space between the comics world and the art world to keep getting smaller and smaller. These two stand out in my mind as artists that are helping to bridge that gap. I’d love to be a part of that transition. I’m always discovering new painters. Some of my favorites are Misaki Kawai, Austin Lee, Mogu Takahashi, Katherine Bernhardt (I’m inspired both by her paintings, and by the gorgeous Morrocan rugs that she sells) and Danny Fox. These people remind me of how powerful one large stand alone image can be. I follow the work of so many illustrators, but my favorites are probably Aart-jan Venema and Monika Forsberg, I’m always trying to figure how they do what they do. Who else… there’s a lot of really interesting stuff happening with ceramics that makes me want to get my hands on some clay. Benjamin Phillips is making great pots, it looks like it could be really fun to work in that style. Clay reminds me of Janie Korn, who makes really fun claymation shorts. Having access to all of these creative minds through social media sheds light on the infinite avenues that I want to explore in the future.
To order D.U.I.I, head to the COLORAMA webstore.
Dark Noise : An Interview with Chris Hammes
Half the sky, all your attention.
What We’re Doing This Weekend: 3.20-3.22
Endless Opportunities (Or Something)
MAINTENANCE #3
from Bad at Sports http://ift.tt/2mHQxB6
via IFTTT
0 notes
Last Seen Blogs
hasan-feyz-blog
Untitled
frenchshoeplaylover
French gay in Paris
cosmiic-fool
✰ paradox ✰

james09876
Untitled