#ides1262 2020
Text
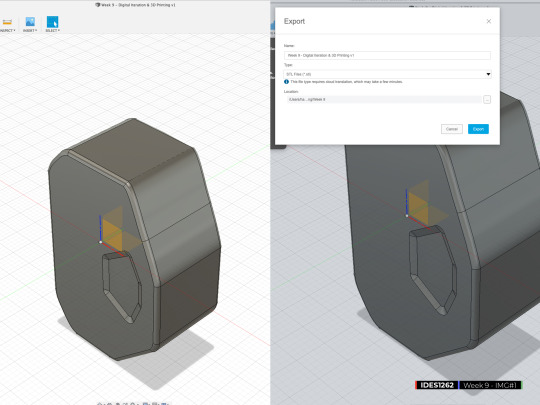
Week 9 - Digital Iteration & 3d Printing
Week 9’s digital iteration reflection:
Images 1-3:
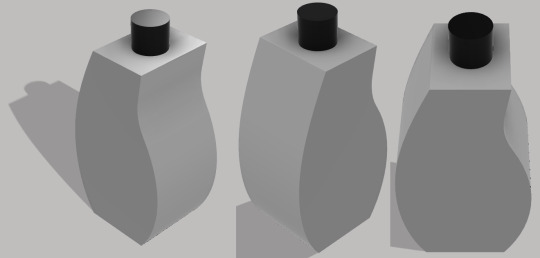
Since I had never used 3ds Max before, I found it very daunting and confronting to approach. Although I am getting slighty better at learning Fusion 360, I thought a mesh and tool dense application would be even harder for me to learn. However, the combination of 3ds Max’s tutorials and the in-class tutorial, I got more comfortable with using a small number of features.
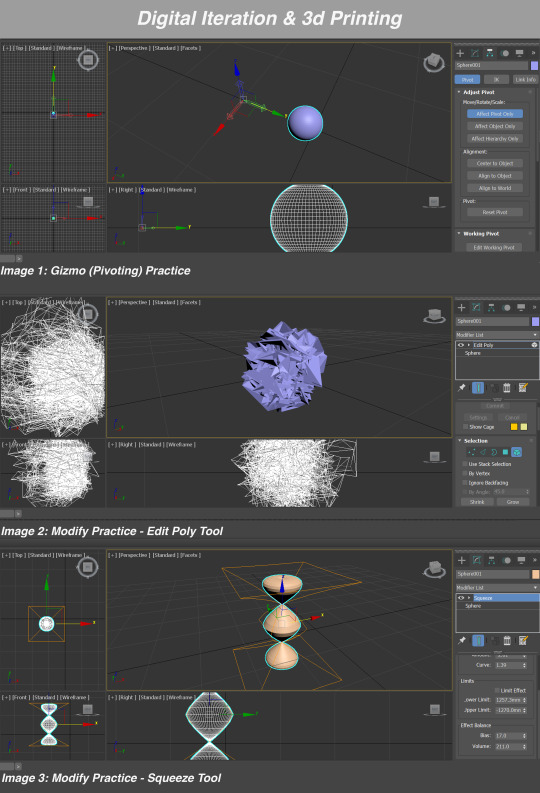
As I experimented with the Gizmo and Modify tools, I got better at seeing how powerful these tools were. It is fascinating to see how different surfaces and forms can be created. It opens so many possibilities for thinking about new sketch model designs. My overall goal was to see how crazy my forms could get until my computer either slowed or crashed. It did not crash but slowing did occur with Image 2 using the Edit Poly tool.
Image 4-6:
The mesh function is incredibly useful for delicately adjusting models over a solid program, such as Fusion 360. Even though Fusion 360 has the sculpt feature, it does not provide as many modification options such as the melt, squeeze, and my personal favourite, the hair option (Image 6), as on 3ds Max. However, I find that Fusion 360 is easier to build my initial sketch model. Then transferring the file over to 3ds Max allowed me to use its extra functions for minor iteration tests.
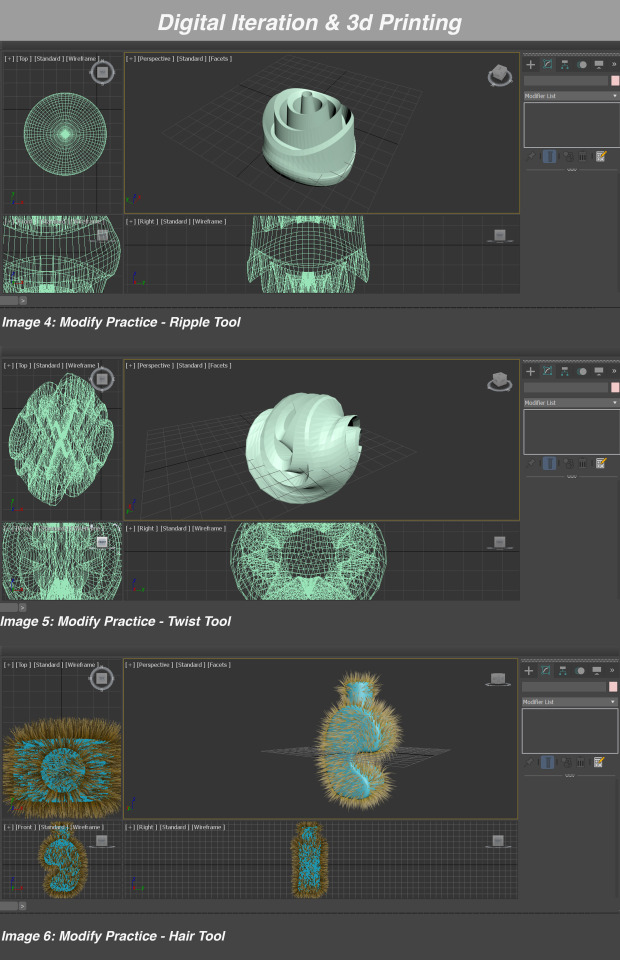
I like the function of turning on/off each modify layer to see each alteration. That ability to see each step of making an iteration was critical for me as it was not permanently changing my imported model (Fusion 360 permanently changes) and could quickly tell me how I was altering the original model.
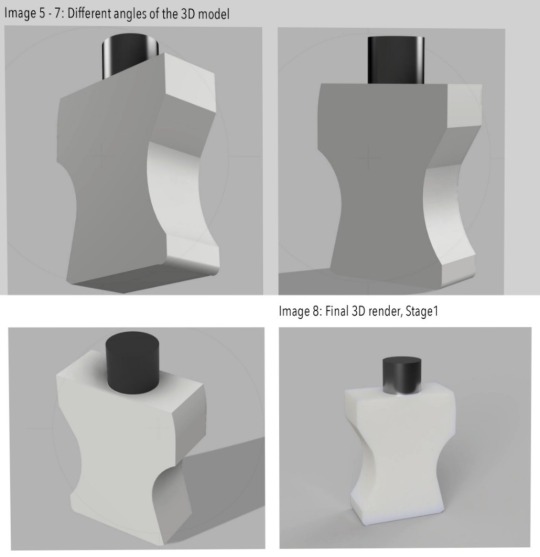
Image 7-11:
Importing my bottle file was very quick however, finding a modification option was time consuming as many of the modify options did not appear to do anything to my model that I could physically see. I experimented with using the squeeze tool, but it looked utterly terrible (Image 8). I then settled on a combination of the bend and spherify tool as it was the closest to achieving the sleek and dynamic form I was aiming for.
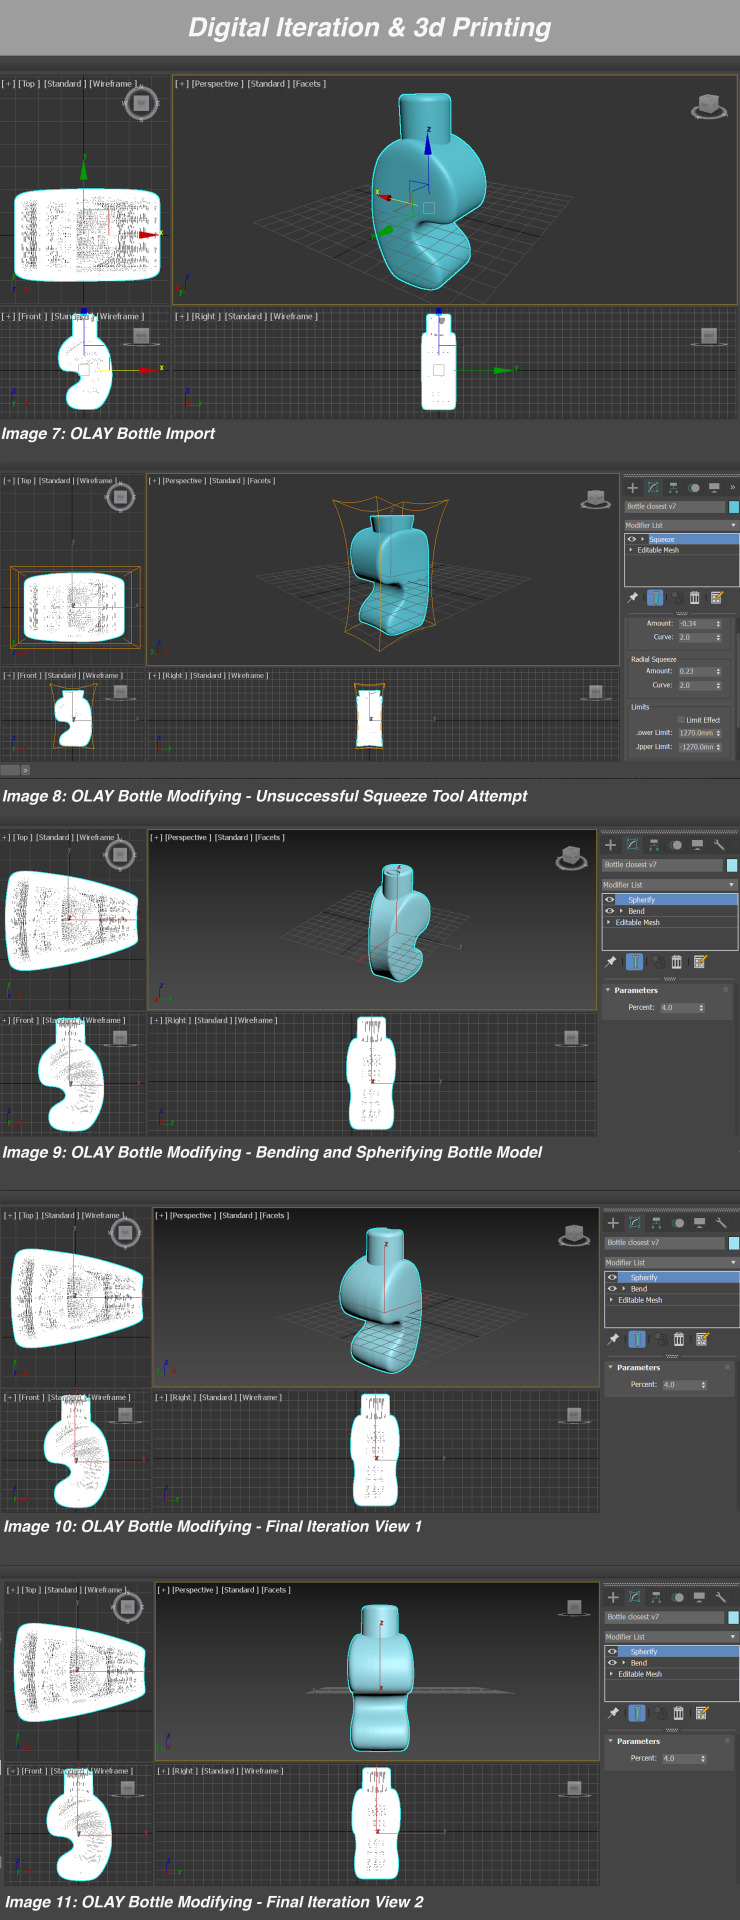
Image 12: Final .3mf file

This whole task was confusing to begin. Especially remembering the names of the tools and locations. Yet, as I used it more, I became more comfortable and eager to use. 3ds Max qualities are excellent for making model iterations without the fear of ruining your original design. You can fail hundreds of times, as long as you have your original model file, you are safe to change it however you want.
From doing this activity, I can clearly see the benefits of using a solid and mesh applications, as I could not tell the difference before. Very enjoyable process of using unique effects to create models I would have never thought of without using them!
I will definitely be learning how to use this program more during the holidays (as well as Fusion 360) to help me accomplish certain designs I want to test. I would have explored this model even more if I had more time to learn 3ds Max’s library of interesting tools. I do wish that this bottle was also more rounded and bubbly but due to my lack of skills, this was the best I could produce.
I’ll see how my 3D print comes out next week.
23 notes
·
View notes
Text
Week 6
Setting up my own making space


Model making task
Eric Strebel cube making exercise - https://www.youtube.com/watch?v=vuq-pT8ww9Y
Steps
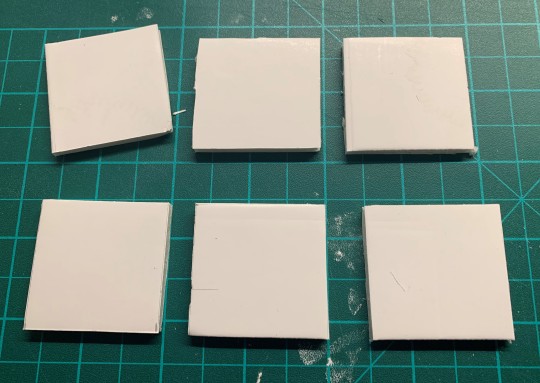
Step 1. Cut 6 identical square (40mm x 40mm) from foam core board.
Step 2. Cut the edges 45 degrees with a sharp scalpel cutter.
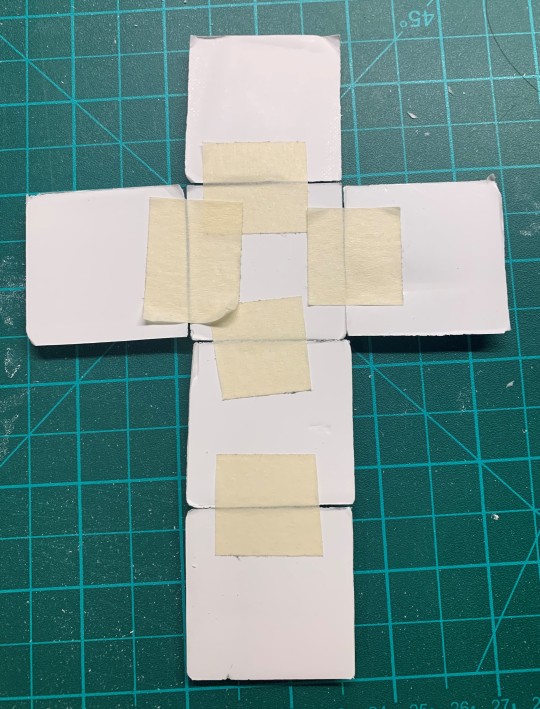
Step 3. Join them with masking tapes.
Step 4. Glue them with PVA glue.
First attempt pieces

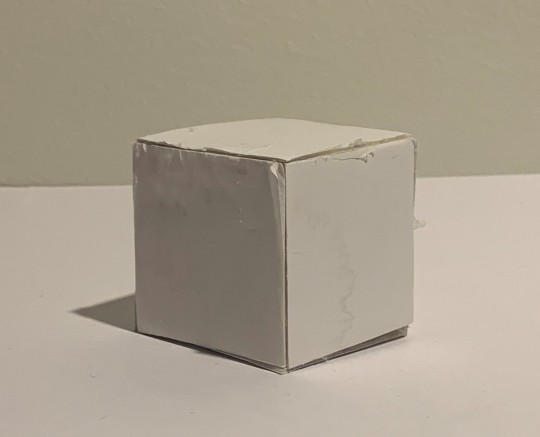
First attempt cube
Second attempt - sanding the 45 degrees edges

Joining pieces with masking tapes
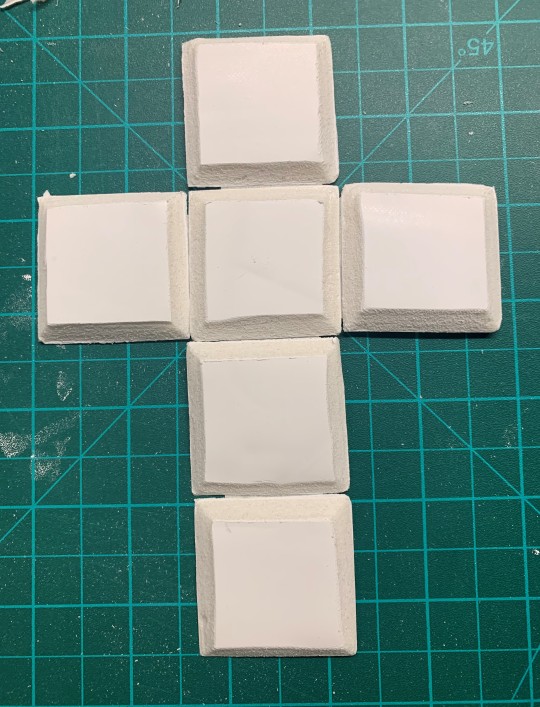
Second attempt cube

What went well and what did I have difficulty with: In the first attempt, I cut the pieces and edges with a not too sharp cutter. This lead to the size of the squares are not 100% identical and those 45-degree edges are jagged. This results in an ugly cube that cannot be joined perfectly and have gaps between edges. After that, I changed to a sharp blade and did a second attempt. I also used sandpaper to get precise and smooth edges, this results in a cube that edges can be joined perfectly, with no gaps!
What I learnt: The skill I learnt from this activity is cutting the edges in 45 degrees. Before this activity, I only join foam core boards by edges on edges directly which shows the foam and not in good looking. This edge skill could join the board together perfectly without exposing the foam inside!
Next Foam core board advanced basics from Eric Strebel: https://www.youtube.com/watch?v=izf0X7obLr0
Learnt how to create rounded corners with foam boards! :)
10 notes
·
View notes
Text
Week 10 - Model Finishing
Final week’s exercise is to finalise the 3D printing model by using 2 different painting over the model. The learning objects are understanding that even the model I designed on either paper or software and printed by the 3D printer, I will always have to finish or finalise the model before it can be presented to my potential clients. Especially after the model printed by the 3D printer, it still has defects on each plane of the model. I couldn’t say that I achieved this week’s exercise, I happened to have flaws during the whole progress. Though, I still deliver the finished model with 2 coatings over it.
Preparation
After I picked up my 3D model, I found out that each plane of the model has defects on it. I prepared sandpaper I used from previous week exercise with pliers, knife and scalpel. Plus, 2 PPE masks and plastic working gloves.

Removed the support parts from 3D printing and evenly sand each plane of the model that make it as flat as possible. I cleaned up the model by using warm water and soaked the water with a paper towel. Let the model dry out for around 10 - 15 minutes. This also could possibly remove any dust from the model. Checked twice before apply the first coating over the model.

Part #1 - Priming
Apply the first coating by using a plastic primer. I didn’t spray the model straight away. Shake the primer for around 3 minutes and did a little testing on the booth. This step could let me know how this spray working and what’s the distance I should keep between the primer and my model before I even start applying. I was wearing the mask during the whole progress and replace this mask on next progress.

I let the model dried out for 30 minutes before the next step. It could be 1 hour depending on a different product. Always check the instruction before use is a good thing to do. In addition, I checked around the model, thanks to the sanding in Part #1, I hardly found any flaws around the model. Though, I still carefully sand the model a little bit before the topcoat.
Part #2 - Topcoat
Wear the new mask before applying the first water-based coating around the model. For this part, time-consuming was quite important. Normally, the first coating needs 1 hour to dry out, however, due to the lower temperature these days. It takes longer than 10 hours to completely dry out before applying the final coating. I placed the model before the heater to make this progress a little faster which still took 5 hours.
* One Mistake was made because I wrongly ordered a white colour water-based acrylic paint, which does not output a better result.

During the second coating, I found out that the water-based spray had too much water flows on the model. Carefully spray over the flows to make it as even as possible. Repeated this several times before taking the final photography of the model.

Final Work


The most difficult part of this exercise is to keep patience during progress. From my perspective, the skill of painting technique for the small object is not that hard to learn, however, it needs much more patience during the whole progress to get the job done. Not just finish the job but also make the model logical.
The enjoyment of this exercise is when applying the painting over the model and see how it changes from a 3D printing model to something else. Thought, I only applied the white colour water-based acrylic, but I still can see the difference after the first topcoat. The model seems glossy.
If I had my time again, I would set up my workspace differently. For example, get a 150mm thickness foam-core to stick my model over it. And of course, purchase different colours for the model.
One of the key things I learnt is that the process of model making is not just building it in software or using the 3D printer but also bring it to life. Both these tools can help me develop my model, but in reality, add different colours to the model would possible make it more realistic and easier to understand the basic functions of it. Also, identify different parts of the prototype by using colour varieties could bring more possibilities to product development.
6 notes
·
View notes
Text
Week 8 - Digital Models
As I’m not a industrial design student, I didn’t took any 3D modelling courses before. Therefore this task was quite challenging for me. I had used other modelling softwares but not Fusion 360, looking forward to learn more to achieve more too.
Image 1-2: As u can see, I used the method of importing an image of my bottle design then I first traced the overall shape of it. I’ve this through the video that was provided which it was very useful. And then I pulled the shape up to create the depth.
Image 3-4: However, as I couldn’t add a horizontal drawing layer, I couldn’t drew the bottle cap with the way that was shown in the resource video. Nevertheless, after trying, I managed to use other way to draw it. Which is that I drew the cap on the same drawing plain as the main body then I rotate it and move it to the position that I wanted which is the top middle part of the main body.
Image 5-8: At the end, the outcome looks amazing. I have added a plastic texture to the surface of the bottle in white and the cap in black.After the design got rendered, it looks very real. The texture is also very nice! I’m very satisfied with what I have created with Fusion360 for the first time. It is such a great experience. I’m looking forward to draw other designs with this software.
However there’s always improvement space for us to make which is that I couldn’t draw the curves on the main body more smoothly which I felt I need more exercise to improve myself in order to achieve this.

6 notes
·
View notes
Text
Week 1 - Drawing Instrument Exercises
During this week’s in-class activities we were intended to use a compass and set squares to practise our skills with engineering drawings. I was overall pleased with the final result and processes of completing it. In high school, I was exposed to many of these types of sketches and activities so I found this task easy to finish and had l almost no difficultly completing it.
I enjoyed retouching on my skills again as it allowed me to practice using various equipment and tools. I enjoyed using different objects such as 5 cent pieces and glue sticks to improvise and create circular shapes. This inspired creativity and I will definitely use this for future drawing and projects when appropriate.
During this task, I learnt that these drawings take extreme amounts of time and precision in order to have a quality finish. The use of light construction lines allowed me to plan out the entire drawing and was easy to erase once I added the darker, thicker line work.
I found out that good technique follows the concentration on precision.
I was able to focus on the initial placement of construction lines allowed me to develop my techniques of utilizing equipment and line work.
I learnt these fundamental insights through experimenting and practising using different paper, equipment and techniques before beginning the final drawing.
If I were to complete this task again I would focus on the intersection of the lines, many lines don’t connect well and overlap where they shouldn’t (as seen in Figures 1 and 2). After conversation with other students and tutors next time I with use liners with a compass which will result in a perfect circle.
I believe that I have successfully accomplished the learning objectives this week. I have gained the knowledge of what is required of this course. I developed an understanding of what sketch modelling is and that the concepts of brainstorming and how quickly create simple, inexpensive modelled assists in workflow saving money, time and resources. After creating these simple drawings with tools I built a familiarity with the concept of engineering drawings and the importance of accuracy using different techniques.


7 notes
·
View notes
Text
Final course reflection
Practical, fun and sometimes a little daunting, Comms 2 has taught me so much within such a small timeframe from orthographic & perspective sketches, digital modelling (fusion & 3ds max) and physical model making (blue foam & spray painted 3d print).
This course has significantly changed my understanding of the design process in the way that I can now recognise models are more than just for presentation but also for exploring initial ideas, determining how a certain feature will work and addressing consumer interaction with the product such as ergonomics & weight. I am no longer hesitant to mock up a quick sketch model to explore a certain component and can definitely say that I fully understand the value & importance of making sketch models to inform a design— I will be making a heap of these (low & high fidelity) in the future!
Model making will significantly improve the capturing/exploration of my original ideas as I sometimes struggle to imagine and sketch out initial concepts on paper. Thus, knowing that the design process is not confined to a specific order and rather open to all tools to enhance/portray/explore features means I can go straight to physical models to communicate complex ideas in a visual manner.
I particularly loved the entire Olay bottle redesign process through the development & transformation of a quick initial sketch to a refined photoshop sketch, hand sculpted blue foam model, digital models on fusion/3ds max and a more professional 3d printed model render. The activity really encapsulated the essence of sketch modelling, the variety of methods & its important place within the design process.
In terms of an area I could improve, I would probably say the craftsmanship and degree of quality to which I complete the activities. Whilst I am really happy with a lot of the activity outcomes especially doing a lot of these tasks for the first time, I know these could be completed even better in the future & produced to be even more informative.
There were 2 major lessons I learnt during this term that are applicable to any course of study. The first being to avoid being consumed by perfectionism and getting caught up in the small details (especially relevant for sketch models)— this time could be spent making more models or doing something more important to the process. The second lesson learnt is to not get too worried/freaked out by difficult tasks (eg. perspective drawing & 3ds max)— work through them step by step, they are often easier than they look and skill will be improved with practice.
Having to constantly reflect on my work each week throughout the entire term, was extremely useful to my learning as it often made me try to understand why a certain part went wrong and how it could be improved. As a learner, I feel there is still room for me to work on my time management specifically when nearing the end of the term when all the other assessments are also due. Gaining feedback from peers whether it be tips or common experiences was definitely one of the best things about this online environment as things I may not have noticed were brought to my attention and able to be improved for next tasks (Eg. AS1100 standards). Hence, working on this would allow me to hear more feedback from peers & gain even more insight.
Although at times it was difficult learning from home, I think the platform used and entire set up being able to read peer blogs, tell others your own tips and in turn receive feedback was really well organised and made it a lot easier. Overall, just want to say thanks to Rob & Miles for all your help & extra lengths you went to for helping us understand & enjoy this course!
0 notes
Text
Week 8
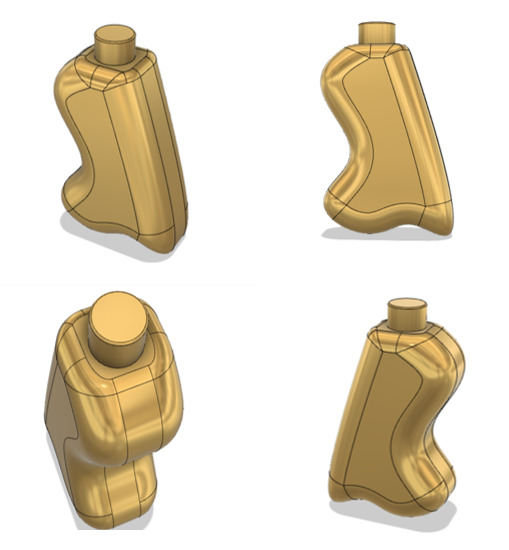
For my 3D fusion model decided to change my design, the student to student feedback I received was valuable as it provided me the insight to create a more curved and organic shape. I believe I have achieved the learning objectives for this week as I was able to produce the new form that I had visualised.
The connection of the main curved body and the lid went well as I could connect them with ease, I had difficulty with filleting the edges of the shape and had to go back and modify the original sketch and had to fillet the shape in a certain order to avoid errors.

This week I really enjoyed exploring my favourite aspect of model making visualisation. I found visualisation very satisfying as you could create a 3-dimensional body in a matter of minutes, this allowed for lots of quick and easy changes which would have taken a lot of time with a foam model. I did not dislike anything this week. I am really pleased with my model and would not do anything differently
The key things I learned where filleting technique, and extrusion as well as initial sketch design. I figured out these through trial and error over many attempts
0 notes
Text
Week 8 – Digital Models
Three dimensional models can be created in two ways that both assist a designer in different ways. Physical models and digital models. This weeks task required the digital development of a model in fusion 360. This was based off the foam models created in week 7. The advantages of physical models is the ability to create high and low fidelity models, as well as understand the weight and feel of materials. This is highlighted in the Andrew Simpson video. One of the biggest advantages of physical models is the weight and material of the model. Weight is usually correlated to value to an extent, this can be experimented with using physical models in both low and high fidelity ( accuracy ).
Creating the model in fusion 360 required a number of steps to be used to create a 1:1 model and at the highest accuracy. Using the tutorials in pre-class activities the techniques were understood and applied. The first step was taking canvas images to base the model off. These can be seen below ( all images were grouped in photoshop).

These canvas images were calibrated to create a 1:1 measurement ratio. Though selecting two locations in the image and then determining the distance from the points.

This was then copied to a sketch placed on the same face as the canvas. this will provide an area to be extruded to create the body shape.

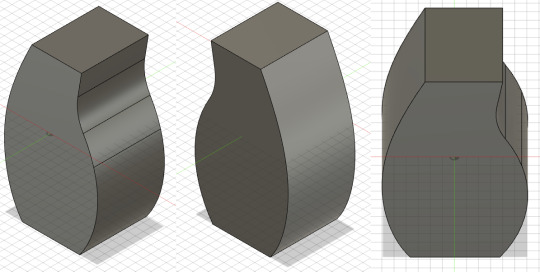
A new component was then created to make a lid on the top face of the body. This lid is the same as week 5. This can be seen below in regular and section view.

The bottle design was then rendered in fusion 360′s native render tab. This creates a more professional and photo realistic model. Overall i believe this task was very interesting and i have learnt a number of techniques that can be applied to further digital models for both 3d printing and rendering. The task was overall very enjoyable and was interesting to see the shape develop. With practice I believe I can speed up my digital model generation and use a new skill set to apply to the design process.
16 notes
·
View notes
Text
Week 6 - Non-teaching Week Tasks
1. Video Reflection
Andrews video was really interesting for me, in particular how he talks about the process of model making being very intentional, and yet through the design process there is still the capacity for changes to be made. I also picked up that there is no rule as to when model making enters the design process. I really like this, as physical making isn't being approached as a formality but is utilised to inform the design process, resulting in a better outcome for the designer.
I also found it interesting how there is a growing integration of different techniques like 3D printing and low pressure moulding to best test an element or mechanism of a design. This has really broadened my view of the design process, through refining ideas and experimenting with different concepts , model making is clearly a vital step for designers.
Video Link: https://www.youtube.com/watch?time_continue=381&v=f3wlp2G5DtM&feature=emb_logo
2. Home Maker Space:
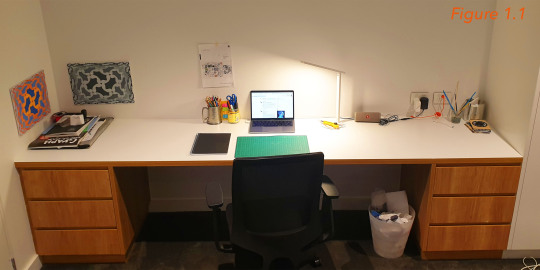
Maker Space 1- The good thing about this space is that there is a significant amount of storage options which means that I can keep the desk tidy and can carry out my work efficiently. Conveniently, the drawers can hold A3 paper, so I usually keep my finished sketches, and general important work in one of these drawers. The rest of the storage space is broken up in different uses (sketching equipment, paper etc) which is great as its very easy to keep track of where things are. I try to use this space as often as possible for non-workshop tasks as it is susceptible to damage from more hand on work.
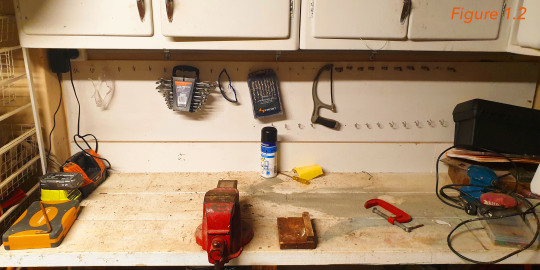
I have made the mistake in the past of attempting to apply spay adhesive glue. which clearly should have been done in space shown in figure 1.2, and highlights the importance of understanding the limitations of home maker spaces whilst we don’t have the luxury of working at UNSW.
Maker Space 2- I am quite lucky to have this work bench in my garage, especially since we don’t have access to the UNSW workshop. Whilst is hasn't been utilised in IDES1262 yet, It’s great for things that will make a mess like sanding, spray painting etc. I can recommend finding a place like this in your home, even if its just a sheet of ply on a table outside, as it gives piece of mind when carrying out tasks that really should be done in a proper workshop.
3. Model Making:
Model 2.1- The use of PVA glue was the most difficult element of the construction for this model, and as a result I had a couple of tries before I got it right. Patience and accuracy were really important, however I found that there were two techniques that would ensure success.
The first was the ensure that the angle of the cuts are correct and clean. It meant that the panels would sit square and not need much support to stay together, only requiring a small piece of tape whilst waiting for the glue to dry. I did this by using a new blade on a scalpel, and a steel ruler which kept the cuts straight and consistent on all sides.
The second was not to use too much glue. Using a minimal amount of glue was important so it dried faster, and would have less chance of leaking excess glue. I did this by using a brush to apply the glue, which was far more effective than straight out of the bottle.

Model 2.2- In the reference video, the presenter said how hot glue was not appropriate to use in this kind of model making however from past experiences I found this to be a bit of an exaggeration. I used hot glue in model 2.2 to test this. Its really important to not use a large amount of hot glue, and again, get the angle cut correctly, if you achieve this, there will be no need to cut away excess glue, and I found that it looked just as neat as Model 2.1 whilst taking half the time.

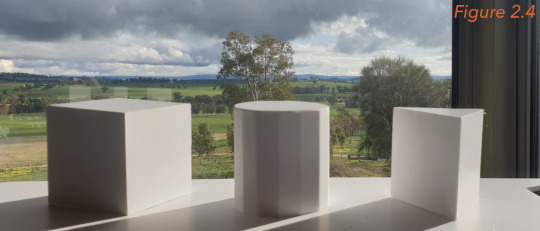
Model 2.3- This was easily the most difficult for me as I was hoping to have an even and perfect circle, however this obviously was not achieved. If I did this again I would space the slits closer together and measure it our prior to cutting. Despite this not being successful it was a good learning experience as I now know what not to do, and I know how to improve in the future.

Final- My advice to anyone doing this task is to practise your angled cuts on a scrap piece prior to committing to the real thing. Sometimes its hard to visualise what angle is needed, and I found it very valuable to double check. This is essentially a warm up for the real thing, and helps to avoid finding mistakes later in the construction process that would force you to start over.
17 notes
·
View notes
Text
Week 10 - Model Finishing
I enjoyed this week’s task more than the others. It was great physically working with the product I had spent time designing. I first started off sanding the bottle with 60 and 120 grit sandpaper. It was really time consuming considering the slow results I was seeing. Nevertheless, the primer and first coat of acrylic paint were drying quickly. I applied four coats in total. I was concerned about the streaks of paint on the bottle but found the more coats I apply, the less it was obvious.
The patterns on the bottle stemmed from the organic shapes of the bottle. I wanted to continue the theme of organic lines and did so with the pink. I found it difficult creating clean lines with the paint, but by the end of changing my paintbrush many times, I was able to achieve a decent finish.
Overall, I’m quite pleased with my final product. Despite the stressful setbacks I endured with the software’s, I’m happy with where I’ve gotten with the bottle. If I could do this again, I would want to create a more exquisite design and challenge myself that little bit more.


12 notes
·
View notes
Text
Week 7 Studio Tutorial – Physical Model Making (foam)
Part 1: Construct your profile templates

Part 2. Cut out blocks of foam blocks (blanks) from which to sculpt your bottle

Part 3. Rough-in your bottle form
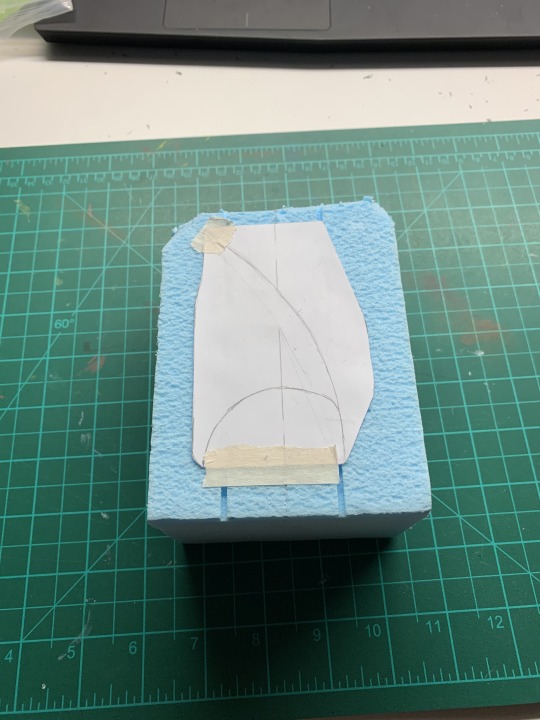
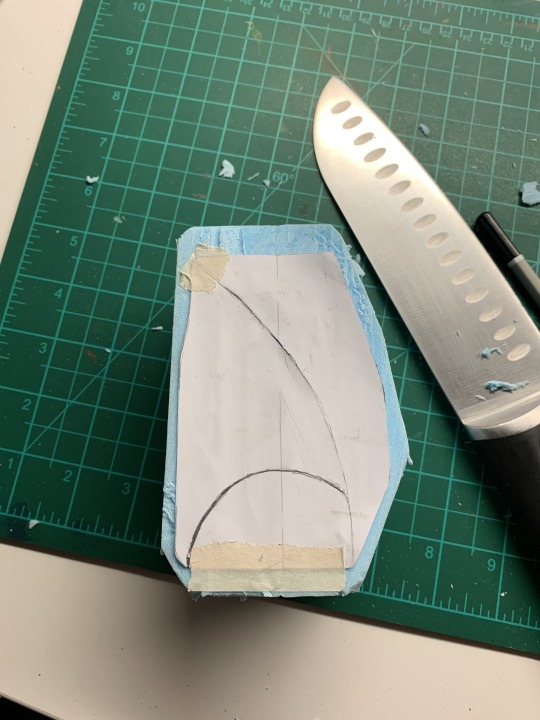
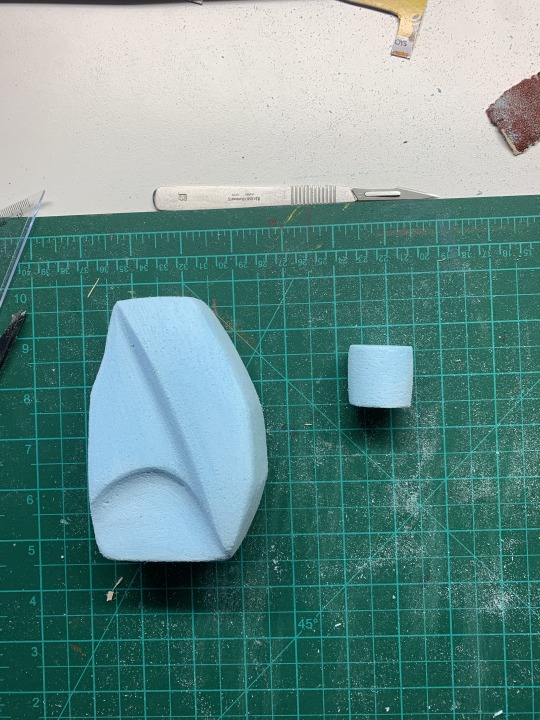
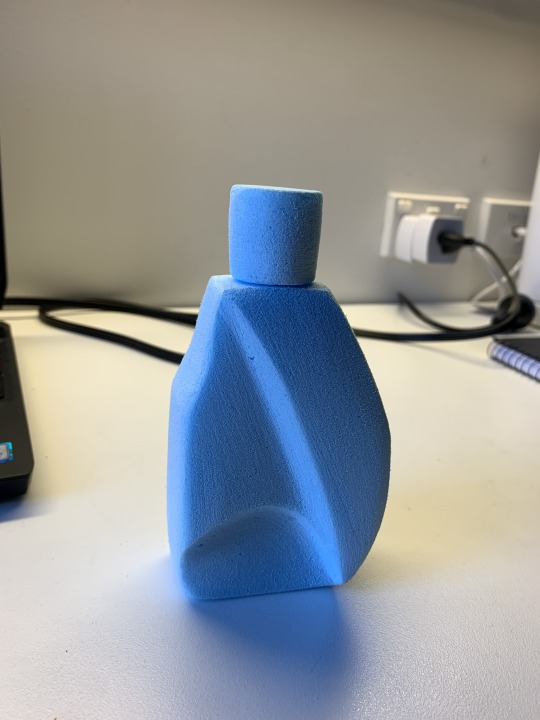
Part 4. Refine your bottle form
I enjoyed this particular task. From the sketching phase to finally having a real life model in my hands. Templates were a huge help, they prevented the final product from being an inconsistent mess. One thing I truly regret though was not working outside. I have cleaned my room three times an I still find foam particles in my room from the time I sanded it.
Sanding paper was incredibly malleable in way. Whenever I needed a tool for an specific shape, I could just create it.
Managing to have the model in my hands truly made me realize the importance of having a 3D model. While creating it, my perspective of it changed while I hold it. It saw how I could improve it, and I believe that only sketching would not have allowed me to see things in a different perspective.
I think that this is okay for my first model, but next I wish to create with more skill, less time and more accuracy.
14 notes
·
View notes
Text
Week 10 - Model Finishing
For week 10’s task:
Images 1-9: Sanding and spray painting my 3D printed model for the final presentation.
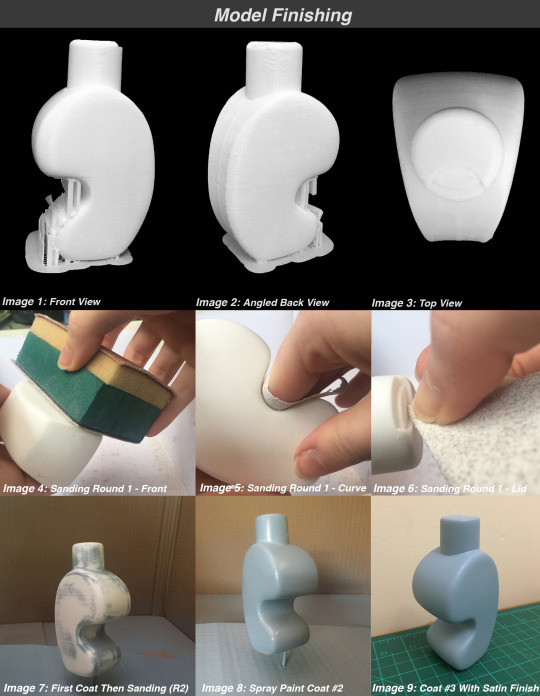
During the sanding process, the wet and dry grits were great for smoothing and buffing out the rough scratches. Even though I could not find a pale blue satin spray paint, I settled for a semi-gloss enamel spray paint. This allowed me to have thicker layers and opaquer colour. I then added a water-based satin topcoat to get that satin finish I wanted.
Final Presentation of the OLAY bottle:
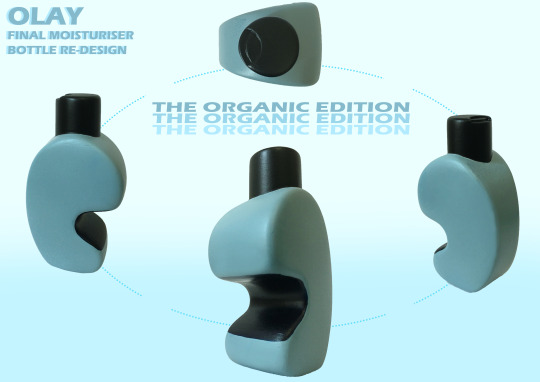
I think I have done a pretty decent job! I always tend to over work my designs and models by adding more details than needed. This habit caused me to spend too much time on it for miniscule reasons. I wanted to also add extra acrylic details but I kept smudging the wet paint. I have learned that it is best to just keep paint mediums consistent and within the same family. For future models, I will actively try to limit my habit of adding more than necessary. Made me learn that one perspective of beauty in model making is simplicity.
I had a lot of fun this week! From never doing 3D printing, I was ultra excited and still am. Now, I have the unending craving to 3D print more.
WHOLE TERM REFLECTION:
At the beginning of the term, I was excited. I did not realise we would be learning these essential industrial design processes this early. I was expecting to learn them in term 3 or even year 2.
Everything in this course was new to me. From the orthographic drawing, foam modelling, 3D mesh modelling and 3D printing, I cannot express how much I have learnt. The shear amount of skills I have been equipped with this early has been such an advantage in other subjects during this course too. Not only do I have more knowledge, but I feel more confident in my own abilities to produce even better designs for the future. Even though I have barely explored the design realm, this class has ignited more curiosity within me to use these industry-standard techniques.
By far the most frustrating weeks were learning orthographic drawing. I had never done it before and having to complete the puzzle-like tasks made me nearly savagely tear my pages apart on each occasion. However, through thoroughly researching, taking short breaks, and enduring, I surprised myself with the finished drawings. I felt very accomplished and appreciate the push to do it. I still have a lot to properly learn such as spacing drawings and spaces but going from not knowing the name of it to knowing the general requirements and drawing them myself within 2 weeks, absolutely astonishing to me.
My favourite weeks have been the 3D modelling and 3D printing phases. From my previous knowledge from Communications 1 in T1 (2020), it aided me to visualise complex models in my head when I was having trouble drawing. My lack of use of these CAD programs still hindered me, but this class taught me more tools to use for the jobs. Whether Rob and Miles taught them, or through the encouragement of finding the solution myself. I have developed a more refined attitude and patience to learning these programs. I have learned to forgive myself more as I am just a beginner. From this course, I plan to learn even more about Fusion 360, 3Ds Max and other CAD packages to improve my skills and confidence as a designer.
Now that I have the basic tools to continue the course, I have learned to move on and accept mistakes and failures. The connotation of ‘failure’ has changed in my mind. I do not feel frustration and anger when I fail, I laugh it off and move on. I used to dread making mistakes because I saw it as a resource and time waster. Now, I see it as part of the design process and expect to fail. It has helped me improve my mind and skills for these very tasks.
Even in distance education, seeing everyone’s post has encouraged me even further to think more about improving my problem solving, formatting, presenting. It is truly inspiring to see other styles and thinking behind each task. Always valuable and informative.
As my final statement, my new knowledge, endurance, lateral thinking, and curiosity birthed from this class are crucial for me to hold onto. Being the most useful class of Term 2, this is what I expected. This is what I am happy doing. I cannot wait to see what future projects are waiting for me.
14 notes
·
View notes
Text
Week 1 activity
The activity this week is drawing instrument exercise, to draw two figures using a compass, set squares, and a circle template. I started with a white paper as I do not have grid paper at home, this made the task a bit challenging.
Part 1.
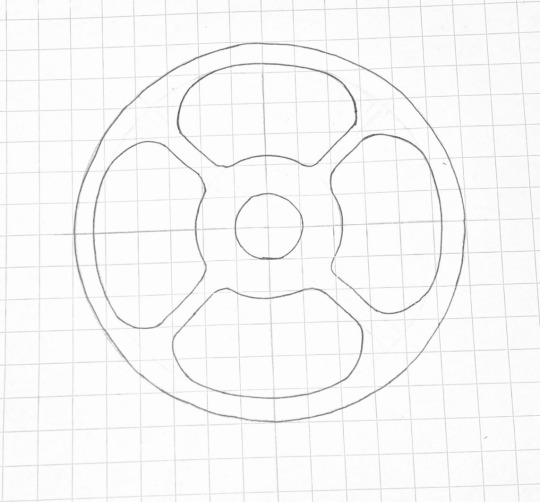
For figure 1, I started by drawing a circle using a compass. Then, I drew the star shape with a ruler only. For figure 2, I first created 4 circles that shared the same point as center and a big x across the center of the circles to divide them into 4. Then, I drew two parallel lines 4mm to the big x and use a coin to create a 10mm radius.

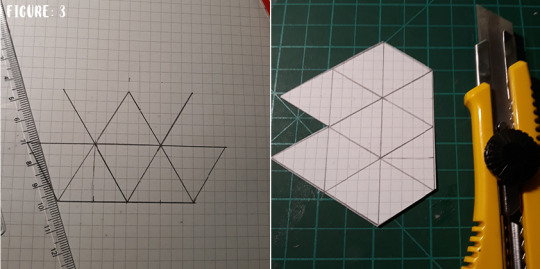
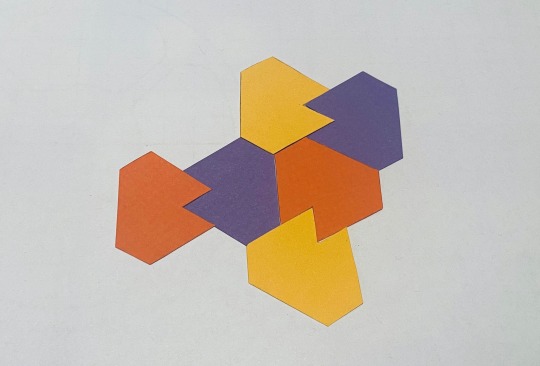
Part 2. Tessellating Pattern
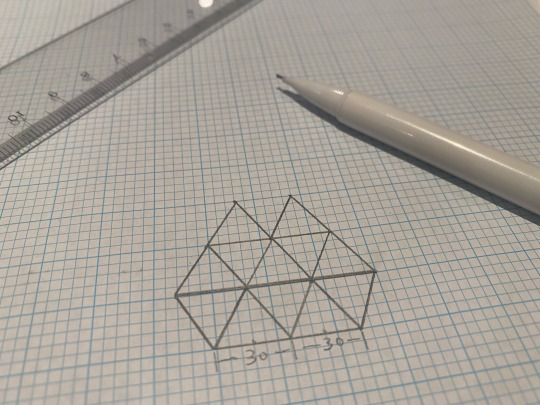
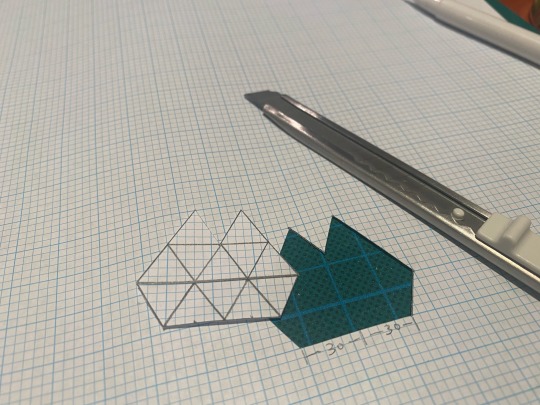
I drew the triangles with a ruler and cut it out and repeat the outline to create the same shape. After cutting all pieces out, they all fit well. Unfortunately, I drew the construction lines too hard.

Overall, I found drawing figure 1 is more challenging than figure 2 as I do not have grid paper and I tried a few times to get the hexagon in proportion. I found this activity fun and get me to familiarize myself with engineering drawings.
7 notes
·
View notes
Text
Week 9 - Digital Iteration & 3D Printing
As an industrial design student, it will always get benefits by learning different modelling software skills to improve and optimise my 3D modelling skills. So far this term, I’ve already learnt the basic skills of Fusion 360 in order to build up my Olay bottle concept in 3D modelling. This week, it’s good to get practice and learning the basics of Autodesk 3DS Max.
Part #1 - Fusion 360
Remove both shell function and bottle mouth from my timeline in Fusion 360 for my Olay Bottle concept in Week 8, and export as .stl file formate for later use.
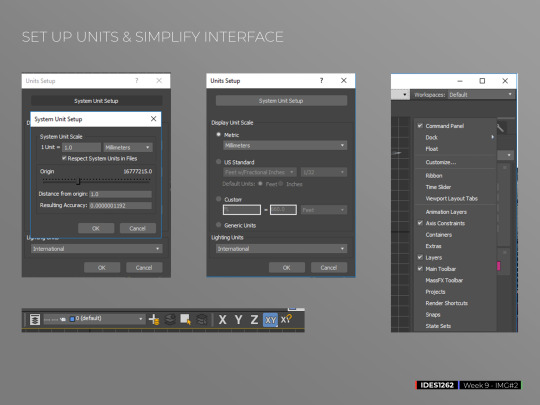
Part #2 - 3DS Max
Part #2.1 - Set up Units & Simplify Interface
Simplify the user interface before starting the rest of the exercise this week. This part includes: set up units, remove some tools from the workspace and arrange my views. Arranging my views the same or similar to the orthographic drawing layout so I would get used to the layout and my views when I draw later in both ways.
Part #2.2 - Create Sphere & Navigation
Create a sphere and get familiar with navigation tools on the left bottom corner. I was also using my middle mouse button to quickly perform one of the navigation tools.

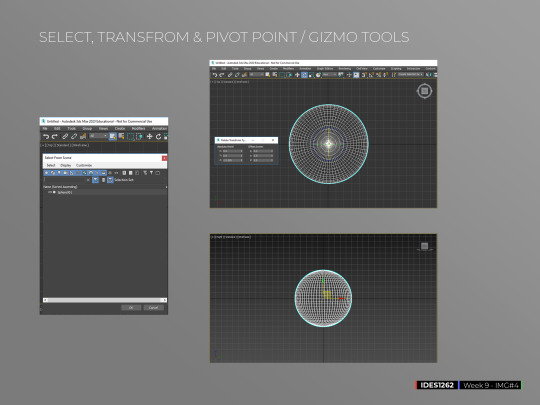
Part #2.3 - Selection & Transforms Tools
The ‘Select’ tool can be used when select different named objects or multiple objects.’ Transforms’ tool can rotate and move the selected object and also scale the object.
It feels like the ‘Pivot Point/Gizmo’ tool could be a helper for when I am going to transforming an object in my viewing plane or orthogonal view.
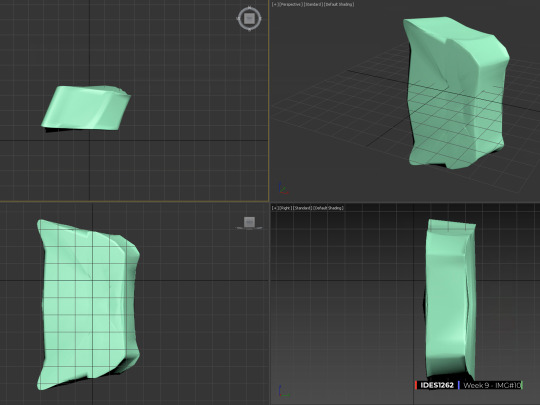
Part #2.4 - Modify My Concept Bottle
Apply 10 different modifiers on top of each other and get the final bottle model. Its twisted!!!
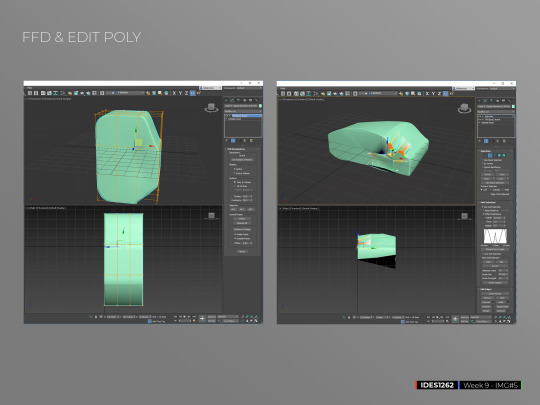
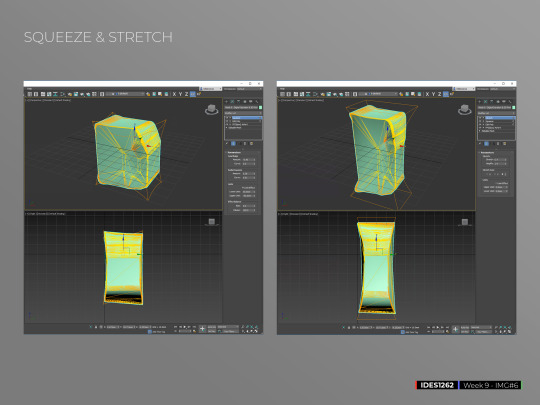

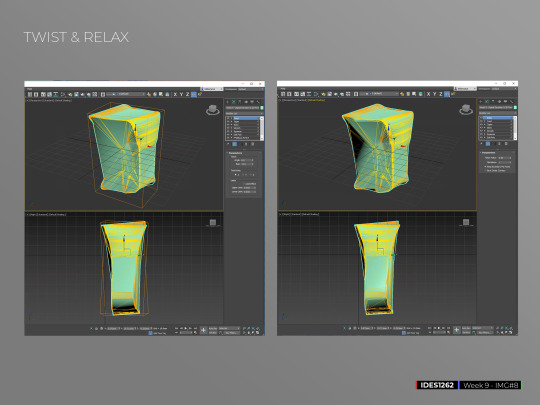
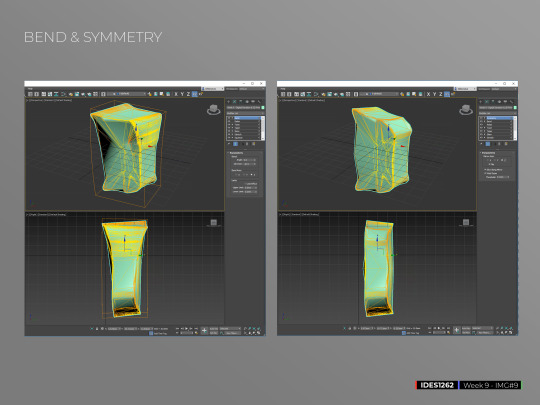
The final model is really messed up by these modifiers I applied.
Part #3 - Cura
Slice before export to .3mf file to the Design Future Lab.

Conclusion
As a first-timer for 3DS Max, it was difficult to memorise all these different functions in the software. The online tutorial recording does help a lot in this case. Though, I felt like I could perform some basic functions such as create different models and add modifiers over them at the end. What I’ve done during this exercise was to try to do the same step 2 or 3 times until I could least understand how and when they should be used while I’m editing my 3D model. I probably still going to forget some of these functions by next week. From my perspective, this 3D modelling software needs more practices to improve my skills in the future.
If I have my time again, I would slowly go each step of modifiers, try to explore more possible geometries on either sphere or my object. Besides, It felt laggy by using 3DS Max in Citrix Workspace application.
6 notes
·
View notes
Text
Week 1 - Studio Tutorial :
Drawing Instrument Exercise Reflection
This is my general education course. In my Bachelor of Design program, one of my major is Object design, which I also design and make furnitures. However, we don’t have specific courses that only teaches technical drawing skills such as engineering hand drawings and 3D renders. Therefore, I think this course will be prefect for me to strengthen my skills.
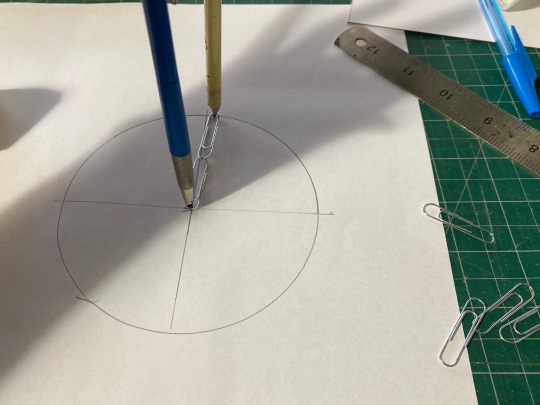
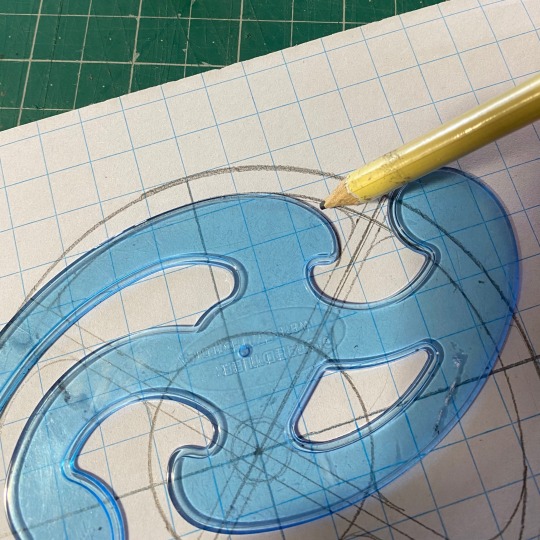
For part 1 : figure 1, when I was drawing it I didn’t have a circle template but I have some paper clip, so that I used them as my circle drawing tool. It worked out very well. After finishing the drawing, I used a black marker to outline the drawing, I failed in some parts where the ink spill out a little bit. I think it’s because I haven’t used markers for a long time which makes me not familiar with it enough, I definitely need more practice on it.
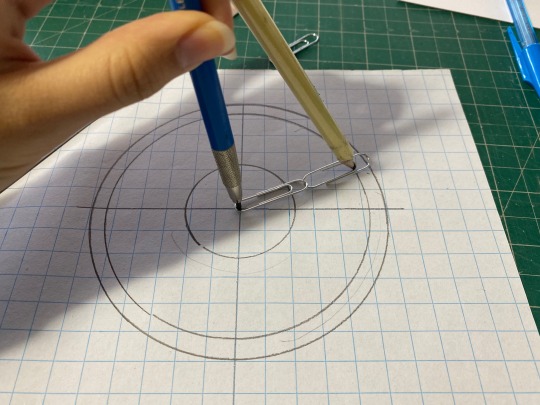
For part 1 : figure 2, I used the same methods as figure 1 to draw the circles. However, I couldn’t draw the round corners with the tools I have. Therefore I went out to buy French Curves that Rob has mentioned in class. It’s not my first time seeing those but it’s my first them using them and learned how to use them. They’re pretty easy to use and are very useful tools, glad to learn how to use them.
For part 2 : figure 1 and 2, It’s a very fun exercise. It is like making a puzzle, that’s why even if we don’t have to make them in colours I still made them in 3 different colours to get the best outcome. Moreover to get better results I finally went out to buy proper grid papers, so that I can produce more accurate and fine finished drawings for the following weeks and for my future works.
Part 1 : figure 1


Part 1 : figure 2
Part 2 : figure 1
Part 2: figure 2

5 notes
·
View notes
Text
Introduction
Hey I’m Sylvia Musel. I am a scuba diving enthusiast who loves to document her adventures with her tiny camera. I love making some of the most random stuff around the house and love to learn new practical design techniques.
As a design student my goal is to finish university with the skills that can assist me in helping people in the future!
This blog with consist of all my weekly class activities and I hope I can successfully present my progress and weekly improvements throughout this term :))

0 notes
Last Seen Blogs

worm-lesbian
Text and Art from Worm

ankaratravestiester
Ankara Travesti Ester

atd-sportscars-blog
ATD-Sportscars
ankaratravestiester
Ankara Travesti Ester

ludanz
ludanz