
maddy5309143
IDES1262 2020 Portfolio By Madeleine Sheppard
My Critiques and Comments are in my 'Likes'
12 posts
Don't wanna be here? Send us removal request.
Last Seen Blogs

americancowgirl19
Imaginary Lives

andreacerone
Pensare, fa la differenza


ariadnekurosaki
The Tangled Red Thread

thelookunder-blog
31 DAYS OF HORROR
Text
Week 10 - Model Finishing
For week 10’s task:
Images 1-9: Sanding and spray painting my 3D printed model for the final presentation.
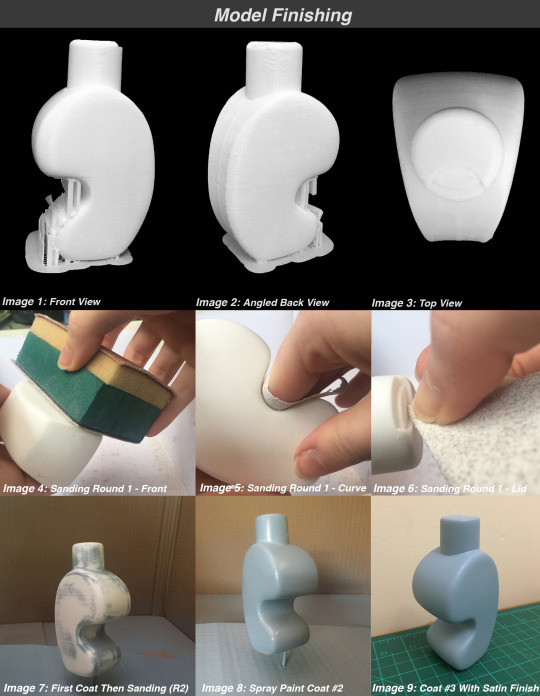
During the sanding process, the wet and dry grits were great for smoothing and buffing out the rough scratches. Even though I could not find a pale blue satin spray paint, I settled for a semi-gloss enamel spray paint. This allowed me to have thicker layers and opaquer colour. I then added a water-based satin topcoat to get that satin finish I wanted.
Final Presentation of the OLAY bottle:
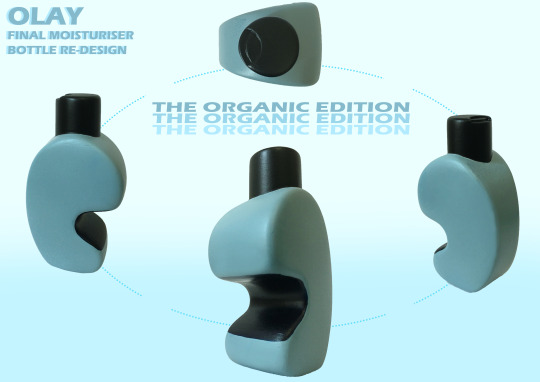
I think I have done a pretty decent job! I always tend to over work my designs and models by adding more details than needed. This habit caused me to spend too much time on it for miniscule reasons. I wanted to also add extra acrylic details but I kept smudging the wet paint. I have learned that it is best to just keep paint mediums consistent and within the same family. For future models, I will actively try to limit my habit of adding more than necessary. Made me learn that one perspective of beauty in model making is simplicity.
I had a lot of fun this week! From never doing 3D printing, I was ultra excited and still am. Now, I have the unending craving to 3D print more.
WHOLE TERM REFLECTION:
At the beginning of the term, I was excited. I did not realise we would be learning these essential industrial design processes this early. I was expecting to learn them in term 3 or even year 2.
Everything in this course was new to me. From the orthographic drawing, foam modelling, 3D mesh modelling and 3D printing, I cannot express how much I have learnt. The shear amount of skills I have been equipped with this early has been such an advantage in other subjects during this course too. Not only do I have more knowledge, but I feel more confident in my own abilities to produce even better designs for the future. Even though I have barely explored the design realm, this class has ignited more curiosity within me to use these industry-standard techniques.
By far the most frustrating weeks were learning orthographic drawing. I had never done it before and having to complete the puzzle-like tasks made me nearly savagely tear my pages apart on each occasion. However, through thoroughly researching, taking short breaks, and enduring, I surprised myself with the finished drawings. I felt very accomplished and appreciate the push to do it. I still have a lot to properly learn such as spacing drawings and spaces but going from not knowing the name of it to knowing the general requirements and drawing them myself within 2 weeks, absolutely astonishing to me.
My favourite weeks have been the 3D modelling and 3D printing phases. From my previous knowledge from Communications 1 in T1 (2020), it aided me to visualise complex models in my head when I was having trouble drawing. My lack of use of these CAD programs still hindered me, but this class taught me more tools to use for the jobs. Whether Rob and Miles taught them, or through the encouragement of finding the solution myself. I have developed a more refined attitude and patience to learning these programs. I have learned to forgive myself more as I am just a beginner. From this course, I plan to learn even more about Fusion 360, 3Ds Max and other CAD packages to improve my skills and confidence as a designer.
Now that I have the basic tools to continue the course, I have learned to move on and accept mistakes and failures. The connotation of ‘failure’ has changed in my mind. I do not feel frustration and anger when I fail, I laugh it off and move on. I used to dread making mistakes because I saw it as a resource and time waster. Now, I see it as part of the design process and expect to fail. It has helped me improve my mind and skills for these very tasks.
Even in distance education, seeing everyone’s post has encouraged me even further to think more about improving my problem solving, formatting, presenting. It is truly inspiring to see other styles and thinking behind each task. Always valuable and informative.
As my final statement, my new knowledge, endurance, lateral thinking, and curiosity birthed from this class are crucial for me to hold onto. Being the most useful class of Term 2, this is what I expected. This is what I am happy doing. I cannot wait to see what future projects are waiting for me.
14 notes
·
View notes
Text
Week 9 - Digital Iteration & 3d Printing
Week 9’s digital iteration reflection:
Images 1-3:
Since I had never used 3ds Max before, I found it very daunting and confronting to approach. Although I am getting slighty better at learning Fusion 360, I thought a mesh and tool dense application would be even harder for me to learn. However, the combination of 3ds Max’s tutorials and the in-class tutorial, I got more comfortable with using a small number of features.
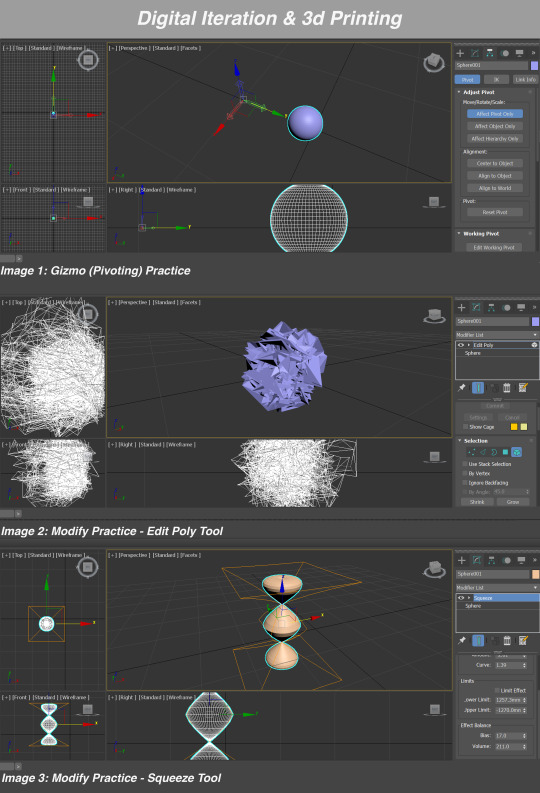
As I experimented with the Gizmo and Modify tools, I got better at seeing how powerful these tools were. It is fascinating to see how different surfaces and forms can be created. It opens so many possibilities for thinking about new sketch model designs. My overall goal was to see how crazy my forms could get until my computer either slowed or crashed. It did not crash but slowing did occur with Image 2 using the Edit Poly tool.
Image 4-6:
The mesh function is incredibly useful for delicately adjusting models over a solid program, such as Fusion 360. Even though Fusion 360 has the sculpt feature, it does not provide as many modification options such as the melt, squeeze, and my personal favourite, the hair option (Image 6), as on 3ds Max. However, I find that Fusion 360 is easier to build my initial sketch model. Then transferring the file over to 3ds Max allowed me to use its extra functions for minor iteration tests.
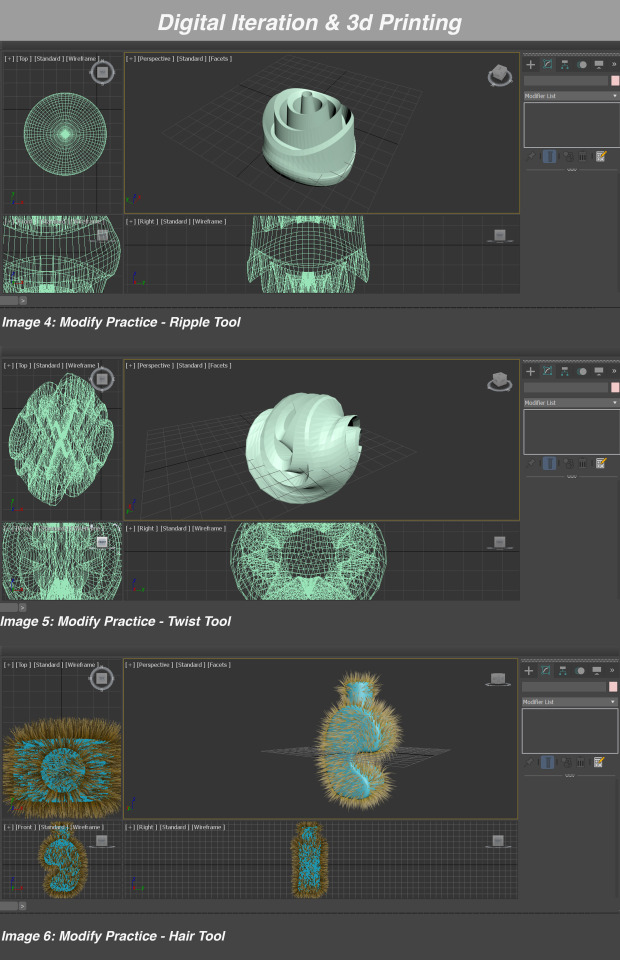
I like the function of turning on/off each modify layer to see each alteration. That ability to see each step of making an iteration was critical for me as it was not permanently changing my imported model (Fusion 360 permanently changes) and could quickly tell me how I was altering the original model.
Image 7-11:
Importing my bottle file was very quick however, finding a modification option was time consuming as many of the modify options did not appear to do anything to my model that I could physically see. I experimented with using the squeeze tool, but it looked utterly terrible (Image 8). I then settled on a combination of the bend and spherify tool as it was the closest to achieving the sleek and dynamic form I was aiming for.
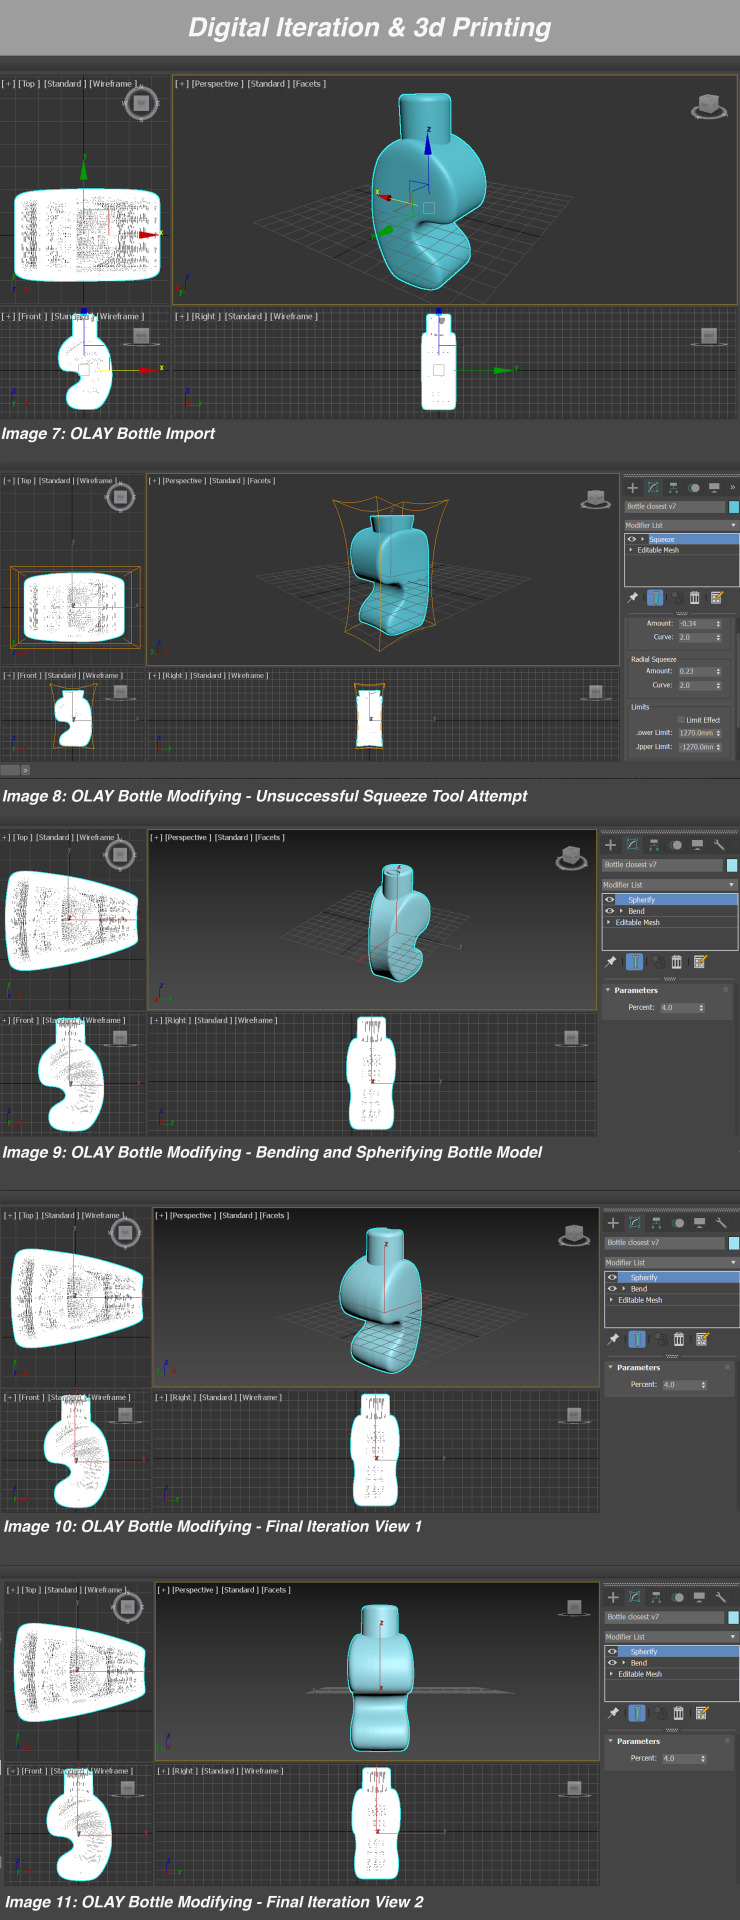
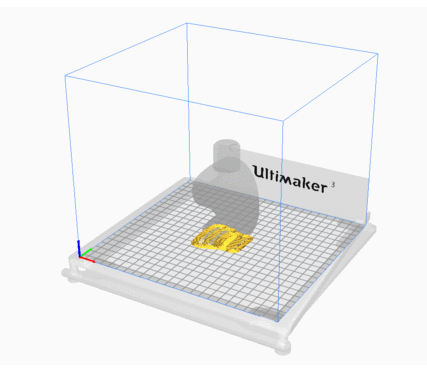
Image 12: Final .3mf file

This whole task was confusing to begin. Especially remembering the names of the tools and locations. Yet, as I used it more, I became more comfortable and eager to use. 3ds Max qualities are excellent for making model iterations without the fear of ruining your original design. You can fail hundreds of times, as long as you have your original model file, you are safe to change it however you want.
From doing this activity, I can clearly see the benefits of using a solid and mesh applications, as I could not tell the difference before. Very enjoyable process of using unique effects to create models I would have never thought of without using them!
I will definitely be learning how to use this program more during the holidays (as well as Fusion 360) to help me accomplish certain designs I want to test. I would have explored this model even more if I had more time to learn 3ds Max’s library of interesting tools. I do wish that this bottle was also more rounded and bubbly but due to my lack of skills, this was the best I could produce.
I’ll see how my 3D print comes out next week.
23 notes
·
View notes
Text
Week 8 - Digital Models
Week 8’s digital modelling activity was a fun and enlightening task!
Image 1-6:
After capturing and editing pictures of my model, I inserted them into Fusion 360 to make my digital rendition. Since my Fusion 360/3D CAD modelling knowledge is extremely limited, I firstly approached it was a simple ‘make a block and fillet the sides’ job. As I conducted this method, Fusion 360 despised me. It would not fillet the harsh edges of my model and crashed a few times when I tired to forcefully do so. I assumed my model’s curves were too complicated through this method. So, since this did not work, I did some online research on how to do organic curves in Fusion 360. I stumbled upon Tango of the Geeks’ video, ‘Sculpting Organic Shapes in Fusion 360’ (https://www.youtube.com/watch?v=7RtxexJCVts). This was a TREMENDOUS tutorial. He explained it so simply and effectively. Within the first few minutes, I gathered the tools and knowledge I needed to try the sculpting function to make my model. This method was incredibly successful for my asymmetrical, organic and complex model.
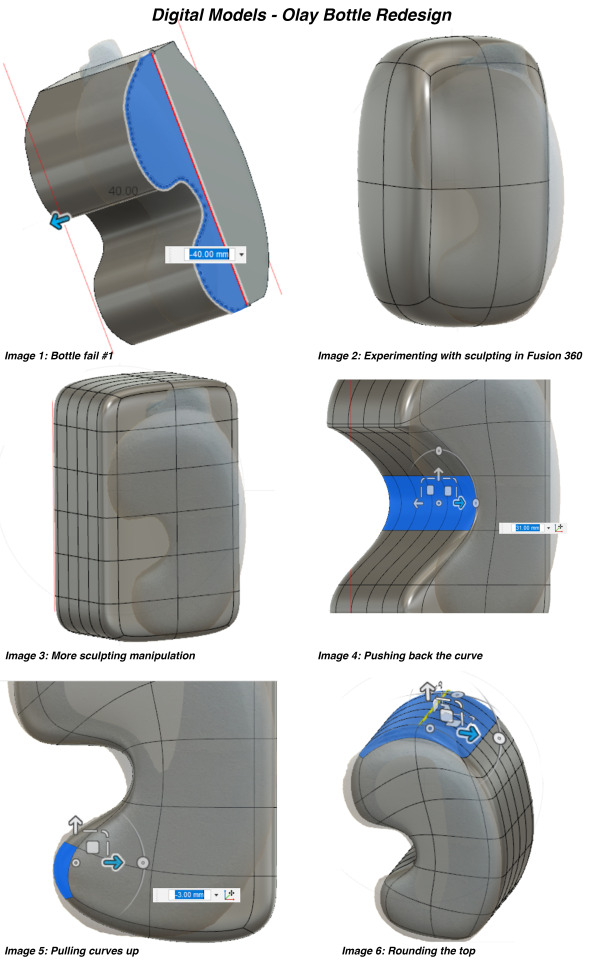
Image 7-10:
Since the bottle cap was not difficult for me to sketch up, I switched back to Fusion’s regular modelling mode and made its cap. I decided not to use the original cap design as the small hill-like shape is not as efficient as a push cap. It can be frustrating to open it if you do not have small fingers and does not aesthetically fit my bottle’s design.
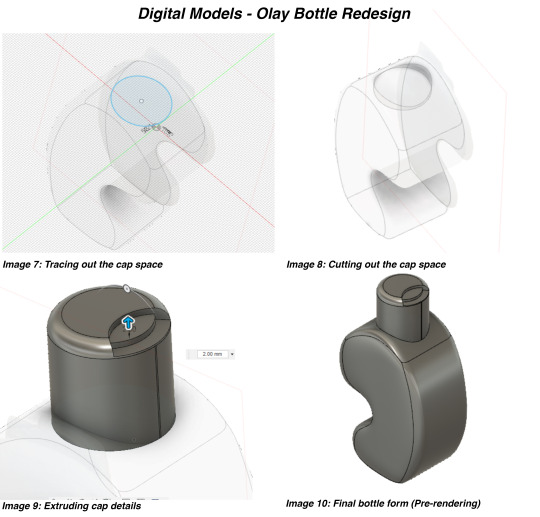
Image 11-16:
My final digital render of my Olay bottle design. I thoroughly enjoyed making this model!
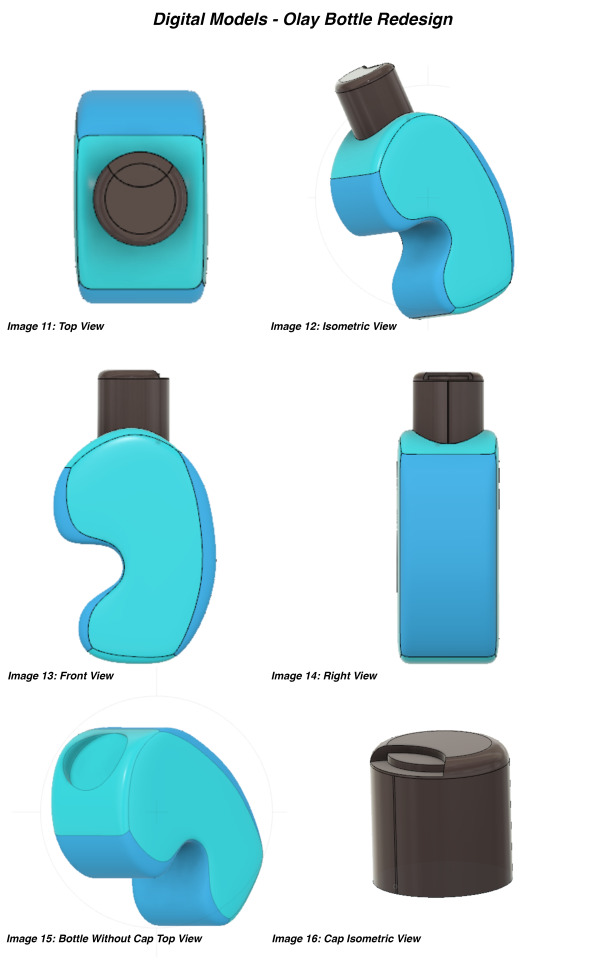
I chose to use a monochromatic blue colour scheme as blue is commonly associated with cleanliness, calmness and generally most people’s favourite colour (Most people I know/have asked all love blue but in different shades). Olay’s graphic designs are also boring and too plain. So, adding more variety of colour would enable their brand to stand out from the rest of the shop aisle.
Even though I struggled using my first approach, I overcame it through looking at more ways to get the job done. I learned that certain tools and functions have their own laws and limits. As I experienced Fusion’s limits, I was able to learn its other tools that I had not used before. Depending on one’s circumstances, other tools and methods must be incorporated to best communicate and represent your design.
Transferring my physical model into a digital model greatly helped me develop a better understanding of Fusion 360’s functions. I deeply appreciate this amazing software package, and Tango’s tutorial too, as a newbie in product modelling. The sculpting environment is so versatile and fun to manipulate, I highly recommend trying it.
Kevin Kennedy’s tutorials were also helpful for building up my knowledge of Fusion 360. Even though his techniques did not work for this model, they are excellent fundamentals for me to learn. My goal for the upcoming holidays is to continue using Fusion 360 and (hopefully) complete his 30-day training course so I can improve my skills in using CAD packages.
11 notes
·
View notes
Text
Week 7 - Physical Model Making (foam)
Week 7 foam sketch model making insights and experiences:
Image 1-4:
Since this task required sanding, I used my outside workspace. My room does not have a ventilation system that is appropriate for high amounts of dust and debris so, I moved outside to have more space, light, airflow and maneuverability.
Since I did not want to make a huge mess in my outside workspace, I used a spare cardboard box to catch my excess foam pieces. As I held my blank down on the edge of my back porch, I taped one side of the box to my back porch because a lot of the excess material I was cutting off kept slipping through the gap between the box and my porch step (Image 4). By taping one side, it guided the material correctly into the box.
Due to the awkward grooves in my yellow blade, it hurt my hand a lot when cutting. The grooves dug into my fleshy palm and did not help make accurate cuts into the blank. So, this thinner red blade was more comfortable and made my cuts more accurate.
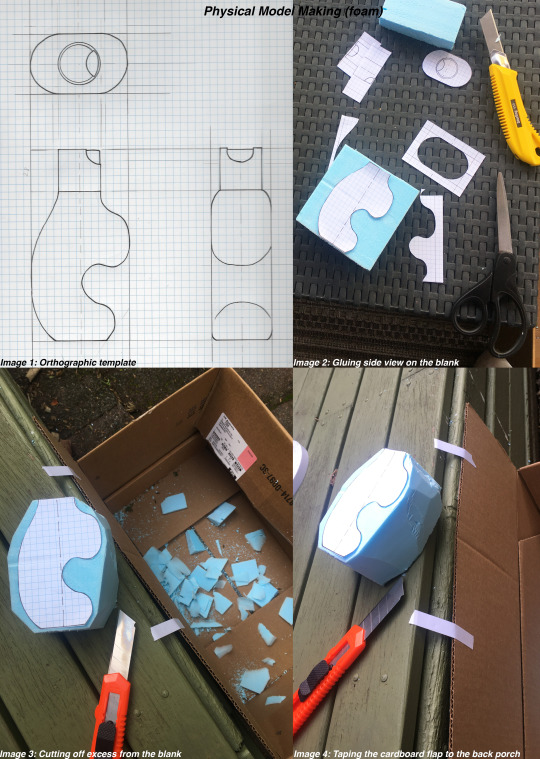
Image 5-10:
Using proper rasps and filed made sanding quite easy. However, I did not have a tool to fit inside the diameter of the organic curve, in the bottle. When looking around my house for a suitable shape, I tried using various oblique hand sanitizer bottles, large paint brush handles, hairbrush handles, small cylindrical lip balm containers, and non were efficient or getting the results I wanted. So, I went back into my recycling bin to find a cardboard roll. As shown in Images 5-6, I folded the roll in half to reach inside the cutout. It worked very effectively as I could adjust the angles of the folded roll to fit specific spots as I needed plus, provided a good handle. Made me learn that, depending on your job, flexible items can work better than solid objects, especially for tight curves.
I used 60 grit to remove larger areas (Image 8), 120 grit for getting rid of rounding the edges (Image 9), finally 240 grit for smoothing and finishing (Image 10).

Image 11-16:
Final sketch model of my Olay bottle concept.
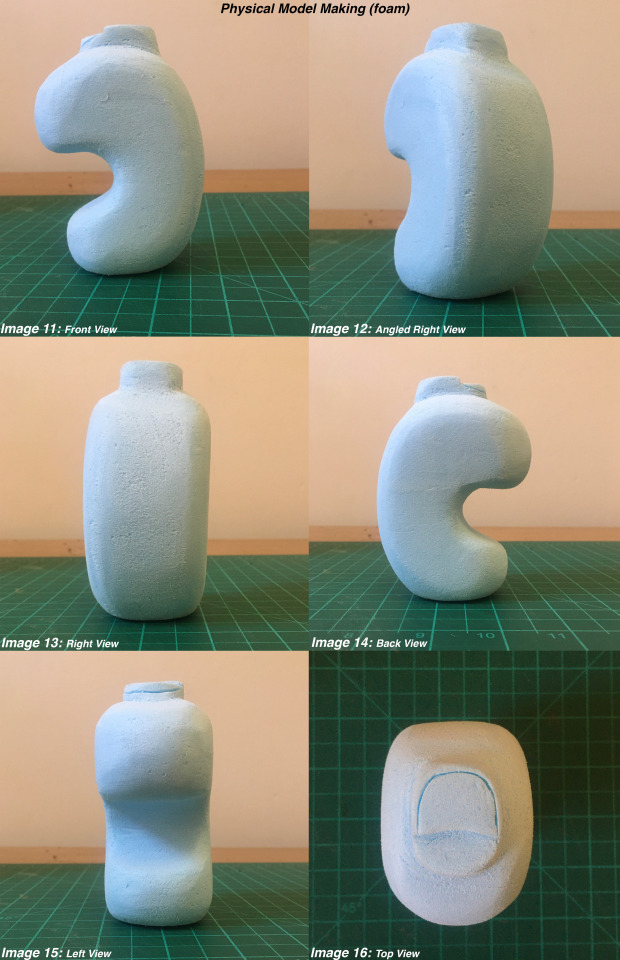
I did not realise that my sketches and orthographic templates did not show the 3D nature of my form. I had in my mind that it would be a rounder object, but I failed to communicate that through my drawings. Had to spend extra time trimming and rounding all the edges to make it look more of what I was imagining. Sketching also fails to match up to the real-world sensations. You cannot feel the drawn idea. What you may think it feels like can be completely different once you make it. The small handle I included is comfortable but only in certain positions in the hand (and only allowing a maximum of two fingers to fit in the cutaway). I would not have known this unless I had made the model.
Making a model is physically tiring, not as mentality tiring as sketching and drawing. I am not used to sanding for long periods of time, so my hands and eyes got drained of energy after 2 hours. Had to rest and come back the next day for final sanding.
Apart from using a cardboard box as my debris and dust collection jig, I free-handed the whole shape. Going off the orthographic template helped define my desired shape. After that, I found feeling the surface, doing single and slow repetitive strokes, and checking different positions around the model easier than keeping it in a locked position. Keeping it within a jig indents the foam, causing more pain to buff and sand later. If I were using a material with a higher density such as wood, I would use grip clamps to keep it sturdier but not for this blue foam model.
Overall, I learned that without making the sketch model, you would never have a proper understanding of a design. As we make products, it is vital to consider what the products will feel like. Consumers do not buy orthographic drawings to eat their cereal with. The drawings are a guideline and plan. Sketch models focus on touch and real-world contexts in appearance and functionality.
10 notes
·
View notes
Text
Week 6 - Non-Teaching Week
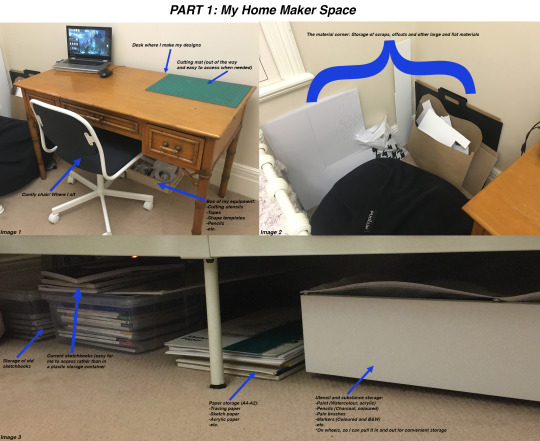
Week 6 – PART 1:
I generally design, draw and construction in my bedroom because:
-It is my own personal space and is specifically tailored for my workflow
-Does not get in the way of important communal spaces within my household e.g. kitchen, living room, etc.
I also have a backyard which allows me to do larger jobs such as spray painting, large box storage, sanding, cutting, etc.
Week 6 – PART 2:
Due to time constraints and other projects needing attention simultaneously, I admit that I could have done a lot better with this model. I had issues with Eric’s beveled edge cutting technique, so I used Clarke’s technique instead: https://www.youtube.com/watch?v=o1kTkKlTkGs&t=608s. He was incredibly helpful and informative.
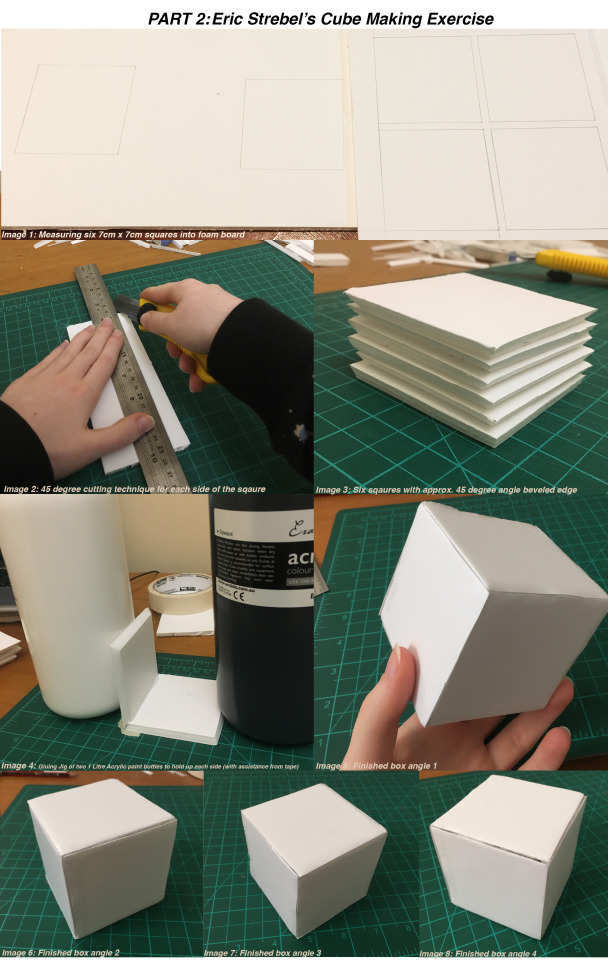
The model has certain edges that are tolerable however, other edges such as Image 5-8 did not join correctly. Obviously due to my lack of practice in this 45-degree cutting technique.
Apart from my acknowledgements of ‘it could definitely be better’, I remember Andrew’s comments throughout his interview on model making. My apparent “happy accidents” are all part of building up my skills and knowledge of professional model making. Model making is just as much of a mental challenge as it is practical challenge.
It made me realise that instead of being frustrated and ashamed of my model, I should transform into another mode of thinking. The edges might not look great, but the model is still a cube. That is its job. It has completed its job. Thus, the model works. It communicates a design idea to me. I can then say “Well, that’s the first prototype done. What improvements or changes could I do to make the next model better than the first?” Your first model is never your final model.
By the words of Andrew, “It informs your own design.” You learn more about the product you are making as you go. Learning material limitations, your own limitations, possible additions, and other features. I was contemplating about putting coloured paper on the cube because I was curious to what patterns I could create. That thinking fuels model making. These observations, curiosity and risks make a design. The model is merely a vessel to explore your thoughts and put them into reality.
Through writing this reflection and carefully listening to Andrew’s advice, I properly understand the meaning of models. Yes, they are important. They are the fundamental steps to eventually making your final product/part design. Models allow you to investigate and discover new opportunities to create more amazing products.
14 notes
·
View notes
Text
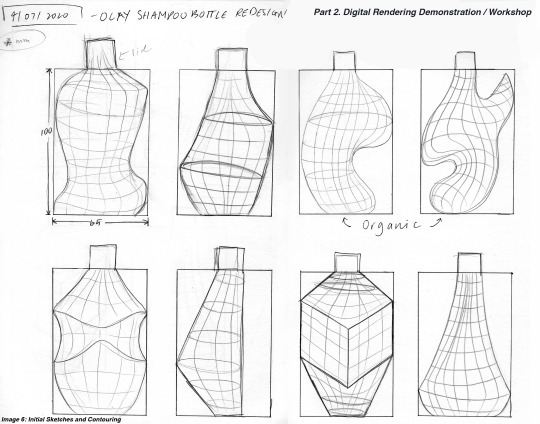
Week 5 - Sketching Workshop
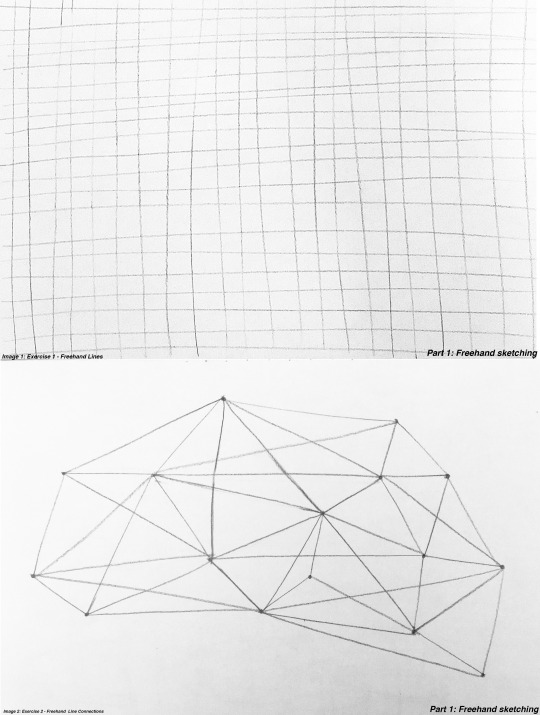
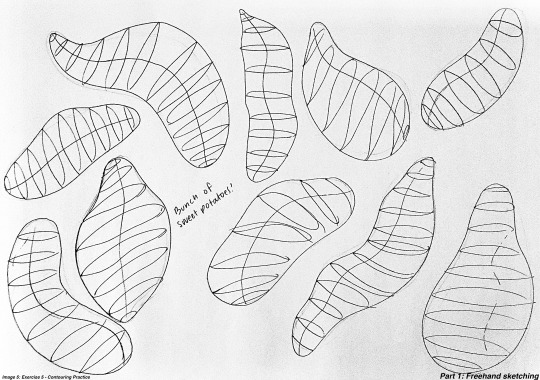
Week 5’s workshop was an overall insightful and vital class that has enabled me to start developing my personal sketching style within design.
Part 1 (Images 1-5): As I was doing these sketching activities in real time, I had a lot of trouble with putting quick and confident strokes on my paper. I have been drawing all my life but have never been assured with my rough sketching abilities. I am used to doing detailed and time-consuming jobs, so this was a massive acknowledgement to me.
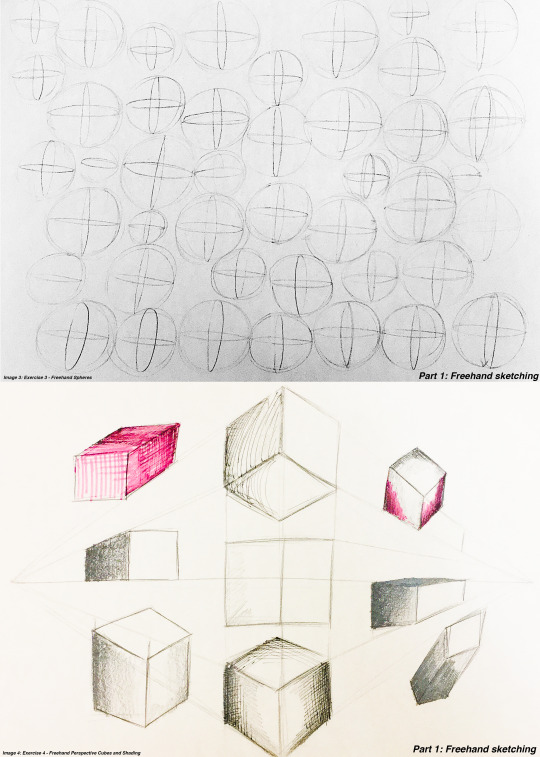
Part 2 (Images 6-9): From Part 1, I decided to be more confident with my strokes and focus more on subtle shading techniques to make the concepts look less realistic.
However, as Image 6 demonstrates, I was not completely comfortable with creating initial concepts/sketches straight onto Photoshop on my drawing tablet, so I hand sketched my initial concepts. From following Rob’s online tutorial, I practiced using contour lines (which I had never considered doing before) and it gave me a great understanding of how I wanted my forms to be viewed and shaded later. I used these hand-drawn concepts as a scanned underlay, and it allowed me to achieve the exact shape I wanted the bottles to be. I typically do not see very organic and complex forms in bottles, so I wanted to experiment with more dynamic forms. This part was my favourite to do.
As Image 7 shows, I was being mindful the entire time to not rush (as for pervious tasks I had) and to not spend more than 5 hours on it. I failed this time limit as I had problems getting my Photoshop masks and pen tool to work. Sometimes my pen would stop working and I would have to reload my document several times. My direct and path selection tools would not select my shapes and did not appear in my paths tab. Application technical difficulties from not knowing how to use many Photoshop functions made this job longer than I had planned for.
However, Image 8-9 shows I was actively making my sketches looser through rough outlining and hatching techniques for shading. Digital shading was very relaxing and fun for me as I am a big fan of shading and layer art.
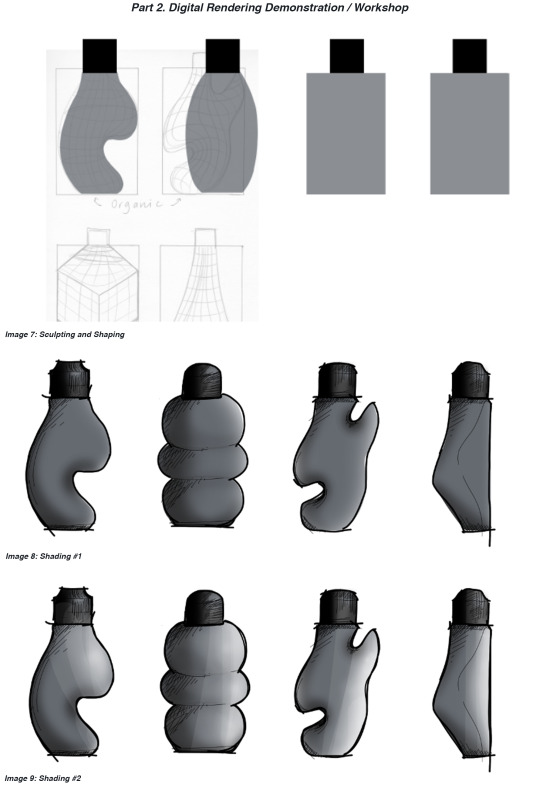
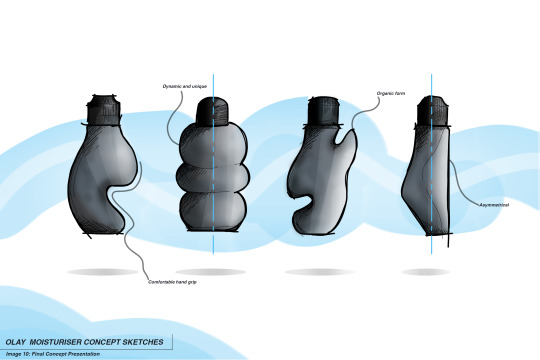
Image 10: My final concept presentation is not as loose as what our field desires it to be, however, I am very proud of the final product. It is not as realistic and structured as I usually do, and I have gained a larger understanding of how to utilise sketching techniques. The contour lines were a great technique for helping me visualise my lights and shadow placement. Looking at other concept sketches online, my outlines have more character and charm. Even making my shading chunky and more stylised made my job look like general digital concepts rather than realistic pieces of art. I will definitely be using these techniques to further enhance my sketching/drawing skills and to bloom my own personal style.
17 notes
·
View notes
Text
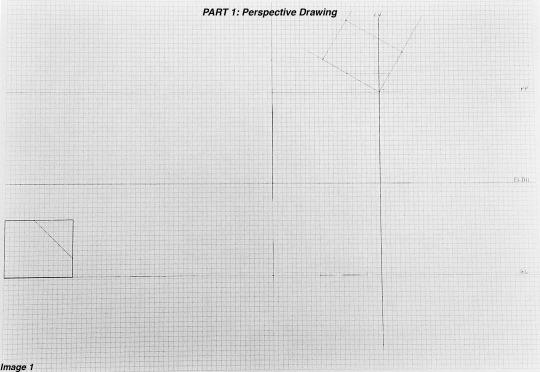
Week 4 - Perspective Drawing
For Week 4’s activity of perspective drawing, I had a lot of fun with.
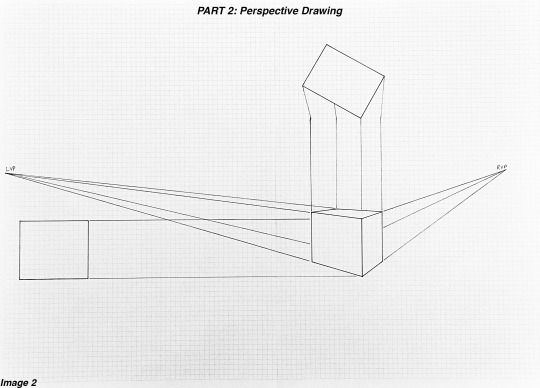
Part 1 (Image 1-4): Went quite smoothly with this drawing process. Followed the directions of our resources. However, due to the (approximately) A2 size grid layout, I found it quite difficult to obtain a high-quality photograph with adequate lighting. Overall, really enjoyed drawing this chamfered box as drawing the straight and precise lines was satisfying and more forgiving than orthographic drawing.
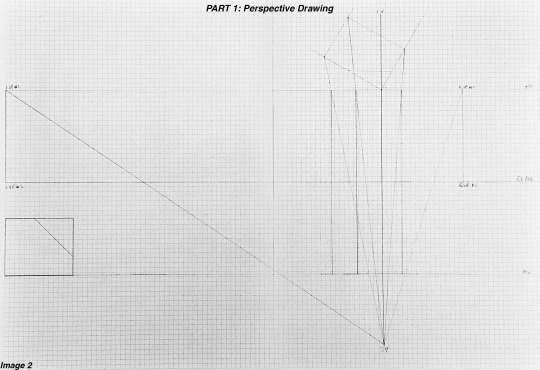
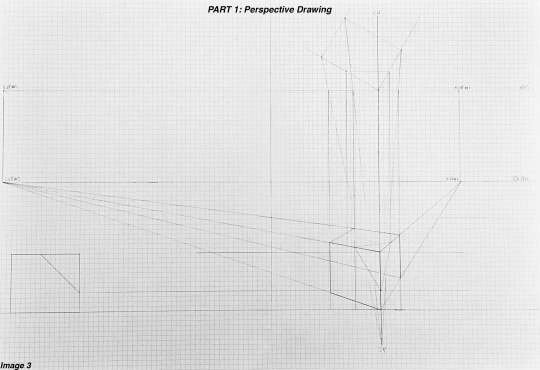
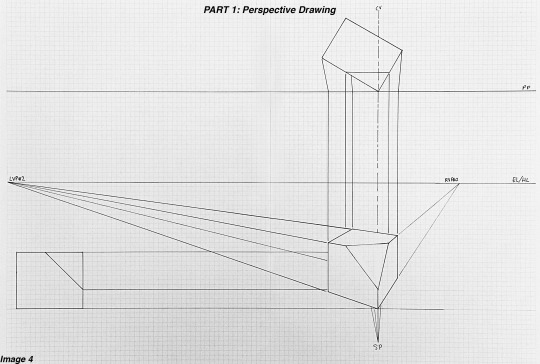
Part 2 (Image 1-4): I followed the same steps are done for the chamfered box in Part 1. I got a bit stuck on how to measure and orientate the surrounding boxes. After checking my drawings view lines on both side, I noticed that I accidentally drew a right view plane line on the wrong interaction point for the box, I corrected it and was able to understand how to draw the surrounding boxes more accurately. Bit of a slow ending but a highly successful and enjoyable process and attempt.
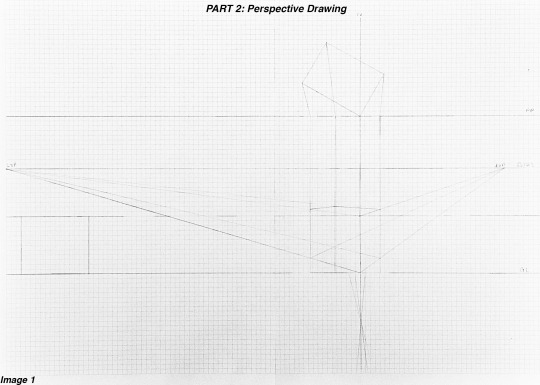
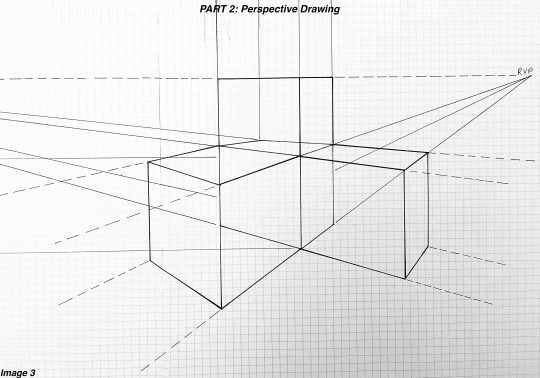
Part 3 (Image 2-5): This part was my biggest obstacle out of this week’s whole task. I was confused on how to approach the rotation of the cube to establish my circle perspectives. After researching deeper, I found a video resource that seemed to me to be the most acceptable option to fit everything on the page. (Video resource I used: https://www.youtube.com/watch?v=lrvc538hHUw&t=188s.)
This method of using 2 point perspective did not require make the overall drawing too complicated and illegible. So, I used this method to layout my circle perspectives. I still do not know if this is correct, but I gave it my best attempt! I also cut and reused my spare boxes (built from my previous parts) to help me visualise and measure my drawn boxes.
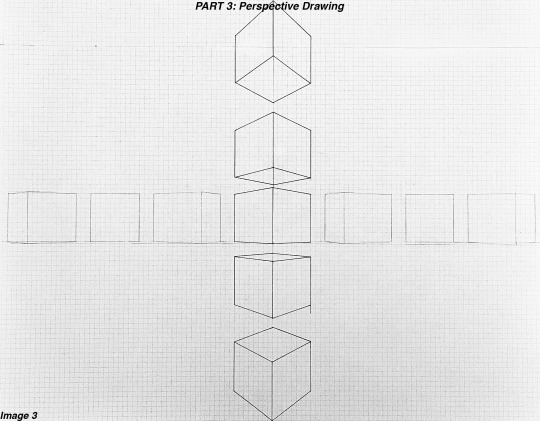
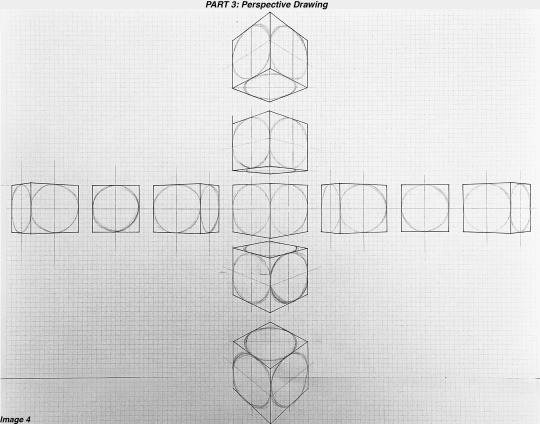

In whole, I thoroughly enjoyed perspective drawing this week. I found it challenging but had lots of fun with the whole process. Very pleased with my improvements thus far as I have always felt more comfortable drawing in a looser, yet still controlled, drawing manner.
17 notes
·
View notes
Text
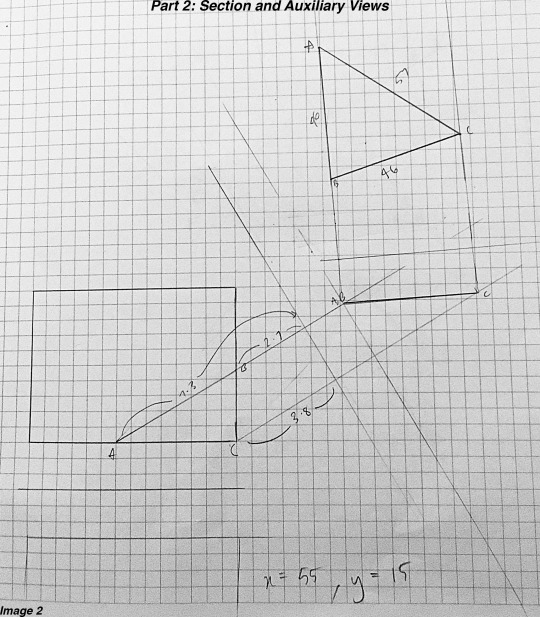
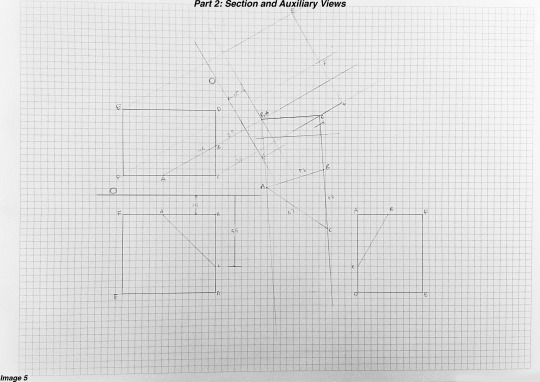
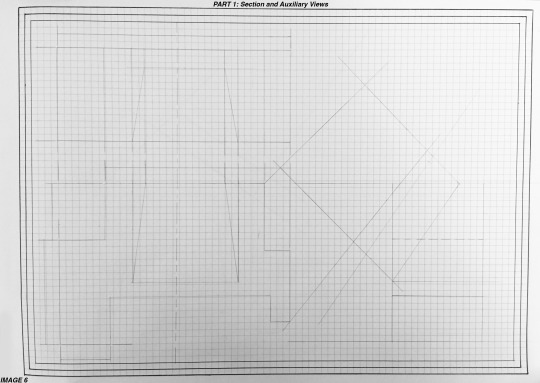
Week 3 (Part 2): Section and Auxiliary Views
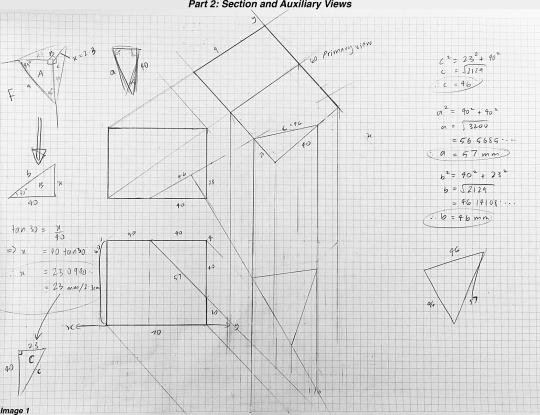
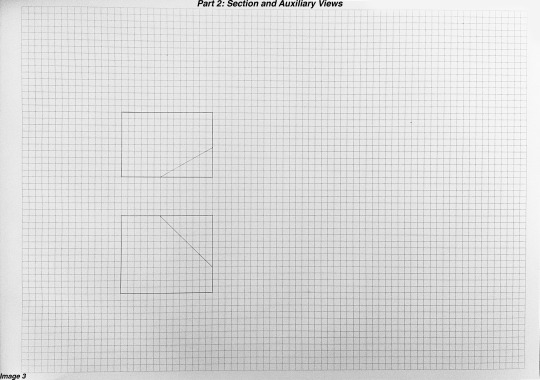

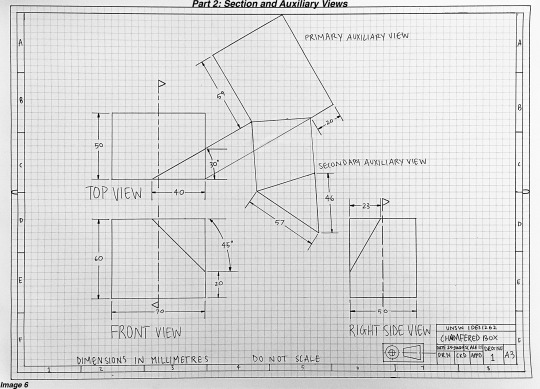
For week 3’s task (part 2), was very tricky but incredibly enlightening.
Image 1: To get the TSS of the oblique face on the chamfered box, I used trigonometry to calculate the true lengths of the beveled edges. I tried using Fusion 360 to help me orient myself around the object, but I still could not understand how to draw the other perspective lines outside of the beveled triangle on the grid paper.
Image 2: Feeling extremely confused and ashamed, I went back to the presentation to see if I had missed any steps on how to draw the primary and secondary views. Turns out I did not realise that slide 25 existed. When I was going through the presentation the first time, I skimmed over it and accidentally missed this slide. Very big oops.
Image 3-6: After properly looking at slide 25, I was able to draw the primary and secondary auxiliary views. This made me GREATLY understand how complex these views are, however, very logical, and fascinating.
I still have plenty to learn for technical drawing (applying dimensions, borders, symbols, etc., correctly). There are mistakes in my drawing but in just 3 weeks, I am astonished to see my improvement. My endurance helped me get through and I am incredibly happy that I figured it out. (Plus, I now have some extra skills in Fusion 360 by accident).
For the next task, I want to focus on correctly positioning dimensions, writing the titles more clearly and regularly cleaning my equipment more. When outlining, I would forget to wipe my rulers, set squares, etc., which led to these utensils carrying small traces of fresh ink on the edges. This caused many minor bleeding and swipe marks on the page.
8 notes
·
View notes
Text
Week 3 - Section and Auxiliary Views
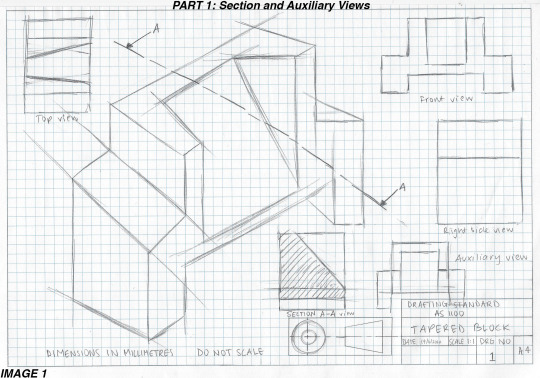
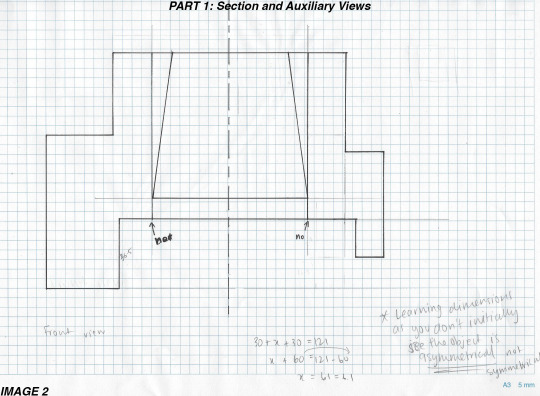
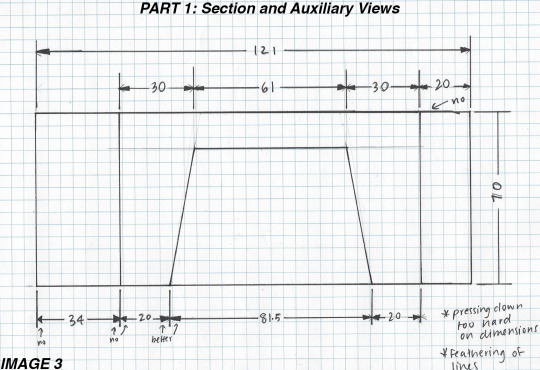
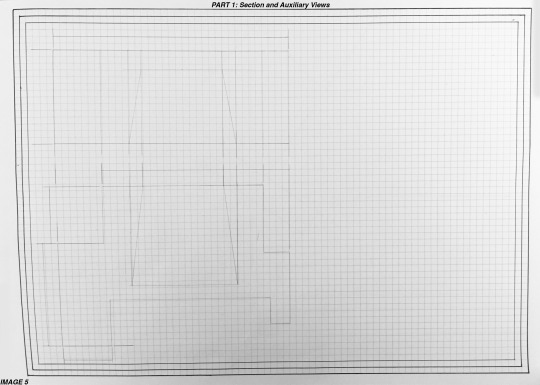
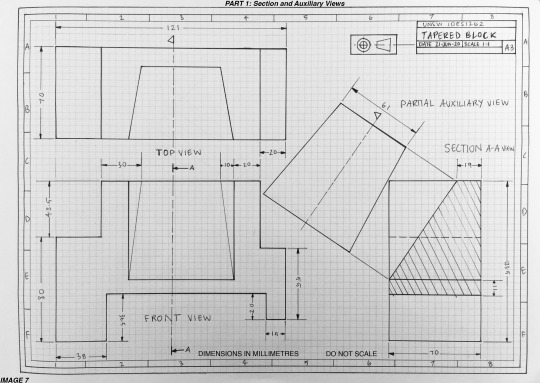
Week 3′s task ‘Section and Auxiliary Views’, was very tough for me.
Image 1-3: From my mistake last week of underestimating the complexity of views, I decided to carefully study the tapered block this time. As I roughly sketched, it surprised me that each side of the block was asymmetrical – even though it appeared symmetrical. Through doing these brief structure studies, I understood its specific dimensions clearly and helped me mentally plan the real drawing.
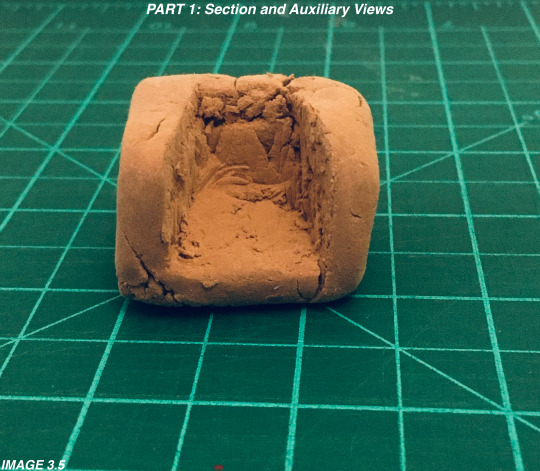
Image 3.5-7: After gaining more confidence from learning its dimensions, I started off by drawing the front view (first) then the top view (second). I employed the use of clay to confirm the incline’s front perspective (Image 3.5: Does not look the best but worked very effectively).
I did not face much difficulty with visualising the front and top view; however, I was horrendously troubled with the partial auxiliary view. As this was the second engineering drawing, I had ever done, I spent more time researching on how to properly orientate that view. Video resources included: - https://www.youtube.com/watch?v=gzq48vBbODg&t=387s, - https://www.youtube.com/watch?v=FEJ4gzgp7Tw and - https://www.youtube.com/watch?v=Pa_rF-wg8Rg&t=160s.
However, I eventually decided to see if other class members had done theirs to see how they interpreted the partial auxiliary view, as the online tutorials did not help me enough for the block. By looking at other people’s blogs, I was able to visually grasp how/where to fit the view on the page.
Even though this drawing/my skills are light-years away from being completely accurate (needing more space between each view), for my second serious attempt, I have certainly increased my quality and presentation. The extra care and research greatly improved my technical drawing skills and I am fairly pleased with my work this week. Looking forward to the next challenge!
14 notes
·
View notes
Text
Week 2 - Orthogonal Projection & AS1100 Standards
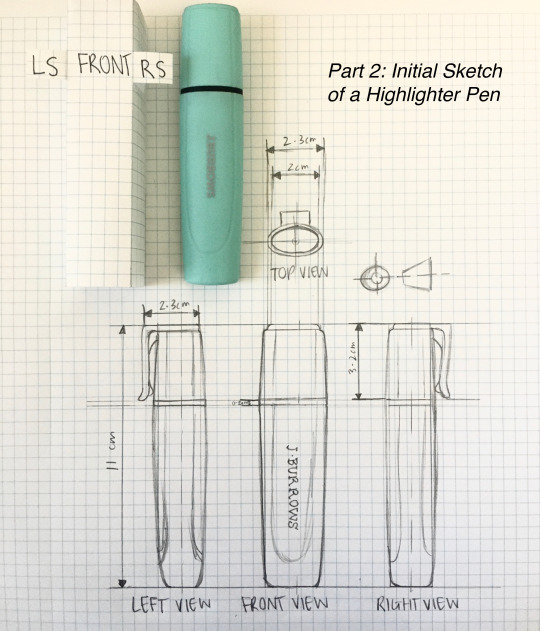
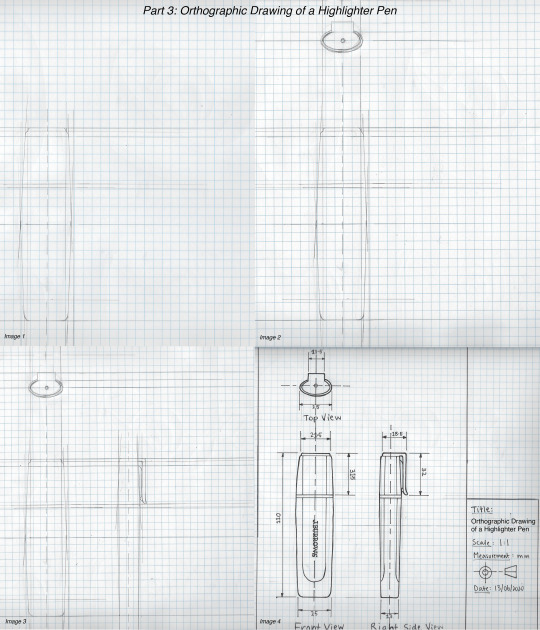
Before this week’s task, I had never drawn an engineering/technical drawing. I did not have subjects or resources available before this course, to teach me how to draw orthogonally or with such strict precision.
I originally drew a tape dispenser but had a very frustrated time sketching and measuring its complex curvature and proportions. I decided to scrap the tape dispenser and switch to a highlight pen. This object was simpler for a beginner like me to manage, than the previous object.
Outlining the drawing caused me the most stress and difficulty. I do not have any half-size liners to completely adhere to the AS1100 standards. I also do not have access to an A3 scanner (only an A4). Especially for Part 3, Image 4; I had to think more strategically so the entire drawing could fit onto the scanner.
However, I endured and continued to try my best throughout this task, even with my lack of experience in this field. After this experience, I now will invest more of my time to research and practice my techniques to produce higher quality orthographic drawings.
15 notes
·
View notes
Text
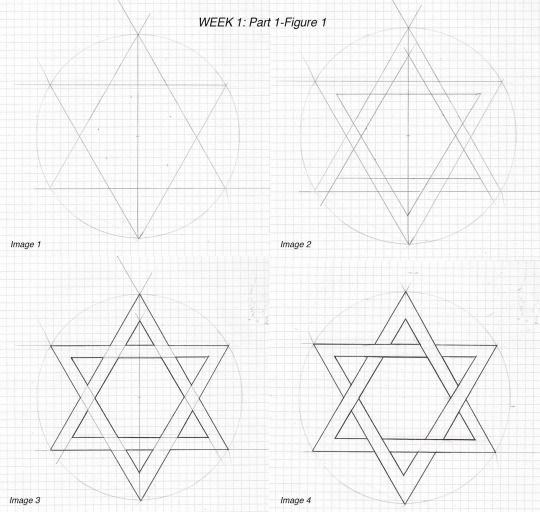
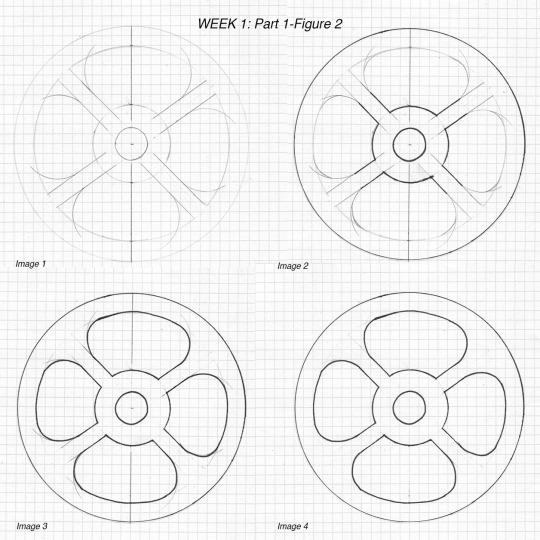
Week 1 - Drawing Instrument Exercises
For our first studio task, I initially thought that this would be rather easy and quick to do. However, I was quickly proved horribly wrong.
In Part 1 (Figure 1), my main mistake was my lack of attention. Particularly when outlining the wrong sketch lines in Figure 1, as the star’s optical illusion made it difficult to differentiate lines. In the next attempts, I took more careful consideration and slowed my pace down as to not make those mistakes.
In Part 2 (Figure 2), previous misjudgments in line connections and inconsistent line thicknesses in inking made me realise that my grip was too tight and strict when outlining in ink. So, I allowed myself to relax and loosen my hand grip to provide smoother and more consistent line art.
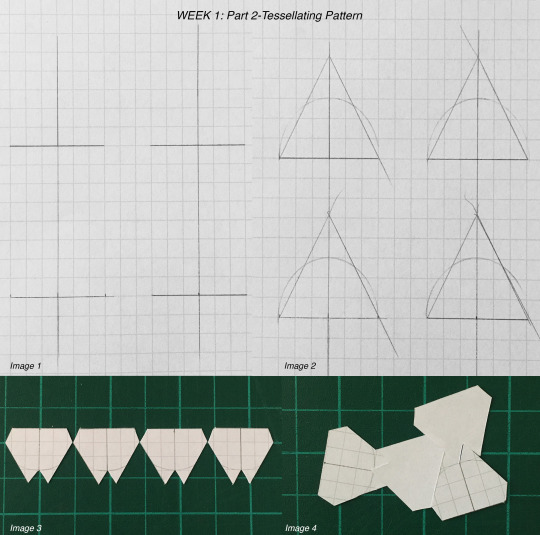
For Part 2 (Tessellating Pattern), I originally rushed this pattern and was left with a malformed pattern. On the next attempts, I slowed my pace and focused more on ensuring the measurements were as accurate as I could get.
I now see that my habits of impatience and rigidity do negatively affect my work. From this experience, I will actively relax and take more thoughtful consideration into the next tasks.
12 notes
·
View notes
Text
Hello there, Stranger
The name’s Maddy. I am a proud addict of designing and creating. Apart from learning how to refine and improve my craftsmanship and technical skills through this class — I love to draw, paint, knit, crochet, sculpt, tie dye and make anything really in my spare time. Weird fact: Favourite animal is a naked mole rat.
Feel free to bash my work with constructive or passive-aggressive critique.
3 notes
·
View notes