#ides1262 2020 week 2
Text
Week 2 - Orthogonal Projection & AS1100 Standards
Before this week’s task, I had never drawn an engineering/technical drawing. I did not have subjects or resources available before this course, to teach me how to draw orthogonally or with such strict precision.
I originally drew a tape dispenser but had a very frustrated time sketching and measuring its complex curvature and proportions. I decided to scrap the tape dispenser and switch to a highlight pen. This object was simpler for a beginner like me to manage, than the previous object.
Outlining the drawing caused me the most stress and difficulty. I do not have any half-size liners to completely adhere to the AS1100 standards. I also do not have access to an A3 scanner (only an A4). Especially for Part 3, Image 4; I had to think more strategically so the entire drawing could fit onto the scanner.
However, I endured and continued to try my best throughout this task, even with my lack of experience in this field. After this experience, I now will invest more of my time to research and practice my techniques to produce higher quality orthographic drawings.
15 notes
·
View notes
Text
Week 2 Studio Tutorial – Orthogonal Projection & AS1100 Standards
Weeks two orthographic drawing was the first time I have ever done drawings up to such strict regulations, and I must say it came with fun experiences and hardships.
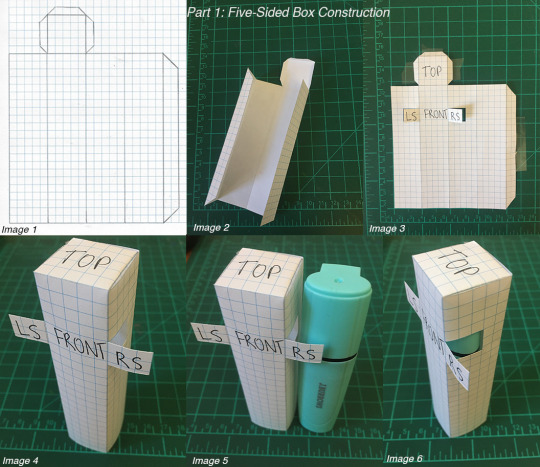
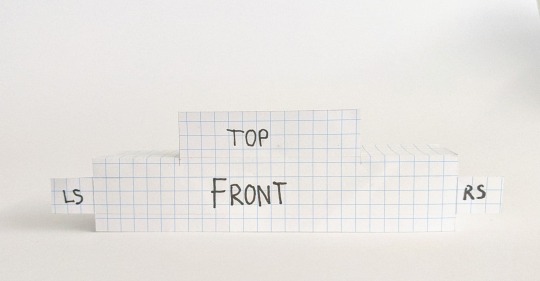
During Part 1 I must say this was the easiest part of the assignment, since it only required me to make superficial measurements of my desired object. Making this kind of guiding paper box, while simple, it was extremely useful to know which side my object was facing.
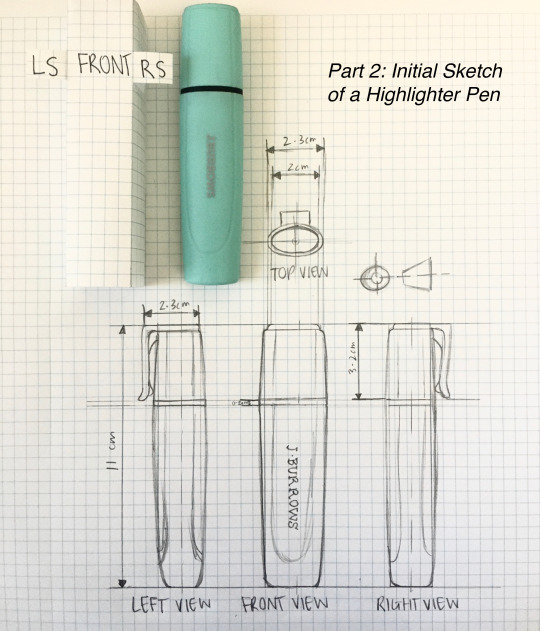
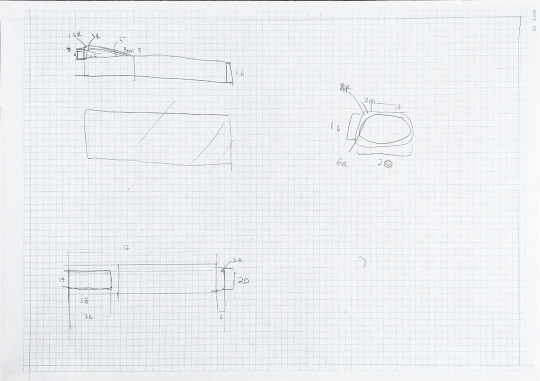
Next in Part 2, the sketching while not very precise, allowed me to get an idea of where all my components should be. It was a fundamental step towards my final product.
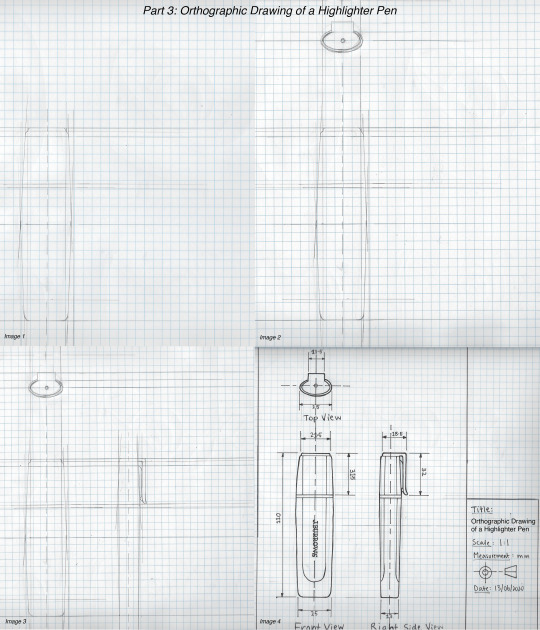
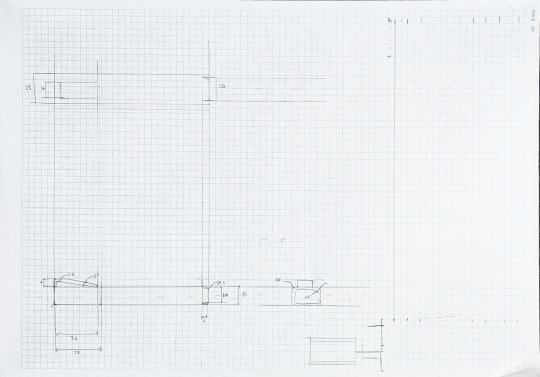
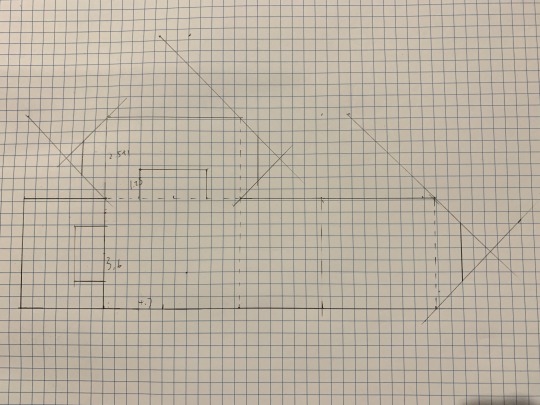
Finally Part 3 was the hardest and time consuming. Getting precise measurements of such a small object was tedious to say the least, and to figure out where to put each line so it would not affect the interpretation was hard on itself. The line drawing in different sizes worried me from time to time, since if I made a single mistake, my work would look awful.
One part I disliked was measuring, since my object was sort of old and wore down, all measurement where sometimes not consistent, which made it a pain to notice when you are working in millimetres,
However, even after all the hardships , I was surprised and happy of seeing my work on paper. Looking at everything fit so precisely and be at scale, brought a weird sense of satisfaction and pride in my own work. It is a sense that I would not mind feeling every day.
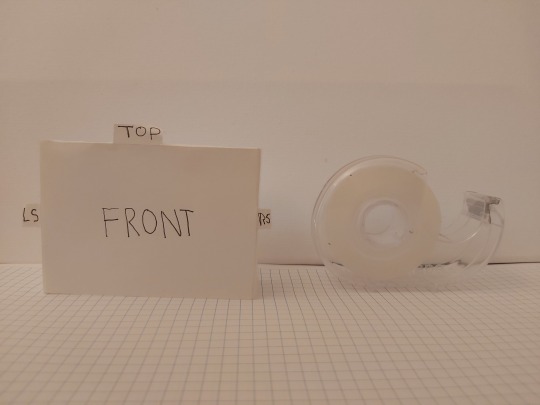
Part 1

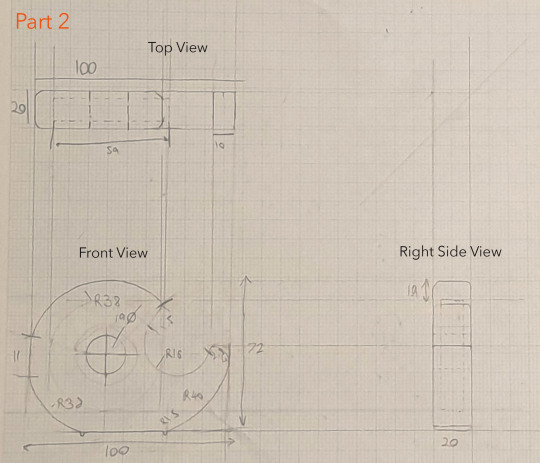
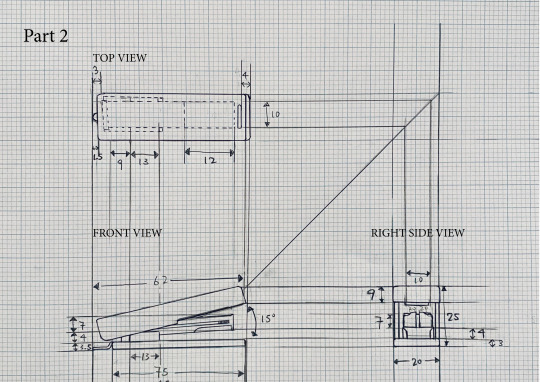
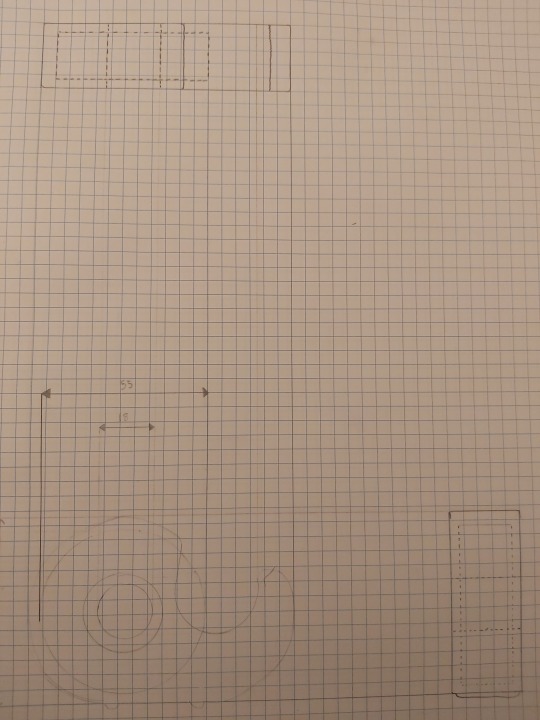
Part 2
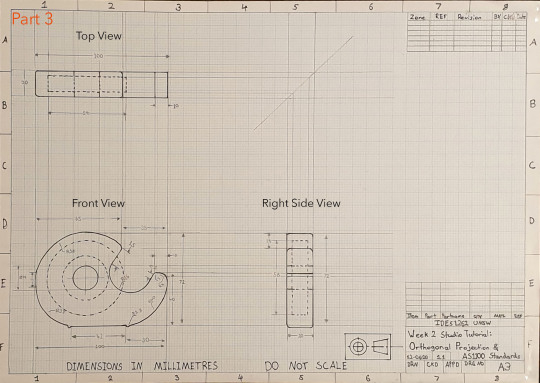
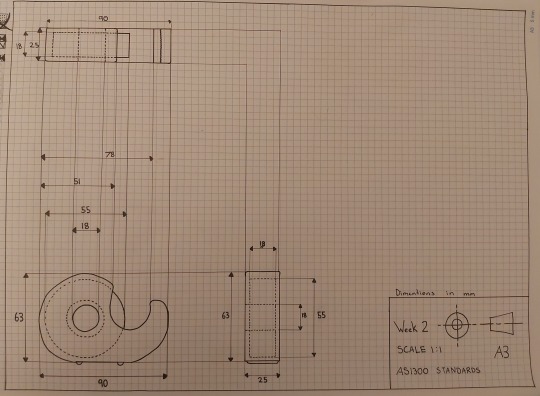
Part 3

11 notes
·
View notes
Text
Week 2 - Orthogonal Projection & AS1100 Standards
This week’s activities involved the development of the fundamental skills of engineering drawings. I was satisfied with my final results as I believe that it reflected my intent and the techniques I used to complete a cohesive drawing.
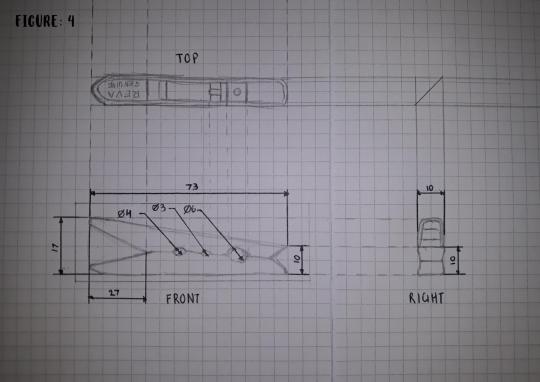
An aspect which went well for me is the final refined engineering drawing (in figure 6) Completing a freehand sketch (figure 4) really made it easy to plan out the third angle layout and the shapes of sides before attempting my final drawing, this allowed for less error and mistakes. Overall I focused on the placement of dimensions and the thickness of these lines. I followed the key aspects which were presented to the class during the lecture.
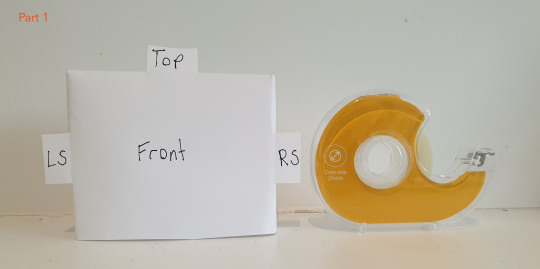
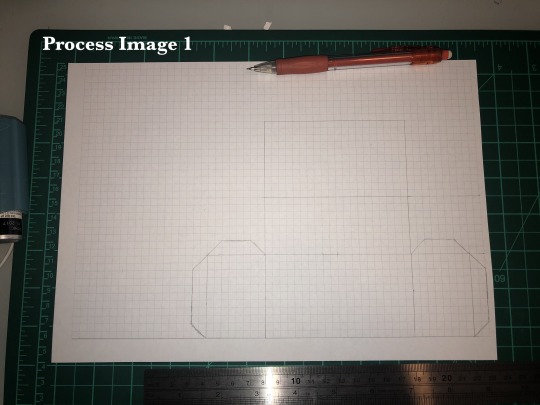
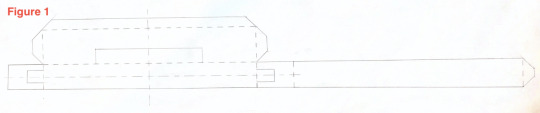
I gained some insights during the development of my engineering drawings. Initially, I didn’t know how to begin, I decided to take my time and focus mainly on planning and creating simple sketches. I chose to start by planning the dimensions of the object, I first laid the peg down flat on the paper to better visualise the sides (seen in figure 1). Following this, I noted the dimensions and developed a simple sketch of the box labelling each side appropriately. To create a box with sharp folds I resorted to using thicker paper (of around 180gsm) with the use of double-sided tape the box was able to hold its shape easily.


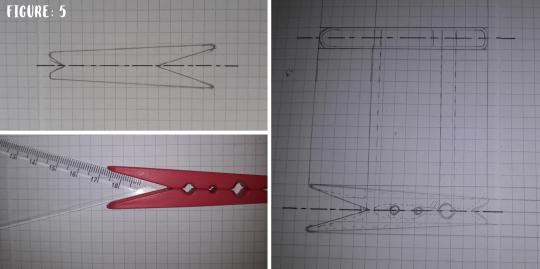
Another interesting insight was discovered when I was struggling to measure out the angle of the end of the peg. I was playing around with this part and discovered that one of the set squares fit perfectly and therefore I was able to see that the angle was 30° (seen in figure 5). Next time when working with different objects I will use the tools around me to assist in deciding the angels and dimensions of the object.
When using the Adobe scan app for my final orthogonal drawing it removed the grid lines. This is great for having a clean, neat final result and allows the viewer to focus on the drawing and not be distracted by the grid lines.
After completing these activities I had a better understanding of the standards used in engineering drawings including line types, scales, dimensioning, layouts and other and their importance in conveying a cohesive drawing. I know I can find the AS1100 standards using online resources so I can memorise standards such as line weights and scales. I can now describe the first angle and third angle views to turn a 3-dimensional form/object into a 2-dimensional drawing as seen in this weeks exercises (figure 6).

If I were to approach this task differently I would try using a slightly more complex object may be a stapler or hole puncher. Choosing an object with many angles would challenge me and I may have developed further insights and tricks in drawing such objects. Another thing I would do is to purchase and use more accurate sized fine liners (0.35 and 0.7) I was limited to what I already had which included 0.3 and 0.8. Otherwise, I was happy with the process and final results.
11 notes
·
View notes
Text
Week 2 - Orthogonal Projection & AS1100 Standard
As touched on at the beginning of the class, one big takeaway from week 2 for me was slowing down and taking care with my work. I think the idea that small errors quickly compound into big errors is very true, and by taking time with a drawing, these errors can be avoided altogether.
This week in IDES 1262, we explored in greater detail engineering drawings, specifically, third angle drawings that adhere to AS1100 Standards.
Part one was relatively simple, and involved the construction of a 5 sided box to fit over the chosen object, in my case a tape dispenser. At first I thought this task was basic and unnecessary, but upon beginning part two I realised it was useful for reference, especially because this was my first attempt at this format of drawing.
Part Two was especially useful in helping my gain an understanding of the concept behind third angle drawings, specifically, lining up the key points to maintain the correct scale. I used part two as a rough sketch to help me visualise how the layout works, and to get my dimensions and technique correct. This part was a very useful step.
Finally, Part 3 was time consuming, however I am reasonably happy with the results. One mistake I made was not creating the boarder and title block before I began the drawing. As a result the drawings are slightly too close to the boarder, and I will ensure this doesn't happen in the future. Further, in the future I will make the dimension markings clearer and larger as it did not turn out well in photography.
If I were to do this task again, I would put a lot of time ensuring I don’t double up on dimensions. This error has made my drawing slightly confusing and cluttered and doesn't adhere to the standards.
Overall, I am happy with the way week two went in IDES1262, the lectures were informative and engaging and I enjoyed the studio task assigned to us.
10 notes
·
View notes
Text
Week 2 – Orthogonal Projection & AS1100 Standards
This weeks studio tasks were a large challenge for me. Although the task was time-consuming and intricate, I still enjoyed it and appreciated the challenge.
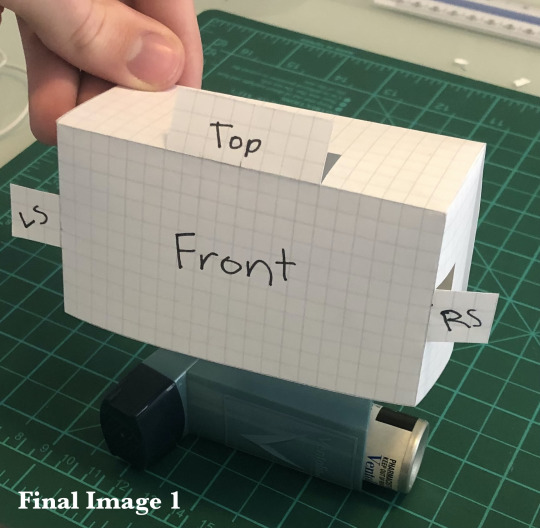
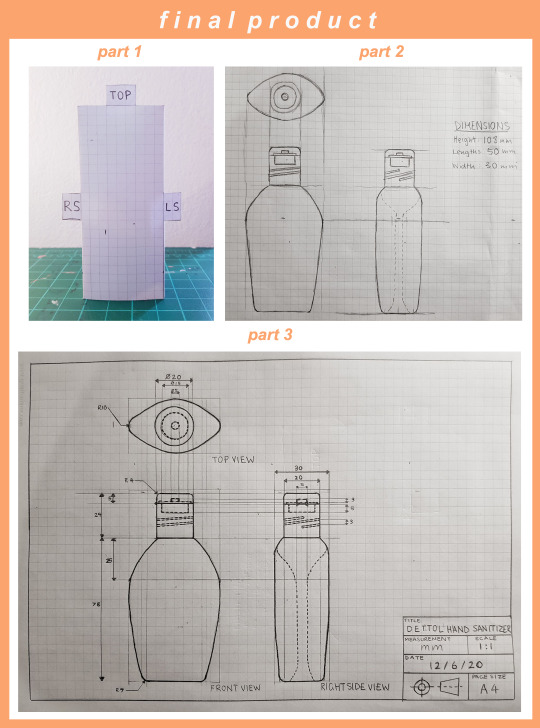
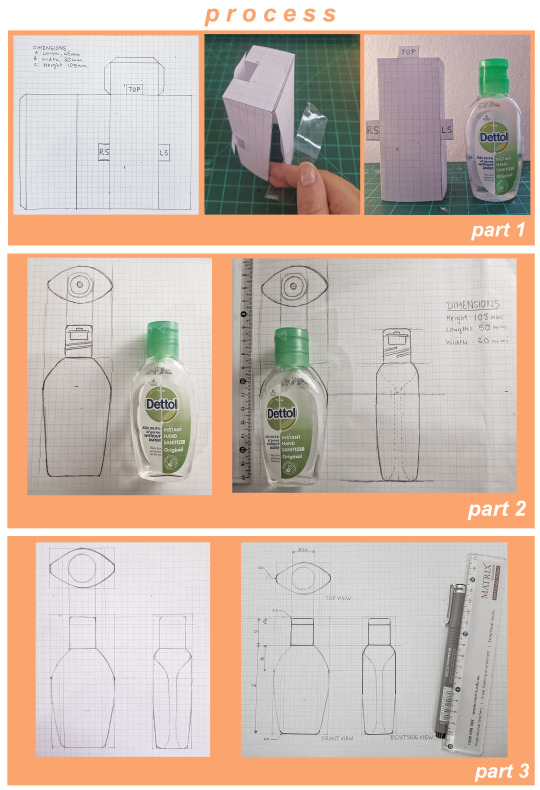
The first task asked us to create a box for our chosen object (as seen in final image 1). I found this task simple and fairly easy to complete. This box did assist me to process how to draw my chosen object (which was an asthma puffer) as I could visualise the different views.
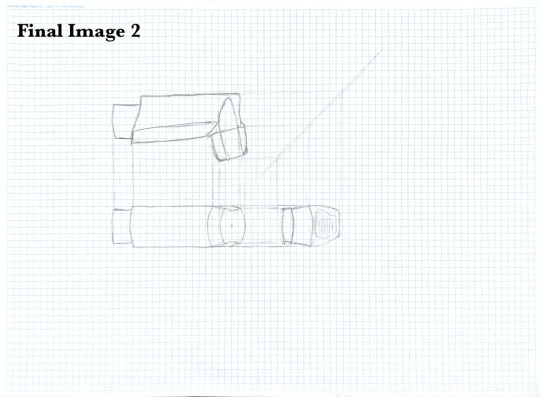
The second task required us to draw our chosen object roughly using a pencil and no tools (as seen in final image 2). This task was moderately difficult as it was challenging to get the dimensions and angles of the asthma puffer correct. It was determined that it was difficult to accurately visualise and depict the puffer on its side and this was adjusted in the next task. I did enjoy the freedom of drawing without having to use a ruler.
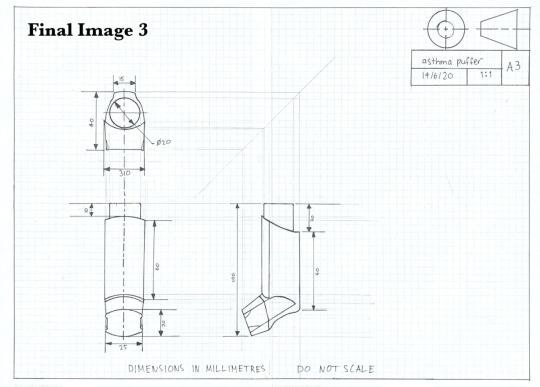
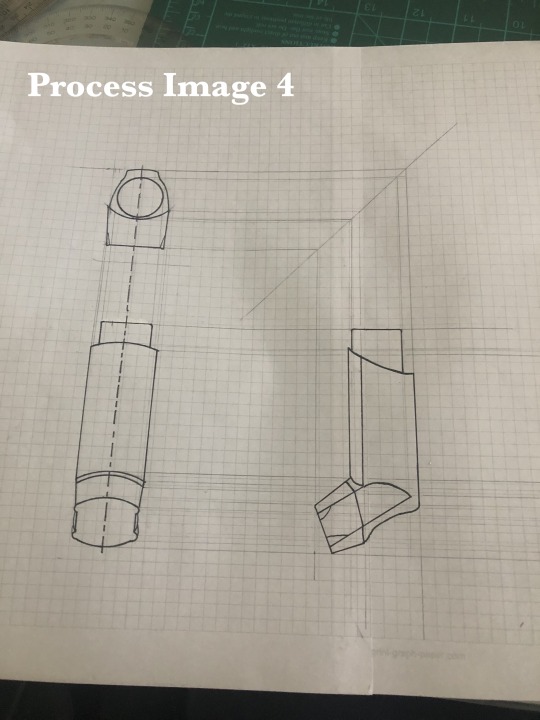
The final task asked us to draw our object accurately and cleanly, using the AS1100 Standards (as seen in final image 3). This task was the most difficult for me for a range of reasons. Firstly, upon beginning this drawing, I discovered the object I had chosen was rather difficult to draw due to its odd shape, angles and curves. Secondly, due to the shape of the object, it was also difficult to measure, resulting in my drawing’s dimensions being off. It was found that one wrong measurement can largely impact the drawing as each perspective becomes warped. Lastly, I also struggled with getting the perspective right which resulted in my side angle lacking accuracy. As seen in the front perspective of the image below, I incorrectly drew the perspective which resulted in the angle of the mouthpiece in the side view appearing incorrect. I believe that starting on the side perspective of this drawing may have allowed the rest of the drawing to appear more balanced and in a more accurate ratio.
If I was to do this task again I would begin with the side view first. This would assist me to get the perspective correct for the other views and make the whole composition much more accurate. I would also use other techniques to measure the object such as string and a ruler rather than estimating the final measurement.

Overall, I am proud of the work I have completed this week and I have learnt an immense amount from these activities.
7 notes
·
View notes
Text
Week 2 - Orthogonal projection

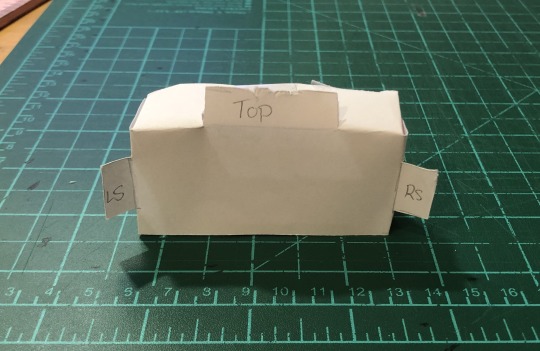
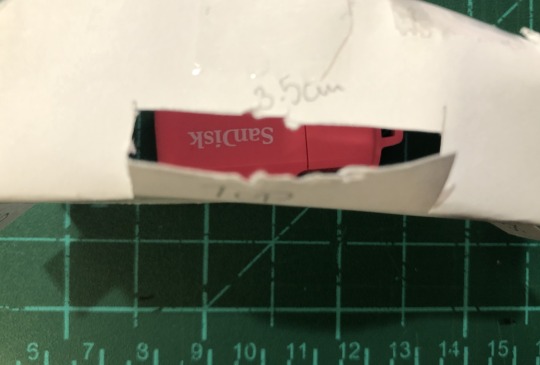
Task 1: For this task i chose a USB stick as my object. After completing all activities i regretted this choice. For this particular task the stick wasn’t too difficult to work work with. This was due to the straight forward directions of how to produce the box, which sits over the USB. However, in task 2/3 it was much more difficult.
When producing the box i felt that my knife wasn’t as sharp as it should’ve been or perhaps it was my technique, nevertheless i discovered i should’ve potentially scored the edges of the paper to assist me in the folding of the edges, as this probably would’ve helped me control the sharpness and cleanliness of the finished outcome. Subsequently, if my lines were easier to comprehend and cut, it would’ve been easier for me to produce a more professional finished product.
Task 2 & 3: For some reason I had difficulty understanding these tasks, specifically task 2, which eventually lead me to combine both task 2 and 3. As seen in the above photos i didn’t have access to grid paper at the time, which lead to an increase of stress in the completion of these tasks as the measurements of my object (USB) was slightly harder to understand as the drawing itself was not placed on a grid thus, the measurements of the USB may be slightly inaccurate.
As mentioned earlier, the USB was personally a bad choice, as the measurements were just too small. Due to this same problem the pencil was also really hard to see, so the pen was needed to establish a clear outline and therefore a clear product.
Overall: I felt that task one was simple and easy to understand, which made it enjoyable to create. However, task two and three were challenging yet mainly due to my own fault. I understand that i chose a difficulty sized object and that i didn’t have grid paper or even a boarder. Most of these factors are just me rushing and an overall lack of effort, which i’m not particularly proud of.
7 notes
·
View notes
Text
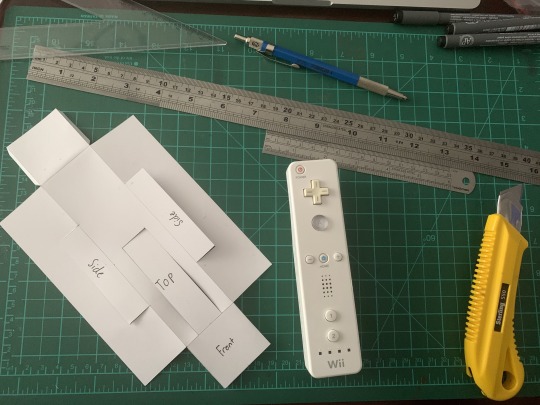
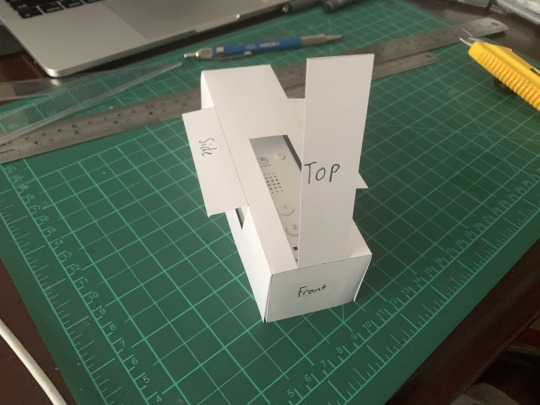
Week 2 - Orthographic Projection: Wii Remote
For our second week, Rob and Miles taught us all about the rules and regulations around orthographic drawings and 3rd angle projection. I really enjoyed this activity, it was quite challenging with the object i had chosen being a Wii remote. It has some pretty organic curves but overall i believe i followed made note of their dimensions well in my drawings.
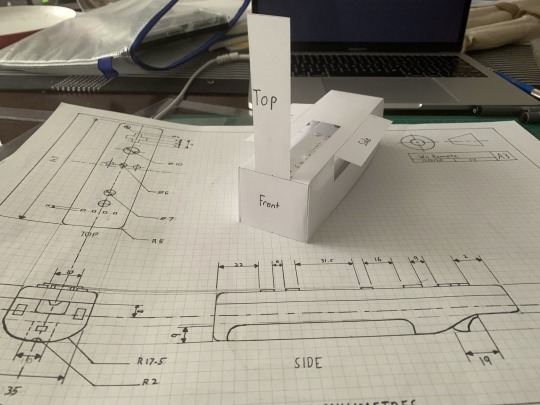
For the first activity, we were assigned to make a paper box 10mm plus the dimensions of our chosen object to act as a guide when drawing the accurate orthographic projection. Overall, this activity was fairly simple and easy to do, i used a small 15cm steel ruler to find the measurements and ruled them on a plain white piece of paper to make the net. I also cut flaps to be able to see into the box as well.

For activity two, we had to draw a rough sketch of our object to get an idea of what it will look like in our orthographic projection and find all the different measurements to then recreate it more accurately. For activities 2 and 3 it was quite difficult as there were many rules that had to be followed for it to be done correctly. The Wii remote has a lot of curves in its shape, thus making dimensions and drawing clean lines proved to be quite difficult, I was eventually able to figure them out with some time though. My object also had many small buttons which pertruded from the top, thus there were many small dimensions which I had to take note of for it all to be perfect. At first I calculated my measurements in centimetres, but for activity 3 I changed to Millimetres.
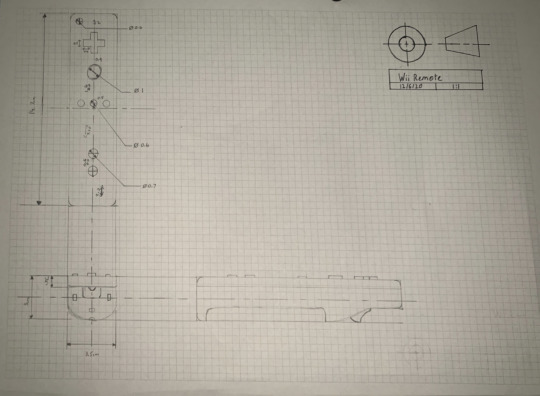
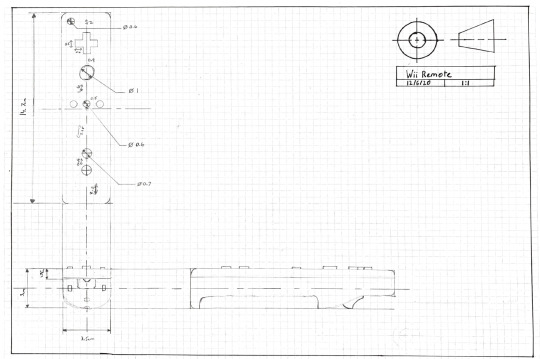
Activity 3 was where I had to ensure all lines were straight and measurements were correct. I ensured all dimensions, centre lines and pieces of the remote were lined up and correct. Once this was done, it had to be outlined in black marker. However according to the lecture, the size markers required were not given to us in our kits, thus I had to make do with what was available. Therefore, for Borders, text boxes and the projection symbol, a 0.8 marker was used, part outlines I used a 0.5 marker, for symbols and centre lines I used a 0.3 marker, and dimension lines and text I used a 0.2 marker. All dimensions were changed from Centimetres from previous activity to Millimetres. I found great difficulty accurately finding the centre of some very small circles and fitting all measurements as space began to become an issue. Overall, I believe I completed the activity to a good standard that i’m proud of.

7 notes
·
View notes
Text
Week 2 - Orthogonal Projection & AS1100 Standard
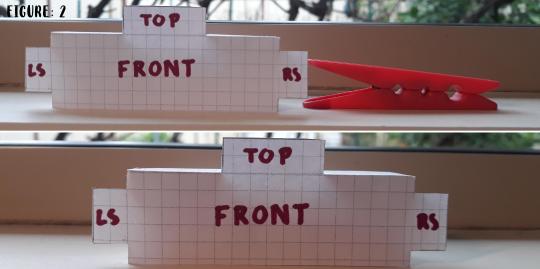
In week 2 class, the lecture and tutorial focused on exploring detailed engineering drawing, especially third angle drawings that adhere to AS1100 Standards. In order to let us be more familiar to those standards, the class exercise was about choosing an object smaller than a mug to make a 5 sided cardboard box (no bottom) that fits perfectly over the object. Shown on Part 1 photo, I have chose a stapler as the object. After making the box and observing the top, front,left side, right side position of the object, it helps me a lot on understanding the projection of the Two-dimensional Orthographic drawings with third-angle more.
Part 2 image shows the attempt from me to draw the third angle drawings with as much as detailed dimensions that I can state and follow to draw a accurate engineering drawing of this stapler. In the middle of drawing, I found that the right side view was not aligned with top view and front view. Therefore, I have to redraw it. The failure is a good process for me to understand the important of fitting the drawings in a balance way. Moreover to connect all of them together to check the accuracy of the dimensions, in which if they are all the same.
Part 3 image shows the finished drawing with all detailed measurements, the outline, drawing information and titles. The part is the most time consuming to mark all the labels but doing that is very good for me to understand the structure of a orthogonal project drawing. After this practise, I have learned how to identify the positions of the different sides and the reason to do it. I will be definitely more confidence in drawing third angle drawings in the future!
Sorry for the late submission, I thought it was uploaded but it actually wasn’t due to the net-work problem, when I found out and repost it, it’s already after 00:00. I will be more careful next time.


6 notes
·
View notes
Text
Week 2
In week 2, we explored third angle projection in engineering drawings and AS1100 Standards. During the online lesson, we where given the task to draw an object in third angle projection by first creating a shell to help guide us through it.
Step 1 was easy, and involved the construction of a box with the bottom missing that was to go over our chosen object. I chose sticky-tape as it was the first thing i looked at when tasked to find an object. constructing the box helped ease into the process and alleviated confusion.
Step 2 involved figuring out which side and angle would go where and how i would line them up. this took me a couple attempts and i learned to go slow
Step 3 is my (mediocre) attempt to complete a third angle engineering drawing. My spacing on the page could of been improved and the title box was a bit sketchy, i could of made the dimensions clearer but overall i was pretty happy as it was my first drawing that i have done of this kind.
6 notes
·
View notes
Text
Week 2
This weeks studio activities focused on the fundamental aspects of third angle orthographic projection drawings. Learning from last week I tried to be as pedantic as possible knowing. These activities required patience and concentration to achieve perfection. Some useful information I took away from the lectures was the use of flipping the set square and the pen, the sharpening of the mechanical pencil, taping my work to the table and to be calm and steady with your work.
Task 1 The object I chose was a highlighter. Although this task was quite simple, this actually took a couple of attempts as I did not look at the example diagram in detail. When I was cutting it out, I kept cutting the wrong lines or I was drew out the wrong dimensions. But in the end, after multiple attempts I was happy with my box. However through my struggle I noticed that through repetition, my skills with drafting tools such as the T square improved.

Task 2 I found this task very important for drafting my final drawing. It provided all the measurements and placement and spacing of each angle. This helped in order to create and neat and mistake ridden final work.
Task 3 This task was not perfect. I made a few mistakes - drawing dimension lines in the wrong place, drawing up the table wrong, pen smudges. The main cause for these mistakes was that I drew some of the dimension lines in pen without drafting in pencil first. My drawings could also be more accurate. Especially the side view which was derived from the other drawings. Besides the few mistakes, I think my drawings are quite neat and easy to understand. I tried to make sure I followed all the guidelines from the lecture. It definitely improved my understanding of third angle projection.

What I would take away from these activities:
-rub out any mistakes and unnecessary lines to avoid using them
- always draft with pencil first
- make sure to FOCUS
- planning is important
6 notes
·
View notes
Text
Week 2 - Orthogonal Projection & AS1100 Standards
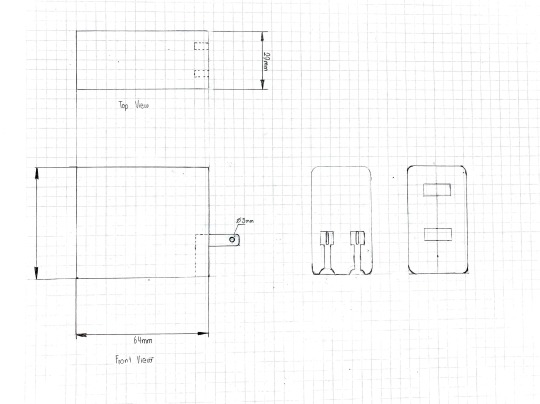
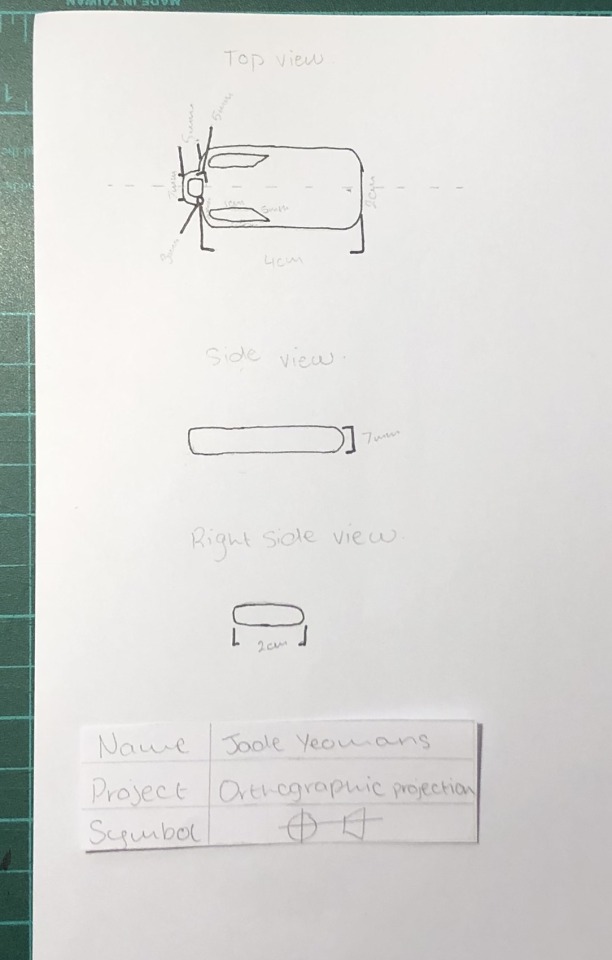
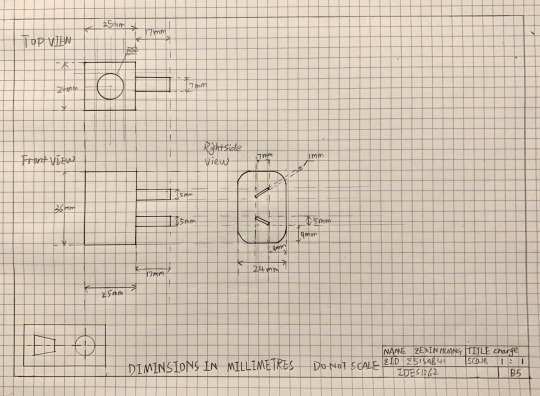
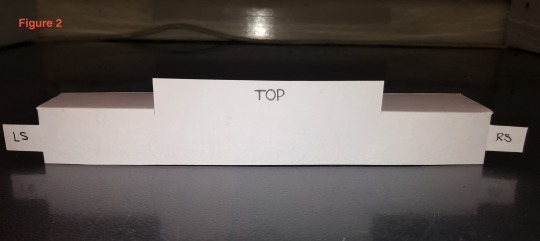
For the second week, we learned about related orthogonal graphs, as well as the third angle engineering drawing that we have to comply with the AS1100 standard. Our task is to practice from the objects that can be found at home, and I chose Phone charge, which is a very interesting challenge. For me, Phone Charge has simple lines, and I need to complete the third angle engineering drawing.
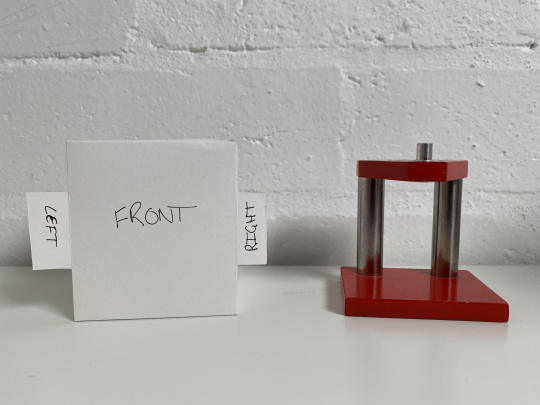
For the first part, I need to make a box structure that involves 5 sides and then fit the phone charge. When I first started, I found this method to be very unnecessary, but when I was drawing the right side view, I chose the left side view by mistake, so I realized that this part is to help me draw each angle graph correctly.

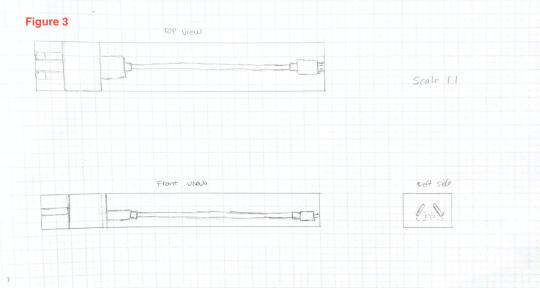
In the second part, I started to try to draw a third-angle engineering drawing. For sketch drawing, I was most interested in it. In the continuous revision, I found that there is no particular difficulty. On the contrary, I think this part is the most important Yes, it reflects the issues that need my attention. The size and scale need to be very precise. As long as one number is wrong, the scale of the entire sketch will be biased. Finally, I found that this part not only made me have a deeper understanding of proportions and dimensions but also learned a lot based on dashed and solid lines.
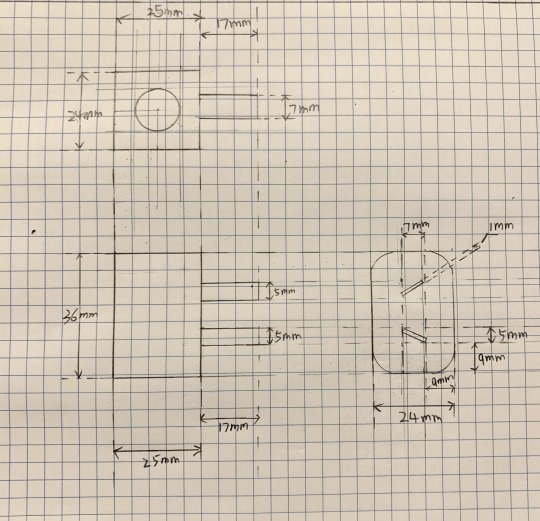
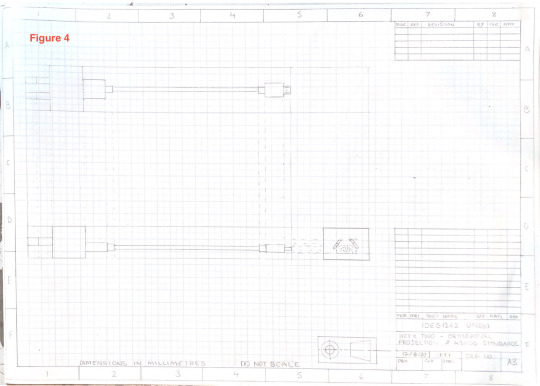
And the third part is a third-angle engineering drawing for complying with the AS1100 standard. Through this part, I found that it is just a phone charger, which includes the rigor of industrial design in every detail and proportion. Not only that, in this exercise, but I also tried to use a black pen to outline the lines, making the main part more prominent, this is the effect I want.
Finally, I am very happy with this week’s practice and have a good start for my sketch drawing, but for the measurement and use of curves, I still need more understanding and practice.
6 notes
·
View notes
Text
Week 2 Activities
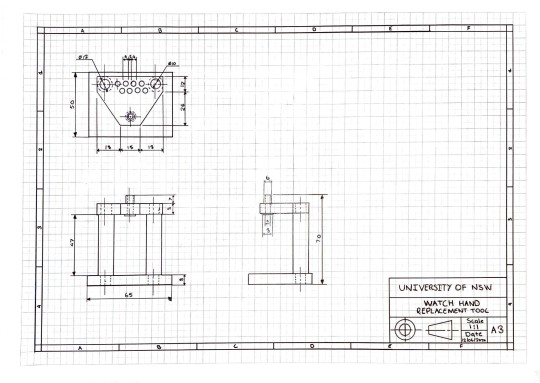
Week 2′s activity was a technical drawing exercise where students were tasked to draw the orthogonal views of a chosen object. I started off by creating a box which would display the different views of my chosen object. I decided to use a watch hand replacement tool because of its size and geometric form.
I was fortunate enough to do graphics technology and engineering in highschool so orthogonal drawings are not a brand new concept to me. I was able to construct each of the views in pencil and then go over them in pen. I decided to remove the construction lines as I felt they took away from the actual orthogonal views and took up space needed for the dimensions. I also decided to draw the object to a 1:1 scale as it was too small to reduce the scale but too large to increase.
While I have had some experience with orthogonal drawing in the past, I did not have experience properly dimensioning and constructing a boarder and titleblock. I found dimensioning each of the sides was fairly easy and tried my best to incorperate the dimensioning functions that I had previously used in Inventor Professional (ie. chaining dimensions). The title block that I found in the lecture slide show contained too many fields for information that did not need to be included, so I created my own.
I found this activity to be a good refresher to what I had learnt in the previous four years of high school while also adding to my knowledge of orthogonal drawing. If I were to complete this activity again the only thing I would do differently would be to be more careful when touching the fresh pen lines on the graph paper. I used a new brand of graph paper which allowed the pen to smudge more easily but it also allowed me to erase the pen with a rubber. So swings and round abouts I guess.
4 notes
·
View notes
Text
Week 2: Orthogonal Projection and AS1100 Standards
This week’s lecture focused on the standards of orthographic drawing. I found it quite interesting to learn how designers in the ‘real world’ actually do their work. The tutorial activities helped us understand orthographic viewpoints and completing general part illustrations of small objects whilst following the Australian Standards.
For the tutorial, I used a dot pad instead of graph paper and I must say I prefer it mostly due to the fact that it’s much easier to see any lines made even with a hard, light pencil. The only drawback is that my supply is only A4, but then again, I only had A4 graph paper too. Yes, I used A4 paper for the following tutorial, but I thought it’d be a waste of money if I don’t use it (and I thought it’d still be appropriate because I’m drawing such a small object 1:1 anyway). If I really did need A3, I can easily stick two sheets together because there’s no border on the dotted sheets (an advantage over my graph paper that has a border and holes for binder use).
Activity 1:
The first activity was to create a box covering for our object that had openings for the third-angle orthographic viewpoints. I first chose a whiteboard marker because I thought it would be simple enough to draw but differing enough in design between both ends (cap and base). For some reason, it took me a while to figure out how to make it, I think I was getting confused with all the lines on the template that we were meant to follow. This led to me having to restart the activity because I accidently cut through a line that was meant to be folded. As I do with all models, I roughly sketch the shape of what I’m cutting so I have an idea in my head of what it should look like and jot down the measurements – can be seen on the post-it-notes in Image 1.
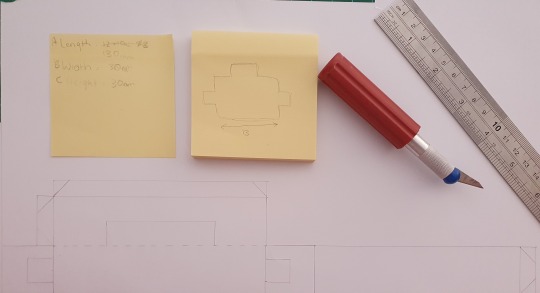
^Image 1
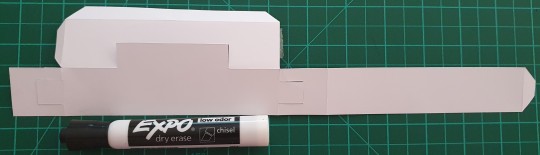
^Image 2
Image 2 shows the box net splayed out beside the marker, yet to be assembled.
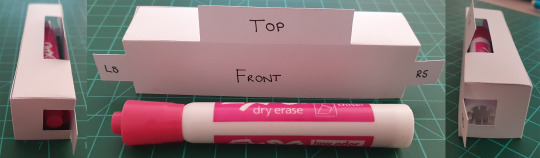
^Image 3
Image 3 are the viewpoints of the marker from the box once assembled.
Activity 2:
As I was starting activity 2, I realised I hadn’t really thought my object choice through as both the front and top view would be exactly the same (given it’s cylindrical shape) and the third angle orthographic drawings shown in the lecture had 3 views (front, top and side), therefore my idea of showing the difference in design from the cap to the base (left and right side views), would not have worked.
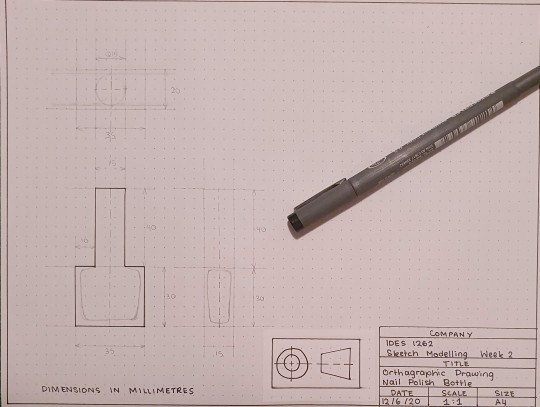
Therefore, I picked another object a nail polish bottle. I felt it unnecessary to redo activity 1 using this object instead because I felt I had effectively understood the concept with which it was trying to teach us (accurately measuring something / orthographic views).
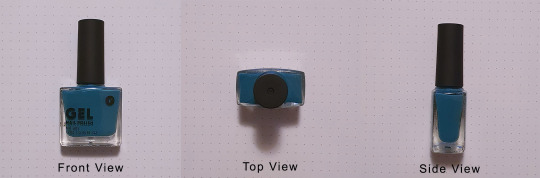
^Image 4
Image 4 shows the three views I would convey in my orthographic drawing.
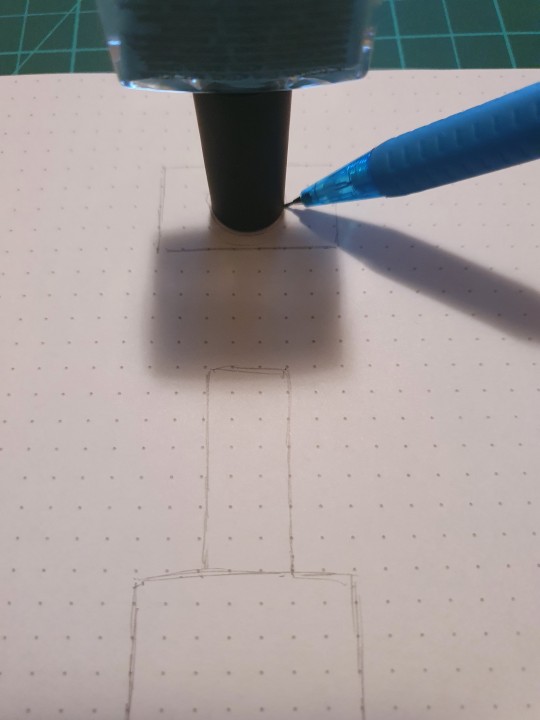
^Image 5
For my rough sketch in activity 2, I experimented with using the actual cap as a circle template, as seen in Image 5.
Activity 2 / 3:

^Image 6
^Image 9
The completed rough sketch is seen in Image 6. I wasn’t fussed as to the placement of the different elements like the third-angle orthographic symbol, the title block and of course the actual viewpoints of the objects. I’m jumping ahead here but as seen in Image 9, I realise later that I should’ve looked over this more closely because the widths of the object in the top view and side view are different – I got confused between the width of the cap (15mm) and the bottle itself (20mm)… and upon writing this, I have just realised in my side view I should’ve made the cap thinner at 15mm, not 20mm. I should have checked the measurements matched across all three views especially before going in with the black felt tip marker, but alas I tried my best to fix the error with a little white-out over the left boundary line in the side view.
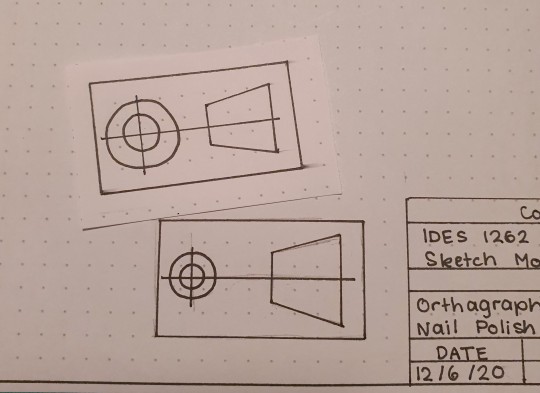
^Image 7
Only realised after marking it that my third-angle orthographic symbol did not have the correct dimensions.I redid it on another piece of dot-pad paper and stuck it over my first attempt, as seen in Image 7.
^Image 8
( process picture of my markings for my final drawing.)
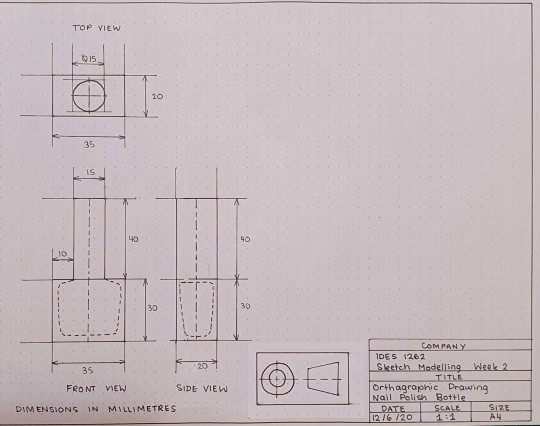
^Image 9
Image 9 is the final product of my first third-angle orthographic drawing. Besides the points made above (with it’s relation to Image 6), I am relatively happy with it. I followed the Australian Standards as best as I could (given that I didn’t have the specific line weights in markers). Something I’m not sure about are the “invisible lines” I marked out within the bottle seen in the front and side view – I thought it necessary to convey the cavity of the bottle but still, the cavity itself has curved edges and I didn’t label the angle of it because they weren’t very even. One thing I would do differently (apart from checking my measurements early on) is to plan out the placements of my views more carefully. The final drawing sort of ended up squished because I obviously had to place my side view parallel to the front view but my third angle orthographic symbol was blocking me from going further to the right of the page. This could have been avoided if I shift everything up as there is more room on the sheet above the top view.
4 notes
·
View notes
Text
Week Two – Orthogonal Projection & AS1100 Standards
For this week’s exercises we practised applying the principals of orthogonal projection and developing our drafting and hand drawing skills. My object of choice for these tasks was a bottle of hand sanitiser; although being relatively simple, I wanted to practice drawing curved edges.
Task One involved creating a five-sided box based off the overall dimensions of the object to help us better conceptualise the object for our later drawings. Due to the curved sides, it was initially difficult to find the exact dimensions. In my first attempt, I had made the net too shallow and it wrapped slightly when placed over my object. I corrected this in my second attempt and was pleased with the result.
Task Two instructed us to construct a free hand sketch of our object. Using the dimensions from Task One and further measurements taken for the added detail, I was able to complete this task fairly easily. When looking at the final draft, I thought I had mismeasured the length as the physical object looked much slimmer. However, after double checking the dimensions, I learnt that curved three dimensional objects translate differently on a two-dimensional drawing.
Task Three, building off the previous exercises, asked us to create an accurate orthogonal projection drawing of our object. I have yet to purchase a French curve ruler so outlining the curved edges in pen was difficult but I took my time and was fairly pleased with the result. I learnt how important being accurate with my drafting tools were when having to create circular shapes with very small radii. My final drawing wasn’t perfect but I was happy with it as a first attempt at engineering drawing.
4 notes
·
View notes
Text
Week Two
Week twos task was designed to give us some practise applying the principles of orthogonal projection, AS1100 drafting standards and expand our hand making and drafting skills. Overall, I think that this activity achieved its desired objective. Although the task was tedious and at times difficult, I believe the skills learnt from it along with the patients it required was a fantastic learning experience.
Chosen object: phone charger
Task 1:
This task required the making of a box to fit around the dimensions of our chosen object. The activity was fairly easy and didn’t require too much thinking. The process did take some time as multiple lines needed to be drawn. I really like the way the final box turned out (figures 1 & 2), and I believe creating this helped to expand my hand making skills.
Task 2:
Task two was a very quick process as it was only a rough sketch of the object in an orthogonal projection layout – seen in figure 3. Already having the measurements from creating the box, along with not having to stress over details made this a very efficient process.
Task 3:
Task three was the most difficult and time consuming out of the three. The process required a lot of time and effort to complete. Figure 4 shows my orthogonal projection before the addition of measurements, figure 5 shows after. Overall, I am happy with the outcome of this task. This process taught me patience as well as expanding my understanding of orthogonal projection, AS1100 drafting standards and drafting skills.
I like how all three tasks turned out and I believe that my knowledge and skill set has been expanded.

4 notes
·
View notes
Text
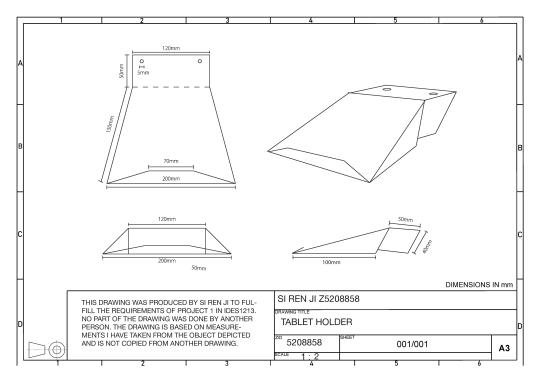
Week2 Activities
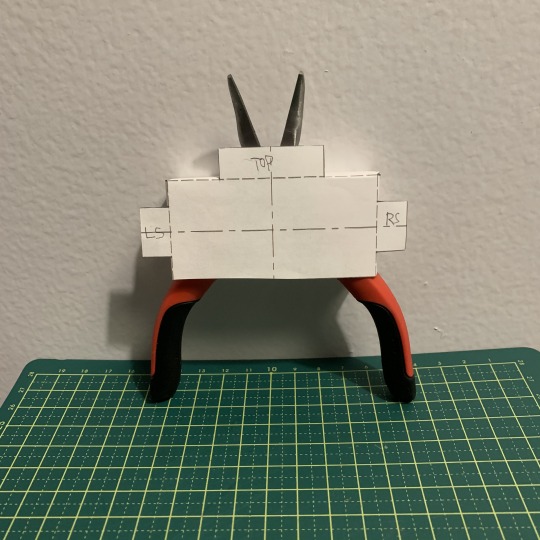
I have chosen a pair of pliers as my object for technical drawing. Although I have done several technical drawings for other designs, but have not try to use hand sketch. As I previously used softwares like autocad, rhino and illustrator to assist in my technical drawing. Therefore I am looking forward to learn more skills and increase my ability in hand sketching.
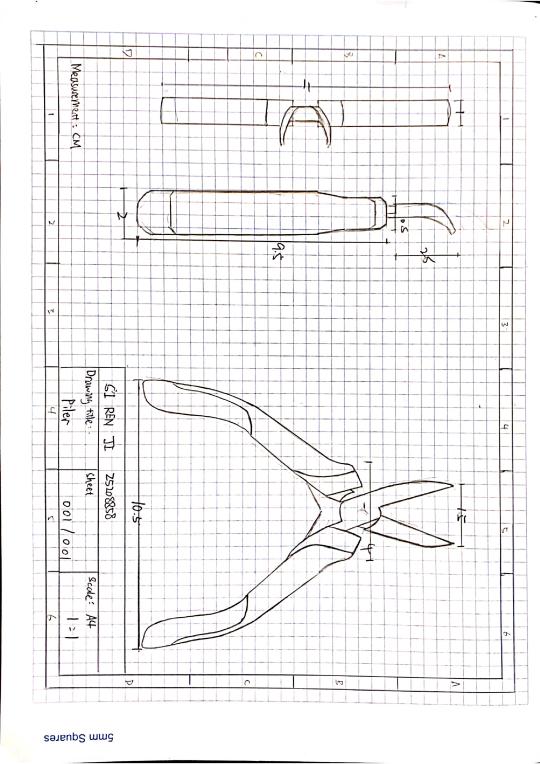
Previous example of technical drawings
2 notes
·
View notes
Last Seen Blogs

systemshuttle
Untitled

polyhexian
DID YOU KNOW EJECT HAS A FUCKING SON

arcinpub
Untitled

voguexdreams
Ethereal 🖤⛓

pswings
Untitled