#ides1262 2020 week 3
Text
Week 3 - Section and Auxiliary Views
Week 3′s task ‘Section and Auxiliary Views’, was very tough for me.
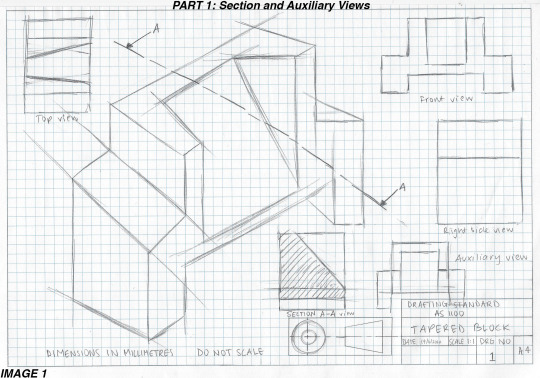
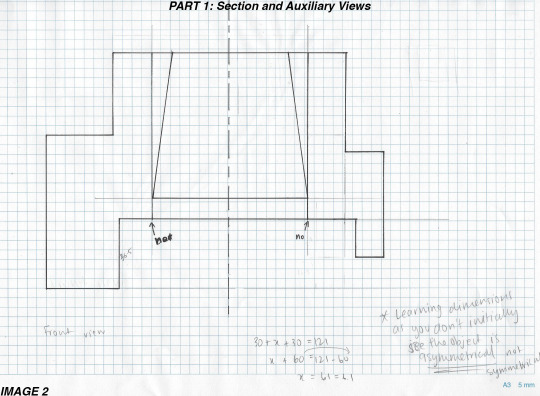
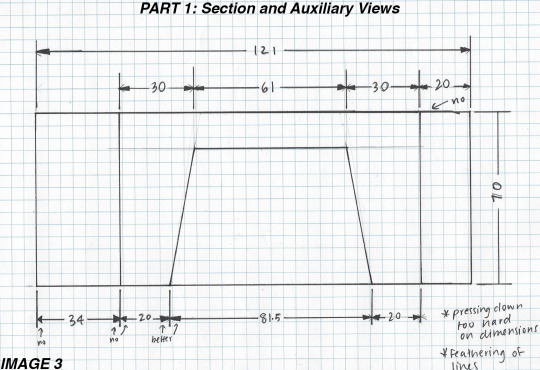
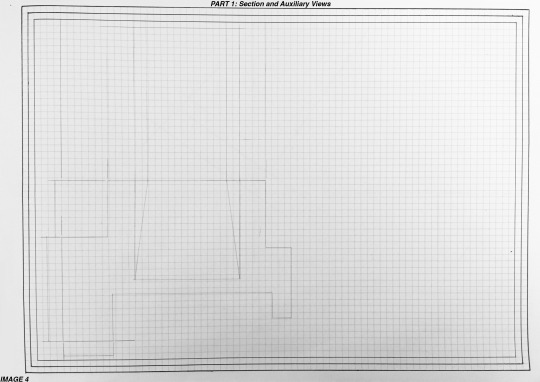
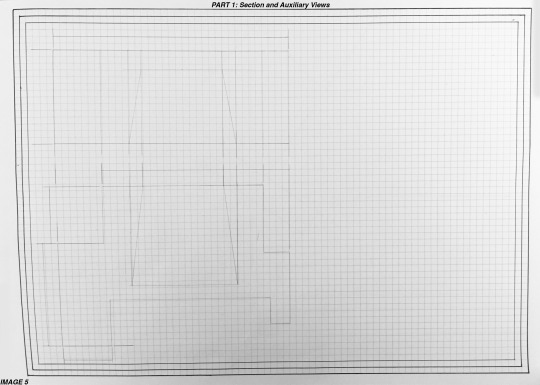
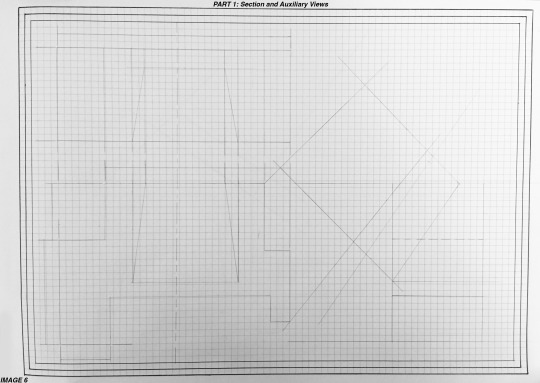
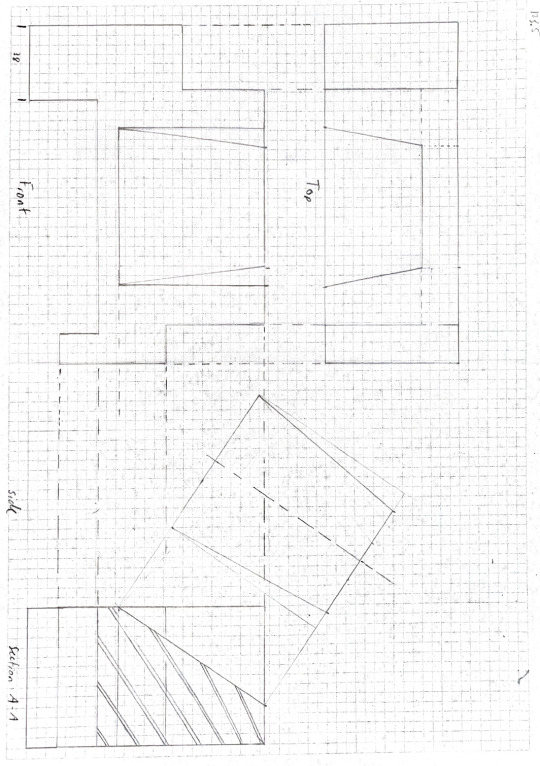
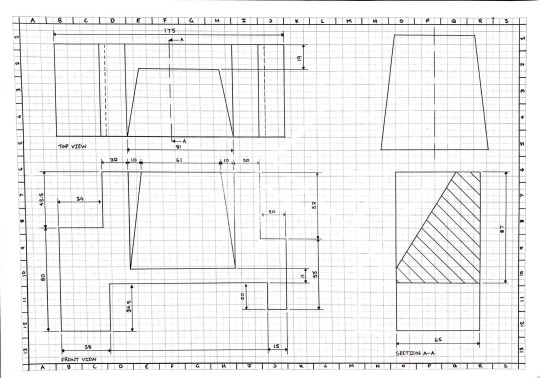
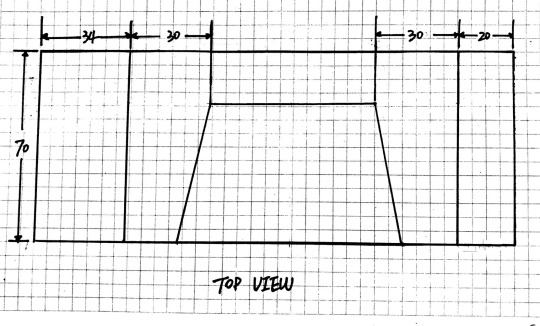
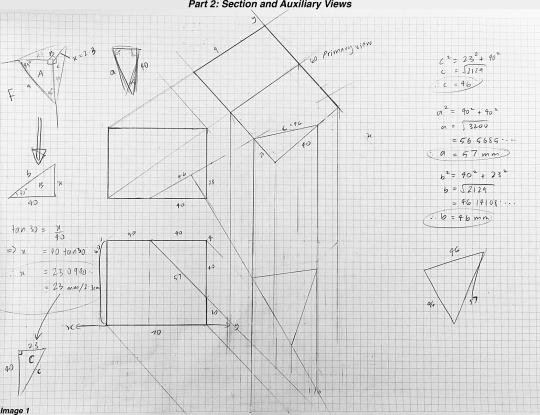
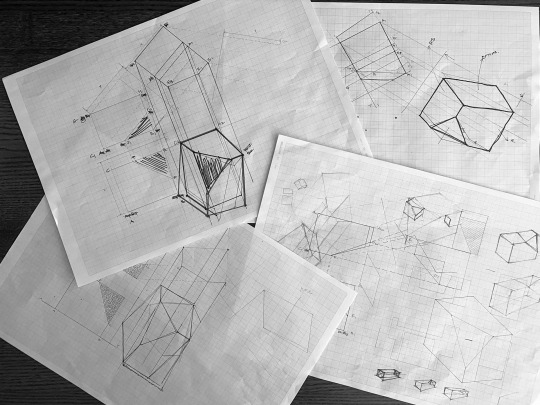
Image 1-3: From my mistake last week of underestimating the complexity of views, I decided to carefully study the tapered block this time. As I roughly sketched, it surprised me that each side of the block was asymmetrical – even though it appeared symmetrical. Through doing these brief structure studies, I understood its specific dimensions clearly and helped me mentally plan the real drawing.
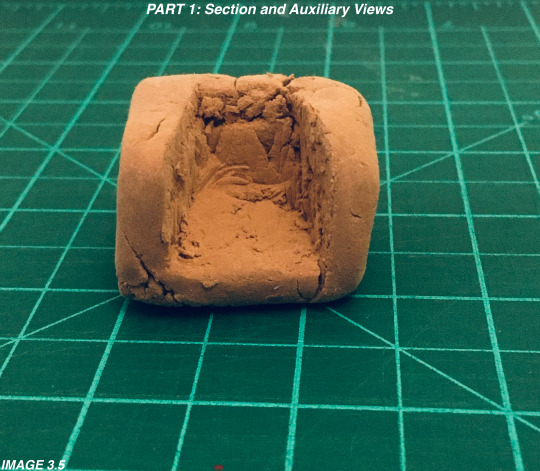
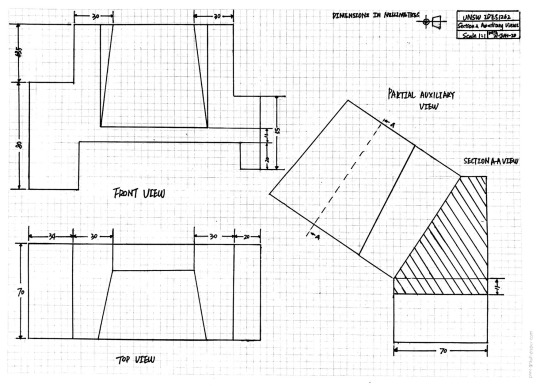
Image 3.5-7: After gaining more confidence from learning its dimensions, I started off by drawing the front view (first) then the top view (second). I employed the use of clay to confirm the incline’s front perspective (Image 3.5: Does not look the best but worked very effectively).
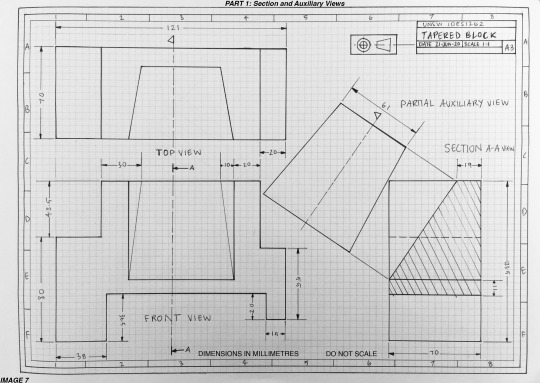
I did not face much difficulty with visualising the front and top view; however, I was horrendously troubled with the partial auxiliary view. As this was the second engineering drawing, I had ever done, I spent more time researching on how to properly orientate that view. Video resources included: - https://www.youtube.com/watch?v=gzq48vBbODg&t=387s, - https://www.youtube.com/watch?v=FEJ4gzgp7Tw and - https://www.youtube.com/watch?v=Pa_rF-wg8Rg&t=160s.
However, I eventually decided to see if other class members had done theirs to see how they interpreted the partial auxiliary view, as the online tutorials did not help me enough for the block. By looking at other people’s blogs, I was able to visually grasp how/where to fit the view on the page.
Even though this drawing/my skills are light-years away from being completely accurate (needing more space between each view), for my second serious attempt, I have certainly increased my quality and presentation. The extra care and research greatly improved my technical drawing skills and I am fairly pleased with my work this week. Looking forward to the next challenge!
14 notes
·
View notes
Text
W3 - Auxiliary Views Pt #1
Auxiliary view and section view were introduced during the Week 3 lecture. Both views present a different view of the object. The auxiliary view is simply a helper view, which shows the slanted part of the object as it actually is. The section view shows the hidden part usually could not be seen if looking at a complicated object. Also, tolerances in drawing was introduced and it has been added to my drawing this week.
Preparation
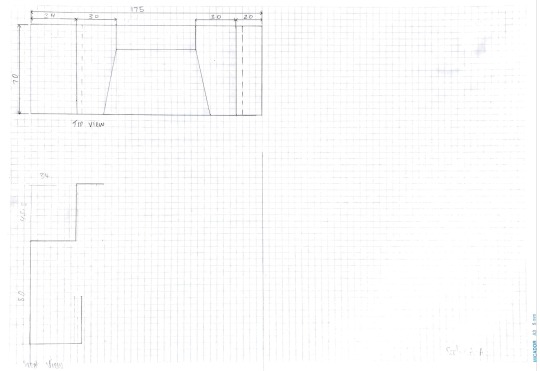
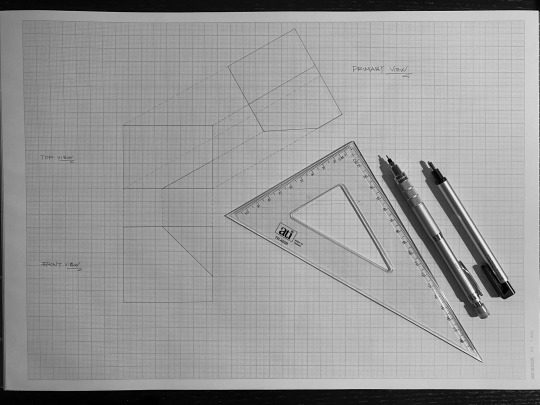
Freehand sketch a page layout before start working on A3 Grid paper. This step would assist me to organise my drawing more clean and clear. I also drew a quick sketch of the object at the same time, from that, I could understand the object from my point of view. The sketch was drawn in 2-point perspective, so it would also help me draw orthogonal project a bit.
Page Layout - Ideal page layout later draw on A3 Grid paper
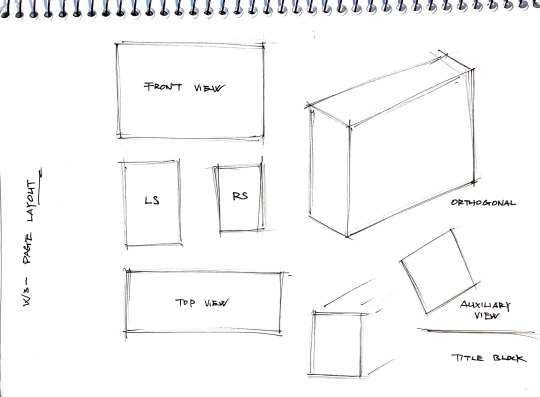
Object Sketch - A quick sketch of the object

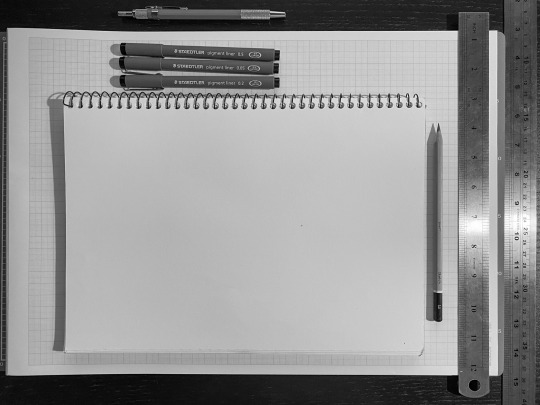
Gear - setup all the gear I need would help me on the progression
Progression
Part #1
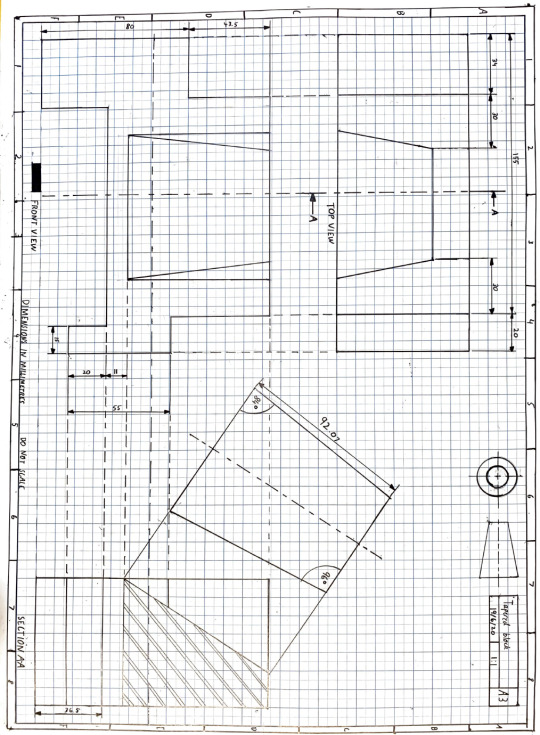
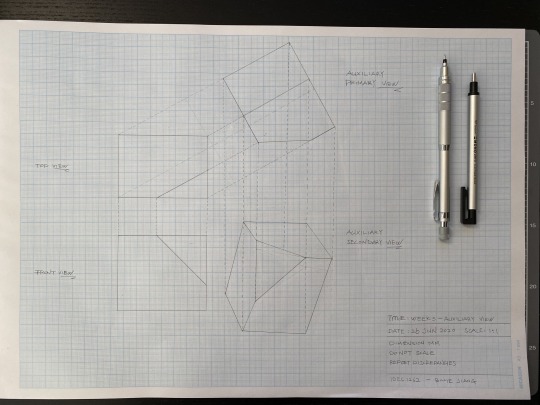
First off, I would like to draw all the views on the paper. Make sure each of the view has enough gap (20mm) between each other, so I can set view’s measurement without crossing each other.
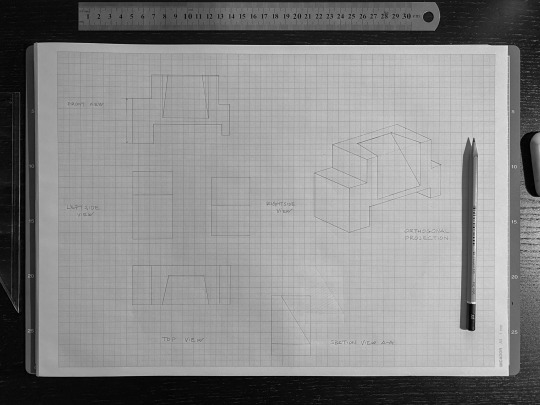
Part #2
After Part #1, drew all the elements on each of the views. Make sure all the lines were accuracy. I had some issues with the Auxiliary Views part as it didn’t have enough space. This makes me realised that even a quick page layout would not perfectly solve the problem. I should make sure the layout will be a bit more detailed next time.
Part #3
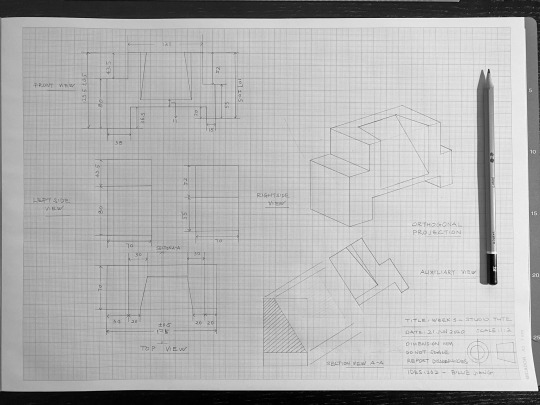
The final part is to outline all the drawing with different thickness pen. Last week, I didn’t pay attention to the thickness of the lines. This week, I used 3 different thickness pens: 0.2mm, 0.5mm and 0.8mm for a different purpose. Finally, I completed the title and the borderline.
*Note: 2 errors found in the final drawing. #1 - Orthogonal projection: right side length should be 2.5mm shorter (1:2 scale). #2 - Section View A-A height measurement was incorrect which make both itself and Auxiliary View a bit off.

11 notes
·
View notes
Text
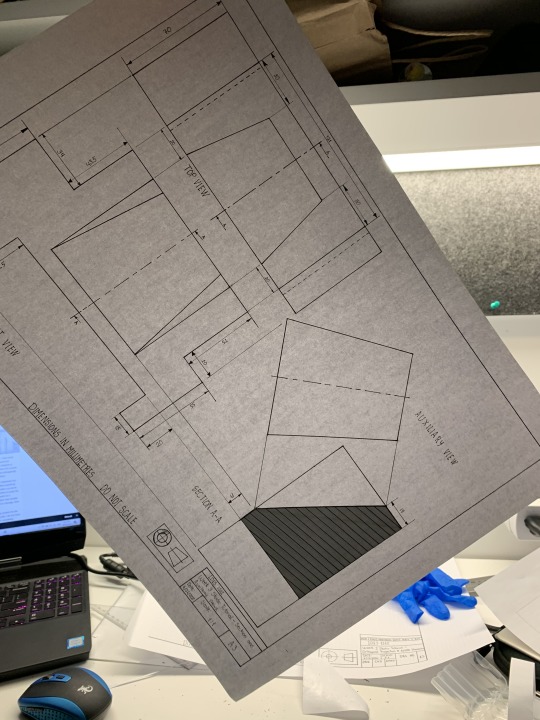
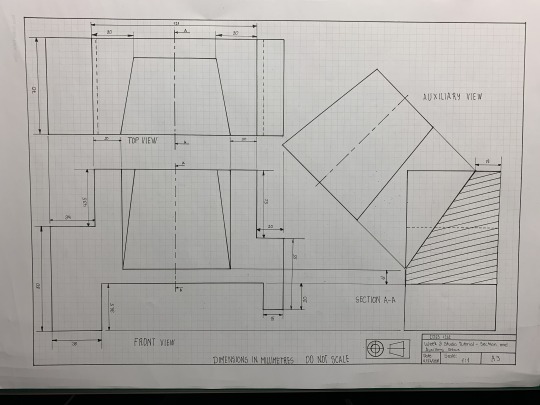
Week 3 Studio Tutorial – Section and Auxiliary Views
This weeks task was the hardest one yet in my opinion. Not only because it required to work precisely and cleanly, but also because in made use of ingenuity to know where to put the auxiliary view. It also allowed me to fix some problems creatively and make my work the best it could.
One part that I liked was using different thicknesses of pens for different lines. At the begging noticing the distinction might be hard, but as you are completing the sketch, you can see how each line represents perfectly different angles and dimensions.
A clearly challenging pat was fitting everything into an A3 paper. It seemed that nothing wanted to fit, especially the auxiliary view. In the first few attempts it didn't work, however by playing with different sketches, everything seemed to fall into place.
However, something tragic happened to my work. Near the end, after measuring, passing sketch lines with pen and writing some measurements neatly. I realized that one of the lines of the section views was of by 1cm. My first reaction was exhaustion that I would need to do it all over again. My second though was fixing it after taking the picture, but that seemed like an easy way out. Finally I though of a more on hands solution, since I had made everything with perfect measurements, I would only need to cut in a different piece of paper that exact portion and glue it in, and since it would be perfectly measured, it would be seamless. I applied my solution and what would you now, it saved me a hole days work.
A guess working accurately can save a lot of time if you do it rigth.
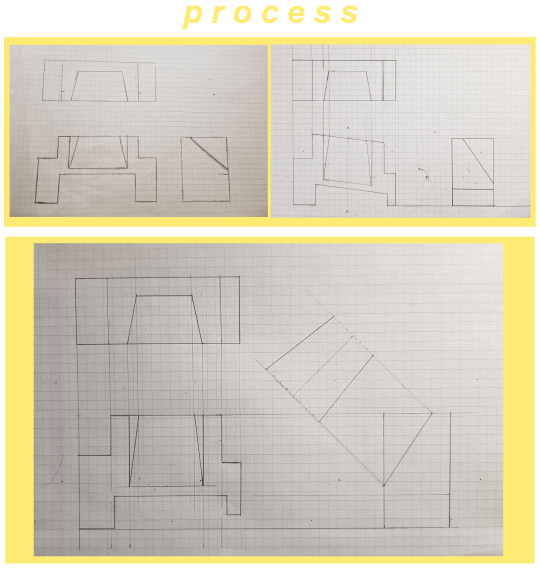
Sketching


Fixing a problem

Final Results

10 notes
·
View notes
Text
Week 3 (Part 1) - Section & Auxiliary Views
Week 3 was quite challenging for me with the task of completing a third angle drawing with a partial auxiliary view and a section view for the first time. Once again the process of completing a freehand layout sketch was really useful as it helped me visualise what needed to be done, and prevented any errors when completing the actual drawing. Essentially this step is necessary in sorting out any problems without the pressure of needing to be 100% accurate.
One thing that I struggled with this week was visualising the partial auxiliary view which took me a few tries to understand and get right in my layout page. I also learnt this week how important the front view is in a third angle drawing, as it is the base that ensures the rest of the drawing is to the correct scale. I made a couple of errors early on in my layout page which had a knock-on effect for the rest of the sketch.
Process Video:
Below is a video of my drawing process this week. Its a very basic video but I thought it was a neater and clearer way to present the process images without taking away from the importance of the final drawing.
undefined
youtube
Final Drawing:
Based on my mistakes from last week, I really put a lot of effort into making sure I didn’t double up or include unnecessary dimensions, and I hope that this has come out well. Further, I ensured there was a clear stroke difference between dimension lines and actual part lines. This has made the drawing much clearer, however it still isn't as obvious as I would like. I also need to make the actual numbers larger in size as they again have not photographed well. One other change I made from last week was using a lighter grade pencil before I traced over with pen. This made it easier to erase mistakes and helped in showing the difference in line strokes.

If I did this task again, I would make the boarder slightly smaller to really put the emphasis on the drawing. Further, I need to work to making the dimensions clearer and easier to view.
Overall, i’m happy with the work this week and enjoyed the studio and lecture sessions. I think my confidence in my ability to produce these kind of drawings is building each week.
10 notes
·
View notes
Text
Week Three - Section and Auxiliary Views
This week’s exercise involved applying third angle orthogonal projection, section views and auxiliary views in addition to building on what we learnt last week regarding AS1100 drafting standards, hand sketching and using drafting equipment. I had a few issues this week, but it was a great learning experience overall.
When starting the freehand sketch, I did not pay close attention to the measurements shown and instead started drawing a rough sketch to help me visualise the object shown. I assumed the object was symmetrical due to the angle it was shown. I started the second draft sketch with consideration of the measurements but now had trouble trying to visualise the object. Knowing one side was shorter, I had the base of the object flat against the ground and angled the horizontal lines downward, as seen in the second image of my process documentation. Although the top and section view were accurate, the front view made it obvious that I had misinterpreted the object. I set out on my third draft knowing I had to keep the horizontal lines flat and instead brought the smaller right side up so that the base of the two sides were not the same. This made a lot more sense in relation to the original image of the object shown and I went on to drafting the auxiliary view.
In order to fit the auxiliary view onto the page, in my third draft I also inverted the sectional view so that the projection lines went left into the middle of the page. As we only had to draw the tapered surface, I was able to fit it into the space. I was finally satisfied with my draft and begun the final drawing.
I found it much easier this week to complete the final drawing neatly as this object only had straight lines and I had a much more detailed draft drawing to help guide me. I feel as if my skills in laying out the different views and the measurement indications have improved, and I was happy with my final product. This week’s exercise was helpful in developing my skills in visualising 3D objects onto paper, something I have always been weak at (possibly due to my aphantasia!), along with all the other learning objectives.

10 notes
·
View notes
Text
Week 3 – Section and Auxiliary Views
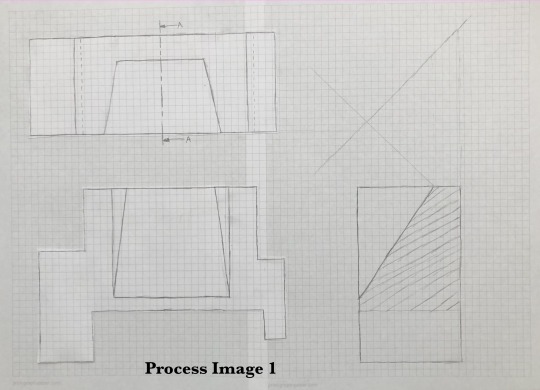
Overall, I found this week’s task slightly more straight forward than that of last weeks. I felt I learned from my mistakes from last week and created a good quality drawing. In saying this, I did have a few minor difficulties. My first issue came with organising the page. Due to the large scale of the shape being drawn, the page had to be accurately laid out in order for each view to fit on the page. I started with a free hand sketch (as seen in process image 1) to visualise the best organisation of my page. I realised that I would struggle to fit the auxiliary view in with this layout and so changed my layout.
My next challenge came with perfecting the partial auxiliary view. I confused myself with the projection of the shape and ended up drawing the face upside down as seen in process image 2.

My last challenge was caused from the close proximity of all of my drawings (as seen in the final image). This made writing the measurements cluttered and hence, impacted the final drawing. The drawing became more cluttered when I attempted to add a border as suggested in my comments last week. I agreed with the comment and thought it was a great idea, however I feel that due to the size of the drawing, the border created too much clutter and made the final drawing a bit confusing. For this reason, I did not complete the border as I did not want to add to the confusion.

I thoroughly enjoyed the tasks set this week and felt a sense of accomplishment seeing a neat and accurate final drawing. I feel as though I am slowly becoming more confident as the weeks progress.
If I was to complete this task again I would use a larger sheet of paper in order to properly space each view.
9 notes
·
View notes
Text
Section and Auxiliary Views
Week 3′s lecture and activities challenged students with section and auxiliary views in addition to orthogonal projection and AS1100. At first, I struggled to fully grasp what the auxiliary view was. The Section view was easier to understand as it’s simply part of the inside of one section. However, it was difficult to understand the angle which the Auxiliary view was asking for. Eventually Rob was able to show us his own attempt at performing the activity which assisted me in completing it.

For Part 1, a rough sketch was made to gain an understanding of the shape. At first I didn’t leave enough space for the auxiliary view from Section A:A, so I had to rub out the original side view I had drawn. I tried just using a ruler to keep everything clean and accurate although it was a sketch, but this proved useful to me when making the final drawing. During Week 2′s activity I skipped the sketch part as I thought it would just be faster, however the final drawing was slightly inaccurate. However, this week I tried the practice drawing and this time it worked out much better.
For part 2, the final drawing was much better. After practicing, I was able to gain a much better understanding of the different views and angles. Robs image from the tutorial was very helpful in finishing the task but from the practice from part 1, i was able to draw an accurate projection of the tapered block.
Looking back on my previous posts, I can see the great improvements i’ve made. From being able to see everyone else's attempts, I was able to learn from their mistakes and see if there was anything I missed. For example, just for this activity, I looked on peers posts and realised I forgot to add the angles for the auxiliary view. So overall, I believe i’ve gained a good understanding of section and auxiliary views but I would like to try more shapes as I gained a lot of help from Robs attempt.
7 notes
·
View notes
Text
Week 3 – Section and Auxiliary Views : PART 1
In the week 3 class, we were introduced to draw the further extent of a third angle drawing. Moreover, for objects that are more complicated which have a lot of surfaces. Therefore, section and auxiliary views is what I have learnt through the class that will in hence my third angle drawings. Although this is my first time using these skills, I found it very reasonable in which it really helps me to present the object.
In image 1, I have drawn a simple layout to see how all drawings will fit nicely on the A3 grid paper, Idid erase and redraw it a few times to get the right position as there’s not much space on the paper. Also studying how the object looks from different views.
There are 2 parts that I struggled most with, shown in image 2 that I am unsure about the shaded area on the partial auxiliary view. Then I looked back into the lecture slides. Then I found that as it cuts through all the way, so that the shades also all goes till the middle part. Secondly, how the dimensions are placed is also what I need to go back and forth to check with the lecture examples that teaches the understanding between the sections and cutting plans.
To conclude, I am quite satisfied with my final outcome shown on Image 3. Which I redraw it with less unnecessary dimension labels, also outlined with a pen so that it looks more clear and tidy. However, I didn’t use a scan version, because when I scan it, the grid paper I use becomes like a glitch. So that I tried my best in taking a top view image and edited to make it look neat.


6 notes
·
View notes
Text
Week 3 - Section and Auxiliary Views
Week 3’s task was a technical drawing of a tapered block that consisted of a top, front, side and auxiliary view. The process of having to calculate and plan every angle was mostly successful and satisfying, once I learnt to slow the pace I was working at.
The task wasn't difficult and fairly simple, however I struggled to make sense of the auxiliary view. I graphed it time after time and couldn't make any sense of it and the dimensions that I was coming up with. I didn't feel confident with the measurements that kept appearing, so after confirming with fellow classmates, I was able to confirm my methods were common amongst the class and I wasn't the first to come up with these results. After comparing my numbers, it boost my confidence to continue on with drawing.
I liked the overall method I used for this task and believe it would work for any other drawing due to it being planned, simple and neat. I learnt that logic figures things out and to not question the process (if you do, things go haywire). Ultimately, if I had to deliver a similar task again, I'd happily take the challenge onboard. :)
Complete drawing:

Planning and calculating the drawing:
Measuring the drawing as I go to detect any errors early on:

Auxiliary view was the real challenge here:

Satisfied with my measurements:


Projection:

6 notes
·
View notes
Text
Week 3 Activities
Week 3′s activity was another technical drawing exercise where students were tasked with creating a 1:1 orthogonal drawing of a pre determined object. The drawing was to include a sectional view and an auxillary view showing the true size of a sloped surface.

I began by creating rough orthogonal views for each of the required sides. These drawings were done true to size so that I would be able to place them on a new piece of paper and arrange the views. This helped me alot as I was able to figure out how much room I would need to leave for dimensions and view names. However, I decided not to make a rough drawing of the auxillary view, which meant I didn’t allow for the required room needed. As a result of this I ended up having to re-do the sectional and auxillary views a number of times in order to get all of the views to fit on the page and not interfere with the dimension lines. If I were to do this task again I would repeat the same process but include the auxillary view in the plan.
After I had first figured out where I wanted all of the views to go I drew the views onto the final drawing and outlined them with the appropriate pen widths. I ended up choosing to place the auxillary view above the sectional view so that I would be able to properly dimension the front and top views, and also to make the drawing look less cluttered. I decided against including a titleblock as there was not enough room for one but did include a boarder.
While I am happy with what I was able to produce and believe that it was an improvement from last week activity, there are still mistakes. An error that I had made when I was planing (including lines corresponding with the end of D and H on the boarder), was carried over to the final drawing. Something that I’m realizing is the amount of attention that you need to be paying when doing an engineering drawing. One seemingly small mistake is all it takes for a drawing to be wrong, giving the chance for it to be misinterpreted.
I enjoyed this task and believe that I learnt a considerable amount from doing it. I also enjoyed it because it is engineering drawing, an aspect of industrial design that is more objective than subjective.
6 notes
·
View notes
Text
Week 3- Section and Auxiliary views
The engineering drawing in the third week was interesting. The pre-class videos made me have a deeper understanding of Section Views and a mechanical drawing, but as for the auxiliary views in the third part, I found it difficult to understand them. The main difficulty being the "missing dimension" auxiliary view, it took me a long time to understand the differences between the depth, the width, and height auxiliary views.
The videos provided help me a lot in doing exercise. It is easy for me to draw the front view and top view. Although the graph is symmetric visually, it can be found after careful observation that the height on both sides is actually different. When I drew the front view, the two slants confused my cognition at the beginning, but in fact, the slants observed in front of the figure were two vertical lines.

The Auxiliary View was the hardest part of the session for me, and I was aware of that as I watched the auxiliary view videos before class. Because it is drawn diagonally, it is very difficult to determine the length of a line drawn on grid paper.

However, I realized that I did not draw the measurement with a finer pen, which is something I will improve in a future drawing. Next time, I will draw an engineering drawing more in line with the AS1100 standard.
6 notes
·
View notes
Text
Week 3 (Part 2): Section and Auxiliary Views
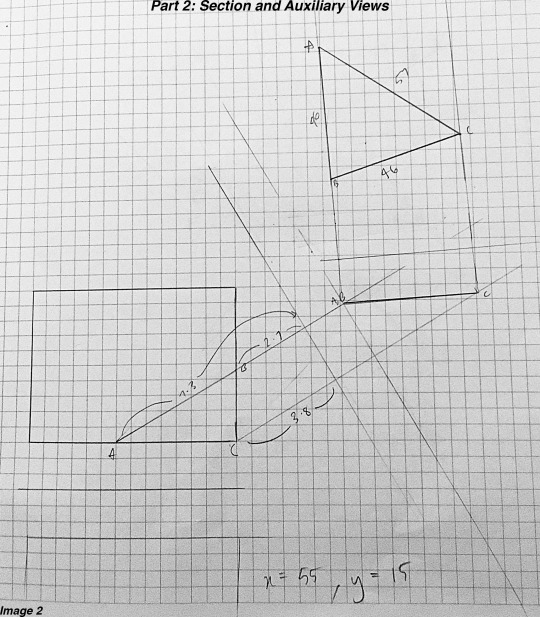

For week 3’s task (part 2), was very tricky but incredibly enlightening.
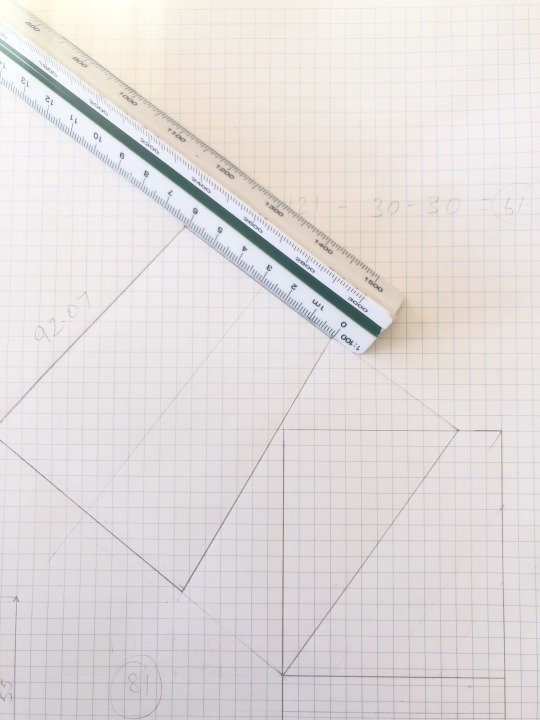
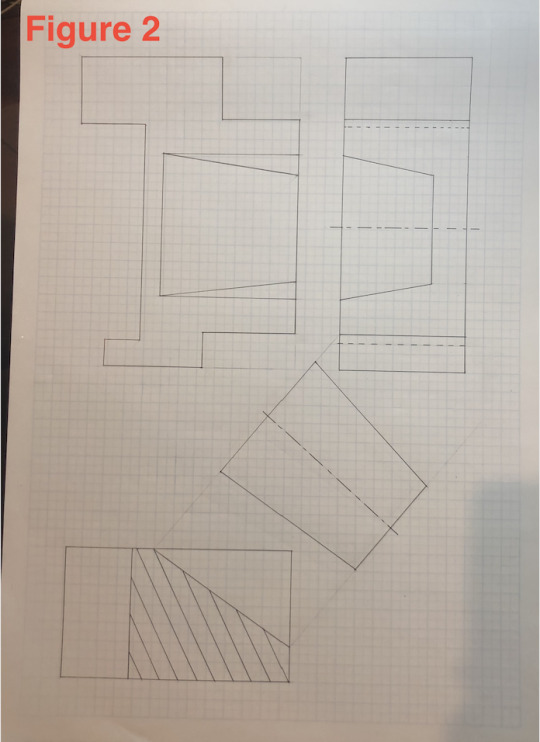
Image 1: To get the TSS of the oblique face on the chamfered box, I used trigonometry to calculate the true lengths of the beveled edges. I tried using Fusion 360 to help me orient myself around the object, but I still could not understand how to draw the other perspective lines outside of the beveled triangle on the grid paper.
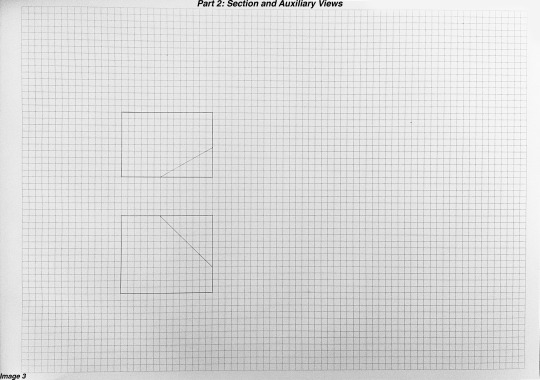
Image 2: Feeling extremely confused and ashamed, I went back to the presentation to see if I had missed any steps on how to draw the primary and secondary views. Turns out I did not realise that slide 25 existed. When I was going through the presentation the first time, I skimmed over it and accidentally missed this slide. Very big oops.
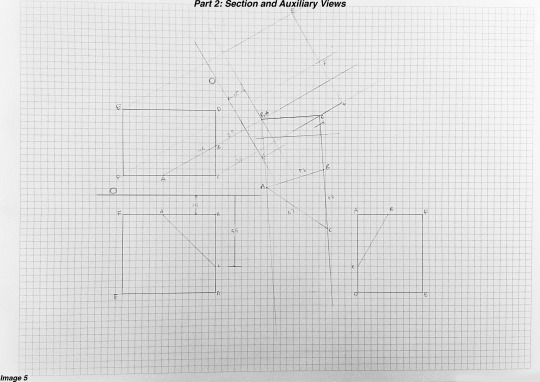
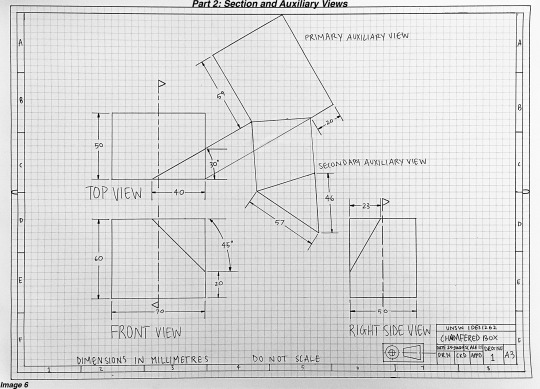
Image 3-6: After properly looking at slide 25, I was able to draw the primary and secondary auxiliary views. This made me GREATLY understand how complex these views are, however, very logical, and fascinating.
I still have plenty to learn for technical drawing (applying dimensions, borders, symbols, etc., correctly). There are mistakes in my drawing but in just 3 weeks, I am astonished to see my improvement. My endurance helped me get through and I am incredibly happy that I figured it out. (Plus, I now have some extra skills in Fusion 360 by accident).
For the next task, I want to focus on correctly positioning dimensions, writing the titles more clearly and regularly cleaning my equipment more. When outlining, I would forget to wipe my rulers, set squares, etc., which led to these utensils carrying small traces of fresh ink on the edges. This caused many minor bleeding and swipe marks on the page.
8 notes
·
View notes
Text
W3 - Auxiliary Views Pt #2
To show the inclined surface in an orthographic drawing without distortion is quite impossible when an object has a slanted or inclined surface. The way to present more accurate details of any inclined surface, an additional view known as the auxiliary view is usually required.
In this week part2 exercise, we are asked to draw primary and secondary auxiliary views. I found the task was quite challenged in the first place and it does have a lot of things need to deal even before start a draft layout.
Desipte build a physical model of the object, I decided to go weith Fusion 360 this time.

Progression
After created the model in Fusion360, I spent quite time on the object by rotate it with different angle. This helps me what would the object look like in real life with different angle. However, I actually feel the physical model might be better in this case.
In addition, I did the research on YouTube and found this video that really helps me on the understanding of different auxiliary views.
Part #1 - Drafting & Layout
As usual, I start with the basic layout and drew 3 views of the object. I did find that the projection that reflected by the primary auxiliary view is very hard to draw even I understand the transformation of the object. Drew a bunch of drafts and brainstormed on a piece of paper would really help me to completely understand this.
Final layout before drawing the secondary auxiliary view.
Part #2
After digging the internet for my information on this and viewed the support links that supplied on Tumblr, I came to understand how this secondary auxiliary view works and what does it actually assist me on certain details.
Part #3
Finalised my drawing with borderline and title block. A 0.5mm thickness pen was used only for outline of all the drawing. I gave a 0.05mm pen a try for tracing the consturction lines. The idea is because I want to give the drawing a 3-demsional vibe.

6 notes
·
View notes
Text
Week 3 Studio Tutorial (Part 2) - Secondary Auxiliary Views
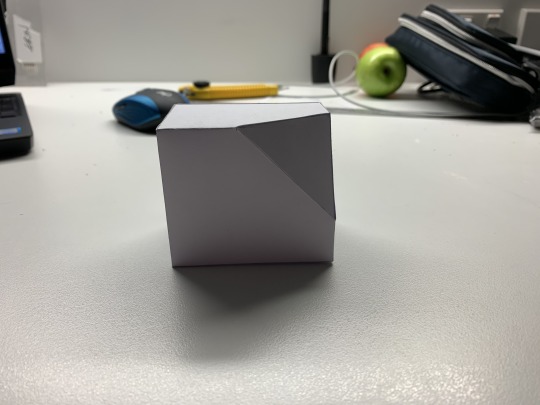
The secondary task of week 3 was particularly challenging. Not only did we have to make 2 auxiliary views, but also had to create a live model of it.
One problem I came across instantaneously was how to get the views right and from which perspective. I went through many hand made attempts but could accomplish a fulfilling angle.
It was then that I realized of the extreme importance of imagining a rotation of the object. After just calming down and reading past content. A shape in my head finally clicked, and form then I was in sense of focus I could not describe.
Sometimes just relaxing and thinking freely can give you that answer you look for.
Process:
Image 1

Image 2
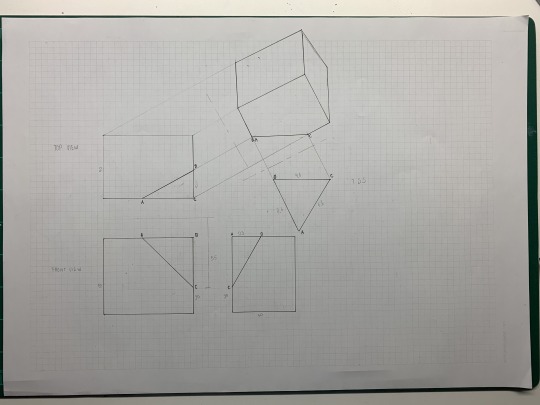
Image 3
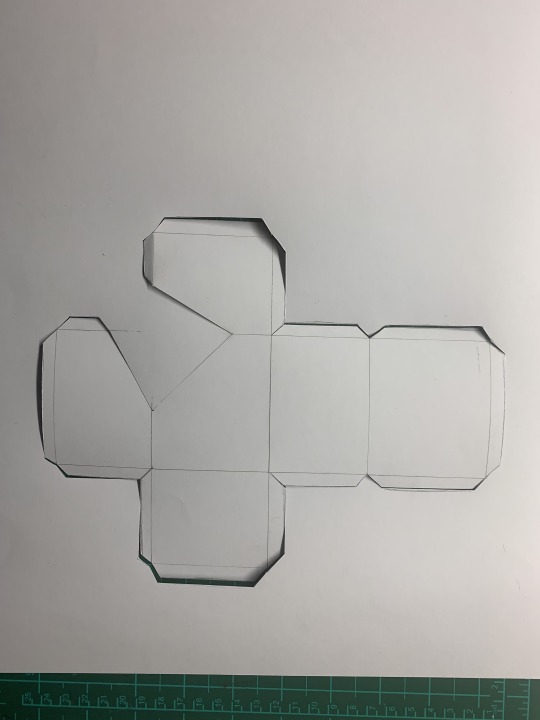
Image 4

Final Results:
Image 5
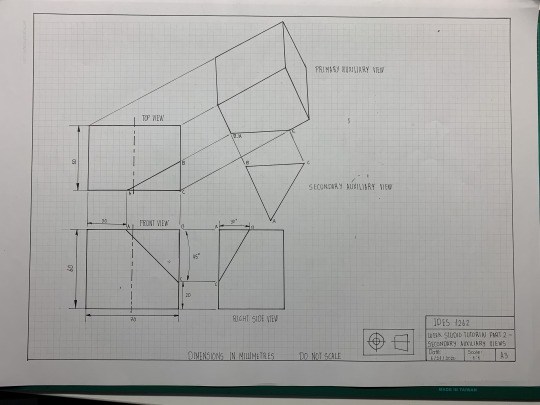
Image 6
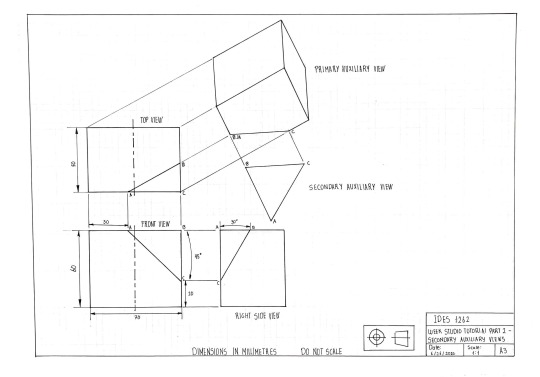
Image 7
8 notes
·
View notes
Text
Week Three: Part 1
Week threes exercise was designed to further our skills in section and auxiliary views – I believe that the assigned task achieved this. These new skills will be very helpful in the future, within and outside of this class.
Task one:
Task one was fairly simple and laid down the foundation for the future steps. It was slightly tedious as it was the first time the measurements were translated from an isometric view to a third angle orthogonal drawing. One step I had particular difficulty with was drawing the auxiliary view, however I eventually figured this out by using connecting lines and measurements – was very relieved when I finally got it done. My layout sketch can be seen in figure one.
Task two:
Once the layout was correct, I moved onto drawing the object with drawing instruments and in pen. This step was easy as I had already done majority of the work in task one. This step in the process can be seen in figure two. One difficulty I had with this was making sure the pen was as neat as it could be, I believe I produced a neat and well put together piece of work during this step.
Task three:
Once the object was drawn, I added measurements and made sure my foundation lines were still visible – as seen in figure 3. This step was definitely the most time consuming. I made a few minor mistakes that I was able to fix (luckily) – these included placing measurements in the wrong areas and few mix ups with the placement of my arrows, however I was able to overcome this issue by coming up with solutions such as using whiteout or placing a measurement in a different area. Overall, I like the way this step turned out, I think my work is as neat as it can be, and I am proud of the final piece that I have produced.
Overall, I really enjoyed this exercise. I feel that my skill set has been expanded and I am happy with my standard of work.


6 notes
·
View notes
Text
Week 3 - Section and Auxiliary Views
This week we focused on sectional and auxiliary views, developing our engineering drawing skills. enabling us to better depict the design and its characteristics.
Figure 1: Following the task instructions, I started by roughly sketching out the view points. Starting with the front view and top view, before sketching the sectional view and projecting the auxiliary view off of it. Early on, I realized how precise I would have to be. Having used a plastic ruler with incorrect measurements, I had to start again on a fresh piece of paper, this time ensuring that I focused on the millimetre by millimetre measurements of my steel ruler, ignoring the distracting 5 mm grid format that for some lengths, made it difficult to accurately draw odd measurements of 34 mm or 48.6 mm for example. Once I had completed the sketches, I managed to fit a simple title block in the opposite corner of its proper position.

Figure 2: Once I had completed my rough sketch, I looked back at the task. Reminding my self of the drawing subject before continuing as I tried to figure out how to better present my drawing. Looking back through the engineering drawing presentations, I realized the error in my layout. With a fresh piece of paper, I lightly penciled out the view points, ensuring that I followed the correct presentation layout. With the top view in the bottom right hand corner, as opposed to where I had placed it in my original sketches. This change, however meant that I had to lose the title block. Luckily however, I was still able to draw a border. Separating the drawing into a grid 1-10 wide and A-G high. Once I had done this, I realized that I was repeating my measurements over and over, depicting the same length and measurement between each view despite my construction lines. Connecting each drawings, I added more construction lines and erased any superfluous measurements, enabling me to clean the engineering drawing up and present it more neatly.

Figure 3: Following my completion of the final engineering drawing, I erased the pencil lines gently. Going back over the drawings with a black pen to re-define the drawings and make the projections cleaner.

Ultimately, the previous weeks task have really culminated in this drawing. Over the course of the tasks, I have managed to greatly improve my understanding and grasp of engineering drawings and the various depictions. With my testing of patience and steadiness enabling me to create a clean, and precise drawing, depicting the tapered block as best as possible.
6 notes
·
View notes
Last Seen Blogs

moose-the-crackhead
i don't feel pain

luxesiren
𝐒𝐈𝐑𝐄𝐍.

nar-bo00
Narnia or Stephan

unleash-the-doves
lesbians that like a pine fresh scent