#ides1262 2020 week 8
Text
Week 8 – Digital Models
Three dimensional models can be created in two ways that both assist a designer in different ways. Physical models and digital models. This weeks task required the digital development of a model in fusion 360. This was based off the foam models created in week 7. The advantages of physical models is the ability to create high and low fidelity models, as well as understand the weight and feel of materials. This is highlighted in the Andrew Simpson video. One of the biggest advantages of physical models is the weight and material of the model. Weight is usually correlated to value to an extent, this can be experimented with using physical models in both low and high fidelity ( accuracy ).
Creating the model in fusion 360 required a number of steps to be used to create a 1:1 model and at the highest accuracy. Using the tutorials in pre-class activities the techniques were understood and applied. The first step was taking canvas images to base the model off. These can be seen below ( all images were grouped in photoshop).

These canvas images were calibrated to create a 1:1 measurement ratio. Though selecting two locations in the image and then determining the distance from the points.

This was then copied to a sketch placed on the same face as the canvas. this will provide an area to be extruded to create the body shape.

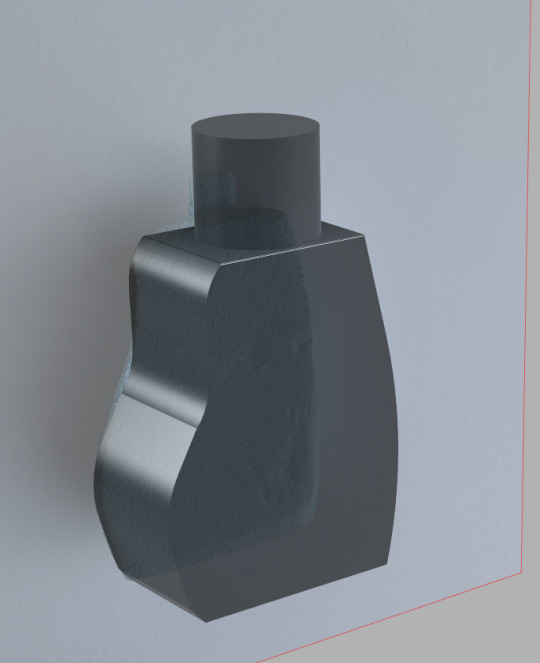
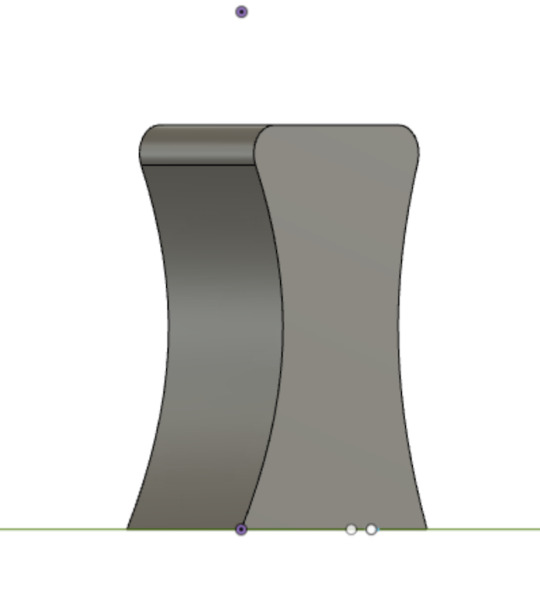
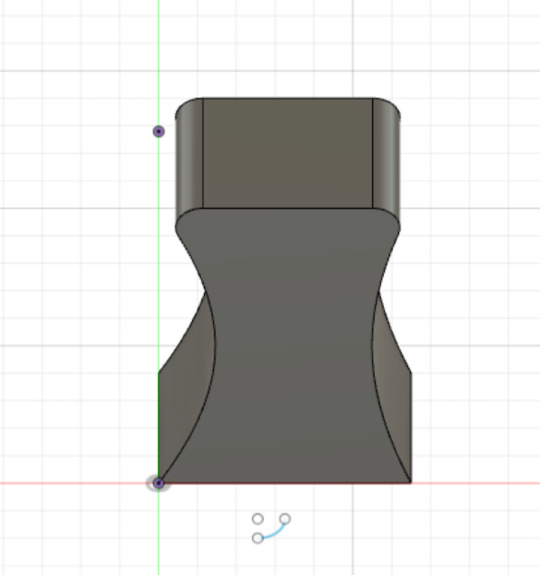
A new component was then created to make a lid on the top face of the body. This lid is the same as week 5. This can be seen below in regular and section view.

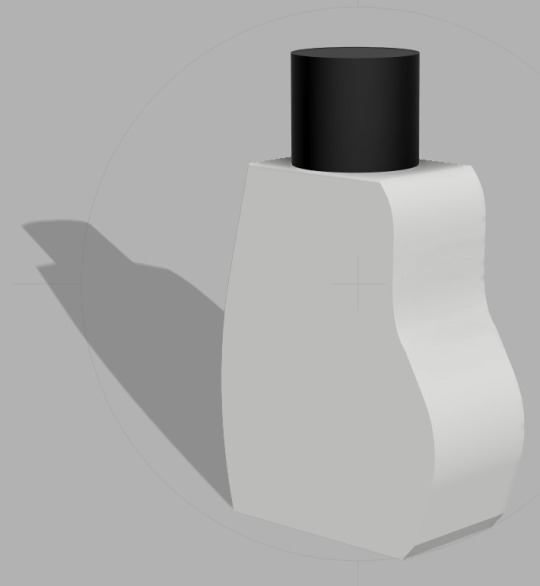
The bottle design was then rendered in fusion 360′s native render tab. This creates a more professional and photo realistic model. Overall i believe this task was very interesting and i have learnt a number of techniques that can be applied to further digital models for both 3d printing and rendering. The task was overall very enjoyable and was interesting to see the shape develop. With practice I believe I can speed up my digital model generation and use a new skill set to apply to the design process.
16 notes
·
View notes
Text
Week 8 Digital Modelling
Week 8 activities started very smoothly, but getting towards the end of making the bottle shape, problems occurred where the program was finding errors that seemed like they were not visible to the eye and frustration slowly built up for the next couple hours trying to fix it. I now see why Miles says you shouldn’t start with CAD/CAM in design, as it’s very easy to get stuck trying to form a curve or an angle that may not even be included in a final design, and thus wasting hours of time that could’ve been spent drawing up 10 more designs. In the end, I was able to successfully model my Shampoo bottle to an extent using the “How to model a Whiskey bottle” video from Robs pre-activities.
Canvas images


I was lucky enough that my dad has a great camera and tripod which I could borrow to get some solid canvas images to use in Fusion. I placed these images into Adobe Lightroom to try brighten the bottle as much as i could so it would stand out, then cropped the photo as close to the edges of the bottle as possible.

I began by watching the Fusion 360 in 30 days series videos that were recommended in the pre-activities. These were vital in my learnings for making the model as my previous experience with Fusion 360 was no where near close to being able to make a complex model like this. I was lucky enough to have done a symmetrical model which made the process much easier, however it still had its issues along the way.

I essentially followed the “how to model a whiskey bottle” exactly to model my shampoo bottle, as the video was suitable for models which are symmetrical. After making each profile of the model and using the loft tool, the final product was similar to the shape of my model, but seemed too chunky around some of the curves. In the video, Kevin mentions a better way of getting the exact shape of a model by making a guide path using the spline tool.

In the video, he specifically mentions an issue which people often have where the guidelines do not pass through each profile, so the loft tool isn’t able to follow its guideline. I was extremely confused as to why this was occurring because I followed the video just as he said, and did exactly what Kevin did to prevent this from happening. This took about an hour and a half of watching back Kevins video and drawing new guidelines, until it finally decided to work. I still don’t fully know why it wasn't working at first, but i ended up just redrawing most of my profiles and retrying the guidelines and eventually it worked.
I wasn’t able to duplicate my model exactly with some of the divots on the middle and bottom of the bottle as Kevins video didn’t explore these techniques. Overall, I was able to successfully transfer a basic physical model with complex curves into a digital model which i’m very proud of. After working with the physical model, i could tell that it was not perfectly straight. Whilst sanding it, i must have sanded too much on particular sides and my shape didn’t not turn out with solid right angles. This became very clear when cropping my photos and making profiles on Fusion. However, I was still able to persevere and make my digital model to a satisfactory level.
12 notes
·
View notes
Text
Week 8 - Digital Models
This weeks task was very enjoyable but required immense amounts of patience, resilience and perseverance. With learning new software, it is a common occurrence that tasks appear as though they should be simple. However, without proper practice or experience, these ‘simple tasks’ can become very time consuming as you search for an answer. This was apparent for me a few times during this task.
Pre-Class Activities
These activities were fairly straight forward as I could follow along at my own pace and copy exactly what Kevin was doing in the videos.


I did, however, have a major issue with the whiskey bottle activity. For an unknown reason, the construction lines drawn did not allow the fix point spline tool to snap to the points. This meant I could not proceed further with the model. I spent close to an hour troubleshooting the issue but to no avail. For the sake of time, I simply restarted the model and this solved my problem.

Olay Bottle Digital Model
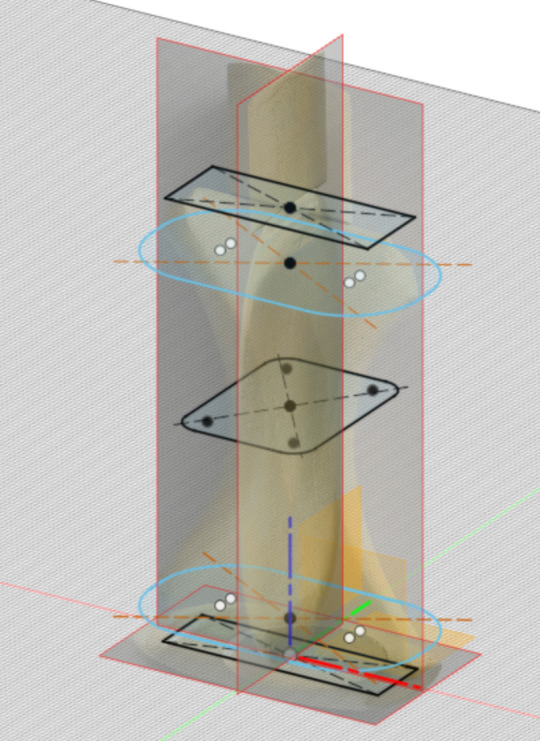
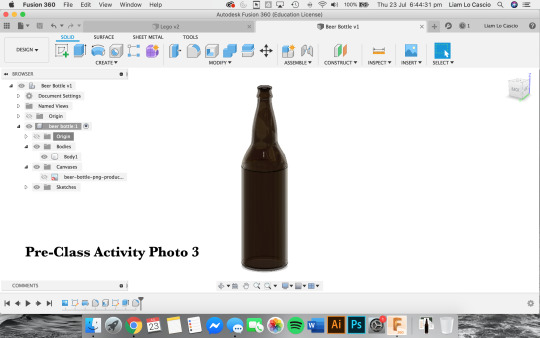
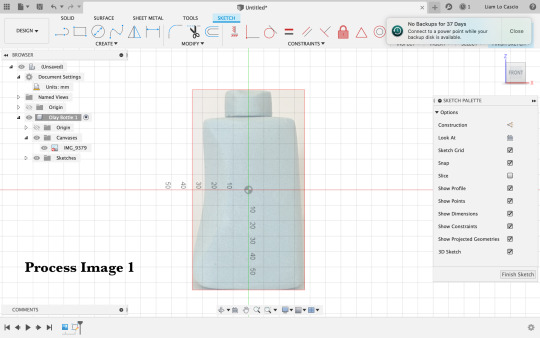
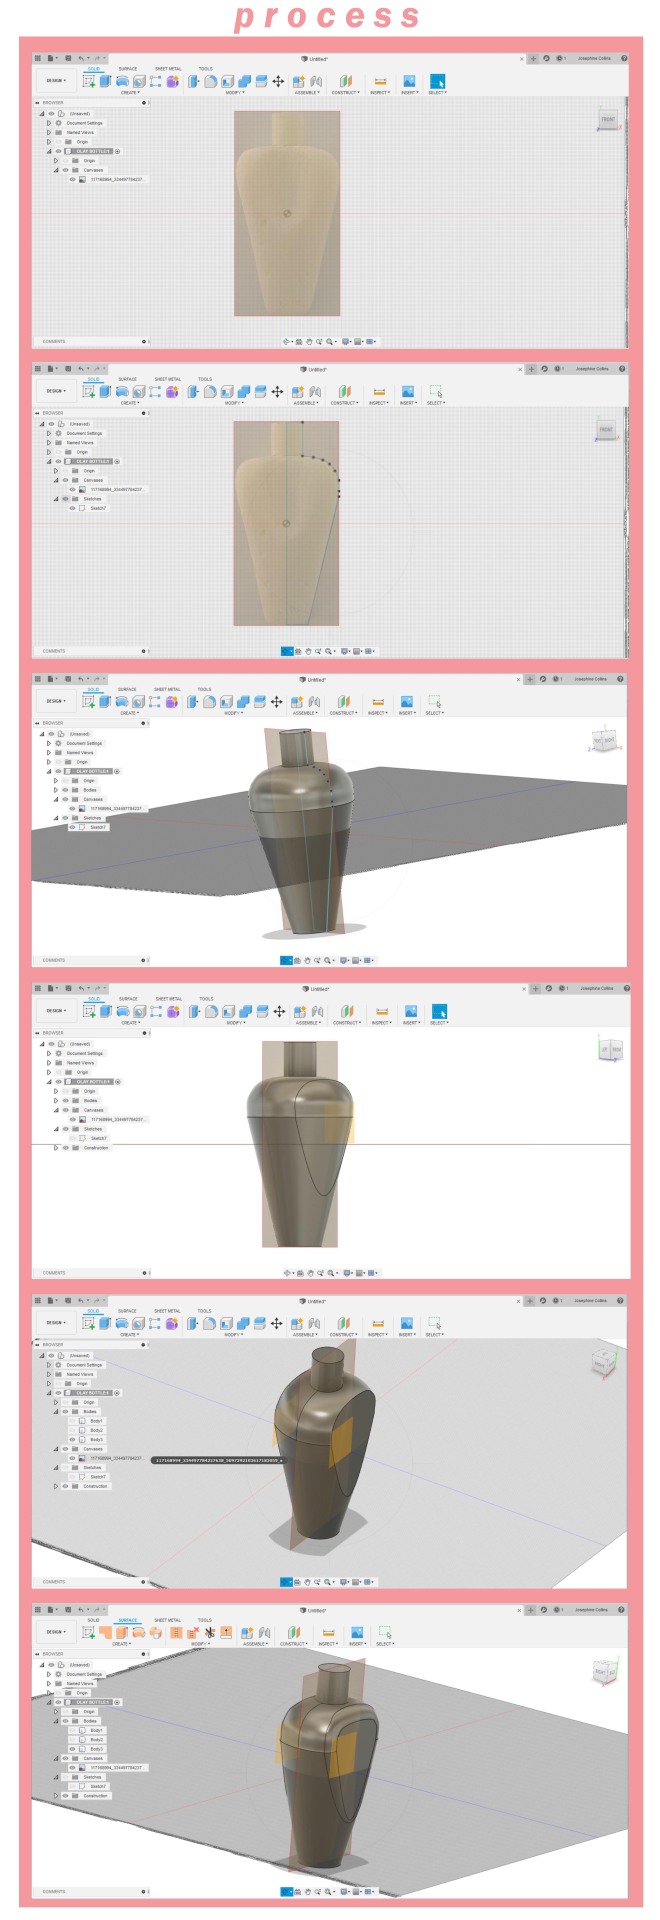
When I began this task I felt a bit overwhelmed. Not having a video to follow the steps made me feel less confident. I began by following similar steps to the beer bottle video tutorial by adding a canvas image of my foam model (as seen in process image 1). This ensured all dimensions were accurate and fit my model.
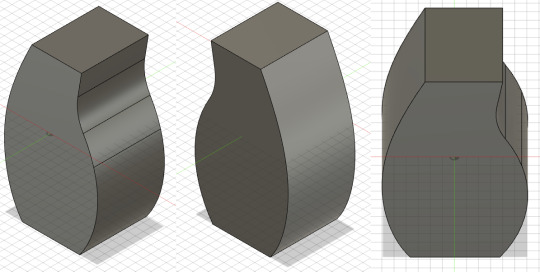
From here I was unsure how to proceed. I followed a similar process to the foam modelling task by creating a 3-dimensional outline of the model (as seen in process image 2). This very much gave me direction in my model and helped me realise that there is more than one way to achieve a given task.

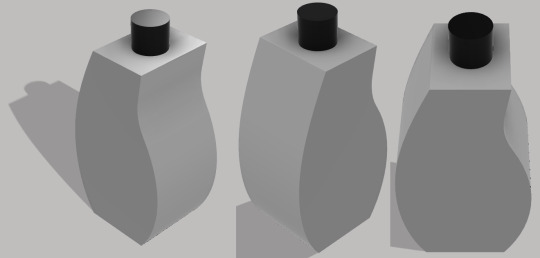
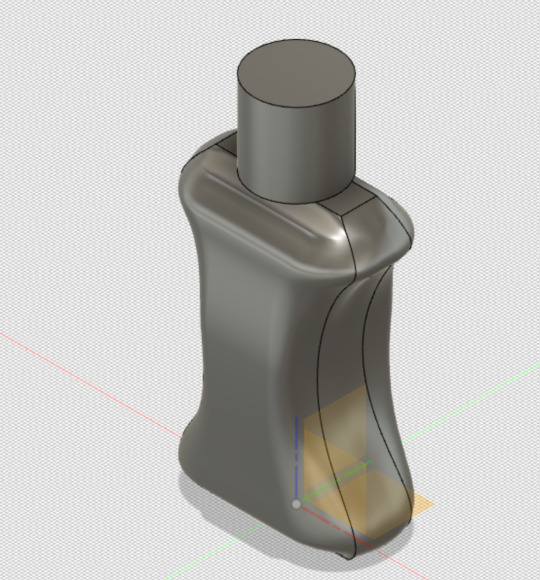
I then faced the task of adding the cut detail on the front right of the bottle (as seen in process image 3). I was unsure how I would go about doing this but after a bit of research, I discovered the plane at an angle feature. This allowed me to cut out the feature of the bottle.

I then added a cap to the bottle and filleted the edges to make them soft and smooth. I learned this from the tutorial videos watched before class.

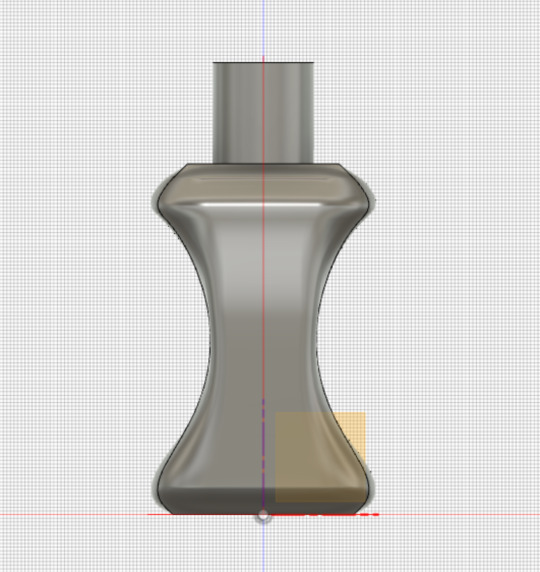
I experimented with possible materials and the model was complete (as seen in final image 1&2). In final image 3, I experimented with a possible label location and added darker colours in the groove to accentuate it more.


I greatly enjoyed the tasks this week and felt very accomplished when I finished my model. I was not very confident at the beginning of the task, however, by the end, I felt as though I had achieved a satisfactory model. I found myself becoming annoyed at times with the software as I received various errors which did not make sense to me and was unclear how to fix. I also feel that at times, Fusion 360 almost randomly is unable to complete some tasks and it is unclear as to why it cannot. I believe this issue could be improved by enhancing my troubleshooting ability as well as simply working with Fusion 360 more to understand why some errors occur.
12 notes
·
View notes
Text
Week 8 Studio Activities
Andrew Simpson Razor video: In terms of low fidelity and hi-fidelity, I think Andrew was expressing how exact a model is to what we are intending to make. In choosing the fidelity of the model depends on the aspect of the design that you are focusing on.
Week 8 Studio Activities were to turn our model concepts into digital models in Fusion360. This task deemed frustrating and challenging but was a very impactful task in my skills in digital rendering.
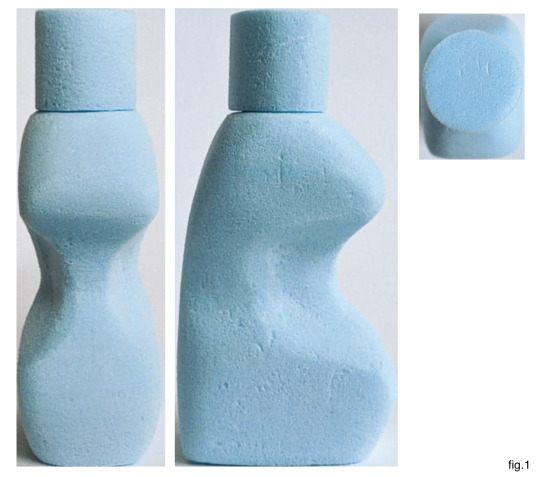
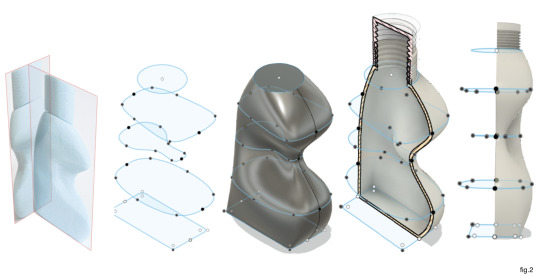
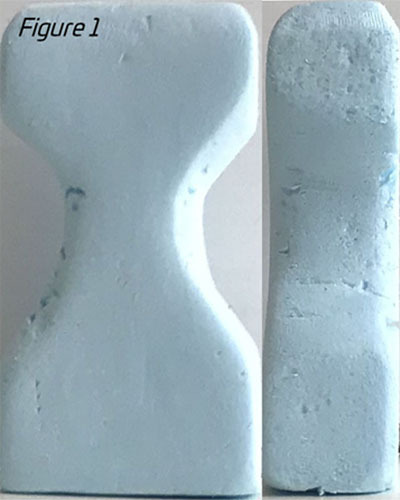
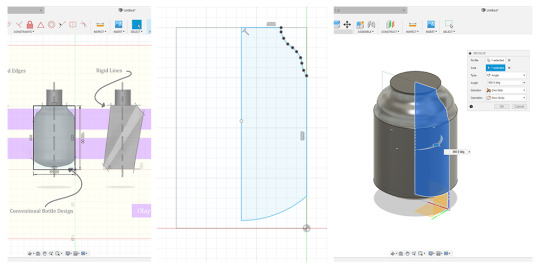
Firstly, the photos were easily produced. [fig.1] However, next time I would make the edges more defined to make it easer to see when referencing it in fusion360. I could have done this by changing the position of the lighting or fixed it in the editing process. I also realised cropping the photos was very important as it made it easier to calibrate the images. This part of the task expressed what Andrew Simpson said in which the models were used in order to “check different aspects of the design”. The low- fidelity blue foam model was was a constant reference in understanding the curves and overall shape and size.
The pre-class activities were extremely helpful as fusion 360 skills are very limited and it taught me insightful techniques very clearly. I mainly focused on the technique used for the whiskey bottle, lofting. [fig.2] . As my model’s structure was organic, curved and not symmetrical throughout, lofting was the only method I researched and practiced that could successfully produce this shape.
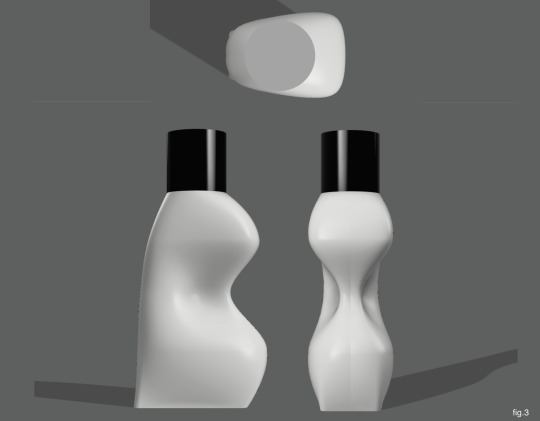
In order to achieve my final results, I had to go through multiple attempts to figure out a methodical and strategic procedure. Overall I am very satisfied with my final results. [fig.3] Not only because it took a long time, but I think the digital reinterpretation turned out quite similar to my model concept. I think incorporating the appearance of a real Olay bottle, completed and refined the digital model. Where I could have improved was making the indents more refined but I am unsure how to do that. I also learned that SAVING your work is very vital. 😅
From the beginning, I knew my model was going to be very difficult a part of me didn’t want to start the task. Although it was very challenging, I feel like having a difficult task improved my skills in fusion 360 immensely and I definitely know a lot more than when I started this task.
11 notes
·
View notes
Text
Week 8 - Digital Models
Week 8’s digital modelling activity was a fun and enlightening task!
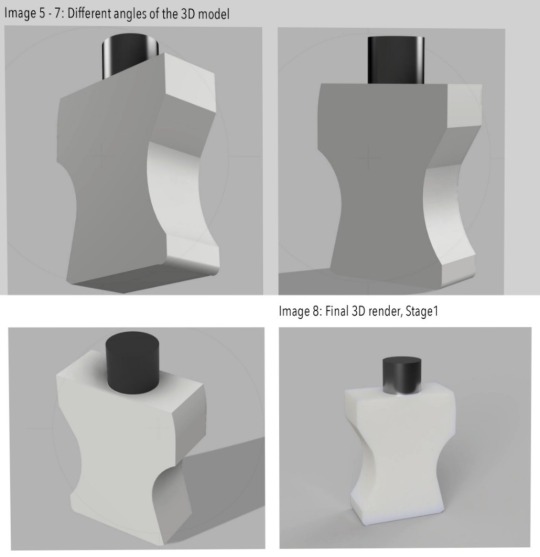
Image 1-6:
After capturing and editing pictures of my model, I inserted them into Fusion 360 to make my digital rendition. Since my Fusion 360/3D CAD modelling knowledge is extremely limited, I firstly approached it was a simple ‘make a block and fillet the sides’ job. As I conducted this method, Fusion 360 despised me. It would not fillet the harsh edges of my model and crashed a few times when I tired to forcefully do so. I assumed my model’s curves were too complicated through this method. So, since this did not work, I did some online research on how to do organic curves in Fusion 360. I stumbled upon Tango of the Geeks’ video, ‘Sculpting Organic Shapes in Fusion 360’ (https://www.youtube.com/watch?v=7RtxexJCVts). This was a TREMENDOUS tutorial. He explained it so simply and effectively. Within the first few minutes, I gathered the tools and knowledge I needed to try the sculpting function to make my model. This method was incredibly successful for my asymmetrical, organic and complex model.
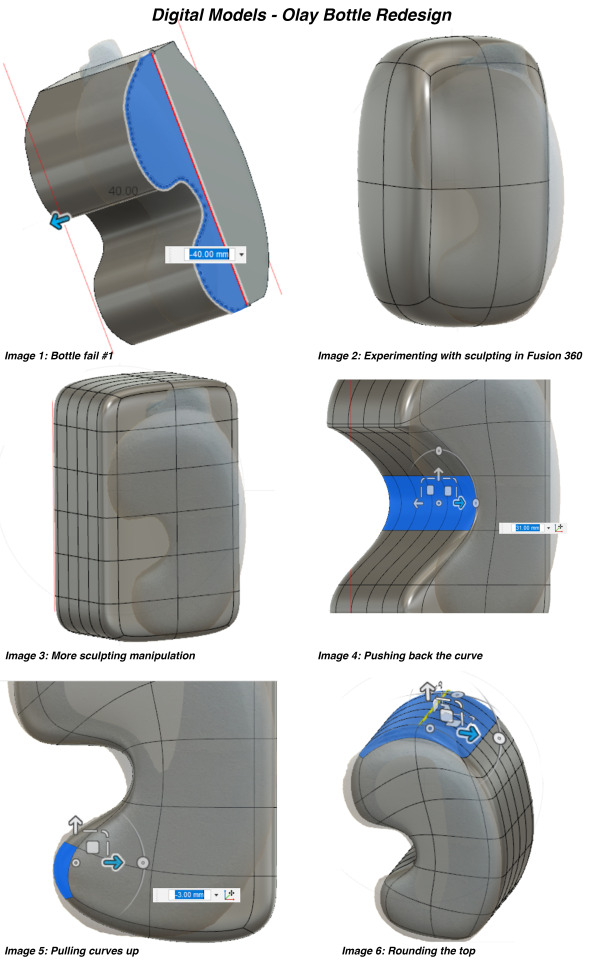
Image 7-10:
Since the bottle cap was not difficult for me to sketch up, I switched back to Fusion’s regular modelling mode and made its cap. I decided not to use the original cap design as the small hill-like shape is not as efficient as a push cap. It can be frustrating to open it if you do not have small fingers and does not aesthetically fit my bottle’s design.
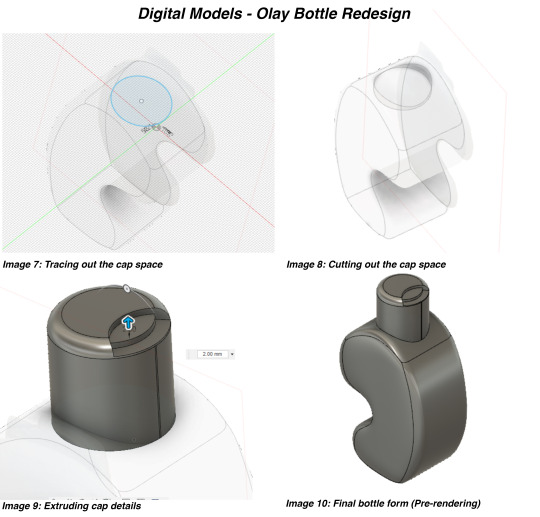
Image 11-16:
My final digital render of my Olay bottle design. I thoroughly enjoyed making this model!
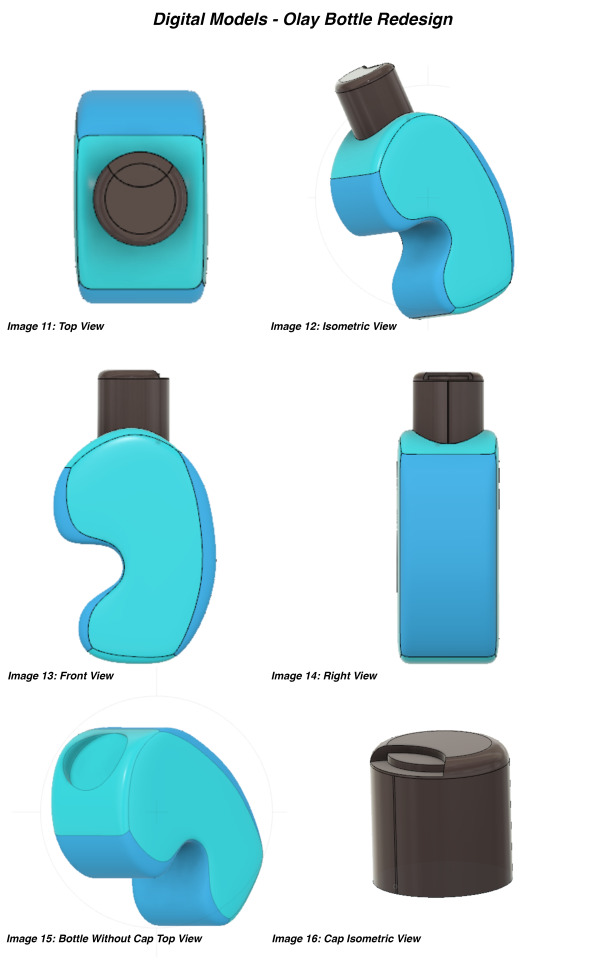
I chose to use a monochromatic blue colour scheme as blue is commonly associated with cleanliness, calmness and generally most people’s favourite colour (Most people I know/have asked all love blue but in different shades). Olay’s graphic designs are also boring and too plain. So, adding more variety of colour would enable their brand to stand out from the rest of the shop aisle.
Even though I struggled using my first approach, I overcame it through looking at more ways to get the job done. I learned that certain tools and functions have their own laws and limits. As I experienced Fusion’s limits, I was able to learn its other tools that I had not used before. Depending on one’s circumstances, other tools and methods must be incorporated to best communicate and represent your design.
Transferring my physical model into a digital model greatly helped me develop a better understanding of Fusion 360’s functions. I deeply appreciate this amazing software package, and Tango’s tutorial too, as a newbie in product modelling. The sculpting environment is so versatile and fun to manipulate, I highly recommend trying it.
Kevin Kennedy’s tutorials were also helpful for building up my knowledge of Fusion 360. Even though his techniques did not work for this model, they are excellent fundamentals for me to learn. My goal for the upcoming holidays is to continue using Fusion 360 and (hopefully) complete his 30-day training course so I can improve my skills in using CAD packages.
11 notes
·
View notes
Text
Week 8 - Digital Models
For the eighth week, we need to create a digital model through Fusion360. In fact, I am a bit scared to create a 3D digital model because I find it very difficult and I have never tried it. I practiced through pre-class videos, and based on my understanding of Fusion360, I started to try modeling.

This task is to build a digital model based on the model made last week. I edited the front view of the model and then used a paintbrush to create a 2D outline.

The next step is to stretch through the 2D outline to get a simple 3D model. In this step, I found that it is not particularly difficult, as long as you watch the instructional video before class carefully, you can learn it. The only thing I found when drawing the contour is that the contour of the curve needs to be drawn very carefully.
In the last step, I added the bottle cap as my final step. In the exercise last week, the bottle cap I designed was a cube, but in this exercise, I found that the round cap is more suitable for me the design of. Through this, I found that the design steps can help me improve and strengthen my design step by step.

After finishing the model, I started rendering. I added shadows and modified the colors to make it more realistic and professional.


In rendering, the final design can achieve a very good effect with the help of rendering. Unlike the physical model last week, the digital model can express its design more intuitively and clearly. With the help of Fusion 360, we can try different designs, such as colors and materials, and demonstrate through rendering. In this week's exercise, I learned a lot.
8 notes
·
View notes
Text
Week 8 - Digital Models
As I’m not a industrial design student, I didn’t took any 3D modelling courses before. Therefore this task was quite challenging for me. I had used other modelling softwares but not Fusion 360, looking forward to learn more to achieve more too.
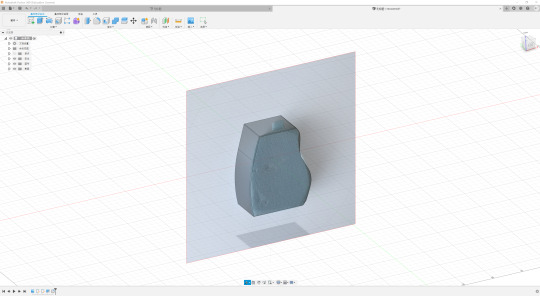
Image 1-2: As u can see, I used the method of importing an image of my bottle design then I first traced the overall shape of it. I’ve this through the video that was provided which it was very useful. And then I pulled the shape up to create the depth.
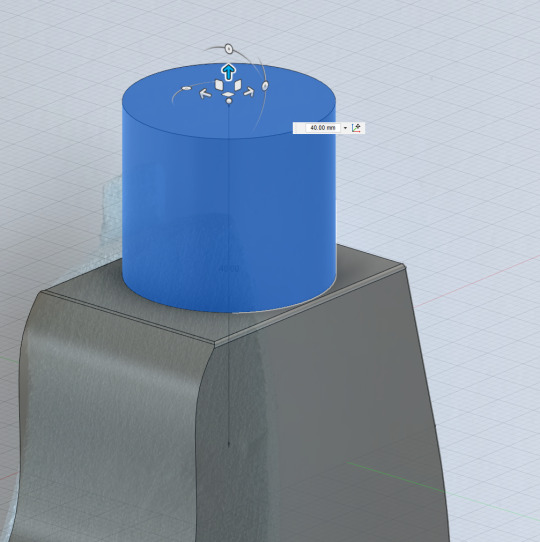
Image 3-4: However, as I couldn’t add a horizontal drawing layer, I couldn’t drew the bottle cap with the way that was shown in the resource video. Nevertheless, after trying, I managed to use other way to draw it. Which is that I drew the cap on the same drawing plain as the main body then I rotate it and move it to the position that I wanted which is the top middle part of the main body.
Image 5-8: At the end, the outcome looks amazing. I have added a plastic texture to the surface of the bottle in white and the cap in black.After the design got rendered, it looks very real. The texture is also very nice! I’m very satisfied with what I have created with Fusion360 for the first time. It is such a great experience. I’m looking forward to draw other designs with this software.
However there’s always improvement space for us to make which is that I couldn’t draw the curves on the main body more smoothly which I felt I need more exercise to improve myself in order to achieve this.

6 notes
·
View notes
Text
Week 8 - CAD Modelling
This week we transitioned from physical modelling to CAD. Using software to render the previously designed soap bottles. Thankfully, I’ve used Fusion 360 before in a previous class, so whilst this task was still trying, my previous experience definitely helped me create my CAD model.
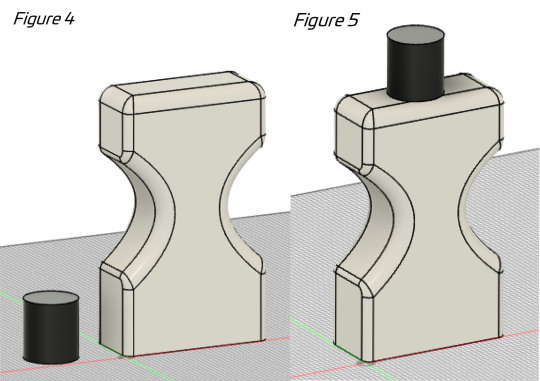
Before I started any edits or modelling, I photographed my foam rendition of my bottle design, cropping the photos closely so that I could use that as guides later on. (Figure 1)
Once I had my templates, I uploaded them to Fusion, tracing the three faces to sketch my design. (Figures 2 and 3) The sketching was slow, as I carefully traced the pictures so as to accurately translate my model into CAD.
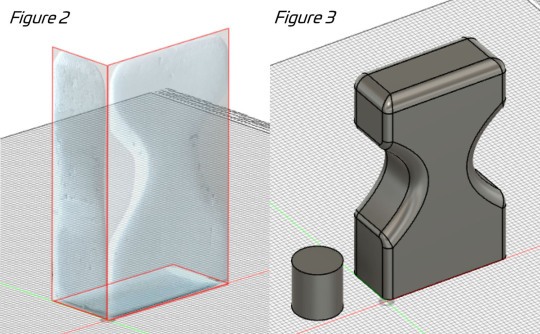
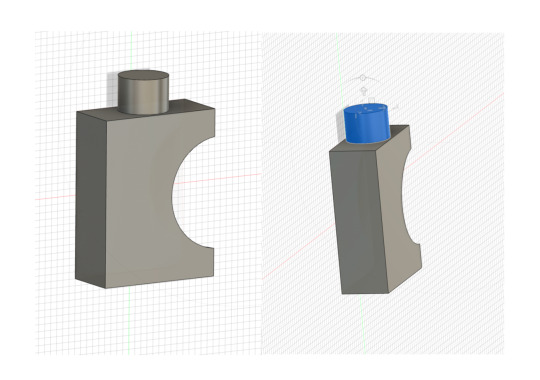
Separating the bottles lid and body, I sketched them one at a time. (Figure 4) Enabling me to clearly see the shapes and parts of the pieces as I modeled them, before then combining them to create my final bottle design. (Figure 5)
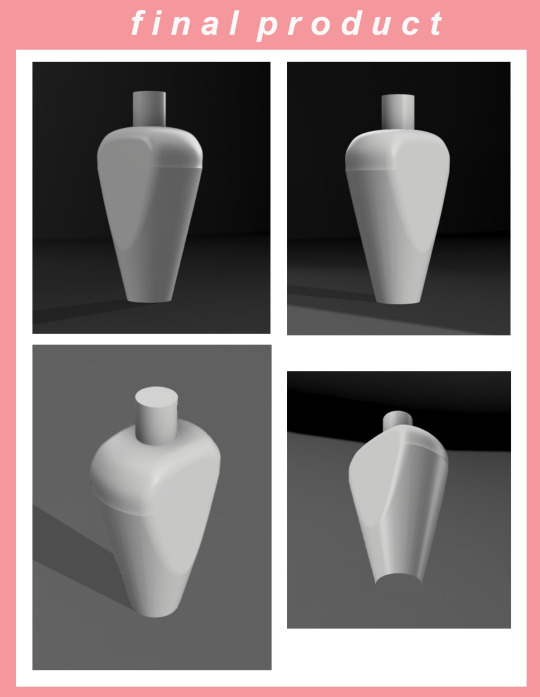
Overall I am happy with how my model turned out. With the rendition conveying the colours and shapes of my design correctly. This task really improved my computer skills, enabling me to explore Fusion 360 and figure out the tools and techniques necessary to create my CAD rendition.
6 notes
·
View notes
Text
Week 8 - Digital models


Andrew Simpson: There were multiple ways in which models informed this particular design process, in ways that sketches and drawings alone could not. Simpson mentioned materiality as a way of perceiving value. When you have a model in your hands you can assess the appropriateness of the material choice, as well as how the user interacts with it. A sketch does not cannot give you this. Simpson also mentioned the weight of the model and its perception of value. If you have a tangible model, you can examine its weight/feel and whether that effects other factors e.g. “objects that are too heavy start to effect the ergonomics.” You are also able to test your models, further informing the design process. E.g. by putting the razor in water, it was found that the grip of the handle was effected. You could potentially guess this would happen in a sketch, but you wouldn’t know for sure. Simpson also mentioned low and hi-fidelity. I think low fidelity means a quick and easy (perhaps cheaper) way to translate a higher quality design into a tangible product. Therefore, hi fidelity means that the model created, will be a representation of the product in its closest resemblance to the final design in terms of details and functionality.
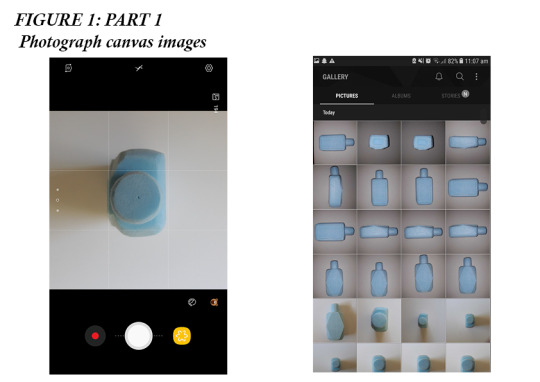
Part 1: This is where I took photos of my Olay bottle. This was actually slightly more difficult than I thought, as you had to capture the object flat on, in focus (adequate resolution) and as far away as possible. There were things that would slightly interfere with these task as well e.g. lighting or having other things in the frame. I took canvas images that resemble front, top and side views of an orthographic drawing. I also followed steps to ensure I minimised the effects of perspective distortion. A tip for this part would be; if you don’t have a steady hand, you could use a tripod of sorts. Note, I took separate photos of the lid from the bottle.
Part 2: I wasn’t extremely happy with my photographs, but felt that they would still be satisfactory as the background images/canvas to model against. In this part, I edited and adjusted my images so that they were appropriate e.g. exposure/contrast. I then cropped the images as tight as possible, so that the edge of the bottle touches the edge of the image without being chopped off.
Part 3: I now understand after having our Friday tutorial, that sharp edges are some what bad for CAM, however, I had already completed my design, so that’s what I went with for the fusion 360 model. I felt in this part that I took some short cuts (don’t know if that’s good or bad) but basically I inserted the front view of my bottle as the canvas image. This was the only image I required in the end, as I quickly realised as soon as I ‘sketch’ a rectangle I could just extrude it and cut a half circle out of it…which is what I did. I cut the half circle out of my bottle, by first, drawing a circle and making sure it was placed in the correct spot, I then extruded it but by pushing it the other way so it would create a ‘cut’. This activity took me no time at all, purely due to my bottles simple shape. Note, I did find the canvas image helpful (making the opacity low so I could sketch over it) as I could get the centre points and the size/shape of my bottle accurate. After I made the body of my bottle, I simply drew a circle and extruded it to create the lid. Finally I connected the two components, making my final 3D bottle.
6 notes
·
View notes
Text
Week 8 - Digital Models
This week’s tasks built off Week 7, in which we were asked to turn our physical models into digital models. This was one of the most challenging exercises for me, as I only have a basic understanding of Fusion360. However, my skills improve little by little whenever I use this program for an assignment, and I was pleased with my effort this week and hope to keep improving.
The pre-class activities allowed me to complete this task; particularly “How to 3D Model a Beer Bottle” and “How to 3D Model a Whiskey Bottle”. Although I knew I would not be able to fully resolve my models using the provided techniques, I used the videos as a starting off point. I followed the “Beer Bottle” tutorial up until the ‘Revolve’ step, then I had to account for my bottle not being symmetrical for 360°.
The following steps took a little experimentation and research:
1. I created two vertical offset planes on either side of the bottle
2. I split the body into 3 separate parts and deleted the two smaller curved shapes
3. I chamfered the edges of the remaining, central component to create a smooth finish
I was unable to create the concave dip on the front (for the label) from my own experimentation and research, however I Intend to conduct further research and ask for help in order to create the shape. I could just be missing something obvious, but I wasn’t able to get the result I wanted after trying out a handful of techniques. I plan to finish this before next week’s activity!
I am glad that my skills and comfort with using the program are slowly improving. Although some aspects are frustrating during the learning process, I’m glad I have good resources to help guide me.
5 notes
·
View notes
Text
Week 8 - Digital Model Making
PRE-CLASS ACTIVITY: Andrew Simpson: Razor Handle
Models allow for a range of ideas to come to life in the three-dimensional environment and be tested and held by a user as it is intended for. Sketches alone can not provide this luxury in developing these ides. As through modelling you can persevere value of aspects and see how it works.
For Andrew and his team models played a essential role in informing elements of weight, grip, size, shape, form, ergonomics aesthetics and function of the razor blade handles. He states that he made about 100 quick models to check different elements and features of each handles. They looked at physical size and the users interactions with them in their hands. They really focused on materiality to persevere value by using different methods of modeling such as foam, 3D printing, etc. He continued to explain that different methods are selected according to what is being informed, example: 3D print allows to look at scale and form but has misinformation of grip and weight. Where as looking at weight a aluminium model would be made a tested while being held in water and in other suitable environments.
Low-fidelity refers to simple, cheaper and low-tech concepts where as high-fidelity models are highly functional, detailed, and interactive. Andrews explains that his personal process was less linear (low fidelity to high fidelity). Instead he created different models of different fidelity levels according to what is being investigated and what aspects are being tested.
PART 1: Photography of canvas images
Figure 1: This process took a while. It was very hard for me to centre my model at first. I did not have a tripod to attach my photo to, nor did I have a proper DSLR camera. I used my phone and used the grid setting to line up each face the best I could. My model laid flat on some white foam core so that no other unnecessary background was used to confuse me during the digital modelling process. I also figured out that using the phone’s flash gave a nice even light to the sides so all edges could be easily seen.
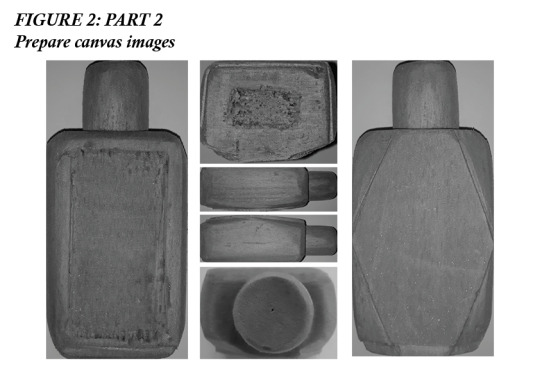
PART 2: Prepare canvas images
Figure 2: During this preparing stage I took my images into Photoshop. I cropped them and applied a black and white filter. In addition to this I played with the contrast of the colours to make sure the model each side and detail of the model was visible and clear to make it easy to work with in Fusion 360. I selected the blues in the adjustment section and made them darker.
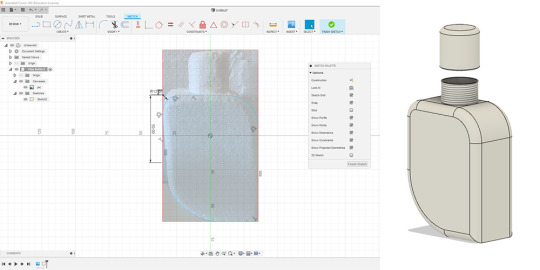
PART 3: Model bottle using Fusion 360
Figure 1 & first half of video 1: I began by working from the photo of the model’s front face. I went into this task not really planning out my approach but this proved to be a mistake as I really struggled with creating the rounded and curved sides like I had with my blue foam model. Instead of using the easiest process and tools I experimented and played around using a variety of different methods.
I began by using the draft tool. This was ultimately unsuccessful as it did not edit the section I wanted to make sloped. To try to fix this issue I tried creating a new plane at an angle, but still not successful. Next, I used the fillet tool, but once I added the diamond face it was not what I pictured it to look like.
This stage took me an extremely long time so I resorted to have a break for a couple days and return back, starting from scratch and plan out on a piece of paper what would work best.

Figure 4 & second half of video 1: This was a much more successful approach. I remembered that Miles stated that having paper and pen with you while modelling helps you with planning the approach and taking note of dimensions, etc. This time I worked with the top view. This was a great approach as I was able to easily edit the sketch and just simply extract the form when I was happy.
Firstly I tried to use the sketching fillet tool. This created a result which was close to what I wanted but I fell a little short. Next, I created a circle sketch and extracted that. This created a curved front face which is not what I had in mind. Lastly, I used the arch/arc tool. This was a great tool as unlike the fillet tool I was able to change the length of the sides of the curve. The fillet tool is equal on both lengths of the curve.

Figure 5: I also played around with the shell tool to hollow out the bottle. This video helped me to have a better understanding of how to use the shell tool with different forms and in different situations. https://www.youtube.com/watch?v=NNPPcCx2Jqc
I tried to look for a way to hollow out the bottle without deleting the top and bottom faces. Unfortunately, I was unable to find a way to do this. Instead, I redrew the faces and extracted them. I played around the sectional analysis tool to look inside.
Additionally, I used the fillet tool to create curved edges just as I had in my foam model. Creates a safer and more comfortable form to fit in a person’s hand. Great tool and really brings the model together very well.
Overall the tools made available in Fusion 360 allows for the creation of more accurate models. It allows for more detailed modification which is something that is very hard to achieve with foam modelling.

Video 1: A short timelapse of my design process and the issues I came to overcome.
Video 1: Time-lapse of Fusion model making
youtube
Figure 6: I was quite happy with my final digital model. Adding materials such as textured plastic and transparent plastics really brings the model together and I can really see how it may look like as a real product in the real environment. First making a physical model than creating a digital model I makes it easier to create the model as I knew how I should look like. If I were to go from sketching straight to Fusion it would be difficult to figure out how each component would work and overall would take a long time to complete.

If I was to do this again I would try and find more approached in creating the curved sides, possibly quicker or more efficient ways.
I felt a sense of achievement and pleasure when I was able to rotate around the bottle. I was able to see how a simple design which was created on paper has been transformed into a refined-looking digital model.
Creating a digital model in Fusion 360 I was able to work more accurately, I was able to re-try and fix my mistakes just by deleting and creating a new component. I was able to get a symmetrical design which was something I struggled to achieve with my foam model.
4 notes
·
View notes
Text
Week 8: Digital models
This week we worked on turning our physical foam model into a digital model on fusion360. Having some basic understanding of fusion and its tools from other course work as well as learning some great new skills from the fusion360 videos, I felt eager to undertake the task. I ended up finding this activity more challenging than anticipated but extremely valuable to the development and improvement of my fusion knowledge & skills.
Andrew Simpson razor video: Models informed this process as designers had the opportunity to test features and aspects such as ergonomics and weight that are reliant and only accurately defined through physical interaction. Sketches alone are unable to show this, hence, the importance of actively modelling when making a product. My take on the fidelity of a model is that low-fidelity refers to initial, lower cost model that turns an idea into a form/object usually exploring scale/size. In contrast, a high-fidelity prototype is generally more expensive to make and considers more complex features for example interactivity and user perception by detailing features such as weight and ergonomics.
Creating digital model:
Photographing: From my images I noticed that my actual blue foam model was not very accurate and symmetrical like it was intended to be since it was handmade. Hence, when making my digital model I had to tweak the angles and lines of the bottle to make it closer to the actual design idea. Going back to my orthographic drawing helped remind me of exact measurements and desired shape.
Digital model making on fusion:
Attempt #1: Initially I tried to create my model by tracing around the front face and using extrude tool. Although this did produce the correct form, it didn’t incorporate the angled/chamfered outer edges on the front face that were vital to the unique character and aesthetics of my bottle. Fortunately, this first attempt was generated pretty fast as I've had lots of experience with the extrude function.
Attempt #2: After paying greater attention to the learn fusion360 in 30 days videos, I realised an alternative approach to making this model: working off profiles vertically (top view) created by offset planes. At first I found this to be pretty difficult as the shapes of each profile weren’t as simple as the ones in the tutorial video. It was when I picked up my physical blue foam model created last week, that I was able to more clearly recognise what each section/plane would look like. Thus, reiterating the usefulness and informative nature of handmade sketch models when trying to understand a product & its distinct features. I came across an issue that seemed very minor, although, prevented me from developing the final model when using the loft tool: the rails guiding model were too sharp to create the form. After already taking so long to even get to the lofting point, I was beginning to feel quite defeated and decided to have a quick break away from fusion and then refocus to try and approach the problem from another angle. More determined, I came back to my work and decided to try create the loft as 2 separate components; one for the top half and other for the bottom which finally worked. I also had to make the centre diamond extend to front face edges as my original design didn’t touch the profiles. Although, the many benefits of digital modelling such as easy editing/changes, it can be limiting in terms of executing detail (especially sharp angles) & ergonomics which can be done in a physical model. Finally, I rendered my bottle model choosing a contrast between classic white and revitalising marigold/apricot for a vibrant and energising effect on the user.
Overall, this week was challenging— minor errors became major setbacks and my final model is far from perfect— but definitely a valuable learning experience which has greatly added to my knowledge of digital modelling. I learnt how to use a lot more techniques on fusion such as offset planes, mirror tool and rails and hope to continue utilising these tools in other digital models. I enjoyed being able to easily change measurements or lines, something not as simple to do when making a physical model. Something I could’ve done to improve my models ergonomics whilst still maintaining its unique geometric form, would be to use the fillet tool to slightly round the edges so that it doesn’t appear as boxy. In the future, I’d like to experiment with more organic forms as I feel these would prove to be even more of a challenge, further improve my fusion skills and allow me to be more adaptable to different designs; geometric or organic.


4 notes
·
View notes
Text
Week 8 Activities
Week 8′s activity was a digital modelling task where students modelled their foam lotion bottle model from the previous week.
{Week 8: Modelling the first lotion bottle design}
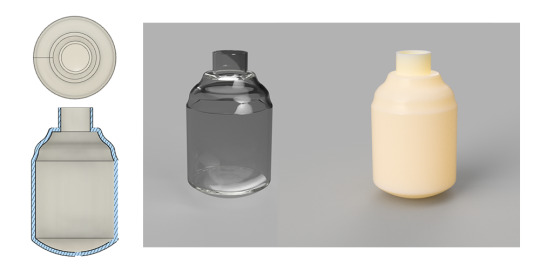
The task asked for photos of all faces of the model so that a digital model could be easily produced. Unfortunately, I underestimated the fragility of the model and damaged it to the point where it could not be used. Instead I took a photo from the week prior and applied a perspective warp so that the front face would appear flatter. I also darkened the photo so that I could see the edges more clearly.

{Week 8: Sectional and rendered views of the first design}
Using the geometry off of the photo I was able to construct the rest of the model (it also helped that I had done the exact same thing the previous week). I smoothed most of the edges out using fillets and and modelled a cap that would fit the bottle. I also experimented with rendering the bottle and applying different textures.
{Week 8: Modelling the second design}
As I am not really familiar with fusion 360 I decided it would be worthwhile to apply what I had learnt in the tutorials to each my own designs. I felt that each differed in some way, to the point where I wouldn’t be repeating the same task 4 times. The second design was very similar to the beer bottle tutorial so I was able to repeat almost the same process.
{Week 8: Sectional and rendered views of the second design}
The second round of renders taught me a bit about fusion 360 and its capabilities. I left the clear bottle to render for about 20 minutes and was surprised to see how realistic it appeared when I came back. I positioned the plasitc render towards the light source which is why it turned out yellow, which is something that I was able to fix in the next renders.
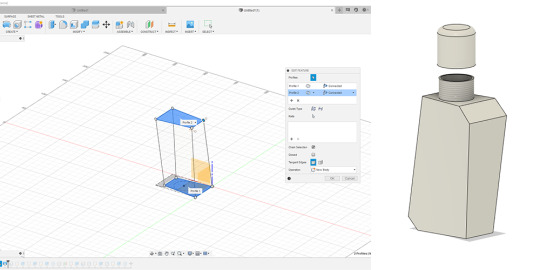
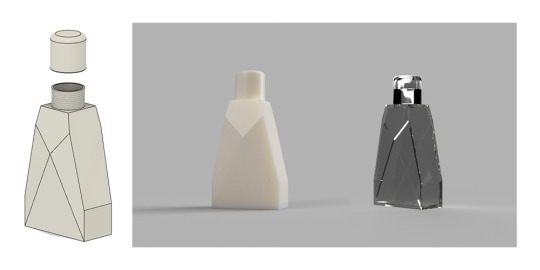
{Week 8: Modelling the third design}
The third design was the hardest for me to conceptualize in my head. I tried subtracting from a 65x100x40 block for a while but found that I wasn’t getting anywhere. I then tried using a loft which ended up working. The final model isn’t as angular along the front face as I had originally intended but I am still happy with how it looks.

{Week 8: Sectional and rendered views of the third design}
For the third set of renders I followed almost the same process as the second set with the exception of positioning the light source away from the font face of the model. While this did reduce the yellowing, it made the outline of the model hard to see.
{Week 8: Perspective and rendered views of the fourth design}
The final design was fairly simple to model as I only needed to subtract from a block. I took what I had learnt from the previous two sets of renders and found a middle ground between too light and too dark.
Overall I found this task enjoyable. I have never taken the time to properly learn a CAD software and found that by doing smaller tasks I was able to learn more about the basic functions and operations of each of the tools (which I’m sure will help me further on). I found experimenting with rendering to be interesting too, especially because of how visible the results are. If I had to change anything it would be to select a more dynamic background to render the models onto and to experiment more with the appearance textures. Positioning the renders within an environment, such as a bathroom, may have grounded them more and made them seem more realistic. I am glad that I took the time to model each of the designs as I feel as though I got alot more out of the task than by choosing one.
4 notes
·
View notes
Text
Week Eight
This exercise was designed to give us some practical experience in transferring our physical model concepts into a digital Fusion 360 model, I think this exercise achieved this.
This process was very frustrating, I have not had much experience using this software so it was a bit of a learning curve. After watching the provided tutorials I had a much better understanding of the software and I was able to start modelling.
I first began measuring my model and transferring these measurements into fusions360 - while following the whisky bottle tutorial. It took a few attempts for me to figure out the tools I was using but I eventually got the hang of it, however, after I has spaced everything out correctly I went to add my guide lines - this is where it all went bad. Trying to loft my design proved very difficult, my software kept telling me there were errors and I tried multiple times to fix this (even starting again at one point). FINALLY i was able to get the loft tool to work by removing the guide rails and adding an extra offset plane, I was then able to finish my design.
The images I used (as a canvas) to make an accurate depiction are below.

Creating and positioning the lid of the bottle was fairly simple, especially after learning the required skills from the provided videos, all it involved was a circle and the extrude tool.
Below are images of my final fusion360 model, from multiple angles.

This was an extremely frustrating process for me and took many attempts, however I do feel like I learnt during this experience. I am glad I pushed through and was able to produce a finished product. The experience helped me to further my skills - skills that will be very useful to me in the future.
3 notes
·
View notes
Text
Week 8 - Digital Models
This week’s task was somewhat challenging. I was nervous about learning fusion360 in such a short amount of time. The lessons from product design online were quite useful. I enjoyed the ‘how to model a whiskey bottle’ the most and thought the explanation would help well with the design of my Olay bottle if I was to follow to step by step tutorial. I was wrong.
As I was drawing my bottle while the tutorial was playing, I found myself super confused and would have to restart my model and the tutorial over and over again. At one point the task became all too overwhelming and I couldn’t get further than the part where I needed to conjoin all the parts to create the 3D model. This really set me back with time, it caused a lot of pressure and I felt that I could never get to the end of it.
I decided to reach out to a few peers, they hadn’t followed the tutorial on product design online, they had their own methods. They provided me with a step by step guide and taught me tools I hadn’t used while following the whiskey tutorial. In just a few clicks, my model was all done and set on fusion360.
While I now know how to create a model on fusion360, I also now know that following tutorials aren’t for everyone. Theres always a different way of learning something as we all learn things differently. I found that asking questions while I was being guided on fusion360, helped me understand what I was achieving by clicking on something.
From this task, I’ve learnt the overall concept of fusion360, it gives you freedom to do what you want to do. If you’re good at the software, I could imagine great things could be done. I also learnt that working alone while learning something new is difficult. I prefer to work with people, I believe I work better when I’m with people. So following the tutorial was frustrating because I couldn’t ask questions and also didn’t know if what I was doing was right or wrong.


3 notes
·
View notes
Photo


Week 8 - Digital Models
I started off my taking a photo of the physical model I was happy with, and then using Samsung Photo Editor that was preinstalled my phone to add contrast and increase the brightness. Although this may not be the most versatile tool, it was quick and easy to use. Next a 2D sketch was made from the photo and extruded to make the basic 3D shape. The size of the bottle was scaled up and the finishing touches were added. I really enjoyed the freedom of being able to edit dimensions in seconds using Fusion360. The last photo is a rendering with white plastic material in a Plaza background.
2 notes
·
View notes
Last Seen Blogs

queen-isabelle-writes
Isabelle
lexasupremacy
Lexa Deserved Better

siaillustratesblog
Sia Illustrates

preccedent
le vide

best-product-reviews0
Untitled