#or like a steel wool sponge would be good too I think… something metallic and abrasive
Text
Something tells me it’s not normal to want to use the top of your hand and your fingers as a chew toy
#And I know I know I have chewelry and ideally I should be using it instead of my hands#But chewelry is not connected to my nervous system#I should get one of those circular wire brush sanding things the next time I go to a hardware store… I always rub my thumb on them#or like a steel wool sponge would be good too I think… something metallic and abrasive#to gently scrub my hands and feet with#or crush in my hand so I can feel the spikiness of it#idk I remember freaking my friends out because I’d play with a pair of folding scissors like Seward and his scalpel#by placing the web of skin between my thumb and forefinger between the blades and gently “sawing” it#It was completely absentminded and I wasn’t stressed out… I’d do it in a relaxed state (if there is such a thing with me)#And I accidentally sliced myself between the fingers (and on the tongue) multiple times before but did that stop me? Absolutely fucking not#because I’m an idiot#I never wear shoes when I have to pull weeds out of the lava rocks in front of the house because I like the feeling of being stabbed#I guess#but at the same time walking on smooth powdery cement makes me flinch wince and walk on the sides of my feet????
3 notes
·
View notes
Text
How To Refinish An Old Clawfoot Tub
We’ve gotten A LOT of questions about how we’ve rescued the clawfoot tub at our beach house, so let’s just dive right into what worked (and what didn’t) and how we nursed this baby back to life.
The tub existed in the house when we bought it last October (Saturday will be our 1-year house-iversary!). But it was a pretty sad existence, as evidenced by the bathroom literally falling apart around it. Yes, this is what that bathroom looked like when we bought the house. You’ll remember we later had to fully remove and rebuild that entire side of the house because it was sinking into the ground due to a completely failing foundation (!!!). You can read more about that process here.
During demo, our contractor moved it out into the bedroom, which is where it lived for over half a year as destruction and reconstruction went on around it.
Once that side of the house was all rebuilt, it was pretty exciting to picture the tub going back in there – this time on stable footing. Here I am back in January standing where the bathtub now sits. Remember John’s best Boomerang capture of all time?
We pretty much ignored the tub during the entire gutting/rebuilding process of the house. We did keep it covered with a piece of plywood so it didn’t get dinged up, but we put off making a plan to resuscitate it until we actually had a bathroom to put it into again.
And then came that exciting day when the bathroom tile was in, the grout was done, and we needed to think about getting this tub back into the bathroom. It was finally time to assess the tub situation to see if it was something we’d have to pay someone to refinish, or something we could tackle ourselves. The first thing I did was wipe everything down (with a spare grout sponge) just to see how stained the inside of the tub really was. A remarkable amount of grime came off, so it gave us hope that we could save it without having to hire someone to professionally paint the inside (we hear that can flake and peel off down the line, so getting it back to its original finish would beat a rental with a peeling/flaking tub in 5-10 years).
We originally worried there were rust stains (which wouldn’t be something we could scrub off – rust literally pits the glazing and creates a hole that needs to be filled and sanded and typically calls for a pro to fix) but upon further inspection we realized that some of this “rust” was actually rubbing off! See the white speckles on those brown streaks below? Turns out nothing was pitted, but there were just some really really bad hard water deposits on top of the tub… which meant if we could scrub them off, we’d find more of that original white finish under them!
So a few weeks later, once the plumber had moved the tub back into the bathroom, we arrived in Cape Charles armed with an array of cleaners – ready to show the tub who’s boss. This is what it looked like when we started:
First, we wanted to evaluate what was just surface grime and what was a legit stain. So we sprayed the whole thing down with 1-part white vinegar, 1-part water and used a little elbow grease (and a green scouring pad) to get all of the superficial gunk off.
It made a HUGE difference, although not enough that I would be willing to actually take a bath in there yet.
The next tool in our arsenal was a bottle of Bar Keeper’s Friend Soft Cleanser, which a few people had recommended to us for old tubs (I just happened to find it for like $1.50 at Ross). We followed the instructions of applying it to a damp surface, letting it sit, and then scrubbing it off. Results were not very good. Confidence levels majorly wavered at this point.
Undeterred, we decided to try a more generous application of BKF (is that what the kids are calling it these days?) and let it sit for much longer (like 15-20 minutes). In the meantime, we also used a heavy duty Magic Eraser on some of the other spots, which is another tip you guys shared for trying to clean up an old tub. It certainly helped, but was a bit slow-going. We burned through a couple of them pretty quickly, but things were starting to look better…
After the scrub had sat for about 20 minutes, we tackled it with a piece of fine grade steel wool (along with hearing that magic erasers and fine steel wool can work, we also have heard that a pumice stone can buff out small stains too – so that’s something else to try if you have the same job ahead of you – we just didn’t have one with us). I’m not sure if it was the cleanser or the steel wool, but we finally started to see some noticeable progress.
It still required A LOT of elbow grease, but it was insanely satisfying to see those rust streaks dissipating. We also very gently scraped it in some parts with the dulled tip of our multi-tool. I didn’t take a picture because I didn’t want to necessarily recommend it since it can etch/scratch your tub which is NOT GOOD, but we checked frequently to make sure we weren’t scratching ours, and it was helpful in chipping off some large chunks of rust-covered hard water stains.
The final results are not flawless, but we are more than satisfied with how it looks. All the rusty looking rings you see below will be covered by a new drain, faucet and spigot once they’re installed, so aside from a few slight imperfections in the white interior finish, she’s gonna look pretty dang good. I’m officially more than willing to plop my bod down in there for a good soak. Just picture me in there wearing a black turtleneck for modesty reasons.
This feels like a good moment for a before and after. Again, this is all from just cleaning – no actual refinishing or reglazing went on with the inside. So we’re glad that there should be no issues with bubbling or peeling paint since we were able to restore the original finish of the tub. Those few sentences don’t adequately capture how elated I am, so I’ll add this: ALL THE JAZZ HANDS!
Now let’s talk about restoring the outside, because what good is a tidy interior if the exterior looks ready for a horror movie?
Our first step was to sand it down, mostly just to get all of the already flaking paint off so we could have a relatively smooth surface to paint. NOTE: always test old tubs for lead paint! Many have it, which is extremely dangerous, especially if kids will be bathing in them. We were thrilled to find out ours was clean- most likely since the outside was painted sometime after lead was phased out and since the inside had never been reglazed.
First we used some coarse sanding blocks to scrub all of the exterior by hand, which was slow going, but definitely knocked a bunch of old dry paint flakes to the ground. John had also bought this rust-removing drill attachment while we were at the store and it turned out to be the perfect tool for the job. It knocked off even more of the loosest parts of the old finish in no time. NOTE NUMBER TWO: we were both wearing heavy-duty lead paint removal masks during all this sanding just to be safe because tons of dust flies and even though it checked out to be lead free, we didn’t want to be inhaling a ton of tiny dust particles anyway, so you’ll catch a glimpse of those later in the post.
After a pass with the drill, we went over by hand with medium and then fine-grit sanding blocks to smooth it out a bit more. It would’ve taken us hours to get everything down to the original finish, but in about 20 minutes we got it down to a smooth-to-the-touch finish which is good enough. You just want a nice flake-free base for some rust-blocking primer and paint to adhere to without worrying it’ll flake and pop off down the line (primer & paint are generally only as secure as their base – so make sure that’s not crumbling).
After a wipe down with a clean towel, we were ready to prime. Based on a deep and meaningful conversation with the pro at our local paint desk, we chose this oil-based Clean Metal Primer to do the job. We obviously wanted something that not only covered the existing rust but helped prevent more – plus it would make the whole thing ready for paint that would last.
It’s very thin (read: drippy) so make sure your floors are well protected! We used small foam rollers to cover most of the large surfaces, and then a cheap chip brush to get under the lip and around the actual clawfeet. It’s also pretty stinky, so we opened every window, put on all the fans, and kept our masks on for this step too.
There was a moment when we were watching the primer dry where we considered just painting it white. It was so refreshing to see it all clean and “new” looking that we were very tempted. However, the room itself is very white (white floor tiles, white trim, white ceilings, white shower tile, and white inside the tub), so we thought a darker accent in the space would actually be really nice to break things up. Plus, the interior finish is a tiny bit off-white (you can sort of tell in the photo below), so matching the outside exactly would’ve made the whole thing a bit creamier than we wanted (which might have clashed with the bright white floor tiles). With all of those factors urging us to go deeper and more dramatic with the outside of this tub, we considered 45,731 paint swatches (just kidding, it was only 45,721).
You probably spotted some of our contenders a few photos up. We considered a whole range of colors for the outside of the tub, but we landed on Riverway by Sherwin-Williams because it was a pretty deep blue with a heavy dose of gray and a hint of green. All of the straight taupes or grays felt a little too boring for a room with such a playful floor pattern, and we wanted to go noticeably darker than the little accent tiles in the floor so it didn’t look like we were trying to match it or skew too “baby blue” everywhere. Also, ignore how dirty these tiles look. They have since been scrubbed within an inch of their life.
After choosing that color, we actually had to have it color matched at Lowe’s in this Anti-Rust Armor paint since it came so highly recommended from the paint pro we chatted with (it’s moisture and stain resistant and has some additional rust prevention built into it – so they thought it was the best bet for our tub holding up longterm). The literal description online says its great for “appliances, playground equipment, mailboxes, and tanks.” I know they probably mean things like propane tanks, but I got a good laugh imagining someone painting a giant military tank by hand with this stuff.
Oh and this paint was also pretty stinky (hence the masks we donned again for this step) but it went on much thicker than the primer did. Once again we used small foam rollers for most of it, and then we used a brush meant specifically for oil-based paints to get between the toes. Basically we gave our tub a pedicure.
A few people have asked why we chose to make the feet the same color, rather than accenting them with a white, silver, or gold finish. We just looked at all of our inspiration photos of clawfoot tubs (because you know I’ve pinned like ten million since we bought this house) and we liked the two-tone look better than a three-tone effect. That’s definitely something you can go for if you like that extra foot-bling though! It can look really cool too.
You can tell in these photos that the outside isn’t perfectly smooth – you can still see the subtle topography of the old finishes beneath the fresh coat of blue. We’re actually kinda happy that it will feel like a tub that has been in this house for decades instead of some new replica that we brought in, so we’re totally cool with that dappled texture – and the glossy shine from the fresh paint is a nice counterpart.
Dappled dots or not, it’s certainly a huge improvement! So for around $50 and a fair amount of sweat, we got something that looks pretty darn close to this Rejuvenation clawfoot tub that retails for $3,300!
I’m gonna hold off on sharing any more “afters” for now, mainly because we haven’t taken any. But late last week our plumber came back to install the faucet and connect the tub (and remove the cardboard!) so word from him is that it’s ready for use! We have to skip our weekly visit since the floors are being sealed and need time to cure before anyone walks on them, so we’re just over here holding our breath until we can go back over to the house and see the tub all hooked up (and the floors all refinished). You know I’ll take like ten million pictures for you guys, so stay tuned!
Psst – Wanna read more about this beach house rehab project of ours? Click here to see everything we’ve done for the past year to get it to this point!
*This post contains affiliate links*
The post How To Refinish An Old Clawfoot Tub appeared first on Young House Love.
How To Refinish An Old Clawfoot Tub published first on http://ift.tt/2qxZz2j
0 notes
Text
How To Refinish An Old Clawfoot Tub
We’ve gotten A LOT of questions about how we’ve rescued the clawfoot tub at our beach house, so let’s just dive right into what worked (and what didn’t) and how we nursed this baby back to life.
The tub existed in the house when we bought it last October (Saturday will be our 1-year house-iversary!). But it was a pretty sad existence, as evidenced by the bathroom literally falling apart around it. Yes, this is what that bathroom looked like when we bought the house. You’ll remember we later had to fully remove and rebuild that entire side of the house because it was sinking into the ground due to a completely failing foundation (!!!). You can read more about that process here.
During demo, our contractor moved it out into the bedroom, which is where it lived for over half a year as destruction and reconstruction went on around it.
Once that side of the house was all rebuilt, it was pretty exciting to picture the tub going back in there – this time on stable footing. Here I am back in January standing where the bathtub now sits. Remember John’s best Boomerang capture of all time?
We pretty much ignored the tub during the entire gutting/rebuilding process of the house. We did keep it covered with a piece of plywood so it didn’t get dinged up, but we put off making a plan to resuscitate it until we actually had a bathroom to put it into again.
And then came that exciting day when the bathroom tile was in, the grout was done, and we needed to think about getting this tub back into the bathroom. It was finally time to assess the tub situation to see if it was something we’d have to pay someone to refinish, or something we could tackle ourselves. The first thing I did was wipe everything down (with a spare grout sponge) just to see how stained the inside of the tub really was. A remarkable amount of grime came off, so it gave us hope that we could save it without having to hire someone to professionally paint the inside (we hear that can flake and peel off down the line, so getting it back to its original finish would beat a rental with a peeling/flaking tub in 5-10 years).
We originally worried there were rust stains (which wouldn’t be something we could scrub off – rust literally pits the glazing and creates a hole that needs to be filled and sanded and typically calls for a pro to fix) but upon further inspection we realized that some of this “rust” was actually rubbing off! See the white speckles on those brown streaks below? Turns out nothing was pitted, but there were just some really really bad hard water deposits on top of the tub… which meant if we could scrub them off, we’d find more of that original white finish under them!
So a few weeks later, once the plumber had moved the tub back into the bathroom, we arrived in Cape Charles armed with an array of cleaners – ready to show the tub who’s boss. This is what it looked like when we started:
First, we wanted to evaluate what was just surface grime and what was a legit stain. So we sprayed the whole thing down with 1-part white vinegar, 1-part water and used a little elbow grease (and a green scouring pad) to get all of the superficial gunk off.
It made a HUGE difference, although not enough that I would be willing to actually take a bath in there yet.
The next tool in our arsenal was a bottle of Bar Keeper’s Friend Soft Cleanser, which a few people had recommended to us for old tubs (I just happened to find it for like $1.50 at Ross). We followed the instructions of applying it to a damp surface, letting it sit, and then scrubbing it off. Results were not very good. Confidence levels majorly wavered at this point.
Undeterred, we decided to try a more generous application of BKF (is that what the kids are calling it these days?) and let it sit for much longer (like 15-20 minutes). In the meantime, we also used a heavy duty Magic Eraser on some of the other spots, which is another tip you guys shared for trying to clean up an old tub. It certainly helped, but was a bit slow-going. We burned through a couple of them pretty quickly, but things were starting to look better…
After the scrub had sat for about 20 minutes, we tackled it with a piece of fine grade steel wool (along with hearing that magic erasers and fine steel wool can work, we also have heard that a pumice stone can buff out small stains too – so that’s something else to try if you have the same job ahead of you – we just didn’t have one with us). I’m not sure if it was the cleanser or the steel wool, but we finally started to see some noticeable progress.
It still required A LOT of elbow grease, but it was insanely satisfying to see those rust streaks dissipating. We also very gently scraped it in some parts with the dulled tip of our multi-tool. I didn’t take a picture because I didn’t want to necessarily recommend it since it can etch/scratch your tub which is NOT GOOD, but we checked frequently to make sure we weren’t scratching ours, and it was helpful in chipping off some large chunks of rust-covered hard water stains.
The final results are not flawless, but we are more than satisfied with how it looks. All the rusty looking rings you see below will be covered by a new drain, faucet and spigot once they’re installed, so aside from a few slight imperfections in the white interior finish, she’s gonna look pretty dang good. I’m officially more than willing to plop my bod down in there for a good soak. Just picture me in there wearing a black turtleneck for modesty reasons.
This feels like a good moment for a before and after. Again, this is all from just cleaning – no actual refinishing or reglazing went on with the inside. So we’re glad that there should be no issues with bubbling or peeling paint since we were able to restore the original finish of the tub. Those few sentences don’t adequately capture how elated I am, so I’ll add this: ALL THE JAZZ HANDS!
Now let’s talk about restoring the outside, because what good is a tidy interior if the exterior looks ready for a horror movie?
Our first step was to sand it down, mostly just to get all of the already flaking paint off so we could have a relatively smooth surface to paint. NOTE: always test old tubs for lead paint! Many have it, which is extremely dangerous, especially if kids will be bathing in them. We were thrilled to find out ours was clean- most likely since the outside was painted sometime after lead was phased out and since the inside had never been reglazed.
First we used some coarse sanding blocks to scrub all of the exterior by hand, which was slow going, but definitely knocked a bunch of old dry paint flakes to the ground. John had also bought this rust-removing drill attachment while we were at the store and it turned out to be the perfect tool for the job. It knocked off even more of the loosest parts of the old finish in no time. NOTE NUMBER TWO: we were both wearing heavy-duty lead paint removal masks during all this sanding just to be safe because tons of dust flies and even though it checked out to be lead free, we didn’t want to be inhaling a ton of tiny dust particles anyway, so you’ll catch a glimpse of those later in the post.
After a pass with the drill, we went over by hand with medium and then fine-grit sanding blocks to smooth it out a bit more. It would’ve taken us hours to get everything down to the original finish, but in about 20 minutes we got it down to a smooth-to-the-touch finish which is good enough. You just want a nice flake-free base for some rust-blocking primer and paint to adhere to without worrying it’ll flake and pop off down the line (primer & paint are generally only as secure as their base – so make sure that’s not crumbling).
After a wipe down with a clean towel, we were ready to prime. Based on a deep and meaningful conversation with the pro at our local paint desk, we chose this oil-based Clean Metal Primer to do the job. We obviously wanted something that not only covered the existing rust but helped prevent more – plus it would make the whole thing ready for paint that would last.
It’s very thin (read: drippy) so make sure your floors are well protected! We used small foam rollers to cover most of the large surfaces, and then a cheap chip brush to get under the lip and around the actual clawfeet. It’s also pretty stinky, so we opened every window, put on all the fans, and kept our masks on for this step too.
There was a moment when we were watching the primer dry where we considered just painting it white. It was so refreshing to see it all clean and “new” looking that we were very tempted. However, the room itself is very white (white floor tiles, white trim, white ceilings, white shower tile, and white inside the tub), so we thought a darker accent in the space would actually be really nice to break things up. Plus, the interior finish is a tiny bit off-white (you can sort of tell in the photo below), so matching the outside exactly would’ve made the whole thing a bit creamier than we wanted (which might have clashed with the bright white floor tiles). With all of those factors urging us to go deeper and more dramatic with the outside of this tub, we considered 45,731 paint swatches (just kidding, it was only 45,721).
You probably spotted some of our contenders a few photos up. We considered a whole range of colors for the outside of the tub, but we landed on Riverway by Sherwin-Williams because it was a pretty deep blue with a heavy dose of gray and a hint of green. All of the straight taupes or grays felt a little too boring for a room with such a playful floor pattern, and we wanted to go noticeably darker than the little accent tiles in the floor so it didn’t look like we were trying to match it or skew too “baby blue” everywhere. Also, ignore how dirty these tiles look. They have since been scrubbed within an inch of their life.
After choosing that color, we actually had to have it color matched at Lowe’s in this Anti-Rust Armor paint since it came so highly recommended from the paint pro we chatted with (it’s moisture and stain resistant and has some additional rust prevention built into it – so they thought it was the best bet for our tub holding up longterm). The literal description online says its great for “appliances, playground equipment, mailboxes, and tanks.” I know they probably mean things like propane tanks, but I got a good laugh imagining someone painting a giant military tank by hand with this stuff.
Oh and this paint was also pretty stinky (hence the masks we donned again for this step) but it went on much thicker than the primer did. Once again we used small foam rollers for most of it, and then we used a brush meant specifically for oil-based paints to get between the toes. Basically we gave our tub a pedicure.
A few people have asked why we chose to make the feet the same color, rather than accenting them with a white, silver, or gold finish. We just looked at all of our inspiration photos of clawfoot tubs (because you know I’ve pinned like ten million since we bought this house) and we liked the two-tone look better than a three-tone effect. That’s definitely something you can go for if you like that extra foot-bling though! It can look really cool too.
You can tell in these photos that the outside isn’t perfectly smooth – you can still see the subtle topography of the old finishes beneath the fresh coat of blue. We’re actually kinda happy that it will feel like a tub that has been in this house for decades instead of some new replica that we brought in, so we’re totally cool with that dappled texture – and the glossy shine from the fresh paint is a nice counterpart.
Dappled dots or not, it’s certainly a huge improvement! So for around $50 and a fair amount of sweat, we got something that looks pretty darn close to this Rejuvenation clawfoot tub that retails for $3,300!
I’m gonna hold off on sharing any more “afters” for now, mainly because we haven’t taken any. But late last week our plumber came back to install the faucet and connect the tub (and remove the cardboard!) so word from him is that it’s ready for use! We have to skip our weekly visit since the floors are being sealed and need time to cure before anyone walks on them, so we’re just over here holding our breath until we can go back over to the house and see the tub all hooked up (and the floors all refinished). You know I’ll take like ten million pictures for you guys, so stay tuned!
Psst – Wanna read more about this beach house rehab project of ours? Click here to see everything we’ve done for the past year to get it to this point!
*This post contains affiliate links*
The post How To Refinish An Old Clawfoot Tub appeared first on Young House Love.
How To Refinish An Old Clawfoot Tub published first on http://ift.tt/2r6hzQy
0 notes
Text
How To Refinish An Old Clawfoot Tub
We’ve gotten A LOT of questions about how we’ve rescued the clawfoot tub at our beach house, so let’s just dive right into what worked (and what didn’t) and how we nursed this baby back to life.
The tub existed in the house when we bought it last October (Saturday will be our 1-year house-iversary!). But it was a pretty sad existence, as evidenced by the bathroom literally falling apart around it. Yes, this is what that bathroom looked like when we bought the house. You’ll remember we later had to fully remove and rebuild that entire side of the house because it was sinking into the ground due to a completely failing foundation (!!!). You can read more about that process here.
During demo, our contractor moved it out into the bedroom, which is where it lived for over half a year as destruction and reconstruction went on around it.
Once that side of the house was all rebuilt, it was pretty exciting to picture the tub going back in there – this time on stable footing. Here I am back in January standing where the bathtub now sits. Remember John’s best Boomerang capture of all time?
We pretty much ignored the tub during the entire gutting/rebuilding process of the house. We did keep it covered with a piece of plywood so it didn’t get dinged up, but we put off making a plan to resuscitate it until we actually had a bathroom to put it into again.
And then came that exciting day when the bathroom tile was in, the grout was done, and we needed to think about getting this tub back into the bathroom. It was finally time to assess the tub situation to see if it was something we’d have to pay someone to refinish, or something we could tackle ourselves. The first thing I did was wipe everything down (with a spare grout sponge) just to see how stained the inside of the tub really was. A remarkable amount of grime came off, so it gave us hope that we could save it without having to hire someone to professionally paint the inside (we hear that can flake and peel off down the line, so getting it back to its original finish would beat a rental with a peeling/flaking tub in 5-10 years).
We originally worried there were rust stains (which wouldn’t be something we could scrub off – rust literally pits the glazing and creates a hole that needs to be filled and sanded and typically calls for a pro to fix) but upon further inspection we realized that some of this “rust” was actually rubbing off! See the white speckles on those brown streaks below? Turns out nothing was pitted, but there were just some really really bad hard water deposits on top of the tub… which meant if we could scrub them off, we’d find more of that original white finish under them!
So a few weeks later, once the plumber had moved the tub back into the bathroom, we arrived in Cape Charles armed with an array of cleaners – ready to show the tub who’s boss. This is what it looked like when we started:
First, we wanted to evaluate what was just surface grime and what was a legit stain. So we sprayed the whole thing down with 1-part white vinegar, 1-part water and used a little elbow grease (and a green scouring pad) to get all of the superficial gunk off.
It made a HUGE difference, although not enough that I would be willing to actually take a bath in there yet.
The next tool in our arsenal was a bottle of Bar Keeper’s Friend Soft Cleanser, which a few people had recommended to us for old tubs (I just happened to find it for like $1.50 at Ross). We followed the instructions of applying it to a damp surface, letting it sit, and then scrubbing it off. Results were not very good. Confidence levels majorly wavered at this point.
Undeterred, we decided to try a more generous application of BKF (is that what the kids are calling it these days?) and let it sit for much longer (like 15-20 minutes). In the meantime, we also used a heavy duty Magic Eraser on some of the other spots, which is another tip you guys shared for trying to clean up an old tub. It certainly helped, but was a bit slow-going. We burned through a couple of them pretty quickly, but things were starting to look better…
After the scrub had sat for about 20 minutes, we tackled it with a piece of fine grade steel wool (along with hearing that magic erasers and fine steel wool can work, we also have heard that a pumice stone can buff out small stains too – so that’s something else to try if you have the same job ahead of you – we just didn’t have one with us). I’m not sure if it was the cleanser or the steel wool, but we finally started to see some noticeable progress.
It still required A LOT of elbow grease, but it was insanely satisfying to see those rust streaks dissipating. We also very gently scraped it in some parts with the dulled tip of our multi-tool. I didn’t take a picture because I didn’t want to necessarily recommend it since it can etch/scratch your tub which is NOT GOOD, but we checked frequently to make sure we weren’t scratching ours, and it was helpful in chipping off some large chunks of rust-covered hard water stains.
The final results are not flawless, but we are more than satisfied with how it looks. All the rusty looking rings you see below will be covered by a new drain, faucet and spigot once they’re installed, so aside from a few slight imperfections in the white interior finish, she’s gonna look pretty dang good. I’m officially more than willing to plop my bod down in there for a good soak. Just picture me in there wearing a black turtleneck for modesty reasons.
This feels like a good moment for a before and after. Again, this is all from just cleaning – no actual refinishing or reglazing went on with the inside. So we’re glad that there should be no issues with bubbling or peeling paint since we were able to restore the original finish of the tub. Those few sentences don’t adequately capture how elated I am, so I’ll add this: ALL THE JAZZ HANDS!
Now let’s talk about restoring the outside, because what good is a tidy interior if the exterior looks ready for a horror movie?
Our first step was to sand it down, mostly just to get all of the already flaking paint off so we could have a relatively smooth surface to paint. NOTE: always test old tubs for lead paint! Many have it, which is extremely dangerous, especially if kids will be bathing in them. We were thrilled to find out ours was clean- most likely since the outside was painted sometime after lead was phased out and since the inside had never been reglazed.
First we used some coarse sanding blocks to scrub all of the exterior by hand, which was slow going, but definitely knocked a bunch of old dry paint flakes to the ground. John had also bought this rust-removing drill attachment while we were at the store and it turned out to be the perfect tool for the job. It knocked off even more of the loosest parts of the old finish in no time. NOTE NUMBER TWO: we were both wearing heavy-duty lead paint removal masks during all this sanding just to be safe because tons of dust flies and even though it checked out to be lead free, we didn’t want to be inhaling a ton of tiny dust particles anyway, so you’ll catch a glimpse of those later in the post.
After a pass with the drill, we went over by hand with medium and then fine-grit sanding blocks to smooth it out a bit more. It would’ve taken us hours to get everything down to the original finish, but in about 20 minutes we got it down to a smooth-to-the-touch finish which is good enough. You just want a nice flake-free base for some rust-blocking primer and paint to adhere to without worrying it’ll flake and pop off down the line (primer & paint are generally only as secure as their base – so make sure that’s not crumbling).
After a wipe down with a clean towel, we were ready to prime. Based on a deep and meaningful conversation with the pro at our local paint desk, we chose this oil-based Clean Metal Primer to do the job. We obviously wanted something that not only covered the existing rust but helped prevent more – plus it would make the whole thing ready for paint that would last.
It’s very thin (read: drippy) so make sure your floors are well protected! We used small foam rollers to cover most of the large surfaces, and then a cheap chip brush to get under the lip and around the actual clawfeet. It’s also pretty stinky, so we opened every window, put on all the fans, and kept our masks on for this step too.
There was a moment when we were watching the primer dry where we considered just painting it white. It was so refreshing to see it all clean and “new” looking that we were very tempted. However, the room itself is very white (white floor tiles, white trim, white ceilings, white shower tile, and white inside the tub), so we thought a darker accent in the space would actually be really nice to break things up. Plus, the interior finish is a tiny bit off-white (you can sort of tell in the photo below), so matching the outside exactly would’ve made the whole thing a bit creamier than we wanted (which might have clashed with the bright white floor tiles). With all of those factors urging us to go deeper and more dramatic with the outside of this tub, we considered 45,731 paint swatches (just kidding, it was only 45,721).
You probably spotted some of our contenders a few photos up. We considered a whole range of colors for the outside of the tub, but we landed on Riverway by Sherwin-Williams because it was a pretty deep blue with a heavy dose of gray and a hint of green. All of the straight taupes or grays felt a little too boring for a room with such a playful floor pattern, and we wanted to go noticeably darker than the little accent tiles in the floor so it didn’t look like we were trying to match it or skew too “baby blue” everywhere. Also, ignore how dirty these tiles look. They have since been scrubbed within an inch of their life.
After choosing that color, we actually had to have it color matched at Lowe’s in this Anti-Rust Armor paint since it came so highly recommended from the paint pro we chatted with (it’s moisture and stain resistant and has some additional rust prevention built into it – so they thought it was the best bet for our tub holding up longterm). The literal description online says its great for “appliances, playground equipment, mailboxes, and tanks.” I know they probably mean things like propane tanks, but I got a good laugh imagining someone painting a giant military tank by hand with this stuff.
Oh and this paint was also pretty stinky (hence the masks we donned again for this step) but it went on much thicker than the primer did. Once again we used small foam rollers for most of it, and then we used a brush meant specifically for oil-based paints to get between the toes. Basically we gave our tub a pedicure.
A few people have asked why we chose to make the feet the same color, rather than accenting them with a white, silver, or gold finish. We just looked at all of our inspiration photos of clawfoot tubs (because you know I’ve pinned like ten million since we bought this house) and we liked the two-tone look better than a three-tone effect. That’s definitely something you can go for if you like that extra foot-bling though! It can look really cool too.
You can tell in these photos that the outside isn’t perfectly smooth – you can still see the subtle topography of the old finishes beneath the fresh coat of blue. We’re actually kinda happy that it will feel like a tub that has been in this house for decades instead of some new replica that we brought in, so we’re totally cool with that dappled texture – and the glossy shine from the fresh paint is a nice counterpart.
Dappled dots or not, it’s certainly a huge improvement! So for around $50 and a fair amount of sweat, we got something that looks pretty darn close to this Rejuvenation clawfoot tub that retails for $3,300!
I’m gonna hold off on sharing any more “afters” for now, mainly because we haven’t taken any. But late last week our plumber came back to install the faucet and connect the tub (and remove the cardboard!) so word from him is that it’s ready for use! We have to skip our weekly visit since the floors are being sealed and need time to cure before anyone walks on them, so we’re just over here holding our breath until we can go back over to the house and see the tub all hooked up (and the floors all refinished). You know I’ll take like ten million pictures for you guys, so stay tuned!
Psst – Wanna read more about this beach house rehab project of ours? Click here to see everything we’ve done for the past year to get it to this point!
*This post contains affiliate links*
The post How To Refinish An Old Clawfoot Tub appeared first on Young House Love.
How To Refinish An Old Clawfoot Tub published first on http://ift.tt/2qCHnUt
0 notes
Text
How To Refinish An Old Clawfoot Tub
We’ve gotten A LOT of questions about how we’ve rescued the clawfoot tub at our beach house, so let’s just dive right into what worked (and what didn’t) and how we nursed this baby back to life.
The tub existed in the house when we bought it last October (Saturday will be our 1-year house-iversary!). But it was a pretty sad existence, as evidenced by the bathroom literally falling apart around it. Yes, this is what that bathroom looked like when we bought the house. You’ll remember we later had to fully remove and rebuild that entire side of the house because it was sinking into the ground due to a completely failing foundation (!!!). You can read more about that process here.
During demo, our contractor moved it out into the bedroom, which is where it lived for over half a year as destruction and reconstruction went on around it.
Once that side of the house was all rebuilt, it was pretty exciting to picture the tub going back in there – this time on stable footing. Here I am back in January standing where the bathtub now sits. Remember John’s best Boomerang capture of all time?
We pretty much ignored the tub during the entire gutting/rebuilding process of the house. We did keep it covered with a piece of plywood so it didn’t get dinged up, but we put off making a plan to resuscitate it until we actually had a bathroom to put it into again.
And then came that exciting day when the bathroom tile was in, the grout was done, and we needed to think about getting this tub back into the bathroom. It was finally time to assess the tub situation to see if it was something we’d have to pay someone to refinish, or something we could tackle ourselves. The first thing I did was wipe everything down (with a spare grout sponge) just to see how stained the inside of the tub really was. A remarkable amount of grime came off, so it gave us hope that we could save it without having to hire someone to professionally paint the inside (we hear that can flake and peel off down the line, so getting it back to its original finish would beat a rental with a peeling/flaking tub in 5-10 years).
We originally worried there were rust stains (which wouldn’t be something we could scrub off – rust literally pits the glazing and creates a hole that needs to be filled and sanded and typically calls for a pro to fix) but upon further inspection we realized that some of this “rust” was actually rubbing off! See the white speckles on those brown streaks below? Turns out nothing was pitted, but there were just some really really bad hard water deposits on top of the tub… which meant if we could scrub them off, we’d find more of that original white finish under them!
So a few weeks later, once the plumber had moved the tub back into the bathroom, we arrived in Cape Charles armed with an array of cleaners – ready to show the tub who’s boss. This is what it looked like when we started:
First, we wanted to evaluate what was just surface grime and what was a legit stain. So we sprayed the whole thing down with 1-part white vinegar, 1-part water and used a little elbow grease (and a green scouring pad) to get all of the superficial gunk off.
It made a HUGE difference, although not enough that I would be willing to actually take a bath in there yet.
The next tool in our arsenal was a bottle of Bar Keeper’s Friend Soft Cleanser, which a few people had recommended to us for old tubs (I just happened to find it for like $1.50 at Ross). We followed the instructions of applying it to a damp surface, letting it sit, and then scrubbing it off. Results were not very good. Confidence levels majorly wavered at this point.
Undeterred, we decided to try a more generous application of BKF (is that what the kids are calling it these days?) and let it sit for much longer (like 15-20 minutes). In the meantime, we also used a heavy duty Magic Eraser on some of the other spots, which is another tip you guys shared for trying to clean up an old tub. It certainly helped, but was a bit slow-going. We burned through a couple of them pretty quickly, but things were starting to look better…
After the scrub had sat for about 20 minutes, we tackled it with a piece of fine grade steel wool (along with hearing that magic erasers and fine steel wool can work, we also have heard that a pumice stone can buff out small stains too – so that’s something else to try if you have the same job ahead of you – we just didn’t have one with us). I’m not sure if it was the cleanser or the steel wool, but we finally started to see some noticeable progress.
It still required A LOT of elbow grease, but it was insanely satisfying to see those rust streaks dissipating. We also very gently scraped it in some parts with the dulled tip of our multi-tool. I didn’t take a picture because I didn’t want to necessarily recommend it since it can etch/scratch your tub which is NOT GOOD, but we checked frequently to make sure we weren’t scratching ours, and it was helpful in chipping off some large chunks of rust-covered hard water stains.
The final results are not flawless, but we are more than satisfied with how it looks. All the rusty looking rings you see below will be covered by a new drain, faucet and spigot once they’re installed, so aside from a few slight imperfections in the white interior finish, she’s gonna look pretty dang good. I’m officially more than willing to plop my bod down in there for a good soak. Just picture me in there wearing a black turtleneck for modesty reasons.
This feels like a good moment for a before and after. Again, this is all from just cleaning – no actual refinishing or reglazing went on with the inside. So we’re glad that there should be no issues with bubbling or peeling paint since we were able to restore the original finish of the tub. Those few sentences don’t adequately capture how elated I am, so I’ll add this: ALL THE JAZZ HANDS!
Now let’s talk about restoring the outside, because what good is a tidy interior if the exterior looks ready for a horror movie?
Our first step was to sand it down, mostly just to get all of the already flaking paint off so we could have a relatively smooth surface to paint. NOTE: always test old tubs for lead paint! Many have it, which is extremely dangerous, especially if kids will be bathing in them. We were thrilled to find out ours was clean- most likely since the outside was painted sometime after lead was phased out and since the inside had never been reglazed.
First we used some coarse sanding blocks to scrub all of the exterior by hand, which was slow going, but definitely knocked a bunch of old dry paint flakes to the ground. John had also bought this rust-removing drill attachment while we were at the store and it turned out to be the perfect tool for the job. It knocked off even more of the loosest parts of the old finish in no time. NOTE NUMBER TWO: we were both wearing heavy-duty lead paint removal masks during all this sanding just to be safe because tons of dust flies and even though it checked out to be lead free, we didn’t want to be inhaling a ton of tiny dust particles anyway, so you’ll catch a glimpse of those later in the post.
After a pass with the drill, we went over by hand with medium and then fine-grit sanding blocks to smooth it out a bit more. It would’ve taken us hours to get everything down to the original finish, but in about 20 minutes we got it down to a smooth-to-the-touch finish which is good enough. You just want a nice flake-free base for some rust-blocking primer and paint to adhere to without worrying it’ll flake and pop off down the line (primer & paint are generally only as secure as their base – so make sure that’s not crumbling).
After a wipe down with a clean towel, we were ready to prime. Based on a deep and meaningful conversation with the pro at our local paint desk, we chose this oil-based Clean Metal Primer to do the job. We obviously wanted something that not only covered the existing rust but helped prevent more – plus it would make the whole thing ready for paint that would last.
It’s very thin (read: drippy) so make sure your floors are well protected! We used small foam rollers to cover most of the large surfaces, and then a cheap chip brush to get under the lip and around the actual clawfeet. It’s also pretty stinky, so we opened every window, put on all the fans, and kept our masks on for this step too.
There was a moment when we were watching the primer dry where we considered just painting it white. It was so refreshing to see it all clean and “new” looking that we were very tempted. However, the room itself is very white (white floor tiles, white trim, white ceilings, white shower tile, and white inside the tub), so we thought a darker accent in the space would actually be really nice to break things up. Plus, the interior finish is a tiny bit off-white (you can sort of tell in the photo below), so matching the outside exactly would’ve made the whole thing a bit creamier than we wanted (which might have clashed with the bright white floor tiles). With all of those factors urging us to go deeper and more dramatic with the outside of this tub, we considered 45,731 paint swatches (just kidding, it was only 45,721).
You probably spotted some of our contenders a few photos up. We considered a whole range of colors for the outside of the tub, but we landed on Riverway by Sherwin-Williams because it was a pretty deep blue with a heavy dose of gray and a hint of green. All of the straight taupes or grays felt a little too boring for a room with such a playful floor pattern, and we wanted to go noticeably darker than the little accent tiles in the floor so it didn’t look like we were trying to match it or skew too “baby blue” everywhere. Also, ignore how dirty these tiles look. They have since been scrubbed within an inch of their life.
After choosing that color, we actually had to have it color matched at Lowe’s in this Anti-Rust Armor paint since it came so highly recommended from the paint pro we chatted with (it’s moisture and stain resistant and has some additional rust prevention built into it – so they thought it was the best bet for our tub holding up longterm). The literal description online says its great for “appliances, playground equipment, mailboxes, and tanks.” I know they probably mean things like propane tanks, but I got a good laugh imagining someone painting a giant military tank by hand with this stuff.
Oh and this paint was also pretty stinky (hence the masks we donned again for this step) but it went on much thicker than the primer did. Once again we used small foam rollers for most of it, and then we used a brush meant specifically for oil-based paints to get between the toes. Basically we gave our tub a pedicure.
A few people have asked why we chose to make the feet the same color, rather than accenting them with a white, silver, or gold finish. We just looked at all of our inspiration photos of clawfoot tubs (because you know I’ve pinned like ten million since we bought this house) and we liked the two-tone look better than a three-tone effect. That’s definitely something you can go for if you like that extra foot-bling though! It can look really cool too.
You can tell in these photos that the outside isn’t perfectly smooth – you can still see the subtle topography of the old finishes beneath the fresh coat of blue. We’re actually kinda happy that it will feel like a tub that has been in this house for decades instead of some new replica that we brought in, so we’re totally cool with that dappled texture – and the glossy shine from the fresh paint is a nice counterpart.
Dappled dots or not, it’s certainly a huge improvement! So for around $50 and a fair amount of sweat, we got something that looks pretty darn close to this Rejuvenation clawfoot tub that retails for $3,300!
I’m gonna hold off on sharing any more “afters” for now, mainly because we haven’t taken any. But late last week our plumber came back to install the faucet and connect the tub (and remove the cardboard!) so word from him is that it’s ready for use! We have to skip our weekly visit since the floors are being sealed and need time to cure before anyone walks on them, so we’re just over here holding our breath until we can go back over to the house and see the tub all hooked up (and the floors all refinished). You know I’ll take like ten million pictures for you guys, so stay tuned!
Psst – Wanna read more about this beach house rehab project of ours? Click here to see everything we’ve done for the past year to get it to this point!
*This post contains affiliate links*
The post How To Refinish An Old Clawfoot Tub appeared first on Young House Love.
0 notes
Photo
How To Refinish An Old Clawfoot Tub http://ift.tt/2xW6urO
We’ve gotten A LOT of questions about how we’ve rescued the clawfoot tub at our beach house, so let’s just dive right into what worked (and what didn’t) and how we nursed this baby back to life.
The tub existed in the house when we bought it last October (Saturday will be our 1-year house-iversary!). But it was a pretty sad existence, as evidenced by the bathroom literally falling apart around it. Yes, this is what that bathroom looked like when we bought the house. You’ll remember we later had to fully remove and rebuild that entire side of the house because it was sinking into the ground due to a completely failing foundation (!!!). You can read more about that process here.
During demo, our contractor moved it out into the bedroom, which is where it lived for over half a year as destruction and reconstruction went on around it.
Once that side of the house was all rebuilt, it was pretty exciting to picture the tub going back in there – this time on stable footing. Here I am back in January standing where the bathtub now sits. Remember John’s best Boomerang capture of all time?
We pretty much ignored the tub during the entire gutting/rebuilding process of the house. We did keep it covered with a piece of plywood so it didn’t get dinged up, but we put off making a plan to resuscitate it until we actually had a bathroom to put it into again.
And then came that exciting day when the bathroom tile was in, the grout was done, and we needed to think about getting this tub back into the bathroom. It was finally time to assess the tub situation to see if it was something we’d have to pay someone to refinish, or something we could tackle ourselves. The first thing I did was wipe everything down (with a spare grout sponge) just to see how stained the inside of the tub really was. A remarkable amount of grime came off, so it gave us hope that we could save it without having to hire someone to professionally paint the inside (we hear that can flake and peel off down the line, so getting it back to its original finish would beat a rental with a peeling/flaking tub in 5-10 years).
We originally worried there were rust stains (which wouldn’t be something we could scrub off – rust literally pits the glazing and creates a hole that needs to be filled and sanded and typically calls for a pro to fix) but upon further inspection we realized that some of this “rust” was actually rubbing off! See the white speckles on those brown streaks below? Turns out nothing was pitted, but there were just some really really bad hard water deposits on top of the tub… which meant if we could scrub them off, we’d find more of that original white finish under them!
So a few weeks later, once the plumber had moved the tub back into the bathroom, we arrived in Cape Charles armed with an array of cleaners – ready to show the tub who’s boss. This is what it looked like when we started:
First, we wanted to evaluate what was just surface grime and what was a legit stain. So we sprayed the whole thing down with 1-part white vinegar, 1-part water and used a little elbow grease (and a green scouring pad) to get all of the superficial gunk off.
It made a HUGE difference, although not enough that I would be willing to actually take a bath in there yet.
The next tool in our arsenal was a bottle of Bar Keeper’s Friend Soft Cleanser, which a few people had recommended to us for old tubs (I just happened to find it for like $1.50 at Ross). We followed the instructions of applying it to a damp surface, letting it sit, and then scrubbing it off. Results were not very good. Confidence levels majorly wavered at this point.
Undeterred, we decided to try a more generous application of BKF (is that what the kids are calling it these days?) and let it sit for much longer (like 15-20 minutes). In the meantime, we also used a heavy duty Magic Eraser on some of the other spots, which is another tip you guys shared for trying to clean up an old tub. It certainly helped, but was a bit slow-going. We burned through a couple of them pretty quickly, but things were starting to look better…
After the scrub had sat for about 20 minutes, we tackled it with a piece of fine grade steel wool (along with hearing that magic erasers and fine steel wool can work, we also have heard that a pumice stone can buff out small stains too – so that’s something else to try if you have the same job ahead of you – we just didn’t have one with us). I’m not sure if it was the cleanser or the steel wool, but we finally started to see some noticeable progress.
It still required A LOT of elbow grease, but it was insanely satisfying to see those rust streaks dissipating. We also very gently scraped it in some parts with the dulled tip of our multi-tool. I didn’t take a picture because I didn’t want to necessarily recommend it since it can etch/scratch your tub which is NOT GOOD, but we checked frequently to make sure we weren’t scratching ours, and it was helpful in chipping off some large chunks of rust-covered hard water stains.
The final results are not flawless, but we are more than satisfied with how it looks. All the rusty looking rings you see below will be covered by a new drain, faucet and spigot once they’re installed, so aside from a few slight imperfections in the white interior finish, she’s gonna look pretty dang good. I’m officially more than willing to plop my bod down in there for a good soak. Just picture me in there wearing a black turtleneck for modesty reasons.
This feels like a good moment for a before and after. Again, this is all from just cleaning – no actual refinishing or reglazing went on with the inside. So we’re glad that there should be no issues with bubbling or peeling paint since we were able to restore the original finish of the tub. Those few sentences don’t adequately capture how elated I am, so I’ll add this: ALL THE JAZZ HANDS!
Now let’s talk about restoring the outside, because what good is a tidy interior if the exterior looks ready for a horror movie?
Our first step was to sand it down, mostly just to get all of the already flaking paint off so we could have a relatively smooth surface to paint. NOTE: always test old tubs for lead paint! Many have it, which is extremely dangerous, especially if kids will be bathing in them. We were thrilled to find out ours was clean- most likely since the outside was painted sometime after lead was phased out and since the inside had never been reglazed.
First we used some coarse sanding blocks to scrub all of the exterior by hand, which was slow going, but definitely knocked a bunch of old dry paint flakes to the ground. John had also bought this rust-removing drill attachment while we were at the store and it turned out to be the perfect tool for the job. It knocked off even more of the loosest parts of the old finish in no time. NOTE NUMBER TWO: we were both wearing heavy-duty lead paint removal masks during all this sanding just to be safe because tons of dust flies and even though it checked out to be lead free, we didn’t want to be inhaling a ton of tiny dust particles anyway, so you’ll catch a glimpse of those later in the post.
After a pass with the drill, we went over by hand with medium and then fine-grit sanding blocks to smooth it out a bit more. It would’ve taken us hours to get everything down to the original finish, but in about 20 minutes we got it down to a smooth-to-the-touch finish which is good enough. You just want a nice flake-free base for some rust-blocking primer and paint to adhere to without worrying it’ll flake and pop off down the line (primer & paint are generally only as secure as their base – so make sure that’s not crumbling).
After a wipe down with a clean towel, we were ready to prime. Based on a deep and meaningful conversation with the pro at our local paint desk, we chose this oil-based Clean Metal Primer to do the job. We obviously wanted something that not only covered the existing rust but helped prevent more – plus it would make the whole thing ready for paint that would last.
It’s very thin (read: drippy) so make sure your floors are well protected! We used small foam rollers to cover most of the large surfaces, and then a cheap chip brush to get under the lip and around the actual clawfeet. It’s also pretty stinky, so we opened every window, put on all the fans, and kept our masks on for this step too.
There was a moment when we were watching the primer dry where we considered just painting it white. It was so refreshing to see it all clean and “new” looking that we were very tempted. However, the room itself is very white (white floor tiles, white trim, white ceilings, white shower tile, and white inside the tub), so we thought a darker accent in the space would actually be really nice to break things up. Plus, the interior finish is a tiny bit off-white (you can sort of tell in the photo below), so matching the outside exactly would’ve made the whole thing a bit creamier than we wanted (which might have clashed with the bright white floor tiles). With all of those factors urging us to go deeper and more dramatic with the outside of this tub, we considered 45,731 paint swatches (just kidding, it was only 45,721).
You probably spotted some of our contenders a few photos up. We considered a whole range of colors for the outside of the tub, but we landed on Riverway by Sherwin-Williams because it was a pretty deep blue with a heavy dose of gray and a hint of green. All of the straight taupes or grays felt a little too boring for a room with such a playful floor pattern, and we wanted to go noticeably darker than the little accent tiles in the floor so it didn’t look like we were trying to match it or skew too “baby blue” everywhere. Also, ignore how dirty these tiles look. They have since been scrubbed within an inch of their life.
After choosing that color, we actually had to have it color matched at Lowe’s in this Anti-Rust Armor paint since it came so highly recommended from the paint pro we chatted with (it’s moisture and stain resistant and has some additional rust prevention built into it – so they thought it was the best bet for our tub holding up longterm). The literal description online says its great for “appliances, playground equipment, mailboxes, and tanks.” I know they probably mean things like propane tanks, but I got a good laugh imagining someone painting a giant military tank by hand with this stuff.
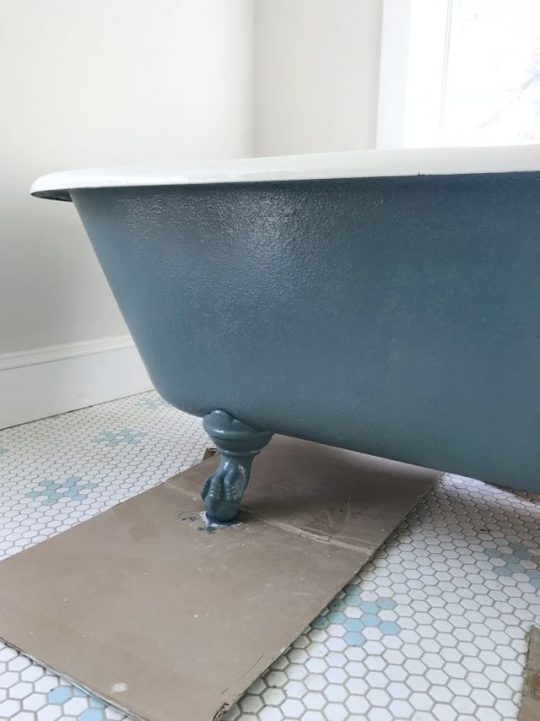
Oh and this paint was also pretty stinky (hence the masks we donned again for this step) but it went on much thicker than the primer did. Once again we used small foam rollers for most of it, and then we used a brush meant specifically for oil-based paints to get between the toes. Basically we gave our tub a pedicure.
A few people have asked why we chose to make the feet the same color, rather than accenting them with a white, silver, or gold finish. We just looked at all of our inspiration photos of clawfoot tubs (because you know I’ve pinned like ten million since we bought this house) and we liked the two-tone look better than a three-tone effect. That’s definitely something you can go for if you like that extra foot-bling though! It can look really cool too.
You can tell in these photos that the outside isn’t perfectly smooth – you can still see the subtle topography of the old finishes beneath the fresh coat of blue. We’re actually kinda happy that it will feel like a tub that has been in this house for decades instead of some new replica that we brought in, so we’re totally cool with that dappled texture – and the glossy shine from the fresh paint is a nice counterpart.
Dappled dots or not, it’s certainly a huge improvement! So for around $50 and a fair amount of sweat, we got something that looks pretty darn close to this Rejuvenation clawfoot tub that retails for $3,300!
I’m gonna hold off on sharing any more “afters” for now, mainly because we haven’t taken any. But late last week our plumber came back to install the faucet and connect the tub (and remove the cardboard!) so word from him is that it’s ready for use! We have to skip our weekly visit since the floors are being sealed and need time to cure before anyone walks on them, so we’re just over here holding our breath until we can go back over to the house and see the tub all hooked up (and the floors all refinished). You know I’ll take like ten million pictures for you guys, so stay tuned!
Psst – Wanna read more about this beach house rehab project of ours? Click here to see everything we’ve done for the past year to get it to this point!
*This post contains affiliate links*
The post How To Refinish An Old Clawfoot Tub appeared first on Young House Love.
0 notes
Text
How To Refinish An Old Clawfoot Tub
We’ve gotten A LOT of questions about how we’ve rescued the clawfoot tub at our beach house, so let’s just dive right into what worked (and what didn’t) and how we nursed this baby back to life.
The tub existed in the house when we bought it last October (Saturday will be our 1-year house-iversary!). But it was a pretty sad existence, as evidenced by the bathroom literally falling apart around it. Yes, this is what that bathroom looked like when we bought the house. You’ll remember we later had to fully remove and rebuild that entire side of the house because it was sinking into the ground due to a completely failing foundation (!!!). You can read more about that process here.
During demo, our contractor moved it out into the bedroom, which is where it lived for over half a year as destruction and reconstruction went on around it.
Once that side of the house was all rebuilt, it was pretty exciting to picture the tub going back in there – this time on stable footing. Here I am back in January standing where the bathtub now sits. Remember John’s best Boomerang capture of all time?
We pretty much ignored the tub during the entire gutting/rebuilding process of the house. We did keep it covered with a piece of plywood so it didn’t get dinged up, but we put off making a plan to resuscitate it until we actually had a bathroom to put it into again.
And then came that exciting day when the bathroom tile was in, the grout was done, and we needed to think about getting this tub back into the bathroom. It was finally time to assess the tub situation to see if it was something we’d have to pay someone to refinish, or something we could tackle ourselves. The first thing I did was wipe everything down (with a spare grout sponge) just to see how stained the inside of the tub really was. A remarkable amount of grime came off, so it gave us hope that we could save it without having to hire someone to professionally paint the inside (we hear that can flake and peel off down the line, so getting it back to its original finish would beat a rental with a peeling/flaking tub in 5-10 years).
We originally worried there were rust stains (which wouldn’t be something we could scrub off – rust literally pits the glazing and creates a hole that needs to be filled and sanded and typically calls for a pro to fix) but upon further inspection we realized that some of this “rust” was actually rubbing off! See the white speckles on those brown streaks below? Turns out nothing was pitted, but there were just some really really bad hard water deposits on top of the tub… which meant if we could scrub them off, we’d find more of that original white finish under them!
So a few weeks later, once the plumber had moved the tub back into the bathroom, we arrived in Cape Charles armed with an array of cleaners – ready to show the tub who’s boss. This is what it looked like when we started:
First, we wanted to evaluate what was just surface grime and what was a legit stain. So we sprayed the whole thing down with 1-part white vinegar, 1-part water and used a little elbow grease (and a green scouring pad) to get all of the superficial gunk off.
It made a HUGE difference, although not enough that I would be willing to actually take a bath in there yet.
The next tool in our arsenal was a bottle of Bar Keeper’s Friend Soft Cleanser, which a few people had recommended to us for old tubs (I just happened to find it for like $1.50 at Ross). We followed the instructions of applying it to a damp surface, letting it sit, and then scrubbing it off. Results were not very good. Confidence levels majorly wavered at this point.
Undeterred, we decided to try a more generous application of BKF (is that what the kids are calling it these days?) and let it sit for much longer (like 15-20 minutes). In the meantime, we also used a heavy duty Magic Eraser on some of the other spots, which is another tip you guys shared for trying to clean up an old tub. It certainly helped, but was a bit slow-going. We burned through a couple of them pretty quickly, but things were starting to look better…
After the scrub had sat for about 20 minutes, we tackled it with a piece of fine grade steel wool (along with hearing that magic erasers and fine steel wool can work, we also have heard that a pumice stone can buff out small stains too – so that’s something else to try if you have the same job ahead of you – we just didn’t have one with us). I’m not sure if it was the cleanser or the steel wool, but we finally started to see some noticeable progress.
It still required A LOT of elbow grease, but it was insanely satisfying to see those rust streaks dissipating. We also very gently scraped it in some parts with the dulled tip of our multi-tool. I didn’t take a picture because I didn’t want to necessarily recommend it since it can etch/scratch your tub which is NOT GOOD, but we checked frequently to make sure we weren’t scratching ours, and it was helpful in chipping off some large chunks of rust-covered hard water stains.
The final results are not flawless, but we are more than satisfied with how it looks. All the rusty looking rings you see below will be covered by a new drain, faucet and spigot once they’re installed, so aside from a few slight imperfections in the white interior finish, she’s gonna look pretty dang good. I’m officially more than willing to plop my bod down in there for a good soak. Just picture me in there wearing a black turtleneck for modesty reasons.
This feels like a good moment for a before and after. Again, this is all from just cleaning – no actual refinishing or reglazing went on with the inside. So we’re glad that there should be no issues with bubbling or peeling paint since we were able to restore the original finish of the tub. Those few sentences don’t adequately capture how elated I am, so I’ll add this: ALL THE JAZZ HANDS!
Now let’s talk about restoring the outside, because what good is a tidy interior if the exterior looks ready for a horror movie?
Our first step was to sand it down, mostly just to get all of the already flaking paint off so we could have a relatively smooth surface to paint. NOTE: always test old tubs for lead paint! Many have it, which is extremely dangerous, especially if kids will be bathing in them. We were thrilled to find out ours was clean- most likely since the outside was painted sometime after lead was phased out and since the inside had never been reglazed.
First we used some coarse sanding blocks to scrub all of the exterior by hand, which was slow going, but definitely knocked a bunch of old dry paint flakes to the ground. John had also bought this rust-removing drill attachment while we were at the store and it turned out to be the perfect tool for the job. It knocked off even more of the loosest parts of the old finish in no time. NOTE NUMBER TWO: we were both wearing heavy-duty lead paint removal masks during all this sanding just to be safe because tons of dust flies and even though it checked out to be lead free, we didn’t want to be inhaling a ton of tiny dust particles anyway, so you’ll catch a glimpse of those later in the post.
After a pass with the drill, we went over by hand with medium and then fine-grit sanding blocks to smooth it out a bit more. It would’ve taken us hours to get everything down to the original finish, but in about 20 minutes we got it down to a smooth-to-the-touch finish which is good enough. You just want a nice flake-free base for some rust-blocking primer and paint to adhere to without worrying it’ll flake and pop off down the line (primer & paint are generally only as secure as their base – so make sure that’s not crumbling).
After a wipe down with a clean towel, we were ready to prime. Based on a deep and meaningful conversation with the pro at our local paint desk, we chose this oil-based Clean Metal Primer to do the job. We obviously wanted something that not only covered the existing rust but helped prevent more – plus it would make the whole thing ready for paint that would last.
It’s very thin (read: drippy) so make sure your floors are well protected! We used small foam rollers to cover most of the large surfaces, and then a cheap chip brush to get under the lip and around the actual clawfeet. It’s also pretty stinky, so we opened every window, put on all the fans, and kept our masks on for this step too.
There was a moment when we were watching the primer dry where we considered just painting it white. It was so refreshing to see it all clean and “new” looking that we were very tempted. However, the room itself is very white (white floor tiles, white trim, white ceilings, white shower tile, and white inside the tub), so we thought a darker accent in the space would actually be really nice to break things up. Plus, the interior finish is a tiny bit off-white (you can sort of tell in the photo below), so matching the outside exactly would’ve made the whole thing a bit creamier than we wanted (which might have clashed with the bright white floor tiles). With all of those factors urging us to go deeper and more dramatic with the outside of this tub, we considered 45,731 paint swatches (just kidding, it was only 45,721).
You probably spotted some of our contenders a few photos up. We considered a whole range of colors for the outside of the tub, but we landed on Riverway by Sherwin-Williams because it was a pretty deep blue with a heavy dose of gray and a hint of green. All of the straight taupes or grays felt a little too boring for a room with such a playful floor pattern, and we wanted to go noticeably darker than the little accent tiles in the floor so it didn’t look like we were trying to match it or skew too “baby blue” everywhere. Also, ignore how dirty these tiles look. They have since been scrubbed within an inch of their life.
After choosing that color, we actually had to have it color matched at Lowe’s in this Anti-Rust Armor paint since it came so highly recommended from the paint pro we chatted with (it’s moisture and stain resistant and has some additional rust prevention built into it – so they thought it was the best bet for our tub holding up longterm). The literal description online says its great for “appliances, playground equipment, mailboxes, and tanks.” I know they probably mean things like propane tanks, but I got a good laugh imagining someone painting a giant military tank by hand with this stuff.
Oh and this paint was also pretty stinky (hence the masks we donned again for this step) but it went on much thicker than the primer did. Once again we used small foam rollers for most of it, and then we used a brush meant specifically for oil-based paints to get between the toes. Basically we gave our tub a pedicure.
A few people have asked why we chose to make the feet the same color, rather than accenting them with a white, silver, or gold finish. We just looked at all of our inspiration photos of clawfoot tubs (because you know I’ve pinned like ten million since we bought this house) and we liked the two-tone look better than a three-tone effect. That’s definitely something you can go for if you like that extra foot-bling though! It can look really cool too.
You can tell in these photos that the outside isn’t perfectly smooth – you can still see the subtle topography of the old finishes beneath the fresh coat of blue. We’re actually kinda happy that it will feel like a tub that has been in this house for decades instead of some new replica that we brought in, so we’re totally cool with that dappled texture – and the glossy shine from the fresh paint is a nice counterpart.
Dappled dots or not, it��s certainly a huge improvement! So for around $50 and a fair amount of sweat, we got something that looks pretty darn close to this Rejuvenation clawfoot tub that retails for $3,300!
I’m gonna hold off on sharing any more “afters” for now, mainly because we haven’t taken any. But late last week our plumber came back to install the faucet and connect the tub (and remove the cardboard!) so word from him is that it’s ready for use! We have to skip our weekly visit since the floors are being sealed and need time to cure before anyone walks on them, so we’re just over here holding our breath until we can go back over to the house and see the tub all hooked up (and the floors all refinished). You know I’ll take like ten million pictures for you guys, so stay tuned!
Psst – Wanna read more about this beach house rehab project of ours? Click here to see everything we’ve done for the past year to get it to this point!
*This post contains affiliate links*
The post How To Refinish An Old Clawfoot Tub appeared first on Young House Love.
How To Refinish An Old Clawfoot Tub published first on http://ift.tt/2uiWrIt
0 notes
Text
How To Refinish An Old Clawfoot Tub
We’ve gotten A LOT of questions about how we’ve rescued the clawfoot tub at our beach house, so let’s just dive right into what worked (and what didn’t) and how we nursed this baby back to life.
The tub existed in the house when we bought it last October (Saturday will be our 1-year house-iversary!). But it was a pretty sad existence, as evidenced by the bathroom literally falling apart around it. Yes, this is what that bathroom looked like when we bought the house. You’ll remember we later had to fully remove and rebuild that entire side of the house because it was sinking into the ground due to a completely failing foundation (!!!). You can read more about that process here.
During demo, our contractor moved it out into the bedroom, which is where it lived for over half a year as destruction and reconstruction went on around it.
Once that side of the house was all rebuilt, it was pretty exciting to picture the tub going back in there – this time on stable footing. Here I am back in January standing where the bathtub now sits. Remember John’s best Boomerang capture of all time?
We pretty much ignored the tub during the entire gutting/rebuilding process of the house. We did keep it covered with a piece of plywood so it didn’t get dinged up, but we put off making a plan to resuscitate it until we actually had a bathroom to put it into again.
And then came that exciting day when the bathroom tile was in, the grout was done, and we needed to think about getting this tub back into the bathroom. It was finally time to assess the tub situation to see if it was something we’d have to pay someone to refinish, or something we could tackle ourselves. The first thing I did was wipe everything down (with a spare grout sponge) just to see how stained the inside of the tub really was. A remarkable amount of grime came off, so it gave us hope that we could save it without having to hire someone to professionally paint the inside (we hear that can flake and peel off down the line, so getting it back to its original finish would beat a rental with a peeling/flaking tub in 5-10 years).
We originally worried there were rust stains (which wouldn’t be something we could scrub off – rust literally pits the glazing and creates a hole that needs to be filled and sanded and typically calls for a pro to fix) but upon further inspection we realized that some of this “rust” was actually rubbing off! See the white speckles on those brown streaks below? Turns out nothing was pitted, but there were just some really really bad hard water deposits on top of the tub… which meant if we could scrub them off, we’d find more of that original white finish under them!
So a few weeks later, once the plumber had moved the tub back into the bathroom, we arrived in Cape Charles armed with an array of cleaners – ready to show the tub who’s boss. This is what it looked like when we started:
First, we wanted to evaluate what was just surface grime and what was a legit stain. So we sprayed the whole thing down with 1-part white vinegar, 1-part water and used a little elbow grease (and a green scouring pad) to get all of the superficial gunk off.
It made a HUGE difference, although not enough that I would be willing to actually take a bath in there yet.
The next tool in our arsenal was a bottle of Bar Keeper’s Friend Soft Cleanser, which a few people had recommended to us for old tubs (I just happened to find it for like $1.50 at Ross). We followed the instructions of applying it to a damp surface, letting it sit, and then scrubbing it off. Results were not very good. Confidence levels majorly wavered at this point.
Undeterred, we decided to try a more generous application of BKF (is that what the kids are calling it these days?) and let it sit for much longer (like 15-20 minutes). In the meantime, we also used a heavy duty Magic Eraser on some of the other spots, which is another tip you guys shared for trying to clean up an old tub. It certainly helped, but was a bit slow-going. We burned through a couple of them pretty quickly, but things were starting to look better…
After the scrub had sat for about 20 minutes, we tackled it with a piece of fine grade steel wool (along with hearing that magic erasers and fine steel wool can work, we also have heard that a pumice stone can buff out small stains too – so that’s something else to try if you have the same job ahead of you – we just didn’t have one with us). I’m not sure if it was the cleanser or the steel wool, but we finally started to see some noticeable progress.
It still required A LOT of elbow grease, but it was insanely satisfying to see those rust streaks dissipating. We also very gently scraped it in some parts with the dulled tip of our multi-tool. I didn’t take a picture because I didn’t want to necessarily recommend it since it can etch/scratch your tub which is NOT GOOD, but we checked frequently to make sure we weren’t scratching ours, and it was helpful in chipping off some large chunks of rust-covered hard water stains.
The final results are not flawless, but we are more than satisfied with how it looks. All the rusty looking rings you see below will be covered by a new drain, faucet and spigot once they’re installed, so aside from a few slight imperfections in the white interior finish, she’s gonna look pretty dang good. I’m officially more than willing to plop my bod down in there for a good soak. Just picture me in there wearing a black turtleneck for modesty reasons.
This feels like a good moment for a before and after. Again, this is all from just cleaning – no actual refinishing or reglazing went on with the inside. So we’re glad that there should be no issues with bubbling or peeling paint since we were able to restore the original finish of the tub. Those few sentences don’t adequately capture how elated I am, so I’ll add this: ALL THE JAZZ HANDS!
Now let’s talk about restoring the outside, because what good is a tidy interior if the exterior looks ready for a horror movie?
Our first step was to sand it down, mostly just to get all of the already flaking paint off so we could have a relatively smooth surface to paint. NOTE: always test old tubs for lead paint! Many have it, which is extremely dangerous, especially if kids will be bathing in them. We were thrilled to find out ours was clean- most likely since the outside was painted sometime after lead was phased out and since the inside had never been reglazed.
First we used some coarse sanding blocks to scrub all of the exterior by hand, which was slow going, but definitely knocked a bunch of old dry paint flakes to the ground. John had also bought this rust-removing drill attachment while we were at the store and it turned out to be the perfect tool for the job. It knocked off even more of the loosest parts of the old finish in no time. NOTE NUMBER TWO: we were both wearing heavy-duty lead paint removal masks during all this sanding just to be safe because tons of dust flies and even though it checked out to be lead free, we didn’t want to be inhaling a ton of tiny dust particles anyway, so you’ll catch a glimpse of those later in the post.
After a pass with the drill, we went over by hand with medium and then fine-grit sanding blocks to smooth it out a bit more. It would’ve taken us hours to get everything down to the original finish, but in about 20 minutes we got it down to a smooth-to-the-touch finish which is good enough. You just want a nice flake-free base for some rust-blocking primer and paint to adhere to without worrying it’ll flake and pop off down the line (primer & paint are generally only as secure as their base – so make sure that’s not crumbling).
After a wipe down with a clean towel, we were ready to prime. Based on a deep and meaningful conversation with the pro at our local paint desk, we chose this oil-based Clean Metal Primer to do the job. We obviously wanted something that not only covered the existing rust but helped prevent more – plus it would make the whole thing ready for paint that would last.
It’s very thin (read: drippy) so make sure your floors are well protected! We used small foam rollers to cover most of the large surfaces, and then a cheap chip brush to get under the lip and around the actual clawfeet. It’s also pretty stinky, so we opened every window, put on all the fans, and kept our masks on for this step too.
There was a moment when we were watching the primer dry where we considered just painting it white. It was so refreshing to see it all clean and “new” looking that we were very tempted. However, the room itself is very white (white floor tiles, white trim, white ceilings, white shower tile, and white inside the tub), so we thought a darker accent in the space would actually be really nice to break things up. Plus, the interior finish is a tiny bit off-white (you can sort of tell in the photo below), so matching the outside exactly would’ve made the whole thing a bit creamier than we wanted (which might have clashed with the bright white floor tiles). With all of those factors urging us to go deeper and more dramatic with the outside of this tub, we considered 45,731 paint swatches (just kidding, it was only 45,721).
You probably spotted some of our contenders a few photos up. We considered a whole range of colors for the outside of the tub, but we landed on Riverway by Sherwin-Williams because it was a pretty deep blue with a heavy dose of gray and a hint of green. All of the straight taupes or grays felt a little too boring for a room with such a playful floor pattern, and we wanted to go noticeably darker than the little accent tiles in the floor so it didn’t look like we were trying to match it or skew too “baby blue” everywhere. Also, ignore how dirty these tiles look. They have since been scrubbed within an inch of their life.
After choosing that color, we actually had to have it color matched at Lowe’s in this Anti-Rust Armor paint since it came so highly recommended from the paint pro we chatted with (it’s moisture and stain resistant and has some additional rust prevention built into it – so they thought it was the best bet for our tub holding up longterm). The literal description online says its great for “appliances, playground equipment, mailboxes, and tanks.” I know they probably mean things like propane tanks, but I got a good laugh imagining someone painting a giant military tank by hand with this stuff.
Oh and this paint was also pretty stinky (hence the masks we donned again for this step) but it went on much thicker than the primer did. Once again we used small foam rollers for most of it, and then we used a brush meant specifically for oil-based paints to get between the toes. Basically we gave our tub a pedicure.
A few people have asked why we chose to make the feet the same color, rather than accenting them with a white, silver, or gold finish. We just looked at all of our inspiration photos of clawfoot tubs (because you know I’ve pinned like ten million since we bought this house) and we liked the two-tone look better than a three-tone effect. That’s definitely something you can go for if you like that extra foot-bling though! It can look really cool too.
You can tell in these photos that the outside isn’t perfectly smooth – you can still see the subtle topography of the old finishes beneath the fresh coat of blue. We’re actually kinda happy that it will feel like a tub that has been in this house for decades instead of some new replica that we brought in, so we’re totally cool with that dappled texture – and the glossy shine from the fresh paint is a nice counterpart.
Dappled dots or not, it’s certainly a huge improvement! So for around $50 and a fair amount of elbow grease, we got something that looks pretty darn close to this Rejuvenation clawfoot tub that retails for $3,300!
I’m gonna hold off on sharing any more “afters” for now, mainly because we haven’t taken any. But late last week our plumber came back to install the faucet and connect the tub (and remove the cardboard!) so word from him is that it’s ready for use! We have to skip our weekly visit since the floors are being sealed and need time to cure before anyone walks on them, so we’re just over here holding our breath until we can go back over to the house and see the tub all hooked up (and the floors all refinished). You know I’ll take like ten million pictures for you guys, so stay tuned!
Psst – Wanna read more about this beach house rehab project of ours? Click here to see everything we’ve done for the past year to get it to this point!
*This post contains affiliate links*
The post How To Refinish An Old Clawfoot Tub appeared first on Young House Love.
How To Refinish An Old Clawfoot Tub posted first on http://ift.tt/2qOPBf9
0 notes
Text
How To Refinish An Old Clawfoot Tub
We’ve gotten A LOT of questions about how we’ve rescued the clawfoot tub at our beach house, so let’s just dive right into what worked (and what didn’t) and how we nursed this baby back to life.
The tub existed in the house when we bought it last October (Saturday will be our 1-year house-iversary!). But it was a pretty sad existence, as evidenced by the bathroom literally falling apart around it. Yes, this is what that bathroom looked like when we bought the house. You’ll remember we later had to fully remove and rebuild that entire side of the house because it was sinking into the ground due to a completely failing foundation (!!!). You can read more about that process here.
During demo, our contractor moved it out into the bedroom, which is where it lived for over half a year as destruction and reconstruction went on around it.
Once that side of the house was all rebuilt, it was pretty exciting to picture the tub going back in there – this time on stable footing. Here I am back in January standing where the bathtub now sits. Remember John’s best Boomerang capture of all time?
We basically ignored the tub during the entire gutting/rebuilding process of the house, knowing that it would only get dirtier throughout the process (we did keep it covered with a piece of plywood so it didn’t get dinged up), but we put off making a plan to resuscitate it until we actually had a bathroom to put it into again.
And then came that exciting day when the bathroom tile was in, the grout was done, and we needed to think about getting this tub back into the bathroom. It was finally time to assess the tub situation to see if it was something we’d have to pay someone to refinish, or something we could tackle ourselves. The first thing I did was wipe everything down (with a spare grout sponge) just to see how stained the inside of the tub really was. A remarkable amount of grime came off, so it gave us hope that we could save it without having to hire someone to professionally paint the inside (we hear that can flake and peel off down the line, so getting it back to its original finish would beat a rental with a peeling/flaking tub in 5-10 years).
We originally worried there were rust stains (which wouldn’t be something we could scrub off – rust literally pits the glazing and creates a hole that needs to be filled and sanded and typically calls for a pro to fix) but upon further inspection we realized that some of this “rust” was actually rubbing off! See the white speckles on those brown rust streak below? Turns out nothing was pitted, but there were just some really really bad hard water deposits on top of the tub… which meant if we could scrub them off, we’d find more of that original white finish under them!
So a few weeks later, once the plumber had moved the tub back into the bathroom, we arrived in Cape Charles armed with an array of cleaners – ready to show the tub who’s boss. This is what it looked like when we started:
First, we wanted to evaluate what was just surface grime and what was a legit stain. So we sprayed the whole thing down with 1-part white vinegar, 1-part water and used a little elbow grease (and a green scouring pad) to get all of the superficial gunk off.
It made a HUGE difference, although not enough that I would be willing to actually take a bath in there yet.
The next tool in our arsenal was a bottle of Bar Keeper’s Friend Soft Cleanser, which a few people had recommended to us (I just happened to find on discount at Ross and grabbed it thanks to you guys recommending it for old clawfoot tubs!). We followed the instructions of applying it to a damp surface, letting it sit, and then scrubbing it off. Results were not very good. Confidence levels majorly wavered at this point.
Undeterred, we decided to try a more generous application of BKF (is that what the kids are calling it these days?) and let it sit for much longer (like 15-20 minutes). In the meantime, we also used a heavy duty Magic Eraser on some of the other spots, which is another tip you guys shared for trying to clean up an old tub. It certainly helped, but was a bit slow-going. We burned through a couple of them pretty quickly, but things were starting to look better…
After the scrub had sat for about 20 minutes, we tackled it with a piece of fine grade steel wool (along with hearing that magic erasers and fine steel wool work, we also have heard that a pummice stone can actually buff out small stains too – so that’s something else to note if you have the same job ahead of you – we just didn’t have one with us). I’m not sure if it was the cleanser or the steel wool, but we finally started to see some noticeable progress.
It still required A LOT of elbow grease, but it was insanely satisfying to see those rust streaks dissipating. We also scraped it in some parts with the dulled tip of our multi-tool. I didn’t take a picture because I didn’t want to necessarily recommend it since it can etch/scratch your tub which is NOT GOOD, but we checked frequently to make sure we weren’t scratching ours, and it was helpful in chipping off some large chunks of rust-covered hard water stains.
The final results are not flawless, but we are more than satisfied with how it looks. All the rusty looking rings you see below will be covered by a new drain, faucet and spigot once they’re installed, so aside from a few slight imperfections in the white interior finish, she’s gonna look pretty dang good. I’m officially more than willing to plop my bod down in there for a good soak. Just picture me in there wearing a black turtleneck for modesty reasons.
This feels like a good moment for a before and after. Again, this is all from just cleaning – no actual refinishing or reglazing went on with the inside. So we’re glad that there should be no issues with bubbling or peeling paint since we were able to restore the original finish of the tub. Those few sentences don’t adequately capture how elated I am, so I’ll add this: ALL THE JAZZ HANDS!
Now let’s talk about restoring the outside, because what good is a tidy interior if the exterior looks ready for a horror movie?
Our first step was to sand it down, mostly just to get all of the already flaking paint off so we could have a relatively smooth surface to paint. NOTE: always test old tubs for lead paint! Many have it, which is extremely dangerous, especially if kids will be bathing in them. We were thrilled to find out ours was clean- most likely since the outside was painted sometime after lead was phased out and since the inside had never been reglazed.
First we used some coarse sanding blocks to scrub all of the exterior by hand, which was slow going, but definitely knocked a bunch of old dry paint flakes to the ground. John had also bought this rust-removing drill attachment while we were at the store and it turned out to be the perfect tool for the job. It knocked off even more of the loosest parts of the old finish in no time. NOTE NUMBER TWO: we were both wearing heavy-duty lead paint removal masks during all this sanding just to be safe because tons of dust flies and even though it checked out to be lead free, we didn’t want to be inhaling a ton of tiny dust particles anyway, so you’ll catch a glimpse of those later in the post.
After a pass with the drill, we went over by hand with medium and then fine-grit sanding blocks to smooth it out a bit more. It would’ve taken us hours to get everything down to the original finish, but in about 20 minutes we got it down to a smooth-to-the-touch finish which is good enough. You just want a nice flake-free base for some rust-blocking primer and paint to adhere to without worrying it’ll flake and pop off down the line (primer & paint are generally only as secure as their base – so make sure that’s not crumbling).
After a wipe down with a clean towel, we were ready to prime. Based on a deep and meaningful conversation with the pro at our local paint desk, we chose this oil-based Clean Metal Primer to do the job. We obviously wanted something that not only covered the existing rust but helped prevent more – plus it would make the whole thing ready for paint that would last.
It’s very thin (read: drippy) so make sure your floors are well protected! We used small foam rollers to cover most of the large surfaces, and then a cheap chip brush to get under the lip and around the actual clawfeet. It’s also pretty stinky, so we opened every window, put on all the fans, and kept our masks on for this step too.
There was a moment when we were watching the primer dry where we considered just painting it white. It was so refreshing to see it all clean and “new” looking that we were very tempted. However, the room itself is very white (white floor tiles, white trim, white ceilings, white shower tile, and white inside the tub), so we thought a darker accent in the space would actually be really nice to break things up. Plus, the interior finish is a tiny bit off-white (you can sort of tell in the photo below), so matching the outside exactly would’ve made the whole thing a bit creamier than we wanted (which might have clashed with the bright white floor tiles). With all of those factors urging us to go deeper and more dramatic with the outside of this tub, we considered 45,731 paint swatches (just kidding, it was only 45,721).
You probably spotted some of our contenders a few photos up. We considered a whole range of colors for the outside of the tub, but we landed on Riverway by Sherwin-Williams because it was a pretty deep blue with a heavy dose of gray and a hint of green. All of the straight taupes or grays felt a little too boring for a room with such a playful floor pattern, and we wanted to go noticeably darker than the little accent tiles in the floor so it didn’t look like we were trying to match it or skew too “baby blue” everywhere. Also, ignore how dirty these tiles look. They have since been scrubbed within an inch of their life.
After choosing that color, we actually had to have it color matched at Lowe’s in this Anti-Rust Armor paint since it came so highly recommended from the paint pro we chatted with (it’s moisture and stain resistant and has some additional rust prevention built into it – so they thought it was the best bet for our tub holding up longterm). The literal description online says its great for “appliances, playground equipment, mailboxes, and tanks.” I know they probably mean things like propane tanks, but I got a good laugh imagining someone painting a giant military tank by hand with this stuff.
Oh and this paint was also pretty stinky (hence the masks we donned again for this step) but it went on much thicker than the primer did. Once again we used small foam rollers for most of it, and then we used a brush meant specifically for oil-based paints to get between the toes. Basically we gave our tub a pedicure.
A few people have asked why we chose to make the feet the same color, rather than accenting them with a white, silver, or gold finish. We just looked at all of our inspiration photos of clawfoot tubs (because you know I’ve pinned like ten million since we bought this house) and we liked the two-tone look better than a three-tone effect. That’s definitely something you can go for if you like that extra foot-bling though! It can look really cool too.
You can tell in these photos that the outside isn’t perfectly smooth – you can still see the subtle topography of the old finishes beneath the fresh coat of blue. We’re actually kinda happy that it will feel like a tub that has been in this house for decades instead of some new replica that we brought in, so we’re totally cool with that dappled texture – and the glossy shine from the fresh paint is a nice counterpart.
Dappled dots or not, it’s certainly a huge improvement! So for around $50 and a fair amount of elbow grease, we got something that looks pretty darn close to this Rejuvenation clawfoot tub that retails for $3,300!
I’m gonna hold off on sharing any more “afters” for now, mainly because we haven’t taken any. But late last week our plumber came back to install the faucet and connect the tub (and remove the cardboard!) so word from him is that it’s ready for use! We have to skip our weekly visit since the floors are being sealed and need time to cure before anyone walks on them, so we’re just over here holding our breath until we can go back over to the house and see the tub all hooked up (and the floors all refinished). You know I’ll take like ten million pictures for you guys, so stay tuned!
Psst – Wanna read more about this beach house rehab project of ours? Click here to see everything we’ve done for the past year to get it to this point!
*This post contains affiliate links*
The post How To Refinish An Old Clawfoot Tub appeared first on Young House Love.
0 notes
Text
How To Refinish An Old Clawfoot Tub
We’ve gotten A LOT of questions about how we’ve rescued the clawfoot tub at our beach house, so let’s just dive right into what worked (and what didn’t) and how we nursed this baby back to life.
The tub existed in the house when we bought it last October (Saturday will be our 1-year house-iversary!). But it was a pretty sad existence, as evidenced by the bathroom literally falling apart around it. Yes, this is what that bathroom looked like when we bought the house. You’ll remember we later had to fully remove and rebuild that entire side of the house because it was sinking into the ground due to a completely failing foundation (!!!). You can read more about that process here.
During demo, our contractor moved it out into the bedroom, which is where it lived for over half a year as destruction and reconstruction went on around it.
Once that side of the house was all rebuilt, it was pretty exciting to picture the tub going back in there – this time on stable footing. Here I am back in January standing where the bathtub now sits. Remember John’s best Boomerang capture of all time?
We pretty much ignored the tub during the entire gutting/rebuilding process of the house. We did keep it covered with a piece of plywood so it didn’t get dinged up, but we put off making a plan to resuscitate it until we actually had a bathroom to put it into again.
And then came that exciting day when the bathroom tile was in, the grout was done, and we needed to think about getting this tub back into the bathroom. It was finally time to assess the tub situation to see if it was something we’d have to pay someone to refinish, or something we could tackle ourselves. The first thing I did was wipe everything down (with a spare grout sponge) just to see how stained the inside of the tub really was. A remarkable amount of grime came off, so it gave us hope that we could save it without having to hire someone to professionally paint the inside (we hear that can flake and peel off down the line, so getting it back to its original finish would beat a rental with a peeling/flaking tub in 5-10 years).
We originally worried there were rust stains (which wouldn’t be something we could scrub off – rust literally pits the glazing and creates a hole that needs to be filled and sanded and typically calls for a pro to fix) but upon further inspection we realized that some of this “rust” was actually rubbing off! See the white speckles on those brown streaks below? Turns out nothing was pitted, but there were just some really really bad hard water deposits on top of the tub… which meant if we could scrub them off, we’d find more of that original white finish under them!
So a few weeks later, once the plumber had moved the tub back into the bathroom, we arrived in Cape Charles armed with an array of cleaners – ready to show the tub who’s boss. This is what it looked like when we started:
First, we wanted to evaluate what was just surface grime and what was a legit stain. So we sprayed the whole thing down with 1-part white vinegar, 1-part water and used a little elbow grease (and a green scouring pad) to get all of the superficial gunk off.
It made a HUGE difference, although not enough that I would be willing to actually take a bath in there yet.
The next tool in our arsenal was a bottle of Bar Keeper’s Friend Soft Cleanser, which a few people had recommended to us for old tubs (I just happened to find it for like $1.50 at Ross). We followed the instructions of applying it to a damp surface, letting it sit, and then scrubbing it off. Results were not very good. Confidence levels majorly wavered at this point.
Undeterred, we decided to try a more generous application of BKF (is that what the kids are calling it these days?) and let it sit for much longer (like 15-20 minutes). In the meantime, we also used a heavy duty Magic Eraser on some of the other spots, which is another tip you guys shared for trying to clean up an old tub. It certainly helped, but was a bit slow-going. We burned through a couple of them pretty quickly, but things were starting to look better…
After the scrub had sat for about 20 minutes, we tackled it with a piece of fine grade steel wool (along with hearing that magic erasers and fine steel wool can work, we also have heard that a pumice stone can buff out small stains too – so that’s something else to try if you have the same job ahead of you – we just didn’t have one with us). I’m not sure if it was the cleanser or the steel wool, but we finally started to see some noticeable progress.
It still required A LOT of elbow grease, but it was insanely satisfying to see those rust streaks dissipating. We also very gently scraped it in some parts with the dulled tip of our multi-tool. I didn’t take a picture because I didn’t want to necessarily recommend it since it can etch/scratch your tub which is NOT GOOD, but we checked frequently to make sure we weren’t scratching ours, and it was helpful in chipping off some large chunks of rust-covered hard water stains.
The final results are not flawless, but we are more than satisfied with how it looks. All the rusty looking rings you see below will be covered by a new drain, faucet and spigot once they’re installed, so aside from a few slight imperfections in the white interior finish, she’s gonna look pretty dang good. I’m officially more than willing to plop my bod down in there for a good soak. Just picture me in there wearing a black turtleneck for modesty reasons.
This feels like a good moment for a before and after. Again, this is all from just cleaning – no actual refinishing or reglazing went on with the inside. So we’re glad that there should be no issues with bubbling or peeling paint since we were able to restore the original finish of the tub. Those few sentences don’t adequately capture how elated I am, so I’ll add this: ALL THE JAZZ HANDS!
Now let’s talk about restoring the outside, because what good is a tidy interior if the exterior looks ready for a horror movie?
Our first step was to sand it down, mostly just to get all of the already flaking paint off so we could have a relatively smooth surface to paint. NOTE: always test old tubs for lead paint! Many have it, which is extremely dangerous, especially if kids will be bathing in them. We were thrilled to find out ours was clean- most likely since the outside was painted sometime after lead was phased out and since the inside had never been reglazed.
First we used some coarse sanding blocks to scrub all of the exterior by hand, which was slow going, but definitely knocked a bunch of old dry paint flakes to the ground. John had also bought this rust-removing drill attachment while we were at the store and it turned out to be the perfect tool for the job. It knocked off even more of the loosest parts of the old finish in no time. NOTE NUMBER TWO: we were both wearing heavy-duty lead paint removal masks during all this sanding just to be safe because tons of dust flies and even though it checked out to be lead free, we didn’t want to be inhaling a ton of tiny dust particles anyway, so you’ll catch a glimpse of those later in the post.
After a pass with the drill, we went over by hand with medium and then fine-grit sanding blocks to smooth it out a bit more. It would’ve taken us hours to get everything down to the original finish, but in about 20 minutes we got it down to a smooth-to-the-touch finish which is good enough. You just want a nice flake-free base for some rust-blocking primer and paint to adhere to without worrying it’ll flake and pop off down the line (primer & paint are generally only as secure as their base – so make sure that’s not crumbling).
After a wipe down with a clean towel, we were ready to prime. Based on a deep and meaningful conversation with the pro at our local paint desk, we chose this oil-based Clean Metal Primer to do the job. We obviously wanted something that not only covered the existing rust but helped prevent more – plus it would make the whole thing ready for paint that would last.
It’s very thin (read: drippy) so make sure your floors are well protected! We used small foam rollers to cover most of the large surfaces, and then a cheap chip brush to get under the lip and around the actual clawfeet. It’s also pretty stinky, so we opened every window, put on all the fans, and kept our masks on for this step too.
There was a moment when we were watching the primer dry where we considered just painting it white. It was so refreshing to see it all clean and “new” looking that we were very tempted. However, the room itself is very white (white floor tiles, white trim, white ceilings, white shower tile, and white inside the tub), so we thought a darker accent in the space would actually be really nice to break things up. Plus, the interior finish is a tiny bit off-white (you can sort of tell in the photo below), so matching the outside exactly would’ve made the whole thing a bit creamier than we wanted (which might have clashed with the bright white floor tiles). With all of those factors urging us to go deeper and more dramatic with the outside of this tub, we considered 45,731 paint swatches (just kidding, it was only 45,721).
You probably spotted some of our contenders a few photos up. We considered a whole range of colors for the outside of the tub, but we landed on Riverway by Sherwin-Williams because it was a pretty deep blue with a heavy dose of gray and a hint of green. All of the straight taupes or grays felt a little too boring for a room with such a playful floor pattern, and we wanted to go noticeably darker than the little accent tiles in the floor so it didn’t look like we were trying to match it or skew too “baby blue” everywhere. Also, ignore how dirty these tiles look. They have since been scrubbed within an inch of their life.
After choosing that color, we actually had to have it color matched at Lowe’s in this Anti-Rust Armor paint since it came so highly recommended from the paint pro we chatted with (it’s moisture and stain resistant and has some additional rust prevention built into it – so they thought it was the best bet for our tub holding up longterm). The literal description online says its great for “appliances, playground equipment, mailboxes, and tanks.” I know they probably mean things like propane tanks, but I got a good laugh imagining someone painting a giant military tank by hand with this stuff.
Oh and this paint was also pretty stinky (hence the masks we donned again for this step) but it went on much thicker than the primer did. Once again we used small foam rollers for most of it, and then we used a brush meant specifically for oil-based paints to get between the toes. Basically we gave our tub a pedicure.
A few people have asked why we chose to make the feet the same color, rather than accenting them with a white, silver, or gold finish. We just looked at all of our inspiration photos of clawfoot tubs (because you know I’ve pinned like ten million since we bought this house) and we liked the two-tone look better than a three-tone effect. That’s definitely something you can go for if you like that extra foot-bling though! It can look really cool too.
You can tell in these photos that the outside isn’t perfectly smooth – you can still see the subtle topography of the old finishes beneath the fresh coat of blue. We’re actually kinda happy that it will feel like a tub that has been in this house for decades instead of some new replica that we brought in, so we’re totally cool with that dappled texture – and the glossy shine from the fresh paint is a nice counterpart.
Dappled dots or not, it’s certainly a huge improvement! So for around $50 and a fair amount of sweat, we got something that looks pretty darn close to this Rejuvenation clawfoot tub that retails for $3,300!
I’m gonna hold off on sharing any more “afters” for now, mainly because we haven’t taken any. But late last week our plumber came back to install the faucet and connect the tub (and remove the cardboard!) so word from him is that it’s ready for use! We have to skip our weekly visit since the floors are being sealed and need time to cure before anyone walks on them, so we’re just over here holding our breath until we can go back over to the house and see the tub all hooked up (and the floors all refinished). You know I’ll take like ten million pictures for you guys, so stay tuned!
Psst – Wanna read more about this beach house rehab project of ours? Click here to see everything we’ve done for the past year to get it to this point!
*This post contains affiliate links*
The post How To Refinish An Old Clawfoot Tub appeared first on Young House Love.
How To Refinish An Old Clawfoot Tub published first on http://ift.tt/2qxZz2j
0 notes
Text
How To Refinish An Old Clawfoot Tub
We’ve gotten A LOT of questions about how we’ve rescued the clawfoot tub at our beach house, so let’s just dive right into what worked (and what didn’t) and how we nursed this baby back to life.
The tub existed in the house when we bought it last October (Saturday will be our 1-year house-iversary!). But it was a pretty sad existence, as evidenced by the bathroom literally falling apart around it. Yes, this is what that bathroom looked like when we bought the house. You’ll remember we later had to fully remove and rebuild that entire side of the house because it was sinking into the ground due to a completely failing foundation (!!!). You can read more about that process here.
During demo, our contractor moved it out into the bedroom, which is where it lived for over half a year as destruction and reconstruction went on around it.
Once that side of the house was all rebuilt, it was pretty exciting to picture the tub going back in there – this time on stable footing. Here I am back in January standing where the bathtub now sits. Remember John’s best Boomerang capture of all time?
We pretty much ignored the tub during the entire gutting/rebuilding process of the house. We did keep it covered with a piece of plywood so it didn’t get dinged up, but we put off making a plan to resuscitate it until we actually had a bathroom to put it into again.
And then came that exciting day when the bathroom tile was in, the grout was done, and we needed to think about getting this tub back into the bathroom. It was finally time to assess the tub situation to see if it was something we’d have to pay someone to refinish, or something we could tackle ourselves. The first thing I did was wipe everything down (with a spare grout sponge) just to see how stained the inside of the tub really was. A remarkable amount of grime came off, so it gave us hope that we could save it without having to hire someone to professionally paint the inside (we hear that can flake and peel off down the line, so getting it back to its original finish would beat a rental with a peeling/flaking tub in 5-10 years).
We originally worried there were rust stains (which wouldn’t be something we could scrub off – rust literally pits the glazing and creates a hole that needs to be filled and sanded and typically calls for a pro to fix) but upon further inspection we realized that some of this “rust” was actually rubbing off! See the white speckles on those brown streaks below? Turns out nothing was pitted, but there were just some really really bad hard water deposits on top of the tub… which meant if we could scrub them off, we’d find more of that original white finish under them!
So a few weeks later, once the plumber had moved the tub back into the bathroom, we arrived in Cape Charles armed with an array of cleaners – ready to show the tub who’s boss. This is what it looked like when we started:
First, we wanted to evaluate what was just surface grime and what was a legit stain. So we sprayed the whole thing down with 1-part white vinegar, 1-part water and used a little elbow grease (and a green scouring pad) to get all of the superficial gunk off.
It made a HUGE difference, although not enough that I would be willing to actually take a bath in there yet.
The next tool in our arsenal was a bottle of Bar Keeper’s Friend Soft Cleanser, which a few people had recommended to us for old tubs (I just happened to find it for like $1.50 at Ross). We followed the instructions of applying it to a damp surface, letting it sit, and then scrubbing it off. Results were not very good. Confidence levels majorly wavered at this point.
Undeterred, we decided to try a more generous application of BKF (is that what the kids are calling it these days?) and let it sit for much longer (like 15-20 minutes). In the meantime, we also used a heavy duty Magic Eraser on some of the other spots, which is another tip you guys shared for trying to clean up an old tub. It certainly helped, but was a bit slow-going. We burned through a couple of them pretty quickly, but things were starting to look better…
After the scrub had sat for about 20 minutes, we tackled it with a piece of fine grade steel wool (along with hearing that magic erasers and fine steel wool can work, we also have heard that a pumice stone can buff out small stains too – so that’s something else to try if you have the same job ahead of you – we just didn’t have one with us). I’m not sure if it was the cleanser or the steel wool, but we finally started to see some noticeable progress.
It still required A LOT of elbow grease, but it was insanely satisfying to see those rust streaks dissipating. We also very gently scraped it in some parts with the dulled tip of our multi-tool. I didn’t take a picture because I didn’t want to necessarily recommend it since it can etch/scratch your tub which is NOT GOOD, but we checked frequently to make sure we weren’t scratching ours, and it was helpful in chipping off some large chunks of rust-covered hard water stains.
The final results are not flawless, but we are more than satisfied with how it looks. All the rusty looking rings you see below will be covered by a new drain, faucet and spigot once they’re installed, so aside from a few slight imperfections in the white interior finish, she’s gonna look pretty dang good. I’m officially more than willing to plop my bod down in there for a good soak. Just picture me in there wearing a black turtleneck for modesty reasons.
This feels like a good moment for a before and after. Again, this is all from just cleaning – no actual refinishing or reglazing went on with the inside. So we’re glad that there should be no issues with bubbling or peeling paint since we were able to restore the original finish of the tub. Those few sentences don’t adequately capture how elated I am, so I’ll add this: ALL THE JAZZ HANDS!
Now let’s talk about restoring the outside, because what good is a tidy interior if the exterior looks ready for a horror movie?
Our first step was to sand it down, mostly just to get all of the already flaking paint off so we could have a relatively smooth surface to paint. NOTE: always test old tubs for lead paint! Many have it, which is extremely dangerous, especially if kids will be bathing in them. We were thrilled to find out ours was clean- most likely since the outside was painted sometime after lead was phased out and since the inside had never been reglazed.
First we used some coarse sanding blocks to scrub all of the exterior by hand, which was slow going, but definitely knocked a bunch of old dry paint flakes to the ground. John had also bought this rust-removing drill attachment while we were at the store and it turned out to be the perfect tool for the job. It knocked off even more of the loosest parts of the old finish in no time. NOTE NUMBER TWO: we were both wearing heavy-duty lead paint removal masks during all this sanding just to be safe because tons of dust flies and even though it checked out to be lead free, we didn’t want to be inhaling a ton of tiny dust particles anyway, so you’ll catch a glimpse of those later in the post.
After a pass with the drill, we went over by hand with medium and then fine-grit sanding blocks to smooth it out a bit more. It would’ve taken us hours to get everything down to the original finish, but in about 20 minutes we got it down to a smooth-to-the-touch finish which is good enough. You just want a nice flake-free base for some rust-blocking primer and paint to adhere to without worrying it’ll flake and pop off down the line (primer & paint are generally only as secure as their base – so make sure that’s not crumbling).
After a wipe down with a clean towel, we were ready to prime. Based on a deep and meaningful conversation with the pro at our local paint desk, we chose this oil-based Clean Metal Primer to do the job. We obviously wanted something that not only covered the existing rust but helped prevent more – plus it would make the whole thing ready for paint that would last.
It’s very thin (read: drippy) so make sure your floors are well protected! We used small foam rollers to cover most of the large surfaces, and then a cheap chip brush to get under the lip and around the actual clawfeet. It’s also pretty stinky, so we opened every window, put on all the fans, and kept our masks on for this step too.
There was a moment when we were watching the primer dry where we considered just painting it white. It was so refreshing to see it all clean and “new” looking that we were very tempted. However, the room itself is very white (white floor tiles, white trim, white ceilings, white shower tile, and white inside the tub), so we thought a darker accent in the space would actually be really nice to break things up. Plus, the interior finish is a tiny bit off-white (you can sort of tell in the photo below), so matching the outside exactly would’ve made the whole thing a bit creamier than we wanted (which might have clashed with the bright white floor tiles). With all of those factors urging us to go deeper and more dramatic with the outside of this tub, we considered 45,731 paint swatches (just kidding, it was only 45,721).
You probably spotted some of our contenders a few photos up. We considered a whole range of colors for the outside of the tub, but we landed on Riverway by Sherwin-Williams because it was a pretty deep blue with a heavy dose of gray and a hint of green. All of the straight taupes or grays felt a little too boring for a room with such a playful floor pattern, and we wanted to go noticeably darker than the little accent tiles in the floor so it didn’t look like we were trying to match it or skew too “baby blue” everywhere. Also, ignore how dirty these tiles look. They have since been scrubbed within an inch of their life.
After choosing that color, we actually had to have it color matched at Lowe’s in this Anti-Rust Armor paint since it came so highly recommended from the paint pro we chatted with (it’s moisture and stain resistant and has some additional rust prevention built into it – so they thought it was the best bet for our tub holding up longterm). The literal description online says its great for “appliances, playground equipment, mailboxes, and tanks.” I know they probably mean things like propane tanks, but I got a good laugh imagining someone painting a giant military tank by hand with this stuff.
Oh and this paint was also pretty stinky (hence the masks we donned again for this step) but it went on much thicker than the primer did. Once again we used small foam rollers for most of it, and then we used a brush meant specifically for oil-based paints to get between the toes. Basically we gave our tub a pedicure.
A few people have asked why we chose to make the feet the same color, rather than accenting them with a white, silver, or gold finish. We just looked at all of our inspiration photos of clawfoot tubs (because you know I’ve pinned like ten million since we bought this house) and we liked the two-tone look better than a three-tone effect. That’s definitely something you can go for if you like that extra foot-bling though! It can look really cool too.
You can tell in these photos that the outside isn’t perfectly smooth – you can still see the subtle topography of the old finishes beneath the fresh coat of blue. We’re actually kinda happy that it will feel like a tub that has been in this house for decades instead of some new replica that we brought in, so we’re totally cool with that dappled texture – and the glossy shine from the fresh paint is a nice counterpart.
Dappled dots or not, it’s certainly a huge improvement! So for around $50 and a fair amount of sweat, we got something that looks pretty darn close to this Rejuvenation clawfoot tub that retails for $3,300!
I’m gonna hold off on sharing any more “afters” for now, mainly because we haven’t taken any. But late last week our plumber came back to install the faucet and connect the tub (and remove the cardboard!) so word from him is that it’s ready for use! We have to skip our weekly visit since the floors are being sealed and need time to cure before anyone walks on them, so we’re just over here holding our breath until we can go back over to the house and see the tub all hooked up (and the floors all refinished). You know I’ll take like ten million pictures for you guys, so stay tuned!
Psst – Wanna read more about this beach house rehab project of ours? Click here to see everything we’ve done for the past year to get it to this point!
*This post contains affiliate links*
The post How To Refinish An Old Clawfoot Tub appeared first on Young House Love.
How To Refinish An Old Clawfoot Tub published first on http://ift.tt/2r6hzQy
0 notes
Text
How To Refinish An Old Clawfoot Tub
We’ve gotten A LOT of questions about how we’ve rescued the clawfoot tub at our beach house, so let’s just dive right into what worked (and what didn’t) and how we nursed this baby back to life.
The tub existed in the house when we bought it last October (Saturday will be our 1-year house-iversary!). But it was a pretty sad existence, as evidenced by the bathroom literally falling apart around it. Yes, this is what that bathroom looked like when we bought the house. You’ll remember we later had to fully remove and rebuild that entire side of the house because it was sinking into the ground due to a completely failing foundation (!!!). You can read more about that process here.
During demo, our contractor moved it out into the bedroom, which is where it lived for over half a year as destruction and reconstruction went on around it.
Once that side of the house was all rebuilt, it was pretty exciting to picture the tub going back in there – this time on stable footing. Here I am back in January standing where the bathtub now sits. Remember John’s best Boomerang capture of all time?
We pretty much ignored the tub during the entire gutting/rebuilding process of the house. We did keep it covered with a piece of plywood so it didn’t get dinged up, but we put off making a plan to resuscitate it until we actually had a bathroom to put it into again.
And then came that exciting day when the bathroom tile was in, the grout was done, and we needed to think about getting this tub back into the bathroom. It was finally time to assess the tub situation to see if it was something we’d have to pay someone to refinish, or something we could tackle ourselves. The first thing I did was wipe everything down (with a spare grout sponge) just to see how stained the inside of the tub really was. A remarkable amount of grime came off, so it gave us hope that we could save it without having to hire someone to professionally paint the inside (we hear that can flake and peel off down the line, so getting it back to its original finish would beat a rental with a peeling/flaking tub in 5-10 years).
We originally worried there were rust stains (which wouldn’t be something we could scrub off – rust literally pits the glazing and creates a hole that needs to be filled and sanded and typically calls for a pro to fix) but upon further inspection we realized that some of this “rust” was actually rubbing off! See the white speckles on those brown streaks below? Turns out nothing was pitted, but there were just some really really bad hard water deposits on top of the tub… which meant if we could scrub them off, we’d find more of that original white finish under them!
So a few weeks later, once the plumber had moved the tub back into the bathroom, we arrived in Cape Charles armed with an array of cleaners – ready to show the tub who’s boss. This is what it looked like when we started:
First, we wanted to evaluate what was just surface grime and what was a legit stain. So we sprayed the whole thing down with 1-part white vinegar, 1-part water and used a little elbow grease (and a green scouring pad) to get all of the superficial gunk off.
It made a HUGE difference, although not enough that I would be willing to actually take a bath in there yet.
The next tool in our arsenal was a bottle of Bar Keeper’s Friend Soft Cleanser, which a few people had recommended to us for old tubs (I just happened to find it for like $1.50 at Ross). We followed the instructions of applying it to a damp surface, letting it sit, and then scrubbing it off. Results were not very good. Confidence levels majorly wavered at this point.
Undeterred, we decided to try a more generous application of BKF (is that what the kids are calling it these days?) and let it sit for much longer (like 15-20 minutes). In the meantime, we also used a heavy duty Magic Eraser on some of the other spots, which is another tip you guys shared for trying to clean up an old tub. It certainly helped, but was a bit slow-going. We burned through a couple of them pretty quickly, but things were starting to look better…
After the scrub had sat for about 20 minutes, we tackled it with a piece of fine grade steel wool (along with hearing that magic erasers and fine steel wool can work, we also have heard that a pumice stone can buff out small stains too – so that’s something else to try if you have the same job ahead of you – we just didn’t have one with us). I’m not sure if it was the cleanser or the steel wool, but we finally started to see some noticeable progress.
It still required A LOT of elbow grease, but it was insanely satisfying to see those rust streaks dissipating. We also very gently scraped it in some parts with the dulled tip of our multi-tool. I didn’t take a picture because I didn’t want to necessarily recommend it since it can etch/scratch your tub which is NOT GOOD, but we checked frequently to make sure we weren’t scratching ours, and it was helpful in chipping off some large chunks of rust-covered hard water stains.
The final results are not flawless, but we are more than satisfied with how it looks. All the rusty looking rings you see below will be covered by a new drain, faucet and spigot once they’re installed, so aside from a few slight imperfections in the white interior finish, she’s gonna look pretty dang good. I’m officially more than willing to plop my bod down in there for a good soak. Just picture me in there wearing a black turtleneck for modesty reasons.
This feels like a good moment for a before and after. Again, this is all from just cleaning – no actual refinishing or reglazing went on with the inside. So we’re glad that there should be no issues with bubbling or peeling paint since we were able to restore the original finish of the tub. Those few sentences don’t adequately capture how elated I am, so I’ll add this: ALL THE JAZZ HANDS!
Now let’s talk about restoring the outside, because what good is a tidy interior if the exterior looks ready for a horror movie?
Our first step was to sand it down, mostly just to get all of the already flaking paint off so we could have a relatively smooth surface to paint. NOTE: always test old tubs for lead paint! Many have it, which is extremely dangerous, especially if kids will be bathing in them. We were thrilled to find out ours was clean- most likely since the outside was painted sometime after lead was phased out and since the inside had never been reglazed.
First we used some coarse sanding blocks to scrub all of the exterior by hand, which was slow going, but definitely knocked a bunch of old dry paint flakes to the ground. John had also bought this rust-removing drill attachment while we were at the store and it turned out to be the perfect tool for the job. It knocked off even more of the loosest parts of the old finish in no time. NOTE NUMBER TWO: we were both wearing heavy-duty lead paint removal masks during all this sanding just to be safe because tons of dust flies and even though it checked out to be lead free, we didn’t want to be inhaling a ton of tiny dust particles anyway, so you’ll catch a glimpse of those later in the post.
After a pass with the drill, we went over by hand with medium and then fine-grit sanding blocks to smooth it out a bit more. It would’ve taken us hours to get everything down to the original finish, but in about 20 minutes we got it down to a smooth-to-the-touch finish which is good enough. You just want a nice flake-free base for some rust-blocking primer and paint to adhere to without worrying it’ll flake and pop off down the line (primer & paint are generally only as secure as their base – so make sure that’s not crumbling).
After a wipe down with a clean towel, we were ready to prime. Based on a deep and meaningful conversation with the pro at our local paint desk, we chose this oil-based Clean Metal Primer to do the job. We obviously wanted something that not only covered the existing rust but helped prevent more – plus it would make the whole thing ready for paint that would last.
It’s very thin (read: drippy) so make sure your floors are well protected! We used small foam rollers to cover most of the large surfaces, and then a cheap chip brush to get under the lip and around the actual clawfeet. It’s also pretty stinky, so we opened every window, put on all the fans, and kept our masks on for this step too.
There was a moment when we were watching the primer dry where we considered just painting it white. It was so refreshing to see it all clean and “new” looking that we were very tempted. However, the room itself is very white (white floor tiles, white trim, white ceilings, white shower tile, and white inside the tub), so we thought a darker accent in the space would actually be really nice to break things up. Plus, the interior finish is a tiny bit off-white (you can sort of tell in the photo below), so matching the outside exactly would’ve made the whole thing a bit creamier than we wanted (which might have clashed with the bright white floor tiles). With all of those factors urging us to go deeper and more dramatic with the outside of this tub, we considered 45,731 paint swatches (just kidding, it was only 45,721).
You probably spotted some of our contenders a few photos up. We considered a whole range of colors for the outside of the tub, but we landed on Riverway by Sherwin-Williams because it was a pretty deep blue with a heavy dose of gray and a hint of green. All of the straight taupes or grays felt a little too boring for a room with such a playful floor pattern, and we wanted to go noticeably darker than the little accent tiles in the floor so it didn’t look like we were trying to match it or skew too “baby blue” everywhere. Also, ignore how dirty these tiles look. They have since been scrubbed within an inch of their life.
After choosing that color, we actually had to have it color matched at Lowe’s in this Anti-Rust Armor paint since it came so highly recommended from the paint pro we chatted with (it’s moisture and stain resistant and has some additional rust prevention built into it – so they thought it was the best bet for our tub holding up longterm). The literal description online says its great for “appliances, playground equipment, mailboxes, and tanks.” I know they probably mean things like propane tanks, but I got a good laugh imagining someone painting a giant military tank by hand with this stuff.
Oh and this paint was also pretty stinky (hence the masks we donned again for this step) but it went on much thicker than the primer did. Once again we used small foam rollers for most of it, and then we used a brush meant specifically for oil-based paints to get between the toes. Basically we gave our tub a pedicure.
A few people have asked why we chose to make the feet the same color, rather than accenting them with a white, silver, or gold finish. We just looked at all of our inspiration photos of clawfoot tubs (because you know I’ve pinned like ten million since we bought this house) and we liked the two-tone look better than a three-tone effect. That’s definitely something you can go for if you like that extra foot-bling though! It can look really cool too.
You can tell in these photos that the outside isn’t perfectly smooth – you can still see the subtle topography of the old finishes beneath the fresh coat of blue. We’re actually kinda happy that it will feel like a tub that has been in this house for decades instead of some new replica that we brought in, so we’re totally cool with that dappled texture – and the glossy shine from the fresh paint is a nice counterpart.
Dappled dots or not, it’s certainly a huge improvement! So for around $50 and a fair amount of sweat, we got something that looks pretty darn close to this Rejuvenation clawfoot tub that retails for $3,300!
I’m gonna hold off on sharing any more “afters” for now, mainly because we haven’t taken any. But late last week our plumber came back to install the faucet and connect the tub (and remove the cardboard!) so word from him is that it’s ready for use! We have to skip our weekly visit since the floors are being sealed and need time to cure before anyone walks on them, so we’re just over here holding our breath until we can go back over to the house and see the tub all hooked up (and the floors all refinished). You know I’ll take like ten million pictures for you guys, so stay tuned!
Psst – Wanna read more about this beach house rehab project of ours? Click here to see everything we’ve done for the past year to get it to this point!
*This post contains affiliate links*
The post How To Refinish An Old Clawfoot Tub appeared first on Young House Love.
How To Refinish An Old Clawfoot Tub published first on http://ift.tt/2qCHnUt
0 notes
Text
How To Refinish An Old Clawfoot Tub
We’ve gotten A LOT of questions about how we’ve rescued the clawfoot tub at our beach house, so let’s just dive right into what worked (and what didn’t) and how we nursed this baby back to life.
The tub existed in the house when we bought it last October (Saturday will be our 1-year house-iversary!). But it was a pretty sad existence, as evidenced by the bathroom literally falling apart around it. Yes, this is what that bathroom looked like when we bought the house. You’ll remember we later had to fully remove and rebuild that entire side of the house because it was sinking into the ground due to a completely failing foundation (!!!). You can read more about that process here.
During demo, our contractor moved it out into the bedroom, which is where it lived for over half a year as destruction and reconstruction went on around it.
Once that side of the house was all rebuilt, it was pretty exciting to picture the tub going back in there – this time on stable footing. Here I am back in January standing where the bathtub now sits. Remember John’s best Boomerang capture of all time?
We pretty much ignored the tub during the entire gutting/rebuilding process of the house. We did keep it covered with a piece of plywood so it didn’t get dinged up, but we put off making a plan to resuscitate it until we actually had a bathroom to put it into again.
And then came that exciting day when the bathroom tile was in, the grout was done, and we needed to think about getting this tub back into the bathroom. It was finally time to assess the tub situation to see if it was something we’d have to pay someone to refinish, or something we could tackle ourselves. The first thing I did was wipe everything down (with a spare grout sponge) just to see how stained the inside of the tub really was. A remarkable amount of grime came off, so it gave us hope that we could save it without having to hire someone to professionally paint the inside (we hear that can flake and peel off down the line, so getting it back to its original finish would beat a rental with a peeling/flaking tub in 5-10 years).
We originally worried there were rust stains (which wouldn’t be something we could scrub off – rust literally pits the glazing and creates a hole that needs to be filled and sanded and typically calls for a pro to fix) but upon further inspection we realized that some of this “rust” was actually rubbing off! See the white speckles on those brown streaks below? Turns out nothing was pitted, but there were just some really really bad hard water deposits on top of the tub… which meant if we could scrub them off, we’d find more of that original white finish under them!
So a few weeks later, once the plumber had moved the tub back into the bathroom, we arrived in Cape Charles armed with an array of cleaners – ready to show the tub who’s boss. This is what it looked like when we started:
First, we wanted to evaluate what was just surface grime and what was a legit stain. So we sprayed the whole thing down with 1-part white vinegar, 1-part water and used a little elbow grease (and a green scouring pad) to get all of the superficial gunk off.
It made a HUGE difference, although not enough that I would be willing to actually take a bath in there yet.
The next tool in our arsenal was a bottle of Bar Keeper’s Friend Soft Cleanser, which a few people had recommended to us for old tubs (I just happened to find it for like $1.50 at Ross). We followed the instructions of applying it to a damp surface, letting it sit, and then scrubbing it off. Results were not very good. Confidence levels majorly wavered at this point.
Undeterred, we decided to try a more generous application of BKF (is that what the kids are calling it these days?) and let it sit for much longer (like 15-20 minutes). In the meantime, we also used a heavy duty Magic Eraser on some of the other spots, which is another tip you guys shared for trying to clean up an old tub. It certainly helped, but was a bit slow-going. We burned through a couple of them pretty quickly, but things were starting to look better…
After the scrub had sat for about 20 minutes, we tackled it with a piece of fine grade steel wool (along with hearing that magic erasers and fine steel wool can work, we also have heard that a pumice stone can buff out small stains too – so that’s something else to try if you have the same job ahead of you – we just didn’t have one with us). I’m not sure if it was the cleanser or the steel wool, but we finally started to see some noticeable progress.
It still required A LOT of elbow grease, but it was insanely satisfying to see those rust streaks dissipating. We also very gently scraped it in some parts with the dulled tip of our multi-tool. I didn’t take a picture because I didn’t want to necessarily recommend it since it can etch/scratch your tub which is NOT GOOD, but we checked frequently to make sure we weren’t scratching ours, and it was helpful in chipping off some large chunks of rust-covered hard water stains.
The final results are not flawless, but we are more than satisfied with how it looks. All the rusty looking rings you see below will be covered by a new drain, faucet and spigot once they’re installed, so aside from a few slight imperfections in the white interior finish, she’s gonna look pretty dang good. I’m officially more than willing to plop my bod down in there for a good soak. Just picture me in there wearing a black turtleneck for modesty reasons.
This feels like a good moment for a before and after. Again, this is all from just cleaning – no actual refinishing or reglazing went on with the inside. So we’re glad that there should be no issues with bubbling or peeling paint since we were able to restore the original finish of the tub. Those few sentences don’t adequately capture how elated I am, so I’ll add this: ALL THE JAZZ HANDS!
Now let’s talk about restoring the outside, because what good is a tidy interior if the exterior looks ready for a horror movie?
Our first step was to sand it down, mostly just to get all of the already flaking paint off so we could have a relatively smooth surface to paint. NOTE: always test old tubs for lead paint! Many have it, which is extremely dangerous, especially if kids will be bathing in them. We were thrilled to find out ours was clean- most likely since the outside was painted sometime after lead was phased out and since the inside had never been reglazed.
First we used some coarse sanding blocks to scrub all of the exterior by hand, which was slow going, but definitely knocked a bunch of old dry paint flakes to the ground. John had also bought this rust-removing drill attachment while we were at the store and it turned out to be the perfect tool for the job. It knocked off even more of the loosest parts of the old finish in no time. NOTE NUMBER TWO: we were both wearing heavy-duty lead paint removal masks during all this sanding just to be safe because tons of dust flies and even though it checked out to be lead free, we didn’t want to be inhaling a ton of tiny dust particles anyway, so you’ll catch a glimpse of those later in the post.
After a pass with the drill, we went over by hand with medium and then fine-grit sanding blocks to smooth it out a bit more. It would’ve taken us hours to get everything down to the original finish, but in about 20 minutes we got it down to a smooth-to-the-touch finish which is good enough. You just want a nice flake-free base for some rust-blocking primer and paint to adhere to without worrying it’ll flake and pop off down the line (primer & paint are generally only as secure as their base – so make sure that’s not crumbling).
After a wipe down with a clean towel, we were ready to prime. Based on a deep and meaningful conversation with the pro at our local paint desk, we chose this oil-based Clean Metal Primer to do the job. We obviously wanted something that not only covered the existing rust but helped prevent more – plus it would make the whole thing ready for paint that would last.
It’s very thin (read: drippy) so make sure your floors are well protected! We used small foam rollers to cover most of the large surfaces, and then a cheap chip brush to get under the lip and around the actual clawfeet. It’s also pretty stinky, so we opened every window, put on all the fans, and kept our masks on for this step too.
There was a moment when we were watching the primer dry where we considered just painting it white. It was so refreshing to see it all clean and “new” looking that we were very tempted. However, the room itself is very white (white floor tiles, white trim, white ceilings, white shower tile, and white inside the tub), so we thought a darker accent in the space would actually be really nice to break things up. Plus, the interior finish is a tiny bit off-white (you can sort of tell in the photo below), so matching the outside exactly would’ve made the whole thing a bit creamier than we wanted (which might have clashed with the bright white floor tiles). With all of those factors urging us to go deeper and more dramatic with the outside of this tub, we considered 45,731 paint swatches (just kidding, it was only 45,721).
You probably spotted some of our contenders a few photos up. We considered a whole range of colors for the outside of the tub, but we landed on Riverway by Sherwin-Williams because it was a pretty deep blue with a heavy dose of gray and a hint of green. All of the straight taupes or grays felt a little too boring for a room with such a playful floor pattern, and we wanted to go noticeably darker than the little accent tiles in the floor so it didn’t look like we were trying to match it or skew too “baby blue” everywhere. Also, ignore how dirty these tiles look. They have since been scrubbed within an inch of their life.
After choosing that color, we actually had to have it color matched at Lowe’s in this Anti-Rust Armor paint since it came so highly recommended from the paint pro we chatted with (it’s moisture and stain resistant and has some additional rust prevention built into it – so they thought it was the best bet for our tub holding up longterm). The literal description online says its great for “appliances, playground equipment, mailboxes, and tanks.” I know they probably mean things like propane tanks, but I got a good laugh imagining someone painting a giant military tank by hand with this stuff.
Oh and this paint was also pretty stinky (hence the masks we donned again for this step) but it went on much thicker than the primer did. Once again we used small foam rollers for most of it, and then we used a brush meant specifically for oil-based paints to get between the toes. Basically we gave our tub a pedicure.
A few people have asked why we chose to make the feet the same color, rather than accenting them with a white, silver, or gold finish. We just looked at all of our inspiration photos of clawfoot tubs (because you know I’ve pinned like ten million since we bought this house) and we liked the two-tone look better than a three-tone effect. That’s definitely something you can go for if you like that extra foot-bling though! It can look really cool too.
You can tell in these photos that the outside isn’t perfectly smooth – you can still see the subtle topography of the old finishes beneath the fresh coat of blue. We’re actually kinda happy that it will feel like a tub that has been in this house for decades instead of some new replica that we brought in, so we’re totally cool with that dappled texture – and the glossy shine from the fresh paint is a nice counterpart.
Dappled dots or not, it’s certainly a huge improvement! So for around $50 and a fair amount of sweat, we got something that looks pretty darn close to this Rejuvenation clawfoot tub that retails for $3,300!
I’m gonna hold off on sharing any more “afters” for now, mainly because we haven’t taken any. But late last week our plumber came back to install the faucet and connect the tub (and remove the cardboard!) so word from him is that it’s ready for use! We have to skip our weekly visit since the floors are being sealed and need time to cure before anyone walks on them, so we’re just over here holding our breath until we can go back over to the house and see the tub all hooked up (and the floors all refinished). You know I’ll take like ten million pictures for you guys, so stay tuned!
Psst – Wanna read more about this beach house rehab project of ours? Click here to see everything we’ve done for the past year to get it to this point!
*This post contains affiliate links*
The post How To Refinish An Old Clawfoot Tub appeared first on Young House Love.
How To Refinish An Old Clawfoot Tub published first on http://ift.tt/2r6hzQy
0 notes
Last Seen Blogs

b17vitamins
B17 vitamins

vvespertina
Vespertina

ask-flipflop-blog
Ask the troubled veteran

palmettoshenanigans
Fox Mischief, Exy Chicanery, & Floozie Tomfoolery

catstheticzone
yet another aesthetic blog