
Last Seen Blogs

fuckyeahgoodomens
Fuck Yeah Good Omens

roxannawords
Rox

kimtiny
Amateur Lincolnist

wendykong6
WendyArtLand🦋
wendykong6
WendyArtLand🦋
Text
Instagram!
I’m on Instagram as js_kitchen_creations. Install the app to follow my photos and videos. https://www.instagram.com/invites/contact/?i=19qyqxth7cpew&utm_content=1kml0rf
Just a quick post, here is a link to my Instagram business page. On here I share every cake or creation I have made.
I share things I’ve sold, things I’ve made for the kids and things I have made with the kids.
Hope you come…
View On WordPress
0 notes
Text
Almost Two years later...
Almost Two years later…
It’s been almost two years since I last wrote on here. It hadn’t been that long since we had welcomed our youngest child, Indianna, to the fold.
Two years on things haven’t changed much, the main difference is that everyone is that much older.
Oh yeah, due to COVID19, we are now on Lockdown! However that will be a later post, for now I think a catch up is in order!
The last two years have…
View On WordPress
0 notes
Text
Since our last post in April we have welcomed baby number 4 into the fold!
Baby Indianna Willow was born at the start of June.
She was 10 days early after I was induced due to several occasions of reduced movements.
I’m grateful to Kicks Count and the work that they do to raise awareness of babies movements in the womb and to not be afraid to call your midwife or Antenatal unit if the baby’s movements have changed at all.
She is now 10 weeks old and growing so quickly. Her big brothers and sister absolutely adore her and I don’t think any of us could imagine life without her.
The bigs have been off school since the middle of July and have spent most of that time arguing! They love each other to bits but they know exactly how to wind each other up in spectacular fashion. They have spent almost every day outside playing with friends on the street. To be honest we have only seen them at meal times and even then they don’t want to come in to eat so picnics on the front garden have been a recurring theme.
Indianna Willow on the day she was born
All 4 of my monkeys, Indianna was 1 week old ❤
Skye and Indianna
Lucas and Indianna
Alexander and Indianna
Indianna at 10 weeks old
I will be back to posting again properly once everyone is back in school and the internet is working properly (It’s playing up again). I will be posting recipes again along with day to day goings on, including the birthdays that we have coming up.
We have the first birthday coming up in a month and it is once again Flamingo themed! I’ll leave it to you to work out whos birthday it is.
Until Next Time
x J x
We’re Back! Since our last post in April we have welcomed baby number 4 into the fold! Baby Indianna Willow was born at the start of June.
0 notes
Text
I have been trying to write this post for a while now and every time I have started I have lost my flow and had to stop so I am sorry for the delay but here we go (Finally!). There has also been lots going on on the sidelines too but that’s a different post for a different day.
Skye’s Birthday!
In the last year we have gone from Princesses to Witches and Wizards. She still loves princesses but at the moment her main love is Harry Potter, Hermione Granger and Ron Weasley (And Ginny Weasley and Luna Lovegood too).
The Cake;
Her birthday cake this year was another big creation, mostly made of polystyrene cake dummies to create a display piece. However unlike last year one part of the cake was actually edible. I wanted to be able to play with the design of the cake and change things as I felt it was needed which I wouldn’t have been able to do if the whole thing was edible, I also knew that she would only be having a small party and there would be no need for the whole thing to be cake or it would just go to waste. Using the cake dummies allowed me time to do the other things that I was also doing that week and they also allow me to move them around without the fear that they will fall apart if over handled.
The bottom “tier” of the cake was actually 3 10″ square cake dummies that were 2″ deep, there were meant to have been 4 however the shop that I buy them from were having problems with their supplier and weren’t sure if they were going to have any more in in time so I changed my initial design which was no problem, if anything it probably looked more in proportion to the other two tiers.
I used the three separate dummies to create the look of 3 books that were mentioned in the Harry Potter books; “Hogwarts A History by Bathilda Bagshot”, “Magical Theory by Adalbert Waffling” and (my personal favourite) “Fantastic Beasts and Where To Find Them by Newt Scamander” Each one was individually covered with fondant which was done in pieces. I wrapped all four 2″ edges with white fondant, on three of them I added in lines to create the effect of pages of a book. Once I had done all three I left them to one side to set, I wanted them completely hard before I continued with the rest of the design. Whilst they were drying I coloured all of the fondant that I was going to need to create the front and back covers and the spine of the books, I made a pinky red, a deep blue and a dark green, I left these to develop in colour and set to work on the second tier.
To do the second tier I lightly coloured the fondant using a caramel colour. I only used a small amount to create a parchment colour, it was a dirty cream colour which I think worked well. To cover this one I covered the top of the cake first with a disk of fondant and then I wrapped a long piece of fondant around the cake and left a visible seam and a slight overlap on the fondant below. I also left a lip of fondant around the top of the cake and thinned it out using my fingers, for the first time ever I didn’t actually mind if this part of the fondant tore slightly as it was going to be made to look like the Marauders map, I left the top of the seam curled back a bit to make it appear as though the map could be opening. Once I had finished doing this I left that to set and continued with the books.
Annoyingly I didn’t get any photos of this section of the cake before I painted the details onto it which I am really disappointed about.
To complete the books I rolled out the fondant and cut it into squares, using just under half of each fondant for each square and then the remainder for the spine, though I didn’t roll that out at the same time as the squares as I didn’t want that to set up before I added it to the dummy.
Once the “covers” were slightly set I attached them to the dummies using piping gel. I used this over water this time as I wanted to make sure that everything stuck down fully and set up quickly and this was perfect. I then rolled out the “spine” of the books and attached them to the dummies too, I made sure that the “spine” joined up with the covers of the books properly on both sides (though in reality only one side needed to be perfect as there would only be one side that would be seen). I did the same on all three books and then left them to one side to set up a little before I stacked them all up, again I used piping gel to stick the three layers together. This was then left to dry for a few hours to ensure that nothing would move when I started to paint on the “spines”.
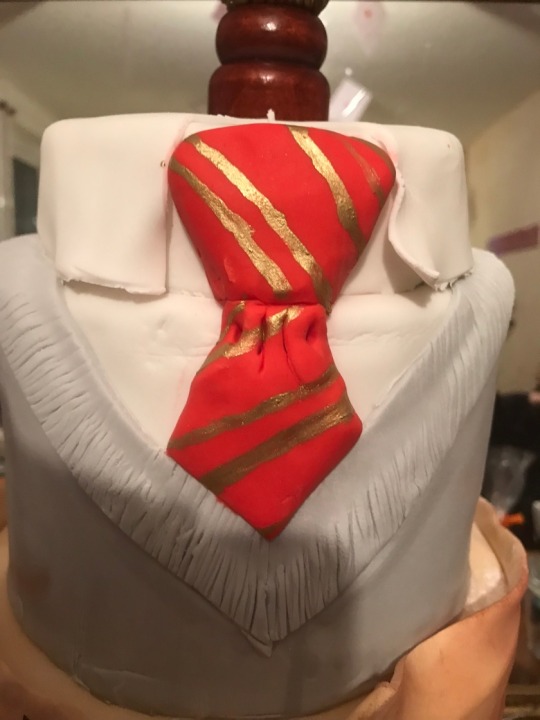
Whist the bottom and middle tiers dried I started on the top tier. The top tier was my rich chocolate cake filled and covered in a dark chocolate ganache. I used ganache because it smooths out better than butter icing, it gives a better surface to work with and I also find that it sets up better than butter icing which gives me longer to play with my design if I feel it’s not going quite to plan.
I made 5 layers of chocolate cake in my 6 inch round cake pan (this took a bit of time as I only have two but I was also baking other bits at the same time so it worked well in that respect). Once they were all cooked and cooled I stacked, filled and crumb coated 4 of the 5 layers. The fifth layer I cut down slightly, as I wanted it to be the collar of the shirt, once I had the size I was looking for I crumb coated it and stuck it in the fridge with the rest of the cake to chill whilst I coloured the rest of the fondant that I was going to need. I made up grey and a deep red.
After 20 or so minutes I took the cakes out of the fridge and gave them another coat of ganache and then set them back in the fridge for another 20 minutes. When they were fully set I took them out of the fridge and covered them in the fondant. First I covered the smallest cake with a thin layer of white before adding another layer which I shaped into a collar. Using the red fondant I made a tie and attached the knot of the tie onto this layer of cake. I then covered the larger cake with white, the shirt, then I added the layer of grey fondant which had a hole cut out of the top of it so that I could work it into the shape of the neck of the jumper. Once I was happy with the shape of the neck I was then able to add the collar of the shirt onto the cake. Once this was in place I then attached the rest of the red tie. Once I was happy with the placement of everything I added more definition to the collar and painted gold stripes onto the tie. I then left this to dry whilst I added the finishing touches to the middle and bottom tiers.
For the bottom tier I hand painted the title of the books and the authors using gold and a little lemon juice. I tried my best to change the writing font on each one but it was difficult as I found that my hand was really shaking when doing this (I have no idea why but it was).
I then moved onto the middle tier and on this I hand painted “I solemnly swear that I am Up to no good” and “Messrs Moony, Wormtail, Padfoot and Prongs proudly present the Marauders Map” I then added little footprints and trails around the cake with name tags (including Skye, Alex, Lucas, Crookshanks and Hetty which Skye was thrilled with).
It wasn’t until Skye was in school that day that I stacked the whole thing, added the Golden Snitch topper and Talking Sorting Hat and moved it into the living room where the party was happening so the first time she saw the cake was when she came home with her friends. She was over the moon with it. Though it wasn’t until after Skye had seen the cake that I realised that I hadn’t actually added on a cape to the top tier like I was meant to. Thankfully Skye didn’t seem bothered and didn’t actually say anything about it.
To take into school I made “sorting cupcakes”. I made a large batch of chocolate cupcakes and cored out the middle and then filled them with vanilla butter icing in either Red (for Gryffindor), Yellow (for Hufflepuff), Blue (for Ravenclaw) or Green (for Slytherin) and topped with chocolate butter icing. As I had some gold left over from the tie I splattered some over the top of the cupcakes to give them a bit of a shimmer.
I finished the cupcakes off with an edible wafer paper Harry Potter topped that I had bought off Amazon. I made sure that I had enough so that they could be given to the girls that came to the party too (so that we didn’t have to cut the cake until all of the family had come over and seen the cake too). I made sure that I put in an equal number of each house into the cupcake boxes that went to school and that I saved for after the party. (I did this before I added the chocolate butter icing to the top of the cakes so I knew how many of each I had).
Party Prep!!
I wanted to make invitations that were similar to the acceptance letter to Hogwarts that Harry Potter receives. I couldn’t print them out as our printer was out of ink and I actually enjoy writing things by hand so I went out and bought a new fountain pen (one of my favourite types of pens to use) and I bought green ink. I also bought a wax seal set with the Hogwarts logo on.
To make the invitations I used A4 Card which I measured out into three sections, as the one piece of card was going to double up as the invitation and the envelope. On the top third I cut a triangle to make the envelope point, I did this with all 10 invitations. To create the old parchment paper effect I used a tea bag to stain one side of the card. I used a card that was thick enough to be stained on one side and not soak through onto the other which left me with two different colours this is exactly what I was after.
I then wrote each invitation as though it was the acceptance letter that was written by Professor McGonagall to Harry. I did change a few things, instead of saying HeadMaster Albus Dumbledore order of Merlin etc I wrote HeadMistress Jade Ward and our address and my contact number.
Instead of saying that each child had been accepted into Hogwarts I wrote “We are pleased to inform you that you have been invited to the Party of Skye…. The party will start on…… at….. We Await your Owl by No later than….. Yours Sincerely Minerva McGonagall, Deputy Headmistress”
On the front of the “envelope” Instead of Mr H Potter I wrote Miss…. 4 Privet Drive, Little Whinging, Surrey and then using either red or gold wax I sealed each of the envelopes using my amazing stamp.
The wax stamp has to be my new favourite toy, it was great fun to use and the children all enjoyed watching me do it and can’t wait to have a go themselves (I didn’t want them using my lovely wax to play with!)
To decorate the house I made floating “envelopes” with the various places that the letters were sent to in Harry Potter And The Philosopher’s Stone. Unlike in the movie where Harry receives letters in Privet Drive and then from Hagrid in the Hut-On-The-Rock in the book he receives them addressed to 4 locations (two of which are in Privet Drive).
I made them in a similar way to the invitations, I used the same card and the same pen and ink however I only used half a sheet of card and I left it flat, I didn’t want them to be too heavy to hang from the ceiling. I can’t actually remember how many I did but they covered the living room ceiling and went into the Hallway too. I didn’t use the wax seal on these either as I was worried that any extra weight would be too much.
We also had some flying keys hung by the living room door (again no photos as they weren’t up when I was taking the photos of the letters). The keys were actually by my younger sister as a Christmas present for me, they are still hung up as I love them so much.
My Beautiful Harry Potter Mad little girl had an amazing 8th Birthday and loved every moment of it! I am already wondering what she will want next year, though for now I am enjoying my break from baking, until September when the birthdays start all over again!
Until Next Time
x J x
Skye’s Birthday 2018 I have been trying to write this post for a while now and every time I have started I have lost my flow and had to stop so I am sorry for the delay but here we go (Finally!).
0 notes
Text
Going through my blog posts I realised that I never actually finished a post I was doing about Lucas’ birthday! I came across a partially written one in my saved section but it was actually just notes!
So I am going to take a rewind time to last September when Lucas turned 6(!) and had a flamingo themed birthday!
If there is something that Lucas loves more than Flamingos (and Trolls) then I am yet to come across it! He has had a fascination with them for a very long time, since the time that he went to the Wetlands centre in Llanelli and he saw them there.
For his birthday I made the invitations for him as I couldn’t find any with flamingos on that weren’t going to cost me an arm and a leg.
I drew out a basic silhouette of a flamingo body and used that to create a stencil that I could use to paint flamingos onto each invitation, to paint them on I actually used a sponge to give them a bit more texture as I didn’t actually want them to be flat. I then liberally sprinkled each invite with glitter to create sparkly flamingos, I did it whilst the paint was still tacky so that the glitter would stick to the pain. Whilst I was waiting for the invites to dry, so I could add-on the legs, I started on a canvas that I was going to give him for his birthday.
I used a dry paintbrush (quite a rough bristled one) and dipped it lightly into a yellow/gold paint and brushed it lightly over the canvas in a few places, once I was happy with how that looked I did exactly the same using a red paint to create a sunset effect. I was really happy with how it turned out and it was practically dry as soon as I was finished doing it. I then used the same technique I used on the invites on the canvas, again liberally sprinkled with glitter once I had finished.
I left them to dry for an hour or so so that they would be fully dry by the time I went to do the legs and writing that I was adding to the top of the invites.
To do the legs I used a thin paint brush and a touch of black paint. I used a metallic gold pen to write “Birthday Party!” at the top of the invites. I probably should have done a faint line to ensure my writing was straight but at the time I really didn’t think about it.
Lucas absolutely adored the invitations, so much so that we actually ended up keeping a spare one for him so that he could have one for himself (good job I made more than I needed).
When I bought the canvas that I used I bought it as a pack of three, initially I was going to use them all to paint for around the house (and I do have a light sketch drawn out on the largest one of them but I am not overly happy with the idea now so will have to change it) however I decided to use two of them for Lucas.
The smallest canvas had multiple flamingos on it and the medium-sized canvas had one large flamingo on it.
For that flamingo I sketched out the shape I wanted straight onto the canvas and then painted over the sketch.
For all of the painting I used acrylic paints as I find them easiest to get hold of and so nice to use.
It took me a couple of days to get it to look exactly like I wanted it to. For the background I used the same effect as I had on the other canvass so it kept them linked. I didn’t use any glitter on this canvas though as I didn’t feel that it was needed as the flamingo was quite large and quite a statement as it was. I did one coat of paint initially and left it to dry, when I went back to it do continue with the details I decided that the flamingo looked too flat so I added more paint on thicker in places. I felt that it gave the flamingo a texture that reminded me of feathers.
His birthday cake and cupcakes followed a similar colour scheme to the canvases that I painted just with hints of gold.
Instead of making a flamingo I decided to buy a personalised cake topper. I also bought wafer paper cupcake toppers for the cupcakes I made for him to take into school, sadly I forgot to take any photos of the cupcakes with the toppers on as I didn’t add them until 10 minutes before I took the children to school so that they didn’t wilt at all.
For the colours on the cupcakes I used white, pink, red and yellow to create a sunset effect. I added all of the colours to one piping bag and using a 1M piping nozzle I piped a “rose” swirl (which has become my favourite swirl to use as it doesn’t put too much butter icing on top of the cupcakes). Once all of the cupcakes were piped I used some rolkem gold powder rejuvenated with some water (usually I would have used a clear alcohol such as vodka but as these were for children I just used water) and with a paintbrush I splattered it onto the cupcakes.
The more cupcakes I piped the more blended the colours became and some became more of a pastel tone rather than the vibrant colours that I had started out with.
His actual birthday cake was a rich chocolate mud cake using the recipe from “My Cupcake Addiction”, covered in vanilla butter icing using the same colours as the cupcakes. I wanted to create a watercolour effect on the cake but I used too much of the coloured butter icing, however I love how the cake turned out in the end even if it wasn’t how I first imagined it would.
To do the cake, I first filled and covered the it with white butter icing to create a “blank canvas”, I then added splodges of the chosen coloured butter icing around the cake. Using a cake scraper and a warm pallet knife I spread the butter icing over the whole cake, cleaning off the scraper and pallet knife after each use.
Once I was happy with the finished effect I added some blue food colouring to some chopped white chocolate and then melted it, I did this so that I could make sure that the chocolate didn’t seize when I added the food colouring (though I have found that the Sugarflair Pro Gels don’t generally seize when added to chocolate but I didn’t want to risk it). I then poured it on top of the cake and let it drizzle down the sides of the cake. Once the chocolate had set I added on flakes of real gold leaf, I should have added them beforehand but I hadn’t actually planned how to do it, so hindsight is a wonderful thing.
To finish the cake off I added the personalised cake topped that I had ordered. I could have had any colour flamingo and writing but I chose to stick to a pink flamingo with gold writing. I don’t think Lucas would have been happy if the flamingo had been any other colour in all honesty and the gold writing just tied in with the rest of the design.
Lucas’ party was held at home with a handful of friends which was lovely. I much prefer doing smaller parties to big ones, though I do love doing a big party too. He had a fantastic time with his friends. Once all of his friends left all of the family came over to celebrate with him too. He had a wonderful day and was spoilt rotten (as children always are), he is already talking about his birthday this September and he keeps changing his mind between a bunny rabbit birthday or a second flamingo birthday! He seems to forget that there are several months between now and then and he may very well change his mind (though actually I doubt that it will change very much), If he sticks with the flamingo theme again I don’t think there will be much that I can get him as I think we have bought almost everything flamingo for him as it is.
He has also had flamingo cushions and a flamingo toy made for him by my nan which he sleeps with every night.
Fingers crossed he chooses something easier for us to buy him this year (I doubt that he will but I will keep my fingers crossed).
Keep a look out this week coming for my blogs on Skye’s birthday, however they may not be up until the end of the week so there could be some silence from me until all my work is completed (I have a few other bits to do this week which I will also blog about once everything is done).
Until Next Time
x J x
Flamingo’s! Going through my blog posts I realised that I never actually finished a post I was doing about Lucas' birthday!
0 notes
Text
It is that time of year again where I am planning Skye’s birthday party.
This year she is really into the magical world created by the wonderful J.K.Rowling, Harry Potter!
This is the best thing ever in my mind as I finally have someone in my household that shares my love of the books.
As she loves Harry Potter so much I have been searching primark for any of their Harry Potter clothes for children for her, along with any accessories I could get hold of.
I have also made her invites for the party. I have made the invites in the style of the acceptance letter that Harry Potter receives in the Philosopher’s Stone I have just changed the wording to fit around an invitation.
Hogwarts School Of
Witchcraft and Wizardry
Headmistress; Jade
(of …….(address)……)
Dear Miss ………
We are pleased to inform you that you
have been invited to the party
of Skye.
The Party Begins On February…. at
3:20 at Skye’s House (at the above address)
and will finish at 6pm.
We await your owl (or text) by
No later than February…
Yours sincerely
Minerva McGonagal
Deputy Headmistress
Each of the invites was handwritten with a fountain pen in green ink, which I absolutely loved doing. I love using a fountain pen when I can and it was really nice being able to do it in a different colour to black or blue.
I also managed to get hold of a wax stamp set with the Hogwarts Crest on so I could seal each of the invitations.
For the invitations I used a piece of card folded into three and the top cut into a point, I did this so that I could turn one side into the letter/invitation and the other side could be the “envelope”.
On the side that would be the invitation I stained the card with tea to give it a more aged effect, though the card wasn’t very thick it was thick enough to not allow the tea stain to seep through to the other side so one side stayed white.
On the envelope I put;
Miss……
The cupboard Under The Stairs
4 Privet Drive
Little Whinging
Surrey.
Once all of the writing was dry I then sealed them with the wax stamp. The majority of the “letters” were sealed with a red wax but as I was starting to run out of the red I sealed some with gold wax which also looked really good.
I really hope that the children, and their parents, really like the invitations as I had such a good time making them.
The only part of making them that I found tedious in any way was drawing the faint lines to ensure that my writing didn’t end up on a slant. For some reason that made my hand ache more than the writing did. I could spend hours writing though as it’s something I actually enjoy doing (I think my GCSE papers might have been proof of that as I just kept writing until they told us to put our pens down).
Now I have around a week to start getting the little bits and pieces made up, such as floating candles. I have the battery-powered tea lights it’s just getting everything else sorted that I have to do now.
Thanks to my lovely sister I already have some flying keys, she made them for me for christmas for my Christmas tree but I loved them so much I refused to pack them away with the christmas decorations. I need to find somewhere to hang them permanently.
I am still trying to work out what else I am going to do but I also have her cake to start on (most of it will be fake so that is one saving grace and it means I can get it done and out-of-the-way sooner rather than later).
I will be taking photos throughout the decorating of the birthday cake and once it is all complete I will be uploading a blog on how I decorated and put the cake together. I will also be making cupcakes to go with the cake which I will share photos of too so keep a look out at the end of next week/beginning of the week after for those.
Until Next Time
x J x
Party Planning It is that time of year again where I am planning Skye's birthday party. This year she is really into the magical world created by the wonderful J.K.Rowling, Harry Potter!
0 notes
Text
Another rainy day with the children and I decided to do more baking, this time with Alex, he had been watching tv for most of the day and I told him that he had to come away from the screen and help me in the kitchen. And that is just what he did, after he established that I wasn’t about to make him wash up all of the dishes once we had finished!
I decided to do a quick and easy bake with him, something that I knew that he would both enjoy making and enjoy eating once it was finished. A swiss roll, well it was more like a yule log but same technique.
For this cake I use a recipe from the Queen of Puddings Mary Berry! I came across it over christmas when it was exactly what I needed to make for an order.
For The Cake;
4 Large eggs
100g Caster Sugar
65g Self Raising Flour
40g Cocoa Powder
For The Butter Icing;
150g Room Temperature/Slightly Soft Butter (I used salted but you can use unsalted if you prefer)
450g Icing Sugar
40g Cocoa Powder
1tsp Vanilla
water, the amount used varies from time to time, add a tablespoon at a time until spreadable.
Method for the cake;
Preheat the oven to 200°c.
Grease a swiss roll tin well and line with grease proof paper or baking parchment.
4 Large Eggs
100g Caster Sugar
65g Self Raising Flour and 40g Cocoa powder
For the Sponge place the eggs and sugar together in a large bowl and using an electric handheld mixer beat until pale, light and frothy.
Sieve the flour and cocoa powder into the bowl and carefully fold into the egg mixture, the original recipe says to do so with a metal spoon but this time Alex and I used a silicone spatula and it worked just as well. Take care not to beat any of the air out of the mixture.
Pour the mixture into the lined tin and spread out into the corners.
Bake in the middle of the oven for 8-10 minutes until the sides are shrinking away from the edge of the tin.
ready to go into the oven
Just out of the oven
Place a piece of greaseproof paper/baking parchment larger than the swiss roll onto the work surface. Invert the cake onto the paper and remove the greaseproof paper/baking parchment as soon as you have taken it out of the oven.
Whilst still hot trim the edges of the cake with a sharp knife and score and mark 2.5cm in along the longer edge of the cake. Roll up using the paper, rolling it up with the paper inside, set aside to cool.
Rolling whilst still warm helps to prevent any cracks from occurring when you roll it up with the filling inside.
Method for the Butter Icing;
Please note that the recipe I use for the butter icing is taken from a recipe by “The Hummingbird Bakery” I have just altered it to suit me.
Place the butter into a bowl and using an electric mixer give it a quick beat to make sure that it is soft.
Add the icing sugar in thirds, it prevents the icing sugar from erupting in a huge cloud and getting everywhere. Beat it in well after each addition, by the third addition it will start to look like small clumps (or like popcorn as Alex described it) you can start to add a small amount of water along with the vanilla to start to bring it all together, don’t add too much yet though.
Add in the cocoa powder and mix as before, it will look like “popcorn” again but just add in small amounts of water to start to bring it all together. Once the mixture is smooth continue to beat the mixture for a few minutes, the icing will change from being a dark brown to a light brown quite quickly. This makes the icing really light and fluffy.
Skye heard the word chocolate and wanted to help make the butter icing too.
Once the cake is completely cool unroll it from the greaseproof/Baking parchment and put some butter icing on to the cake, using a pallet knife spread the icing right to the edges of the cake.
Starting at the edge that you scored start to roll the cake back up as tightly as possible (Don’t worry if the filling comes out of the sides/end you can always use that to cover the cake).
At this stage you can either keep the cake as one long swiss roll or you can cut a small amount off the end of it and add it to one of the sides to create a yule log. You can now cover it all in the remainder of the chocolate butter icing if you want, or you can leave it as it is that is entirely up to you.
We made ours into a yule log as I didn’t have a plate or cake board long enough for the whole thing to sit on.
Place in the fridge to let the butter icing set up before cutting into it. Once set enjoy 🙂 It tastes lovely on its own or even served with cream.
This butter icing is also lovely when warmed up as it turns into quite a fudgy topping, when warm this would be lovely served with vanilla ice cream.
The children all enjoyed eating their cake. They pretty much ate the whole thing over a few days (I had a slice too but that was it)
Both of the boys had a mouthful of cake when I took the photos.
Alex can’t wait to help me out again in the kitchen but at the moment I have quite a bit coming up. However I think we might make brownies over the weekend as I know that the brownies are an easy bake and I know that the kids all love their brownies 🙂
I hope you all enjoy trying out this recipe. If you do give it a go please comment and let me know how it went I would love to hear from you.
Until Next Time
x J x
Yule Log/Swiss Roll Another rainy day with the children and I decided to do more baking, this time with Alex, he had been watching tv for most of the day and I told him that he had to come away from the screen and help me in the kitchen.
0 notes
Text
Last year my mum gave me a recipe for a delicious apple cake with a crumble topping.
This cake is gorgeous and is best served warm with cream, vanilla ice cream or even custard, just like apple crumble.
As the weather was awful I decided to do some baking with the children, Skye and Lucas came to help whilst Alex played on his tab with my brother Jacob. I have wanted to make the apple cake for ages so I decided that today was the perfect day to make it. Skye couldn’t wait to help and Lucas couldn’t wait to wear the Flamingo apron he had for Christmas.
On to the cake!
The batter for the cake can be quite thick depending on the size of the eggs that you use. I used relatively large eggs when making it and it wasn’t as thick as when I made it with my mum and sister previously. It can be almost as thick as cookie dough so don’t worry if that happens when you make it.
Ingredients;
For the Cake;
125g Softened butter (or stork)
150g Soft brown sugar
2 Eggs
250g Plain flour
3 tsp Baking powder
2 tbsp Orange Juice
2 tsp Orange rind
a few drops of vanilla essence
500g Apples
For the Crumble topping;
25g Butter
50g Plain Four
2 tbsp Demerara sugar
1 Pinch Cinnamon
1 tbsp Chopped Hazelnuts
Method;
Preheat the oven to 170°c
Grease a 9 inch round cake in and line the base.
Beat the softened butter with the soft brown sugar until light and fluffy.
Beat in the eggs.
Sift in the plain flour with the baking powder (I actually didn’t have any baking powder so I just used self-raising flour) and fold in with the orange juice, orange rind and vanilla (I didn’t have any oranges in so I decided to just use orange juice).
Peel, core and chop the apples into medium-sized chunks.
Stir the apple chunks into the cake mixture and turn into the prepared tin and level, tap lightly on the surface to make sure that the mixture is at the bottom of the tin.
In a bowl rub the butter and flour together until it resembles breadcrumbs, mix in the sugar, cinnamon and nuts (I didn’t use any nuts as I didn’t have any in the house).
Sprinkle the crumble mixture over the cake.
Bake for 1 to 1 1/4 hours, or until a skewer comes out clean.
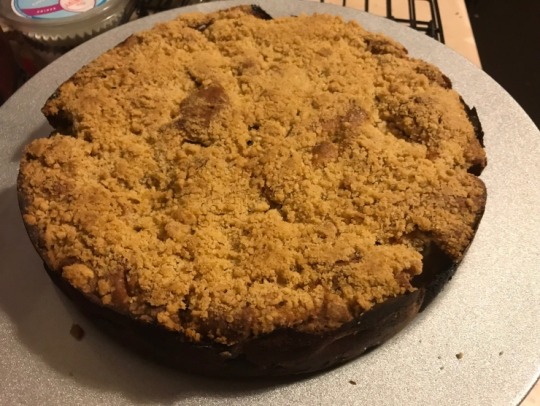
The sides of the cake have come out looking quite dark but this is due to the caramelisation that occurs because of all of the sugars in both the cake and the apples. I also think my cake looks darker in the photo because my kitchen has really poor lighting and all daylight had gone by the time I got around to taking the photo of the final cake out of the tin.
Skye really enjoys being able to help out in the kitchen, she loves being able to help cut up fruit and veg. She likes to use my blue paring knife as it is small enough for her to control. Skye is my little helper usually, today however Lucas decided that he would like a try at cutting up the apple too. Skye had to share the knife with him as I don’t have another smaller one at the moment (I generally use my large purple knife for everything) I think I will be buying a few small knives for the children to be able to help me with the cutting up of vegetables and fruit from now on.
I enjoyed cooking with both Skye and Lucas today. Now I just hope that they actually eat the cake too.
Look out for our next blog with another recipe which will be up soon though I haven’t quite decided which recipe to go for.
Until Next Time
x J x
Apple Cake Last year my mum gave me a recipe for a delicious apple cake with a crumble topping.
0 notes
Text
Still here!
I know I promised that I would start blogging again soon and that I would be baking again however I am still having days where I am really unwell. At around 4-6 weeks pregnant I started being sick, which I fully expected as I was sick with the other three too. By around week 8 I was really struggling with how sick I was being. I had hardly eaten anything for days and I was not keeping any fluids…
View On WordPress
0 notes
Text
2018!

HAPPY NEW YEAR! Well that came around quickly! I know that by the middle to the end of last year I hardly posted at all. I actually don’t know where the time went. I started to write so many posts but because of how slow the internet was at one point I just stopped. That has now mostly been rectified (Until I try to do a food shop online and then it gives up on me completely). Well… This time…
View On WordPress
0 notes
Text
Rock Candy!
Just a quick update on the Rock candy post that I did back in August. What a waste of time the rock candy turned out to be. We came home from our holiday and waited a day before taking a look at them. When we started to remove the sticks/string etc and the result.. well there was no result! Basically I had just made coloured sugar!! I followed the recipe word for word and it just didn’t work. We…
View On WordPress
0 notes
Text
All over the internet I have been seeing wonderful cakes made to look like they have agate in them. These cakes have been absolutely wonderful and I have been desperate to make one for myself. To do this though I wanted to make my own rock candy and I decided that to make it I should include the children, I thought it would be interesting for them to see what happens.
I found a recipe on YouTube from Cookies Cupcakes and Cardio and decided to give it a try.
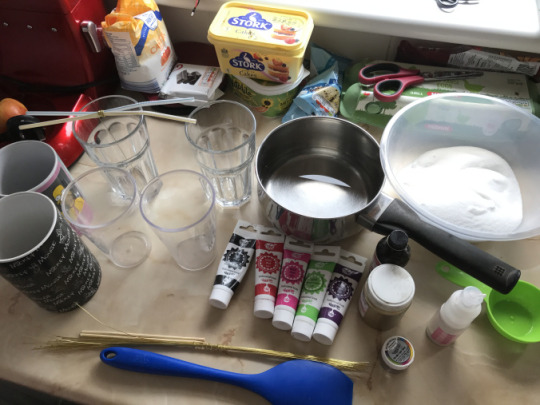
The stork and dairy free products were for another bake that I was going to be doing after making the rock candy with the children.
I used 3 different kinds of cups for the sugar syrup to see if it makes any sort of difference with how they turn out, we used mugs, Glasses and heat proof plastic cups. I also used different things for the candy rocks to grow on too. I used cake wire, Bamboo Skewers (the kind used on a bbq for a kebab), a wooden dowel (not pictured here) and some string (again not pictured here).
To start off we needed a cup of water on a gentle heat to which we gradually added 3 cups of caster sugar stirring all the time until the sugar has completely dissolved.

At this point you need to leave the sugar syrup to cool slightly. During this time you can get the string/skewers ready.
To do this you need to dampen the string/skewer with some water and then roll it in some sugar. This gives the starting point for the rocks to grow. The wire didn’t seem to get much sugar around it so I don’t think that it is going to have worked but we will have to wait and see what has happened.
You can use spare bamboo skewers to tie the string onto or you could even do what I did and use drinking straws with a bit of wire through to give some stability or even just use some wire wrapped around the skewers.
At this point if you are going to use multiple colours you can add them to the bottom of the glass that you are going to be using. We used rainbow dust pro gel colours in Black, Red, Purple, Green and Pink. One was going to be left clear with a touch of gold lustre dust added but I was a bit heavy-handed and added too much to the glass. We added a tiny bit of shimmer dust, silver dust and gold dust to each of the other colours too to see if they add any more sparkle to the rock candy. To add some extra flavour to the rock candy we also added a drop of peppermint extract. You don’t have to add colour, dusts or flavouring if you don’t want to, it is purely personal preference what you do.
Once all of the colours were added we poured in the sugar syrup and gave the mixture a stir to make sure the colour was throughout the syrup. I think we added too much purple gel paste to the cup as it did look quite black, will see when it is done what the colour looks like and hope that it isn’t quite as dark as it appeared when making it.
When I was filling the cups I actually realised that I hadn’t made enough mixture for the size cups that we were using, when I looked back at the video that I had been following I noticed that the cups that were used were considerably smaller. So I filled up 3 cups and then went back and made another batch of the sugar syrup. This time I used granulated sugar as I didn’t have enough caster sugar left to make both the syrup and do the baking that I had intended on doing. *Serves me right for not double checking my stock before going food shopping and just assuming that I had more than one bag of sugar like I usually do.*
Whilst the second batch of sugar syrup was cooling I started adding the string/skewers/wire to the other syrup and securing them in place using some strong tape. I only did this as I didn’t want anything to move at all.
Once the second batch was cooled I continued to fill the other three cups, mix the syrup and colour and then added the string/skewers/dowel.
Black – Alex
Green – Jacob
Pink – Skye
Purple – Lucas
Gold – Mine
Red – Matt
Skye and Lucas
Mine and Matt’s
Alex and Jacob
All Together
They were then put to one side and have been left to sit. They were made 9 days ago and we will have a look at them at the end of next week once it has been 2 weeks. We will then be able to see what cup was best to use and we will find out whether string, wire, bamboo skewers or a wooden dowel were the best thing to use for the rocks to grow up.
The children are really looking forward to eating the rock candy and I can’t blame them, it is great getting to eat something that you have made. I do think that I am going to have to make more rock candy to be able to make the cake that I want though but this will serve as a lesson in which is the best way to do it. I can’t wait to see the results.
Until Next Time
x J x
Making Rock Candy All over the internet I have been seeing wonderful cakes made to look like they have agate in them.
0 notes
Text
Sorry for the radio silence of late.
With my slow internet I am finding it difficult to be able to load anything onto the computer that requires the use of the internet.
We are getting around 1mb internet speed and unfortunately we cannot get fiber broadband where we live. Both Matt and I have agreed that using dial-up would be faster. Our service gets even slower when Alex watches Netflix on his Xbox
I do get a relatively good 3G and 4G service on my mobile but I prefer to be able to type my blogs on the laptop rather than on my phone.
I have done several cakes since my last blog, which I will blog about eventually. The children have all broken up from school for the summer holidays (pity it is now raining more than ever). They all had really good school reports and I couldn’t be happier with them. In September Alex and Skye will be in the same class, I have no idea how well this will work. They do get along very well normally but they can also fight like cat and dog, I guess only time will tell with how they get along in a classroom. Maybe I should buy their new teacher a bottle of wine for when they start back as a good luck gift.
Since my last blog we have also welcomed a new fluffy baby in the form of our kitten Crookshanks a Ginger Tom. He is the cutest, fluffy pain in the bum I know. Ariel hates him, but then she hates Hetty and most other people too. Hetty on the other hand loves him, she finally has someone to play with and they are forever running around the house together and play fighting. I will often come into a room and find the pair of them sleeping close together, or even cwtched in together, which is so adorable.
Next week we will be heading to Folly Farm for the first time in ages. We are all really looking forward to it especially Lucas who is looking forward to seeing the Chilean Flamingos.
We are now in the run up to Lucas’ birthday, just over a month and he will be 6! I have no idea where 6 years have gone but they have flown by. He is very much into Flamingos and Trolls. I have no idea what cake I am going to be making for him yet, I think that Trolls and Flamingos will come into it somewhere 🙂
I also have just under two months until I have my first ever wedding cake to make. I wont lie I am very nervous about making it but I know that I can do it and I know that it will be the best cake that I can make. I can’t wait to see the brides and grooms faces when they see the cake.
I will be posting a blog in the next week or so on Rock Candy making, which I might do as a two-part blog as they can take a week to make. I will decide as I am typing no doubt.
Until Next Time
x J x
Radio Silence Sorry for the radio silence of late. With my slow internet I am finding it difficult to be able to load anything onto the computer that requires the use of the internet.
0 notes
Text
I can’t believe how quickly the time has passed since Skye turned 7! (I have been trying to write this post since the day after her party!)
I absolutely loved her party which was helped by the wonderful team at “Pick A Mix” who we hired for the entertainment and for Natalie at “Happily Ever After – Swansea” who came as the Tower Princess! I cannot sing their praises high enough. They were perfect and Skye had the most amazing time.
Skye had asked for a Disney Tangled themed party, she had a Rapunzel costume off my mum for her birthday so that just added to her excitement.
We made a big banner to go above her cake saying “BEST DAY EVER”, I painted the golden sun onto purple cups and party bags for the guests and I also made “frying pans” out of paper plates.
Her cake was a three-tiered cake with a fish bowl with “the Magic Golden Flower” (Made by my lovely friend Aeyshea Jones) separating the bottom two tiers from the top-tier, it was then topped with a modeling paste lantern which was lit up with a battery-powered tea light. The top tier was hand painted to look similar to the scene in the film where Rapunzel and Flynn Rider are in the boat watching the lanterns light up the sky. The second tier was decorated to look similar to the tower that Rapunzel lives in. Finally the bottom tier was decorated to look similar to the top of the dress worn by Rapunzel with her plait with flowers around the base. Each aspect of the cake was great fun to do. I absolutely loved painting the top tier of the cake, it had been a very long time since I had painted anything so it was something that I loved doing. The lantern on the top I made over a week before the party to ensure that it would be strong enough to stand on its own on the top of the cake. To create the shape I actually put the modeling paste around a “bisto” tub. It was the right shape and it was the right size for what I wanted. (Good job we didn’t want bisto that week haha).
Bottom Tier, Decorate to look like her top
Second Tier, decorated to look like her home
Second Tier, decorated to look like her home
Flower Made by Ayeshea Jones
Flower Made by Ayeshea Jones
Top Tier hand painted to look like the lanterns floating by the caste
Top Tier hand painted to look like the lanterns floating by the caste
“lantern” with a tea light to make it glow
“lantern” with a tea light to make it glow
At the end of the party each child received a party bag which also had the sun logo on the front along with a cupcake decorated with rainbow coloured butter icing, similar to the ones I made to go with her unicorn cake.
The cupcakes went down really well (and I had made more than enough for my three monkeys to have some of their own at home!). I like to give cupcakes at the end of the parties as I am not having to worry about cutting up a cake and I’m not worrying that the children don’t each have the same amount and there is also the fact that not many people actually like fondant, so by just doing butter icing there is much less wastage.
I really enjoyed doing this party, I loved being able to create items around a theme, a Theme that I was then able to extend onto the entertainment. For a Tower Princess or Ice Queen I couldn’t recommend Natalie Coles more. She not only looks the part, she acts the part and has the most wonderful of atmosphere about her. She is wonderful with the children and I couldn’t have asked for more. Richard with “Pick a Mix” is also wonderful, he, like Natalie, had a wonderful presence and was fantastic with the children. I would recommend them both to the stars and back again!
Until Next Time
x J x
Skye’s Party! I can't believe how quickly the time has passed since Skye turned 7! (I have been trying to write this post since the day after her party!)
0 notes
Text
Hi All, sorry for the silence on my part. Our Internet is awful and I spend more time trying to get the photos to load than I do actually trying to write. Hopefully I will be able to start writing more often again.
The April Upper Killay Monthly fell the day before Easter this year. It was a fantastic Market too.
It wasn’t massively busy by any means but there was a steady flow of people that attended and bought from us.
This month was the first month that I sold cakes by the slice with the teas and coffee’s (with Debbie, who runs the Market) as well as having my own stall.
I decided to make a gluten and dairy free carrot cake, victoria sponge and my sticky ginger cake.
The carrot cake sold out within the first hour of the market being open and I heard that many people were disappointed to have missed a slice. I have decided for May’s market that I will do two carrot cakes. I honestly didn’t expect the cake to go down as well as it did I was over the moon.
I had a variety of other things on my own stall. I had Easter themed cupcakes, chocolate brownies, chocolate chunk brownies, Gluten and Dairy free chocolate brownies (made with cocoa powder rather than melted chocolate) and chocolate orange welsh cakes.
In the March market my cupcakes sold out really quickly, this month however they didn’t do as well. That’s the thing with markets the things that were popular one month wont always be the thing that is popular the next month.
At the moment I am planning what cakes I will have with the teas and coffees in May apart from the Carrot cake (which again will be gluten and dairy free). I am also working out how many other things should be gluten and dairy free as I know lots of people were interested in what I had.
Though I knew that there was a possibility of the gluten free things being popular I wasn’t sure of how popular so I only made the one batch of brownies and one carrot cake. I will definitely be making more this month.
I also have a few other things going on this week. I have a very cool birthday cake to make for the end of the week which I am really looking forward to as I know that the birthday girl has no idea of the design and I have designed it especially for her knowing what she likes (it’s useful when the birthday girl is the best friend of your daughter and girlfriend of your eldest son!)
I also have other things happening this week but I don’t want to say much more about them until I have more news, I am excited about how things are progressing though.
Hopefully I will have more news by the end of the week. I will also have photos of the birthday cake to show too :)
Until Next Time
x J x
Easter Monthly Market 2017 Hi All, sorry for the silence on my part. Our Internet is awful and I spend more time trying to get the photos to load than I do actually trying to write.
0 notes
Text
Today at lunch time I was craving something sweet. I knew that there was a bar of chocolate in the cupboard but I also knew that it wasn’t going to satisfy my needs. I then remembered the brownie recipe that my sister shared with me at the start of the year. It is a quick and easy recipe and it really did hit the spot. That and it also got me baking which is always good :D
The recipe takes 10 minutes to prepare and 15-20 minutes to cook. So in half an hour there is a yummy, gooey, chocolaty delight ready for you. I did leave it to sit for 5 minutes before diving into them to let it set slightly in the middle but the slices were still gooey 4 hours later when the children came home from after school club and had a slice each.
For these brownies you will need;
An 8″ Square tin
1/2 cup of Melted Butter/stork
1/2 cup of Unsweetened Cocoa Powder
1 cup of sugar (I used caster sugar)
2 Eggs (I used large eggs)
2 tsp Vanilla extract (or 1 tsp of vanilla bean paste)
1/2 cup of Plain Flour
1/4 tsp salt (optional)
1 tsp Baking Powder
1 – 2 cups of your choice of added extras E.G Marshmallows, Chocolate Chips etc
Pre-heat the oven to 180c
Grease the baking tin and set to one side.
Mix together the melted butter, cocoa powder and sugar until completely combined.
Add in the eggs one at a time and mix well between each egg.
Add in the vanilla and mix
Fold in the Flour, baking powder, salt (if using) and your added extras.
Pour into the prepared tin and put into the oven for 15-20 minutes
When ready it will still wobble slightly in the middle (you want that, that’s what makes it gooey!)
Cut into pieces, I usually get 9. You can now dive straight in (being careful it will be hot!) or you can leave it to set slightly for a few minutes.
When eaten hot (or even cooled come to think of it) a scoop of vanilla* Ice cream would be perfect.
*You can obviously choose what ever flavour ice cream you want but I personally think that the vanilla cuts through the sweetness and richness of the brownies ;)
Now go forth and make brownies, I promise they are totally worth it :D
I really hope that you enjoy this recipe. If there is anything you would like me to make and share a recipe for please leave a comment and I will try my best to find you the best recipe that I can :)
Until Next Time
x J x
Brownies Today at lunch time I was craving something sweet. I knew that there was a bar of chocolate in the cupboard but I also knew that it wasn't going to satisfy my needs.
0 notes
Text
I have to admit that the one thing that I usually do not enjoy doing is baking (or cooking in general) with the children. I like my kitchen to be child free when I am cooking, it’s just me. Over the last couple of weeks I have found myself cooking with the children a few times and I really did enjoy it. My two favourite days of cooking with the monkeys.
WELSH CAKES!
Over the half term holidays Skye and Lucas had homework. Skye’s was work sheet based easy enough, Lucas’ homework was “Do something Welsh” and that included “make Welsh cakes” So that’s what we did.
excited boy ready to make welsh cakes
all of our ingredients
We made Welsh cakes with currants and Chocolate Orange Welsh cakes too (my specialty haha)
The only thing that Lucas’ didn’t do was to put them on the bake stone and take them off.
Together we weighed out the ingredients, he rubbed the butter into the flour and spices,
he added in the currants/chocolate chips, Skye came and helped out too.
and mixed them in with an egg, he rolled out the dough and then cut out the shapes.
We all had a great time doing it :)
Whilst the Welsh Cakes were cooking on the bake stone Lucas got a bit bored (I don’t blame him, they can take a while to cook) and went off to play. As soon as he could smell the finished ones he came running back downstairs and wanted to eat them, and eat them he did.
We all enjoyed eating the Welsh cakes, they didn’t last very long at all and they were delicious :D
PANCAKES!
The Tuesday that they went back to school was Shrove Tuesday (or Pancake day as its also known). I knew that the kids wanted pancakes that day and I fully intended on making them American style pancakes as I have never been able to make the traditional style ones.
That morning after they went to school I came home determined to crack my curse with the pancakes. I found a recipe online and I went ahead with my plan. I messed up the first one (too much butter in the pan made it greasy) the next one went to plan and so did the others that followed. It turned out that I had bought a brilliant non stick frying pan which didn’t need any extra butter to help (best bit was that it was only £5 in Tesco!)
The kids stayed in school until 5:30 that night as they had a movie night so when they came home I put their dinner in the oven and whilst that was cooking Alex and Skye came to help me make pancakes ready for their desert.
They both had a turn at flipping the pancakes, Skye typically dropped hers on the floor and Alex’s flopped in half. They were both nervous but I was really happy with how well they did.
I have honestly really enjoyed cooking with the kids over the past couple of weeks and I am looking forward to cooking with them again soon, especially now Alex and Skye are both showing more of an interest in cooking in general.
Until Next Time
x J x
Baking with My Monkies I have to admit that the one thing that I usually do not enjoy doing is baking (or cooking in general) with the children.
0 notes