
Last Seen Blogs

catoshop1
Untitled

fwacata
FWACATA!

earthangel67
will you be mine

ilebisumette
Take me as is!

poisonedsugarcookies
ღ Crybaby's Cookies ღ
Text
Poster Development


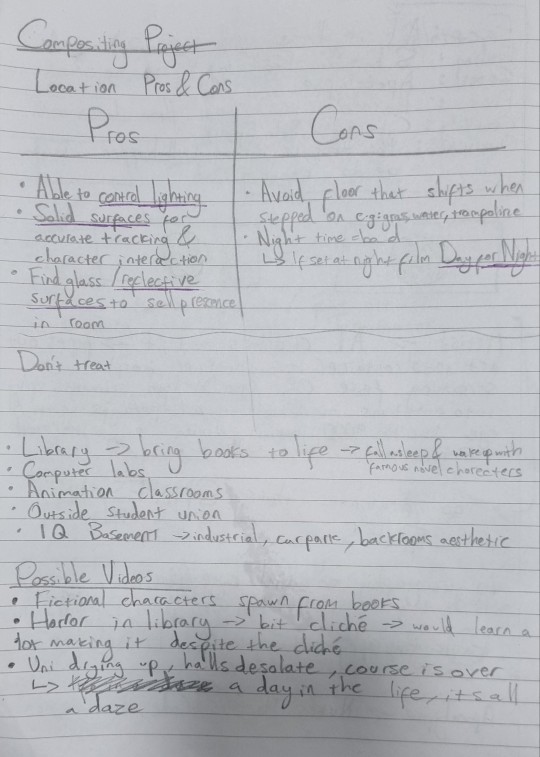
The environment I want to bring to life is a sterile cell in which citizens eat, sleep and work doing their duty to their company whos mascot is plastered on all walls so they never forget that they must serve the company. Posters will help sell the environment and these are some generic corporate posters which I want to take bits from when designing my own.


As I want to create me own Big Brother, famous propaganda from the past would be a great starting point for the poster design and I can hint at the lifestyle these people live with the messaging from the posters.


I've always been a big fan of the Fallout series and Paul mentioned in one of our emails that I could use the robot I was creating as some sort of a mascot like the Vault Boy seen on all the Vault Tec posters.
0 notes
Text
Conceptual Development
I pitched my idea in an email to Paul to get a better idea of what did and did not work, after getting some feedback my idea slowly evolved into something more coherent.

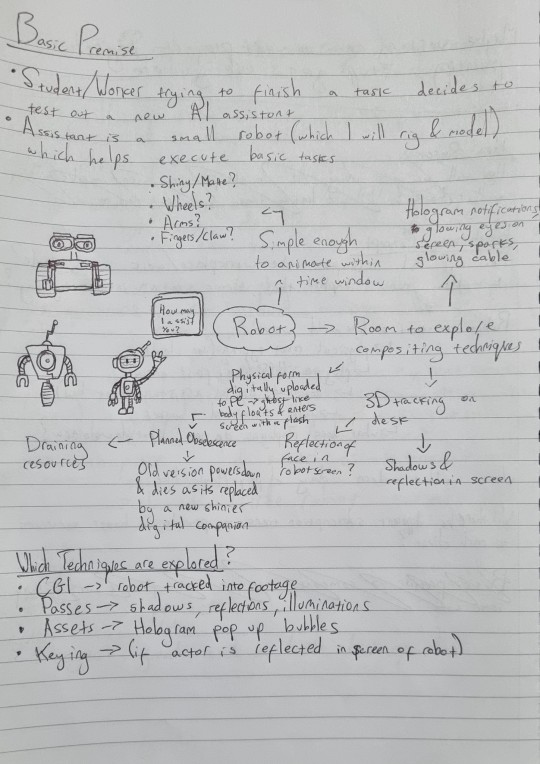
Here's the summary of my initial idea.

After getting some feedback I started to change things around and pivoted the role of the robot from assistant to boss/manager. This took me in a different direction which made more sense in the context of the short, I could explore the impact of AI from a new angle.

Here's the final summary of my idea which gives me room to explore a lot of different compositing techniques without it taking limiting the project as a technical display.
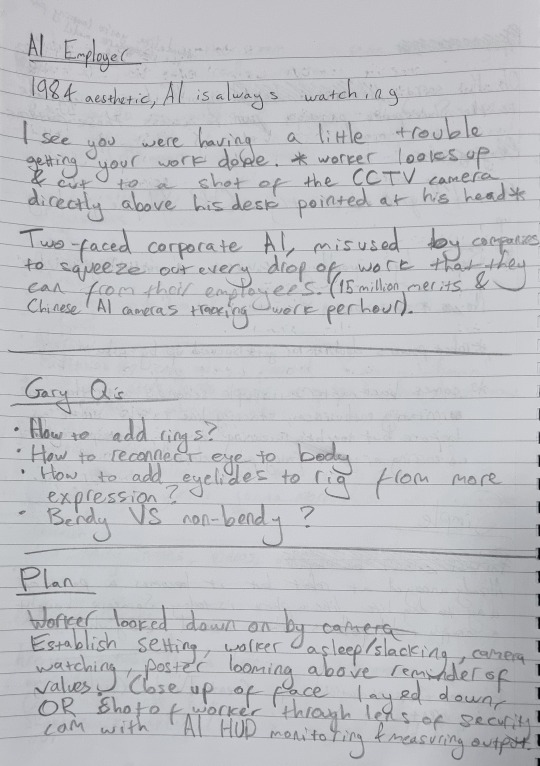

Here are some notes I took after sending the email to figure out how the short would develop from shot to shot so I had a basis for the storyboard.
youtube
youtube
youtube
I wanted to make my short something like one of these scenes with an employees frustration boiling over. However, after my most recent crit I discussed some of the complications with my short and Paul said that I am taking things in a narrative direction whereas most others are creating something non-linear so I'm going to steer away from scripting and over-planning and just start making things and now that I have my rig fully finished I can move onto figuring out the animation for each shot and how I can bring the environment to life using compositing techniques.
0 notes
Text
Hologram Texture Tests
youtube
I knew that I needed a hologram texture at some point during my animation whether I make the robot a hologram or just use it for the pop-up messages above its head. The video above is a really simple tutorial for creating this sort of texture, which I need to test out in animated form.


These are my test shots using the robot model I made previously but I still need to figure out which one works best in video form because a hologram would be semi transparent and I need to test whether it filters light through.
0 notes
Text
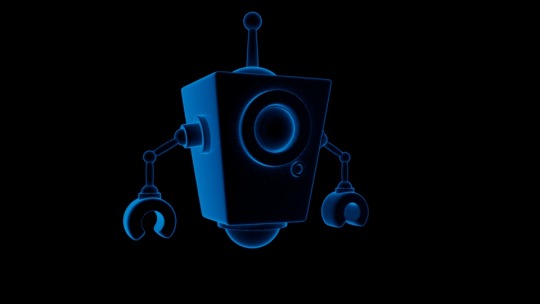
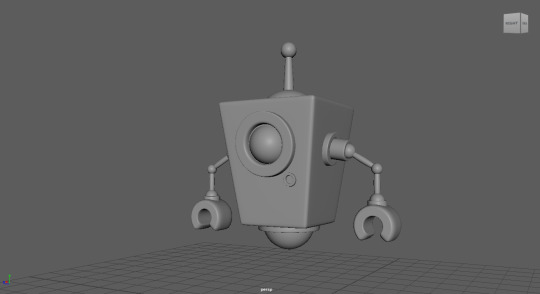
Modelling and Rigging
youtube
This is the tutorial series I am following for the rigging process. I've never been taught how to rig before so I wanted to start simple so that I'm not wasting all my time for a compositing module on character modelling, texturing and rigging.
Here's the first draft run of the model, it felt a bit too plain and the arms were too skinny in proportion with the rest of the model so I knew I needed to revisit things later.


Here's the finished model, considering how fast I've made it I'm happy with the results. It's simple enough with a little bit of character to it which will hopefully come out more when it comes to texturing and animating.

Here's the initial colour test, its a bit bland but I wanted to lay out a foundation for the possible colours,

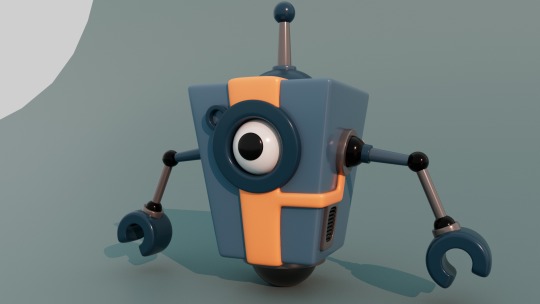
The concept of the robot is an AI assistant in the near future one which is faulty and inefficient and juxtaposes the idea that AI will be flawless in all iterations. I wanted to explore one which, like in the past, started as a good idea to solve problems like Clippy however, just like Clippy it too had its flaws and was simply too much for users. I had to decide between the sanitised futuristic look or one which looks a little more run of the mill but it has more character to it and I decided to go ahead with the orange and blue model it felt more complete than the other.


Here's the robot after most of the rigging is complete, Gary helped me figure things out and built the skeleton which I then did the weight painting for which didn't take long to understand but getting the weight painting to work as intended took some time. Building the skeleton was quite a simple process and works similarly to the rigging I did last semester in After Effects so I think I'll be able to repeat the steps smoothly in future projects.

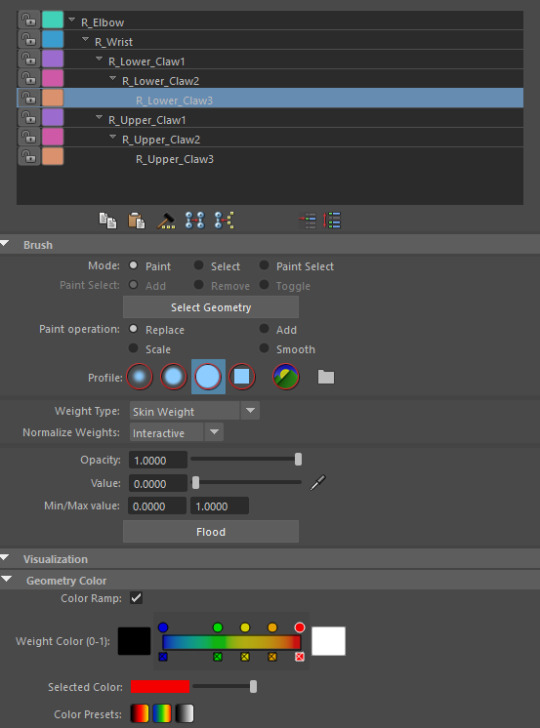
This is some of the important UI when working on a rig, each joint is bound to the vertexes of the mesh and by painting different tones of the spectrum above, you assign the level of influence each joint has over each part of the mesh with black being no influence and white being total influence (only one joint will have control of vertexes painted white). You change the value bar in the brush settings to assign the value and make sure to check Colour Ramp in Geometry Colour to get a better idea of the weights visually. You have to select each individual mesh one by one and paint it based on the joints nearest to it, to save time select the value and then press flood to fill the mesh with one colour and for more precision use the 3rd profile icon of the brush which is at 100% hardness so other vertexes aren't mistakenly painted.

Here's the finished rig, everything seems to work well so far so I can get on with animating the character.
0 notes
Text
Idea Restructuring

The key theme I wanted to explore with this video is AI and its impact on the future and somewhere in my short about AI I needed to include a few different compositing techniques which made sense in the context of the video.

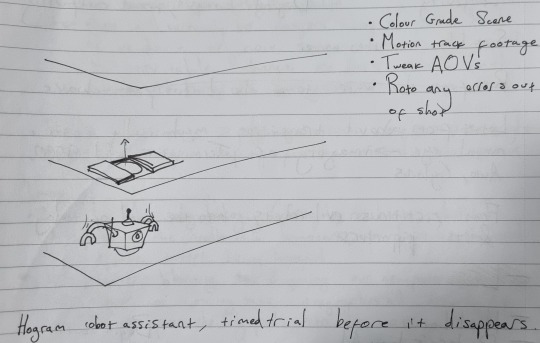
I knew that I needed to incorporate some motion tracking into the video so I thought that a robot assistant would be a good fit and I could explore how things might play out in the near future when these sort of products are released to the public. How would they be executed:
Would they be just as imperfect as digital assistants of the past like Clippy and Alexa?
Would they follow subscription models?
Would they need upgrading or replacing every time the company wanted users to buy more of their products?
I started planning what the robot could do based on the basic premise of the video and how I could incorporate interesting compositing effects. The types of compositing techniques I could explore with this premise are:
CGI - Robot helper made in Maya tracked in Nuke (possibly also used for hologram pop-ups and delivery tube aswell)
Passes - AOV layering onto footage
Assets - Sparks, glows, smoke (if robot gets smashes), text layering, wall detailing (posters/logos)
Colour Grading - sell the tone of the short
Keying - Reflections in shiny surfaces of the robot keyed in post
Rotoscoping - removing unwanted objects from the shot to polish the final cut
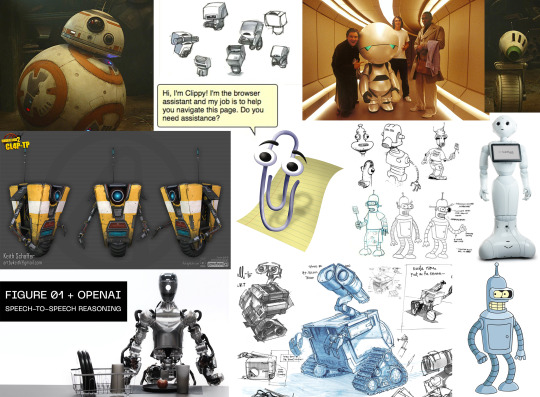
Here's a quick mood board for the robot, the two I had most in mind were Clippy and Claptrap both of which are assistants which tend to get in the way and irritate people (a wheel also works better as a time saver as I don't have to waste time animating legs unnecessarily).

Here's an overview of what I have time for in 30 seconds, in the past I have gotten carried away with ideas which aren't suited to a 30 seconds short so I need to keep things simple. I didn't want to spend too much time on the character design aspect as the module is about how I utilise assets not how I create them so I am following a rigging tutorial to make a simple robot that I can play around with for this short.

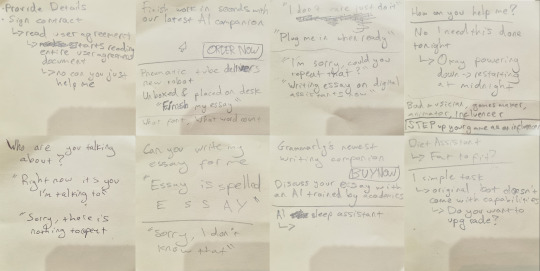
At this stage I was just trying to figure out what to write in the script and what mistakes the robot would make/ what its purpose was/ what its dialogue was. I used an amazon alexa to get some ideas of how modern day tech misinterprets prompts to pick up on some different quirks that I could adapt for my robot.


Here's the start of a storyboard based on my ideas so far, I can't quite figure out the script after the introduction with the interaction between the worker and the AI assistant so I stopped here to rethink some other things. I tried mind mapping a few ideas but it all just felt forced and I couldn't figure out something which actually made sense within the context, a lot of the ideas I came up with felt arbitrary so I took a break and focused on other projects temporarily.


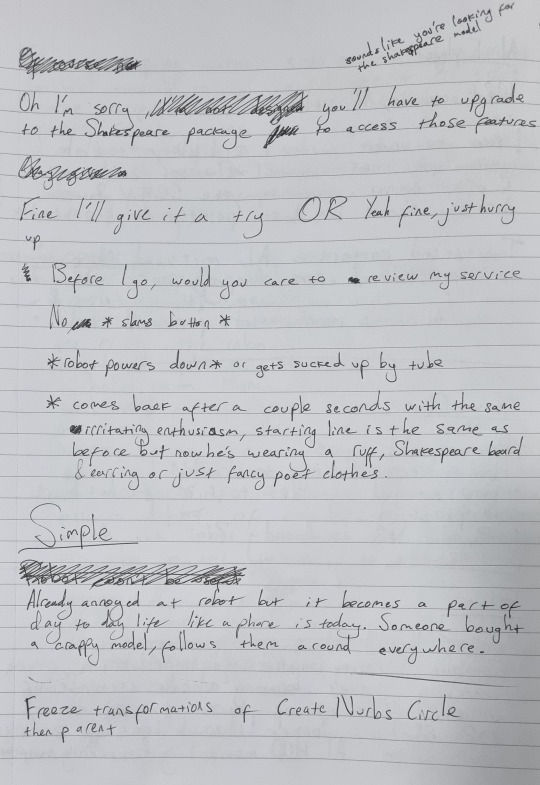
I revisited things and tried to develop my concept further and figure out what it may look like and what the dialogue might sound like. I just couldn't get anything down which felt right so I just wrote down as much as I could think but things still didn't seem right so I left things to stew a little longer instead of trying to brute force something which clearly wasn't working as intended.
0 notes
Text
Storyboard for Initial Idea


Here's the initial storyboard I made based on my loose notes before the crit. It's very bare-bones and at this stage I was trying to figure out how I could make something interesting which included all of the techniques I wanted to test.


I was planning to make this a POV horror short with the world collapsing around the camera man and these are the two main shots/locations.


I wanted some sort of being to emerge from a portal in the wall during the interview with the teacher and these were the possible locations I had in mind.
To include more motion tracking I wanted some creatures/robots emerging from under the desk.
Here's some test footage I did on my phone to get a feel for what it could look like.
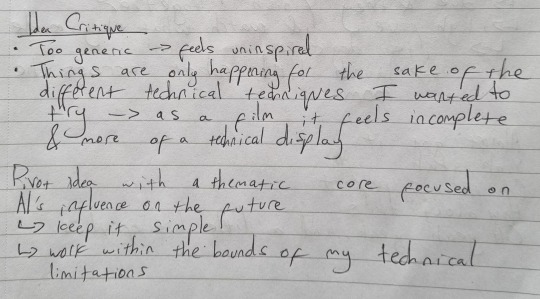
After storyboarding and testing my shots I realised that what I was making was more of a technical display when really I should be trying to create a short story. I was falling into the trap of making something that would look good on my showreel when employers will have seen thousands of examples of content just like this. Things happen arbitrarily for the sake of trying out a different type of compositing and the end result would be underwhelming. I took a step back to critique things and boil things down to their bare bones so that I could make something different and to develop the concept into something novel.
0 notes
Text
Storyboard and Reference
youtube
asdasd
youtube
sdfd
youtube
0 notes
Text
Crit 1 - Idea Discussion

I was in A&E at the time of class presentations but I got this feedback via email about my two ideas for the project with the critique of my ideas in green. I summarised what I had so far as another opportunity to boil down my ideas and understand what I am making and during this process I realised my stronger option would be the second as it leaves more scope for actual compositing work rather than spending all my time animating.

Before the one-on-one crit session, I planned out some shots in my head and scribbled down my ideas. I have a lot of ideas which I want to try out because I want to push myself so that I'm not just making something like cute blobs hopping around campus like some of the examples. I want to make it feel as through the campus is crumbling and falling away around me and to do so I am going with a glitchy aesthetic because it suits the idea and me room to push myself. I am keeping in District 9's approach to compositing work in that my animations feel grounded in reality and aren't entirely show pieces with a spectacle at the end as the environment distorts and slips further from reality.

The main feedback from my one on one was to develop my idea conceptually so that it isn't simply a project which test my technical skills but also my idea development. I am going to try to take my ideas to the next stage to actually make a story that isn't just a technical display with a story cobbled together on top. The very basics of my concept right now are to explore the themes of AI and its impact on the Animation Industry.
0 notes
Text
2D Compositing
Here's the finished roto work using Nuke, its a fairly simple process and the tracking speeds up the roto work massively. After trying rotoscoping with 2D animation I can see how using 2D characters for the compositing module might be an issue if the perspective shifts too far - if the perspective changes too much then I would have to animate the 2D character shifting perspective so which would take a lot of time with any complex characters.
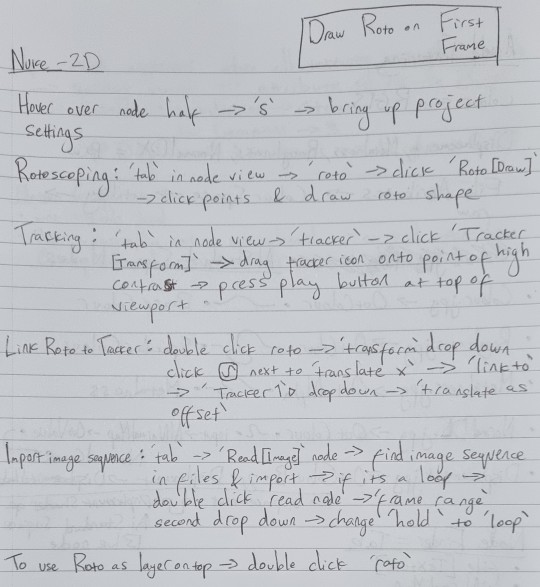
To make sure I understood each step of the process I took notes to solidify them in my memory as this will also be useful for future 2D roto work.
0 notes
Text
Project Ideas
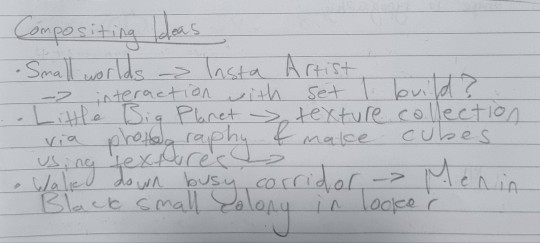
Here are some of the first ideas I scribbled down initially inspired by the artist David Zinn.
youtube
I thought I could explore something like the micro-world within the lockers in Men In Black 2 but the amount of detail for something like this would be excessive and less focused on compositing and may become more of a modelling and animation project.
youtube
This is the main video which inspired this train of thought, its all about the making of Little Big Planet. The game was stylised and build using simple blocky shapes with loads of textures applied and then dotted around with a sandbox feeling and I thought that I could try and make something of this sort for this project using a mixture of assets and real world interaction.
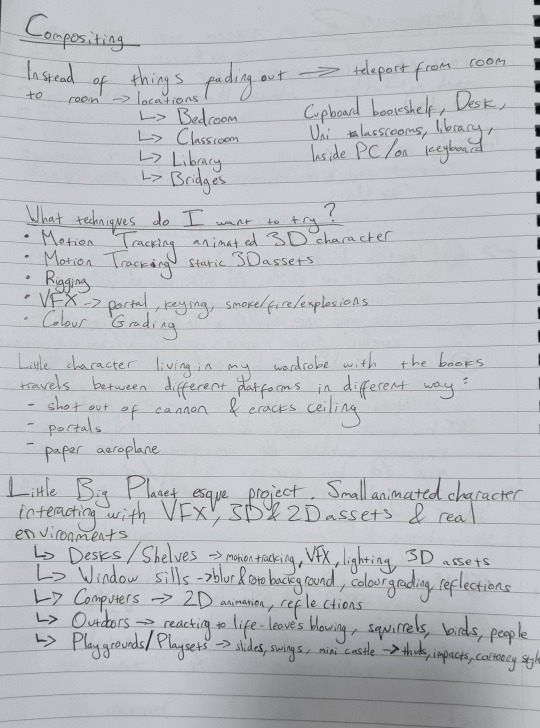
I wrote some more notes about location ideas and plans for using a small 3D character and which environments would work for this project.


These are some of the locations I could use for this animation with some experimentation with reflections, lighting and some VFX added on top to transition from location to location with portals or cannons.
instagram
If I go down this route then I could try to make something like the video above, the animator uses a mixture of 3D and 2D animation with a lot of different techniques that would be useful to learn for compositing.
An alternative to the small world aesthetic is exploring campus with a video editing approach in mind with slightly less focus on animating characters. Taking what I have learnt about District 9's approach to VFX I could try to integrate VFX without turning it into the show piece of the project. The image above are some notes related this idea keeping in mind my limitations and which locations could work best. The idea I want to run with if I take this approach is an experimental approach trying out different types of effects within each shot and combining them together.


The notes here further explored this idea with a focus on a POV horror/experience inspired by the course closing down and the surroundings are fading with it with shots that have people and objects glitching, disappearing and transforming unnaturally until we are found in a void at the end like the image above.
The main locations for this project would be the computer lab, classroom and I would also have to used the green screen room for the void at the end if I go down this route.
youtube
youtube
youtube
youtube
youtube
youtube
Above are some video tutorials or references which I want to try out for the VFX side of things as I think it would be a great way to push myself into video editing and VFX which I have not dabbled with much as of yet. Ideally I want to find a way to execute my best ideas for these two plans because I may find that focusing on smaller scale shots may be limiting for a module about compositing which aims for layers upon layers of different effects and techniques to make something really believable.
For the glitch/matrix style shots, the video above is one of the shots that would look visually amazing if I could make it work with a lot of rotoscoping and a 3 static shots one of which is a clean plate as reference for backgrounds and to not mess anything up. This relates to one of the ideas I wrote down in my sketchbook with a discussion between student and teacher and there is a jump-scare of someone coming through the teachers face saying something like "wake up" or "its over".
Whilst doing research I also found this post on reddit with someone doing compositing of their own looking for feedback to improve a shot of Godzilla composited into some of their own footage. The advice was really interesting because it talked about adding a camera shake to account for each footstep of Godzilla which made me think more about the environmental implications of the VFX added to a shot and what extra thought must be put in to make the shots feel real:
Camera Shake
Blurring
Smoke/Dust
Reflections
Lens Flare
0 notes
Text
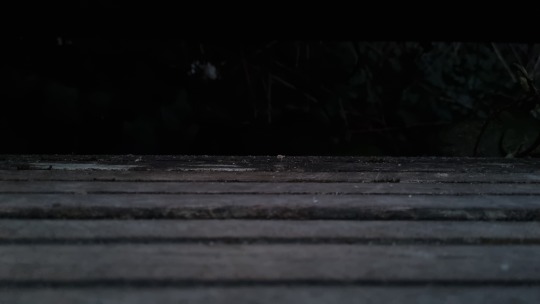
Location Ideas and Photography Testing
Test using pro video settings on my phone, another possible horror location with characters appearing and disappearing behind the pillars like in the video I filmed in the computer lab with Harvie.


This was a test just to practise using the pro photography settings and to get an understanding of how water reflects things and the slight distortion it creates.
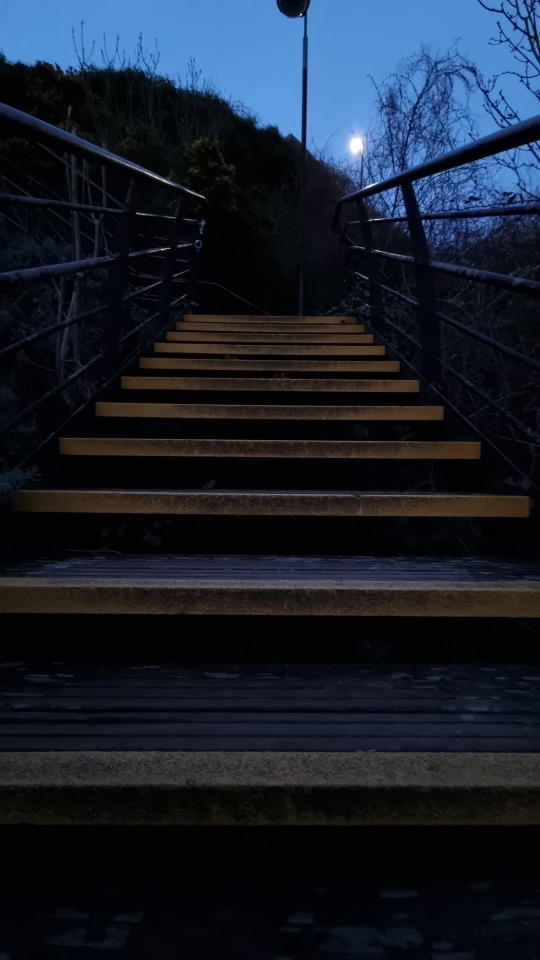

Fitting some creatures under some stairs could look good for a horror setting but I think that if I was going to do this I would have to film it during the day and darken in post because there needs to be enough light under the stairs for Nuke to track points of contrast.


Creating a giant roaming through Newcastle could look really good but I would probably have to keep it walking on land because simulating its interactions with the water will certainly be problematic and I may not have the time to figure that out alongside other compositing techniques I want to try out. However, the water would be a good way to ground a 3D animation into the scene because of the reflections that sell the realism.


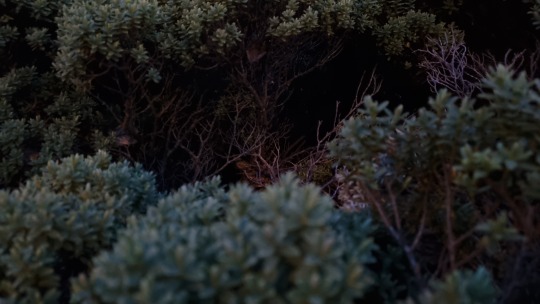
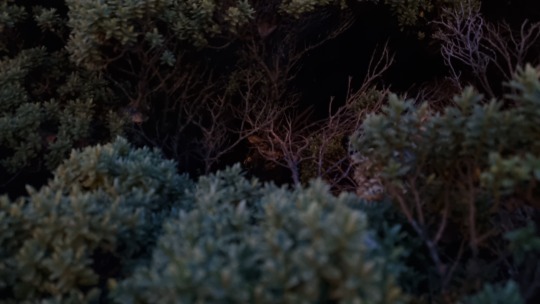
If I focus on exploring smaller landscapes these bushes look somewhat like a forest from above, the only issues is that working in such a tight space means that there is less room to move the camera and Nuke might have trouble tracking because the wind will shake the bush. ISO changes to test impact on quality and darkening of the image.
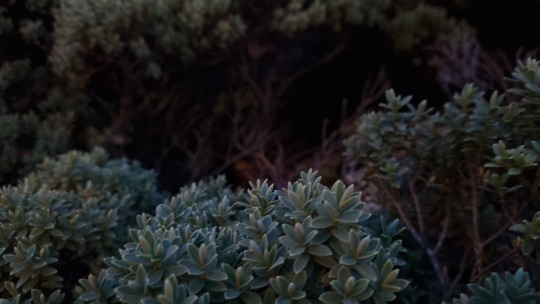
Focal shift from Foreground to Background
ghjkghj


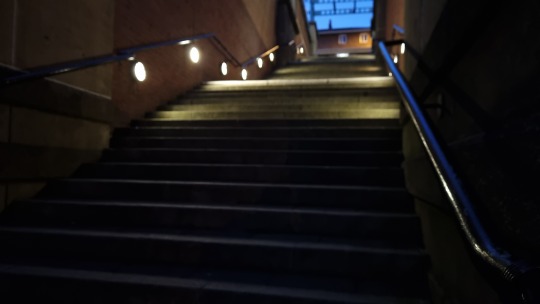

This location reminded me of the Joker stairs and could be a good site to interact with however the stairs are quite busy so it might be hard to get a shot without people interrupting the shot. Manual Focus changes to test blur depth.
0 notes
Text
2D Compositing Analysis
youtube
Here's a more in depth tutorial on how to composite 2D animation into live action footage using After Effects using a slightly different approach to what we learnt with Gary.
SOUND ON
Above is an animation I made last semester when bringing inanimate objects to life, the most painstaking part of this process was adjusting each frame to the same part of the log as the shot moves, after learning about motion tracking I should be able to improve upon this work and save a lot of time.
0 notes
Text
Compositing Analysis
youtube
To get a better understanding of this project and compositing as a whole I looked into some videos explaining VFX work in the film industry. This is a video I watched a year ago on a similar topic about the VFX process behind Davy Jones beard and why CGI from 2006 still looks better than some VFX work today. The art direction understood how to play into the strengths of the software by designing a character which avoids the uncanny valley that CGI characters of the time fell into. Bill Nighy's emotive performance was captured in the Davy Jones model because they allowed the eyes and brow area to retain their humanity and convey the subtlety of his acting. All of his scenes are in lighting and weather conditions that compliment his character; the issue of rubbery CG characters at the time was played into by designing a squid like character which looks natural when shiny and wet because he's a captain of the sea. Furthermore the costume hides most of the body and allows more time to be spent on the tentacles which add a lot of expression to the character.
youtube
When looking for a new video to learn about compositing I found this short video about The Mask briefly explaining how they achieved the cartoonish aesthetic with a mixture of props and CGI. You've got to keep in mind amplifying distances to make room for VFX that is layered on top of your skin, I'll keep this in mind for any attempts at mapping VFX on top of or directly interacting with people.
youtube
This video covers in depth the use of VFX in District 9 and why a film from 2009 has better looking effects than some films today. Contrary to CGI in the past which usually took centre stage in dramatic sequences District 9 immerses characters into the scene by disregarding their importance, acting as though they are just another person in shot. It makes these outlandish characters feel grounded within each scene despite their insect like character design, they also managed to sell their emotions by applying a human rig to the insectoid models which adds to the realism because we can understand the subtle changes around the eyes and brows. It is also important to consider using an actor as a stand in for a CG character so that other actors have a fixed focal point throughout the scene instead of guessing where they are supposed to look. District 9 couldn't get around all of their issues with a quick fix and had to brute force their way especially when it came to keying out the characters and have to manually repaint the backgrounds for each frame. This is because they couldn't capture a clean plate for each shot because of the handheld aesthetic used for the documentary style filmmaking.
youtube
To add some context to some of the techniques we are learning about this video explains some of the main techniques used in the compositing process. Including:
Keying - removing green/blue screens
Rotoscoping - manually cutting out selected parts of a shot
Paints Outs/Removals - getting rid of wires, unwanted props by painting over them
Matte Paintings - creating background from 2D painting on a glass plane with forced perspective to embed it into the shot, nowadays done digitally
Day for Night - shooting during the day and tweaking lighting in post, its easier to reduce light in post than create it
Assets - embedding 3D assets into a shot or special effects like fire/magic/smoke
CGI -
Passes - multiple layers of a render for diffuse, reflections, illuminations, lighting, etc.. the separation of these layers allows for more control during post production
0 notes
Text
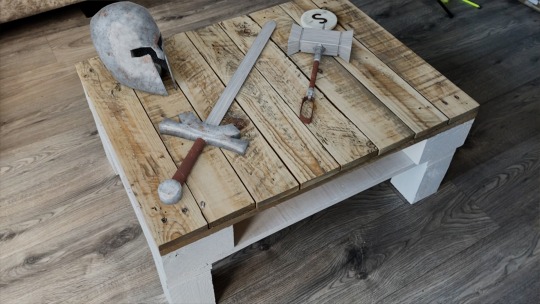
Maya Motion Tracking 2
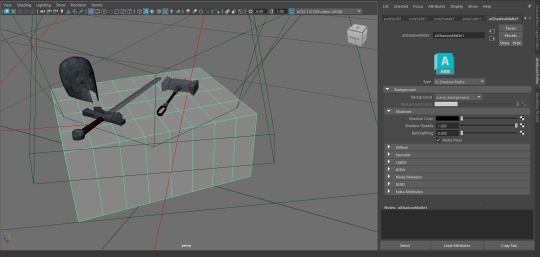
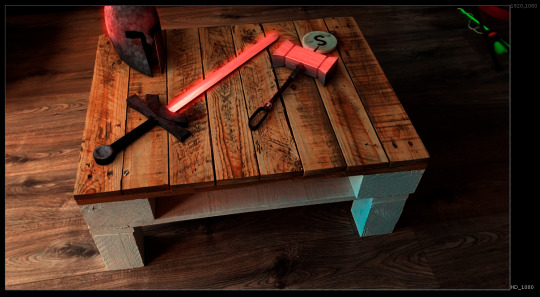
Before I could export things into Nuke, I had to set the table texture to AiShadowMatte so that the shadows on the flat surface would be captured without capturing the model itself (next time I try this I will make the table model more accurate so the shadows perfectly match.

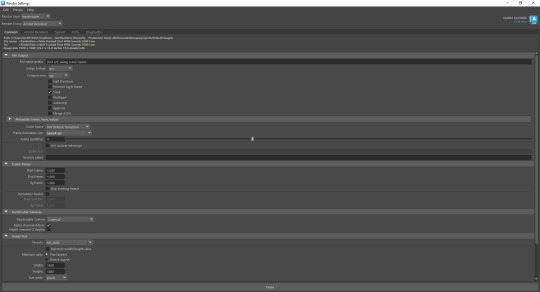

After having a discussion with Paul about exporting from Maya using AOVs I had a chat with Gary to figure out the process which was actually very simple. The most important AOV's that I would use for this project are RGBa (everything captured), Specular Direct (Light), Specular Indirect (Reflections) and Shadow Diffuse (Shadows). AOV stands for Arbitrary Output Variables, rendering a project using AOVs allows you to fine tune each part of the render individually whether you want just the shadows to be a little more saturated or if the reflections need to stand out more with a little extra contrast. AOVs can be selected from in the AOV tab of the render settings and creates a folder for each variable.

Gary showed me how to import the EXR image sequences into Nuke and the correct nodes needed to plug them in together.

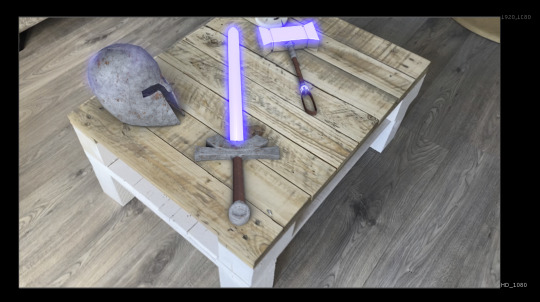
As an example of what can be achieved using AOVs we used a glow node on each Specular node to compare the results.

This is the full node tree that I used for the second image above on the Specular direct which gave the swords a lightsaber-like glow.


Changing the operation of the merge node is equivalent to changing blend modes in Photoshop and has a big effect on the resultant image. We found that using multiply for the shadows and screen for the specular looked pretty good, some of the other operations became masks for the whole image or burned the colour of the merged node.
TURN ON SOUND
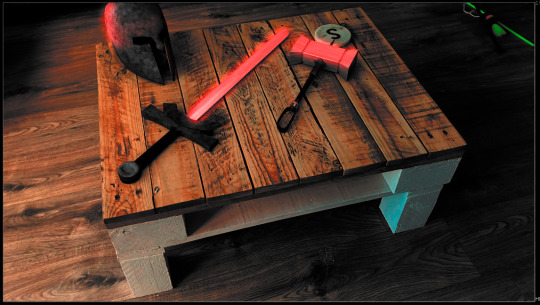
I went back to campus to try it out again on my own on two occasions to see if I could figure out how to export the full video and play around with the node settings to finish the motion tracking exercise. The first video is made using a similar tree to the one I made with Gary but the lighting looks a little bit stale and boring so I wanted to go back into Nuke and play around with the 'Grade' and 'ColorCorrect' nodes because colour grading is a huge part of compositing. The original footage itself is quite plain and sterile and I wanted to see if I could bring out some of the colour and some more saturation to the video. I wanted to give it more of a cinematic feel than the first video however I think I dialled up the blues too strongly on the table leg which is very distracting. I had initially wanted to bring out this blue hue to add a splash of colour to the bland shot but looking back on it it's a bit too much, I should have looked at some colour schemes for a warm sinister tone because I think the blue takes away from this. I may be being overly critical because this is something which is very easy to overwork and get lost into so I need to take a step back next time so I don't get lost into subtle changes and instead ask someone with fresh eyes to see what they think. Overall the second video looks somewhat cinematic and considering it was just me fiddling around with some new nodes it looks alright.
I also wanted to see if I could animate the glow so I did a tiny bit of keying to adjust the glow over time.
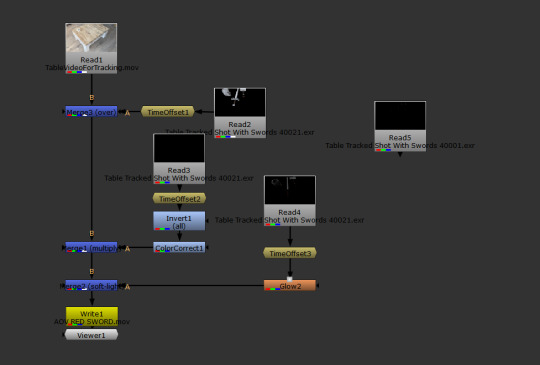
This is the original node tree, the main issue I had to figure out myself was the time offset nodes because all of the EXRs were numbered starting at 40001 so I had to set the offset to -40000 to make the AOV footage sync with the original video.
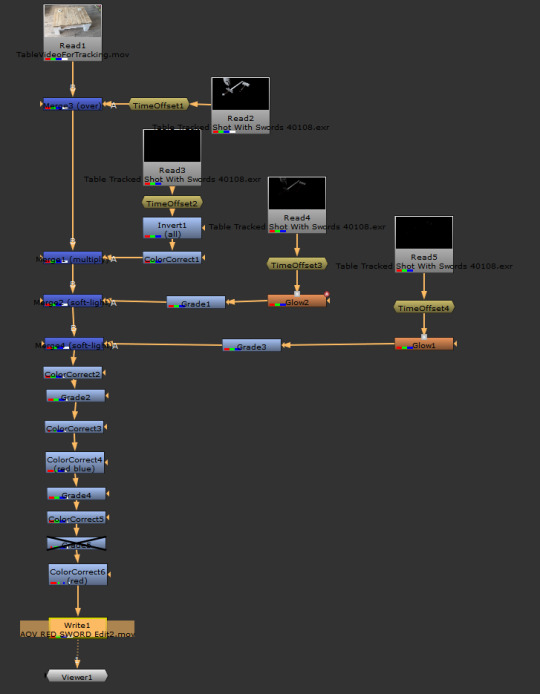
This is the final node tree with a lot of different correctional modes attached.

These were some of the tests made whilst tweaking colours, I wanted to use this as am opportunity to play around with colour grading so that I understood the limitations and here I have learnt that it is better to work within the confines of the original footage and work in a process of reducing a combination of green, reds or blues rather than trying to create more of one colour which I'd already lacking. I need to do some more work on this and have a think about the lighting I want for my video because it may be a good idea to set up some lighting when filming to make it more cinematic. I think I should have leaned into the colour palette of the first image as the original video is quite desaturated so trying to force a warmer palette from quite a cool washed out room didn't work as well as a colder palette could have.
0 notes
Text
Maya Motion Tracking
youtube
This is the first part of the motion tracking tutorial for this exercise with Gary however the videos differ slightly to what we did in class.
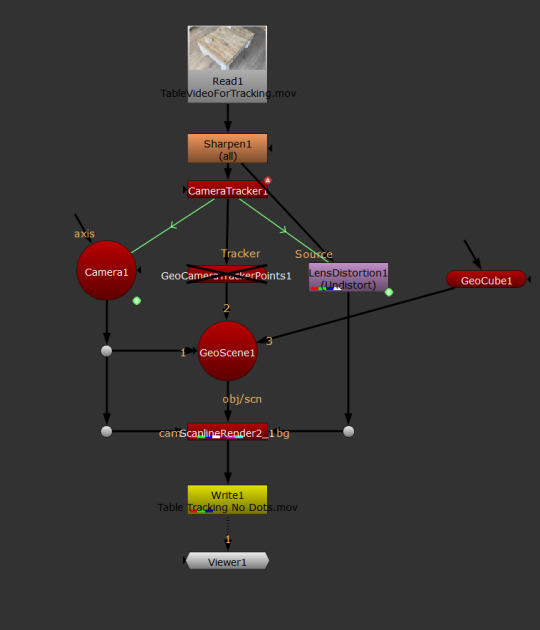
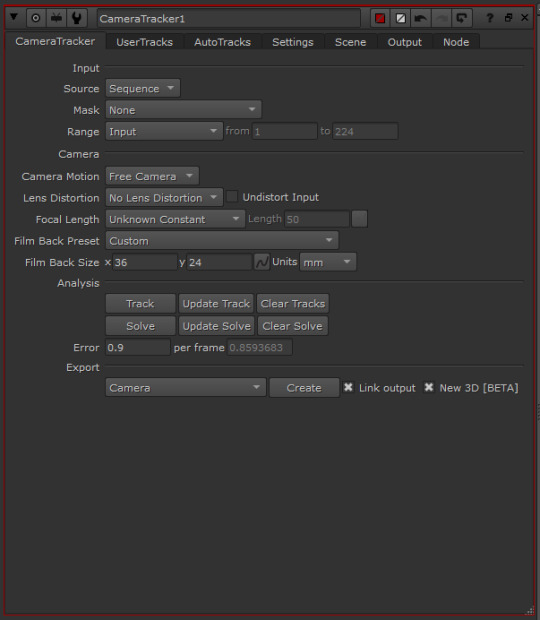
The first part of the process is importing your footage to Nuke and adding a sharpen node to up the contrast which helps out Nuke's motion tracking process which operates by picking out high contrast points to map throughout the video. Then add the camera tracking node and allow Nuke to map the points, select those on the floor plane so Nuke understands which points are on the same level. Follow along the video and build the rest of the node tree most of which comes from the GeoScene and the GeoCube is the marker we use when in Maya to understand where the object would be in relation to the camera.
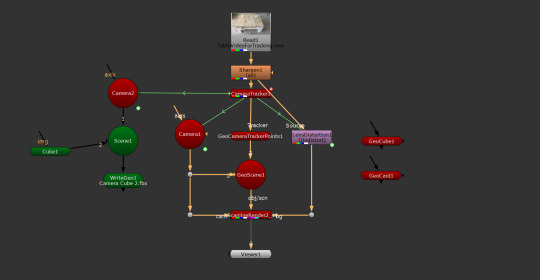
I will recap this process with some of my own footage to solidify my understanding of 3D motion tracking.
Here the finished node tree which was used in the footage exported to Maya.
Here the footage in Nuke with all of the points tracked and the GeoCube in place to use as reference in Maya.


Once exported into Maya was imported the video footage as an image sequence onto the image plane. Then I added a cube in the shape of the table underneath the cube imported from Nuke. We then added some props from the
Here's an exported shot still frame from the footage with some lighting added and textures added and tweaked. There's not much more to do other than put all of the footage together in Nuke which we have not yet gone through with Gary in class.
0 notes
Text
Videography

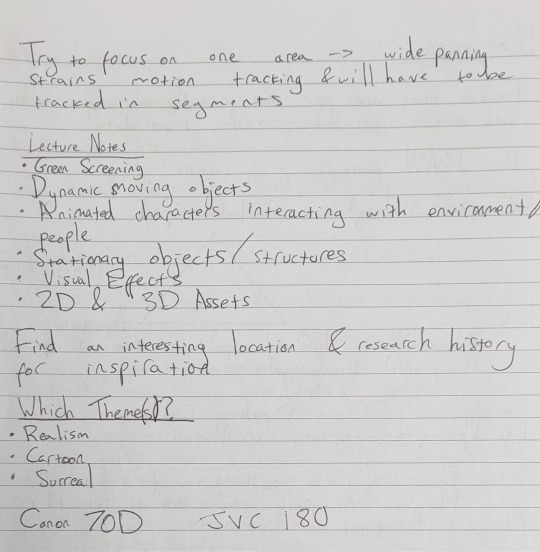
These are my notes from the lecture about videography, I've never used any camera other than my phone camera in the past so I don't know a lot about these camera settings so I'm trying to soak in as much as possible during these sessions and from my time spent messing around with the cameras.
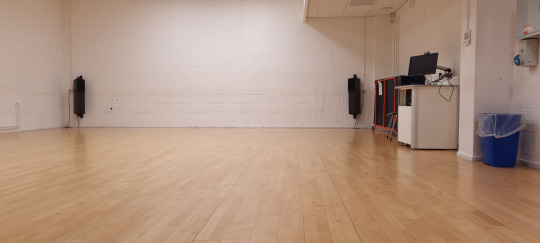
Here's some of the footage from the camera session after being taught some of the basics, other than the first video with me walking with the JVC 170 the other footage is my own recordings. The second clip was filmed using the Canon 70D/80D and I am going to use this as a piece of test footage to practise motion tracking with a 3D asset which could be animated. The third clip is the same shot filmed using the JVC which I used first and obviously didn't correct the settings properly as it is overexposed possibly due to the ISO and Shutter speed both being too high. The footage of the last two clips is very grainy which probably means that the ISO is too high which created all the noise in the footage. Those clips are a bad showcase of my camera setting understanding but I was playing around with different ideas possibly themed around found footage content like the Blair Witch Project or Outlast. I haven't decided what sort of a short I want to make yet but I can already tell that if I am going to film in a dark room then I need to pay attention to setting up lighting so that the video quality isn't destroyed by boosting the ISO in the dark.


The top camera here is the JVC 170 and the bottom camera is the Canon 70D/80D. If I was to choose between the two cameras I think I would use the Canon because the video quality was generally higher in both my footage and my groups footage and it seems like changing the settings is more intuitive. I am going to mess around using my phone in the pro video settings so that I can get a better understanding of how they can make or break a shot.
0 notes
Text
Photoshop Exercise
youtube
We had to try and Photoshop a random image into one of the photos we took during our photography lesson. This isn't something I've done before so I used the video above to guide me through the process.
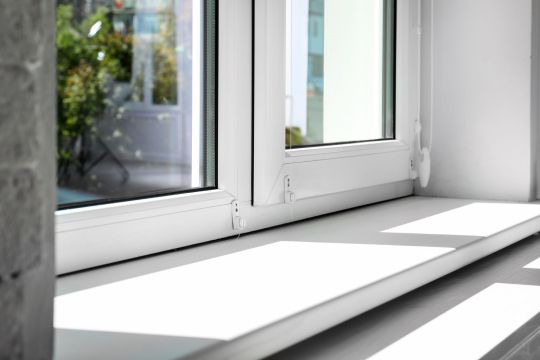
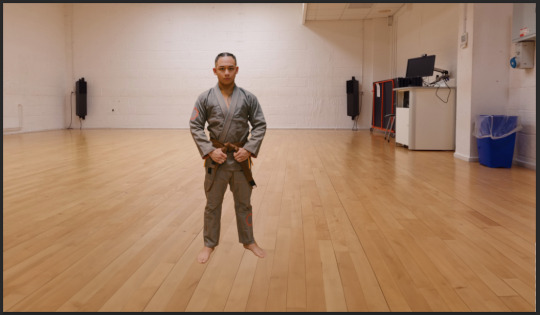
This image gave me the most room to frame a figure into the image with interesting lighting and reflections that I would have to figure out.
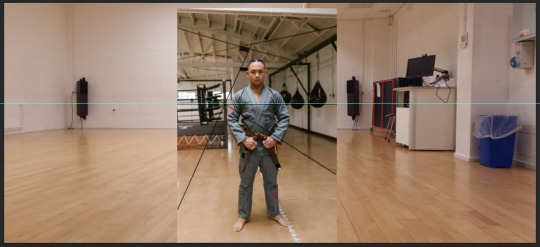

The video above stressed the importance of finding an image with similar lighting and although the image I selected has a tad too much shadow on the legs, the top lighting looked like a decent fit. I cropped the image and following the video above, I found the horizon line for both images to find a position in which the perspective of both images would match.
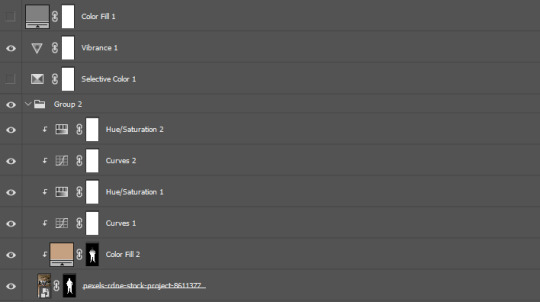
I followed the steps in the video to tweak the saturation values and decreased the blues and slightly decreased the greens so that it had a warmer hue overall. Above are most of the adjustment layers I used when trying to find the right balance of shadows highlights and mid-tones (using curves) and colours (using hue/saturation). I used a black and white filter to figure out the light balance of the image and selective colour and vibrance to exaggerate the area of each colour to figure out where the most saturated areas of the image were.


I tried to figure out where the light source would be to figure out where the inner and outer shadow would lie on the ground. I'm pretty sure that there are multiple light sources in that room but for the sake of this test, I am focusing on the light in the back as the dominant source of light. I also used generative fill on the bottom of the image because I wasn't happy with the framing of the image as he looked a little too small and the composition was too forced so generative fill helped a lot.


The shadow needed softening towards the edges so I added a layer mask to fade it out slightly. I couldn't decide on the direction of lighting because when I started this I hadn't taken into account the reflection in the floor and so I wasn't entirely sure where to place the shadow and reflection in relation to one another. As there were already shadows angling off to the right from the dominant sources of light, I decided to change the angle of the shadow to give room for the reflection which throughout the image is entirely vertical. I also softened the edges of the character as the outlines of the image seemed a little too strong.

Here's the final edit with the reflection and shadow and I think it looks fairly believable, the weakest part is probably the part of the body with the white wall behind it as it might have needed more fine tuning to make things work but that's something I need to look into more for the next attempt at compositing. I may be over scrutinising but for the most part I'd say this worked out fairly well and has helped my understanding of this process which I can apply to the adjustment nodes in nuke as I have done for the robot composite before.
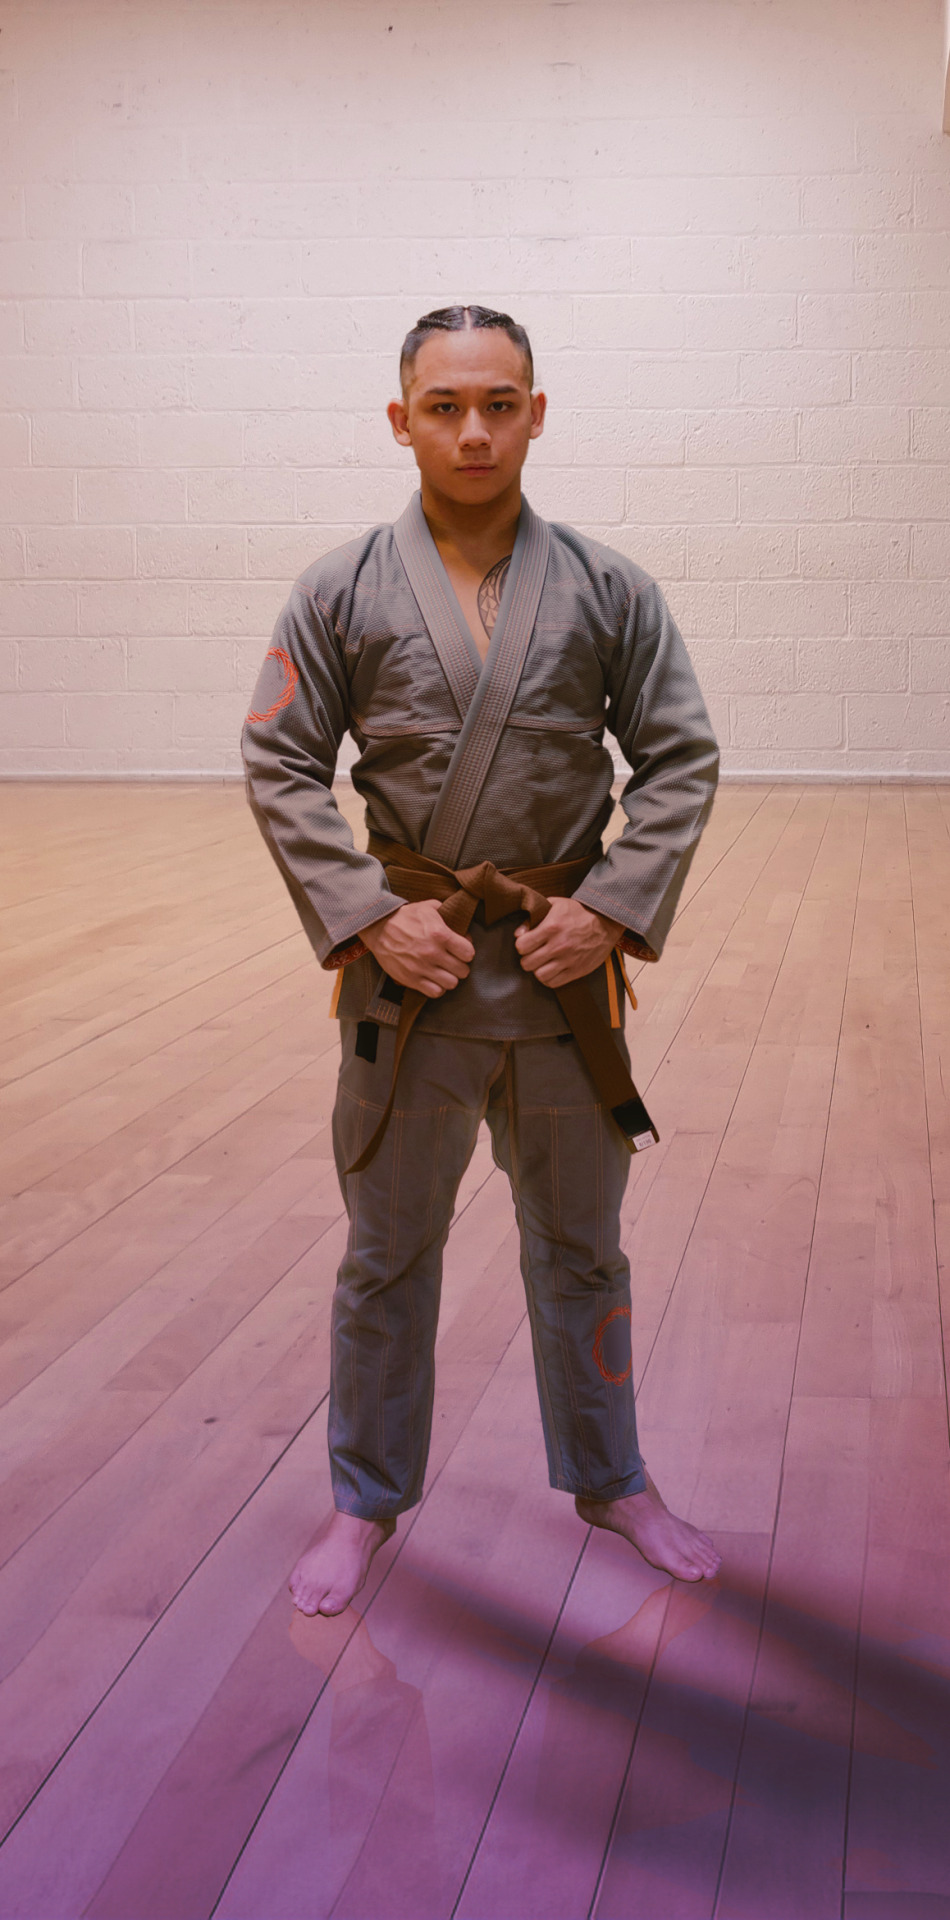
To tie things together quickly, I added some gradient fill layers over the top to add a filter to the whole image which should make things look a little more cohesive. The purple in the bottom right is overbearing but it was more to test how it sells the composite within the image and I'd say it hides some of the imperfections.
0 notes