
onlinesims
onlinesims
new simblr acc17 • simmer • black
48 posts
Don't wanna be here? Send us removal request.
Last Seen Blogs

nissdesign
NissDesign
adarina
ADA

blackforestdoc
Unbetitelt

dokidobe
yellow.dr.monv

beyonderground-blog
Beyonderground
Text
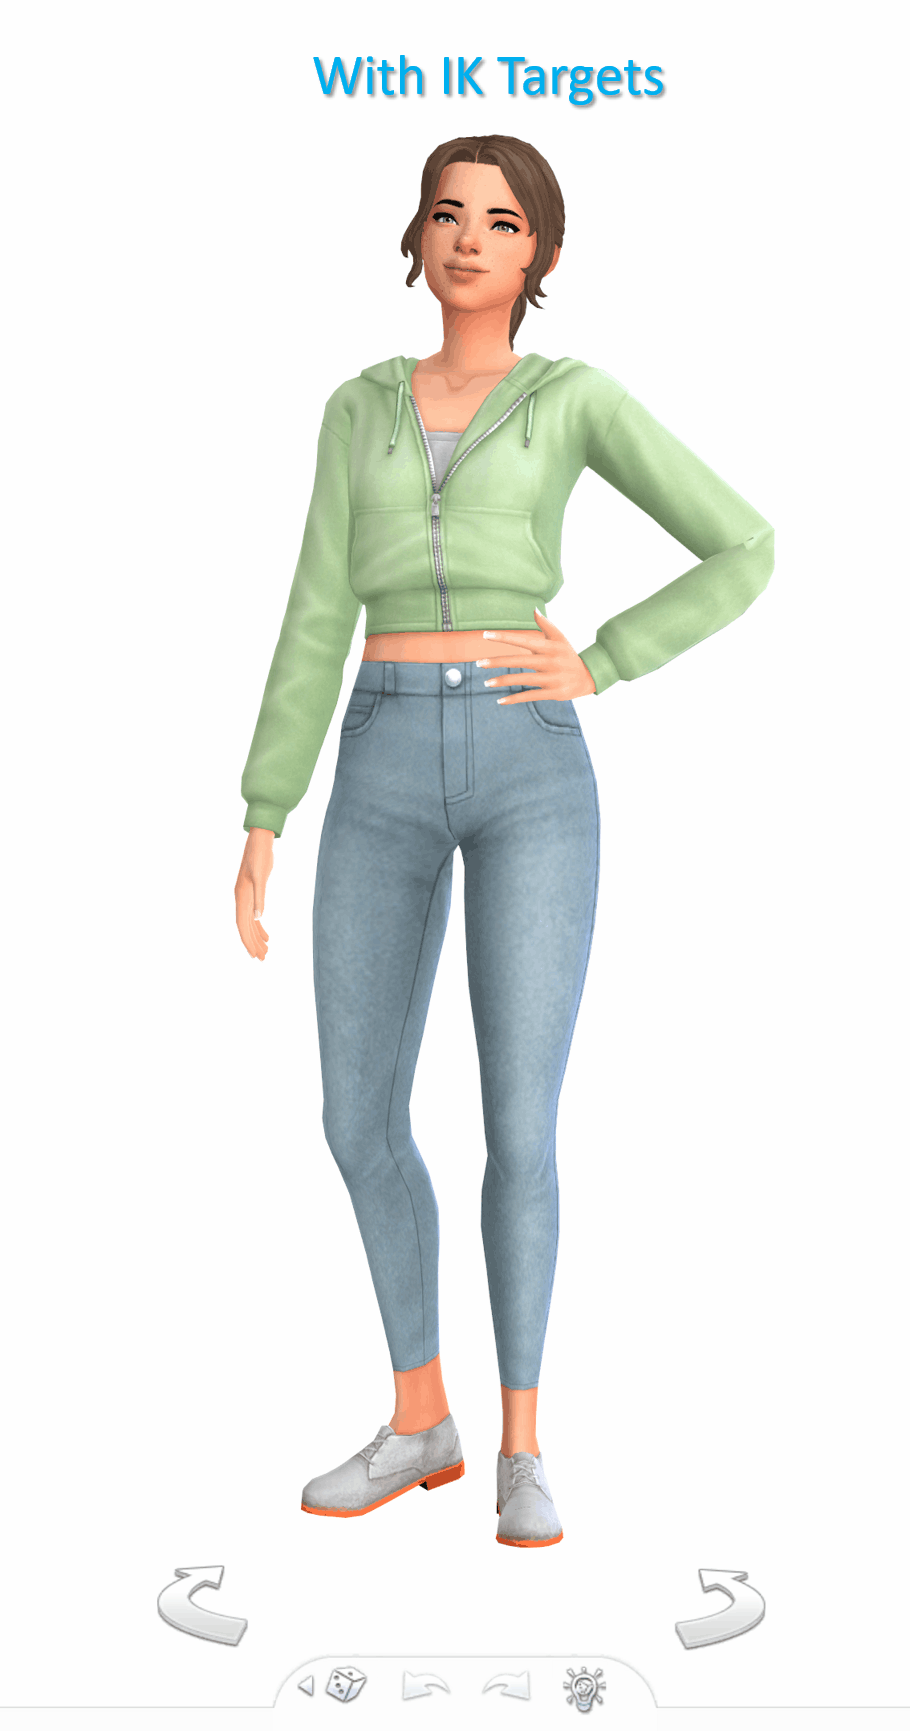
Making dynamic poses/animations that adjust to a sims body with Animation Tools by thepancake1
Made this short guide after talking to thepancake1. I haven't seen many people use this feature yet and felt like it might be worth sharing? There are some limitations to be aware of, but I think it's a useful option (for poses as well as animations) 😊
Many thanks to thepancake1 for the tools and for the helpful explanations he provided for this guide.
1. Background and in-game mechanics
The way TS4 handles different body shapes and clothes in animations (for example, in order to avoid clipping) is basically by putting markers (“slots”) on the surface of a sims body that can be then used as (IK) targets with the in-game IK system.
As you probably know, IK (Inverse Kinematics) – as opposed to the default FK (Forward Kinematics) – is a set-up where bones in a chain are influenced backwards. So, for example, when you move a hand, the arm will follow.
In a similar way, what in-game IK does, is assigning a bone or slot to animate relative to. For example, if your sim is posed with hands on the hips, you can assign the hands to the hips slot and the game will then process the pose/animation and perform IK in real time to change the position of the arms and hands relative to the hips.
Note that there are limitations to this system, though, as only hands, feet and the root bind can procedurally target other bones/slots.
Hereby, feet targets and root target are mainly used in interactions with objects, in particular in sitting animations (where, for example, the root is targeting a chair slot).
Hand targets are mainly used for adjusting a pose/animation to a sims body shape and clothes.
The in-game IK always influences the complete arm/leg (chain: foot-calf-thigh/hand-forearm-upperarm).
You can find an article that provides some background information here: https://simsvip.com/2014/08/20/community-blog-the-sims-4-animations/
2. Using the feature in custom poses/animations
Per default, when you make custom poses/animations with Blender and S4S, the relevant information that the game requires to apply in-game IK is not included. And so, you will notice that while a pose might look good with the base rig in Blender, it might not fit other sims with a different shape in game, in particular causing clipping.
You can use TS4 SimRipper to fine-tune a pose for a certain sim, but this might not be the solution you’re looking for, if you share your poses and/or want them to be compatible with different kinds of sims.
The animation tools now include a feature that makes it possible to use in-game IK with custom poses/animation as described in part 1.
Disclaimer:
The animation tools are in development and subject to change.
Currently TS4 SimRipper sims are not properly supported. (Although, imo for the purpose of the task, it doesn't make much sense to use them as models.)
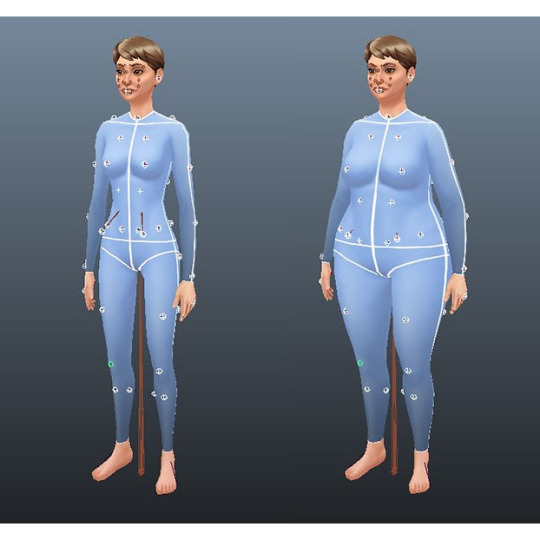
As you can see in the comparison below, there might be some accuracy loss for the flexibility gained. (The position of the arms in the version without IK targets matches exactly the pose I made in Blender but doesn't work at all for the heavier sim causing extreme clipping. At the same time, the version with IK targets deviates a bit from the pose I made, but works for any sim.)

Below a short guide on how to set it up with the example pose I made.
1) You can download the tools HERE. Make sure to check the installation guide and tutorials in the wiki tab for the basics. (Note: The tools were originally made for Blender 3.0 but also support newer versions, in particular Blender 3.3.)
Some additional tips for poses in another post of mine HERE.
After you set up the tools in Blender and have made your pose:
2) Go to the S4AnimTools panel. Fill out rig name, clip splits and clip name as described in the tutorials linked above (also make sure to select “Allow Jaw Animation”).
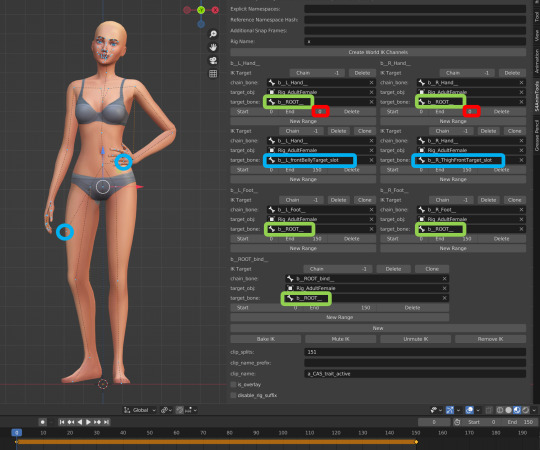
3) Find & click “Create World IK channels”.

This will create 5 IK channels for the afore mentioned hands, feet and b_ROOT_bind bone. You can also add channels either by cloning the existing ones or clicking “Create World IK channels” again. To get rid of unwanted channels click “Delete”.
4) Set up the targeted bones/slots based on the type of pose you made.
In my example, I created a pose where a sim has the left hand on the hip, and the right hand close to the thigh. Therefore, I added IK channels targeting the “b__L_frontBellyTarget_slot” and “b__R_ThighFrontTarget_slot”.
The slots are marked blue in the picture below. Some notes:
The slots are hidden by default, I made them visible for the picture. You can unhide all bones/slots available by pressing Alt+H. But I recommend doing this on a separate rig/in another blend file or undo it directly afterwards if you don't want all the (unneccessary) bones/slots blocking your view.
The selected slots worked well enough for my example, but you should figure out what is suitable for you. (Fo example, the HandDangle slots seem to be commonly used when the arms are hanging near the body.)
As orientation you can also look up clip files for EA poses/animations via the S4S Game File Cruiser and see what bones/slots are used as targets ("Warehouse" tab -> "SlotAssignments"; IKChainIndex: 0 - left hand / 1 - right hand / 2 - left foot / 3 - right foot /4 - root bind). On that note: The Clip Pack export loses/resets the slot data, but you can use it to find an animation and check its Instance ID to then search for in the Game File Cruiser. (If you know the name of an animation you can also determine its Instance ID by converting the name with the S4S Hash Generator.)
5) To ensure an animation works properly and, in particular, blends with other animations in game, each IK channel should (also) target b_ROOT of the rig.
The bones are marked green in the picture below. This set up was recommened to me by pancake. Another experienced creator mentioned though that it's only necessary to target b_ROOT at the start and end of an animation, in his experience.
Also note that this seems to be a restriction for animations that are made as in-game interactions and might not be necessary for poses or animations used with Andrews Pose player.
6) The start and end frame is set according to the length of the pose/animation (I want to use the pose as a CAS trait pose and set the duration to 150 frames = 5 seconds), except for the b_ROOT target for hands where the end frame is set to 0 in my example, since they are also targeting the slots “b__L_frontBellyTarget_slot” and “b__R_ThighFrontTarget_slot” during the animation.
Note: My example is a static pose. In animations, however, you can also target different slots at different times by setting up multiple IK channels and specifying the start frame and end frame respectively.
7) Bake the animation by pressing “Bake IK”.
8) Export the clip and create a package with your pose/animation as described in the linked tutorials above.
@ts4-poses @thefoxburyinstitute
667 notes
·
View notes
Photo


Oleander’s Sims 4 Painting Overrides
This file will replace the easel paintings that your sims can create in the game! If you play as an artist a lot like I do, you get tired of seeing the same paintings all the time! So I made this to change things up! It does not include the landscape and figure paintings categories, just the base game styles and all emotional categories. It is not compatible with any other painting override mod, so make sure you only have one in your game at a time. Place it in your mods folder. Thank you to DaisyTighfield on MTS for your tutorial and all of the painting DDS files… I was struggling for so long searching for them on my own in Sims 4 Studio! Here is their painting override file, check them out!
More info on my patreon - click the link below! The file is free!
download ad-free here
2K notes
·
View notes
Text
UNDERSTANDING RESHADE - a guide by amoebae
This guide aims to give a general overview of what ReShade actually is, and a working understanding of the difference between the ReShade binary, ReShade shaders, and ReShade presets.
Additionally, at the end of the guide you'll find basic installation instructions, information about how to make a backup of ReShade, how to uninstall ReShade, and a few other helpful tips and tricks, including troubleshooting.
---
I've wanted to make a basic overview like this for a long time. I didn't realise how long the guide would end up! It's text-heavy, no screenshots, no videos.
I initially wanted to write something to solve the problem of people getting confused about the difference between ReShade (the tool) and shaders when they update to a newer version and find their presets might not look quite the same. I quickly realised that required a proper understanding of what ReShade actually is and how its different constituent parts work.
Never one to do things by halves, I got stuck in.
The result is something that hopefully gives a solid grounding in the way ReShade works, so people are better equipped to solve their own problems as they arise.
UNDERSTANDING RESHADE - a guide by amoebae
809 notes
·
View notes
Text
mutt's guide to using dsr on ts4, with pictures!!!
ok so, dsr is a thing available for nvidia gpus that allows you to take veeery high resolution screenshots of games without much trouble, like this
it's an alternative to srwe, as it plays nicer with a lot of reshade shaders and is just, generally more nice to use! let me teach you how to use it - full tutorial with pictures for every step under the cut (im sorry its too long without the cut)
step 1: right click your desktop and open the nvidia control panel
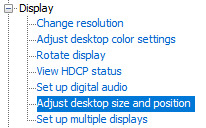
step 2: go here (adjust desktop size and position)
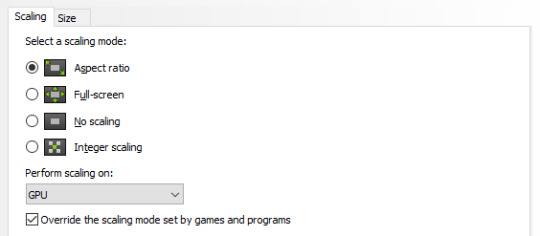
step 3: make sure your settings are set as follows! this is important
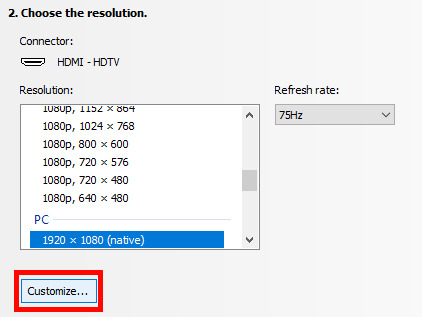
step 4: now, go here (change resolution)

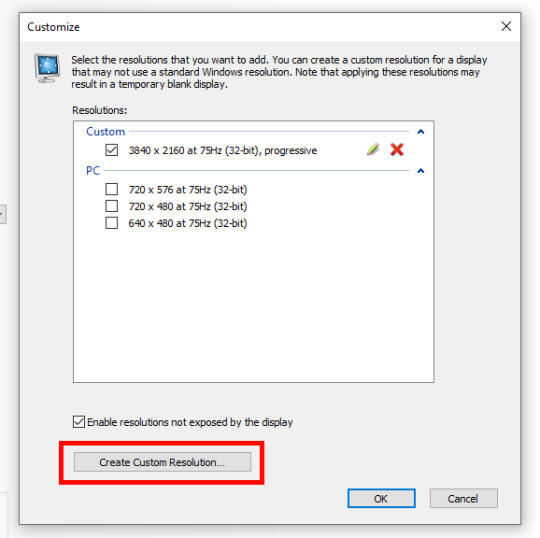
step 5: under change resolution, click on this button (highlighted with a red square)
step 6: in the windows that appears, make sure that "enable resolutions not exposed by display" is ticked! this is very important! (again, highlighted in red - it should look like this)
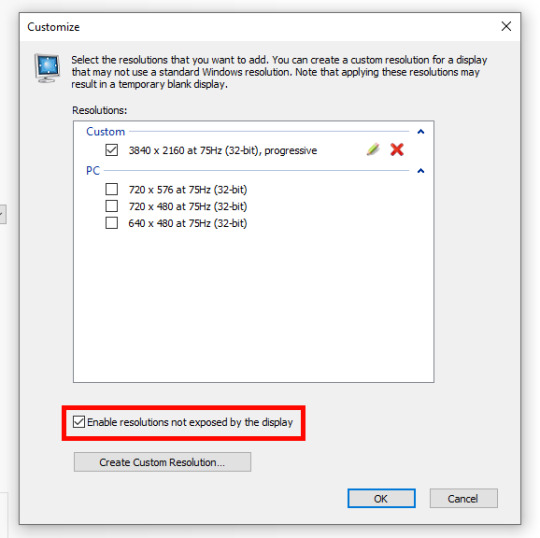
step 7: now, click on "create custom resolution"
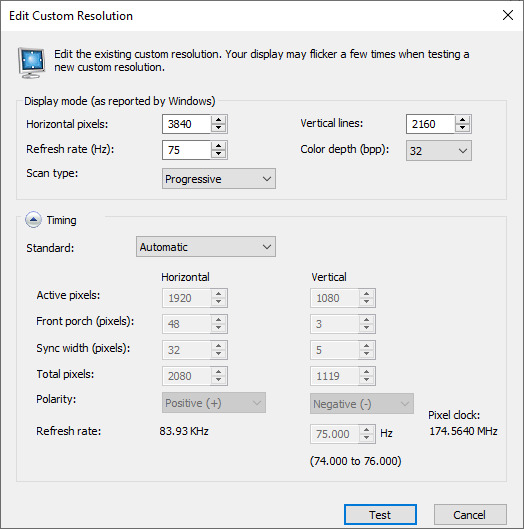
step 8: this is where you set your desired resolution, and where i get a bit rambly; so, in my opinion, there is ZERO reason to go above normal 4K for TS4, as it's generally not a really high-poly game and it has rather simple graphics. you can fuck around a lot here, but if you don't feel like it, here are my settings - this will give you 4K screenshots. NOTE: THE REFRESH RATE DOESN'T NEED TO BE 75! SET IT TO WHATEVER THE REFRESH RATE OF YOUR MONITOR IS!
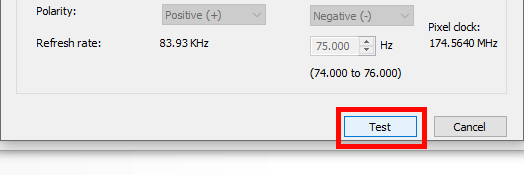
step 9: now, click on test
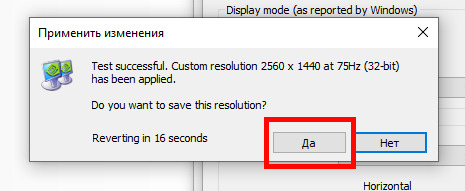
step 10: let the thing load, and after it's done, a window like this should pop up.. but yknow, in your language. click on "yes" (or accept or ok!! idk mine's in russian; basically, the button highlighted here!)
step 11: click "ok" in the window that pops up! like this! afterwards, close the nvidia panel

step 12: open the sims 4 and go into game options, then into graphics
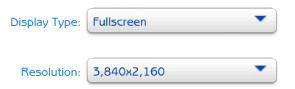
step 13: set your "display type" as "fullscreen", like this

step 14: under "resolution", select whatever resolution you setup earlier; in my case it's 4K, so if you used the same resolution, your settings should look like this
step 15: click on apply changes!
AND UR DONEE!! WAHOOIEE!! now, take your screenshot using reshade, and then go back into sims settings and set it back to what you usually play at, then apply changes!
every time you need to take an HD screenshot, simply open game settings and use your custom resolution! that's it, have fun :3
617 notes
·
View notes
Text
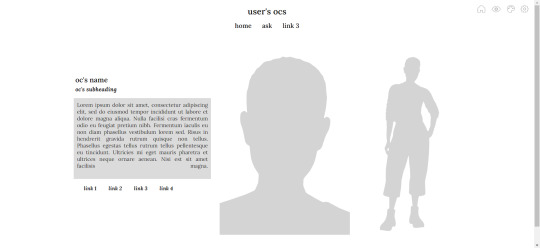
sims character page code
hii, ages ago i made a simple but customisable character page to try and get the hang of html and css, so i thought i'd release it. all of the instructions are within the code!
the code will look like the first pic when you put it in your page but you can play around with it to get different looks.
i tried to make it as beginner friendly as possible so even if you have no code knowledge you should be able to follow it :) but if not, don't hesitate to send me an ask!
preview | download code
1K notes
·
View notes
Text
Writing Character Arcs
Here’s an easy secret about character arcs—they fit the same structure as plots (that’s because your main character’s arc is the main plot, but I’ve already talked about that here).
That means, your character arc will somewhat follow this structure:
Normal world
Inciting Incident
Big thing happens 1
Fun and Games
Midpoint
Things get worse
Big thing happens #2
Crisis
Climax
Resolution
It begins with your character in their ‘normal state’—who they are from their backstory. They have some sort of problem that they aren’t addressing, because why would they? Change is hard.
Then, inciting incident. Something happens that sends them into a “change spiral”. They’re forced to face something they’ve been ignoring or avoiding. This incident can be just about anything that turns their world upside down—a new person comes into their life, an old person they left behind reappears, a close one dies, or a friend moves on. Etc. Etc.
Big thing #1 is the first action they take to “right” what happened in the inciting incident. An old flame reappears in their life, maybe they decide to meet up with them. A close friend dies—maybe they decide to take a trip away for a little while. It is an action taken by your character because of what happened in the inciting incident.
Fun and Games is the part where things seem to be going okay for them. Or things can be going terribly for them—it’s up to you. Either way, it accumulates to…
The midpoint. Something happens and it’s terrible and probably their fault. The old flame reinforces why they stopped going out by breaking your character’s heart again. The funeral for the friend is happening and MC missed it. Etc.
Things get worse is just hammering home this point. From their actions, things are going downhill.
Big thing happens #2 is the second action they take to right things again. This time they’re changing strategies from the first thing they tried. Maybe if they tried avoiding their problem first, they’re going to confront it (for better or for worse).
The crisis is the recognition of their initial problem or flaw. Leading to:
The climax, in which the character either chooses to change or to stay the same. Grow and do the right thing knowing what we now know, or stay stagnant and do the thing they would have done in the beginning. What you choose here depends on if your story is a tragedy or a comedy—tragic characters don’t recognize their flaw and grow from them.
Resolution is the consequences of their actions. For tragic characters, things are probably bad and remain that way—we need to show the readers their choice was the one wrong. For characters who do grow, we see them begin to thrive for the first time in the story. They’ve achieved what they wanted, though maybe not in the way they thought they wanted it.
(Pair this post with Character is Plot to flesh out your characters.)
942 notes
·
View notes
Text
i think simblr needs to stop acting like theres only room on here for fun slice of life sitcoms and light dramas. not being able to talk about certain parts of ocs or their stories because people on simblr are puritanical and cannot comprehend a character thats worst crime isnt anything beyond littering is ridiculous. theres so many cool ideas that none of you hear about cause people dont wanna have to deal with idiots in their inbox trying to tie morality to fiction that is meant to be fucked up and in genres similar to horror and psychological horror.
658 notes
·
View notes
Text

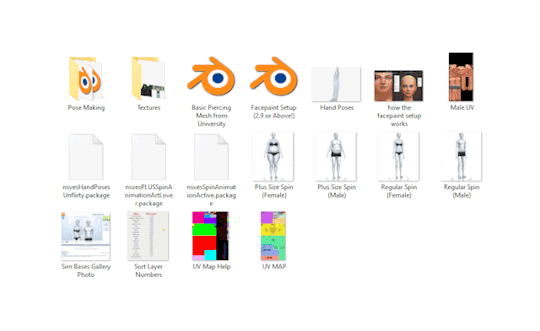
nsves cc making resource pack.
dl | patreon | further details of what's included under the cut. people wanted a resource pack i curated so here it is! it's a free for all, do whatever you want! all of it is BGC and texture are from paid packs so you don't have to own/download them
pose making rigs (set for a flat view for easiness, 2.7+) that has almost all animals, plus sized bases (made by me), and mermaid bases.
textures that are pretty useful such as embroidery patches, fur textures, knitted bralettes, piercings (for the included piercing mesh), pins and rips, badges, and a crochet pattern strip i created from the punk stuff pack
facepaint setup i personally use for 2.9+ as a sketching base (short explanation written on the provided preview)
piercing mesh from university that you can do anything with!
useful images such as uv maps and what they include, facial expressions for pose making, sort layer numbers.
animations created by me! two are plain 360 spins that go twice around for preview gif making, the other is a set of hand poses meant for rings/bracelets/etc. there is a gif preview for all of them to show what they look like
sim bases that i personally use to just use as a start up with no CC or custom presets (even though it says it does, it's probably just seeing all my custom presets and sliders). they're available on my gallery id: alienflesh
592 notes
·
View notes
Text
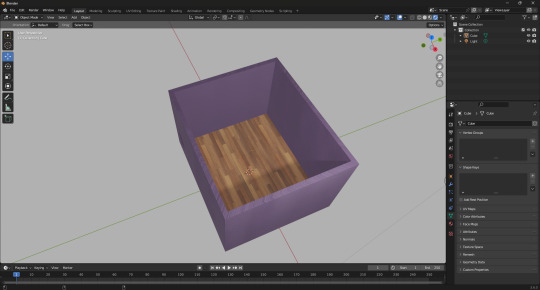
Making a Room in Blender
I've gotten a couple asks about my process, so I decided to make a lil tutorial. Beware though, I'm not finna explain Everything so if you're brand spankin new to Blender, this might not be the one for you.
Step 1: I go in game to build the room first, this way I know all the objects I wanna use and have a pretty good reference for the scene I'll make in Blender.

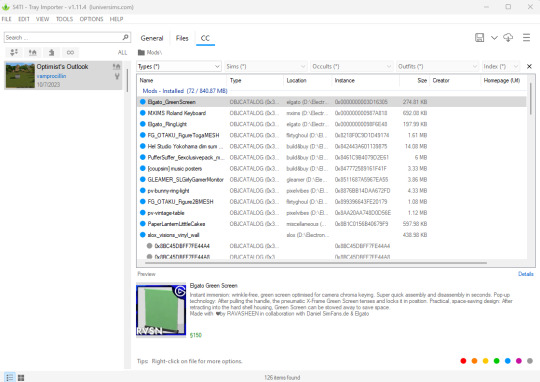
Step 2: I save the lot to my in game gallery then open Sims 4 Tray Importer. Click the lot you just saved then click the CC tab.
Step 3: This is gonna be a bit tedious, but since there's no way to mass export all of the textures and objects used, you'll have to go one by one. Double click each package file, the folder where the object is located will pop up, open it in Sims 4 Studio. Export the texture(s) and the mesh.


Step 4: Once you've gone through all kajillion package files, whatever folder you decided to keep them in should look a little like this.

Step 5: Open Blender. If you're doing a basic 4 walled room, you can just use the starter cube. I usually remove the top face then apply the solidify tool to thicken the walls. For some nice wall and floor textures, I recommend Poliigon (watch this tutorial for the download link + how to apply the textures).
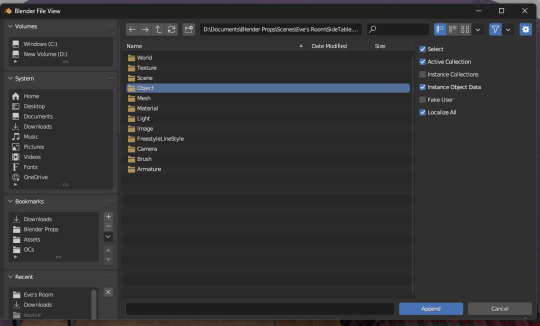
Step 6: Click File, then Append, navigate to where you saved all of your textures and meshes and click one of the .blend files.
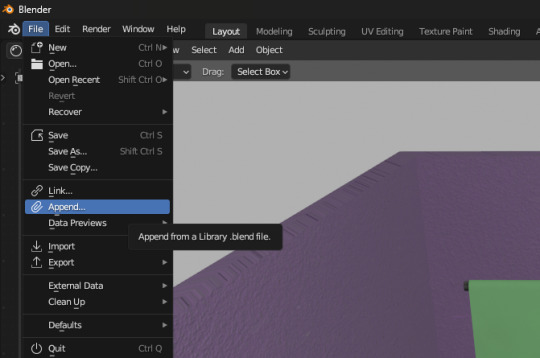

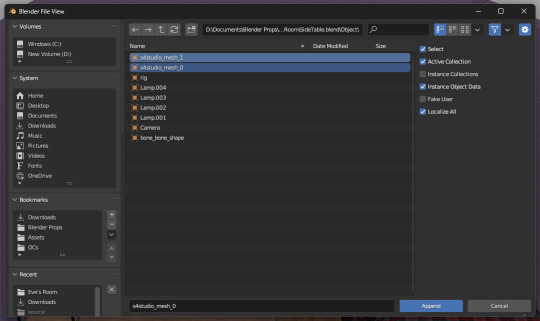
Step 7: It will lead you to even more folders, click the one that says Object. Once inside the Object folder, click the s4studio_mesh files (one of these will typically be the shadow which you won't need so you can delete it once you see which is which) then click Append.
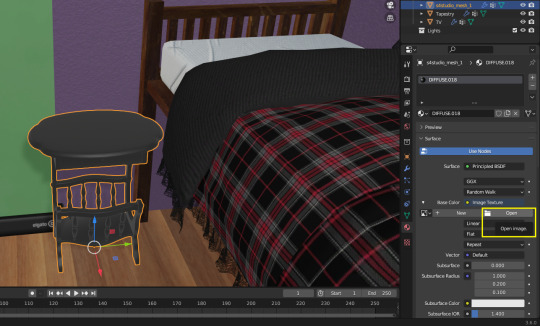
Step 8: The object will appear completely white, so click it then go down to the Material tab, click Use Nodes. A Principled BDSF automatically appears, click the little yellow dot right next to Base Color then hit Image Texture.


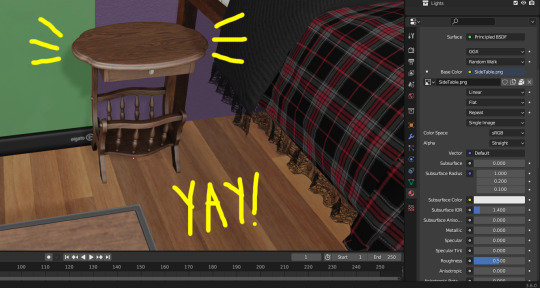
Step 9: The object will then turn black (it also adds a specular, I usually just turn that all the way down to 0 depending on what the object is). Click open, then select the corresponding texture you saved. And boom, you just added a piece of furniture to your lil digital room.
Step 10: Repeat this 600 times until you get carpal tunnel and voila...

Side Note: Sometimes textures get lost from being moved around or just because Blender decided to be an asshole, so to avoid that, you can click File, go down to External Data, and hit the button that says Automatically Pack Resources. But please be aware, this does take up quite a bit of memory and could possibly slow down Blender depending on your specs.

175 notes
·
View notes
Text
hey here's a direct link to the rebels vault, no sign ins required.
488 notes
·
View notes
Text
anyway
"When you contribute UGC [user generated content], you grant to EA, its licensors and licensees a non-exclusive, perpetual, transferable, worldwide, sublicensable license to use, host, store, reproduce, modify, create derivative works, publicly perform, publicly display or otherwise transmit and communicate the UGC, or any portion of it, in any manner or form and in any medium or forum, whether now known or later devised, without notice, payment or attribution of any kind to you or any third party.
You also grant to all other users who can access and use your UGC on an EA Service the right to use, copy, modify, display, perform, create derivative works from, and otherwise communicate and distribute your UGC on or through the relevant EA Service without further notice, attribution or compensation to you." - ea terms of service
"Mods must be non-commercial and distributed free-of-charge. Mods cannot be sold, licensed, or rented for a fee, nor can Mods contain features that would support monetary transactions of any type." - official sims 4 policy on mods
free cc resources:
my free cc tag
** all sfs folders
dollhouse mafia
* telegram group (instant messaging app), requires phone number to sign up but you can set your # to private. 100% safe and my most used resource
ts4rebels
* new site, new link
paysitesmustbedestroyed
* it's back bby!!
simsgalaxy
* vk page, requires account but is free (**good for sl conversions)
kemono.party (for patreon/boosty releases)
* use an adblock on this one
losts4cc
* not a pirating site, just an archive of cc that's been deleted/lost
🏴☠️🏴☠️🏴☠️
2K notes
·
View notes
Text
ur friendly reminder that animations.txt exists and is ur friend for if ur lazy like me and dont like to make ur own poses/ search for hours. just pose by name and voila u make it work. just do ctrl+f and type in what kinda pose you want and im sure you can find something. also you dont even need andrew's poseplayer if you use wicked/wonderfulwhims which also include a position adjuster to move ur sim abt like with the tool mod but without the tool mod.
589 notes
·
View notes
Text
a little list of links to how-to posts and videos. i'll add more on as i find them! these are tutorials i found really helpful. if there's something you wanna learn how to do and it isn't linked here, then send me an ask and i'll search for a tutorial for it lol.
meshing tutorials by platinumluxesims
changing lot sizes in s4s
turning builds into deco houses
how to make animations by pixifiedtips
neon sign tutorial by simslife
how to make cc objects by sieory
how to make cc clothing by powluna
how to make custom tv shows by pixifiedtips
how to make backdrops into objects by awingedllama
how to make custom loading screens by goddessgamez
how to make custom poses by katsverse
how to make animations by simmer_creator
how to make objects by illogicalsims
newborn overlay tutorial by awingedllama
how to make alpha hairs by iconicsims
how to make maxis match hairs by alerii
how to make alpha clothing by famsimsss
blender render tutorial by famsimsss
ts4 studio tutorial index
how to make cc nails by pinkpusay
how to make cc earrings by christopher067
last updated: 08/30
616 notes
·
View notes
Note
Hi I was wondering as a beginner can you what software do you use as a beginner and what videos tutorials to watch to make Sims 4 custom content
hi! i use blender for meshing, blender+photoshop for texturing (photopea.com is a free alternative to photoshop. has all the same features and crashes less), and sims 4 studio.
a video tutorial i found very helpful was this one by illogical sims
mostly, i’d recommend beginner blender tutorials that cover simple things like navigating the 3D viewport, keyboard shortcuts, what options each tab contains, how to bake shadows, how to make a UV map, and so on. the sims 4 studio interface is very user friendly and easy to figure out, whereas blender is just a confusing grey hellscape of dropdown menus the first time you open it up. i had all the shortcuts written down for a couple months before they became muscle memory
if you get stuck or need help, the sims 4 studio forum is the place to go (i’m in the habit of just googling “site:sims4studio.com + whatever problem i’m having). someone’s likely had the same question before. if you can’t find answers there, there’s a great discord for sims modding (Creator Musings). and you can always shoot me a message or ask and i’ll do my best to help you out :)
118 notes
·
View notes
Text
oh yeah and if you wanna start making cc and want to try premade models, here's a few sites:
free3d
cgtrader
rigmodels
they have paid and free models!
40 notes
·
View notes
Text
a little list of links to how-to posts and videos. i'll add more on as i find them! these are tutorials i found really helpful. if there's something you wanna learn how to do and it isn't linked here, then send me an ask and i'll search for a tutorial for it lol.
meshing tutorials by platinumluxesims
changing lot sizes in s4s
turning builds into deco houses
how to make animations by pixifiedtips
neon sign tutorial by simslife
how to make cc objects by sieory
how to make cc clothing by powluna
how to make custom tv shows by pixifiedtips
how to make backdrops into objects by awingedllama
how to make custom loading screens by goddessgamez
how to make custom poses by katsverse
how to make animations by simmer_creator
how to make objects by illogicalsims
newborn overlay tutorial by awingedllama
how to make alpha hairs by iconicsims
how to make maxis match hairs by alerii
how to make alpha clothing by famsimsss
blender render tutorial by famsimsss
ts4 studio tutorial index
last updated: 08/16
616 notes
·
View notes
Text
im starting to think ea‘s definition of gameplay is different than ours
3 notes
·
View notes