#ADB USB
Text
Tag 13: der angebissene Apfel im Mäusestall
Heute mal ein sehr design-lastiger Apple Beitrag. Es geht um meine beiden Macintoshs im klassischen Design. Aber auch da gibt es Unterschiede. Der eine folgt der Snow White Linie. Der andere ist einzigartig schön. Und schaut euch erst mal die Mäuse an.
Der dreizehnte Beitrag in meiner Reihe von Beiträgen zur Neugestaltung der Ausstellung in meinem Computermuseum. Heute und an weiteren 20 Tagen stelle ich die Zusammenstellung meiner Ausstellungsstücke vor. Heute kommen meine beiden Knubbel-Macs aus der Apple-Zeit nach Steve Jobs und ein paar Mäuse ins Visier. Bis auf eine Logitech Maus für den Atari Mega ST sind hier nur Apple Mäuse vertreten.…

View On WordPress
#ADB#Apple Macintosh#Apple Magic Mouse#Apple Mighty Mouse#Apple Pro Mouse#Apple USB Mouse#AppleDesign#Color Classic#Macintosh SE
1 note
·
View note
Text
hating thr world my sister finally got an sd card 2 put her apps on bc theyre too big except weare now finding out tech corporations hate their consumers and theres just like. no way to do that anymore without jumping tons of hoops and shes afraid of damaging her phone or losing her apps
she doesnt wsnna compromise on anything and ive been looking online for hours for smth that works but theyre all Liars!!! theres no "format another way" button for the sd card or "change" button in the storage its not fair!!!!!!!!! biting killing biting killing
#GGRGEHAAHHHHH#HATE HATEBHATE#WAHHHHHH#world sucks world is eveil#if i go thru the laptop and. do whaterver it tells me with adb and usb debugging it ruines the camera#torch chatter
0 notes
Quote
Googleは、過去4か月でPixelスマートフォンに発生した2番目の大きなストレージバグに対する別の修正を行った。 先週、 一部の Pixel 所有者が携帯電話のローカル ストレージからロックアウトされ、あらゆる種類の問題を抱えてほとんど役に立たない携帯電話になっているという報告が浮上しました。 多くの人がこの問題の原因は 2024 年 1 月の Google Play システム アップデートにあると考えており、昨日 Google はその仮説を認めました。 Google は この問題に対する公式の解決策を Pixel Community Forums に投稿しましたが、ここにはユーザーフレンドリーな解決策はありません。 Google の自動更新システムは人々のデバイスを破壊しましたが、修正は完全に手動で行われ、ユーザーはコマンドライン インターフェイスを介して開発者ツールをダウンロードし、ドライバーをインストールし、設定を変更し、携帯電話を接続し、特定のファイルを削除する必要があります。
幸いなことに、ここ 1 ~ 2 週間、携帯電話をほとんど役に立たない状態で放置していた場合でも、指示に従えば実際にはデータが失われることはありません。 しかし、多くの人にとって 1 ~ 2 週間のダウンタイムは許容できないものであり、 数人の ユーザー は、携帯電話を再び使えるようにするためにすでにデバイスをワイプしており、その結果生じるデータ損失に対処しなければならなかったとスレッドに返信 しました(多くの人がそうしているにもかかわらず)試みても約束しても、Android には機能する包括的なバックアップ システムがありません)。
Advertisement
悪いニュースは、多くの一般ユーザーが Google の指示に従うことができるとは思えないということです。 まず、Android の開発者向けオプションを有効にするためのシークレット アクションを実行する必要があります (ビルド番号を 7 回タップします)。 次に、アプリ開発者向けの Google の「SDK Platform-Tools」zip ファイルをダウンロードする必要があります。 その後、携帯電話を接続し、正しい「ファイル転送」接続モードに切り替え、ターミナルを開き、platform-tools フォルダーに移動して、「./adb uninstall com.google.android.media.swcodec」と「./adb uninstall com.google.android.media.swcodec」の両方を実行します。 「./adb uninstall com.google.android.media.」 その後、携帯電話を再起動して、うまくいくことを祈ります。
いくつかの手順を省略しましたが (これを試す場合は、Google の手順をお読みください)、それが基本的な要点です。 Google が人々に使用させているツールは「ADB」、つまり「Android Debug Bridge」です。 これは、開発者が自分の携帯電話にコマンドラインでアクセスできるようにすることを目的としており、これにより、新しいアプリのビルドをデバイスにすばやくプッシュしたり、システム ログを読み取ったり、さまざまなテストのために特別な開発者フラグをオンにしたりできるようになります。
Google の指示は、すべてが順調に進んだ場合にのみ機能します。Android のさまざまなバージョンをテストして ADB に何百時間も取り組んできた私としては、おそらくスムーズにはいかないだろうと推測します。 Windows では、ADB ドライバーが自動的にインストールされないことがよくあります。 代わりに、「不明なデバイス」またはその他の誤ったデバイスが検出され、コマンドを実行できなくなります。 通常は、「コンピューター上のドライバーから選択する」オプションを使用し、ファイル システムを参照し、さまざまな警告をクリックしながら必要なドライバーを手動で「選択」(「推測」に近い)する必要があります。 このスレッドではすでにドライバーの問題を抱えているユーザーが少なくとも 1 人確認されており、実際にはドライバーが必要なだけなのに Windows が「デバイスが故障しました」と通知していることがわかります。
Page: 1 2 Next →
jump to endpage 1 of 2
Google の指示に従っているユーザーがこのエラーを受け取りました。これは、ADB を扱うとき��遭遇する多くの問題の 1 つです。 ユーザー 17604310222180026198
Google の説明書にはドライバーの問題についてはまったく記載されておらず、Google 独自の 用「 Google USB ドライバー Windows 」ダウンロードへのリンクもありません。 この問題が発生する前は、このドライバー バンドルは ADB を動作させるための必須の手順であり、USB ドライバー ページの最初の文は「Google デバイスを使用して Windows で adb デバッグを実行するには、Google USB ドライバーが必要です。」であると推測していました。 ただし、Google の説明書にはそのことについては言及されていません。
Google の Pixel ストレージ問題の修正には開発者ツールと端末が必要です | アルス テクニカ
5 notes
·
View notes
Text
You can truly, permanently, delete bloatware off your phone!
It genuinely stresses me out on a spiritual level that so many of you are just walking around with bloatware on your phone that your phone companies have convinced you are “necessary” or can’t actually be deleted (like that fucking netflix app, I’m looking at you), so you just hide it, shove it into a folder and put it out of the way of sight, or the only slightly better, “disable” when it lets you.
You can actually remove those. Not disable, not hide. Full on, straight up delete, removed, disappeared, gone. And no, you don’t need to root or jailbreak your phone to do this! That’s what they want you to think!
You will need a PC, and a your phone > PC cable, but it’s so easy and it works for all modern android phones. I’ve completely emptied my last like, 3 phones of bullshit this way. It’s the first thing I do whenever I get a new phone.
Step 1, install APK Analyzer, or another APK package inspector. This will tell you every single package installed on your phone, down to the system file ones. You’ll need the ones you want to remove, and this will tell you exactly what they are. They’ll be named something like “com.android.google.xxx” Alternatively, you can look up a list online for the obvious ones, like googles.
2. Download and unzip Android Platform tools from the official website on your PC, it doesn’t matter where, anywhere you can easily find it. I’ll put the link here https://developer.android.com/tools/releases/platform-tools but if you’re safety conscious and don’t click links you can also just search “android platform tools” in an engine.
3. In your phone, go into settings, search for build number, tap it 7 times. After about three, it tells you how many taps away you are from entering “developer mode.” You may have to enter your pin, but developer mode will be enabled.
4. Then in the newly unlocked developer options, turn on “USB debugging.” This effectively allows you to control your phone from your PC once connected, I’m about to tell you exactly how.
5. Connect your phone to your PC. Wait for it to finish making all the annoying connection sounds while it sorts itself out. Hit allow on the options that appear on your phone. Go to the platform-tools folder you just extracted, and in the file browser panel, where it’ll say something like “D:\Users\YourPC\Documents\Phone Hax\platform-tools“, type “cmd” without quotes and hit enter. This opens up the command prompt in this file location, so you don’t need to faff about getting there through the cmd.
6. In the cmd, type in “adb devices” without quotes, hit enter. Your phone model should come up after it throws a bit of a conniption (more annoying sounds), under a named list of “devices attached“ you should see your phone model number, and “device.” This means the computer can see your phone, and they’re ready to communicate. Now type “adb shell” without quotes, hit enter, and you’re ready to start swatting these apps away like flies.
7. Now for the fun part. You can freely go into the APK analyzer app you installed earlier and go dig out all that shit you wish you could banish from your eyesight and one by one start removing them. To do this, type, without quotes, “pm uninstall --user 0“ followed by the package name.
For example, removing GMail would look like this
“pm uninstall --user 0 com.google.android.gm”
Hit enter, it’ll say “Success,” and that’s it. It’s gone. It’s been deleted off your phone. Not disabled, not hidden. Banished. Removed.
When you’re done, just unplug your phone, go back into developer options, unclick debugging mode, turn developer mode off, and voila, your phone is now officially more “yours” than the phone companies would have you believe. Clears space, removes corporate spyware, and take note of how much longer your battery lasts, too!
You’re in more control than you think, these are your phones, make sure they act like it!
Disclaimer!: Be very careful deleting system apps! Don’t do the equivalent of deleting system32 or something. If you’re unsure, look it up, and most things can be redownloaded later if you make a mistake.
2 notes
·
View notes
Text
need to send a letter to the creator of this fully open-source tool that allows for screen mirroring / input through ADB, both wired and wireless, thanking him immensely for allowing me to evacuate all of my best nudes off this phone. but i can’t decide which nudes to include in the letter as thanks
also PSA turn on that damn USB debugging whenever you get a new phone. so glad i’m anal about this or i’d be fucked
#seriously so thankful. this shit is so robust#and all the other options are like . $10/mo. this is open source#i was warned i'd have to build it myself on linux but it's actually got better linux support than windows i think#considering. it's on APT and i can just install it + ADB + all prereqs without having to maintain shit#sadly does not solve the issue of having an unusable screen#which really sucks i really like this phone and i want to keep it so so badly but. a new screen probably costs more than i paid for it#which i'd absolutely shell out for if i was confident i could do it myself & i didn't ask my friend to send their spare already..
3 notes
·
View notes
Text
Build apk cho Android thông qua Wifi
Gần đây Android Studio hỗ trợ kết nối qua wifi để build nhưng đôi khi cũng có lỗi không kết nối được. Đây là cách cổ điển hay dùng.
Cấu hình với MacBook
Bước 1:
Kết nối wifi cho điện thoại chạy Android (nên cùng wifi với MacBook)
Bước 2:
adb tcpip 5555
Bước 3:
adb shell ifconfig
Bước 4:
Ngắt kết nối USB
Bước 5:
adb connect <DEVICE_IP_ADDRESS>:5555
ví dụ:
adb connect…
View On WordPress
0 notes
Text
Latest Nokia Flash Tool Without Box Version 2023
Prior to downloading and installing the Nokia Flash Tool, it's essential to ensure that your computer satisfies the specified minimum system requirements. Typically, these requirements include a minimum of 1 GB RAM, 500 MB of available disk space, and a processor with at least an Intel Pentium 4. Depending on the platform, additional memory may be necessary. If you are a Mac user, please verify the minimum system requirements before initiating the Nokia Flash Tool download. Once these conditions are met, you can proceed with the installation.
The Nokia Flash Tool is a handy utility for reinstalling the software on your Nokia phone and can be obtained for free on our website. Ensure you carefully follow the instructions provided by the tool. Once downloaded, proceed to install it on your Windows PC by following the detailed step-by-step guide. This process guarantees you access to the most recent firmware updates for your Nokia phones. Nevertheless, keep in mind that opting for the installation of the latest firmware will lead to the loss of all your personal data and settings on the phone.
Initially, you must install the ADB & Fastboot drivers along with the most recent firmware version. Subsequently, proceed to install the Nokia flash tool. After the installation, connect your Nokia device to your computer using an ADB or Fastboot cable. Choose the 'flashing' option from the menu and then proceed by following the provided instructions. Upon completion of the flashing process, your Nokia device will undergo an automatic reboot.
The Nokia OST Tool is an online service utility akin to the Android Odin flash tool. While it can be unofficially downloaded, it proves helpful for addressing diverse problems and installing stock firmware on your Nokia device. It's advisable to employ this tool on a sanctioned PC. This guide will walk you through the installation process on your computer. After obtaining the file, the next step involves installing the USB drivers specifically designed for Nokia HMD Global.
If your device is encountering issues like sluggish performance, frequent overheating, or being stuck in a boot loop, the Nokia OST Tool can serve as a solution to rectify these issues and return your device to its stock state. It's crucial to understand that this tool is exclusively compatible with Nokia phones utilizing the Qualcomm Snapdragon chipset and is not applicable to devices with MediaTek chipsets. In the event of any complications arising post-installation, it is advisable to promptly reach out to a nearby service center. Keep in mind that receiving updates for your device may require some patience, as the process could take several months.
Read the full article
1 note
·
View note
Text
my weird phone journey
this is my little brother's old phone. the screen doesn't work because he tried to wash it eight water. i want to try and see what i can do with it.
my current plan is to buy a usb-a to usb-c adapter and connect my keyboard, then try to turn on screen reader and adb. from there i can just use something like vysor to view the screen from my pc and work on doing something with it
my most likely choice for what i'm gonna do with this phone is probably host some app or bot with it, but if y'all have any ideas better than that then i'd be glad to hear them
0 notes
Text
More thrift store sightings!
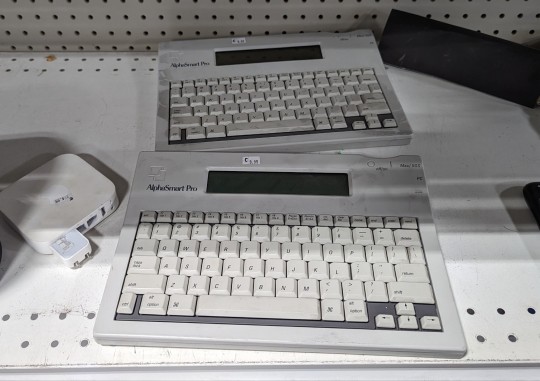
These are Alphasmarts, an old keyboard made mostly for the educational market. See, the deal is that in addition to just plugging into a computer (on this "Pro" model, to PCs via the PS/2 port and to Macs or the Apple IIgs via ADB), they also have a screen — 4 lines of 40 characters — and memory — eight text buffers. You can turn them on away from the computer, running on a couple of AA batteries, and type whatever you want in; it saves automatically, and when you connect to your computer, it squirts the text down the line as if you were typing it, so you don't have to mess with any software. Later models were more contoured and curvy to match the new iMacs, and then offered USB, as well as adding applets like spellcheck and calculators.
These ones, after discounts, are priced at $7.50 each, which is a pretty good deal, and I might have snatched them up if I didn't already own 6-8 of them of various vintages.
1 note
·
View note
Text
فایل Eng Rom شیائومی (Xiaomi Redmi Note 11 Pro (Pissarro

فایل Eng Rom شیائومی (Xiaomi Redmi Note 11 Pro (Pissarro
Eng Firmware چیست؟
Eng Firmware یا Engineering Firmware رام های مهندسی شده ای هستند که با اعمال تغییراتی روی ساختار رام های رسمی که توسط توسعه دهندگان صورت می پذیرد ساخته میشود.این فریمورها فاقد رابط کاربری هستند و فقط جهت تعمیرات استفاده میشود.این رام ها برای چیپست های مدیا تک و کوالکام ساخته شده اند.
Xiaomi شیائومی -دکتر موبایل
نکته ۱:
زمانی که گوشی بوت لوپ (boot loop) است و شما قادر نیستید با رایت کردن رام های رسمی گوشی خود را فلش کنید اما Eng Firmware توانایی فلش کردن دستگاه شما را در حالت EDL و فست بوت را به شما میدهد و بعد از رایت Eng Firmware خواهید بود گوشی خود را با رام رسمی فلش کنید.
نکته ۲:
از ویژگی های این رام فعال بودن Diag Mode و ADB است که یک سری از فایل ها به صورت پیشقرض روت میباشد.
نکته ۳:
با ابزار xiaomi pro tool در حالت فست بوت بدون کردیت رایت شد که با این ابزار به صورت رایگان رایت میشه ولی توسط ما تست نشده و بهتره باکس داشته باشید.باکس هایی مانند ۹۰۰۸ ، umt ، ufi ، esay ، hydrar
____________________________________________________--
کاربرد فایل Eng Firmware:
-
حل مشکل بیس باند و شبکه بدون باکس
-
روت کردن بطور خودکار
-
فایل کامبنیشن دستگاهای شیائومی
-
حل مشکل خاموشی
-
ترمیم سریال
-
حل مشکل بوت لوپ گوشی و هنگ روی لوگو
-
تغیییر منطقه گوشی بدون نیاز به آنلاک بوتلودر
-
جهت دانگرید و پایین آوردن نسخه اندروید
-
حل مشکل nv data
__________________________________________________________
نوجه:
با فلش کردن ENG Rom اطلاعات شخصی شما را برای همیشه از دستگاه پاک می شود. بنابراین توصیه می کنیم قبل از پیروی از دستورالعمل های بالا ، از اطلاعات شخصی خود نسخه پشتیبان تهیه کنید.
_________________________________________________________________________
طریقه نصب Eng Rom :
-
فایل eng rom را در کامپیوتر دانلود و اکسترکت کنید.
-
پس ��ز اکسترکت فایل Redmi Note 11 Pro (Pissarro) Eng Rom ، می توانید درایور UMT QCFire ، MTK USB Driver و فایل فلش ENG را دریافت کنید.
-
اکنون ، درایور MTK USB Driver ارائه شده را روی کامپیوتر خود نصب کنید.
-
پس از نصب موفقیت آمیز درایور MTK Preloader Driver بر روی کامپیوتر ، باید دستگاه شیائومی خود را با استفاده از کابل USB به کامپیوتر متصل کنید.
-
پس از اتصال دستگاه به کامپیوتر ، باید دستگاه را در حالت BROM (دکمه ولوم بالا و ولوم پایین را فشار دهید) بوت کنید.
-
هنگامی که دستگاه شما در حالت Preloader است ،ابزار Infinity CM2 MTK را اجرا کرده و با استفاده از دکمه rawprogram0.xml فایل ENG ROM را لود کنید.
-
پس از بارگیری ENG ROM ، روی گزینه Flash کلیک کنید تا فرآیند فلش کردن آغاز شود.
-
پس از اتمام فرآیند Flashing ، دستگاه شیائومی خود را از کامپیوتر جدا کرده و مجدداً ری استارت کنید.
نکته بسیار مهم:
هنگام نصب این ENG ROM از طریق ابزار SP Flashtools لطفا تیک پارتیشن Preloader رو بردارید در صورتیکه این تیک را برندارید و فایل را بروی گوشی فلش کنید تمام مسئولیت و عواقب آن بر عهده خودتان است و گروه ما هیچ گونه مسئولیتی در قبال این بی توجهی شما ندارد.
Read the full article
#RedmiNote11Pro(Pissarro)EngRom#فایلEngFirmwareگوشیشیائومی#فایلEngRomشیائومی(RedmiNote11Pro(Pissarro#فایلEngRomشیائومیRedmiNote11Pro#فایلEngromگوشیشیائومی
0 notes
Text
not Windows 10 but android. to uninstall apps without root, use this guide
Here's the instructions:
Download Android SDK Platform Tools here and unzip it.
Go into Settings>About phone>Software information and tap "Build number" a bunch of times to unlock Developer options
In Developer options, turn on USB debugging and OEM unlock. I actually don't remember if OEM unlock is necessary for this but it's good to have.
Get some sort of app on your phone that tells you the internal names for your apps. I use APK Analyzer.
Plug your phone into your computer.
Navigate into your platform tools folder and type "cmd" in the file address bar and hit enter to open command prompt in that folder.
In command prompt, type "adb devices" to make sure your phone is connected properly. On your phone, a popup will ask you to allow the computer to do USB debugging. Allow it.
If your phone is connected, type "adb shell".
Type "pm uninstall --user 0 [com.package.internal.name]", replacing [com.package.internal.name] with the internal name of whatever app you want to uninstall.
Here's a couple lists of supposedly bloatware apps, but make the decision for each app yourself, and there's plenty beyond that list you can uninstall too if you want.
0 notes
Text
この端末はリセットされました。続行するには、この端末で前に同期したGoogleアカウントにログインしてください。
#この端末はリセットされました,#文鎮化寸前
どうすればいいんだと悩んでいたら、
一つのヒントを得た。
adb shellにより、スマホの開発者向けオプションを起動し、
OEMロック解除を行う方法だ。
ただ、自分のスマホはそこにたどりつくまでのUSBデバックモードも
開発者向けオプションにあるから、そこがデバックモードにならないと
adb shellは使えない。
ネットで探したその方は、
「QuickShortcutMaker」をsdへ入れ、
それをインストール。
「QuickShortcutMaker」を起動し、
「Core Settings」を起動するという運びだったが、
自分のスマホには「Core Settings」がなかった。
でこの方法はダメということになった。
次にヒントを得たのが、
「FRP Bypass」という技術だ。
次回へつづく、、、
View On WordPress
0 notes
Text
Phone cleaning
This is the time of the year when you should remove the unnecessary apps from your android phone. But how can you remove those preinstalled apps on your phone that can't be uninstalled from settings? Well, you can remove them, but you need to peek under the hood a bit by pretending to be an android developer for a minute.
1) Install Android studio. https://developer.android.com/studio
2) Switch your phone to developer mode by tapping Build Number a bunch of times (usually seven) in the About Phone submenu.
3) In Settings there will be a new menu called Developer Options. Go into the Developer Options and enable USB debugging
4) Connect your phone to your computer via a usb cable, open a command prompt and type "adb devices" and hit enter. On your phone you should see a pop up asking you to allow usb debugging access, you should allow it.
5) Type "adb shell" and hit enter.
6) The following command will remove a specified package from your phone:pm uninstall -k --user 0 NameOfPackage
Please pay attention to the number of dashes before k and user, and capital letters in the name of the package. You can find out the name of the package you want to remove. To find out the name of the package you can install an app inspector package on your phone like: https://play.google.com/store/apps/details...or in the adb shell you can simply search for a package by name by using the following command:for example:
pm list packages | grep 'samsung'
1 note
·
View note
Text
RG35XXのADB機能を有効化してUSBデバッグしてみた
RG35XXとPCをUSB接続してデータ転送したかった

最近お気に入りのRG35XXですが、前回導入したGarlicOSにはADB機能を有効化してUSBデバッグする方法が提供されているのです!
ADBとは正式名称「Android Debug Bridge」で、デバイスと通信する為の多用途のコマンドを提供するものです。
Androidはご存じの通りLinuxカーネルがベースとなっています。GarlicOSもLinuxカーネルがベースとなっていまして、Androidのソースをベースにしているのかどうかはわかりませんが何かしら共通する部分があるのだと思われます。違っていたらごめんなさい…。
さて、そんなADB機能が有効となっていると何ができるかというと、「RG35XXとPC(OSはWindows/macOS/Linuxすべてで理論的に可能)をUSB接続することで、PCからRG35XXを操作できる」のです!
普段RG35XXで遊んでいるゲームのセーブデータバックアップや、これから遊びたいゲームのデータをコピーする際にはmicroSDカードをPCにマウントする必要がありました。ということはRG35XXから毎回microSDカードを抜き差ししなければならず、microSDカードの表裏を間違えてイラッとしたりする経験を何度もしてきた訳です。
それが、ADB機能を有効化してPCとUSB接続するだけで、PCからmicroSDカードの中身を直接触ることができるのです!
それでは、ADB機能の有効化から始めていきましょう。
更新履歴
2023/05/25 : GarlicOS 1.4.7で本記事の内容を検証済みです。
自分の環境
Windows 11 Pro 22H2 (OSビルド 22621.1702) 64bit : 2023/05/25時点
ADB Explorer v0.8.23050 : 2023/05/25時点
今回合わせて紹介する「ADB Explorer」はWindows OSのアプリですが、ADBコマンド自体はmacOS/Linuxでもセットアップ可能です。
是非本記事を参考にして試してみてください!
ADB機能を有効化するには…
それではGarlicOSのADB機能を有効化していきましょう。
ADB機能有効化のヒントは、前回解凍したファイルに含まれていた README.txt に記載されています。
. . Enabling ADB support: To enable ADB support, create a file named enableADB in the misc partition. Enabling ADB disables USB gamepad support but allows developers easy access to the device.
miscパーティションに enableADB という名前のファイルを作成すると、ADB機能が有効になるよ~と書いてありますね。
また、ADB機能を有効にするとUSBゲームパットは使用できなくなるよ~と合わせて書いてあります。USBゲームパッドを普段ご利用されている方はご注意くださいね。
(※最後まで読んでいただければ、RG35XX本体のみでGarlicOSのADB機能をON/OFFする方法をご説明しています!)
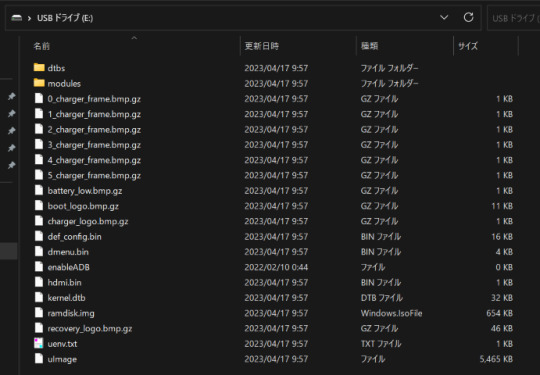
TF1/INTスロットに挿入しているSDカードをWindowsに接続してください。
GarlicOSをセットアップした際、 BIOS CFW Roms フォルダが存在した H: パーティションの他に、画像のように kernel.dtb や uImage ファイルが存在するパーティションが実はあったのですが、こちらがmiscパーティションです。
今回の場合はドライブレターが E: でした。
miscパーティションが何か解れば、後は enableADB という名前のファイルを作成すれば完了です。
ここで注意が必要なのは、拡張子無しのファイルでないといけないという点です。
エクスプローラの「ファイル名拡張子」を表示するように設定変更した上で…
E: パーティションの直下にテキストドキュメントを新規作成しましょう。
ファイル名拡張子が正しく表示されるようになっていれば、 E:\新規 テキスト ドキュメント.txt という名前のテキストファイルが作成されるはずなので、 E:\enableADB という名前に変更しましょう。
.txt を忘れずに取り除くこと、 enableADB は enable を半角小文字、 ADB を半角大文字とすることを必ず守ってください。
GarlicOSはLinuxカーネルがベースのOSですので、小文字と大文字を厳密に区別します。Windowsは小文字と大文字を区別しないので慣れないと混乱しますね。
尚、 .txt を取り除くと「拡張子を変更すると、ファイルが使えなくなる可能性があります。変更しますか?」と確認されます。気にせず[はい(Y)]ボタンを押下しましょう。
以上、SDカードをRG35XXの「TF1/INT」スロットに挿入して電源ONすればADB機能が有効化された状態でGarlicOSが起動します。
PCにADBコマンドをセットアップしよう
GarlicOSのADB機能が有効化されても、PCの準備が整わないとUSB接続しても何も起きません。
PCからADB機能が有効なGarlicOSを操作する為に、Android Debug Bridge(adb)コマンドをセットアップしましょう。
ADBコマンドは、Android StudioというAndroidアプリ開発用 統合開発環境をセットアップしてダウンロードする他に、Android SDK Platform Toolsパッケージを個別にセットアップすることでも利用可能になります。
日常的にAndroidアプリ開発を行っていない場合は、Android Studioをセットアップすると無駄にPCのディスク容量を圧迫してしまいますので、後者のAndroid SDK Platform Toolsパッケージを個別にセットアップする方法がおすすめです。
SDK Platform-Tools リリースノートより利用中のOSに適したSDK Platform Toolsをダウンロードします。
今回の手順ではWindows OSを使用しますので、SDK Platform-Tools for Windowsをダウンロードします。
利用規約に同意する必要があるので、規約をしっかり読んで「□上記の利用規約を読んだうえで利用規約に同意します。」にチェックを付けた上でダウンロード実行しましょう。
次に、ダウンロードした platform-tools_r##.#.#-windows.zip ファイル( ##.#.# の部分はダウンロードしたバージョンに依存)を解凍すると、 platform-tools フォルダの中に adb.exe 等のファイルが入っていることが確認できるかと思います。
この platform-tools フォルダ毎、任意の場所に移動します。例えば、 C:\Program Files フォルダ以下に移動しましょう。
C:\Program Files\platform-tools のようにフォルダが移動していれば成功です。
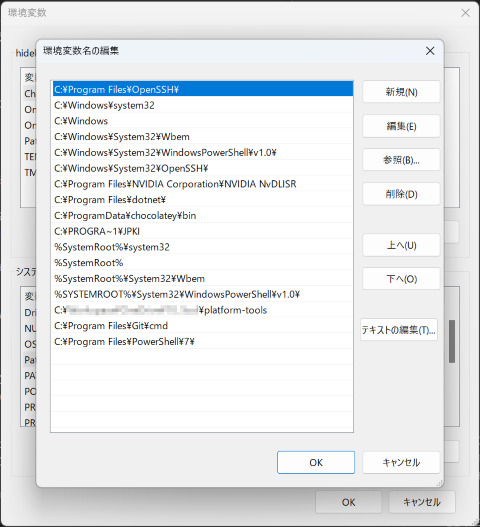
その後、システム環境変数の Path に C:\Program Files\platform-tools を追加します。
これで準備完了です!
PCからADBコマンドを使ってRG35XXを操作してみよう
それではRG35XXとPCをUSBケーブルで接続して、ADBコマンドを実際に使ってみましょう!
RG35XXは電源ON状態でUSB接続しても、OFF状態でUSB接続した後に電源ONしてもどちらでも大丈夫なようです。
USB接続できたら、コマンドプロンプトで下記を実行してみましょう。
REM ADBコマンドがちゃんとセットアップできているか確認します。 $ adb version Android Debug Bridge version #.#.## Version ##.#.#-####### Installed as C:\Program Files\platform-tools\adb.exe
上記のように Installed as ... 等と表示されていればセットアップ成功です。
もし上手く表示されないようであれば、システム環境変数の Path に正しく追加できているかどうか確認してみてください。
若しくは、 "C:\Program Files\platform-tools\adb.exe" version とフルパス指定で実行しても動作確認できますが、後述するADB Explorerは利用できないかと思います。
さて、引き続きコマンドプロンプトで下記を実行してみましょう。
REM 接続している端末を一覧表示します。 $ adb devices List of devices attached 0123456789ABCDEF device
(RG35XX以外に端末をUSB接続していない前提ですが、)上記のように出力された場合は
0123456789ABCDEF がシリアル番号で、 device がデバイスの接続状態(adbサーバに接続されている状態)です。
GarlicOSのADB機能が正しく有効化されていないと、そもそも何も一覧表示されません。その場合は enableADB ファイルに拡張子が残っていたり、大文字小文字や綴りを誤っていないか確認してください。
ちなみに、 0123456789ABCDEF というシリアル番号はGarlicOS上の /sys/class/android_usb/android0/iSerial ファイルに記述されている内容のようです。つまり、シリアル番号は皆様等しく 0123456789ABCDEF だと思われます。
ということは2台のRG35XXにGarlicOSをセットアップして同時にUSB接続するとシリアル番号が重複する…?
気になるのですが私の環境では検証しようが無いので、もし2台RG35XXをお持ちの方いらっしゃれば検証してみてください。
それでは、対話型シェルを起動してGarlicOSを操作してみましょう!
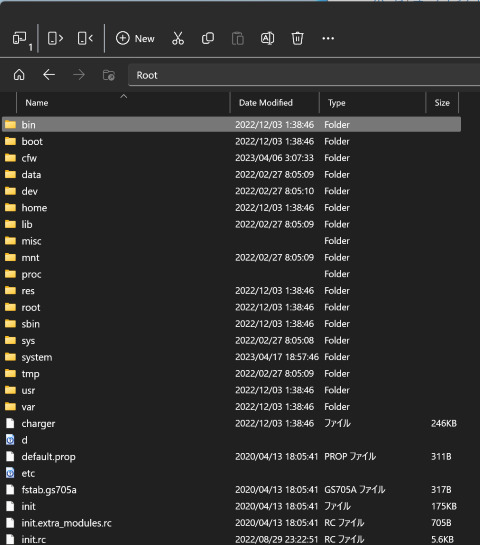
REM 対話型シェルを起動します。 $ adb -s 0123456789ABCDEF shell REM `root@xxxxxx:/ #` 等と表示されれば対話型シェル起動成功です! REM 試しに `ls` コマンドでディレクトリ内容を一覧表示してみます。 # ls bin boot cfw charger d data default.prop dev etc fstab.gs705a home init init.extra_modules.rc init.rc init.wifi.rc lib loadapp.sh misc mnt proc res root sbin sys system tmp ueventd.rc usbdbg.sh usbmond.sh usbtest.sh usr var REM 上記のような出力が確認できれば正しくGarlicOSを操作できています! REM 対話型シェルを終了する場合は `exit` コマンドを実行します。 # exit
GarlicOSのディレクトリ内容を一覧表示するだけの簡単な操作でしたが、念願だったRG35XXとPCをUSB接続して操作するという目的を達成しました!
ここまで確認できれば、例えばコマンドプロンプトで下記を実行すると「TF2/EXTスロットに挿入しているSDカード上のSavesフォルダをPCにコピーする」というバックアップ処理の第一歩を踏み出せます。
REM PC上の空のフォルダである `C:\Temp` にセーブデータをコピーしてみます。 $ cd C:\Temp REM 空のフォルダなので、 `dir /B` コマンドを実行しても空白行が出力されるだけです。 $ dir /B REM それでは、TF2/EXTスロットに挿入しているSDカード上のSavesフォルダをコピーしてみます。 $ adb pull /mnt/SDCARD/Saves . /mnt/SDCARD/Saves/: # files pulled, 0 skipped. #.# MB/s (###### bytes in #.###s) REM Savesフォルダがコピーされて、 `dir /B` コマンドの実行結果が変わりました! $ dir /B Saves
もし「TF1/INTスロットに挿入しているSDカード上のSavesフォルダ」をコピーする場合は adb pull /mnt/mmc/Saves . となります。
/mnt/mmc 以下がTF1/INTスロットに挿入しているSDカードの Roms フォルダ等が存在した場所、 mnt/SDCARD 以下がTF2/EXTスロットに挿入しているSDカードの Roms フォルダ等が存在した場所と対応しています。
GUIで簡単にデータ転送できる「ADB Explorer」
ということで、ADBコマンドを使用してRG35XXを操作することができるようになりました。が、普段からCUI操作に慣れていないと取っ付きにくい…ということで、GUIで簡単にデータ転送できる「ADB Explorer」を紹介します。このアプリはWindows OS専用ですので、その点ご了承ください。
ADB ExplorerはMicrosoft Storeからインストールすることが可能です。ソースコードも公開されていて、おそらく怪しくないアプリですが、ご心配な方は使用をお控えください。
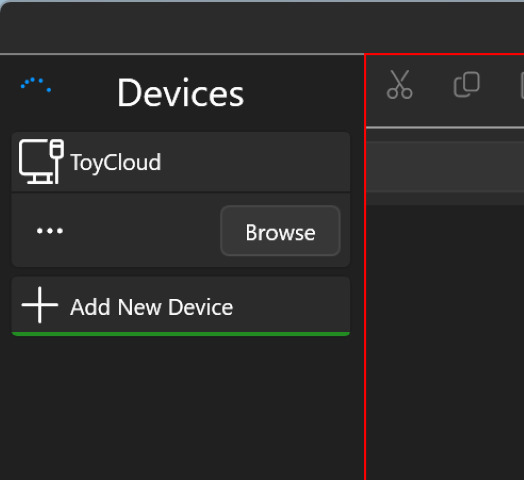
ADB Explorerを起動すると、画面左端の「Devices」に「ToyCloud」という名称の端末が見つかると思います。これがRG35XXです。
「ToyCloud」をマウスでクリックし、表示される[Browse]ボタンを押下すると…

このようにGarlicOS上のディレクトリが参照できます。[Root]と表示されている箇所をマウスでダブルクリックすると、
エクスプローラのようなUIでファイルにアクセスすることができます!
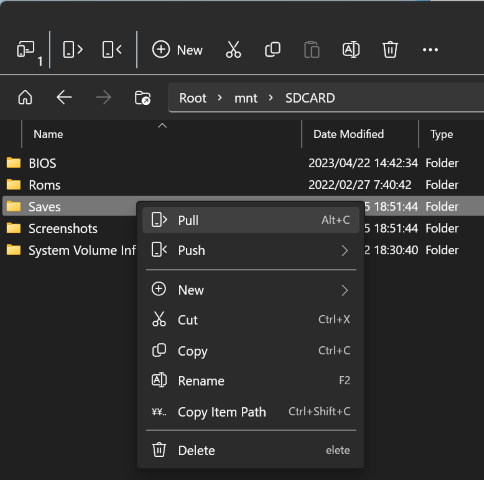
例えば先ほどADBコマンドでTF2/EXTスロットに挿入しているSDカード上のSavesフォルダをコピーしましたが、ADB Explorerを使用して /mnt/SDCARD フォルダまで移動し、 Saves フォルダ上でマウスを右クリックして表示されるメニューより[Pull]を選択することでPC上の任意の場所にコピーすることができます。
ここまでは pull という操作でRG35XXからファイルをコピーする例のみ紹介していますが、RG35XXにファイルをコピーする push という操作も実行することが可能なので、例えば『テーマ画像をPC上で作成してコマンド操作 又は GUI操作でRG35XXに画像をコピー』みたいなことが気軽に実施できます!
ADB機能をON/OFFするスクリプトを書いてみよう
ADB機能は便利なのですが、あくまでも「デバッグ用途」であるという点と、ADB機能を有効にすると「USBゲームパットは使用できない」という点には注意が必要です。
特に後者のUSBゲームパットが使用できないという点については、多用される方にとっては致命的かと思います。
ということで、RG35XX本体のみでGarlicOSのADB機能をON/OFFするシェルスクリプトを作成してみましょう!
実はGarlicOSは ./Roms/APPS フォルダ以下にシェルスクリプトを配置すると、ゲーム一覧から任意のタイミングでスクリプトを実行することができるんです。
これは、 ./CFW/config/coremapping.json ファイルの中で "APPS": "/bin/sh" とデフォルトで紐付け設定されているので実現可能となっています。
例えば coremapping.json に "SCRIPTS": "/bin/sh" と紐付けを追加すれば、 ./Roms/SCRIPTS フォルダ以下にシェルスクリプトを配置することも可能かと思います。
今回作成するのはどのようなシェルスクリプトかというと、ADB機能を有効化する ./Roms/APPS/enable_adb.sh と、ADB機能を無効化する ./Roms/APPS/disable_adb.sh という2つのファイルを作成します。
この2つのファイルはPC上で作成して、先ほどのADBコマンドやADB Explorerで ./Roms/APPS フォルダ以下にコピーすると楽々です。
スクリプトファイルは文字コードをUTF-8、改行コードはLFとしてください。
まず、 ./Roms/APPS/enable_adb.sh の内容は以下の通りです。
#!/bin/sh mount -o rw,remount /misc touch /misc/enableADB mount -o ro,remount /misc sync
本記事冒頭では手動で enableADB ファイルを作成しましたが、スクリプトでは touch /misc/enableADB で空の enableADB ファイルを touch コマンドで作成しています。
ポイントは mount -o rw,remount /misc です。 /misc フォルダ以下はデフォルトで読み込み専用となっており、明示的に読み書きできるよう再マウントしなければなりません。
enableADB ファイルの作成後は、念の為 mount -o ro,remount /misc として改めて読み込み専用として再マウントします。
最後に、 sync コマンドにてキャッシュ上に存在する未処理データをSDカードに書き込み確定させます。
そして、 ./Roms/APPS/disable_adb.sh の内容は以下の通りです。
#!/bin/sh mount -o rw,remount /misc rm /misc/enableADB mount -o ro,remount /misc sync
変わった点は rm /misc/enableADB で、 enableADB ファイルを rm コマンドで削除しています。
これらのスクリプトファイルを ./Roms/APPS フォルダ以下にコピーしたら、ゲーム一覧から「enable_adb」又は「disable_adb」を実行し、画面暗転して元に戻った時点で本体右横のResetボタンを押下してGarlicOSを再起動してください。
GarlicOSの起動と同時にADB機能がON/OFFされるはずです。
色々と夢が広がるADB機能
以上でざっくりADB機能の解説でした。
海外の方のGitHubリポジトリを参照すると、ADB機能を使用してGarlicOSのアップデートを自動化する例もあるようです。
PCとUSB接続してバッチ処理を実行するだけでセーブデータバックアップ!みたいなことももちろん実現可能なので、興味がある方はadbのドキュメントに目を通してみてください!
それでは!
1 note
·
View note
Text
Fastboot Nasıl Kapatılır?

Fastboot Nasıl Kapatılır? - Fastboot ne demek öncelikli olarak bununla alakalı yardımcı olmak daha doğru olacaktır. Fastboot özellikle xiomi ve redmi telefonlarında ile alakalı olan özellikler olarak karşımıza çıkmaktadır.
https://www.youtube.com/watch?v=TL4Ka34TNQw&pp=ygUcRmFzdGJvb3QgTmFzxLFsIEthcGF0xLFsxLFyPw
Fastboot ya da fastboot Mode özellikle Bu marka telefonları sahip olan kişiler tarafından araştırılan konular arasında yer almaktadır. Özellikle bu yazıda bu kelimenin ne olduğunu ne işe yaradığı ile alakalı gerekli bilgileri bulacaksınız.
Fastboot Android Platform araçları paketin bir parçası olan bir protokol ve tanı aracı olarak karşımıza çıkmaktadır. Bu protokol Google tarafından USB ya da Ethernet üzerinden ön yükleyiciler ile iletişime geçilmesi ve iletişim kurması şeklinde tanımlanmaktadır. Bir mekanizma olarak tanımlanmaktadır. Doğrudan Android cihazlardaki flash dosyaları yenilemenize yardımcı olmaktadır. Bu anlamda da kişiye çok ciddi boyutta kolaylık tanımaktadır. Bu uygulama kurulum ve güncellemelerde de size yardımcı olan kurtarma moduna bir alternatif olarak da karşımıza çıkmaktadır.
Fastboot Mode Ne Demek?
Fastboot ne demek Özellikle kişinin verilerini saklaması ve güvence altına alması anlamına gelmektedir. Verileri doğrudan telefonunuzun flash belleğine yazmanıza veya verileri modifiye etmenize yardımcı olan uygulama olarak karşımıza çıkmaktadır. Bu mod cihazınızın bölümlerine veri yükleme ve ön yükleme bölümüne erişmenizi bile sağlamaktadır. Doğu telefonunuzdaki temel dosyaların belli kısımlarını değiştirme olanağı vermektedir. Özellikle Android telefonunu üreten kişiler bunun önüne geçmek için bu dosyaları kilitli tutmaktadırlar. Ama bu uygulamayı indirerek değişiklik yapma şansınız bulunmaktadır.
Fastboot Ne İşe Yarar?
Fastboot Moduna neden ihtiyaç duyulacağı ile ilgili olarak araştırma yapılsa da birçok sebep olabilmektedir. Yazılımın yapısını değiştirmeniz mümkün olmaktadır. Android sisteminin çeşitli bölümlerini değiştirmek için başlangıçta ön yüklüyse içinin kilidinin açılması gerekmektedir. Ön yükleyicinin kilidini açmaya yarayan uygulama bu uygulama olarak karşımıza gelmektedir. Bu uygulama ile yapılacak olan işlemler aşağıdaki gibidir
- Bootlader kilidi açma
- Custom rom yükleme rom atma
- Custom recovery yükleme
- Stok rom yükleme
- Sistem imajı alma
Fastboot Nasil Kapatilir
Fastboot Nasıl Girilir?
Fastboot girmek için bazı basit kod satırlarını kullanarak cihazları dosyaları yeniden yüklemenize ve değiştirmenize olanak sağlayan bir uygulama olarak karşımıza çıkmaktadır. Özellikle bu uygulamaya girmek için aşağıdaki adımları izleyebilirsiniz.
- Öncelikli olarak Android geliştiricilerden Android SDK’yı indirip yüklemek gerekmektedir.
- Android telefonunuza USB aklama modu nu açın ve cihazınızı PC’ye bağlı olmanız gerekmektedir.
- Komut istemini çalıştırın ve ADB komutu Girin.
- Sonrasındaki aşamada ise telefonunuz kapanacak ve ardından bu şekilde giriş yapacaksınız.
Birçok telefon marka ve modeline göre bu uygulamada girişte farklı değişiklikler olabilmektedir. Telefonunuza göre farklı şekilde de girmek ya da açmak mümkün olmaktadır. Özellikle bu uygulamayı yaptıktan sonra cihazınızı tekrardan açıp kapatabilirsiniz.
Teknolojinin hemen hemen hayatımızın her yerine girmesiyle birlikteBir çok işlemlerimizi artık teknoloji üzerinden yürütmekteyiz.Teknolojinin bize birçok sunmuş olduğu yardım ve fayda bulunmaktadır. Teknolojinin kullanımıyla alakalı olarak kişinin bilinçli olması ve buna göre hareket etmesi gerekmektedir. Teknoloji avantajları yönünden düşündüğümüz zaman kişiye avantaj sağlamaktadır. Ama dezavantajları da bulunan cihazlardır. Bu anlamda teknolojinin bilinçli olarak kullanılması gerekmektedir.
Özellikle bu uygulama ile kişiler örnek olarak verecek olursak ekran kilidinin unutulması ya da farklı bir takım sıkıntılar yaşamasıyla birlikte uygulamanın içerisine girmesi gerekmektedir. Bu genellikle telefoncular aracılığı ile yapılıyordu. Mı internetin çok fazla ciddi boyutta gelişmesiyle birlikte internet üzerinden de kişi evde belirli adımları takip ederek bu durumun üstesinden gelmektedir.Siz de bu tarz bir sıkıntı yaşamanız durumunda internetten basit yönergeleri takip ederek tekrardan düzenleme yapabilirsiniz.
Read the full article
0 notes
Text
Unlock Bootloader On Samsung Galaxy Devices 2023
From an Android Developer's point of view
Unlocking the bootloader on Samsung Galaxy devices is a necessary step if you want to customize and install custom ROMs, kernels, or recoveries. It allows you to gain administrative access to the device and make changes to the system software.
However, the process of unlocking the bootloader is not straightforward and requires some technical knowledge. In this article, we will guide you on how to unlock the bootloader on Samsung Galaxy devices in 2023.

What is Bootloader?
A bootloader is a program that runs when you turn on your device. It loads the operating system and other necessary files to run the device. The bootloader also checks the system for any errors and allows the device to enter into different modes such as recovery or download mode.
The bootloader is locked by the device manufacturer to prevent users from making unauthorized changes to the system software. However, unlocking the bootloader allows you to make modifications to the software and install custom firmware.
Why Unlock Bootloader?
Unlocking the bootloader on Samsung Galaxy devices allows you to install custom firmware, custom kernels, and recoveries. It gives you administrative access to the device and allows you to make changes to the system software. This can help you to:
- Install custom ROMs that offer more features and customization options than the stock firmware.
- Increase the device's performance by installing custom kernels.
- Backup the entire system, which can be useful in case of data loss or software issues.
- Flash custom recoveries that can be used to install custom ROMs and other software updates.
Requirements:
Before you proceed to unlock the bootloader on your Samsung Galaxy device, you should make sure that:
- You have a computer running Windows, macOS, or Linux.
- You have a USB cable to connect your device to the computer.
- You have installed the Samsung USB drivers on your computer.
- You have enabled USB debugging on your device by going to Settings > Developer options > USB debugging.
Note: If you cannot find the Developer options on your device, go to Settings > About phone and tap the Build number seven times to enable Developer options.
Also read: Getting Started With Magisk Modules
How to Unlock Bootloader on Samsung Galaxy Devices?
Now that you have met the requirements, you can proceed to unlock the bootloader on your Samsung Galaxy device by following these steps:
Step 1: Back up Your Data
Unlocking the bootloader on your device will erase all data on the device. Therefore, you should back up your data before proceeding.
Step 2: Get Your Device's Unique Identifier
To unlock the bootloader on your Samsung Galaxy device, you need to get the device's unique identifier. To do this, follow these steps:
Turn off your device.
- Press and hold the Volume Up + Volume Down buttons and connect your device to the computer using a USB cable.
- Release the buttons when the warning message appears.
- Open a command prompt or terminal window on your computer and type the following command:
- Windows: "adb devices"
macOS/Linux: "./adb devices"
If your device is connected, you will see a message that says "List of devices attached" followed by your device's unique identifier.
Step 3: Unlock the Bootloader
To unlock the bootloader on your Samsung Galaxy device, follow these steps:
- Go to the Samsung Developer website and create an account.
- Download the latest version of Odin on your computer and extract the files.
- Download the bootloader unlocking file for your device and extract the files.
- Open Odin on your computer.
- Boot your device into download mode by pressing and holding the Volume Down + Power buttons.
- Connect your device to the computer using a USB cable.
- In Odin, click on the "AP" button and select the bootloader unlocking file you downloaded.
- Click on the "Start" button to begin the bootloader unlocking process.
- Wait for the process to complete, and your device will automatically reboot.
Step 4: Verify Bootloader Status
After the device reboots, you can verify if the bootloader has been unlocked by following these steps:
Turn off your device.
- Press and hold the Volume Up + Volume Down buttons and connect your device to the computer using a USB cable.
- Release the buttons when the warning message appears.
Open a command prompt or terminal window on your computer and type the following command:
Windows: "adb devices"
macOS/Linux: "./adb devices"
If your device is connected, you will see a message that says "List of devices attached" followed by your device's unique identifier.
Type the following command in the command prompt or terminal window:
Windows: "fastboot oem get_unlock_data"
macOS/Linux: "./fastboot oem get_unlock_data"
- You will see a long string of characters. Copy the string and paste it into a text editor.
- Remove all spaces from the string.
- Go to the Samsung bootloader unlock website and paste the string in the designated field.
- Click on "Confirm" to verify the status of the bootloader.
If the bootloader status is shown as "Unlocked," you have successfully unlocked the bootloader on your Samsung Galaxy device.
Also read: How To Fix An Android Stuck In Fastboot?
Conclusion
Unlocking the bootloader on Samsung Galaxy devices is a necessary step if you want to customize and install custom ROMs, kernels, or recoveries. It can help you to increase the device's performance, backup the entire system, and install custom software updates.
However, the process of unlocking the bootloader requires some technical knowledge and can potentially void your device's warranty. Make sure to follow the steps carefully and back up your data before proceeding. With the right tools and knowledge, you can unlock the bootloader on your Samsung Galaxy device and gain administrative access to the system software.
Read the full article
#samsungroot#samsungunlockbootloader#unlockbootloaderofanysamsungdevice#unlockbootloaderofanysamsungphone#UnlockBootloaderOnSamsungGalaxyDevices#UnlockBootloaderOnSamsungGalaxyDevices2023#UnlockBootloaderOnSamsungGalaxyphones2023
0 notes
Last Seen Blogs

swagglinhagelin
hockey ruined my life

avilaepictetus26
Omar Ávila

b3y0ndm3asur3
fellow travelers has ruined my life

littlemisspeaches
Love Me Some Fiction!

travjason95
Travjason