#Created By Dxo
Video
flickr
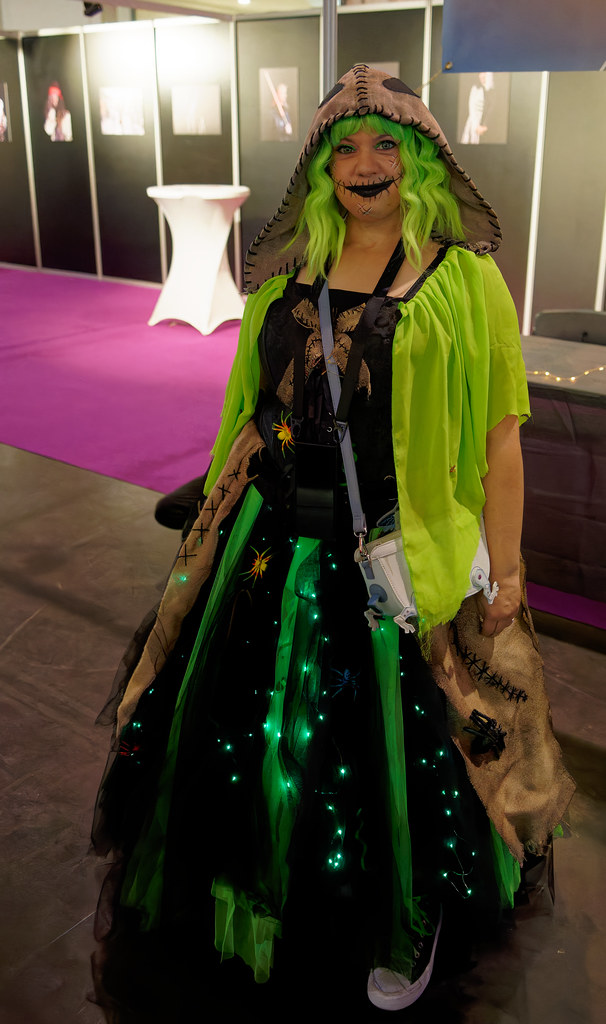
2023-09-22_14-33-52_ILCE-7C_DSCAH1903_DxO by Miguel Discart
Via Flickr:
Made in Asia - 2023 Fall - Day 1 Day 1 ( Le rendez-vous des fans de mangas, d?animes, de jeux video, de youtubers et de cosplay Embarque dans l?aventure au pays de la pop culture et decouvre bientot tous les invites de l?edition Fall 2023 ! )
#2023#28 Mm#Belgie#Belgique#Belgium#Bru#Brussels#Bruxelles#Bxl#Bxlove#Cosplay#Cosplayer#Created By Dxo#Day 1#Dxo#Dxo Photolab#Dxo Photolab 6#E 28-200mm F2.8-5.6 A071#Edited Photo#Focal Length - 28 Mm#Focal Length In 35mm Format - 28 Mm#Heysel#High Iso#Ilce-7c#Iso 40000#Jour 1#Made In Asia#Made In Asia 2023 Fall#Mia#Sony
0 notes
Text
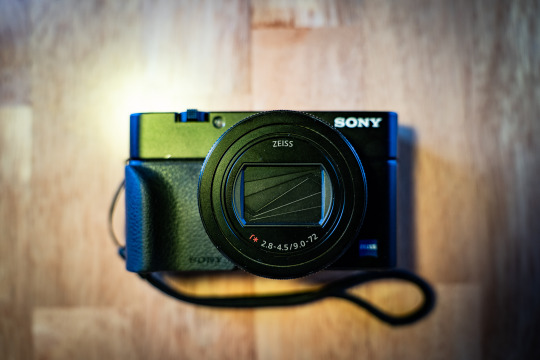
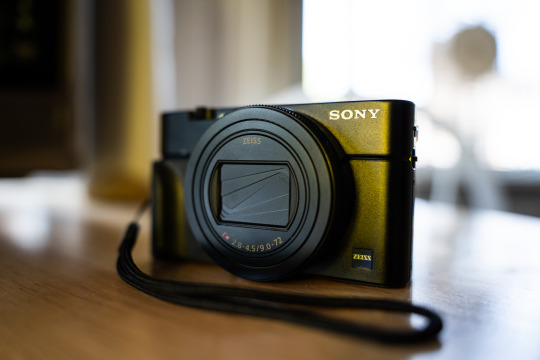
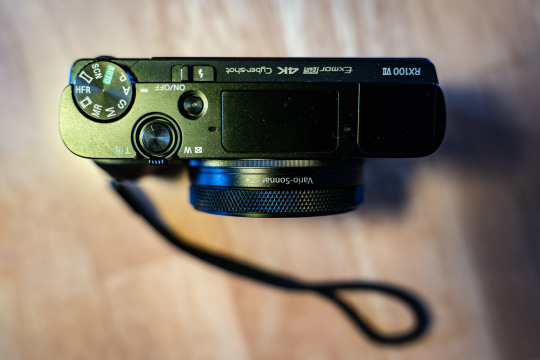
Sony RX100 VII Thoughts After Two Months
PROS:
Stacked sensors are the future. Well, technically the present considering that Canon, Nikon, Sony, Fuji, and OM Systems all use stacked sensors in their top of the line cameras. Either way, finally getting to experience shooting with one on a daily basis has made me want one in pretty much any camera going forward. The benefits are twofold: Not only do you get shutter speeds up to 20 frames per second, and without a mechanical shutter flipping in the way obscuring your view in between shots, but you also get no rolling shutter while doing it. Pretty much every Sony camera can shoot 10 fps bursts with the silent shutter, but any movement can give you a jello-like effect since the sensor reads out so slow on non-stacked cameras. The only con, at least on this camera, is that you can’t shoot flash at higher than 1/100 with the electronic shutter. That’s still plenty fast for a lot of stuff, but well below the 1/2000 you get when shooting the mechanical shutter.
The fast frame rate wouldn’t make much of a difference if the camera was bad at autofocusing, but this camera is great at it. It has a lot of the same fancy focusing stuff that my full frame Sony has like human/animal eye autofocus and all the tracking modes I’m used to. It actually makes the camera pretty solid for wildlife if you can get close enough at the 200mm end.
Speaking of that, the 24-200mm equivalent is a great range, and one that I missed a lot since I traded away my Tamron 28-200 to help cover the cost of my A7RIV. The small size and extra 4mm on the wide end actually makes it even more convenient than that Tamron.
Aside from covering a broader range than the 24-70 equivalent lens from the older RX100 cameras, this lens also seems noticeably sharper. The last RX100 model I had, the Mk. IV, just didn’t seem as crispy as this lens is.
It has a touchscreen! It’s wild to think that the previous RX100 cameras I owned didn’t have this basic ass feature, but Sony was very late in putting touch screens in their cameras. Ironically, I don’t really use it in this one because the AF is good enough that I can just do focus and recompose with tracking.
CONS:
It’s still only a 1” style sensor so high ISO isn’t the cameras strong suit. Programs like DXO PureRAW help a lot and let you get somewhat usable images at ISO 6400 in a pinch, but you’re kinda pushing things at that point.
While the lens is sharper and covers a wider range than the older models, it’s also significantly slower. At 24mm equivalent it’s already at f/2.8 where the old cameras were f/1.8. It’s f/3.2 at 25mm, f/3.5 at 33mm, and f/4 at 40mm. From 109mm to 200mm you’re at f/4.5. The relative slowness of the lens combined with the small sensor means that this can struggle getting quality images in low light without a tripod or something.
No USB-C. My Fuji, Ricoh, and larger Sony all have USB-C charging, which is amazingly convenient when traveling. I haven’t really gone anywhere with this camera yet, but having to account for a micro USB cable is annoying since pretty much everything aside from my iPhone uses USB-C.
It’s expensive. Just like my Mk III and Mk IV I got it used so it was cheaper than retail, but the copy I got cost about twice what I paid for the previous models.
Start up time is just a tad bit slower than I’d like. The GRIII and X100V both beat it that regards, albeit those aren’t zoom lens so I have to cut the Sony some slack.

SAMPLE PHOTOS:
(The sample photos were edited in Lightroom Classic and DXO PureRAW2. Also, the sensor creates a roughly 2.7x crop factor, so the 9-72mm lens equates to 24-200ish)

Young Bird | ISO 160. 72mm. f/4.5. 1/200.
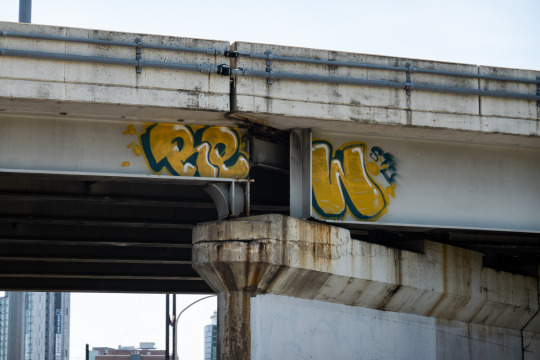
Graffiti Shot from a Car | ISO 100. 33.98mm. f/4. 1/400.
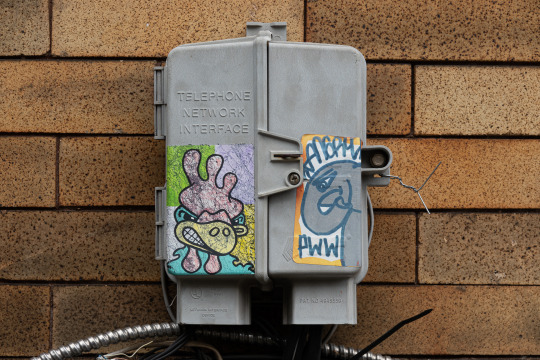
Stickers | ISO 100. 29.67mm. f/4.5. 1/100.

City Hall | ISO 100. 38.13mm. f/4.5. 1/200.

Flip Up Screen Selfie with My Friend Hanae | ISO 3200. 9mm. f/2.8. 1/40.

Zoomed in Graffiti | ISO 640. 72mm. f/4.5. 1/500.

Fishing Store Neon | ISO 800. 28.67mm. f/8. 1/200.

Flowers | ISO 200. 72mm. f/5. 1/640.

Selfie Shots with My Sister | ISO 3200. 9mm. f/2.8. 1/100.
28 notes
·
View notes
Video

flickr
Colorado River Flowing Through Needles and a Backdrop of Mountains and Blue Skies by Mark Stevens
Via Flickr:
While taking in views along a dirt road paralleling the Colorado River in Needles, California. My thought on composing this image was to find a location where I could capture the river flowing by and use it as a leading line into the image. Far off would be ridges and peaks of the Eldorado-Newberry Mountains. On the other side of the river is the state line border with Arizona. I liked how there was this front coming through that brought almost a texture to the blue skies in the clouds with its highlights and shadows, seemingly painted across the skies. I angled my Nikon SLR, camera slightly downward, in order to bring the horizon higher into the image, and create more of a sweeping view. I later worked with control points in DxO PhotoLab 6 and then made some adjustments to bring out the contrast, saturation and brightness I wanted for the final image.
#Arizona#Azimuth 323#Blue Skies#Blue Skies with Clouds#Buildings#Colorado River#Day 1#DxO PhotoLab 6 Edited#Eldorado-Newberry Mountains#Great Basin Ranges#Homes#Intermountain West#Joshua Tree National Park and California#Landscape#Landscape - Scenery#Looking NW#Mojave Desert Ranges#Mountain Peak#Mountains#Mountains in Distance#Mountains off in Distance#Mountainside#Nature#Nikon D850#No People#Outside#Partly Sunny#Red Independence Peak#Ridge#Ridgeline
3 notes
·
View notes
Text
Unleashing Your Photo Editing Skills: A Simple Guide to High End Photo Retouching
In the ever-evolving world of photography, the importance of high-quality images has reached the pinnacle of corporate priorities. Whether it's for online businesses or traditional brick-and-mortar establishments, the demand for visually appealing photographs has given rise to the booming picture editing business. High-end photo retouching, a process executed at a professional level using advanced tools like Adobe Photoshop, has become an integral aspect of achieving polished and refined images.
Defining High-End Photo Retouching
Photo retouching is a term familiar even to those outside the photography realm. However, delving deeper reveals the complexity of high-end retouching. At its core, high-end retouching is a meticulous correction process that goes beyond basic touch-ups.
This includes a myriad of adjustments, from altering body forms and cleaning skin to manipulating colors and enhancing overall image quality. Clients often seek major picture adjustments, making high-end retouching the go-to solution for achieving a professional and polished look.
Distinguishing Basic and High-End Retouching
Understanding the distinction between basic and high-end retouching can be challenging for both clients and photographers. Basic retouching involves fundamental adjustments such as light and color correction, blemish removal, and shadow correction.
These changes are noticeable but don't dramatically alter the image. On the other hand, high-end retouching encompasses more significant alterations, from fixing old or damaged images to modifying body shapes, performing color manipulation, and removing distractions.
The depth and complexity of these changes set high-end retouching apart, creating a more refined and professional result.
Trends in High-End Photo Retouching (2022)
As technology advances, new trends emerge in the field of high-end photo retouching. Skin retouching takes center stage, with a focus on eliminating spots, and blemishes, and preserving the natural texture of the skin. Beauty retouching, often employed in fashion and portrait photography, goes beyond skin and hair adjustments, requiring a deep understanding of cosmetics and precise color alterations.
Portrait retouching, especially for fashion photography, emphasizes hair retouching, including tasks like eliminating stray hairs, straightening hair, and enhancing overall patterns. In the realm of fashion retouching, a combination of skin, hair, and beauty retouching is crucial, with an added emphasis on body form manipulation. Product retouching, although comparatively simpler, is essential for e-Commerce, involving color correction, background removal, and attention-grabbing techniques.
Get a Free Frail! For High-End Photo Retouching Service.

Best Apps for High-End Photo Retouching
The availability of a plethora of software options for high-end retouching provides photographers and editors with a range of tools to choose from. Adobe Photoshop stands out as the leading software, offering unparalleled versatility. Adobe Lightroom is the preferred choice for color correction, while Luminar boasts a user-friendly interface. AutoRetouch leverages AI for simple yet effective picture editing, and ON1 Photo Raw excels in portrait editing with the assistance of artificial intelligence.
GIMP is a robust tool for complex manipulation, Portrait Pro specializes in high-end retouching, and DxO Photolab 4 is recognized for its excellence in ISO invariance. Exposure XS4 by Alien Skin Software is particularly effective for picture masking.
Learning High-End Photo Retouching: Effective Methods
Mastering high-end photo retouching is a journey that requires effort, focus, and perseverance. Two primary methods facilitate the learning process: tutorials and high-end retouching courses. Tutorials offer convenience due to their widespread availability, providing a wealth of information that learners can navigate at their own pace.
However, the drawback lies in the absence of precise standards and certifications. On the other hand, enrolling in high-end retouching courses, available both online and offline through platforms like Skillshare, Udemy, CreativeLive, and Linkedin Learning, provides structured learning with step-by-step instructions. While quality courses may require an investment, they offer certifications that can enhance employment prospects.
Conclusion
In the competitive world of photography, where visuals are the first point of contact between customers and goods, mastering high-end photo retouching is paramount. The trends, techniques, and tools outlined for 2022 reflect the dynamic nature of this field. Consistent practice, combined with a dedication to staying updated on industry trends, will not only enhance your skills but also shape your reputation as a professional in the realm of high-end photo retouching.
As your photographs become a reflection of your expertise, the emphasis on delivering high-quality images remains crucial for establishing lasting connections with clients and ensuring success in the ever-evolving landscape of photography.
#clipping world#colorcorrection#highendretouching#ghostmannequin#ecommerce#ecommercephotoeditingservices#photography#ecommerce photo editing services#photo editing sevices
0 notes
Text
From Basic to Expert | A Comprehensive Guide to Photo Retouching Software
In today's digital age, photo retouching has become an essential tool for photographers and graphic designers alike. Whether it's removing blemishes on a portrait or enhancing the colors of a landscape, photo retouching software can help bring your images to life.
But with so many options available, it can be overwhelming to choose the right one. That’s why we’ve put together this guide to take you from basic to expert in photo retouching software.
Basic Level: Free Photo Editors
For those who are just starting out with photo retouching, there are several free options available that are perfect for basic editing. Some of the most popular ones include:
GIMP - This open-source software is often compared to Photoshop in terms of its capabilities. It’s completely free to download and use, making it an excellent option for beginners.
Paint.NET - Another free option, Paint.NET is a Windows-based program that offers basic functionality for photo editing. It’s easy to use and includes features such as layers, filters, and special effects.
Pixlr - This browser-based editor is perfect for those who don’t want to download any software. It’s user-friendly and offers basic editing tools such as cropping, resizing, and color correction.
Intermediate Level: Paid Photo Editors
Once you’ve mastered the basics of photo editing, it may be time to invest in a paid software that offers more advanced features. Here are some of the best options:
Adobe Photoshop - This industry-standard software is used by professionals all over the world. It offers advanced features such as layer masks, selective adjustments, and 3D modeling.
Affinity Photo - This affordable alternative to Photoshop is gaining popularity among professionals. It offers similar features and even includes a few unique tools such as focus stacking and live filter layers.
Capture One - This software is mainly used for photo editing and raw file processing. It’s an excellent option for professional photographers who need to make complex adjustments to their photos.
Expert Level: Specialized Photo Editors
For those who want to take their photo retouching skills to the next level, there are specialized software options available that cater to specific needs:
Adobe Lightroom - This software focuses on photo organization and editing. It’s perfect for photographers who need to process large volumes of images quickly.
DxO Photolab - This software is designed specifically for correcting lens distortion and other optical imperfections. It’s an excellent option for architectural or landscape photographers.
PortraitPro - This software is perfect for retouching portraits. It uses advanced algorithms to automatically enhance skin tone, remove blemishes, and even reshape facial features.
Whether you’re a beginner or an expert, there’s a photo retouching software out there that can meet your needs. From basic free editors to specialized paid software, the options are endless. The key is to find the one that works best for you and your style of photography. With practice and patience, you’ll be able to create stunning images that truly capture the beauty of the world around us.
Author: Pinky Roy, Senior Graphics Designer @cuttingedger
0 notes
Text
Mastering Photo Editing: Tips and Tricks for Lightroom and Photoshop
For a photographer, taking a great shot is just the first step to creating a great shot. Post-processing is just as important to use your photo's full potential. In this guest post, we'll explore some Lightroom and Photoshop photo editing tips and tricks to enhance your images and take your skills to the next level.
Understanding color grading
Color grading is the process of changing the colors in your image to create a specific look or feel. In Lightroom and Photoshop, you can adjust the hue, saturation, and brightness of individual colors or ranges of colors to create a more cohesive and polished look. Experiment with different color combinations to find the right balance for your image. https://clippingpathproject.com/
Mastering exposure
Exposure refers to the amount of light that hits your camera sensor. Correct exposure is essential to creating a well-exposed image that captures the essence of the moment. In Lightroom and Photoshop, you can adjust exposure, highlights, shadows, and contrast to balance the lighting in your photo and create a more vivid and dynamic image.
Retouching techniques
Retouching is the process of removing defects or imperfections from an image. There are many tools and techniques in Lightroom and Photoshop to help you retouch your images, including blemish correction, cloning and repair tools. Use these tools to remove unwanted objects or distractions from your photo to create a cleaner, more professional look.
Sharpening and noise reduction
Sharpening and noise reduction are important techniques to bring out the details in your image. In Lightroom and Photoshop, you can adjust the sharpness and noise reduction settings to reduce the noise in your image and create a sharper, clearer photo.
Using preferences and actions
Presets and Actions are pre-made settings and adjustments that you can apply to your images in Lightroom and Photoshop. They can save you a lot of time and effort when editing your photos, allowing you to quickly achieve a specific look or style. Experiment with different presets and actions to find the ones that work best for your image.
Advanced photo editing techniques
In addition to the basic techniques we've covered, there are many advanced techniques in Lightroom and Photoshop that can take your photo editing skills to the next level. For example, you can use the Selective Color Adjustment tool to adjust the colors of certain areas of an image. You can also use the curves adjustment tool to fine-tune the brightness and contrast of your image. In addition, you can use layer masks in Photoshop to apply different adjustments to specific areas of an image, creating a more customized and unique look.
Use of Third Party Plugins
In addition to the built-in tools and features in Lightroom and Photoshop, there are also many third-party plugins that can expand your editing capabilities. For example, Nik Collection by DxO is a popular plugin that includes a suite of tools for advanced color grading and black-and-white conversion. Similarly, the VSCO Film pack includes presets that mimic the look of different types of film, allowing you to achieve a more vintage and cinematic look to your images. https://clippingpathproject.com/
Stay organised in Lightroom
When editing and working with multiple photos in Lightroom, it's important to stay organized so you don't get overwhelmed. You can use Lightroom's organizational tools like keywords, tags, and collections to keep track of your photos and easily find the ones you need. Additionally, you can use Lightroom's batch editing capabilities to apply the same adjustments to multiple photos at once, saving you time and effort.
Conclusion
Photo editing is a crucial aspect of photography that can help you realize the full potential of your images.
0 notes
Text
dxo photolab guide
It's different I am totally computers freak or anything, but every time I am on my computer, I strive doing or learning whatever i really enjoy or as. One of discovered is photo editing. Now let me mention reduced very clearly, I am definitely an excellent 'geniously brilliant' person since the comes to computer stuff ( and that i don't think I even want being one:p) on the other hand do all these stuff by fun and do prolonged as as Towards the gym interest because of these. To put in dxo photolab Registration Key , my hobby for something remains as hobby until it becomes stress.
There a variety of good photo editing programs around. You probably already have one on pc and a fresh one with yes, that's right software. There are specific free or trial versions available for download from the net. You can try these find the one which suits your requirements then you can purchase it.
Picture Shark. This free editing program will enable write through the photo an individual are editing you can basically write inside the photo. You can do what all other program can create as let me tell you. This is really cool if you would like to add something a good autograph appear to a picture too.
The first thing to do is go for the pictures you want to use. It's ordinarily a good idea to select a theme pertaining to example the family, holidays, the home, children, pets and thus on and select your pictures around this theme. In case the calendar is meant for personal use, choose pictures that bring back happy thoughts. If you want to provide the calendar to and also friends, choose pictures that speak for their own reasons. After you decision photographs, copy them any CD (scan old film prints) in order that they are ready for take advantage of.
Some photo editing programs have regarding artistic effects, so that anyone can make your digital photo look for example mosaic, a painting along with other style of art. You should use photo editing to combine several photos too, though there is the way. dxo photolab Not really try upload a cup of photos and acquire a photo canvas with a lot of photos. An image collage is often a much compared to sticking these a noticeboard with push pins. Creating dxo photolab Crack Free Download of effect excellent way to commemorate personal occasions where you are lots of photos, possibly wedding, anniversary party, graduation or bday.
If you don't mind spending some money, then you can get a more basic version of Photoshop called Elements. It's also by Adobe, and an individual the comprehensive and updated tools you're able to get for the investment. This would become your best second option if you're freelance shooter because, it is great newcomers and veterans trying to trade their photos online. Obviously the main downside essentially are still going in order to spending a small amount of cost. The program cost around $90.00. Still, if dxo photolab Cracked Download think you want to sell your digital photos to buyers and also you're set for the long haul, understand can invest under $100.00 for picture perfectness. Yow will discover the program on Adobe's site.
Finally, generate a set of mugs, each with another good face. Presto, a regarding 2, 4, 6 a lot more mugs for the grandparents, featuring each certainly one of their grandkids. They'll love it!
0 notes
Video

flickr
2023-08-20_13-30-46_ILCE-7C_DSCHY5694_DxO by Miguel Discart
Via Flickr:
museumPASSmusees 2023 - Mima - Studiolo (Jean Jullien) MIMA presents 'Studiolo'', the first European institutional solo museum exhibition by French artist Jean Jullien (1983), in which the artist's intimate paintings come to life in an immersive environment of commentary painted on the walls of the museum. ( 1 pass, plus de 220 musees Le pass musees est l'abonnement le plus genereux aux musees belges. Il vous donne acces a l'ensemble des musees participants de notre pays, pendant toute une annee. Quand vous voulez et aussi souvent que vous le souhaitez. Au programme : Decouverte des collections permanentes. Avec votre pass musees, vous pouvez visiter librement les collections permanentes de plus de 220 musees. Acces aux expositions temporaires. Vous pouvez egalement visiter les expositions temporaires gratuitement ou avec une jolie reduction. Vous beneficiez de billets de train a moitie prix, de reductions dans les boutiques des musees et de nombreux autres cadeaux reserves exclusivement aux abonnes du pass musees. Les meilleurs conseils en matiere de musees. Tous les quinze jours, vous recevez dans votre boite mail des informations sur les expositions a ne pas manquer et les plus belles decouvertes a faire dans les musees. www.museumpassmusees.be )
#2023#30 Mm#Belgie#Belgique#Belgium#Bru#Brussels#Bruxelles#Bxl#Created By Dxo#Dxo#Dxo Photolab#Dxo Photolab 6#E 28-200mm F2.8-5.6 A071#Edited Photo#Focal Length - 30 Mm#Focal Length In 35mm Format - 30 Mm#High Iso#Ilce-7c#Iso 2000#Jean Jullien#Millennium Iconoclast Museum Art#Millennium Iconoclast Museum Of Art#Mima#Mima Museum#Musee#Musees#Museum#Museumpassmusees#Museums
0 notes
Video
Mother Nature Is My Favorite Painter by Mark Stevens
Via Flickr:
Mother Nature Is My Favorite Painter Yes, I have met a few others in my life’s travels And there are quite skilled But Nature can brush out a sky blue, Adding hints of greens and purples to amaze the mind Then Her strokes paint out grasses swaying in a breeze of wind An explosion of hues when Spring has arrived And another tapestry of colors on trees come Autumn Shades added to places under a canopy of trees And tints to those in sunlight Oranges and yellows with the butterflies fluttering about I marvel at the imagination of things created While wondering about new places to visit A setting looking to the southwest while taking in views in view of the skies with the wisps of clouds above. This while walking around the Alpine Village Jasper one morning and a setting looking to Whistlers Peak. My thought on composing this image to have a landscape orientation and wide angle view to capture the entire setting to my front. While most of the attention was deservedly to the skies above, I felt including some foreground interest with the nearby trees and lodges help to add to the image as well as create a layered look, from near to far. I later worked with control points in DxO PhotoLab 6 and then made some adjustments to bring out the contrast, saturation and brightness I wanted for the final image.
#Alberta and Glacier National Park#Alpine Village Jasper#Azimuth 237#Blue Skies with Clouds#Canadian Rockies#Central Front Ranges#Central Main Ranges#Day 3#DxO PhotoLab 6 Edited#Evergreen Trees#Evergreens#Forest#Forest Landscape#Free Verse Poetry#Hillside of Trees#Jasper National Park#Landscape#Landscape - Scenery#Lodges#Looking SW#Maligne Range#Mountain Peak#Mountains#Mountains in Distance#Mountains off in Distance#Mountainside#Nature#Nikon D850#No People#Outside
7 notes
·
View notes
Text
Comprehensive Guide to Photo Editing in Lightroom and Photoshop
As a photographer, capturing a great shot is only the first step toward creating a stunning image. The real magic happens in post-processing, where you can enhance your photos and take your skills to the next level. In this comprehensive guide, we'll cover everything you need to know about photo editing in Lightroom and Photoshop.
First, we'll explore the fundamentals of color grading, including how to adjust hue, saturation, and luminance to create a cohesive and polished look. Next, we'll cover mastering exposure, including how to adjust highlights, shadows, and contrast to create a more vibrant and dynamic image.
We'll also delve into retouching techniques, including how to remove unwanted blemishes and distractions using spot healing, cloning, and patch tools. Plus, we'll cover sharpening and noise reduction, which are essential for bringing out the details in your photos.
In addition to these basics, we'll discuss advanced techniques that can take your photo editing skills to the next level. For example, you'll learn how to use selective color adjustment tools, curve adjustment tools, and layer masks in Photoshop to create a more customized and unique look.
We'll also cover third-party plugins that can expand your editing capabilities, such as the popular Nik Collection by DxO and the VSCO Film pack. Finally, we'll discuss how to stay organized in Lightroom using keywords, tags, and collections, as well as how to use batch editing to save time and effort.
With these tips and tricks, you'll be well on your way to mastering photo editing and creating stunning images that truly stand out.
0 notes
Last Seen Blogs

happyengineerdeer
Unbetitelt

hiromisroom
題名未設定
hiromisroom
題名未設定

ardenti-corde
♡Angelus mortis♡
hiromisroom
題名未設定