#TLS1.0
Text
メール送信ができなくなった時 解決しました
ビジネスやアフィリエイトで独自ドメインメールを使用している方にとって、メールが送信できなくなったら一大事です!!
2024年1月25日 突然メール送信ができなくなった方
コアサーバー(coreserver)等バリュードメイン(ValueDomain)のユーザーの方に多いのではないでしょうか?
コアサーバーに限らず、最近エラーメールが多くなった、Gmailに送信できない、failure noticeやMAILER…
View On WordPress
#456#587#coreserver#SMTP#SMTPサーバー#TLS1.0#TLS1.1#TLS1.2#コアサーバー#バリュードメイン#ポート#メール送信#メール送信できない#送信できない#送信サーバー#送信ポート
0 notes
Link
0 notes
Text
【Firefox】有効にした TLS1.0/1.1 を無効にする方法
Firefoxで有効にした TLS1.0/1.1 を無効にして初期状態に戻す方法のご紹介です。
(more…)
View On WordPress
#about:config#mozilla#Mozilla Firefox#SSL#TLS#TLS1.0#TLS1.1#TLS1.2#ウェブブラウザ#エラー#エラー対処法#セキュア#セキュリティ#ソフトウェア#マルウェア#危険
0 notes
Photo

Microsoft browsers will disable 20-year-old security protocol Microsoft has announced that it will be disabling the oldest versions of the Transport Layer Security (TLS) protocol in…
0 notes
Text
iLearn disabling TLS 1.0
On Monday, June 5, 2017, iLearn will no longer support TLS 1.0 to conform with web security best practices. Faculty, staff and students on current browsers should not see any impact on day to day iLearn usage.
The following platforms will be unsupported after this change:
IE 6 - 8 on Windows XP
IE 7 on Windows Vista
IE 8 - 10 on Windows 7
IE 10 on Windows Phone 8
Safari 5.1 on OS X 10.6
Safari 6.0 on OS 10.8
If you have any questions or concerns, please contact [email protected].
0 notes
Text
本体ブログが閲覧できなくなっている方へ
急に筆者の本体ブログ https://ksnovel-labo.com/ が閲覧できなくなった方へ。
また、運営元が設定変更しているようです…。ご迷惑おかけします。
運営元からアナウンスが出ていますので、こちらご参考にブラウザの変更をなさってください。
【重要】「TLS1.0」および「TLS1.1 」の脆弱性に対する対応につきまして
この度、弊社では暗号化通信のセキュリティ強化のために、
FC2BLOGサーバーにおいて2022年3月1日以降順次TLS1.1以前の
暗号化プロトコルを無効化いたします。
TLS1.1以前の暗号化プロトコル無効化により、
古い端末やブラウザにおいてアップロードされている
画像やファイル等にアクセスできなくなる可能性があります。
お使いのブラウザで利用できるかどうか確認するためには、
こちらのサイトでご確認ください。
「お使いのブラウザは TLS 1.2に対応しています。引き続きサイトをご利用になれます。」と表示されれば問題なくご利用可能です。
エラーが表示された場合は、お使いのブラウザのセキュリティ設定内で
TLS 1.2 暗号化プロトコルを有効化する必要がございます。
各ブラウザ―にTLSの有効化について下記を参考にお願いいたします。
Microsoft Internet Explorer 8, 9, 10
Microsoft Edge
1.メニューの「ツール」をクリック
2.インターネット オプション を クリック
3.詳細設定タブをクリック
4.TLS 1.2 の使用にチェックを入れます。
▼SSL・TLSの設定
https://help.fc2.com/requirements/SolutionCheckSsl?type=pc
Internet Explorer 8より前のバージョンはTLS1.2には対応していないため、アップデートが必要です。
詳細 Internet Explorer を再インストールまたはアップグレードするには (Microsoft社サポートページ)
※Internet Explorerをご利用の場合は、
Google ChromeまたはFirefoxへ変更することを推奨いたします。
…(略)
0 notes
Text
Issues with older versions of the TM/exchange sync
The sync in versions 16.5 and lower, use a security protocol called TLS1.0 and Microsoft has disabled that protocol. (in all fairness, they sent out a notification in 2018 letting everyone know that they were going to). In order for the TM sync to work you will have to be on TM 16.6 or higher.
0 notes
Text
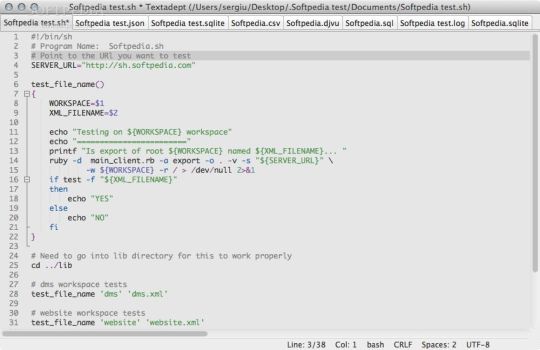
Textadept

Textadept is a fast, minimalist, and remarkably extensible cross-platform text editor for programmers. Written in a combination of C and Lua and relentlessly optimized for speed and minimalism for more than 12 years, Textadept is an ideal editor for programmers who want endless extensibility without sacrificing speed and disk space, and without succumbing to code bloat and a. Textadept runs on Windows, Mac OSX, Linux, and BSD. It also has a terminal version, which is ideal for work on remote machines. Textadept is a tool in the Text Editor category of a tech stack.
Textadept - Reviews, Pros & Cons | Companies Using Textadept
TextadeptOriginal author(s)MitchellInitial release2007; 14 years agoStable releaseRepositoryWritten inC, LuaOperating systemLinux, BSD, UNIX, Microsoft Windows, macOSTypeText editorLicenseMIT LicenseWebsitefoicica.com/textadept/
Textadept is a free softwareminimalisttext editor designed for computer programming. Distributed under the MIT license, it is written in C and Lua and is extensible using Lua.[1] Textadept can use either a graphical user interface or a text-based user interface when running in a terminal window. Textadept uses the Scintilla editing component. Textadept's developer makes the curseswrapper library for Scintilla used by Textadept available separately.[2]
In common with Emacs, Textadept is deeply extensible; the Lua API has access to any subsystem of the program. Despite this, the developer states that one of his goals is for the C portion to not exceed 2000 lines of code and for the Lua portion to never exceed 4000 LOC. When running in a graphical interface Textadept purposely does not save window size or position, leaving this up to the window manager.
See also[edit]
References[edit]
External links[edit]
Retrieved from 'https://en.wikipedia.org/w/index.php?title=Textadept&oldid=999978664'
Package Details: textadept 11.1-1
Package Actions
View PKGBUILD / View Changes
Git Clone URL: https://aur.archlinux.org/textadept.git (read-only, click to copy) Package Base: textadeptDescription: A fast, minimalist, and remarkably extensible cross-platform text editorUpstream URL: http://foicica.com/textadept/Keywords: Licenses: MIT Conflicts: textadept-bin Provides: textadept Replaces: textadept-bin Submitter: bitwaveMaintainer: rezthoLast Packager: rezthoVotes: 24Popularity: 0.000001First Submitted: 2015-09-04 11:30Last Updated: 2021-02-07 12:34
Dependencies (5)
gtk2(gtk2-patched-gdkwin-nullcheck, gtk2-ubuntu, gtk2-git, gtk2-minimal-git, gtk2-patched-filechooser-icon-view)
mercurial(mercurial-hg, mercurial-stable-hg)(make)
unzip(unzip-natspec, unzip-iconv)(make)
wget(wget-git)(make)
Sources (2)
Cached
twitt commented on 2016-10-05 12:13
Just small addition: `hg config -e` always opens $HOME/.hgrc for editing and ignores $HGRCPATH if set. But Mercurial itself will ignore $HOME/.hgrc if $HGRCPATH is set. So make sure to open the right hgrc file.
reztho commented on 2016-10-03 18:14
fusion809, it's explained inside the PKGBUILD: https://aur.archlinux.org/cgit/aur.git/tree/PKGBUILD?h=textadept
,line 19 onward.
But here's the text anyway:
'If textadept can't be compiled try the following things in this order:
- Run: hg config -e , and then add these lines:
[hostsecurity]
foicica.com:minimumprotocol = tls1.0
- Run makepkg with the -C argument'
sunplan commented on 2020-12-28 11:58
/usr/share/doc/textadept is a broken symlink pointing to non-existent /usr/share/textadept/doc.
MarcusE1W commented on 2020-05-12 12:18
Successfully build with Pinebook Pro. You could add the 'aarch64' architecture as supported.
slut commented on 2019-04-16 08:13
mgr commented on 2019-01-28 05:56
Textadept 9.6 is more than a year old by now. Please update to 10.2 if you can.
noch commented on 2018-06-08 23:56
Please note that before one runs make doc, she should patch luadoc with textadept/modules/luadoc.patch to ensure documentation is formatted properly. ref: https://foicica.com/lists/code/201806/4495.html
It might be useful to make a note of this in the PKGBUILD.
reztho commented on 2017-09-21 18:52
Popolon commented on 2017-09-20 23:15
Can't clone it due to unsecure protocol settings on the mercurial server :(.
Edit : Oops thanks, just seen it.
fushinari commented on 2017-06-08 23:40
twitt commented on 2016-10-05 12:13
Just small addition: `hg config -e` always opens $HOME/.hgrc for editing and ignores $HGRCPATH if set. But Mercurial itself will ignore $HOME/.hgrc if $HGRCPATH is set. So make sure to open the right hgrc file.
reztho commented on 2016-10-03 18:14

fusion809, it's explained inside the PKGBUILD: https://aur.archlinux.org/cgit/aur.git/tree/PKGBUILD?h=textadept
,line 19 onward.
But here's the text anyway:
'If textadept can't be compiled try the following things in this order:
- Run: hg config -e , and then add these lines:
[hostsecurity]
foicica.com:minimumprotocol = tls1.0
- Run makepkg with the -C argument'
0 notes
Photo

What makes our PDU to be unique compared with others? 1. Provide HTTPS management, support TLS1.0 and above standards, support SNMPv3, DES or AES encryption mode can be selected, and provide MD5 or SHA private encryption; 2. Support network command line view and operate equipment, SSH command line, SSL mail sending and network firewall; 3. Electrical isolation is adopted for external sensor interface and communication interface to improve the electrical performance and communication safety of equipment; 4. The switch control is able to recover quickly without power supply; 5. The latest Linux kernel version 4.0+ and encryption library. Fix most of the system security vulnerabilities, provide IPV6 support, and support software online upgrade #UPS #PowerSystems #EnergySaving #Jeidar #kotohirasystem https://www.instagram.com/p/CO186dwjZ_I/?igshid=1i9aw1sp02b8n
0 notes
Text

What makes our PDU to be unique compared with others?
1. Provide HTTPS management, support TLS1.0 and above standards, support SNMPv3, DES or AES encryption mode can be selected, and provide MD5 or SHA private encryption;
2. Support network command line view and operate equipment, SSH command line, SSL mail sending and network firewall;
3. Electrical isolation is adopted for external sensor interface and communication interface to improve the electrical performance and communication safety of equipment;
4. The switch control is able to recover quickly without power supply;
5. The latest Linux kernel version 4.0+ and encryption library. Fix most of the system security vulnerabilities, provide IPV6 support, and support software online upgrade
#UPS #PowerSystems #EnergySaving #KotohiraSystem
0 notes
Text
ASP.NET C# - Client e server non possono comunicare perché non dispongono di un algoritmo comune - Come Risolvere

Se vi siete imbattuti in questo articolo è probabile che vi siate imbattuti nel seguente messaggio di errore ASP.NET:
System.ComponentModel.Win32Exception: Client e server non possono comunicare perché non dispongono di un algoritmo comune.
System.ComponentModel.Win32Exception: The client and server cannot communicate, because they do not possess a common algorithm.
Questo tipo di errore è solitamente dovuto all'implementazione non corretta (o non completa) di un protocollo di crittografia, nella maggior parte dei casi il Transport Layer Security (TLS) 1.2, e della conseguente esclusione delle precedenti versioni (TLS 1.0 e TLS 1.1): il problema può essere legato a una errata configurazione del vostro server, del client che utilizzate per connettervi ad esso oppure a una connessione server-to-server - ad es. un WebService - tra due server gestiti direttamente da voi o tra il vostro server e un servizio esterno.
Si tratta di un problema che nelle ultime settimane è diventato quantomai comune, viste le nuove linee-guida pubblicate dal PCI SSC (Payment Card Industry Security Standard Council) e destinate a entrare in vigore a partire dal 30 giugno 2018, in conseguenza dell'introduzione preliminare del PCI Data Security Standard v3.2.1: in conseguenza di questo aggiornamento, tutti i protocolli di cifratura considerati non sicuri (SSL 1, SSL 2, SSL 3 e TLS 1.0) saranno progressivamente abbandonati in quanto considerati non più sicuri, lasciando spazio soltanto al TLS 1.1 e al TLS 1.2 - quest'ultimo fortemente raccomandato in quanto considerevolmente più sicuro del suo predecessore.
Per maggiori informazioni sui protocolli di crittografia e sul loro livello di sicurezza, vi consigliamo di dare un'occhiata al documento Transport Layer Protection Cheat Sheet realizzato dal progetto OWASP (Open Web Application Security Project), la principale organizzazione che si occupa a livello mondiale dello studio dei criteri di sicurezza per il World-Wide Web. In questo articolo, invece, cercheremo di comprendere come mai questo errore di "mancanza di algoritmo comune" si verifica su IIS / ASP.NET e come risolverlo.
#1: Impostare il SecurityProtocol
La prima cosa da fare è aggiungere la seguente riga di codice all'interno della nostra applicazione ASP.NET:
Nel caso in cui la versione di ASP.NET utilizzata fosse inferiore alla versione 4.5, sarà necessario impostare manualmente il numero corrispondente al TLS 1.2 nel seguente modo:
Il punto migliore per inserire questa istruzione è, probabilmente, all'interno del metodo presente nel Global.asax (ASP.NET 4.x) o Startup.cs (ASP.NET 5 / .NET Core), a seconda della versione di ASP.NET utilizzata:
Inutile dire che, nel caso di una connessione server-to-server, dovrete impostare la proprietà SecurityProtocol su entrambi gli applicativi ASP.NET che effettuano la connessione - il caller e il receiver.
Un approccio più conservativo
E' importante comprendere che, aggiungendo questa riga di codice, disattiverete automaticamente il supporto di ogni altro SecurityProtocol: questo significa che SSL1, SSL2, SSL3, TLS1.0 e TLS1.1 smetteranno di funzionare, così come eventuali protocolli che saranno implementati in futuro (TLS 1.3, TLS 2.0 e così via). Per questo motivo, se vi interessa mantenere la forward-compatibility del vostro progetto con eventuali future versioni di ASP.NET e/o del protocollo TLS e/o di altri protocolli futuri, consigliamo di implementare un approccio leggermente più complesso del precedente ma certamente più corretto:
#2: Installare il .NET Framework 4.6.2+
Se impostare la proprietà SecurityProtocol non risolve il vostro problema, la cosa successiva da fare è installare una versione del .NET Framework che garantisca un supporto nativo del TLS 1.2 - ovvero dalla 4.6.2 in su - o meglio ancora, come consiglia Microsoft nell'articolo "Transport Layer Security (TLS) best practices with the .NET Framework", dalla 4.7 in su.
Nel caso in cui non abbiate possibilità di effettuare questo upgrade, potete installare le apposite hot patch (KB3154518, KB3154519, KB3154520 o KB3156421) e/o questo pacchetto di estensioni, valide dal .NET Framework 3.5 SP1 al .NET Framework 4.5.
In tutti questi casi, è però fondamentale avere un sistema operativo Windows 7 o superiore (nel caso dei sistemi Desktop) o Windows Server 2008 o superiore (nel caso dei sistemi Server): Windows XP, Windows Vista e Windows Server 2003 non sono infatti supportati - non a caso, su ciascuno di questi sistemi operativi non è possibile installare versioni di .NET Framework superiori alla 4.6.1.
#3: Impostare il .NET Framework nel Web.Config
Nel caso in cui i punti 1 e 2 non siano stati sufficienti a risolvere il problema, la causa potrebbe dipendere dal fatto che IIS non utilizza la corretta versione del .NET Framework per la vostra applicazione web. Questo può capitare in tutti i casi in cui sul server coesistono più versioni del framework installate - ad esempio, la 2.x, la 3.x, la 4.5 e/o la 4.6.x. Per risolvere questo tipo di ambiguità è opportuno specificare la versione del .NET Framework da utilizzare direttamente nel Web.Config, nel seguente modo:
L'attributo "targetFramework" istruisce IIS su quale versione del .NET Framework utilizzare per avviare l'applicazione: nel caso specifico, il .NET Framework 4.6.2 utilizza il TLS 1.2 per impostazione predefinita ed è quindi una buona ipotesi - se non si ha modo di installare/utilizzare il 4.7.
Sfortunatamente, come abbiamo spiegato nel paragrafo precedente, non è possibile utilizzare questo workaround con Windows Vista, Windows XP e Windows Server 2003, poiché le versioni 4.6.2 e 4.7.x (e superiori) non possono essere installate.
#4: Modificare le chiavi di Registro di Windows
Se nessuna delle opzioni di cui sopra ha funzionato, non vi resta che provare ad alterare le chiavi di registro di Windows per "sbloccare" il supporto del TLS 1.2 (e/o di altri protocolli di crittografia) utilizzando lo script presente in questa risposta su StackOverflow, che per comodità riportiamo anche qui di seguito:
Prima di lanciarlo, assicuratevi di abilitare o disabilitare i protocolli desiderati impostando il relativo valore rispettivamente a o a .
Per il momento è tutto: spero che questo articolo possa essere d'aiuto ai tanti sviluppatori che si scontreranno con questo problema!
Read the full article
#.NETCore#.NETFramework3.5#.NETFramework4.0#.NETFramework4.5#.NETFramework4.6#.NETFramework4.7#ASP.NET#SecurityProtocol#SSL#SSL1#SSL2#SSL3#TLS#TLS1.0#TLS1.1#TLS1.2#Web.Config
0 notes
Text
【Firefox】SSL_ERROR_UNSUPPORTED_VERSION の対処法
Mozilla Firefoxで「安全な接続ができませんでした エラーコード: SSL_ERROR_UNSUPPORTED_VERSION」と表示されてウェブページが見れない場合の対処法
(more…)
View On WordPress
#mozilla#Mozilla Firefox#SSL#TLS#TLS1.0#TLS1.1#TLS1.2#ウェブブラウザ#エラー#エラー対処法#セキュア#セキュリティ#ソフトウェア#マルウェア#危険
0 notes
Text
Managed Hosting - Zertifikatsketten und Zertifikate

Zum Managed Hosting gehört mehr als nur der Betrieb von Servern. Dazu gehören auch komplexe Themen wie HTTPS und Zertifikatsketten. Wir erklären, wie sie funktionieren, welche Fehler dabei am häufigsten gemacht werden und wie wir diese Fehler beheben.
HTTPS und Zertifikatsketten
Verschlüsselung ist heikel. An ihr hängen die Vertrauenswürdigkeit einer Seite und die Sicherheit von Kundendaten. Auch die Performance kann beeinflusst werden.
Für die Sicherheit sind folgende drei Aspekte entscheidend:
verwendete Protokolle (SSL vs. TLS)
zugelassene Cipher
benutzte Zertifikatsketten (Root-CAs, Intermediates und Zertifikate)
Bei den Protokollen (SSL/TLS) gilt immer TLS1.0 oder höher. Es gibt Ausnahmen, aber die machen wir bei SysEleven nicht ohne auf die Gefahren hinzuweisen.
Die Cipher sind für die Verschlüsselung zuständig. Hierbei setzen wir auf Sicherheit und Verfügbarkeit: mit weit verbreiteten Ciphern und Prefer Server Cipher Order.
Erfahre mehr im SysEleven Blog
0 notes
Text
0 notes
Text
Simple Methods To Fix The Quickbooks Error Code OL-334
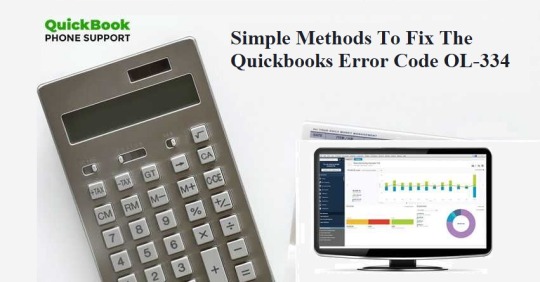
Quickbooks is a reliable accounting program that is used by several companies of medium-scale and small scale. It provides the facilities to audit the taxes effectively and helps in payroll management. Some issues occur with QuickBooks payroll or other errors such as the code OL-334, which can be resolved by connecting with QuickBooks payroll support for technical assistance. You can implement the techniques provided below to resolve this issue.
Enabling The TLS 1.2 Security Protocol
You can start by updating the internet explorer to the latest version and then open the browser and click on the gear icon that appears on the right-hand side top section of the browser. You can click on the internet options then choose the advanced tab.
Once you reach the section named section start to scroll down, untick the box titled use TLS1.0, and tick the box named use TLS 1.2, click on the apply tab and choose ok. Further, you can close the programs and reboot the machine and see if the error has been resolved.
Create a New Company File
Click on the new company tab and then on express start from the QuickBooks company file menu. Further, you can add the bank account, the one that is having issues. Set the account for bank feeds.
You can download the bank feed transactions for testing the account, the error persists, then you can contact the bank if no error displays, then issues with the bank are not there. You can try another below if this doesn’t solve the error code OL-334.
Running Account With Suppressed CTRL
Start by creating a company file backup. Lok for the inactive account that has the icon of the lightning bolt. Further this you can deactivate the online services related to the account.
After this, you can run the setup of bank feeds. Hold and press the key of CTRL whenever a command gets clicked. Update the program after these steps to see if the error OL-334 has disappeared.
Get In Touch With Us
If you are facing issues related to QuickBooks payroll, you can connect with QuickBooks payroll support for further help.
Ronan rim is a creative person who has been writing blogs and articles about QuickBooks Products and Services. She writes about the latest updates regarding Quickbooks Support and Quickbooks payroll Support how it can improve the work experience of users. His articles have been published in many popular e-magazines, blogs and websites.
SOURCE:- http://quickbooks-quickbooks.com/simple-methods-to-fix-the-quickbooks-error-code-ol-334/
#Fix Quickbooks Error Code OL-334#Quickbooks Error Code OL-334#QuickBooks Payroll#QuickBooks Payroll Support
0 notes
Photo

EC2のWindows Server構築でやるべきこと https://ift.tt/3362W2C
1. 概要
2. Windows Serverのインスタンス起動
— 2.1. AMIを選択してインスタンス起動
— 2.2. Cドライブのサイジング
3. Windows ServerのOS初期設定
— 3.1. Administratorのパスワード変更
— 3.2. Administrator以外のユーザー作成
— 3.3. Timezone設定、Language設定、Region設定
— 3.4. File name extensions設定
— 3.5. NTP設定(Amazon Time Sync Service)
— 3.6. Computer Name変更(*)
— 3.7. Windows Update
4. EC2 管理ツールのインストール/セットアップ
— 4.1. AWS CLI のダウンロード & インストール
— 4.2. AWS CLI のセットアップ
— 4.3. E2CConfigのダウンロード & インストール
— 4.4. CloudWatch Agent のインストール
— 4.5. CloudWatch Agent のセットアップ(*)
5. OSのネットワーク/セキュリティ関連の設定
— 5.1. リモートデスクトップ接続設定(セキュリティポリシーによる)
— 5.2. ネットワークレベル認証設定(セキュリティポリシーによる)
— 5.3. 暗号化レベルをHigh設定(セキュリティポリシーによる)
— 5.4. 暗号化TLS1.0/1.1 を無効化(セキュリティポリシーによる)
6. ADに登録(*)
7. ミドルウェアのインストール(*)
— 7.1. ミドルウェアのインストール
— 7.2. ミドルウェアのログローテーション
8. AMI を使った横展開
概要
インフラエンジニアの基本はIaaS構築から! 本記事は、EC2上に起動したWindows Server OSの構築でやるべきことをまとめた記事となります。対象はOSのベースのみであり、WebサーバーやDBなどミドルウェアの手順については含みません。
なお、本記事に完成はなく、Windows Server OSの構築で新しい発見があれば都度更新の予定です。
Windows Serverのインスタンス起動
AMIを選択してインスタンス起動
AMI を選択します。「コミュニティ AMI」を選択し、「Windows」をチェックします。
日本語OS を使用する場合、「Japanese」で検索します。
特に理由がなければ、AWSが配布するAMI(provided by Amazon)を選択します。バージョンやミドルウェアを含むなどいく���かの種類があります��で、目的に応じて選択。
以降のインスタンスの設定については、本記事では省略します。
Cドライブのサイジング
Windows Server のCドライブにはある程度の未使用領域が必要です。Cドライブをサイジングする方法は、下記ドキュメントを参照。
概要はじめに今回は、EC2 のディスク拡張についてご紹介します。対象のサーバーOSは、Windows Server 2012 R2 となります(2016以降も手順は同じです)。マイクロソフトのドキュメントを例に、IaaSの設計時に悩ましいCドライブの容量をサイジングする方法についても...
EC2(Windows) Cドライブのサイジングと拡張 | Oji-Cloud - Oji-Cloud
Windows ServerのOS初期設定
次に、Windows Server が起動した後のOS初期設定を記載します。
Administratorのパスワード変更
Administratorのパスワード変更
確認のためサインアウト/サインイン
Administrator以外のユーザー作成
Administrator以外のユーザー作成
Administratorsグループ割り当て
確認のためサインアウト/作成したユーザーにてサインイン
Timezone設定、Language設定、Region設定
タイムゾーン(Timezone)の設定
コントロール パネルの時計、言語、および地域(Control Panel\Clock, Language, and Region)
例:UTC
言語(Language)の設定
例:English(US)
Regionの設定
例:United States
File name extensions設定
ファイル名拡張子(File name extensions)の表示は有効にする。
NTP設定(Amazon Time Sync Service)
Amazon Time Sync Service(Server:169.254.169.123)を設定。
C:\Users\Administrator>w32tm /query /status Leap Indicator: 3(last minute has 61 seconds) Stratum: 0 (unspecified) Precision: -6 (15.625ms per tick) Root Delay: 0.0000000s Root Dispersion: 0.0000000s ReferenceId: 0x00000000 (unspecified) Last Successful Sync Time: unspecified Source: Local CMOS Clock Poll Interval: 9 (512s) C:\Users\Administrator>net stop w32time The Windows Time service is stopping. The Windows Time service was stopped successfully. C:\Users\Administrator>w32tm /config /syncfromflags:manual /manualpeerlist:"169.254.169.123" The command completed successfully. C:\Users\Administrator>w32tm /config /reliable:yes The command completed successfully. C:\Users\Administrator>net start w32time The Windows Time service is starting. The Windows Time service was started successfully. C:\Users\Administrator>w32tm /query /status Leap Indicator: 0(no warning) Stratum: 4 (secondary reference - syncd by (S)NTP) Precision: -6 (15.625ms per tick) Root Delay: 0.0341949s Root Dispersion: 7.7766624s ReferenceId: 0xA9FEA97B (source IP: 169.254.169.123) Last Successful Sync Time: 2/22/2019 10:53:21 AM Source: 169.254.169.123 Poll Interval: 9 (512s)
Computer Name変更(*)
Computer Name(コンピューター名)を変更する。
OSの再起動を伴うため、OS初期設定の最後に実施とする。
Windows Update
SSM(Systems Manager)からWindows Update
SSM(Systems Manager)のRun Commandより、下記コマンドを使用して、SSMのUpdateを実施。
AWS-UpdateSSMAgent
SSMが古いと、次のWindows Updateが失敗するため。
SSM(Systems Manager)のRun Commandより、下記コマンドを使用して、Windows Updateを実施。
AWS-InstallWindowsUpdates
Action: Install
Allow Reboot: True
事前に、EC2のロールにAmazonSSMFullAccessがアタッチされていることを確認する。
EC2 管理ツールのインストール/セットアップ
AWS CLI のダウンロード & インストール
以下より、AWS CLI のインストールモジュールをダウンロード。
https://s3.amazonaws.com/aws-cli/AWSCLISetup.exe
AWS CLI をインストールする。
C:\Users\niikawa>aws --version aws-cli/1.16.103 Python/3.6.0 Windows/2012ServerR2 botocore/1.12.93
AWS CLI のセットアップ
以下記事を参考に、AWS CLI をセットアップする。
Linux + aws cli のはじめ方準備今回は、Linux にaws cli をインストールして初期設定する方法をまとめます。Linux環境は、Windows 10にインストールしたWindows Subsystem for Linuxを使用します。Windows Subsystem for Linuxのインストール方法は、下記の記事を参...
やさしいaws cli のインストール方法 | Oji-Cloud - Oji-Cloud
E2CConfigのダウンロード & インストール
以下より、AWS CLI のインストールモジュールをダウンロード、インストールする。
https://s3.amazonaws.com/ec2-downloads-windows/EC2Config/EC2Install.zip
あるいは、SSM(Systems Manager)のRun Commandを使用して、インストールする。
AWS-UpdateEC2Config
CloudWatch Agent のインストール
以下より、AWS CLI のインストールモジュールをダウンロード、インストールする。
https://s3.amazonaws.com/amazoncloudwatch-agent/windows/amd64/latest/amazon-cloudwatch-agent.msi
msiexec /i amazon-cloudwatch-agent.msi
次のディレクトリが作成されたことを確認する。
C:\Program Files\Amazon\AmazonCloudWatchAgent
あるいは、SSM(Systems Manager)のRun Commandを使用して、インストールする。
AWS-ConfigureAWSPackage
Action: Install
Name: AmazonCloudWatchAgent
事前に、EC2のロールにAmazonSSMFullAccessがアタッチされていることを確認する。
次のディレクトリが作成されたことを確認する。
C:\Program Files\Amazon\AmazonCloudWatchAgent
CloudWatch Agent のセットアップ(*)
以下記事を参考に、CloudWatch Agent をセットアップする。
Windowsインスタンスの統合CloudWatch エージェント設定方法はじめに目的EC2インスタンス上のWindowsサーバーが個々に持つログを収集して、CloudWatch Logsに集約すること。CloudWatchを使って、各EC2インスタンスのカスタムメトリクスを監視すること。何が【新】か...
【最新】Windows + CloudWatch Agentによるメトリクス/ログ管理 | Oji-Cloud - Oji-Cloud
OSのネットワーク/セキュリティ関連の設定
リモートデスクトップ接続設定(セキュリティポリシーによる)
リモートデスクトップ(RDP)接続を 2セッションまで許可する設定に変更する。
ローカルグループポリシー(gpedit.msc)を起動し、コンピューターの構成を開く。
下記の項目を展開する。
管理用テンプレート → Windows コンポーネント → リモート デスクトップ サービス → リモート デスクトップ セッション ホスト → 接続
(English)Administrative Templates -> Windows Components -> Remote Desktop Services -> Remote Desktop Session Host -> Connections
下記のパラメータを無効(Disabled)に変更する。
リモート デスクトップ サービス ユーザーに対してリモート デスクトップ サービス セッションを 1 つに制限する
(English)Restrict Remote Desktop Services users to a single Remote Desktop Services Session

ネットワークレベル認証設定(セキュリティポリシーによる)
以下記事を参考に、設定する。
Windows Server セキュリティ強化: ネットワークレベル認証前提条件Windows Server のセキュリティ強化の設定を紹介します。RDP(リモートデスクトップ)を行う際の認証方法をネットワークレベル認証(NLA)に変更します。ネットワークレベル認証とは、接続元のクラ...
Windows Serverのネットワークレベル認証設定 | Oji-Cloud - Oji-Cloud
暗号化レベルをHigh設定(セキュリティポリシーによる)
以下記事を参考に、設定する。
Windows Server セキュリティ強化: 暗号化レベルのHigh設定前提条件Windows Server のセキュリティ強化の設定を紹介します。RDP(リモートデスクトップ)による接続を行う際、サーバーとクライアント間で通信されるデータは暗号化されています。しかし、盗聴時に解読...
Windows Serverの暗号化レベルをHigh設定 | Oji-Cloud - Oji-Cloud
暗号化TLS1.0/1.1 を無効化(セキュリティポリシーによる)
以下記事を参考に、設定する。
Windows Server セキュリティ強化: TLS1.0/1.1を無効化する前提条件Windows Server のセキュリティ強化の設定を紹介します。TLS(Transport Layer Security)の旧バージョンであるTLS 1.0/ TLS 1.1を無効化し、旧バージョンの脆弱性から回避します。(例:TLS 1.0 に...
Windows Serverの暗号化TLS1.0/1.1 を無効化 | Oji-Cloud - Oji-Cloud
ADに登録(*)
システムでADサービスを利用する場合は、Windows Server をADに登録する。
以下記事を参考に、ADに登録する。
Windows Server のAD登録方法前提条件AWSでは手軽にADサービスを利用することができます。本投稿では、マネージド型の Microsoft Active DirectoryにWindows Serverを登録する手順を記載します。OSのバージョンは、Windows Server 2012 R2 となります。Microsoft AD...
やさしいWindows Server をADに登録する方法 | Oji-Cloud - Oji-Cloud
ミドルウェアのインストール(*)
ミドルウェアのインストール
システムの要件に応じて、各種ミドルウェアやツールをインストールする。
例) Microsoft .NET Framework, IIS, DB, Javaなど
ミドルウェアのログローテーション
システムの要件に応じて、ミドルウェアののログローテーションや定期削除を組み込む。
概要Windows Server において、Linux のlogrotate コマンドの役割を作ります。Windowsのforfiles は、Linux のfind コマンドに近い動作をします。forfiles を使ったbatファイルを作成し、スケジューラーで定期実行させます。forfilesの使用方法構文forfiles [/c &...
Windowsのforfilesを使ったログのリネーム/削除 | Oji-Cloud - Oji-Cloud
AMI を使った横展開
これまでの構築後にAMIを取得し、別のサーバーに横展開 or スケールアウトする場合、AMIを取得する前にWindows Server をsysprep(初期化)する。
以下記事を参考に、Windows Serverをsysprepする。なお、sysprepは、EC2Config サービス、あるいはSSM(Systems Manager)のRunCommandのいずれかを使用する。
なお、横展開後にサーバーごとに変更が必要と思われる箇所を(*)にて、マークする。
Windowsにログインせず、SSM(CLI)からsysprepを投げる概要はじめに今回は、SSM(Systems Manager)を使用して、EC2上のWindows Server に対してsysprepを行う方法をご紹介します。Sysprepはsysprepコマンドを直接実行するのではなく、AWSのEC2Config サービスを利...
SSMからEC2 Windowsをsysprepする方法 | Oji-Cloud - Oji-Cloud
元記事はこちら
「EC2のWindows Server構築でやるべきこと」
November 20, 2019 at 02:00PM
0 notes
Last Seen Blogs

cynoodn
Badumm Tss 🐍


whittlebaggett8
Baggett Whittle's Blog

palesoulmoon
old soul, vintage heart

circ77
Untitled