#completely lineless so i had to be very precise
Text
i've had this Saint in a WIP stage for a while, i figured y'all could have him

take good care of him ok?
and you can have the sketch too

#art#destiny#destiny 2#saint 14#saint 14 destiny#cutie patootie#i love him#very near and dear to my heart he is#this is a style that i am *very* unused to#completely lineless so i had to be very precise#obviously it needs a few additions and some texturing#but i think it looks nice
94 notes
·
View notes
Text
ace and the amazing not-technicolor dressed to kill/alive costume(s)
in my salad days, i was a cosplayer (in my uni days, i was a theater minor), and one of the things i like doing is looking over the kiss costumes to get an idea of the construction/materials/etc. some are a lot more obvious than others. but it’s also neat as you look into all the iterations of individual costumes for a tour or tours.
there’s a fantastic overview of really everyone’s costumes (in makeup, sorry; unfortunately, no one’s made an exhaustive review of bruce’s myriad bedazzled BK tops or paul’s fringed lysol gloves yet) on this site, but i really wanted to take a look at ace’s ‘75-early ‘76 costume, which they’ve covered a bit here.
there are more versions of this costume than are listed here. i’m honestly a bit curious as to why he had so many alternate versions. ace’s costumes were fairly cheap to make at this point, so that may have factored in to the amount of changes. i have some ideas, but let’s take a look.
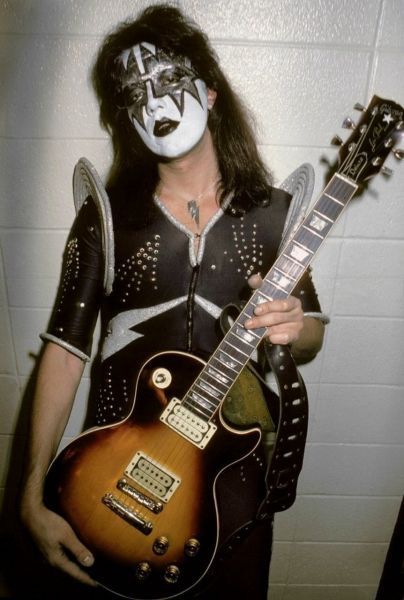
this one isn’t listed on the site as one of the versions of this costume, but it is. his pose doesn’t really do him any favors here, but this version isn’t exactly flattering. in my non-professional opinion, looking at a nearly fifty-year-old photo, i think that the (uneven/wavy) lightning bolt design is probably an iron-on vinyl cutout. not knocking it-- it’s a convenient way to get a nice lineless look-- but with the severe wear and tear of being on the road, the chances that this could be cleaned well without peeling off (or avoid peeling at all) are pretty low. i like the way the comets reverse. the zipper’s very visible here, and the way they silver piping goes down the collar isn’t as flattering as it probably looked on paper.
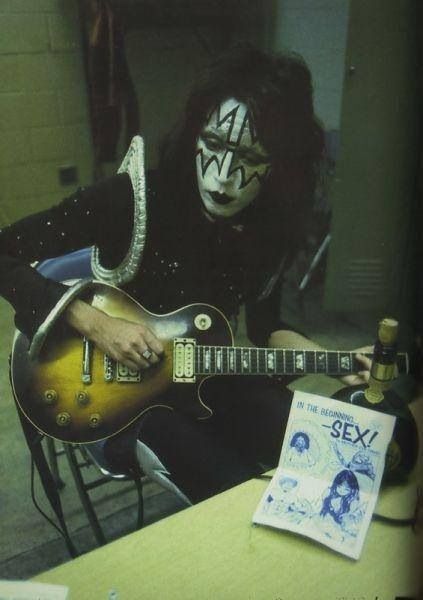

(hi, jeanette!) this is what the fansite lists as the first version of the costume. you can see in this version (and the ones following) that the lightning bolts are sewn-on appliques; they’re also padded. the trouble with the appliques is that they’re not very smooth or precise (if you look at too many pictures of these, you’ll notice that they never line up completely evenly), and there’s bunching (again, stretchy material and it is difficult to work with it and make sure it looks nice!) it looks like the sleeve stretched out when he kept rolling it up. but what kind of confuses me is the lack of silver piping on his left sleeve in the first picture. was the piping only velcroed on? (kind of unlikely, to me, given how it’s not too thick. it’s not impossible that it’s snap-on) a mystery....
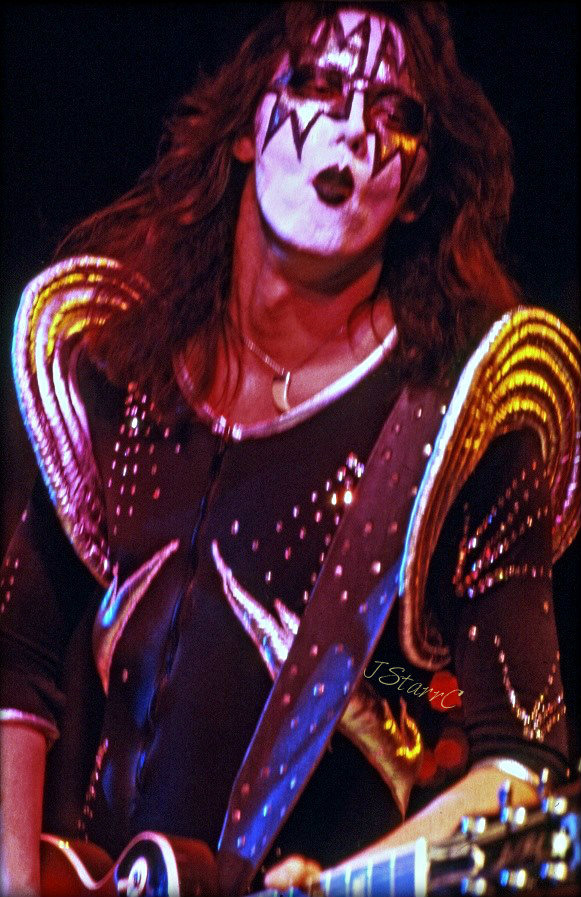
holy seam puckering,batman! sewing zippers is a pain, and sewing zippers onto spandex or anything with stretch is an even worse pain. you can see the puckers on a lot of pictures of this outfit (regardless of version). the length of the zipper in this costume would have helped considerably/been necessary for getting in and out of it, but it does pose some aesthetic drawbacks.
so, why do i think he went through so many iterations? here are my theories.
1) i don’t think he was fond of the sleeve piping/cuffs/whatever you want to call them. he keeps rolling the sleeves up, and there’s even a version with shorter sleeves.
2) the visible, long zipper could detract onstage/in pictures, keeping the look from being as streamlined and clean. i think this is why most of his later costumes (minus elder) went back to chestpieceland/vestland-- it hides the zipper.
3) trouble with the lightning bolts. against the black leotard, even tiny differences in the shape/sizes/placement of the bolts (particularly at the front of the costume) are very obvious, because that’s where your eye immediately goes.
12 notes
·
View notes
Note
Do you guys have any tips on making the lineart look more natural and fitting with the rest of the drawing? Like rn a lot of my lineart looks too stark and kinda jarring against the rest of the image ;w;
If there’s a disparity between your subject lineart, and the lineart you use in the background, it can make the image look unintentionally disjointed. This can be used for metacontextual or stylistic effect. But as you’ve experienced yourself, it can also make it difficult to draw the subjects looking properly integrated with the background.
In lieu of previous posts, I think we should set our eyes on some established visual universes and styles. What they all seem to have in common - is that their subjects usually share the same line -thickness and density as the backgrounds with few variations to make the two aspects stand out against one another.
Essentially, these universes work on the notion that subject and background can vary in aesthetic - but follow most of the same basic rules as one another.

Disney’ s Phineas and Ferb displays a very unified way of depicting characters against backgrounds. Their line thickness is, for the most part, the same all over the board. Some lineart is coloured, like the lines around the character’s hair, whilst others remain black. This lends itself well to animation. The motion of the characters against the still backgrounds will separate the two entities from one another. Although when seen in a still image like this, the visuals rely on having characters stand out from the background via their toont shapes and bright colours.
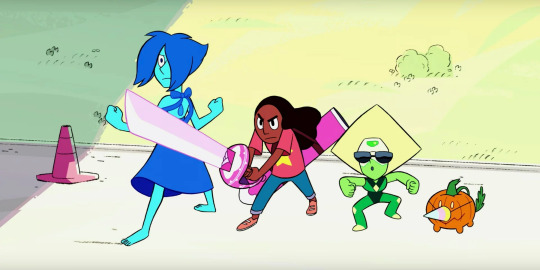
Steven Universe follows a method that’s been tried and tested by its predecessors. Character’s sport more bold lines than the background, which is drawn much more delicately. This makes the characters stand out immediately when put in a composition. But even with the differences in lineart thickness, the weight of the linework on the characters rarely go beyond the weight of the backgrounds’ most dense bits ( like the traffic cone’s outline ). This is a rule laid down to prevent the characters from ever appearing as if “ on top “ of the background, while still keeping them integrated with the environment.
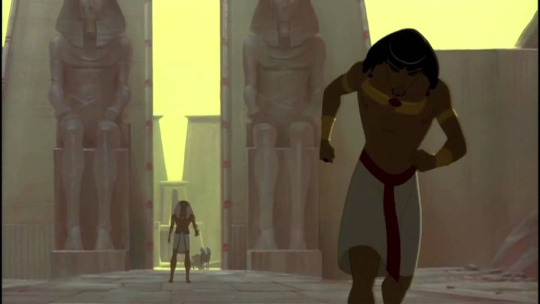
One popular method from all the way back to some of the first feature animated film was the lined-characters on painted backgrounds. Prince of Egypt is one of my favourite examples ( and favourite 2d animated musicals ). Notice how there’s a thin bit of outlining around the character ( most prevalent around Moses’ legs ). Had the lines been any thicker, the integration would’ve been rougher. But because the linework is so precise and delicate it’s perfectly harmonious with the otherwise lineless background.

On a completely different spectrum, you’ve got the comic-noir variety of styles. That integrate their characters completely with the background by having everything bathed in large chunky shadows. In this particular genre, characters are often brought forward by setting them against contrasty backgrounds- or through abstraction in the environment. In this particular style, especially the monochrome ones, the line thickness can vary greatly from image to image, depending on what sort of mood or atmosphere the artist wants to evoke. But the use of those dense shadows helps to bring it all into the same space seamlessly. Even if the denseity of the character’s lineart is vastly different from that in the background.
If your lineart of your subjects do not match with the lineart of your background, it can mean that the two aspects are following different rules. If you want to change that, making sure that the thickness of your lines doesn’t vary too much between the two aspects. Or if they do so, find a way to add other unifying aspects (shading, colours, etc ) that can link the two planes together.

As for me, my lineart varies somewhat in density depending on what I need it to do. I follow the basic rules of 2D animation - by keeping most lines the same thickness. While also taking liberties from the Noir genre when illustrating larger pieces.
- Characters are outlined to make them stand out against the background - These outlines are denser where there’s contact between the background and characters - The closer to the camera the character is, the thicker the linework and outline. - Segments, where characters overlap, have denser outlines
- Sturdy and heavy materials have thicker linework- Light and frail materials have thinner linework
It comes down to you figuring out what you want to do in terms of the rules of your visual universe, and then actively implementing these rules and keeping them consistent across the subjects and backgrounds when drawing. It takes a while to get a grip of - since it comes down to your abstract abilities, but as you develop your style more and more, perhaps hone some technical skill too - you ‘ll probably find it easier to pinpoint why something stands out in the linework and why some things don’t.
- Mod wackart ( ko-fi )
#whyis-every-username-taken#ask#mod wackart#lineart#style#art style#stylization#backgrounds#theredlinestation
272 notes
·
View notes
Last Seen Blogs
pheganleo3
PheganLeo1

mephone5c
Please Stop My Relentless Daughter

sirbreeze
Untitled

dashfox1artwork
Dashfox1 on Tumblr