#edit: wifi card works fine i can share my phones mobile data and connect just fine
Text
ay with the wifi kit im getting pretty good signal even in a place where my phone doesnt... BUT i cant connect for some reason.
#tütensuppe#pwease the connection has been really poor all day long#while installing i broke one of the antennas off the card and panicked but luckily they were just clicked on#so i could reconnect it easily phew#edit: wifi card works fine i can share my phones mobile data and connect just fine#its just the neighbors network bleh
0 notes
Text
Protect Your Browsing/Data Sharing
For free, because in this house I don’t believe in making people pay for basic human rights.
I’ve decided to share my browsing protecting tips here. Digital security is usually quite expensive, but it doesn’t have to be! In this day and age, you’ll be told to watch out for home-born hackers and ‘hacktivists’ accessing your data, but I gotta tell you, what your own governments and ISPs are doing makes this more important (aka: they’re worse).
I know with all the TIKTOK IS SPYING ON YOU stuff, a lot of my friends have come to me seeking some advice on this. This is also great if you don’t want parents checking your browsing >_> just sayin’
If anyone has questions - drop me an ask! I’ll always answer for this topic. I am also happy to ‘expand’ on one of these suggestions if they’re unclear :)
Note: This works under the assumption you have your default ISP provided router and can’t get another one for whatever reason. I will advise that if you can get an additional router, do so! Try to avoid the one the ISP has provided to you.
Additional Note: This is not ‘optimal’. There is no such thing in security – everything has a backdoor.
Let’s get cracking! This is a long, and thorough post, but I _do _have a pdf somewhere if you want it because it looks nicer :*)
Use Tor to browse.
There you go, there’s my advice leaves
https://support.torproject.org/ to Download/Install/Run.
Don’t change anything, except maybe using Tor in ‘bridge’ mode.
Okay, you can use other browsers (see: Chrome/Firefox), but they are not as secure as Tor.
USE A VPN IF YOU ARE GOING TO USE TOR! I prefer Firefox (extensions + good security)
________________________________________________________________
Install the following extensions if you have Chrome or Firefox:
Privacy Possum
Stops tracking cookies. PSA: Cookies are not evil, certain cookies can be.
Firefox: https://addons.mozilla.org/nl/firefox/addon/privacy-possum/
Chrome: https://chrome.google.com/webstore/detail/privacy-possum/ommfjecdpepadiafbnidoiggfpbnkfbj
Ghostery
Stops tracking adverts and cookies. Why do I need this in addition to Privacy Possum? Ghostery specifically looks at tracking cookie ads. It’s like adding MOAR POWAH to Privacy Possum.
Firefox: https://addons.mozilla.org/nl/firefox/addon/ghostery/
Chrome: https://chrome.google.com/webstore/detail/ghostery-%E2%80%93-privacy-ad-blo/mlomiejdfkolichcflejclcbmpeaniij?hl=nl
HTTPS Everywhere
Enforces HTTPS. If you look next to the URL in your browser, you’ll see the little lock which indicates the specific URL is secure and uses HTTPS. Many websites still use the old HTTP, which is not as secure and you should NEVER EVER VISIT AN HTTP SITE ITS LIKE READING A BOOK OVER SOMEONE’S SHOULDER, thank you.
Firefox: https://addons.mozilla.org/nl/firefox/addon/https-everywhere/
Chrome: https://chrome.google.com/webstore/detail/https-everywhere/gcbommkclmclpchllfjekcdonpmejbdp?hl=nl
Adblock Plus
Foff, ads.* Firefox: https://addons.mozilla.org/nl/firefox/addon/adblock-plus/
Chrome: https://chrome.google.com/webstore/detail/adblock-plus-free-ad-bloc/cfhdojbkjhnklbpkdaibdccddilifddb
________________________________________________________________
DNS Settings
Ideally, you should change this on your router. ISPs use a default DNS – you don’t want to use anything those bastards say you should use.
Use Cloudflare or OpenDNS:
Cloudflare is more secure overall and keeps up to standards in addition to not storing your data, whereas OpenDNS is great at avoiding malicious websites, just take your pick really 😊There are a ton of other options, feel free to google ‘free DNS servers’. Google has it’s own as well, but, yaknow, it’s Google.
Cloudflare
Primary Server: 1.1.1.1
Secondary Server: 1.0.0.1
OpenDNS
Primary Server: 208.67.222.222
Secondary Server: 208.67.220.220
Add these to your router settings:
In a browser, go to http://192.168.1.1/ or http://192.168.1.0/ (it varies per router). This will lead to your router’s configuration portal. Don’t have a router with a configuration portal? Throw it in the trash and tell your ISP they suck for giving it to you.
Login to the admin portal. If you have not configured this or set a password, try the default combinations: usernames are usually ‘admin’ or blank, the passwords are usually blank, ‘admin’, or ‘1234’.
Each router is different, navigate to where it asks for DNS values or servers, and enter the above addresses. You will see ‘Static’ near the DNS options, select it. This also ensures you’re in the right place. If you’re not sure what to do, look up the model/make of your router and check how you can change DNS.
Whilst you’re at it, change your WiFi password from the default one, and create a proper password for the WiFi portal login. If these two things are kept as default, all these protection methods are pointless as it is easy to crack your router passwords.
Can’t do this on your router because your parents are ds?* No worries! This can be done on your device! :) Yeah, I know how parents work.
Windows OS
Go to Control Panel <Network and Internet < Network and Sharing Center
Click on the link next to “Connections:”* Click “Properties” in the dialogue that pops up.
Select Internet Protocol Version 4 < Click Properties < Select “Use Following DNS Servers” < Enter the primary and secondary server addresses
Do this again for Internet Protocol Version 6 in the list.
Boom. Windows is so nice to make this easy.
Mac OS
Go to Apple Menu < System Preferences < Network
Select the Network you’re connected to
Click Advanced
Select DNS Tab
Click the + button < Enter chosen DNS < Save
Linux OS
I’m going to assume if you’re using Linux, you know how to use the terminal and are using a modern Linux system. Enter these line by line. There are many ways to do this (Google is your friend)
· sudo apt update
· sudo apt install resolvconf
· sudo systemctl status resolvconf.service (check that it is running)
· sudo systemctl start resolvconf.service (to start it, use ‘enable’ instead of ‘start’ to enable)
· sudo nano /etc/resolvconf/resolv.conf.d/head
· nameserver YOUR.DNS.ADDRESS.HERE
· nameserver YOUR.SECOND.DNS.ADDRESS.HERE
· sudo systemctl start resolvconf.service
Android
Oh yeah, you can do this on phones too wiggles eyebrows. Note, if you’re using a VPN it will lock you out of editing this. Turn it off, edit your DNS, turn it back on. This can be tricky with mobile devices that have not been jailbroken (I don’t advise doing that if you have no clue what you’re doing).
Go to Settings < Connections < WiFi
Select the gear icon next to your current WiFi
Select Advanced < Ip Settings drop-down < Static
Enter chosen DNS options under “DNS 1” and “DNS 2”
iPhone
Go to Settings < Wi-Fi
Select the arrow button next to your current WiFi
Select DHCP tab, scroll down to DNS
Select DNS, and enter your DNS servers
TEST YOUR DNS IS WORKING:
OpenDNS: https://welcome.opendns.com/ (You’ll see a “Welcome to OpenDNS” message”
Cloudflare: https://www.cloudflare.com/ssl/encrypted-sni/ (You’ll see check marks for all fields)
________________________________________________________________
Turn of WPS on router. Enable encryption on router.
If you can access your router portal, find any sort of toggle or field that says “WPS” and disable it. WPS= bad.
Wherever there is an option for WPA2 (or higher) to enable, enable it.
Enable the firewall on your router and Operating System – ALWAYS. If you disable this, you’re disabling an additional layer of security. Firewalls are confusing things and a royal pain in the ass to configure, but having the default is better than having nothing.
________________________________________________________________
Configure your browsers.
Browsers have most things enabled by default, including tracking your location, turning your microphone on etc. Let’s disable that nonsense and make them ask you for permission because it’s 2020.
I’m using Chrome as an example below because it is INFAMOUS for this. Essentially, go through your browser and scroll through settings you don’t like.
Go to the little menu icon < select “Settings”
Sign out if it’s linked to your Google account. Let’s not give Chrome a reason to track your browsing history for your account >_>* Disable EVERYTHING:
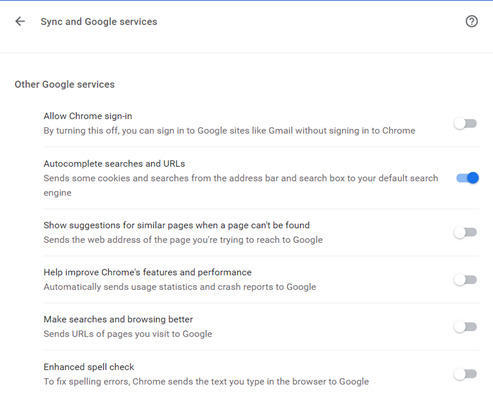
Here, I turned off everything I would find annoying except autocomplete because I’m lazy.

NICE TRY GOOGLE, YOU CANT SAVE MY CREDIT CARD. (Seriously, don’t ever EVER autosave passwords/payment info).


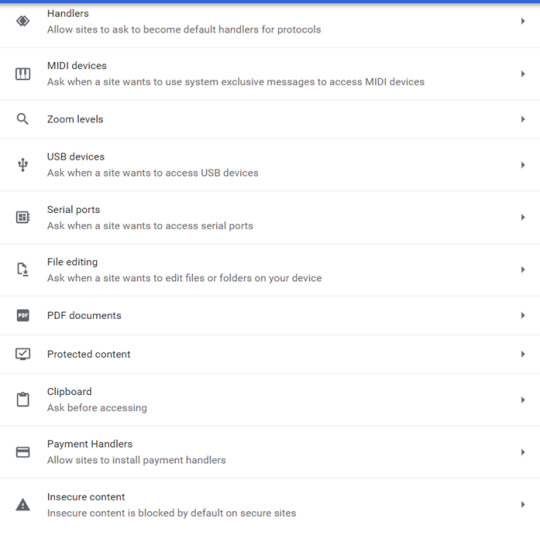
The trick is to balance ease of use with security. These may vary from person to person, in general though, if there’s a setting ‘ask before etc.’ select that over ‘allow’.
As a rule of thumb:
NEVER ENABLE FLASH (not even an ‘ask before’), NEVER ENABLE LOCATION (ask before is fine, but at your own risk), NEVER ENABLE CAMERA (ask before is fine, but at your own risk, use the desktop version of an application over the browser version), NEVER ENABLE MICROPHONE (same as camera)
________________________________________________________________
Additional Tipss
Check every single social media setting. You should disable anything that accesses your privacy, if possible.
Cover your camera with a sticker. Disable it unless it’s needed
Disable your mic unless you need it.
Turn off Bluetooth/NFC when you don’t need it.
Have two separate networks/Wi-Fi for smart devices and personal devices.
Always use two/multi-factor-authentication for every single app, site, device etc. that you can.
Biometrics are preferable and the usual chosen default (fingerprints, retina scan, NOT FACE OR VOICE THIS IS SO EASY TO IMMITATE BRO PICTURES ARE A THING)
SMS (try to avoid if you can, please)
App ‘token’ authentication. A good choice if done well.
Hard physical key or token. The best option (Google: Yubikey, for some information on how this works).
Passwords
I know you use the same password for everything – get a centralized password manager, and start using different ones. Examples include PasswordSafe, Keeper, Bitdefender etc. Try go for a Cloud provider, and pay a little bit for the extra security and backup. If they’re compromised, then you will know, and you’ll be able to change everything. You can tie password managers to a token too.
USE PASSPHRASES, 17 characters is a good average length, use a mix of characters, uppercase, lowercase, numbers, ascii etc.
It doesn’t matter if your password is ‘complex’, it matters if it is complex and long. Servers and computers these days are jacked up on tech steroids and can bruteforce many things, given enough time.
Anti-virus.
EVERYONE SHOULD HAVE ONE, ON EVERY DEVICE. If you have a device that can add AV, add it. This goes for phones, PCs, smartTVs, you name it.
Free versions are okay, some free ones I like are Bitdefender, Kaspersky, McAfee, Avast (hate their fihsfirstg89ewjg9srjgrd ads though).
Sorry Mac users, that belief that you don’t need one is from 2008. Windows has more security built in than Mac, which means Mac devices should 100% make sure they are adding an AV.
VPN
Ahhhhh. The great VPN. A tricky one. Most free versions I find incredibly slow, but give them a try – play around! A VPN is an excellent addition and these days, I’d argue it’s an absolute must. Many AV solutions include a VPN package with their deal. If you want to make sure those sites don’t share your data, this is the thing that will hurt the most - a good VPN will make it a jumbled mess.
Updates - just do them.
There is no complete security in this day and age – it really is just a matter of time. If you use social media, you’re traceable, be it by the company, ISP, some bored 10 year old, or your ex, your data is out there circulating. Once it’s on the internet, it’s there forever, so don’t worry too much and try to make sure it’s all complex binary trash so that they open it and go “WTF” 😊
#tiktok#security#it security#data#data privacy#private browsing#facebook#google#data theft#third party ad#ads#secure browsing#protect data
9 notes
·
View notes
Text
Parents Ideas when Getting your Family's First Mobile Phone
Couples with children right this moment have a difficult decision to take when it comes to solving what age group a small child might access a phone. Keeping in connection with your kids involves allowing them with a smartphone that’ll keep them linked, although it addittionally sharing them up to the environment of social websites and its obsessive disruptions.
There is no correct or incorrect time to give your child their initial cell phone, yet various health specialists agree that the much longer you procrastinate to deliver your children and teenagers their first smartphone, the better. On the other hand, what if you are a father or mother who would like to be able to reach the young person without providing them their private smart phone too quickly? We have revealed a resolution.
Relay is a video display-free, water repellent, smartphone that allows your kid to contact your mobile phone with the click of a button. Parents can chat with their child’s Relay gadget utilizing a Relay software from their personal smartphone.
For mother and fathers who want a mobile phone with few phone numbers to give a call to their children, Relay permits children and teenagers to phone mom and dad when they are at their home from school or out with classmates and friends, with out the increased worry of what they could be watching at on the displays or all of the other risks associated with allowing a child mobile phone use too soon.
Adults can even use the Relay app on the smartphone to individualize their kid’s device to play music files, present language talk and translation to their good friends who've Relay cellphones. The Relay phone itself can be $50 and there exists a $10 charge every month to run it on the network.
Relay, for example, is sold at many retailers. It comes in 5 fun designs, so you’re sure to get the ideal last-second stocking stuffers for your own little one, or a niece or nephew.
The best cell phone for young children can be found in all sizes and shapes, from a single-button press-to-call safety products, to cutting-edge Samsung smart phone with drop guard, to the cheapest iPhone if you would like them on your iCloud family storage space plan.
It is still a hard selection when purchasing for the littlest person in your personal life. We’re here to help you uncover the perfect smart phone for your child, pre-teen, or young adult - just about every age, essentially. We are experts on picking smart phones for teenagers, as much as we are able to aptly pick and choose the very best cellphones in America.
We’ve considered critical concerns, including parental controls, ruggedness, ability rules, GPS navigation tracking, and value.

The perfect phones for little ones are going to be very basic devices mostly meant to open a channel of contact with parents. For teens, we went ahead and planned for low cost plain smart phones that enable phoning and text messages without lots of product features for your kids to get swept up in. For older individuals, we added low-cost cell phones that have a strong balance of market price and function while holding onto serious parental settings using Android and iPhones.
Since newer iPhones and Android smart phones running the most up-to-date os's (like iOS 11.4 and iOS 12 beta) come with sufficient parental adjustments build in, adults will feel confident picking out these cell phones for teens and pre-teens at their discretion.
Moto E5
The Moto E5 is not merely just one cell phone but instead a series of low cost cellphones with different product highlights. Despite their difference, they all make great budget choices for your daughter or son. Although cheap Android devices can be functioning on obsolete equipment or software, the Moto E5 is updated with recent Android and cpus 8.0 software.
Finally, the Moto E5 Play is definitely trim down a little, making it more affordable at 99 dollars. In England, a conventional Moto E5 and the Moto E5 Plus will be available in the near future. Besides the regular Moto E5, each of the others incorporate a water-repellent finish that can help make certain that your children may not harm their smart phone.
Galaxy S8
If you want to get your young adult an incredibly capable cell phone but get worried they could ruin it and squander lots of money, the Samsung Galaxy S8 Active is the best answer. It provides most of the performance a modern Android mobile phone requires, but it’s built strong.
The Galaxy S8 Active screen is sharp, the camera is great, and the electric battery is forgiving if your teen forgets to charge it one night. All of that is packed into a chassis with an great ranking. In other words, it can handle a complete lot of carelessness. We dropped one screen-first onto a rock floor from five ft up, and the display screen was fine.
The Galaxy S8 Active will come in the US on AT&T, Sprint And T-Mobile. Buyers on other systems and in the UK can look rather at the Galaxy S8 and any of the top Galaxy S8 cellphone cases.
iPhone SE
From the Apple family of mobile phones, our iPhone SE is not the most desirable smartphone, but it’s still recognized by Apple with the new iOS 11 updates. Although their age, it consistently works excellently with Apple’s A9 processing unit, and it would clearly give your son or daughter all the smartphone performance they could demand. The perk of their age is definitely that it is sold at an extremely low price for an Apple phone.
One of the primary problems about handing your teenager an iPhone mobile phone is that it’s not built to end up being incredibly long-lasting. Luckily, this is an issue that can be resolved with a low priced iPhone SE case instantly.
Apple's iPhone 7 or iPhone 8
If price is not a huge challenge and you want to buy a phone case (or your teenager has revealed themselves to not be reckless), the iPhone 7 present you with exceptional alternatives. Your daughter or son should not feel held back by any absence of functionalities (or style) on these newer products, although you may be positive that the parent configurations on iOS will be enough to watch your teenager’s use.
Though the advance price will be higher, program help and support for all these newer iPhones ought to go longer, so you will not have to worry about upgrading any time soon. As an added benefit, the iPhone cameras are impressive, so you’ll get to see a lot of fantastic shots of those things your teenager is doing.
There's one cause to give your children a smart phone: if they're often out of view of trusted grown-ups and may have to contact you or some other caregiver.
Don't purchase your child a high priced, high-end cell phone.
The Wait Until Eighth program, which encourages only giving young children smartphones once they reach the 8th grade, makes some good arguments, although it too quickly avoids smartphones and social networking, which are different things. The crusade's central reason, though, is the fact that younger kids generally solely need phones for calling a loved one and limited text messages. The preferred cellphone for tweens and kids is a basic voice mobile phone, a screen-less Republic Wireless Relay, or a true monitoring device just like the GoFind.
When you try to step up to a mobile phone, do not spend a lot of money. Young people aren't reliable. That's the fact of everything that would make them kids. They will lose mobile phones, drop telephones, soak phones, and destroy phones. Believe it will sooner or later happen. There's a good quantity of sound smart phones in the budget-friendly collection that are fairly new, secure editions of their operating systems, aren't aggravating to use, and don't appear shamefully not cool. Various impressive cellphones are under two hundred dollars.
We will not enter the endless controversy, by no means resolved, about cellular phone children and radiation, however more and more couples with children have expressed alarm to us about it. The good information is the fact that radiation issues only actually enter into play when a phone is held exactly up to your brain for prolonged amounts of time, and children do not speak on the phone with their classmates and friends very much these days: they will text. Concise chats with mom and dad on a rudimentary mobile phone, for safety or logistical uses, won't hurt any individual. To have long conversations, get a hold of an affordable wired headphone.
No matter what mobile phone you purchase, be sure to get a good, durable case for this. My girl uses a Galaxy Note 4 within an Otterbox Commuter phone case. I could not foresee how artistic my kid turn into with the S Smart pen, constantly doodling and making ideas. As a result of the smart pen, the Samsung Galaxy Note 4 is not just a smart phone, it's actually an limitless diary.
Make a deal with your young fella: If they end up getting a telephone, you will get to take a look at it. I check my child's cellphone regularly. She's fine with that; that is the package deal. I don't read her texts, nevertheless she understands I've that ability.
One more prerequisite when choosing your kid a cell phone is to go for the ideal company plan.
The most economical alternative is Wi-Fi-only, with no SIM card. In this case, they will only experience coverage in accepted Wifi systems, and won't be set to send out conventional texts or make traditional telephone calls. They can, however, use iMessage on Apple iPhones, or Skype for sending text messages and phoning to various other Google accounts on Android cellphones.
Your phone company may possibly give you a smart phone on a monthly installment deal. If perhaps you are using a data bucket with your daughter or son, you should set a limit on their smartphone to a specific amount of periodic data to be sure they would not consume every bit of your data.
0 notes
Text
The Most Trendy First Smartphone For Children Doesn't Have A Screen At All
Couples with children today have a hard decision to make in relation to choosing what age group a daughter or son should access a smartphone. Remaining in connection with your teenager means providing them with a smartphone that’ll keep them linked, yet it also sharing them up to the universe of social media and its obsessive distractions.
There is no right or wrong period to give your kid their initial cell phone, but various researchers acknowledge that the longer you procrastinate to issue them their first mobile phone, the better. Then again, what if you are a mom or dad who would love to have the ability to reach the teen with out allowing them their very own cell phone too early? We’ve identified an option.
Relay is a screen area-free, water-repellent, cell phone that allows your son or daughter to contact your smartphone with the touch of a button. Fathers can check with their child’s Relay gadget utilizing a Relay application from their own phone.
For mother and fathers who want a smart phone with very little numbers to call to their little ones, Relay permits teenagers to phone parents when they’re at home from school or away with close friends, with out the added worry of the things they might be seeing at on the screens or all the other risks involved with giving a kid mobile phone gain access too early.
Adults can even utilize the Relay app on the phone to personalize their child’s device to play music, offer language chat and translation with their good friends who've Relay telephones. The Relay telephone alone is usually $45 to 55 and there is a $10 monthly charge to run it on the network.
The device Relay is offered at many discount stores. It comes in five cool styles, so you are sure to choose the best last-minute present for your own child, or a nephew or niece.
The top rated cellphone for young children come in all sizes and shapes, from 1-button press-to-call safety gadgets, to high tech Google phone with drop protection, to the least costly iPhone if you want your children on your iCloud family storage plan.
It is still a tricky choice when searching for the littlest person in your personal life. We’re here to support you find a smart phone for your family, preteen, or teen - every single age, really. We are professionals on finding the ideal cellphones for young adults, as much as we are able to appropriately choose the preferred cellphones in the US.
We’ve taken into account valuable characteristics, like for example parental controls, endurance, ability limitations, GPS unit tracking, and cost.
The perfect smartphones for teenagers are going to be very simple devices primarily intended to open a path of dialogue with parents. For teenagers, we went ahead and aimed for low-cost simple cell phones that allow phoning and texting without too many product features for your kids to get caught up in. For older individuals, we added in low cost smart phones that deliver a good balance of worth and efficiency while keeping powerful parental settings using Android and iOS.
Since most recent iPhones and Android cell phones operating the most recent operating systems (like iOS 11.4 and iOS 12 beta) incorporate adequate parental configurations build in, parents should feel comfortable selecting such mobile phones for teens and pre-teens at their discretion.
Moto E5
The fresh Moto E5 is not simply just one cell phone but instead a series of inexpensive phones with numerous product features. Even though their difference, each of them make great spending budget picks for your child. Even though many budget Android smartphones can be running on out of date software or equipment, the Moto E5 is caught up with up to date chips and Android 8.0 Oreo.
The Moto E5 Play is toned down somewhat, rendering it more budget-friendly at less than $100. In England, a standard Moto E5 and the Moto E5 Plus will be available in the near future. Besides the basic Moto E5, each of the others feature a water-repellent layer that might help make sure your young adults don’t break their smart phone.
Samsung Galaxy S8 Active
If you wish to really get your young adult a highly capable smartphone but worry they could damage it and waste lots of money, the Samsung Galaxy S8 Active is the best choice. It provides each and every one of the overall performance a top of the line Android smart phone calls for, yet it’s built up tough.
The Galaxy S8 Active screen is sharp, the camera is great, and the battery is forgiving if your child forgets to charge it one night. All that is packed right into a chassis with an great rating. In other words, it can handle a lot of carelessness. We dropped one screen-first onto a stone floor from five feet up, and the screen was fine.
The Samsung Galaxy S8 Active is available in the US on Sprint, AT&T and T-Mobile. Buyers on other platforms and in the UK can look rather at the Samsung Galaxy S8 and the top Galaxy S8 cases.
Iphone SE
Apple's iPhone SE will not be the latest iPhone, but it is currently backed by Apple with the latest iOS 11 features. Although its years, it continually functions very well with Apple’s A9 chip, and it'll provide your son or daughter many of the mobile phone capabilities they could need. The perk of their generation is that this is marketed at a very low price for an Apple device.
One of the main problems about giving your teenager an iPhone mobile phone is that it’s not created to be amazingly resilient. Luckily, this is a challenge that can easily be dealt with with a budget friendly iPhone SE case very easily.
Apple's iPhone 7 or iPhone 8
If price isn’t an important challenge and you want to purchase a case (or your teenager has proven themselves to not be reckless), the iPhone 7 or 8 make for superb solutions. Your teen shouldn’t feel held back by any lack of features (or design) on these new gadgets, although you may feel safe that the parent settings on iOS will be enough to watch your teen’s usage.

Even though the upfront expense will be larger, application customer support for these more recent iPhones should go on for substantially more time, so you will not have to worry about upgrading anytime soon. As an extra bonus, the iPhone cameras are exceptional, so you will get to witness a large quantity of pretty shots of everything that your kid is doing.
Discover one justification to give your son or daughter a smart phone: if they are often out of sight of honest people and may possibly need to get in touch with you or another caregiver.
Please don't purchase your child an expensive, sophisticated smartphone.
The Wait Until 8th program, which encourages only giving children cell phones after they initiate the 8th grade, makes some really good arguments, though it too very easily avoids mobile phones and social media, which are very different things. The system's central point, though, is that young kids generally only require telephones for calling and limited text messaging. The perfect smart phone for tweens and kids is a basic voice telephone, a screen-less Republic Wireless Relay, or a 100 % pure tracking gadget like the Findster.
The instant you manage to step up to a smartphone, do not waste a lot of cash. Children and teenagers aren't cautious. That's the reason of the things that would make them children. They would lose cell phones, drop cellphones, dip mobile phones, and smash cellphones. Realize it will happen. There is a bunch of sound phones in the $300 to $400 selection that run fairly brand-new, protected editions of the operating systems, aren't irritating to utilize, and don't appear to be entirely not cool. You will uncover also some decent ones under two hundred.
We are not going to get into the never-ending argument, never solved, about mobile phone radiation and children and teenagers, however many couples with children have expressed anxiety to all of us about it. The fantastic information is the fact that radiation problems only really come into play when a phone is held directly up to your head for prolonged amounts of time, and kids don't talk on the smartphone with all their classmates and friends much anymore: they text. Short chats with mom or dad on a basic phone, for safety or logistical uses, will not injure anyone. For longer chats, purchase a cheap wired headphone.
No matter what mobile phone you purchase, make sure to buy a good, rugged case for this. My girl has a Samsung Galaxy Note 4 in an Otterbox Commuter cellphone case. I didn't foresee how innovative my child become by working with the S Smart pen, frequently doodling and making comments. Because of the smart pen, the Galaxy Note 4 is not simply a phone, it certainly is an unlimited journal.
Make a trade with your teen: Whenever they obtain a mobile phone, you will get to take a look at it. I examine my teen's phone periodically. She is good with this; that is the offer. I don't peruse her messages, but she understands I've the ability.
Another obligation after choosing your teenager a smartphone is to choose the ideal company package.
The lowest priced approach is Wifi-only, with no SIM card. In this case, they only get internet in well-known Wifi networks, and won't be set to send conventional texts or make common mobile calls. Your kid may, nevertheless, use iMessage on Apple iPhones, or Google Hangouts for sending text messages and contacting to various other Google accounts on Google Android cellphones.
Your phone company may recommend a mobile phone on a monthly installment plan. In cases where you are sharing a data plan with a kids, you should place a limit on their cellphone to a particular volume of regular monthly internet data to be sure that they may not eat up most of yours.
0 notes
Text
Backup or a Laptop Alternative?
At first glance, it appears to be just another portable hard-drive, but Gnarbox promotes their device as an alternative to carrying a laptop while traveling in the back-country. It contains a quad-core processor and 256GB of solid-state storage, and apps that allows you to control it through your smart phone or tablet. But it’s not cheap. The Western Digital MyPassport Wireless Pro also contains a CPU, a dual-core Realtek RTD1195PN, which helps allow the device to run apps like Plex Server and simultaneously stream multiple videos to several connected devices, it costs half as much as the Gnarbox, and the version that I tested contains a 2TB hard-drive. Which one makes more sense for a working photographer to carry? Let’s take a look. Note: Gnarbox provided me an early unit for testing.[9. Gnarbox provided me with a review unit for free, but I did not receive and will not receive in the future any financial compensation for referrals, purchases, clicks or anything else from the company. I purchased the WD unit myself, and also have no ongoing relationship with the company. I try to remain as objective as possible in my reviews, but as with anything you read on the internet, take this with a grain of salt.]
[/media-credit] Resting on a thick bed of moss, the Western Digital MyPassport Wireless Pro (left) and the Gnarbox 256GB (right) are both portable, but the Gnarbox is more compact.
Build
The Gnarbox was designed for back-country use, and it shows. Its rugged, rubberized case has two weather sealed doors protecting the card-reader slots and cable ports, and just as importantly, the inner workings of the box contain no moving parts (it uses solid-state memory rather than a spinning hard-drive), making it much more shock resistant. If you’re hiking through snowy conditions or rafting to your next destination, you can be pretty sure that your data will be safe in the Gnarbox. It’s not tiny like a plain external SSD, but it is still nice and compact: 5.25 inches by 3.4, and about one inch thick.
[media-credit id=1 align=”aligncenter” width=”740″][/media-credit]
If ease of access is more important to you, then the Passport Wireless’s ports and slots are not hidden behind stiff doors that sometimes need to be pried open with a coin[1. My Gnarbox is new, and perhaps will loosen up with age, but for now it’s a pain to open the side doors without a tool or gloves.], so they’re easy to get to. The body of the drive is a square (about 5 x 5 inches, and 7/8ths inch thick) of normal drive-enclosure plastic, and a bit bigger than the Gnarbox, though not as thick. It’s not especially grippy, and I almost immediately dropped mine on some rocks and dinged up a corner (visible in the photo at the top of the page), but it still works for the moment.
Takeaway: If you work around town, then the Passport’s build and accessibility make it great for backing up data while on the go, but if you need something to count on in rough conditions, the Gnarbox is much more likely to protect your data.
Functionality
Connections & Speed
Let’s start with Wi-Fi. Both devices provide the option to connect directly to the drive’s WiFi hot-spot, at which point the drive can be controlled by an app (we’ll get to the apps in more detail later). Additionally, though, the WD Passport can be connected directly to an existing WiFi network so that it can be accessed as a network drive. Not only can the drive then be shared by a team that’s working on a project together (the Gnarbox supports multiple direct connections), it also means that you can continue using your WiFi internet at the same time… not currently possible with the Gnarbox[2. Tim at Gnarbox assures me that this will be possible in the future with their v2.0 OS.]. This is great if you’re in a hotel room and are working with the drive while also streaming music or pulling video clips from a remote drive, for example.
When it comes to hard connections, the Gnarbox offers more flexibility. While the WD has an SD card slot, the Gnarbox has full-size and micro-SD card slots, and though the WD has a full-size USB 3.0 port, the Gnarbox has full size USB 2.0 and USB 3.0 ports, and they both have one of those weird-shaped USB 3.0-sized ports that can accept a micro-USB plug in the right half (see photo below if you’re confused).
[/media-credit] The Gnarbox’s card slots and USB ports. Note the far-right USB port, which is marked with “micro” in fine print below. This will accept a micro-USB cable.
For Backup
On the Gnarbox, you can backup images (or simply transfer images from one drive to another) by connecting the drive/card, selecting the files in the Gnarbox app, and pressing the “Copy” button. This prompts you to select a copy location, either on the Gnarbox or another connected device. It’s not as streamlined or intuitive as it could be[4. Initially, I was hesitant to press the “Copy” button because I didn’t know whether that was going to copy the images to my phone or transfer them to the Gnarbox or what. “Transfer” or “Import” would probably be a better label, there.], perhaps, but the added flexibility of attaching external drives is great, especially considering the fact that the internal storage is only 256GB.
These days, 256GB doesn’t go as far as you might think. It’s not uncommon for me to shoot 64GB at a basketball tournament in a single day on a Canon 5D Mark III, and if I’m shooting wildlife and landscape work, I prefer to shoot with the 5DS R, and shooting a couple thousand shots with that sensor (not uncommon when I’m shooting birds) can quickly balloon to 128GB. If you’re shooting DSLR video, your drive space will disappear even more quickly. With the Gnarbox, you can easily connect a second portable drive like a $100 WD MyPassport (4TB) (or a smaller, faster external SSD), but it also makes the Gnarbox a less compact, elegant storage solution.
[/media-credit] The MyPassport’s ports are all visible here: a USB 3 charging port, another full-size USB port to connect devices, and on the adjoining face, a full-size SD card slot.
On the WD MyPassport Wireless Pro, you start with quite a bit more storage space at 2TB (or more, depending on the model). For simple operation, you have the option of setting the drive so that any time an SD card is inserted into the slot, it automatically imports all of the files to the drive. Alternately, you can open the WD MyCloud App on your phone and (if the app doesn’t crash, as it often does for me), you can press the MyPassport “settings” icon, then “SD Card Import”, and then “Import” from the card. Why this common function is hidden under the “settings” menu I can’t begin fathom, but it works simply enough once you know where it is. There is a similar option for importing from connected USB devices (including card-readers), but there’s no option to transfer files from one external drive to another, though that’s not much of a concern with so much storage space to begin with.
Takeaway: If you’re just looking for a quick backup and storage solution between shoots in town, the WD MyPassport is cheaper, simpler, and offers more storage, though you’ll need an SD Card adapter for your micro-SD cards. The Gnarbox is also fast and efficient for the job, but if you just use it for backup, you’d be wasting its processing power rugged build (and your money). If you’ll be spending more than a few days in the field, you may want to consider an external SSD to attach to the Gnarbox.
For Image & Video Editing
Before anything else, let me make it clear that the both devices have differing functionality on Apple and Android devices. With both devices on iOS, you can mount the drive and use it as a connected network drive, and browse and edit photos in Lightroom, for example. This is not possible on Android, currently.
I tested them both on Android.
On the Gnarbox, using the Gnarbox app, you get quite a bit of functionality. Once you’ve imported your images and video, you can browse them all (arranged by date) from the app. Photos (JPG and RAW) can also be edited for posting to the web, though the Gnarbox app’s editing capabilities are not as sophisticated as something like Lightroom. Editing is non-destructive and adjustments include the expected (cropping, exposure, shadows, highlights, contrast, black point, white point, midpoint, temperature, tint, saturation) and also a couple of sliders that are a bit baffling to an Adobe user (punch, intensity) which must be combinations of contrast, saturation and other tonal adjustments, though exactly what they do is still not clear to me. Still, the basics are covered.
It can also be used for video editing, making use of the Gnarbox’s CPU to keep things smooth and fast. Individual clips can be edited with the same basic adjustments as still images, and you can drag the beginning and endpoints in to trim clip length. Additionally, each clip can be added to the work-space called the “highlight reel”, where you can order and arrange the clips into a longer video, and also add music. It’s remarkably quick and easy to use, though it doesn’t have the power of a workstation video editor (and there are no tools for text overlays, different transitions, audio editing, etc). You’re not going to produce a feature film with it, but even for a high-quality YouTube video, it could be enough. The nice thing is that you can work with large HD or 4K files while only dealing with smaller, proxy files on your phone, which keeps things quick and smooth.
The basic video clip editing options on the Gnarbox. Adjustment controls are the same as those available for still images.
The Highlight Reel view has an audio mixer (clip sounds vs music) and a hit-point marker for the video.
In the music editor section, the sole control is the “hit point”, which you can sync with a moment of intense action in the video.
Problems? The audio functionality is pretty lame[6. This is unfortunately true of most mobile apps, not just the Gnarbox. The only app that I’ve found with decent audio editing for Android is PowerDirector, so far.]. You can add a single music track, but that’s it… no voice-over, no sound effects, no combining of multiple recorded files. This pretty much means that, unless you want to follow the same audio formula with all of your videos, you’re going to have to use some work-around. The easiest may be to produce the video portion using the Gnarbox, then export it (potentially as a small, SD file) and move it to your phone, then open it in a separate audio/video editor (like PowerDirector on Android or LumaFusion on iOS) to work with the audio. If you decide to use an SD video file for this purpose, you can then arrange the audio in your audio editor, export it as an audio file, import it into the Gnarbox app instead of a music file, and re-export it as a high-definition file. Yes, that seems like a bit of a mess.
Alternately, you could produce the audio portion on your phone/tablet first… assuming that you can do it without a video file for reference… and then simply load that as the music track in the Gnarbox, and create the video around it.
Using the WD My Cloud App, you get basic file-browser functionality. It’s not exactly beautiful, but it’s familiar and easy to use.
By selecting the “Photo” tab, you can browse thumbnails of your JPGs, but not RAW files.
Third-party apps like Photo Mate R3, pictured here, allow you to browse RAW files from the drive, but as you can see, rating is not supported over the network connection.
Similarly, any attempt to open network files in the develop module results in an error message. Photos can be moved to the phone for editing, however.
On the WD MyPassport Wireless Pro, there are no built-in photo or video editing options. You can browse thumbnails of JPGs, but not RAW files[8. The new WD My Passport Wireless SSD claims to have support for RAW files, but since it uses the same app as a browser, it’s unclear what that means.]. Rather than using the WD MyCloud App, you can directly play videos with Android apps like VLC, which is nice[3. There’s plenty of room on the drive for storing movies, if you want to tote them along to watch on the plane or in your tent/hotel room.] However, after exhaustive search, I could not find any Android apps that would allow me to connect to the MyPassport via the network connection and edit photos or videos. Photo Mate R3 came the closest: it allows you to browse network drives, and it has support for RAW files, and even PSD files, but you still can’t edit them. If you have sufficient storage space on your phone, you could import the clips/images that you want to work with, and then save the results to the WD drive again, but you won’t get the speed advantages of the Gnarbox’s CPU… you essentially reduce the Passport’s role to that of an oversized MicroSD card (perhaps that alone would be worth it, if your phone doesn’t have a MicroSD card slot).
Problems? The big one is the complete lack of editing capabilities of photos and videos on the drive. But even the WD My Cloud app is much less stable than I’d expect for such a big company, with the app frequently crashing for me. When it’s stable, the thumbnails for images often go blank, as though the cache has been lost and refreshing does not help matters.
Takeaway: If you’re an Android user and want to edit photos and videos using the power of your backup drive, the Gnarbox is the clear winner.
For General Use
It’s worth mentioning that both units can be used as powerbanks to recharge your phone or tablet, if necessary. That’s pretty handy. The Gnarbox battery is only a 4000mAh, about the size of a phone battery, so it’s best for emergency use, but the WD is a bit bigger at 6400mAh.
The Gnarbox is ultimately a great tool for specialized use: photo/video editing and mobile backup. If you want to use it for other purposes, though, it’s not as flexible. It’s not easy to just use it as a wireless network drive for your desktop computer at home, for example. And currently, it doesn’t support media streaming apps like Plex or Twonky servers. In an interview with Gnarbox CEO Tim Feess at PhotoPlus in October of 2017, I was told that in the future, Gnarbox may become an open platform and support a variety of different apps, but that time has not yet arrived.
A playlist in PLEX on the WD My Passport
Movie details in the Plex interface from the WD My Passport.
On the other hand, the WD MyPassport is exactly a general purpose device. It’s easy to connect it to a home or office WiFi network to be shared by multiple users. There’s no easy to way to install new apps on it (to run from the unit’s processor), but it does come with built-in support for Plex and Twonky, so streaming music and videos from it is simple from anywhere. You can even use it in your car, if you want to avoid streaming from your phone’s data plan. But of course, these don’t solve the problems of a working photographer.
Conclusion & Recommendations
If you are legitimately working in remote, harsh locations, then the Gnarbox is really the best option there is, especially if you can use it in conjunction with a tablet or phone to eliminate the need for a laptop and its weight. The Gnarbox’s build will keep your data safe through rainstorms and bumps along the trail, and it will allow you to get some of your basic photo editing and video production accomplished as you go. That said, if you shoot a lot of video or have a high megapixel sensor, you may need to supplement it with an external SSD or hard drive. Most people will probably only need the internal storage of the Gnarbox 256GB, though. The extra cost will be worth the security and functionality when you really need it.
If you’re a photographer who spends most of your time in the city, or even traveling between cities and primarily needs quick backup space rather than processing power, the WD MyPassport Pro Wireless (2TB) has about as much storage space as 8 Gnarboxes, and is better suited to casual use, like streaming music and videos during your downtime. And of course, it costs significantly less. If you’re an Android user, it won’t be much help for image editing, but iOS users may get more use out of it.
Either way, if you shoot with a Canon 5D series camera or a similar body that uses CF cards rather than SD, make sure that you get a fast, USB 3.0 card-reader to connect to your device for fast data dumps.
[/media-credit] The Gnarbox connected to a CF card reader and external hard drive through it’s two full-size USB ports.
And finally, as I was preparing this review for publication, Western Digital announced a new version of their MyPassport Wireless Pro at CES 2018. It appears to be identical except for an orange stripe and the inclusion of solid-state drives (500GB, 1TB, 2TB) rather than spinning plates, and of course, there’s the expected increase in price to go along with them ($350, $600, $900). After a cursory examination of these new models, my recommendations remain the same.
Price and Availability
The Gnarbox 256GB model costs $399, and a 128GB is still available for $299, and they’re available at Amazon, B&H, and Adorama. The WD My Passport Wireless Pro 2TB costs $149, with larger a larger 4TB version costing $229. These are also available at Amazon, but can typically be found at your local Best Buy or other consumer electronics stores as well. The new SSD models can be found online now, and will probably be available in stores soon.
GNARBOX 256 vs WD My Passport Wireless Pro : Which is Best for Backup & Mobile Editing? Backup or a Laptop Alternative? At first glance, it appears to be just another portable hard-drive, but Gnarbox promotes their device as an alternative to carrying a laptop while traveling in the back-country.
0 notes
Last Seen Blogs

curebay
CureBay-Healthcare Clinic

miamoresunartedepaz
Y mi amor es un arte en virtud

famaluminium
Fam Aluminium

streamergirlsvibez
Streamer Girls Vibez

yukimori-shibata
Napoleon of crime