#edited to add: at least watching the gif loop back to the first frame is making me laugh
Photo
NATALIE'S TUTORIALS: 003 - SPARKLE GIFS
In this tutorial, I will be explaining how to create edits where there is a sparkle / falling snow effect overlay. An example of this is the banner used above. Here are some more examples of what you should be able to achieve by the end of this tutorial: x x x
Please let me know if you experience any problems / notice any mistakes and I will try and help you / correct them.
↳ requested by anonymous
STEP ONE: Setting Up
Okay so, the first thing you need to do is create your photoshop file and set up your image as you would like it. Do whatever cool fanciful stuff you would like to your image and make it look however you would like.
One key trick that you will need to remember is to not let your image be too dark. The method I use to add sparkle textures will darken your image slightly, so lighten it up if you have to.
Once everything's sorted, put all your layers in a folder so that they're easy to move / copy over when required. Also take note of your image size.
STEP TWO: Obtaining the GIF
Now, most people don't make the sparkle layers themselves. Most people, myself included, will use easily accessible files either found on tumblr or via google image searches. I have a folder on my computer of saved GIFs to use in my editing, and I would recommend that you start collecting any good texture GIFs that you see in the future. Just save them all into a folder on your computer and you'll never need to hunt them down again.
To help you get started, here is the main one that I use: here
You will need to save this file to be able to use. Remember that you will need to save it as a GIF file or this process won't work.
STEP THREE: Importing the GIF
Now, you will need to import the GIF as a new file. To do this, click the "File" button at the top of your Photoshop, and in the drop down menu, find "Import" and select "Video Frames to Layers...".
Now, this will open up a box where you can view your documents. Go to where you've saved the GIF file. Depending on a variety of things (specifically, which version of photoshop you're using) the GIF may or may not be immidiately visible. If the GIF is not immidiately visible then what you'll need to do is ~ where it says "File Name", type in - *gif - and press enter. Now your GIF files should be visible.
Select the GIF file you want to use and double click on it. This should open up a screen that looks like this:
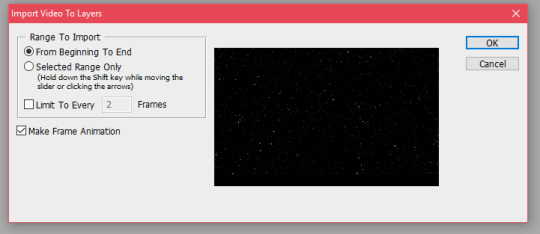
Now, make sure that you've selected everything the same as shown above ~ you will want to be importing it From Beginning to End and you will need to check the box to Make Frame Animation.
In some instances, you will have experienced errors trying to get to this stage. For instance, in my new version of Photoshop, I was unable to import this GIF in this method. In this case, what you'll need to do instead is ~ go to File and click Open... which should then bring up your documents. Follow the stages above here ~ type *gif into the search bar once you've located the correct folder where you've stored your GIF, and then double click on the one you want to use. Unfortunately, in this scenario, the frames imported but without any correct timings. I'll explain this more in the next stage. Just focus now on getting that GIF imported so that each frame of it is a seperate layer.
STEP FOUR: Setting up your Workspace
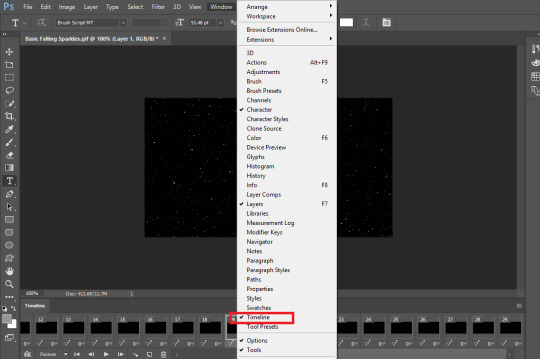
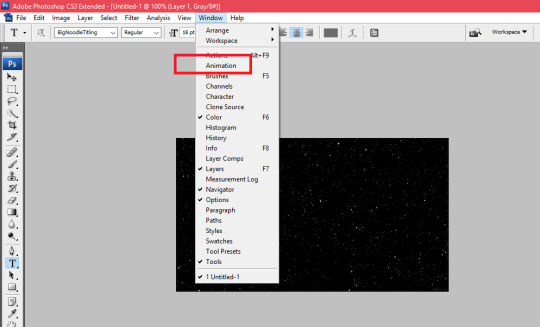
Right, now it's very important that you have all the right Photoshop Windows open for this stage. In recent updates of Photoshop, they have changed the name of the correct window from "Annimation" to "Timeline".
What you'll need to do is, at the top, where you can see the drop down titled "Window", click on that. Find either the window called "Animation" or called "Timeline". If there's a tick by the name, then it means that window is visible. If not, click on the name, and it should open up the window for you. Below are two screenshots, both respresting this stage, one for outdated photoshop and one for the more recent versions:
STEP FIVE: Making Sure Your Gif Runs Correctly
Now, depending on how you uploaded your GIF, this stage will have to be executed differently, but it's sort of similar? Basically, you need to make sure that your GIF
1. Runs smoothly;
2. Is set at a good speed.
Now that you have that nice friendly GIF editing window open, this should be quite easy. All the frames should be represented in it, each layer of the GIF on a new frame.
If you were able to import the gif to layers properly, then it will have imported the frames with a "delay" as well, meaning that the frames will all have a little number in the bottom that's above 0. This little number represents how many seconds/milliseconds it will show the frame before moving onto the next one. Anything under 0.1 normally works, and feel free to play around with these numbers to make sure that the GIF runs at a speed that you're happy with.
If you had to open the GIF as a file because it wasn't able to import, then you will need to pick a number yourself and set it from scratch. I would recommend starting at 0.01 and seeing how that looks, and then maybe trying to increase it by 0.01 a few times to see if you prefer it any slower.
Tip: To change the delay on all the frames at the same time, select all of them in the Timeline/Annimation window before clicking on the time. Bear in mind, that the smallest number that they will show as a quick click option is 0.1, and to set it any slower than that, you will need to click "Other" and type the time in yourself.
STEP SIX: Setting the Size
Now, remember I told you to make a note of the size of your edit? This is important now. You will need to make sure that your gif is not smaller than your edit. It's okay if it's bigger, because then you can crop it, but if it's smaller then things really won't work correctly.
To change the size of your file, click "Image" at the top and in the drop down select "Image Size". This should bring up a box that looks like this:
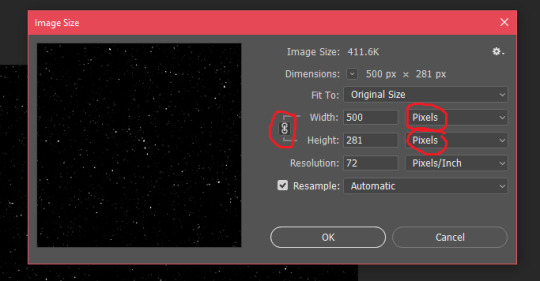
I have highlighted on that image the things you will need to focus on. First, I always tend to work using pixels, so I always make sure that when I'm redefining my image size, I've selected "Pixels", but if you're using a different measurement, just make sure that you've selected the right one.
Secondly, make sure you've kept the demensions locked. To do this, click on the button that looks like a chain. This will mean that the proportions of your image will stay consistent, leading to the best looking GIFs. Now, set these sizes so that they are at least as big as your image and then press OK.
STEP SEVEN: Combining Images
Right, now it's time to bring over your original edit. If you've followed my instructions, it should be as easy as pie. Just go back to that file and (this will work if you've saved all the layers in one folder) right click the folder and press "Duplicate". Duplicate it over to the PSD with your GIF in and then make sure all of those layers are underneath the gif.
Note: You should be fine to move text above the GIF files if you'd like, but any full images should 100% be underneath the GIF.
Tip: I like to save all my GIF files in one folder as well, to make everything easier to organise.
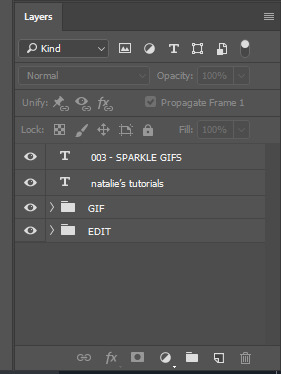
Below is an example of how your layers should be organised now.
STEP EIGHT: Opacity
Now, your image should look completely hidden behind the GIF. I know some people have other ways of completing this step, but what I like to do is play around with the opacity of the GIFS (these means how transparent it is).
To do this in the most effective way, first of all you will need to select all the frames in the Timeline/Animation window again to make sure you're editing it in all frames and not just one.
Next, in your Layers window, select the GIF folder and where it says "Opacity", change it to, well, anything. Here you will really need to play around with numbers to see what looks best. I tend to like using 20% but sometimes that can be too much or too little, it depends on what image you're using behind it.
STEP NINE: Correcting Errors
It's important at this stage now to check that your GIF looks good and is working correctly. The Timeline/Annimation panel allows you to play your GIF. Press the play button and watch it.
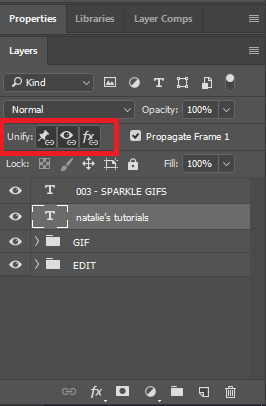
The most common error that I experience is moving/changing layers. This is a frequent problem. This happens when you've changed the positioning / formatting of a layer in one frame and not another. Now, yes, you can go through each frame correcting this. Or, alternatively, you can just find the frame where it looks correct, click on that frame, and all the layers will show their settings for that frame. Then, select the layer you want to make consistent, and use the "Unify" buttons to make sure it looks the same in every frame.
STEP TEN: Exporting the GIF
Now, you should be done! First of all, save the file as a PSD in your Documents.
Now, you need to save it as a GIF. To do this, click "File", "Export", and select "Save For Web (Legacy)".
There are a few important things to check here before you save ~ first of all, make sure at the bottom where it says "Looping Options", you have selected Forever. Also, this is where you have the opportunity to change the size of the GIF.
My recommendations are this ~ if you're creating a banner (like the one I've used in this post), make the width aprox 700px. If you're making character posters, then a width of 500px is ideal.
Once you're happy with the settings, save this in your documents. You should now have your sparkle gif!
And there you should have it!
Feel free to send me tutorial requests!
12 notes
·
View notes
Last Seen Blogs
armort2
Mi rincón...
broken-rod3nt
Bleh.

aestheticoftheyear
essential aesthetic

aradiiaa
Land of Angst and Sketches

punchincorporated
let me be your guy