#i really like how the shading came out here. adding highlights really helps with 3d shapes
Text

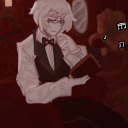
in the bathroom at the gay clubbbb
#a less edited version added for plausible deniability that its not a mirror selfie#bc i know astarion shouldnt be visible in the mirror. but the vision was too strong#anyways on the dancefloor shadowheart is doing those goth girl dances from tiktok#and astarion is doing the fork in the garbage disposal#they dont get any btw bc they get too drunk on tequila and end up throwing up outside and#astarion has to call wyll to pick them up. he does of course#at the same time laezel and karlach are getting into a bar brawl someplace else#and gale is going snork mimimi at home:)#i really like how the shading came out here. adding highlights really helps with 3d shapes#and the way ive shaded shadowhearts torso had me feeling like pygmalion ngl#bg3#baldurs gate#baldurs gate 3#shadowheart#astarion#astarion ancunin#bg3 modern au#i NEED to draw shad in more outfits
2K notes
·
View notes
Text
hello here is my tutorial on how i paint hair . under a readmore because im too lazy to figure out how to format this in a way thats nice to look at
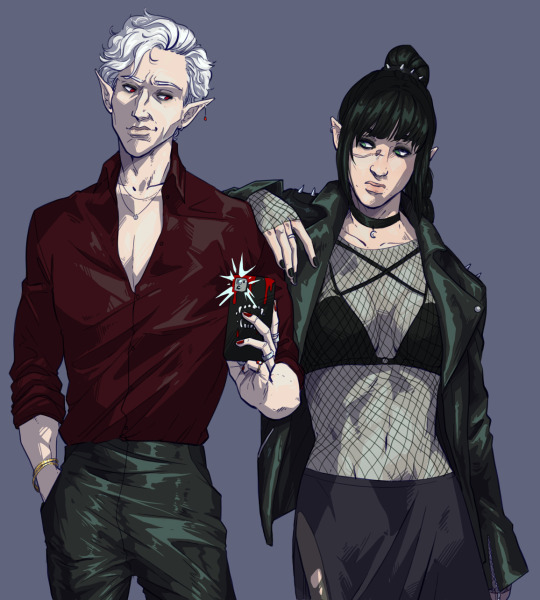
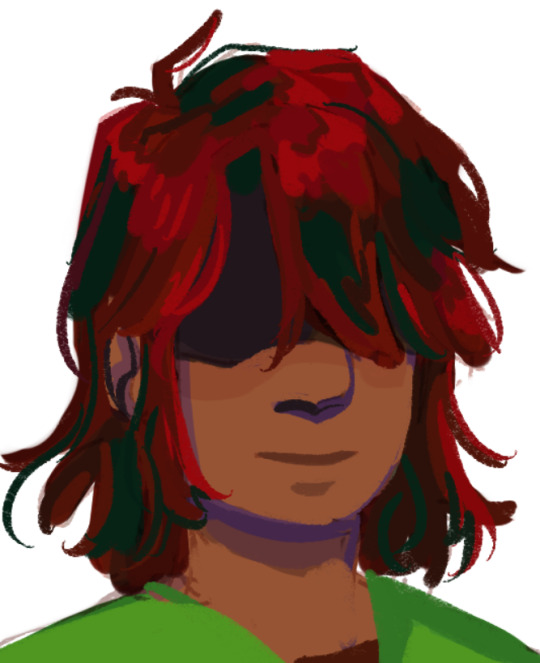
a lot of the way i paint hair is rooted in my specific workflow/style so hopefully this will be at least a little useful for others! find out how the hell i get from THIS

to THIS
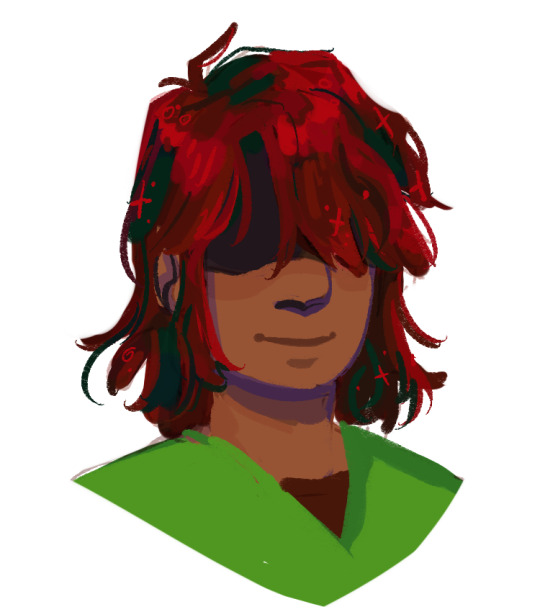
woaaahhh wow. i’m doing kris because auburn hair is really fun to color and also i love them. just a note but with this specific method neatness isn’t terribly important and some messiness can actually make things more interesting further in so just slap those flats underneath your “lines” and let’s fucking gooooooooo
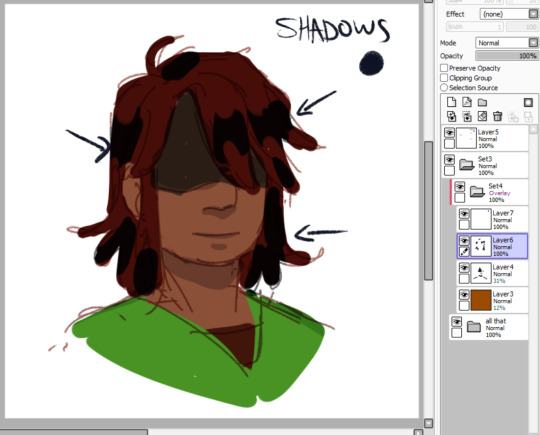
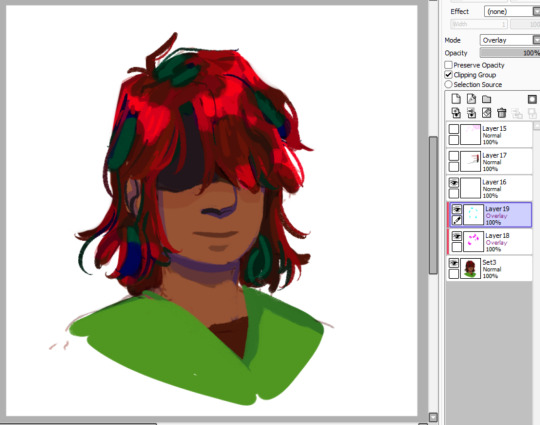
i do p much all my shading and lighting in overlay because 9/10 it looks cleaner than multiply/luminosity. first step is to block in those shadows babey. this is where you have your first opportunity to express form and really sell your hair existing in a “3D” space. (i’ll be showing everything at full opacity initially so you can see where exactly i’m putting what i’m talking about, but assume i am lowering opacity to taste)

sometimes i like to make a second pass of shadows with either cyan or true blue, depending on the intensity of shadows i’m going for. in this case true blue came out too dark so i used cyan. as a note, right here i’m less looking to define values in the hair, and am more just tinting the shadows to a contrasting color (in this case, blue!)

and now for light! at this stage, it’s important to keep in mind that you’re not trying to put in a lot of detail; that’ll come in a few more steps. just slap your light hue in a way that will still be readable to you as you continue working. don’t forget that light will bounce and define edges where you might not necessarily expect! (i’m looking at you, far left corner)
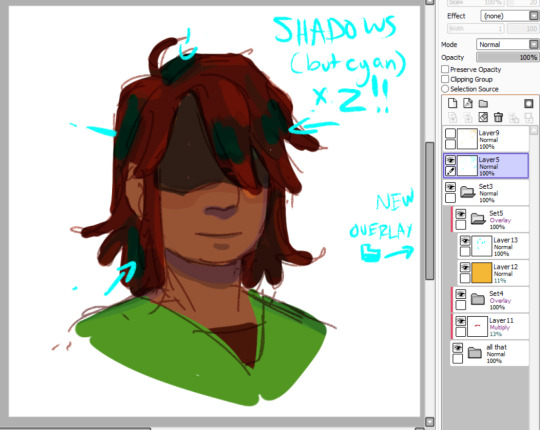
my coloring process can usually be seperated into at least two overlay folders; the first is for initial color tweaking but is Most Importantly for introducing some sexy new values to your work . the second overlay folder is usually where i delve more into bringing out interesting colors. i really want to draw more attention to the blue shadows, so i’ll put some more cyan down on a few focus points
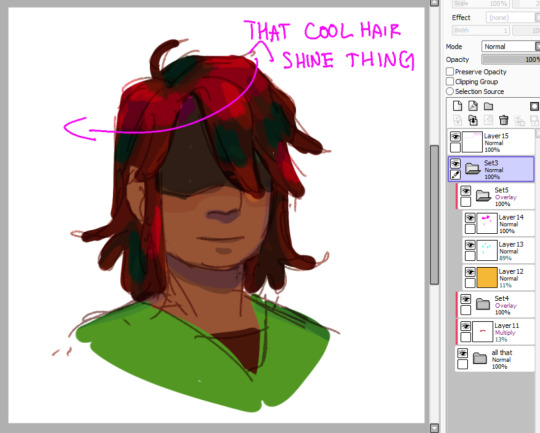
yknow that cool hair shine thing that cool artists put on their cool art of their cool characters? here’s how i do that. just slam down a circle of highlight color (here i use magenta, because it’ll still bring up the value and warmth while not drowning out or muddying the orange highlights in the other overlay folder).

and then you’re gonna use your eraser to feather out the edges and get that nice wave affect. i do this by just clicking down with my tablet pen without moving it
and now it’s time to move on to the actual painting. are you ready? take my hand. you’re merging the layers now. we’re doing this together. i believe in you
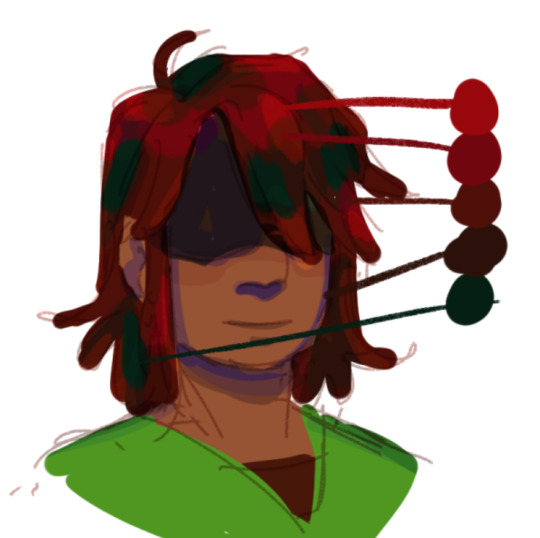
now that we’re here, i’ve picked the colors in their hair so you can see we’ve got a REALLY nice palette to work with. i don’t really do this because i’m a terrible creacher and i’ve gotten used to working messy like this, but pulling a palette can be a quick way to make sure you’re staying clean and concise with your painting
the most important thing that i keep in mind when painting hair is to work from dark to light - so the bottom of the palette up. what this means is that i’ll make sure to render the shadows first, so that when i paint the lighter values over them, it’ll look a LOT more natural and nice looking, and it’s usually easier than working light to dark (with hair at least).
there’s no easy way to get around the next step. it’s time to draw your circle.

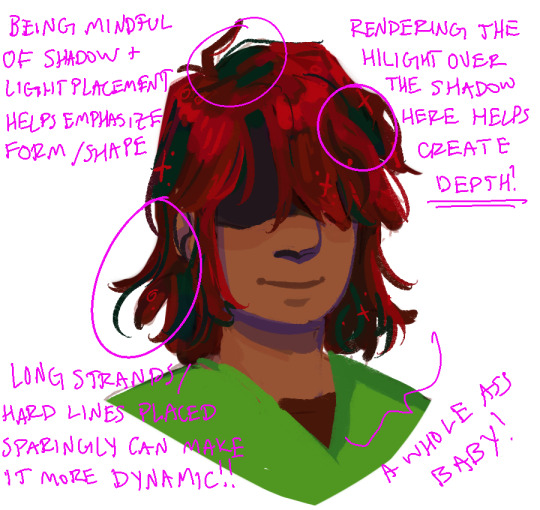
here you can see i’ve rendered a lot of the shadows/lighting and created more shapes in my hair, defining more of the edges between lights and darks where i can
adding some hard lines/edges can really help indicate flow! once i’m satisfied with where i’m at here, i’ll move on to some last color tweaks!
it’s the last bit of overlay i promise!! just a little more cyan to bring out those blues again, and i added another bit of shine over some areas. i’ve found doing the eraser feather thing for both lighting and shadows at this point can help add a touch of ingradience to everything and help pull it together, especially when i’m doing something that has no/minimal blending like this
add a few more details and voila!! Woah, That’s Hair!
488 notes
·
View notes
Text
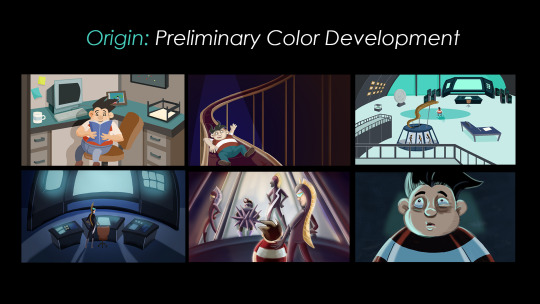
A9 Final Pitch
Wow! After nine weeks, we’re finally at the end of the quarter...so without further ado, here’s a quick summary of the work behind ‘Origin’.
Theme: Appearances can be decieving/life isn’t always black and white
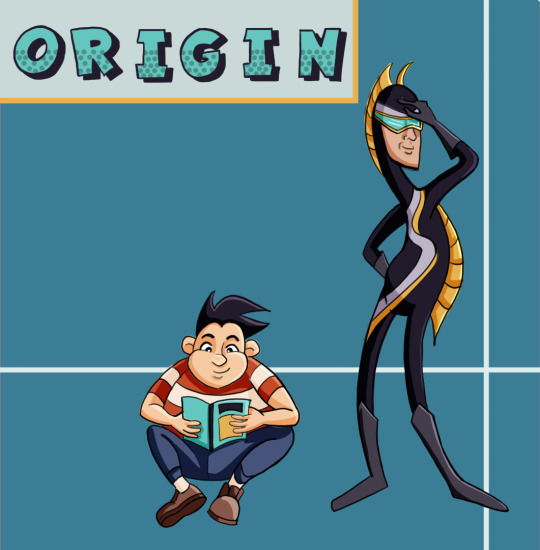
Logline: When Dennis -a superhero-obsessed boy- is dragged to his dad’s office for a ‘Take Your Child to Work Day’ he comes face-to-face with some titillating family secrets. Could this be the origin story for Voltaic City’s newest crimefighter?
Link to final animatic: https://www.youtube.com/watch?v=j0V-kj4Sc9Q&feature=youtu.be&fbclid=IwAR3npV64LbHoybTt2JF6xB35kJiMK4cPKXZCDfXtOLDYqATOlXm7SUYTqcY
In this version of the animatic, I addressed the notes about establishing (more clearly) the initial setting of the office, as well as changing the design of the desk that Dennis hides behind in order to make it more plausible that Eel Man wouldn’t be able to see him.
Supplemental Materials: This section ties in well with the characters/world
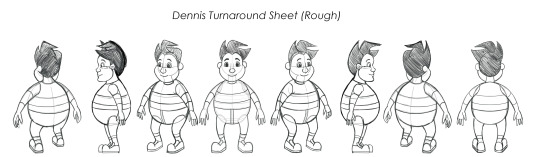
Dennis:
To rehiterate, Dennis is a seven-year-old boy who is obsessed with superheroes and comic books. He views his favorite comic book as his ‘guide to life’, believing that the world contained between the pages has the answers to everything. In a way, his attachment to comic books represents the very ‘black-and-white/good-and-evil’ view of the world that people have in their youth, because more traditional comic plotlines (of the past) tend to be very formulaic in that good always triumphs over evil.
In terms of new material, I reviewed the SCAD Animated Short handbook and developed a rough turnaround sheet and expression page for Dennis. After doing so, when this goes into production, I’m wondering if it might be a good idea to revist the hair design. As much as I enjoy the asymmetrical swoop from the frontal and 3/4 views, since this will be 3D, I’m not entirely certain if it will silhouette well from the sides.
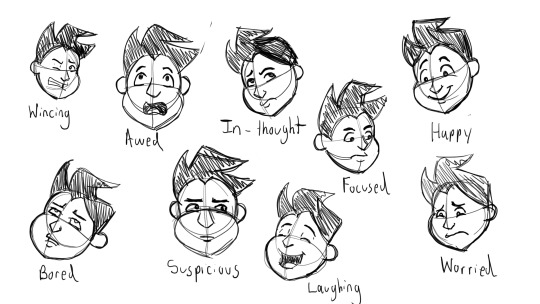
The expression page for Deninis was a lot of fun to make: since he’s the main character and the type to wear his heart on his sleeve, I got to play with a lot of large facial emotions...His roundness makes him a lot of fun to sketch out.
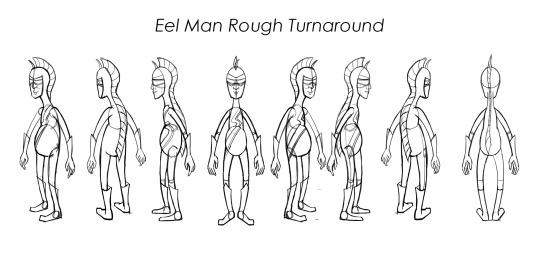
Eel Man/The Dad:
Eel Man is the secondary character in the film: he’s a systems analyst for a Tuna Company by day, and a super-their by night. He’s calculating, insecure and has a little bit of an invisibility complex. He began his life of crime after his job cut his benefits and began by selling classified corproate information to rival companies for money. Eventually, he went from hacking/digital theft and branched out into stealing top secret tech that was being developed by other types of companies: his theft of a sonar weapon (mentioned at the end of this short) is his first ‘big’ venture into typical supervillainesque crime which is why it made the news.
As a mid-level office worker, he feels very stifled and invisible at times. He definitely feels like just another cog in the machine and the noteriety he recieved in the criminal underworld for being a ‘super-theif’ helps stave off his greatest fear, which is going through life forgotten and unimportant.
Doing the turnaround sheet for him was a little tricky because I’m used to drawing him in poses that allow me to really exagerrate his ‘s-curve’ shape. But since characters are typically kept in a neutral pose for the sheets, it felt a little tricky to ‘straighten him out’, so to speak.
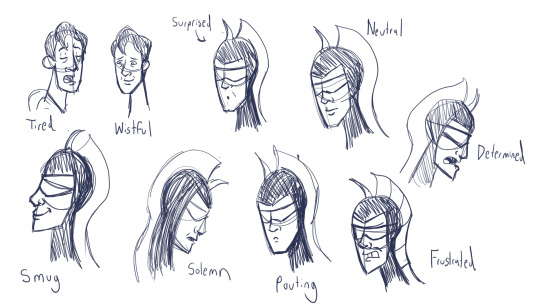
Unlike his son, Eel Man is a bit of an enigma in the short. He does need to keep a little bit of an ‘air of mystique’ so that it is plausible that Dennis could misinterpret his status of being a villain. Additionally, with the visor, drawing expressions was doubly challenging because it removed two of the main three components that really drive facial expressions (eyes, mouth, eyebrows). I did draw two images of him without the mask to hint at how he emotes around his family.
To round out the requirements for character in the Animated Short book, here are the action poses I submitted as a part of my pitch package to indicate how the characters will move. To me, I always begin with action poses before I even finalize character designs because it helps me connect character design, movement style and personality together. By drawing out how they behave, it helps me clarify (even to myself) a character’s identity/sense of being.
Dennis, ever the excitable kid, has very big movements. He puts his entire body into action and is very open with his behavior. I tried to remember how I moved when I was that age and personally, I remember being very impulsive and confident with everything I did: there was no planning or second-guessing, only action.
Eel Man also has exagerrated movements, but in a different way. His ‘s-design’ was chosen to specifically favor poses with strong lines of action: I really wanted to capture the dynamic poses typical to superhero comics, but also soften the seriousness behind the fight scenes by adding a slick, slithery element to his movements. He ‘slips’ and ‘slides’ everywhere.

The World: Style, Lighting and Color
The short takes place in a corporate office and has two main sets: The cubicle and the lair. The cubicle is a very tight and slightly dreary space, so the colors will be mostly beiges and neutral tones to convey a sense of corprorate drudgery. The lightingin the office (during Act 1) will be fairly even to indicate that this is the ‘mundane world’...The story has not truly taken off at this point.

The quick color study here is a rough indication of the palette for the transition between sets. It carries over some of the beige/muted orange elements from the office set while the intense blue forshadows the color palette for the lair. This is the still I’m most likely to revist to finesse the color a little more so that it is congruent with the other panels. I’m not entirely sold on the color of the slide and want to explore what a blue-grey might look like...or perhaps a more saturated bronze color.

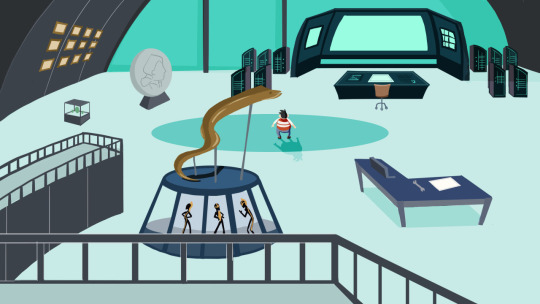
In Act 2, when Dennis is looking around the lair and starting to come up with ideas of what this foreign space could possibly be, the color palette changes to a high-pitched, limited palette of blue/blue green. This was heavily inspired by Lou Romano’s color key work on the Incredibles, because the vibrant, limited palette imbues the space with a sense of ‘otherworldliness’, removing it from what both Dennis and the audience associate with our ‘day-to-day’ reality. The lighting is bright and still fairly even because not only do I want the audience to be able to drink in full ‘grandeur’ of the set, but tonally, the emotions of the piece are still largely positive -it’s a moment of discovery. I also want all of the props (such as the giant coin, the costume carousel, the supercomputer etc) to be highly visible. The narrative relies heavily on props to drive the plot (with each component acting as an indicator that the dad is a hero) and its also important to establish props that will come into play during Act 3 when the fight sequence happens.
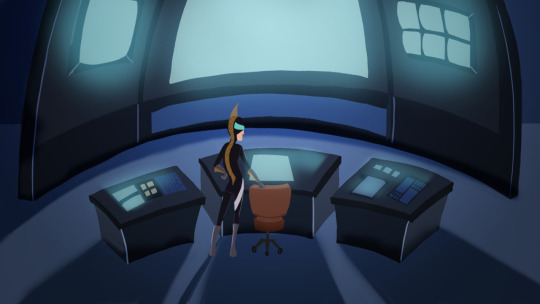
In Act 3, however, the lighting changes. As Eel Man (our secret antagonist) enters the set and Dennis gets visual confirmation that his guess was right (sort of), the set darkens a little and the lighting becomes very high contrast to create a visual intensity that foreshadows the conflict. The color palette of the set is still blue, but leaning a little bit away from the turquoise end fo the spectrum.
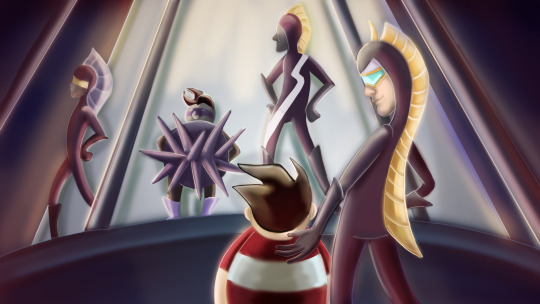
These are two production stills for the film. I chose Dennis and Eel Man’s first face-to-face interaction in the film to showcase because their relationship is what lends impact to the revelation off Eel Man’s true identity at the end. I attempted to do a little more color blending to convey a ‘3D’ quality to the image, but I feel like I want to keep working on it because currently, some elements such as Eel Man’s arm and hand could use a little less exposure to the yellow light for higher overall contrast. But overall, it serves its purpose to convey the general lighting in the scene. The scene is illumnated with warm yellow light to be visually misleading, conveying the beginnings of something wonderful and new...
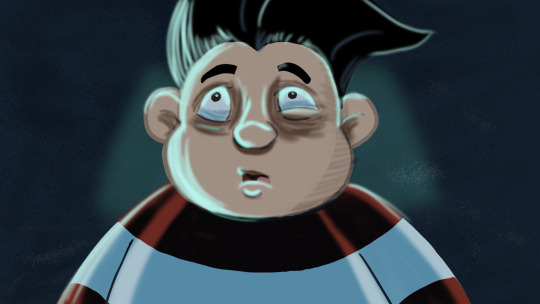
This is the second production still depicting the big ‘reveal’ when Dennis finds out that his dad is a supervillain. In this scene, he is illuminated by the LED lights of the television that is playing the broadcast that completely turns his worldview upside down. The teal highlights act as a visual calllback back to the palette of the lair,but now, the lighting is darker and far more dramatic to convey the sinister turn of the story.
Looking ahead, I really want to develop a more concrete color script for this short. What I have now gives a decent indication of color, but I’d like to push the lighting and shading within the style frames to more closely match the quality of light within the production stills. I also feel like at least two more stills (one of the office and one more in the lair during Act 2) would strengthen the color development, giving people a more concrete idea oft the final ‘look’ for the short. However, I did end up prioritizing the fixes to the animatic, as well as the creation of turnaround sheets over a color script at this current time because those items were the ones definitively required by the SCAD Animated Short Handbook.
Why Animation?
My answer to this question can be found in my description of both the characters and the world. When it came to development, I was favoriting very stylized and exaggerated designs. The character’s shape based design language to inform their acting, as well as the saturated yet limited color palette for the hero world should work in tandem to create a visual universe that far removed from anything that the viewers can easily associate with our ‘day-to-day’ reality (i.e. live-acton). The stylization and exaggeration, which can only be accomplished via animation, serves to make Dennis’s conclusiion that his dad MUST be a hero more believable to the audience by lowering the suspension of disbelief: if the audience doesn’t have a comparison point to explain the unfamiliar space, it excuses Dennis’s runaway imagination.
Although this story could be done in live action, it would change the tone of the story to something a little more corny (similar to Disney’s live-action film Sky High). Even though I personally enjoy campy superhero stuff, in this case, it would tonally undermine the theme that ‘life isn’t always black and white’, which I would like to avoid.
Final Notes and What Comes Next:
Taking this pitch from start to finish was a really interesting endeavor, especially in seeing how the concept evolved over time. I’m a large fan of DC comics, so getting to play around with some of my favorite tropes was a definite plus with this story. I know I personally enjoy hero origin stories a lot...I think the stories people come up with to explain what could drive a person into acts of superhuman heroism/villainy are pretty interesting because they reflect the things that majorly impact people’s lives (loss of family, social injustice etc, etc).
In a way, Origin, for me is as much of a coming-of-age tale as it is a superhero story. Dennis’s discovery at the end, that his dad was not the man he thought he was is an amplified version of how at a certain age, you realize that your parents are not necessarily these godly, untouchable super-humans who can magically solve all of your problems. Awknowledging that life isn’t always easy is a, difficult, yet essential, part of growing up and I wanted to touch on that in my film.
But-with that being said- I’m finally going to reveal what I think would happen after the title card! Originally, I had thought of this idea as a pitch for a television show and I think that after the revelation, Dennis would agree to be Eel Man’s sidekick so that he could try and discover WHY his dad would become a villain. I think he would actively try to sabotage his dad’s villainous escapades, because he’s still a good-hearted character, but I think his loyalty to his dad would lead him to agree to be his sidekick so that he could try to better understand his father. I think that if it were further developed into a series, that you could have a lot of fun coming up with various ‘heroes-of-the-week’ that Eel Man and Urchin Boy could encounter...So in a way, this short could double as a good ‘hook’ for a pilot.
In terms of moving forward with the production of the short, I’m really looking forward to seeing what my future teammates will bring to the production. The thing I enjoy the most about being an animation student at SCAD is being able to discuss and develop ideas wth other people who also love stories and storytelling. Everyone has such a different and unique way of viewing the world, that even being a small part of their stories during the feedback process makes me happy.
In the end, this was rewarding experience because it reminded me that storytelling is about finding common ground with other people.
Well...Onwards and upwards, I guess!
0 notes
Text

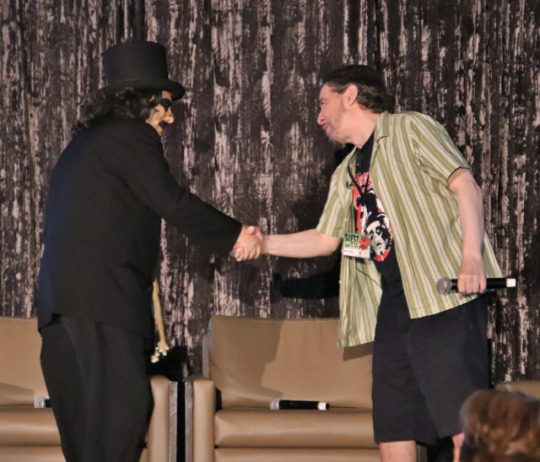
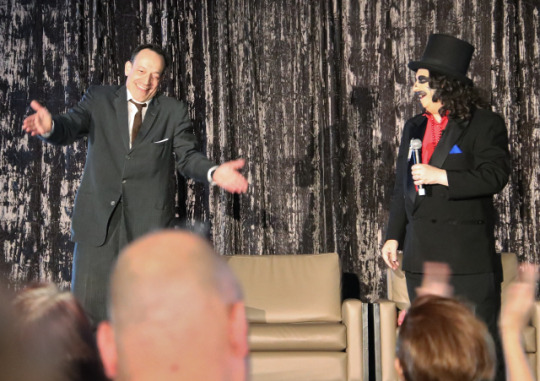
The Follow highlights were“transcrammed” from the 2019 Flashback Weekend panel celebrating 40 years of Rich Koz’s Svengoolie. The event began with a video presentation narrated by the original Svengoolie – the late Jerry G. Bishop. The panel was moderated by WGN Radio’s Nick Digilio and proved an entertaining 90 minutes – with a few surprises!
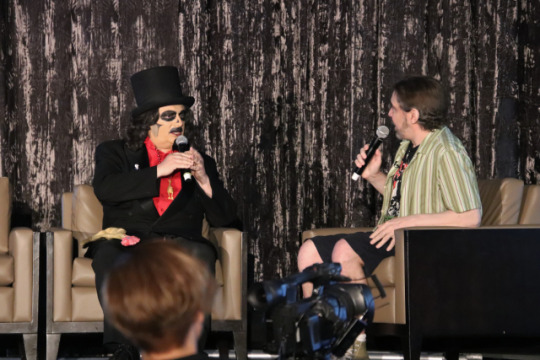
Nick Digilio: You started working with Jerry G. Bishop when you were just a kid.
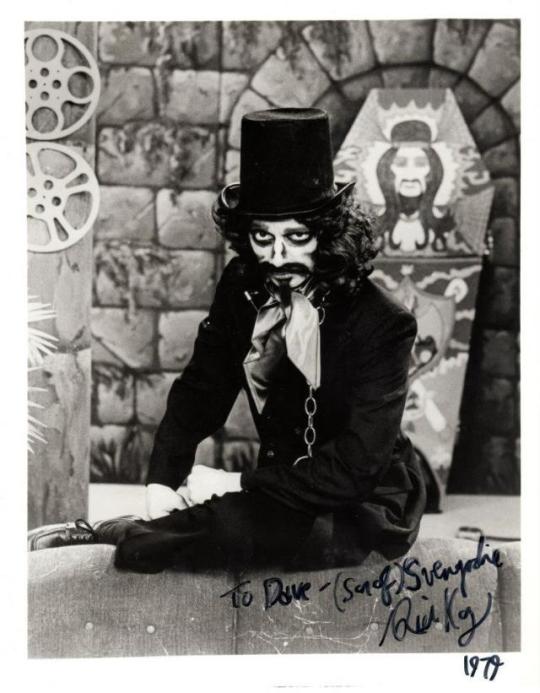
Svengoolie: (laughs) It was that long ago, wasn’t it? I’d just graduated from high school and was about to go to college. Jerry was a live announcer back when they used to have live staff announcers on all the TV stations. He happened to be on Friday nights when they were running these horror movies and started to do the voice (Transylvanian accent) and more schtick before later expanding it out with old sound effects…many that are now my sound effects. I was a fan of his radio and television work and he used to run jokes that people would send in. So I started sending some and he used a lot of them. I told him I was a broadcasting major and he volunteered to come on my show at the college station. Then he said, ‘Would you mind writing song parodies, parodies of commercials, and such?” Eventually, I started working with him and when his show was canceled he was nice enough to bring me with him to WMAQ Radio. Back then you weren’t a sidekick, you were a producer, so I was doing that while also playing 80% of the people who called him on the phone. (Sven discusses some of the skits they did) Later when the opportunity came along for him to reprise the role of Svengoolie he wasn’t interested but suggested I take over as the Son of Svengoolie with his blessing. I shopped the idea around to various stations and one program director laughed and hung up on me. Eventually, I called WFLD-TV (Channel 32) which was the station Jerry’s Svengoolie had originally run on and they said, “That sounds really interesting…let’s have a bake-off!” and open it up to anyone to compete for the role. Here I’d created full scripts, had all these ideas, and everything else but had to audition with other people doing different things. Eventually, I did get the job. So in 1979, forty years ago, I hit the air as Son of Svengoolie.

The original Svengoolie – Jerry G. Bishop
Nick: And what was the first movie you presented?
Svengoolie: In the Year 2889 (1967) and boy was it terrible.
Nick: Let’s talk about the makeup changes over the years. You look a lot different than when you first started.
Svengoolie: Actually, I did more shading back then, more subtle and not with the straight lines you see here. I used a real crepe mustache…crepe was real hair…and for the little beard. I used this stuff called spirit gum as an adhesive. Spirit gum is absolutely awful stuff and I remember going to my dentist and he said, “Wow, your gums are in really bad shape” and we couldn’t figure out why. Finally, we realized that it was the spirit gum because I was constantly touching the area to adjust it and getting some in my mouth. That was when I decided it was better to just paint on the mustache. I figured if Groucho Marx could paint his on, that was good enough for me.
Nick: You mentioned the sound effects that you shared with Jerry G. Bishop. My favorite is “Ow Ow OWWW!”
Svengoolie: A lot of people ask where they came from and, with most of them, we aren’t sure. They were taken from old comedy records, commercials, and stuff Jerry had recorded with his colleagues. We’ve also added to our collection and now have over a 1,000 different ones. They’re all numbered and we try and keep track of them. All of the ones you hear I’ve scripted but in-between filming Chas (Ailing) will often play a few and it’s a lot of fun.
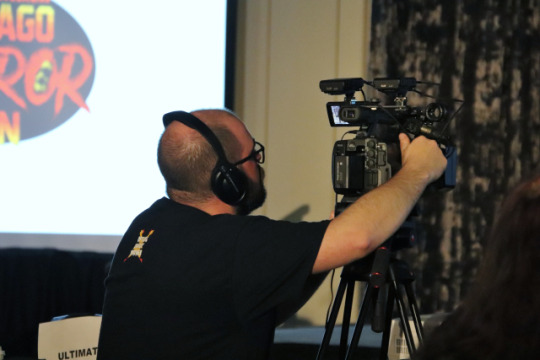
Speaking of Chas, he was filming this panel
Nick: I’ve been at the station many times and one thing I’ve noticed is how much work you put in. I’ve seen your scripts and it’s hours and hours and hours of work for each show.
Svengoolie: Well we have a very small staff. People think TV shows have huge staffs of people and in many cases they do. With ours, it’s just me, my producer (Jim Roche), my director/editor (Chris Faulkner), and our video guy (Chas Ailing) and then whomever they assign to be floor supervisor while we’re taping.

SEE this photo in glorious black & white in the upcoming Scary Monsters Magazine #114!
Nick: How different is your current set compared to the one at WFLD?
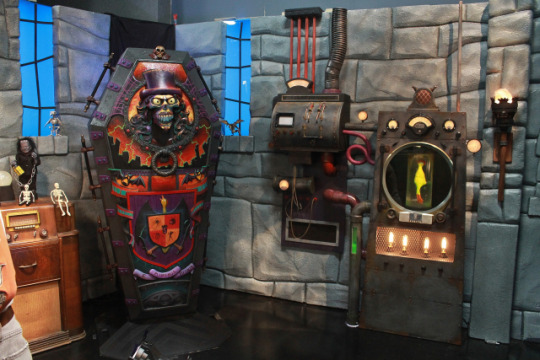
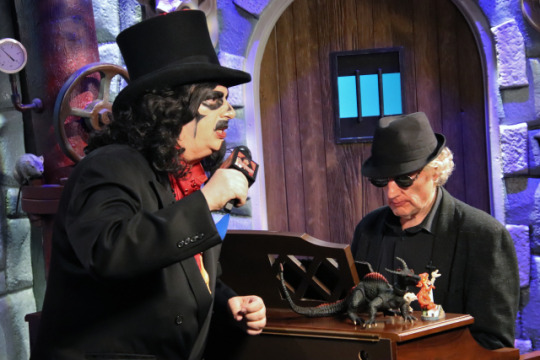
Svengoolie: Well it’s a whole different feel to it. For the WFLD stuff, they put up a few walls with a door. And then they found some flats that had been stored upstairs which were used back in the ‘50s for “Shock Theater” featuring the horror host, Terry Bennett a.k.a. Marvin. After I started up again at WCIU in 1995, I’d been told they gave them over to Columbia College but when I called them they said, “Oh, we repainted those and took them apart a long time ago.” So we had to start over with just some black curtains and then we finally got some walls. Eventually, we got a brand new set built for us by Acme Design of Elgin. They built the coffin first and then all the great sci-fi features like what one of our fans calls the “Clux Capacitor.” There is a new door and gargoyles that are designed after Boris Karloff and Vincent Price. It’s great stuff and has such a great look to it. Now, with all the additional lighting, it really stands out.
Nick: I watch you every week and love your parody commercials. One of my favorites is the one for “Die Pillow” (parody of “My Pillow). Let’s play that for the audience.
Svengoolie: Okay, and after you see it, I’ll tell you the story of why I don’t like him. (audience laughs)
Nick: Well I’m sure we each have a story as to why we don’t like him. Anyway, let’s roll the commercial…
youtube
Svengoolie: Are you familiar with the local radio station that comes from MeTV, MeTV FM? They play various eras of music and it’s a lot of fun. Like most radio stations they do commercials and “line reads.” So they were going to do line reads for “My Pillow” and the boss came to me and said, “Well, you’re our main live person on MeTV, so do you want to do these commercials?” and I said, “Sure, that will be fun.” Suddenly Mr. ‘hug the pillow’ over there says, “Oh, no! He hosts horror movies and that’s terrible! I don’t want him doing my commercials!” (While Sven is quoting him, he’s using a hilarious voice impersonation that Nick sites as Dr. Smith from “Lost in Space”).
Nick: So what are your favorite skits from the earlier years?
Svengoolie: We did one at WFLD called “Mr. Robbers Neighborhood” that was done before Eddie Murphy did his “Mr. Robinson’s Neighborhood” on “Saturday Night Live.” It was a Mister Rogers parody about him going into people’s homes and stealing things. He changes his shoes to sneakers so people won’t hear him and when he has trouble opening things he had his friend “Mr. Crowbar” to help him out. I always liked that one. We also did one that would not have been politically correct today called “Gandhi and Dagwood” based on the Blondie and Dagwood movies.
Nick: How do you come up with the ideas for your parodies?
Svengoolie: Basically, you have to keep your mind open all the time. You’ll notice something and that’s when things happen…and I’m not sure how quite honestly. I’ve learned to pay attention to everything, even if you aren’t really focusing on it.
Nick: We have to talk about this…Revenge of the Creature (1955) in 3D. It was 1984 and people are still upset about it.

Svengoolie: Well, at that time somebody held the rights to Revenge of the Creature in 3D and it was played around the country at various local stations with 3D glasses being sold at select stores. We shot promos for it all over the place like Lincoln Park Zoo, the Chicago lakefront, and Shedd Aquarium. I even played an announcer during the show who would say “Put your glasses on” and “Take your glasses off.” I guess they were afraid the Empire Carpet man (commercial personality on ‘70s/’80s Chicago TV) was going to pop out at them during breaks (audience laughs).
Here’s the thing…first of all, there weren’t a whole lot of big things that popped out at you during the film. You had the electrifying thing, the creature falling forward, and always fish in the foreground. Meanwhile, the station was worried because they had a lot of big sponsors who paid a lot of money for their spots and didn’t want any mistakes. So they dubbed everything…the movie and my bits…all onto one tape. If you know anything about videotape, when you make a dub the quality won’t be as good as the original. Secondly, I’ve heard rumors that the transmitter for the station was not at full power. I don’t know if that would affect it or not but here’s the main thing; remember those old TV’s, the adjustments for a lot of their features were in the back. So you’d have to be behind the set to adjust them for the 3D. The way they did it was show a screen with two different sides to it and then adjust one of the controls until you saw (with your glasses on) both sides looking the same. So you couldn’t see anything but had to yell to your friends, “How bout’ now? Nope? Okay, how about now?” – And you only had a minute to get things set up. So some people had problems with that and were unable to get the 3D effect. 7-11 (local convenience store that was one of the two locations selling the glasses) had to give out coupons as restitution and someone even did a Class Action Suit. From then on I’d get people yelling at me at appearances, “Hey, I want my 89 cents back!” So some people won’t let me forget while others ask if I’ll ever do it again. That would be rather difficult on a national level and, to be honest, I’d be happy NOT to do it. (audience laughs)
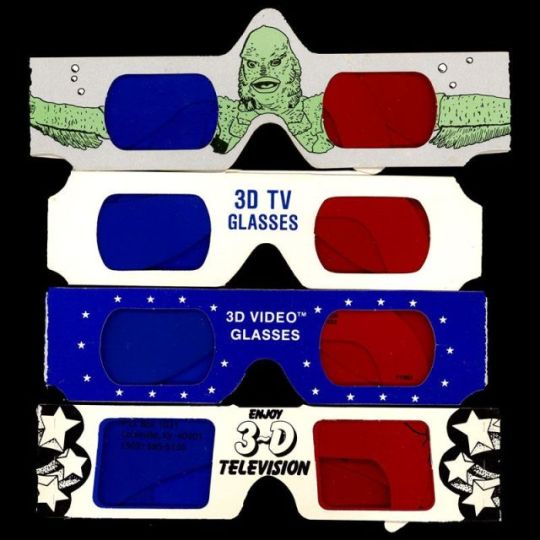
What I would not give to still have my 3D glasses from that night!
Nick: So how are movies chosen?
Svengoolie: Getting movies is a lot harder now than it was back on WFLD because you have so many streaming services and cable channels that get all the rights. Before, you’d have distributors knocking at your door trying to sell packages to you. It just doesn’t work that way anymore. We have to seek them out and there’s a lot of competition. My boss, Neal Sabin, managed to get the Universal movies which have been the cornerstone of our show. And now we’ve managed to get some from other distributors including Warner Bros and Sony/Columbia which help to widen things out but the Universal films are our main stock and trade. People love them though occasionally I’ll get people saying, “Oh no, another Frankenstein movie…” And I’m thinking, “It’s Frankenstein, c’mon!”

Svengoolie keeps the original Frankenstein monster alive on MeTV!
Nick: And people complain you show the Abbott & Costello movies all the time but Abbott and Costello Meet Frankenstein (1948) is your most requested movie.
Svengoolie: Yes, and they’ll request Munster, Go Home! (1966) and The Ghost and Mr. Chicken (1966). We ran The Beast from 20,000 Fathoms (1953) recently and it had over a million viewers.

Nick: On that note, I have a surprise guest here. Ladies and Gentlemen, Virginia Madsen…(Cheers)
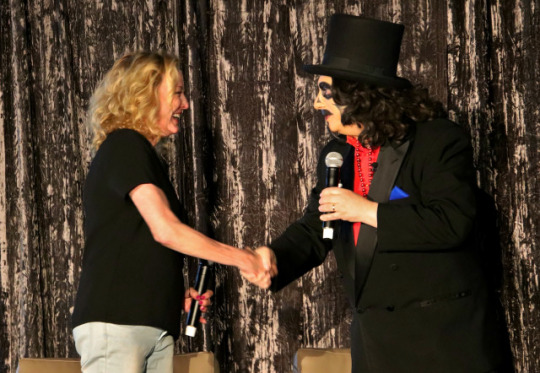

Svengoolie: This is so cool! Nick and I were just talking on the radio and I said, “Boy, I’d love to meet Virginia Madsen” and now here you are!
Virginia Madsen: Yes, where’s your rubber chicken? See, now you know I did watch you.
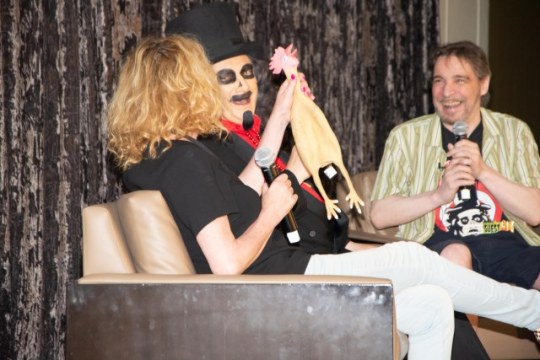
Photo courtesy of Jim Roche
Svengoolie: Was that back in the Son of Svengoolie days? (NOTE: Madsen grew up in Evanston, Illinois)
Virginia: I just know it was a long time ago
Svengoolie: I read an article that said you and your son would watch horror movies, is that true?
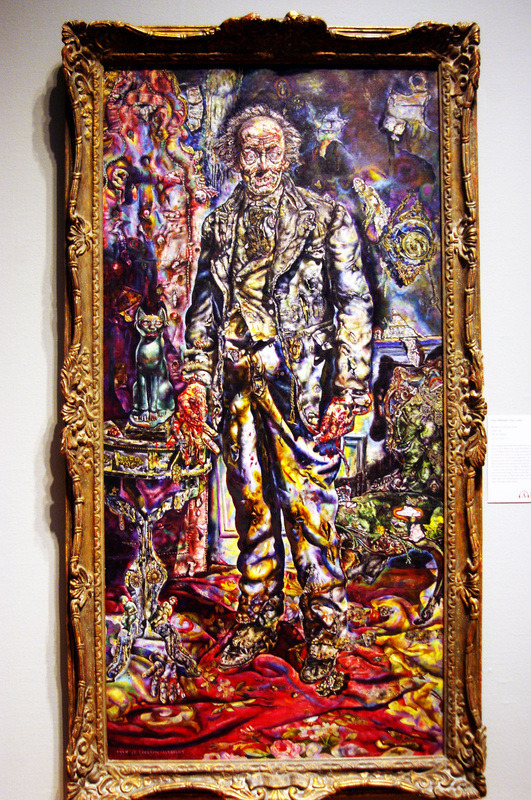
Virginia: Well, he was little and I was showing him the classic originals, even silent ones like The Hunchback of Notre Dame (1923 ), and he just loved all those Creature Features. But then I traumatized him. I was very tired one day and thought he’d be fine watching The Picture of Dorian Gray (1945 ). He was like five or six and there’s this moment when the portrait of Dorian Gray is revealed and there’s this burst of color in an otherwise black and white movie. So he’s getting nice and sleepy then that scene comes and he about levitates off the floor. Needless to say, we watched a lot of cartoons after that. He’s 25 now and still a big horror fan.
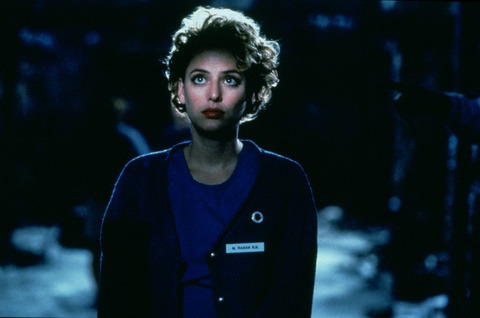
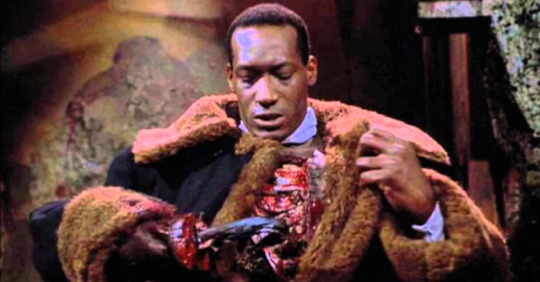
Nick (to Virginia): Are you a fan of horror movies yourself? I mean, you’re in Candyman (1992) obviously.
Virginia: Oh my god, ever since I was little. I would stay up late and watch you (points to Sven) and “Creature Features” on a little black and white TV.

Nick (to Virginia): So did you enjoy filming Candyman?
Virginia: Oh, it was great. We really genuinely had an excellent time. The Director (Bernard Rose) wanted me more “real,” as he said. So he was bringing me pizzas every day because he wanted me to fill out a little bit. And I loved that because this was a time in Hollywood where they always wanted you to be skeletal which was just not my frame. So every day I had pizza.
Nick: At least it was Chicago pizza.
Virginia: Well actually it was in LA. We only shot four days in Chicago. The rest was shot in the same studio they filmed Whatever Happened to Baby Jane (1962). The only time it became disturbing was close to Christmas and it seemed like every day had to do with blood. There was the dog head scene, me screaming and bloody, it was someone getting disemboweled, the doctor getting disemboweled.
Svengoolie: That sounds like every day here in Chicago (laughter)
Svengoolie: You know I heard a story of when you were shooting Sideways (2004) that there was someone with a crossbow watching you?
Virginia (at first looks confused as I shift in my seat having been the one who told him this story): Oh…yes…that’s true. They had rented his house to film scenes at night and at first, he was really amiable but when all the filming trucks showed up he went up in the hills and was very upset about it. He went riding off on one of those gator tractors with a crossbow and we’d hear him screaming up in the woods. But nothing happened, he was just aggravated.
Nick: That so weird because I watch that movie monthly, it’s one of my favorite movies of all time and your monologue in it destroys me. Now I’m going to be thinking about a crossbow every time I watch it.

Virginia: He might be somewhere out there in the darkness but that was the only…I mean that valley was so beautiful and everybody knew him and was like, “Don’t worry about it, he likes to go off with his crossbow.”
Nick: Where did you hear that story, Rich?
Svengoolie: Somebody that I know here (which would be me) told me she has a great story about a guy with a crossbow. Was I not supposed to share that?
Virginia: Well I just don’t want to make anyone feel bad.
Svengoolie: Especially someone with a crossbow.
Nick: Well, it was so nice having you, Ms. Madsen!
Virginia leaves the stage and, for the record, the “man in the woods” story came from Paul Giamatti’s commentary on the Sideways Special Edition Blu-ray. The “crossbow” part I heard from Madsen, herself, earlier that day.
Nick: Your appearance itself has altered over the years. I remember you telling me this story where you made this fantastic decision to start wearing a turtle-neck.
Svengoolie (with turtleneck) posing with my kids 15 years ago
Svengoolie: When I was at WFLD I wore the official red, Son of Svengoolie T-shirt with the green, disco scarf – which was so slippery it kept getting untied. The whole costume was awkward. I had a chain I’d wear that was actually part of a wall clock I owned that was supposed to look like a pocket watch. When I went to WCIU I thought, “Let’s do something different. I know! I’ll wear a red turtle-neck.” A red turtle-neck under hot television lights. This was not the smartest decision I ever made. After a while, I decided to go with the red tuxedo shirt which was more comfortable
Nick: Let’s talk about you going national. That’s gotta be really amazing, right?
Svengoolie: It is and I’m stunned to be hearing from people all over the country. It’s nice because many have grown up with a local horror host and I always equate your favorite horror host like Dr. WHO…you always prefer the one you grew up with. I’ve been very fortunate that these people like what I do and tell me how happy they are that I’m keeping horror hosting alive.
Nick: How about the fan letters which is one of my favorite segments. What kind of stuff do you get?
Svengoolie: We get so much stuff. A lot of framed artwork people send…we should open a branch at The Art Institute and put them all up. We have a bust of me someone carved out of a tree trunk that must weigh 200 pounds. People take so much time and effort on these things and from all over the country.
Nick: Holy smokes, Ted Raimi’s in the house!
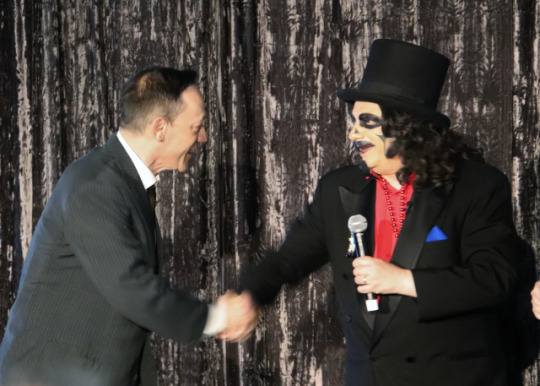
Ted Raimi: The great Svengoolie! How nice to see you! (looks out at the audience) And look at all you civilized horror people sitting out there. These things legitimize shit you wouldn’t show your own mother!. I mean, I love horror so much – and I know all of you do, too, and can’t get enough of it…but it’s hilarious to think they have conventions for it. I mean, have you ever stopped to think about that? Yes, it’s a legitimate thing, we all need to be scared but it’s a little like porno conventions. To what end are you having a convention…what do you talk about? Watching heads fly?
Nick (reeling him in): So, uh, did you have a local horror host growing up?
Ted: We did have a local horror host…Sir Graves Ghastly. He’s one of the reasons I love horror so much. (Raimi then proceeds to do a dramatic impersonation of him) . “Close the shades…turn out the lights…you’re about to be TERRIFIED!”

Nick: Do you have a favorite horror movie?
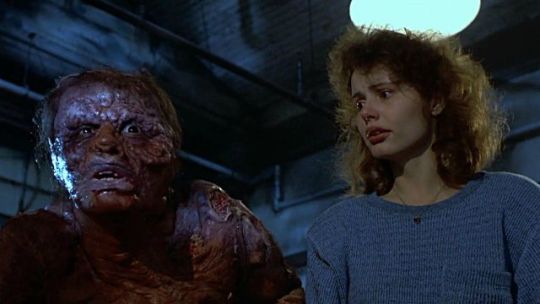
Ted: Yes, depending on what day of the week it is. There are ones I watch over and over. At the top of that list is David Cronenberg’s The Fly (1986). First of all, it’s a Canadian film so it looks rather Canadian with its own unique style. So that gives it a weird look anyway. Then you have Cronenberg who’s a weirdo and a movie that’s a love story at its heart. It’s the classic story of “boy meets girl, then boy turns into a fly and tries to eat girl” which we’ve seen a thousand times (audience laughs). But it’s a very powerful film because like any romantic story it has to end with someone breaking off the relationship which, in this case, is done so dramatically. Jeff Goldblum’s character begs Gina Davis’ to kill him which is so powerful. It’s so emotional and yet so grisly. It has all of the elements that make a really lasting picture.
Ted Raimi leaves and Nick continues his interview with Svengoolie. He mentions his favorite parody commercials and they play one of his modern classics – “Boa Brace” which mocks the infamous Health Hotline commercial with terrible animation.
youtube
As it happens, my friends Ron and Angela Urban (“Don and Bunny”) were guest stars in this commercial and sitting in the first row. Svengoolie has them stand for applause.
Nick: Hey, I don’t see him wearing his “Boa Brace” out there.
Svengoolie: Well, that’s because he’s all better now. See, it works!
Nick: Let’s talk about Doug.
Svengoolie: I’d be happy too. Doug Scharf, who plays “Doug Graves,” has been a friend since high school. We played in high school band together, hung out, and used to make 8mm films for fun. I think he’s been a part of every TV show I ever did. He’s an incredible musician who taught himself to play the piano after he’d broken his leg. He’s a trumpet player who can play so many other instruments. He does the complete music tracks for the songs we do every week. So I’ll say, “Here’s the song we’re going to do” and then he produces the whole track while I write the words. Then he’ll show up at the studio and we’ll film the segment. I love his deadpan humor.
Nick: He’s hilarious and the vibe between the two of you is just great. All the songs are so funny and, for me, it’s a highlight of the show (audience applauds in agreement).
Svengoolie: And this brings us to another song. You’ve heard me mention Freddy “Boom Boom” Cannon, a famous icon of the ‘60s. Just out of nowhere one day he sent me an email saying he loves my show and wrote a song for me. And I’m thinking, “He wrote a song for me? The guy who sang ‘Palisades Park?” And he sends it to us and we were blown away by it, it was such a great song. And we ended up meeting him and he was just the nicest guy. He told us so many great stories about hanging out with Elvis and various celebrities. The fact that he wrote this without my even knowing about it was just so cool and it was produced on a 45 record and is available on iTunes. And I think it might even be available right here…
youtube
Nick: What were some of the worst movies you’ve shown?
Svengoolie: Oh, man…well, when we were on WFLD, we presented a movie called Track of the Vampire (a.k.a. Blood Bath 1966). Part of it was made in Yugoslavia and part of it was made in Los Angeles and neither side knew what the other was doing. It was truly awful and there was this one scene with this girl named Dorean (Lori Saunders) who dances. Her big number is like 4-5 minutes long and they use this kaleidoscope lens so you see multiples of her as if you were a fly. It was so awful. The late film editor I used to work with had a great sense of humor and did a couple things with it that made it really funny. There’s this one scene with no dialogue where the vampire is chasing this girl into the ocean. So we added dialogue to make it sound like it was her swim coach and she didn’t want to get in the water. And there was this bald lifeguard whom we dubbed as Curly Howard. Then there was another part where we patched a whole bunch of film clips from different movies along with clips of dialogue from celebrities like Liberace and Dean Martin. This went on for like three minutes. I’m sure if management had seen it, we would have both been fired but, fortunately, I don’t think management ever watched my show. It was such an awful movie that made no sense.

Nick: You have to watch every single one of these movies because you have to do all your bits and time everything out…
Svengoolie: Yes, I have to watch them and as I’m doing this I’m breaking them down for the different segments – if it needs to be edited for time or content. I take copious notes so when I get down to writing the bits I can go back and read them.
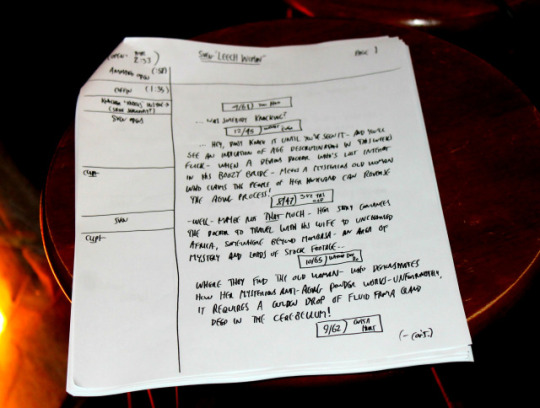
Sven’s handwritten script for “The Leech Woman”
Nick: I love Sven-Surround. Like you just did recently with Village of the Giants (1965).
Svengoolie: I think that one needed some help.
Nick: I think it’s hilarious and when did that start happening?
Svengoolie: Actually it goes back to when Jerry was doing his Svengoolie show. He was the announcer on duty back then and he’d get bored. So he and the engineers would take his sound effect parts and add them into the movies. Sometimes it was so funny because it would be so incongruous. So you might see some guy walking through the jungle and then all of a sudden hear a phone ringing. When I first started at WCIU, we would do one segment of every movie in “Sven-Surround” which we can’t really do now with the Universal classics. We do it sometimes as a separate part so we don’t interfere with the movie. Coming up this fall we’ll be re-running a show that had a Commando Cody (old movie serial) episode in it, so we redubbed all of that. People seem to enjoy those.
Nick: Let’s talk about Kerwyn. When did Kerwyn come into existence?
Svengoolie: At first when we started at WCIU, Doug would read the mail with me. Since he couldn’t always stay around we had various characters do it. There was “Ed the Bat” who had an electronically raised voice that my boss, Neil Saban, hated so much he said, “You gotta get rid of that character!” So we actually shot a bit where he fires Ed and hits him with a club. And then we used a Godzilla (Tri-Star 1998) figure and the Wacky Dactyl DJ (made with a Hasbro Jurassic Park III pterodactyl toy) and then finally as a surprise to me, my Director (Chris Faulkner) and Jessica Carlton who worked at the station for a kids’ show, created the prehistoric rubber chicken, Kerwyn. We were trying to come up with a voice for him and we looked at those eyes and goofy teeth and thought Jerry Lewis would be the best inspiration. He’s become very popular and it’s quite possible a special limited-edition T-shirt featuring him will be coming out in the future.

Nick: So what’s going on for your future. It’s your 40th year…how long are you going to do this?
Svengoolie: I’m now old enough to retire but we’ve just become so popular all over the country that I can’t see giving that all up right now, especially when I’m having such a good time with it. The fact that people like it and have made it so popular – I’ll keep doing it for a while. (audience applauds).
Nick: I saw a guy around the convention with a Svengoolie tattoo.
Svengoolie: Yes, we saw him yesterday (and so did YOU in my last Flashback post)
Nick: It’s gotta be weird seeing your face on somebody.
Svengoolie: It is. My own family would never put a tattoo of me on them. I’d have to say I’ve seen about thirty different ones out there and the artwork is often really incredible.
Nick: You guys tape just about every week, right?
Svengoolie: We tape about four days every month. After my heart attack, we decided not to shoot two days in a row but to break them up. It’s hard to say how long it takes to put a show together because pre-production with some movies often overlaps with the post-production of others.
Nick: And you’re still doing public appearances, obviously, because you’re here. Your busy season is coming up, right?
Svengoolie: They used to only be in October but now my appearances go all year long. The demand is high and we want to do as many as we can but, again, I have to stay healthy and don’t want to overdo it. Now we’re getting a lot of requests to do appearances outside of Illinois at various conventions. We’re talking about doing that and recently went to Phoenix, Arizona for a private Dish TV event and that was fun.

Svengoolie greeting a fan at one of his numerous public appearances
As the interview winds down, a young girl dressed as Svengoolie is brought on stage to say ‘hello.’

The show wraps with a montage of celebrities visiting the Svengoolie set.
Svengoolie: When I started, I never imagined I’d be doing it for forty years – back then I was just grateful I had a job on TV. It’s only possible with the support of everybody out there and it means a lot to me.
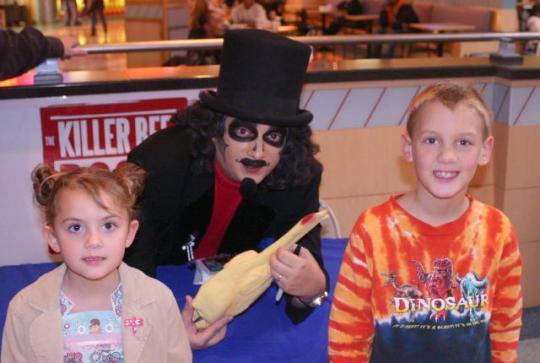
Coming up…Svengoolie greets his fans!
Dave
“An Evening with Rich Koz – 40 Years of Svengoolie” at Flashback Weekend! The Follow highlights were“transcrammed” from the 2019 Flashback Weekend panel celebrating 40 years of Rich Koz’s Svengoolie.
0 notes
Text
Kerkeri NZMCA Park
We were back at what is now the NZMCA Park we have visited the most, in Kerikeri for a catch up with fellow Dethleffs motorhome owner John who we had met firstly at the NZMCA Park in Plimmerton then later in Blenheim (twice) and then later at a meeting of fellow Dethleffs van owners back here in Kerikeri. Refer to my blog about the catch up here.
Filling the tank
John and Sarah watching me work
One of the issues with living in the heart of New Zealand’s biggest city is the lack of space for our motorhome. We have it stored on a rural property in West Auckland. However where we store the van has no water so washing the van there is a no go and it’s really hard to find places that are large enough to wash a 9 metre motorhome.
With this in mind we had asked John if we could wash the motorhome at his place, just down the road from the Park in Kerikeri to which he kindly agreed. He also allowed us to fill with water as there is none at the park in Kerikeri and the tap at the local dump station is one of those terrible push button jobs. I honestly don’t know why they fit those push button taps to the potable water, you are still going to hold it until the van is full it’s just really painful using them.
The real reason for our visit to the area (sorry John) was to continue our exploration of the historical sites promoted by Landmark Whenua Tohunga We had already visited a couple of the mission stations in the Hokianga and this was to be our first visit to somewhere that wasn’t a building.
Landmarks Whenua Tohunga are charged with promoting a number of sites around New Zealand. These are sites that belong to Heritage New Zealand, DOC, Local Councils and even Private ownership that are perhaps less well known or more out of the way than the more popular places.
The Rangihoua Heritage Park is part of the DOC network and they look after the day to day running of the park, tree plantings, pathways etc whilst Landmarks promote the place to visitors.
The reason that I started this story with me washing the motorhome was that the last 14 kilometres of the road leading to this park are gravel road. With me thinking all that hard work would be wasted. Thankfully as it was a dry day the motorhome just collected some road dust rather than being re coated in mud.
This way
14 kms of gravel road
The road into the heritage park must have also been recently graded as it was fairly rut free. Much better than some of the roads we drove down in the South Island. Arriving in the car park the place was basically deserted. With only one other car there so tons of places to park the motorhome without having to worry about squeezing into some spot that’s designed for a mini rather than a motorhome.
Sadly no camping or dogs
Love the sign
The entrance to the park
Roses on the fence
Sarah at the entrance
The entrance to the Park is set amongst some native shrubs together with rose creepers along the fence line creating a very welcoming atmosphere. About the only thing letting it down would be the no dogs sign for some, this is because there are Kiwi present in the bush.
Sadly also the sign states no camping, given the remoteness of the site and the fact that there are toilets a short stroll from the carpark I would have thought this might have been an option. Even if the number of spots available was limited to 4 or 5 I think it would be a great spot to park up for a day or so. Especially with the beach a stroll down the path.
The fantastic visitor centre
About the history
Look at that view
The inside walls
A relief sculpture of the site
With the sun shining on a glorious winters day we put together a picnic to take with us on the stroll through the Park. We could tell this place was going to be somewhere special as we came through the gates and saw the views.
Recently opened and just inside the gates is the visitor centre which opens up to the most spectacular views down towards the site of the original settlement. This is where the first ever christian service was held in New Zealand on Christmas day 1814. This service was led by Samuel Marsden and was witnessed by the Maori who lived in the Pa adjacent to the site of the service.
From here it’s just over a kilometre downhill towards Marsden Cross a memorial erected on the centenary of the service in 1914. So you might wonder what happened for the bicentenary and the answer to that question is that on 21st December 2014 the Governor General of New Zealand opened the visitor centre.
Great Views
The 3d relief
The walk heads off from the visitor centre with the first stop a viewing point giving you a magnificent view of the whole Kerikeri inlet. There is also a 3D relief of the area with numbered points showing the highlight areas. I really didn’t want my shadow in the photo but there was no way to take the photos with the shadow in them. So sorry about this.
At this point I should mention that there is a really informative website (www.rhp.nz) that has been built for this place with each of the attractions numbered and by following the commentary you can learn a huge amount about this place. This blog is mostly about our visit to this park the history here plays an important part but that’s an experience you should gain by visiting here. My intention is more to talk about what a great place this was to visit.
The walkway takes you through landscaped bush areas that have been covered in native planting with these destined to provide shade as they grow. The bush really adds to the walk adding to the feeling that you are in a remote place. As you work your way down the path there are numerous story boards that add to the commentary available online and explain the history of this place.
The story boards begin to expand on the local Maori and their worldwide travels on merchant and whaling ships. They also cover the stories of the people who settled this land and those who helped build the mission.
These story boards greatly add to the walk and provide some really interesting facts. Such as the group of convicts who came from Sydney arriving here to help build the place and when the building was completed they where shipped home again. I never knew we had a convict work force in New Zealand! Apparently one also fathered a child with one of the mission wives, I bet that was the scandal of the day!
We reached a junction in the path, deciding to turn left rather than continue straight to Marsden cross. Here we came to what I guess are the remains of someones garden with a couple of really old lemon trees and huge old apple tree.
The lemons where unlike any fruit you see in the shops these days with a really rough almost wart like surface and thick skin suggesting that the tree might be very old. In fact an article online suggests it might be the oldest fruit bearing tree in New Zealand.
Leaving the old orchard we arrived at the memorial to Thomas Hansen who became New Zealand’s first non missionary settler. There is a large amount of material online about the Hansen family and you can access this, if interested here. For me it was another case of finding out just how much I don’t know about the history of New Zealand.
The path then leads to a memorial stone to those who passed away on this site. Including John King who served as the minister from 1814 till 1832 when the mission was closed. John stayed here however until he passed away in 1854. It also commemorates the first European born in New Zealand. Thomas Holloway who was born in 1815 sadly he died 3 years later.
This place is about the Marsden Cross and about the fact that this was the first permanent settlement by Europeans in New Zealand but it’s also about the Maori Pa located on the hill in the back of this photo. Sadly access to this park is restricted to areas of the park that don’t include the Pa. I imagine that there are cultural reasons for this and for that reason we didn’t venture on the Pa but it would have been fantastic to be able to stand up there and imagine what it would have been like in 1814.
Yes the history here is important but this park is also a place of huge natural beauty and you could quite easily spend the day here just enjoying the park. In fact we strongly recommend that you come here and take the time to relax and enjoy and maybe learn a little at the same time.
The painting at the gate gives the best representation of what the Pa would have looked like. As you can see it looks very well fortified as was the case in those days.
Down at the water we found a convenient log to sit down and have the picnic lunch we had brought with us. It’s such a sheltered bay that had it been a bit closer to summer we probably would have gone for a swim. Considering that it’s only about 1 km from the carpark and how few people we had met here it could be a great place to come during summer.
As we sat there eating our lunch we watched a launch come into the harbour and drop the anchor it was all just so peaceful. I think next time we visit I would come with my fishing rod, there looked like a couple of great spots just off the rocks.
Heading back towards the motorhome we remarked to each other how this had been another really great place to visit and where surprised by how few people where here. It was such a wonderful day that there really was no excuse not to get out and about. It could be that nobody knows about the place (well you do know) or it could be the 14 kms of metal road to get here. Whatever it is you should now find the reason to come and visit this place it really is quite special.
You can keep up to date on all that is happening with Landmarks Whenua Tohunga and their site by either following them on Facebook , Twitter or clicking on their Website. Next stop on the tour will be the Te Waimate Mission. You can also visit the DOC website or their Facebook Page and checkout what other parks they have in your area. You may be surprised just where some of the DOC parks actually are.
To view the places we have visited click here to see them on Google maps. You can click the links to read the blog about that area.
[cardoza_facebook_like_box]
To view the Ratings we have done for other camps click here
[jetpack_subscription_form]
Rangihoua Heritage Park We were back at what is now the NZMCA Park we have visited the most, in Kerikeri for a catch up with fellow Dethleffs motorhome owner John who we had met firstly at the NZMCA Park in Plimmerton then later in Blenheim (twice) and then later at a meeting of fellow Dethleffs van owners back here in Kerikeri.
#campervan holiday New Zealand#Doc camps#Heritage New Zealand#Landmarks Whenua Tohunga#Nature New Zealand#Northland#Walks
0 notes
Text
Dinner Party at Spider Temple
As a part of this year’s Halloween Style Challenge series, we sent Lynn Ferris of Holiday Decor & More a gargantuan spider and let her do the rest. From a life-sized spider web to a Peruvian-inspired temple wall, Lynn got creative and created the perfect place to host a spooky Halloween dinner party.
Check out how you can also impress your family and friends with a Halloween dinner party at spider temple.
Halloween Dinner Party at Spider Temple
Imagine my delight when I received my feature item from The Home Depot—their awesome Gargantuan Spider! Spanning 9 ft., I knew I had to design a space for my spider outdoors. After kicking around a few ideas, I did some online research and came upon a temple in Peru. It is referred to as the “Spider God Temple” and features numerous wall panels depicting the Ancient Peruvian’s Spider God. I decided to use this as my inspiration. I would create my own “Spider Temple” and use the space to host a dinner party.
Building the Spider Web
With my 9-ft. spider, I decided I needed a large spider web. I chose two trees in my backyard that were approximately 24 ft. apart. I decided to build my web between the two trees and sketched out my design.
From my sketch, I estimated how much rope I would need to build my spider web. My estimate came to about 200 ft. Deciding to get extra for other projects (and just to be on the safe side), I purchased four 100-ft. packages of Everbilt All-Purpose Clothesline.
Everbilt ¾ x 3 in. screw eyes were screwed into the two trees to hold each side of the spider web. Everbilt 9-in. Tent Stakes were used to anchor the bottom of the web to the ground. With the triangular web outline set, we started on the interior web design. I was fortunate to have a friend helping, as this step of the project is much easier with two people.
One person tied the rope sections while the other watched from a few steps back, giving direction on where to tie the knots. Following my sketch, we moved the clothesline around, tying off and cutting each section as we worked. My estimate was close. We ended up using about 194 ft. of clothesline for the web.
I think it came out pretty cool! A very large spider web for my very large spider.
Creating the Spider Tunnel
Next, we started working on our spider web tunnel. Using some wire fencing we had left over from our garden, we made two arches approximately 6-ft. high. We placed one at the top of the steps leading down to the yard and the second one at the base of the steps.
We staked these in place, using 4-ft. rebar stakes. Using more of the Everbilt All-Purpose Clothesline, we connected the two arches together with sections of rope tied to the tops and sides of each arch.
Having built the loose framework for our tunnel, it was now time to start covering it with spider webs. I purchased nine packages of HDX Cheesecloth, and we stretched and ripped this, making it look like creepy cobwebs.
We then draped each piece over our rope framework, tying it in place to the ropes. We also let some strands hang loose. Lastly, we added our prop spiders throughout the tunnel as well as two web-wrapped skeletons at the entrance.
A big, hairy spider with a Danger sign dangles from the tunnel entry. A great way to greet our guests!
Peruvian Temple Wall
On to our temple wall panels! This was a bit daunting at first. I had seen the process online but had never done them myself. It was time to give it a try and make my first carved foam walls! First, I needed to draw out my design. I knew I wanted each spider panel to be 2 x 2 ft.
Materials
(3) Owens Corning Pink Foam Insulation
Soldering Iron
Dewalt 2.75 in. Heat Gun
Glidden Essentials Flat Interior Paint
Glidden Essentials Cool Metalwork
Black Rust-Oleum Painters Touch Ultra Cover Premium Latex Paint
8 oz. White Rust-Oleum Painters Touch Ultra Cover Premium Latex Paint
Economy Basic 1.5 in. Flat Utility Brushes.
Step 1: Sketching the Spider
Not having any paper that large, I decided to use the back of some wrapping paper I had. This actually worked out perfectly as the back of the paper had a 1-in. grid printed on it. This helped me get my design where I wanted it to be. Additionally, the paper was thin enough that I could trace the design on the foam panel and see the indentations of the lines.
To make the panels, I purchased three sheets of Owens Corning pink foam insulation, 1-in. thick by 4 x 8 ft. We cut about 4 in. off each sheet to make it fit the space. I then traced my “Spider God” image on to the foam panel.
Step 2: Engraving the Foam
Now the fun begins! I was given a foam carving kit a few years ago for Christmas, but had yet to use it. I say carving, but these tools actually melt the foam allowing you to do fine engraving work, carving and sculpting.
This step should be done outdoors or in a well-ventilated area as there may be some fumes. Using the trace lines on my foam panel, I drew out the design with the engraving tool. An inexpensive soldering iron from The Home Depot would work, too.
After engraving the outline, I removed chunks of foam with the heat carving tool to give my design a 3D appearance. I kept the removed areas quite rough to resemble chiseled rock. This was time-consuming, but quite fun, and the finished carving looked pretty cool.
Step 3: Creating a Stone Look
I then drew out the stone portion of the temple wall panels freehand, using the heated engraving tool. For more dimension, I carved out the crevices between the rocks.
Step 4: Adding Depth
The walls at this point did resemble rocks, but I knew I could make them even better. With my Dewalt 2.75 in. Heat Gun, I carefully moved it across over the surface of my foam panel. Try a test piece first to see how hot you need the gun to be and how close you need to get to the foam.
The heat gun creates great crevices for your “grout” lines and gives dimension and texture to the faux rocks. I was admittedly a little intimidated at first by using a heat gun, but this was really so simple, and the result is so cool.
Step 5: Painting the Rocks
After carving the foam panels, they were ready for painting. I went to our local Home Depot and purchased one gallon of Glidden Essentials Flat Interior Paint. Although the Peruvian temple walls I used for inspiration are shades of orange, I decided to go with grey to look dark and gloomy. I chose a shade of grey called Cool Metalwork. I purchased a gallon, but could’ve gotten much less. I now have lots of leftover grey paint for another future project! I would always rather have too much than too little!
I decided to also purchase black and white paint to add shadows and highlights to my stone wall. A quart of black Rust-Oleum Painters Touch Ultra Cover Premium Latex Paint was just the right amount for the project, and a small 8 oz. can of white Rust-Oleum Painters Touch Ultra Cover Premium Latex Paint was purchased for the highlights. I already had some round crafters paint brushes, but purchased two Economy Basic 1.5 in. Flat Utility Brushes.
Again, I was fortunate to have a friend helping, and he started by painting all the grout lines black. He also painted the spider panels black.
Next, we painted the stones with the grey. Using quick, dry-brush brushstrokes across the groutlines, the grey settled only on the high areas, leaving the deep recesses black. We painted each stone, trying to keep the paint thin. Drying time was very quick.
Using the highs and lows created from the heat gun as my guide, I added black to the low areas of each stone. I tried to keep my brush dry with very little paint on it creating shadows on each stone. This admittedly took quite longer than anticipated, so leave yourself enough time. I found myself getting sloppy at the end in order to finish. I actually think I added too much black, but for my first time doing this, I think it still came out ok. I may go back and lighten it up at another point in time.
After the black dried, I mixed some white and grey together to add as highlights. Again, I used the contours of the foam, adding the light grey to the highest areas of each stone.
And my spider walls were now complete!
Spooky Halloween Dinner Party
With my temple wall backdrop complete, it was now time to add props and accessories, set the table, get my lighting set and prepare the fog machine. Almost time for my Dinner Party at Spider Temple!
I set my table for twelve, with simple place settings in black, white and grey to coordinate with my stone walls. Three LED Spider Lanterns from The Home Depot adorned the table. I think they look great!
Then, I set up my dessert table nearby. I found this great 3-Tier Square Glass Dessert Stand at The Home Depot as part of their Home Decorators Collection. Who knew The Home Depot had such great accessories? It’s just what I needed to display my homemade spider cupcakes!
Finishing Touches
And now some props. I add skulls, hands and feet on the ground below my Gargantuan Spider. Looks like quite a few people have fallen victim to this arresting arachnid! Hopefully my guests survive the evening!
A 3-ft. hairy spider was positioned in a tree, looking as if he’s ready to drop down and startle my guests.
The Home Depot’s Animated Jumping Spider with Red LED Eyes is guaranteed to startle my guests! I positioned him amongst some potted plants, at the foot of the stairs. As guests descend from the cobweb tunnel, they will look up at the spider in the tree. Their motion will activate the jumping spider beside them, and screams and laughter will surely follow!
Final Reveal
At night, I light candles, turn on the LED candles and position my lights. We light a fire, creating a warm glow over our seating area. The Home Depot’s 5 ft. Poseable Skeleton with LED Eyes takes a seat on the couch, making for a great photo op for my guests. Here, have a seat with Mr. Bones. Now smile for the camera. Snap. Got it! Everyone will love him.
The evening darkness has now taken over. The fog machine does its magic, adding a touch of spookiness. The fog, combined with strobe and spotlights, creates a truly awesome atmosphere. I do one last walk-through to ensure everything is in place, envisioning how my guests will see everything.
I think it looks amazing! My Halloween dinner party at Spider Temple is ready to start, and my guests should be here any minute now. With a little creativity and some great spooky decorations from The Home Depot, I have designed a memorable evening, sure to impress. I can’t wait to share it with my friends!
For more DIY Halloween and harvest ideas, see other articles in our Halloween Style Challenge series, and follow our Halloween Style Challenge board on Pinterest.
Visit The Home Depot’s online Halloween Décor Department for everything you need to decorate your home for Halloween and fall.
The post Dinner Party at Spider Temple appeared first on The Home Depot Blog.
from Roofing Pro http://ift.tt/2wYPJNg
Curated by a professional Roofing Contractor
from Blogger http://ift.tt/2h6Ne5d
via RoofingProToday
0 notes
Text
Dinner Party at Spider Temple
As a part of this year’s Halloween Style Challenge series, we sent Lynn Ferris of Holiday Decor & More a gargantuan spider and let her do the rest. From a life-sized spider web to a Peruvian-inspired temple wall, Lynn got creative and created the perfect place to host a spooky Halloween dinner party.
Check out how you can also impress your family and friends with a Halloween dinner party at spider temple.
Halloween Dinner Party at Spider Temple
Imagine my delight when I received my feature item from The Home Depot—their awesome Gargantuan Spider! Spanning 9 ft., I knew I had to design a space for my spider outdoors. After kicking around a few ideas, I did some online research and came upon a temple in Peru. It is referred to as the “Spider God Temple” and features numerous wall panels depicting the Ancient Peruvian’s Spider God. I decided to use this as my inspiration. I would create my own “Spider Temple” and use the space to host a dinner party.
Building the Spider Web
With my 9-ft. spider, I decided I needed a large spider web. I chose two trees in my backyard that were approximately 24 ft. apart. I decided to build my web between the two trees and sketched out my design.
From my sketch, I estimated how much rope I would need to build my spider web. My estimate came to about 200 ft. Deciding to get extra for other projects (and just to be on the safe side), I purchased four 100-ft. packages of Everbilt All-Purpose Clothesline.
Everbilt ¾ x 3 in. screw eyes were screwed into the two trees to hold each side of the spider web. Everbilt 9-in. Tent Stakes were used to anchor the bottom of the web to the ground. With the triangular web outline set, we started on the interior web design. I was fortunate to have a friend helping, as this step of the project is much easier with two people.
One person tied the rope sections while the other watched from a few steps back, giving direction on where to tie the knots. Following my sketch, we moved the clothesline around, tying off and cutting each section as we worked. My estimate was close. We ended up using about 194 ft. of clothesline for the web.
I think it came out pretty cool! A very large spider web for my very large spider.
Creating the Spider Tunnel
Next, we started working on our spider web tunnel. Using some wire fencing we had left over from our garden, we made two arches approximately 6-ft. high. We placed one at the top of the steps leading down to the yard and the second one at the base of the steps.
We staked these in place, using 4-ft. rebar stakes. Using more of the Everbilt All-Purpose Clothesline, we connected the two arches together with sections of rope tied to the tops and sides of each arch.
Having built the loose framework for our tunnel, it was now time to start covering it with spider webs. I purchased nine packages of HDX Cheesecloth, and we stretched and ripped this, making it look like creepy cobwebs.
We then draped each piece over our rope framework, tying it in place to the ropes. We also let some strands hang loose. Lastly, we added our prop spiders throughout the tunnel as well as two web-wrapped skeletons at the entrance.
A big, hairy spider with a Danger sign dangles from the tunnel entry. A great way to greet our guests!
Peruvian Temple Wall
On to our temple wall panels! This was a bit daunting at first. I had seen the process online but had never done them myself. It was time to give it a try and make my first carved foam walls! First, I needed to draw out my design. I knew I wanted each spider panel to be 2 x 2 ft.
Materials
(3) Owens Corning Pink Foam Insulation
Soldering Iron
Dewalt 2.75 in. Heat Gun
Glidden Essentials Flat Interior Paint
Glidden Essentials Cool Metalwork
Black Rust-Oleum Painters Touch Ultra Cover Premium Latex Paint
8 oz. White Rust-Oleum Painters Touch Ultra Cover Premium Latex Paint
Economy Basic 1.5 in. Flat Utility Brushes.
Step 1: Sketching the Spider
Not having any paper that large, I decided to use the back of some wrapping paper I had. This actually worked out perfectly as the back of the paper had a 1-in. grid printed on it. This helped me get my design where I wanted it to be. Additionally, the paper was thin enough that I could trace the design on the foam panel and see the indentations of the lines.
To make the panels, I purchased three sheets of Owens Corning pink foam insulation, 1-in. thick by 4 x 8 ft. We cut about 4 in. off each sheet to make it fit the space. I then traced my “Spider God” image on to the foam panel.
Step 2: Engraving the Foam
Now the fun begins! I was given a foam carving kit a few years ago for Christmas, but had yet to use it. I say carving, but these tools actually melt the foam allowing you to do fine engraving work, carving and sculpting.
This step should be done outdoors or in a well-ventilated area as there may be some fumes. Using the trace lines on my foam panel, I drew out the design with the engraving tool. An inexpensive soldering iron from The Home Depot would work, too.
After engraving the outline, I removed chunks of foam with the heat carving tool to give my design a 3D appearance. I kept the removed areas quite rough to resemble chiseled rock. This was time-consuming, but quite fun, and the finished carving looked pretty cool.
Step 3: Creating a Stone Look
I then drew out the stone portion of the temple wall panels freehand, using the heated engraving tool. For more dimension, I carved out the crevices between the rocks.
Step 4: Adding Depth
The walls at this point did resemble rocks, but I knew I could make them even better. With my Dewalt 2.75 in. Heat Gun, I carefully moved it across over the surface of my foam panel. Try a test piece first to see how hot you need the gun to be and how close you need to get to the foam.
The heat gun creates great crevices for your “grout” lines and gives dimension and texture to the faux rocks. I was admittedly a little intimidated at first by using a heat gun, but this was really so simple, and the result is so cool.
Step 5: Painting the Rocks
After carving the foam panels, they were ready for painting. I went to our local Home Depot and purchased one gallon of Glidden Essentials Flat Interior Paint. Although the Peruvian temple walls I used for inspiration are shades of orange, I decided to go with grey to look dark and gloomy. I chose a shade of grey called Cool Metalwork. I purchased a gallon, but could’ve gotten much less. I now have lots of leftover grey paint for another future project! I would always rather have too much than too little!
I decided to also purchase black and white paint to add shadows and highlights to my stone wall. A quart of black Rust-Oleum Painters Touch Ultra Cover Premium Latex Paint was just the right amount for the project, and a small 8 oz. can of white Rust-Oleum Painters Touch Ultra Cover Premium Latex Paint was purchased for the highlights. I already had some round crafters paint brushes, but purchased two Economy Basic 1.5 in. Flat Utility Brushes.
Again, I was fortunate to have a friend helping, and he started by painting all the grout lines black. He also painted the spider panels black.
Next, we painted the stones with the grey. Using quick, dry-brush brushstrokes across the groutlines, the grey settled only on the high areas, leaving the deep recesses black. We painted each stone, trying to keep the paint thin. Drying time was very quick.
Using the highs and lows created from the heat gun as my guide, I added black to the low areas of each stone. I tried to keep my brush dry with very little paint on it creating shadows on each stone. This admittedly took quite longer than anticipated, so leave yourself enough time. I found myself getting sloppy at the end in order to finish. I actually think I added too much black, but for my first time doing this, I think it still came out ok. I may go back and lighten it up at another point in time.
After the black dried, I mixed some white and grey together to add as highlights. Again, I used the contours of the foam, adding the light grey to the highest areas of each stone.
And my spider walls were now complete!
Spooky Halloween Dinner Party
With my temple wall backdrop complete, it was now time to add props and accessories, set the table, get my lighting set and prepare the fog machine. Almost time for my Dinner Party at Spider Temple!
I set my table for twelve, with simple place settings in black, white and grey to coordinate with my stone walls. Three LED Spider Lanterns from The Home Depot adorned the table. I think they look great!
Then, I set up my dessert table nearby. I found this great 3-Tier Square Glass Dessert Stand at The Home Depot as part of their Home Decorators Collection. Who knew The Home Depot had such great accessories? It’s just what I needed to display my homemade spider cupcakes!
Finishing Touches
And now some props. I add skulls, hands and feet on the ground below my Gargantuan Spider. Looks like quite a few people have fallen victim to this arresting arachnid! Hopefully my guests survive the evening!
A 3-ft. hairy spider was positioned in a tree, looking as if he’s ready to drop down and startle my guests.
The Home Depot’s Animated Jumping Spider with Red LED Eyes is guaranteed to startle my guests! I positioned him amongst some potted plants, at the foot of the stairs. As guests descend from the cobweb tunnel, they will look up at the spider in the tree. Their motion will activate the jumping spider beside them, and screams and laughter will surely follow!
Final Reveal
At night, I light candles, turn on the LED candles and position my lights. We light a fire, creating a warm glow over our seating area. The Home Depot’s 5 ft. Poseable Skeleton with LED Eyes takes a seat on the couch, making for a great photo op for my guests. Here, have a seat with Mr. Bones. Now smile for the camera. Snap. Got it! Everyone will love him.
The evening darkness has now taken over. The fog machine does its magic, adding a touch of spookiness. The fog, combined with strobe and spotlights, creates a truly awesome atmosphere. I do one last walk-through to ensure everything is in place, envisioning how my guests will see everything.
I think it looks amazing! My Halloween dinner party at Spider Temple is ready to start, and my guests should be here any minute now. With a little creativity and some great spooky decorations from The Home Depot, I have designed a memorable evening, sure to impress. I can’t wait to share it with my friends!
For more DIY Halloween and harvest ideas, see other articles in our Halloween Style Challenge series, and follow our Halloween Style Challenge board on Pinterest.
Visit The Home Depot’s online Halloween Décor Department for everything you need to decorate your home for Halloween and fall.
The post Dinner Party at Spider Temple appeared first on The Home Depot Blog.
from garage2 http://ift.tt/2wYPJNg via great info
0 notes
Text
Dinner Party at Spider Temple
As a part of this year’s Halloween Style Challenge series, we sent Lynn Ferris of Holiday Decor & More a gargantuan spider and let her do the rest. From a life-sized spider web to a Peruvian-inspired temple wall, Lynn got creative and created the perfect place to host a spooky Halloween dinner party.
Check out how you can also impress your family and friends with a Halloween dinner party at spider temple.
Halloween Dinner Party at Spider Temple
Imagine my delight when I received my feature item from The Home Depot—their awesome Gargantuan Spider! Spanning 9 ft., I knew I had to design a space for my spider outdoors. After kicking around a few ideas, I did some online research and came upon a temple in Peru. It is referred to as the “Spider God Temple” and features numerous wall panels depicting the Ancient Peruvian’s Spider God. I decided to use this as my inspiration. I would create my own “Spider Temple” and use the space to host a dinner party.
Building the Spider Web
With my 9-ft. spider, I decided I needed a large spider web. I chose two trees in my backyard that were approximately 24 ft. apart. I decided to build my web between the two trees and sketched out my design.
From my sketch, I estimated how much rope I would need to build my spider web. My estimate came to about 200 ft. Deciding to get extra for other projects (and just to be on the safe side), I purchased four 100-ft. packages of Everbilt All-Purpose Clothesline.
Everbilt ¾ x 3 in. screw eyes were screwed into the two trees to hold each side of the spider web. Everbilt 9-in. Tent Stakes were used to anchor the bottom of the web to the ground. With the triangular web outline set, we started on the interior web design. I was fortunate to have a friend helping, as this step of the project is much easier with two people.
One person tied the rope sections while the other watched from a few steps back, giving direction on where to tie the knots. Following my sketch, we moved the clothesline around, tying off and cutting each section as we worked. My estimate was close. We ended up using about 194 ft. of clothesline for the web.
I think it came out pretty cool! A very large spider web for my very large spider.
Creating the Spider Tunnel
Next, we started working on our spider web tunnel. Using some wire fencing we had left over from our garden, we made two arches approximately 6-ft. high. We placed one at the top of the steps leading down to the yard and the second one at the base of the steps.
We staked these in place, using 4-ft. rebar stakes. Using more of the Everbilt All-Purpose Clothesline, we connected the two arches together with sections of rope tied to the tops and sides of each arch.
Having built the loose framework for our tunnel, it was now time to start covering it with spider webs. I purchased nine packages of HDX Cheesecloth, and we stretched and ripped this, making it look like creepy cobwebs.
We then draped each piece over our rope framework, tying it in place to the ropes. We also let some strands hang loose. Lastly, we added our prop spiders throughout the tunnel as well as two web-wrapped skeletons at the entrance.
A big, hairy spider with a Danger sign dangles from the tunnel entry. A great way to greet our guests!
Peruvian Temple Wall
On to our temple wall panels! This was a bit daunting at first. I had seen the process online but had never done them myself. It was time to give it a try and make my first carved foam walls! First, I needed to draw out my design. I knew I wanted each spider panel to be 2 x 2 ft.
Materials
(3) Owens Corning Pink Foam Insulation
Soldering Iron
Dewalt 2.75 in. Heat Gun
Glidden Essentials Flat Interior Paint
Glidden Essentials Cool Metalwork
Black Rust-Oleum Painters Touch Ultra Cover Premium Latex Paint
8 oz. White Rust-Oleum Painters Touch Ultra Cover Premium Latex Paint
Economy Basic 1.5 in. Flat Utility Brushes.
Step 1: Sketching the Spider
Not having any paper that large, I decided to use the back of some wrapping paper I had. This actually worked out perfectly as the back of the paper had a 1-in. grid printed on it. This helped me get my design where I wanted it to be. Additionally, the paper was thin enough that I could trace the design on the foam panel and see the indentations of the lines.
To make the panels, I purchased three sheets of Owens Corning pink foam insulation, 1-in. thick by 4 x 8 ft. We cut about 4 in. off each sheet to make it fit the space. I then traced my “Spider God” image on to the foam panel.
Step 2: Engraving the Foam
Now the fun begins! I was given a foam carving kit a few years ago for Christmas, but had yet to use it. I say carving, but these tools actually melt the foam allowing you to do fine engraving work, carving and sculpting.
This step should be done outdoors or in a well-ventilated area as there may be some fumes. Using the trace lines on my foam panel, I drew out the design with the engraving tool. An inexpensive soldering iron from The Home Depot would work, too.
After engraving the outline, I removed chunks of foam with the heat carving tool to give my design a 3D appearance. I kept the removed areas quite rough to resemble chiseled rock. This was time-consuming, but quite fun, and the finished carving looked pretty cool.
Step 3: Creating a Stone Look
I then drew out the stone portion of the temple wall panels freehand, using the heated engraving tool. For more dimension, I carved out the crevices between the rocks.
Step 4: Adding Depth
The walls at this point did resemble rocks, but I knew I could make them even better. With my Dewalt 2.75 in. Heat Gun, I carefully moved it across over the surface of my foam panel. Try a test piece first to see how hot you need the gun to be and how close you need to get to the foam.
The heat gun creates great crevices for your “grout” lines and gives dimension and texture to the faux rocks. I was admittedly a little intimidated at first by using a heat gun, but this was really so simple, and the result is so cool.
Step 5: Painting the Rocks
After carving the foam panels, they were ready for painting. I went to our local Home Depot and purchased one gallon of Glidden Essentials Flat Interior Paint. Although the Peruvian temple walls I used for inspiration are shades of orange, I decided to go with grey to look dark and gloomy. I chose a shade of grey called Cool Metalwork. I purchased a gallon, but could’ve gotten much less. I now have lots of leftover grey paint for another future project! I would always rather have too much than too little!
I decided to also purchase black and white paint to add shadows and highlights to my stone wall. A quart of black Rust-Oleum Painters Touch Ultra Cover Premium Latex Paint was just the right amount for the project, and a small 8 oz. can of white Rust-Oleum Painters Touch Ultra Cover Premium Latex Paint was purchased for the highlights. I already had some round crafters paint brushes, but purchased two Economy Basic 1.5 in. Flat Utility Brushes.
Again, I was fortunate to have a friend helping, and he started by painting all the grout lines black. He also painted the spider panels black.
Next, we painted the stones with the grey. Using quick, dry-brush brushstrokes across the groutlines, the grey settled only on the high areas, leaving the deep recesses black. We painted each stone, trying to keep the paint thin. Drying time was very quick.
Using the highs and lows created from the heat gun as my guide, I added black to the low areas of each stone. I tried to keep my brush dry with very little paint on it creating shadows on each stone. This admittedly took quite longer than anticipated, so leave yourself enough time. I found myself getting sloppy at the end in order to finish. I actually think I added too much black, but for my first time doing this, I think it still came out ok. I may go back and lighten it up at another point in time.
After the black dried, I mixed some white and grey together to add as highlights. Again, I used the contours of the foam, adding the light grey to the highest areas of each stone.
And my spider walls were now complete!
Spooky Halloween Dinner Party
With my temple wall backdrop complete, it was now time to add props and accessories, set the table, get my lighting set and prepare the fog machine. Almost time for my Dinner Party at Spider Temple!
I set my table for twelve, with simple place settings in black, white and grey to coordinate with my stone walls. Three LED Spider Lanterns from The Home Depot adorned the table. I think they look great!
Then, I set up my dessert table nearby. I found this great 3-Tier Square Glass Dessert Stand at The Home Depot as part of their Home Decorators Collection. Who knew The Home Depot had such great accessories? It’s just what I needed to display my homemade spider cupcakes!
Finishing Touches
And now some props. I add skulls, hands and feet on the ground below my Gargantuan Spider. Looks like quite a few people have fallen victim to this arresting arachnid! Hopefully my guests survive the evening!
A 3-ft. hairy spider was positioned in a tree, looking as if he’s ready to drop down and startle my guests.
The Home Depot’s Animated Jumping Spider with Red LED Eyes is guaranteed to startle my guests! I positioned him amongst some potted plants, at the foot of the stairs. As guests descend from the cobweb tunnel, they will look up at the spider in the tree. Their motion will activate the jumping spider beside them, and screams and laughter will surely follow!
Final Reveal
At night, I light candles, turn on the LED candles and position my lights. We light a fire, creating a warm glow over our seating area. The Home Depot’s 5 ft. Poseable Skeleton with LED Eyes takes a seat on the couch, making for a great photo op for my guests. Here, have a seat with Mr. Bones. Now smile for the camera. Snap. Got it! Everyone will love him.
The evening darkness has now taken over. The fog machine does its magic, adding a touch of spookiness. The fog, combined with strobe and spotlights, creates a truly awesome atmosphere. I do one last walk-through to ensure everything is in place, envisioning how my guests will see everything.
I think it looks amazing! My Halloween dinner party at Spider Temple is ready to start, and my guests should be here any minute now. With a little creativity and some great spooky decorations from The Home Depot, I have designed a memorable evening, sure to impress. I can’t wait to share it with my friends!
For more DIY Halloween and harvest ideas, see other articles in our Halloween Style Challenge series, and follow our Halloween Style Challenge board on Pinterest.
Visit The Home Depot’s online Halloween Décor Department for everything you need to decorate your home for Halloween and fall.
The post Dinner Party at Spider Temple appeared first on The Home Depot Blog.
from together1 http://ift.tt/2wYPJNg via recommended
0 notes
Text
Dinner Party at Spider Temple
As a part of this year’s Halloween Style Challenge series, we sent Lynn Ferris of Holiday Decor & More a gargantuan spider and let her do the rest. From a life-sized spider web to a Peruvian-inspired temple wall, Lynn got creative and created the perfect place to host a spooky Halloween dinner party.
Check out how you can also impress your family and friends with a Halloween dinner party at spider temple.
Halloween Dinner Party at Spider Temple
Imagine my delight when I received my feature item from The Home Depot—their awesome Gargantuan Spider! Spanning 9 ft., I knew I had to design a space for my spider outdoors. After kicking around a few ideas, I did some online research and came upon a temple in Peru. It is referred to as the “Spider God Temple” and features numerous wall panels depicting the Ancient Peruvian’s Spider God. I decided to use this as my inspiration. I would create my own “Spider Temple” and use the space to host a dinner party.
Building the Spider Web
With my 9-ft. spider, I decided I needed a large spider web. I chose two trees in my backyard that were approximately 24 ft. apart. I decided to build my web between the two trees and sketched out my design.
From my sketch, I estimated how much rope I would need to build my spider web. My estimate came to about 200 ft. Deciding to get extra for other projects (and just to be on the safe side), I purchased four 100-ft. packages of Everbilt All-Purpose Clothesline.
Everbilt ¾ x 3 in. screw eyes were screwed into the two trees to hold each side of the spider web. Everbilt 9-in. Tent Stakes were used to anchor the bottom of the web to the ground. With the triangular web outline set, we started on the interior web design. I was fortunate to have a friend helping, as this step of the project is much easier with two people.
One person tied the rope sections while the other watched from a few steps back, giving direction on where to tie the knots. Following my sketch, we moved the clothesline around, tying off and cutting each section as we worked. My estimate was close. We ended up using about 194 ft. of clothesline for the web.
I think it came out pretty cool! A very large spider web for my very large spider.
Creating the Spider Tunnel
Next, we started working on our spider web tunnel. Using some wire fencing we had left over from our garden, we made two arches approximately 6-ft. high. We placed one at the top of the steps leading down to the yard and the second one at the base of the steps.
We staked these in place, using 4-ft. rebar stakes. Using more of the Everbilt All-Purpose Clothesline, we connected the two arches together with sections of rope tied to the tops and sides of each arch.
Having built the loose framework for our tunnel, it was now time to start covering it with spider webs. I purchased nine packages of HDX Cheesecloth, and we stretched and ripped this, making it look like creepy cobwebs.
We then draped each piece over our rope framework, tying it in place to the ropes. We also let some strands hang loose. Lastly, we added our prop spiders throughout the tunnel as well as two web-wrapped skeletons at the entrance.
A big, hairy spider with a Danger sign dangles from the tunnel entry. A great way to greet our guests!
Peruvian Temple Wall
On to our temple wall panels! This was a bit daunting at first. I had seen the process online but had never done them myself. It was time to give it a try and make my first carved foam walls! First, I needed to draw out my design. I knew I wanted each spider panel to be 2 x 2 ft.
Materials
(3) Owens Corning Pink Foam Insulation
Soldering Iron
Dewalt 2.75 in. Heat Gun
Glidden Essentials Flat Interior Paint
Glidden Essentials Cool Metalwork
Black Rust-Oleum Painters Touch Ultra Cover Premium Latex Paint
8 oz. White Rust-Oleum Painters Touch Ultra Cover Premium Latex Paint
Economy Basic 1.5 in. Flat Utility Brushes.
Step 1: Sketching the Spider
Not having any paper that large, I decided to use the back of some wrapping paper I had. This actually worked out perfectly as the back of the paper had a 1-in. grid printed on it. This helped me get my design where I wanted it to be. Additionally, the paper was thin enough that I could trace the design on the foam panel and see the indentations of the lines.
To make the panels, I purchased three sheets of Owens Corning pink foam insulation, 1-in. thick by 4 x 8 ft. We cut about 4 in. off each sheet to make it fit the space. I then traced my “Spider God” image on to the foam panel.
Step 2: Engraving the Foam
Now the fun begins! I was given a foam carving kit a few years ago for Christmas, but had yet to use it. I say carving, but these tools actually melt the foam allowing you to do fine engraving work, carving and sculpting.
This step should be done outdoors or in a well-ventilated area as there may be some fumes. Using the trace lines on my foam panel, I drew out the design with the engraving tool. An inexpensive soldering iron from The Home Depot would work, too.
After engraving the outline, I removed chunks of foam with the heat carving tool to give my design a 3D appearance. I kept the removed areas quite rough to resemble chiseled rock. This was time-consuming, but quite fun, and the finished carving looked pretty cool.
Step 3: Creating a Stone Look
I then drew out the stone portion of the temple wall panels freehand, using the heated engraving tool. For more dimension, I carved out the crevices between the rocks.
Step 4: Adding Depth
The walls at this point did resemble rocks, but I knew I could make them even better. With my Dewalt 2.75 in. Heat Gun, I carefully moved it across over the surface of my foam panel. Try a test piece first to see how hot you need the gun to be and how close you need to get to the foam.
The heat gun creates great crevices for your “grout” lines and gives dimension and texture to the faux rocks. I was admittedly a little intimidated at first by using a heat gun, but this was really so simple, and the result is so cool.
Step 5: Painting the Rocks
After carving the foam panels, they were ready for painting. I went to our local Home Depot and purchased one gallon of Glidden Essentials Flat Interior Paint. Although the Peruvian temple walls I used for inspiration are shades of orange, I decided to go with grey to look dark and gloomy. I chose a shade of grey called Cool Metalwork. I purchased a gallon, but could’ve gotten much less. I now have lots of leftover grey paint for another future project! I would always rather have too much than too little!
I decided to also purchase black and white paint to add shadows and highlights to my stone wall. A quart of black Rust-Oleum Painters Touch Ultra Cover Premium Latex Paint was just the right amount for the project, and a small 8 oz. can of white Rust-Oleum Painters Touch Ultra Cover Premium Latex Paint was purchased for the highlights. I already had some round crafters paint brushes, but purchased two Economy Basic 1.5 in. Flat Utility Brushes.
Again, I was fortunate to have a friend helping, and he started by painting all the grout lines black. He also painted the spider panels black.
Next, we painted the stones with the grey. Using quick, dry-brush brushstrokes across the groutlines, the grey settled only on the high areas, leaving the deep recesses black. We painted each stone, trying to keep the paint thin. Drying time was very quick.
Using the highs and lows created from the heat gun as my guide, I added black to the low areas of each stone. I tried to keep my brush dry with very little paint on it creating shadows on each stone. This admittedly took quite longer than anticipated, so leave yourself enough time. I found myself getting sloppy at the end in order to finish. I actually think I added too much black, but for my first time doing this, I think it still came out ok. I may go back and lighten it up at another point in time.
After the black dried, I mixed some white and grey together to add as highlights. Again, I used the contours of the foam, adding the light grey to the highest areas of each stone.
And my spider walls were now complete!
Spooky Halloween Dinner Party
With my temple wall backdrop complete, it was now time to add props and accessories, set the table, get my lighting set and prepare the fog machine. Almost time for my Dinner Party at Spider Temple!
I set my table for twelve, with simple place settings in black, white and grey to coordinate with my stone walls. Three LED Spider Lanterns from The Home Depot adorned the table. I think they look great!
Then, I set up my dessert table nearby. I found this great 3-Tier Square Glass Dessert Stand at The Home Depot as part of their Home Decorators Collection. Who knew The Home Depot had such great accessories? It’s just what I needed to display my homemade spider cupcakes!
Finishing Touches
And now some props. I add skulls, hands and feet on the ground below my Gargantuan Spider. Looks like quite a few people have fallen victim to this arresting arachnid! Hopefully my guests survive the evening!
A 3-ft. hairy spider was positioned in a tree, looking as if he’s ready to drop down and startle my guests.
The Home Depot’s Animated Jumping Spider with Red LED Eyes is guaranteed to startle my guests! I positioned him amongst some potted plants, at the foot of the stairs. As guests descend from the cobweb tunnel, they will look up at the spider in the tree. Their motion will activate the jumping spider beside them, and screams and laughter will surely follow!
Final Reveal
At night, I light candles, turn on the LED candles and position my lights. We light a fire, creating a warm glow over our seating area. The Home Depot’s 5 ft. Poseable Skeleton with LED Eyes takes a seat on the couch, making for a great photo op for my guests. Here, have a seat with Mr. Bones. Now smile for the camera. Snap. Got it! Everyone will love him.
The evening darkness has now taken over. The fog machine does its magic, adding a touch of spookiness. The fog, combined with strobe and spotlights, creates a truly awesome atmosphere. I do one last walk-through to ensure everything is in place, envisioning how my guests will see everything.
I think it looks amazing! My Halloween dinner party at Spider Temple is ready to start, and my guests should be here any minute now. With a little creativity and some great spooky decorations from The Home Depot, I have designed a memorable evening, sure to impress. I can’t wait to share it with my friends!
For more DIY Halloween and harvest ideas, see other articles in our Halloween Style Challenge series, and follow our Halloween Style Challenge board on Pinterest.
Visit The Home Depot’s online Halloween Décor Department for everything you need to decorate your home for Halloween and fall.
The post Dinner Party at Spider Temple appeared first on The Home Depot Blog.
from mix1 http://ift.tt/2wYPJNg via with this info
0 notes
Last Seen Blogs