#linksys smart wifi
Text
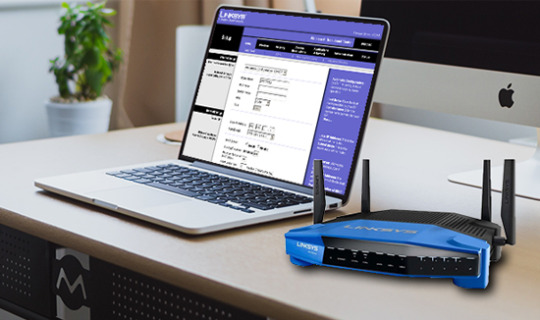
How Do I Manually Configure My Linksys Router?
Connect to Linksyssmart WiFi by visiting linksyssmartwifi.com. The settings of the WiFi extender and router can also be changed using this web address. Using Linksysmartwifi.com, a Linksys router setup is simple to complete at home and at the office.
You can access your wireless router using a number of different techniques with the help of Linksys router login. You may access your router and modify its wifi settings by using the Linksys router login. You will be able to log into your Linksys router with ease after learning how to do so.
On the web-based setup page, look for the Wireless tab.
You can view the Configuration View with a Manual by selecting Manual.
Mixed is available in the drop-down menu for network mode.
Please provide an SSID (domain name) for your networks.
Select Auto from the Channels Width drop-down option (20 MHz or 40 MHz).
Select the desired channel from the drop-down menu.

2 notes
·
View notes
Text
How to login to Linksys Smart Wifi?
You can easily log into your Linksys smart WiFi router correctly to make any configurations. For the login, you require the router’s default IP address and username & password. Through the default IP address, access the login page and log in using the login credentials. Connect with our team if you come across any doubts or issues.
0 notes
Text
If you're struggling with weak Wi-Fi signals in certain areas of your home or office, a Linksys extender can be a game-changer.
#smartwifi#linksyslogin#extender.linksys.com#linksys setup#linksys smart wifi#linksys smart wifi login
0 notes
Text
Linksys smart wifi login
Want to learn about Linksys smart wifi login process? Enter linksyssmartwifi.com URL in the web browser and then provide the login details. Once you click Submit, you will successfully login to the Linksys Smart Wifi. After that, you can also manage the wireless settings of your Linksys Smart Wifi network.
0 notes
Text
How to change the basic Wireless settings of Linksyssmartwifi.com?
Wireless settings of the Linksys router consist of the Network Name, Wi-fi password, Channel Width Wireless Channel, Security mode that are prominent attributes of the router’s network. You can also keep the default Network Name and the default Network key to the router’s network. Users are recommended to change the Wireless settings of a network during the setup process as it secures and protects your network from malicious attacks. It is suggested to assign the default Security mode to the router’s network.
Steps to change the basic Wireless settings of the linksyssmartwifi.com
Launch a browser on your computer connected to the router’s network.
Take the cursor to the address bar and type linksyssmartwifi.com as the URL of the browser.
You can also type 192.168.1.1 on the address bar of the browser. It is the default IP address of the Linksys router.
Note: A user having an issue in connecting to the linksyssmartwifi.com interface, the IP address might have changed. You can check the current IP address of the Linksys router through its web interface.
Hit enter the default management login window that appears on the screen.
Mention the login credentials within their respective fields. Type “admin” on the username field and type the login password on the password field.
In case you haven’t changed the login password of the linksyssmartwifi.com login window, type “admin” as the password.
Click on the login button and the linksyssmartwifi.com interface appears on the screen.
From the web menu Dashboard, Go to the Router Settings then click on the Wireless tab.
Network’s Wireless settings page displays on the screen.
To create changes in the Wireless settings, click Edit on the Network that you want to configure.
Select the “Enabled” checkbox, then enter the Network Name and Wi-fi password in their respective fields.
Type the desired SSID name on the Network name field and mention the network key you want to assign to the network in the Wi-fi password field.
Note: Make sure the Network Names of both the Wi-fi names are different, though the Wi-fi password could be the same. The Wireless network name should be different from the router password.
To change the Network Mode, select an optimum mode from the available drop-down list.
Users recommended choosing Wireless-AC only as of the Network mode.
Now, select the Security mode you want to assign to the network.
The default Security mode assign to your network is WPA2
Select the channel width from the 20 MHz, 40MHz, and 80MHz options.
Select the network channel from the Wireless Channel option.
Click on the Ok button when you are done.
Note: The Wi-fi password field is case-sensitive, make sure you hold the shift key when you want to type an uppercase letter and release the key whenever you want to type a lowercase letter. For example, If you have assigned the Wi-fi password as “Password24”, it will be different from the “PASSWORD24”. Any fault in the network key may deny a user from accessing the linksyssmartwifi.com network.
For more information linksyssmartwifi.com
0 notes
Link
With this guide, you will get to know how to find linksys smart wifi password. You will also get to know about linksys wifi change password and reset password steps. For more info, you can visit the webpage.
2 notes
·
View notes
Link
Looking for help with accessing the Linksys Router Login page online? You can start by connecting your devices to the router network and then using the default web address/IP address to access the login page. The default credentials can then be used to gain access to the setup wizard and edit the network as well as device settings. For more help with the router login process, you can always read through the setup guide on our website.
0 notes
Text
0 notes
Text
does nord vpn upload to wifi router
🔒🌍✨ Get 3 Months FREE VPN - Secure & Private Internet Access Worldwide! Click Here ✨🌍🔒
does nord vpn upload to wifi router
NordVPN router compatibility
NordVPN is a popular VPN service known for its robust security features and reliable performance. Many users prefer to set up a VPN connection on their routers to protect all devices connected to their home network. The compatibility of NordVPN with various routers is therefore a crucial factor to consider.
NordVPN is compatible with a wide range of router brands and models, making it easy for users to secure their entire network with just a few simple steps. The VPN service offers dedicated apps and setup guides for popular routers, including brands like Asus, Linksys, Netgear, and more.
Setting up NordVPN on a compatible router allows users to protect their internet traffic, encrypt their data, and bypass geo-blocks on all connected devices, including smart TVs, gaming consoles, and IoT devices. This ensures that all internet activities conducted within the network remain private and secure.
Furthermore, using NordVPN on a router also helps users overcome device limitations, as some platforms or devices may not support VPN apps. By securing the router directly, users can enjoy the benefits of VPN protection on devices that do not natively support VPN connections.
In conclusion, NordVPN's compatibility with a wide selection of routers makes it a convenient choice for users looking to safeguard their entire home network. By following the provided setup guides, users can enjoy the benefits of enhanced security and privacy across all their connected devices.
VPN router setup
Setting up a VPN router can enhance your online security and privacy by encrypting your internet connection and masking your IP address. This ensures that your browsing activities remain private and protected from prying eyes, especially when using public Wi-Fi networks or accessing geo-restricted content.
To begin the VPN router setup process, you'll need a compatible router and a VPN subscription from a reliable provider. First, access your router's settings by typing its IP address into your web browser. This typically involves entering "192.168.1.1" or "192.168.0.1" into the address bar.
Once logged in, locate the VPN section within your router's settings menu. Depending on your router model, this may be labeled as "VPN," "OpenVPN," or something similar. Next, enter the configuration details provided by your VPN provider, including the server address, username, and password.
After entering the required information, save your settings and proceed to the connection test. This will verify that your router can successfully connect to the VPN server. If the test is successful, your router is now configured to route all internet traffic through the VPN, ensuring privacy and security for all devices connected to your network.
It's important to note that not all routers support VPN functionality, so be sure to check compatibility before purchasing. Additionally, some VPN providers offer dedicated router firmware or pre-configured routers for easy setup.
In conclusion, setting up a VPN router is a straightforward process that significantly enhances your online security and privacy. By encrypting your internet connection at the router level, you can enjoy peace of mind knowing that your browsing activities are protected from potential threats and surveillance.
Wireless router VPN integration
A wireless router VPN integration offers users an extra layer of security and privacy when connected to the internet. VPN, short for Virtual Private Network, creates a secure connection to another network over the internet. By integrating this technology into your wireless router, all devices connected to the network will benefit from the VPN protection.
One of the primary advantages of a wireless router VPN integration is the encryption of data transmitted over the network. This encryption ensures that sensitive information such as passwords, personal data, and financial details remain secure from potential cyber threats. With the rising concerns over online privacy, using a VPN through your wireless router can give you peace of mind knowing that your online activities are shielded from prying eyes.
Moreover, a wireless router VPN integration allows users to bypass geo-restrictions imposed by certain websites or streaming services. By connecting to a VPN server located in a different country, users can access region-locked content and enjoy a more open internet experience.
Setting up a VPN on a wireless router may require some technical knowledge, but many VPN service providers offer user-friendly guides to facilitate the process. It is essential to choose a reputable VPN provider to ensure the reliability and security of the connection.
In conclusion, integrating a VPN into your wireless router can enhance your online security, protect your privacy, and unlock geo-blocked content. Consider the benefits of a wireless router VPN integration to safeguard your digital presence in an increasingly interconnected world.
NordVPN router security
NordVPN is a popular choice for users seeking to enhance their online security and privacy. One effective way to leverage the benefits of NordVPN is through setting it up on a router. By doing so, you create a secure gateway for all devices connected to the network. This ensures that all internet traffic is encrypted and secure, providing an added layer of protection.
Setting up NordVPN on a router is a relatively straightforward process, with detailed instructions provided by NordVPN. This allows for easy configuration and management of the VPN connection at the router level. By establishing the VPN connection at the router, all devices connected to the network, such as smartphones, laptops, smart TVs, and gaming consoles, automatically benefit from the encryption and security provided by NordVPN.
One of the key advantages of using NordVPN on a router is the ability to secure devices that do not natively support VPN connections. This includes IoT devices, such as smart thermostats and security cameras, which may have limited security features. By routing their traffic through the VPN-enabled router, you can ensure that all data transmitted to and from these devices is encrypted and secure.
In conclusion, setting up NordVPN on a router is a convenient and effective way to enhance your online security and privacy. By encrypting all internet traffic at the router level, you can ensure that all devices connected to the network benefit from the advanced security features offered by NordVPN.
VPN-enabled router configuration
A VPN-enabled router configuration is a convenient and secure way to protect your online activities and maintain your privacy. By setting up a VPN directly on your router, you can encrypt all the internet traffic flowing through your network, ensuring that your sensitive data remains safe from prying eyes.
To configure a VPN on your router, you first need to ensure that your router supports VPN functionality. Many modern routers come with built-in VPN support, while others may require you to flash custom firmware such as DD-WRT or Tomato to enable VPN capabilities. Once you have confirmed compatibility, you can proceed to set up your VPN connection.
The exact steps for configuring a VPN on your router may vary depending on the VPN service you are using and the router model you have. Typically, you will need to log in to your router's settings panel, enter the VPN configuration details provided by your VPN service provider, and establish a connection. After successful configuration, all devices connected to your router will benefit from the VPN encryption, regardless of whether they support VPN natively.
Using a VPN-enabled router has several advantages, including encrypting all your devices' internet traffic, bypassing geo-restrictions on streaming services, and enhancing your online security when using public Wi-Fi networks. However, it is essential to choose a reliable VPN service, configure your router correctly, and regularly update your router firmware to ensure optimal performance and security. By following these steps, you can enjoy a more private and secure online experience with a VPN-enabled router configuration.
0 notes
Text
0 notes
Text
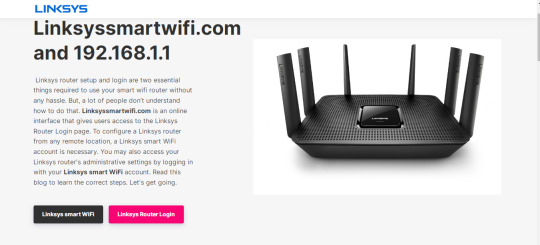
How to Set Up a Linksys Router via Linksyssmartwifi.com and 192.168.1.1
Linksys smart WiFi account is required in order to setup a Linksys router from any remote location. By entering in with your Linksys smart WiFi account, you can also access the administrative settings of your Linksys router. To find out how to do it right, read this post. Let's move forward.
192.168.1.1 Linksys Router Login
The IP address 192.168.1.1 can also be used to set up and log into a Linksys wireless router. adhere to the guidelines below;
Your laptop or computer's default web browser should be opened.
In the web address area, enter the address 192.168.1.1.
The Linksys WiFi router's login web interface will then show up.
Watch careful for typing errors and double-check that you wrote the text accurately.
Enter "username" and "admin" or "password" in the corresponding username and password boxes on your Linksys WiFi router to continue.
1 note
·
View note
Text
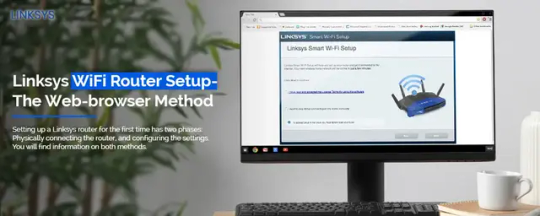
Step-by-Step Guide for Linksys WiFi Setup
At the beginning of the process for Linksys Wi-Fi Setup, what you have to do is connect your smart device to the router and launch a web browser. Afterward, enter either the web address of your Linksys router or its IP address in the URL bar of the already opened web browser. Now, you will be able to access the setup wizard of your router. Stuck somewhere else? Ring us up!
0 notes
Text
Step-by-Step Guide for How To Login to Linksys Router?
The Linksys router comes with advanced features that enhance your home's network coverage and eliminate dead zones. Additionally, these are easy to connect with the primary router unit and its web interface is so simple that anyone can access it with accurate details. Similarly, if you buy a brand new Linksys router, then you must understand how to login Linksys router web interface.
Moreover, there are two primary methods that you can use to access the login page of your Linksys router. One is through the web address and another is using the Linksys smart app. Consequently, the web address method primarily easy to log in to Linksys router to enjoy a secure and lag-free network. In this brief post, we will explain the complete steps for accessing the admin panel through a web address.
Prerequisites for Linksys router login
Before you dig deep into the process of Linksys router login, you need to gather a few of the necessary things, such as:
Linksys WiFi router
Reliable network connection
Ethernet cable
Web address
Admin credentials
Computer/Laptop
How To Login to Linksys Router?
Additionally, if you want to make the most of your router, then login to its admin panel is necessary. In this section, we explore the complete steps to carry out the Linksys router login process. Let’s begin here:
Initially, power on your router.
Next, connect the router network to the computer.
After that, open the web browser and then type linksyssmartwifi.com web address.
Now, a login window pops up here.
Enter the default admin credentials.
Next, you visit the smart dashboard of the router.
Hereon, go to the advanced settings and change the SSID name and password to secure your network.
Finally, you can access your router network.
On the whole, the above-mentioned information will surely help you understand the process for how to login Linksys router admin portal. To carry out an error-free process, follow the given steps carefully. If need more information, stay tuned with us!
0 notes
Text

"🌐 Ready to supercharge your internet? 🔗 Dive into the world of seamless connectivity with Linksys router login! 🚀 CLICK LINK IN BIO for a hassle-free setup. #TechTalk #RouterMagic #InternetWiz #LinksysLove #ConnectWithEase #DigitalRevolution 📶✨"
0 notes
Text
Benefits Of Getting Linksys RE7000 At Your Place
Undoubtedly, the Linksys RE7000 setup is a reliable option for better WiFi coverage if you have an ample place. Along with the fastest internet signals with maximized stability, you can have access to a number of useful features through this device. You will be able to enjoy the network without getting any interruptions while browsing or playing video games. Your multiple devices will remain connected to the network for improved internet signals at the same time. These include gaming consoles, Smart TVs, laptops, Tablets, PC, CCTV, and many more devices.
Apart from that, performing any task will be easier for you once you get the extender at your place. For security purposes, this device contains the best security encryption which allows you to keep your network safe and secure from hackers. The interesting thing is that there will be no remaining WiFi dead spots at your place as this device is capable of covering every corner of your house and office. So, choosing this extender can be a reliable and beneficial option for you in a number of ways. Also, installing the extender is such a simple task, you can do this by only pressing the WPS button from it.
0 notes
Text
linksys extender setup
The Linksys Wifi Extender Setup is necessary to users in the modern world. Users today use expert, high-frequency WiFi routers to meet their daily Internet requirements.
However, routers show that there is little to no internet in multiple areas of the home or office. Dead points or network zones are the names for these specific areas. Instead of purchasing a new router, experts suggest using a Linksys Extender setup to resolve the problem.
How to setup linksys wifi extender?
Users must interact during setup, as implied by the names. The steps listed below should be executed in order to set up a Linksys WiFi Extender:
Connect the Linksys WiFi Range Extender to the power switch.
To connect your Linksys wifi range extender to your router or WiFi setting, use an Ethernet cable.
Open a browser and enter the IP address of the regular Linksys WiFi Extender or visit extender.linksys.com.
When you visit extender.linksys.com, you will be prompted for your Linksys Extender login details.
After entering the correct data, click the "Login" button.
Follow the instructions displayed on the screen.
Click "Edit" to make changes after you're done.
Note:Contact our team of experts or go to the official website, extender.linksys.com, if you need any help with your Linksys wifi extender.
Linksys Velop setup
Linksys Velop mesh networking devices can be set up in a manner resembling that of a typical wireless router. To get started, each Velop mesh network requires a primary computer or router. This main computer is designed to link to the modem of your Internet service provider.
The Linksys Velop Setup App can be installed by any wifi device.
At this point, connect the Linksys Velop to the power outlet.
On your smartphone, launch the app, and then follow the on-screen directions.
Make a Linksys Smart Wi-Fi account to have access to the Linksys Velop Mesh Range Extender setup page.
Select your current wifi network after logging in.
The current WiFi network will now be accessible to your Linksys New Velop.
Visit extender.linksys.com to complete the configuration.
Setup a Linksys Extender at extender.linksys.com
To access the Linksys extender setup user interface, go to extender.linksys.com and provide the proper login information, including your username and password. After successfully logging in, you can start adjusting the extender's basic and advanced settings.
To access extender.linksys.com's setup page:
To turn on the Linksys extender, go to extender.linksys.com.
Connecting the extender to the computer takes an Ethernet cable.
Look in the manual for the default login details.
Look at the tag on the extender to get the model number.
Be careful not to scratch the extension or other devices when opening it.
The extra length ought to be near the power supply.
Always use the most recent web browser version to view the New Extender Setup.
How do I login and log in to extender.linksys.com?
The first step in activating a Linksys wifi booster is to log into the Linksys Wi-Fi Extender Setup webpage. In order to finish this step, you must type the default address extender.linksys.com into the address bar of any device connected to your home Wi-Fi network's updated browser. The default login link you are using takes you to the setup page for the new extender. This page from Linksys contains setup instructions for range extenders. You'll be ready to start customising your new Wi-Fi extender after you've established the connection.
Now let's talk about how to get to the extender.linksys.com website.
Turn on your Linksys extender and wait for the power light to grow bright before continuing.
Connect a device to your Linksys WiFi extender, such as a laptop, desktop, smartphone, or tablet.
Your username and password are now required on a page.
After inputting your information, you will be able to visit the Linksys wifi extender page.
1 note
·
View note
Last Seen Blogs

chocolatereignz
Chololate Reignz

pcsx2-cheat-files-downloab6
👑 pcsx2 cheat files download (mod free) NSGQ#

kogorapaduk
제목 없음

jeinsx
Jeinsx Art or What Ever

chara13drimm
=^~^=