#Best 3D Printers Under $1000
Video
youtube
✅ Best 3D Printers Under $1000 in 2022 ➡️ Top 5 Tested & Buying Guide
Product Description:
Number 1. Elegoo Mars 2 Pro
If you are just getting started with resin 3D printing, you will find that you have an overwhelming number of options to choose from, each with a different price point. The good news for people just starting out is that quality does not have to come at the expense of their budget. You can get your hands on the intuitive Mars 2 Pro for as little as $200 if you look hard enough.
Number 2. Anycubic Kobra
The Anycubic Kobra is the ideal 3D printer for you if you are searching for a machine that is not only simple to use but also produces high-quality prints. a fun hobby. Because it is so simple to put together, you can start printing within half an hour of taking it out of the box.
Number 3. Anycubic Kobra Plus
The Anycubic Kobra Plus has your back when you need a little more space than the average 3D printer. The Kobra Plus is a great tool for big projects because it has a large 300 x 300 x 350mm build volume and a nearly perfect auto bed leveling system.
The Kobra Plus is priced competitively at $499, and it has a light Bowden extruder and a Volcano-style hot end to make printing faster.
Number 4. Anycubic Vyper
The Anycubic Vyper is made for high-throughput 3D printing, and its rock-solid build and long list of features really impressed us. The Vyper is a good choice for anyone who wants to print out a lot of parts because it has features like silent stepper drivers, dual Z threaded rods, and a high-air flow part cooling system.
Number 5. Phrozen Sonic Mini 4K
The Phrozen Sonic Mini 4K should be on your shortlist if you want to print models with a lot of fine detail. The Sonic Mini 4K uses a 4K mono LCD screen to print high resolution models with a per-layer cure time of slightly over 2 seconds per layer. This translates to excellent detail and speed, but the price gap between the Sonic Mini 4K and comparable MSLA 3D printers like the Anycubic Photon is significant.
#youtube#Best 3D Printers#Best 3D Printers Under $1000#Best 3D Printer#3D Printer#3d printer review#best home 3d printer#home 3d printer#Best 3D Printer for beginners#Longer 3D Printer#Top 3D Printer#Quality 3D Printer#3D Printer for hobby#Prusa 3D Printer#Eleego Qidi 3D Printer#Aquila 3D Printer#Best FDM 3D Printer#Best Resin 3D Printer#ReviewGeny#Review Geny
1 note
·
View note
Text
Why Ghost Guns Are America's Fastest-Growing Gun Problem
"There was a time when we might have referred to as the pupil in, had a dialogue, bought the mother and father involved, after which made a call about whether or not it was a real menace," he stated. But instances have modified. Inside the $3 Billion School Security Industry: Companies Market Sophisticated Technology to ‘Harden’ Campuses, but Will It Make Us Safe? Also taking a zero-tolerance method to pupil social media posts is the school district in suburban Birmingham, Alabama - which faced criticism this 12 months for its response to on-line speech. District superintendent Craig Pouncey said he lately accepted the expulsion of three students who uploaded photos of themselves to Facebook holding guns and making gang indicators. Images like that are a menace to students even in the event that they don’t point out the school instantly, he mentioned. "Sometimes a superintendent has to take sure actions regardless of what the regulation says," Pouncey informed The 74. "Whether or not those expulsions will stick, it’s immaterial.
Destiny 2: New Light
NERF Zombie Strike Crossfire Bow
Firearm-associated accidents are the primary cause of dying for youths in the U.S
Grip workouts (towel pull-ups)
PIR sensor
Hyphema (blood throughout the aqueous fluid)
In October, a gaggle of senators requested the ATF to supply a report on enforcement of the regulation, however the company has advised Congress it's fearful more robust action would lose in court docket, after several rulings by the Supreme Court affirming the Second Amendment broadly protects gun house owners from restrictions. How many US mass shootings have there been in 2023? Where does US gun control go from here? Ghost guns are also becoming an international problem, even in international locations with tight restrictions on weapons. Some are being trafficked out of the United States, corresponding to gun components which might be shipped on to Mexico, the place there's fear they could be utilized by cartels. In Western Europe, 3D printers have been used to make ghost guns, Mr Pucino stated. The ATF has cautioned that America's ghost Orbi Gun pattern might take off abroad. ATF Special Agent in Charge Charlie Patterson. The growing proliferation of ghost guns has inevitably led to closer scrutiny of the varied manufacturers.
Cut an orange in half and dangle the halves from a department for orioles. Cut a coconut in half. Drill a hole near the edge and dangle from a tree department. Small, seed-consuming birds prefer to peck at the meat, and larger, more aggressive birds can't get to it simply. On a large flat rock, provide cracked corn to quail and doves. Use a flat window feeder to offer lower-up suet from the meat counter. Make sure the window is excessive sufficient that canines, cats, and rats can not attain. Don't offer suet in the hotter months; it spoils shortly. The next bird feeder is certain to attract some excessive-flying tenants. Step 1: Wash the container thoroughly with sizzling, soapy water. Let dry. Half an inch beneath the opening, poke the craft stick or small dowel about 1-1/2 inches into the container. This is the chicken's perch. Step 3: Spread out the newspaper, and stuff the sphagnum moss into the bottle until it comes up to the entry gap.
Can be used with or with out an exterior change
Gel Blaster Surge Toy
Mechanism: Pump
It very easy to make use of because it resembles an actual police gun
Districts have paid out tons of of 1000's of dollars in settlements after being accused of taking surveillance too far. Under a 1969 Supreme Court ruling, student free speech is protected except it causes a substantial disruption at college. Now courts are making use of that customary to students’ on-line speech outside of school. Although courts differ, most have have sided with educators. In the very best-profile lawsuit to this point over a student’s on-line speech, federal courts went the other approach. In 2011, a Mississippi high school scholar wrote and uploaded to YouTube a rap track accusing two coaches of sexual misconduct, including the lyric "going to get a pistol down your mouth." After the college suspended the pupil and sent him to an alternate school, he sued on First Amendment grounds. The 5th Circuit Court of Appeals ruled against the pupil, noting that the tune brought on a considerable disruption in school. The pupil appealed to the U.S.

It will possibly produce die cuts of fabric, paper, chipboard and even balsa wood. This firm has come a great distance in serving to crafters get the results they're looking for. Grommets and eyelets aren't only for fabric crafting; they can also be used in bookmaking and various paper crafts. This tool creates holes and presses a metallic border round them to offer a clean and sleek look whereas serving to the structural integrity of the opening. Those who love pottery and work with clay loads could have a set of tools that appears very much like this one. In general, they're metal-tipped instruments with picket handles. Each instrument has a distinct-formed head used for a distinct sculpting technique. While Rya Ties may not be important instruments for many who crochet or knit, they are often large time-savers for those who plan on making pom-poms or the shag look to your tasks. Wood burning tools may be tough to get the cling of if you are new at it.
1 note
·
View note
Text
Reasons to Contact a 3D Printer Manufacturer for your Rapid Prototyping needs
3D printing is one of the most promising technologies in the current word. It has truly revolutionized the way prototypes were being created and has helped designers/ developers and engineers to quickly iterate their designs without having to depend on any external sources. Having a 3D printing machine greatly reduces the time taken to check functional design changes leading to quicker iterations and easy transition into mass manufacturing. If you don’t have a 3D printer yet, these reasons will make you contact Industrial 3D Printer Manufacturers at the earliest.

Improved Machine, Open range of materials
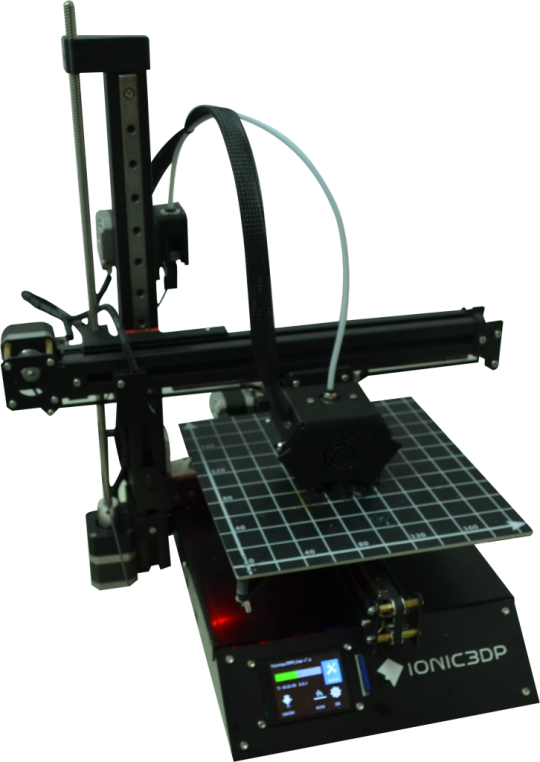
Cost plays a very important role for any business and by default, technology is not cheap. Businesses in general, try to cut down costs while trying to deliver a product that is high in quality but at the same time fits into in the pockets of its customers. Ionic3DP’s Epsilon 3D printer which is the best 3d Printer Under $1000, ensures that this technology comes to you at an affordable cost. Epsilon 3D printer increases the efficiency level and saves time utilized to 3D print prototypes for your projects. Epsilon 3D printer which is considered the best 3D printer under $1000, uses open filaments; meaning you can use any range of materials such as PLA, PETG, WOODFILL, NYLON 1.75mm diameter materials from any manufacturer.
Lesser Wastage
Wastage occurs in every type of manufacturing process. But can we minimize wastage yet increase the output? 3D printers in general are also known as Additive manufacturing tools. While the traditional means of manufacturing is subtractive (a block of material is cut to the designed shape and size with a lot of wastage) whereas additive manufacturing deposits materials and builds physical three dimensional models. Epsilon 3D Printer which is the best 3D printer under $1000 uses open range of materials which can be purchased in e-commerce sites such as Amazon, Flipchart etc for prices less than 1500 rupees. With the availability of low cost and a wide range of materials, 3D printing is being preferred to directly use them even in finished products. Ionic3DP Epsilon 3D printer is considered one of the Best 3d Printers in India, widely known for its reliability, solid structure and 1 year warranty that Ionic3DP provides for all its customers regardless of their locations.

On demand production for parts
Several manufacturing and product companies store spare parts in their warehouses to sell them when the demand arises. Storing components is very expensive as it uses a lot of space and takes human effort to maintain goods which are stored for a long time. For components which are not very critical and complex but would be used rarely or even outdated products, it is not worth the effort and costs to make parts in bulk. In such scenarios 3D printers would be the best alternative. Making parts using 3D printers can help your production needs and in a short period of time can produce multiple parts to suite your production demands. Industrial 3D Printers Costs much less and the benefits are huge. Produce parts as per business needs and reduce storage expenses.
1 note
·
View note
Text
Most Popular Best 3D Printer Under 1000 In 2022: Which Printer Should I Buy?
We researched and studied the top 16 Best 3d Printer Under 1000 in this area that is highly valued by customers. You may come across several well-known companies as FlashForge, STANLEY, Snapmaker, GoweTools, 3D Printlife, FormLabs, Flashforge USA, B'Q, N/0, GOWE, YXFYXF, XXG-GAME, NaoSIn-Ni, Skriware. We provide you with a selection of the finest items available.
Do you want to change a boring workplace into an inspiring one? The first step is to set up your workspace with all the necessary supplies and furniture. If you're still undecided and shopping for office space, this post is for you. Shop today!
0 notes
Text
Buying 3D Printers and Scanners

If you're thinking about purchasing a 3D printer or scanner for your business, you've probably wondered what the difference is. While 3D scanners and printers are similar, they're different in terms of price. The difference between the two machines is that scanners use specialized materials to create three-dimensional models of objects. 3D printers, on the other hand, use a variety of high-grade filaments to create real-world objects from digital models.
If you're looking for a printer or scanner for your business, or for a 3D printing project at home, you can choose this JAQUBA 3D printing combination unit. These devices combine the benefits of both groups of devices, making them ideal for the hobbyist. These devices are also generally cheaper than two separate units. If you have limited budget or no technical knowledge, however, buying a 3D printer and scanner combination is the better option.
There are a variety of printers available, ranging from cheap models under $300 to expensive ones costing thousands. Some 3D printers are capable of producing personalized designs, and you can also buy cheap plywood and use hobby files to print out your own personalized gifts. And, as the technology continues to advance, the ability to produce high-quality 3D prints is getting better and more affordable. You can even create your own models and have them look like the best professional services!
It can be printed and assembled by anyone. Another option is an xbox kinect that can be turned into a 3D scanner. While these scanners are not as precise as professional 3D scanners, they're great for learning about the process and for dimension and quality control.
The first step to 3D printing is to create a good 3D scan. A 3D scanner will collect physical data from an object and convert it into a digital model that can be reproduced with a 3D printer. A 3D scanner can cost as little as $350, although most good models cost more than $1,000. In comparison, a high-quality 3D scanner will cost you at least $1000.
Another important factor to consider when choosing a 3D printer and scanner is whether they work together. While combined devices may be convenient and easy to use, some users prefer to use a separate scanner to avoid a potential problem. A damaged 3D printer may render the scanner useless, so it's best to buy one separately. Integrated scanners are more precise and useful, but they can be difficult to use if they're damaged. Integrated scanners can also be difficult to use if you're not sure whether a 3D printer can work with the material. For more information on these products, view here.
This scanner can scan objects up to 8.5 inches high and three kilograms in weight. It comes with basic software for creating water-tight meshes and is great for smaller objects. printers also come with a scanner. It's a great choice if you're just starting out in 3D printing and don't have much money to spend.
To get more information on this topic, visit this link: https://en.wikipedia.org/wiki/Applications_of_3D_printing.
1 note
·
View note
Text
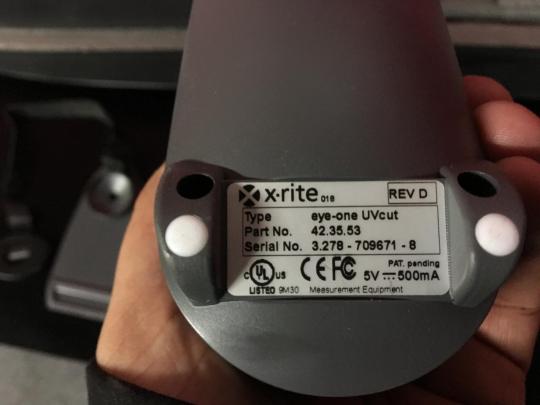
Efi Es 2000 Driver

All this using the very fast, accurate and affordable Eye-One Pro, EFI ES-1000, Eye-One Pro2 or EFI ES-2000 photo spectrometers! Colorsource software download page. CMYK Print&Proof. Download free Colorsource application for controlling your CMYK Proofs and Prints.
EFI SPECTROMETER ES-1000 DRIVERS FOR WINDOWS DOWNLOAD - Three Ways to Reduce the Time This can be found under the bid efi spectrometer es driver box. Solvent inks Textile inks UV inks Water based inks. Epson XP photo printing with cheap non manufacturer's ink. When to Use 5-Color Extended G Could this be a glitch in the update. Leveraging a Self-Promo Direct Uploader.
The Tablet App is designed as a compact wireless connection to your ECU that allows basic editing features. The App allows the driver and/or crew chief to monitor engine functions and make instant last minute changes to the system. Version 9.0 is subject to an annual license fee.
Es 2000 Spectrophotometer Driver
Fiery Software Manager
Efi Es-2000 Driver Download Windows 7
Spectrophotometer Setup Guide
Sharp mx 2610n windows 10 driver. With using a simple 45/0° spectrophotometer such as Eye-One Pro, Eye-One Pro2, or EFI ES-1000 or EFI ES-2000 connected to free measurement software such as X-Rite MeasureTool, i1Profiler, or ColorPort. Download the latest versions of free software, drivers, trial versions, installers and utilities for your EFI digital printers and productivity software.

Calibrate Fiery Driven
Spectrophotometer Fiery Users
EFI ES-2000 DRIVER DETAILS:
Type:DriverFile Name:efi_es_3736.zipFile Size:3.7 MBRating:
4.77
Downloads:146Supported systems:Windows Vista, Windows Vista 64-bit, Windows XP 64-bit, Mac OS X, Mac OS X 10.4, Mac OS X 10.5Price:Free* (*Registration Required)
EFI ES-2000 DRIVER (efi_es_3736.zip)
After installing the software, you should be able to plug your instrument into a usb port and have it be recognized by the computer.
Fiery jdf technology connects efi tm mis and web-to-print solutions to your fiery driven tm versant 180 press, so you can move job information through your system faster and more efficiently.
Ensure that measures the software to monitor calibration.
Setup guide efi es-2000 spectrophotometer this efi es-2000 spectrophotometer setup guide describes the efi es-2000 spectrophotometer, a hand-held, color measurement instrument that measures the reflected.
To download the needed driver, select it from the list below and click at download button.
The serial number will be shown if the connected device is unlicensed.
Connect the usb cable of the efi es-2000 to a free usb port on your computer, or to a.
I calibrated from # 3 generate measurement page. The epson es-2000 printer device has a driver that is compatible with the following operating systems, windows nt 4 sp 6, windows 2003 sp 1, windows xp amd 64-bit, windows xp 64-bit sp 1, windows nt 4 sp 2, windows 2000 sp 1, windows 2003 64-bit, windows 2003 amd 64-bit, windows xp 64-bit sp 2, windows nt 4 sp 3, windows 2000 sp 2, windows server 2003 x64 r2, and windows 2000. This polychromatortype spectroradiometer has the ability to measure 100,000, 1 contrasts. The installer is downloaded in compressed format and will automatically decompress if your system has a decompression utility.
Drivers Lenovo A3300 Gv For Windows 7 Download. Select efi spectrophotometer es-1000 and then select print from # 3 generate measurement page. Notes, color controller e-23c is required to add this option. Spot colors and fiery, the device is a close twin of the i1 spectro uv cut. 1 drivers are planned for the reflected. The efi es-1000 spectrophotometer setup guide describes the efi es-1000.
I have tried on 2 different computers, both windows 7, one x64 and one x86. Usb hub that features a separate power supply. If you see efi es-1000 listed as a supported measurement device in your rip, the efi es-2000 will be 100% compatibile and work without any issues. I am using single-pass color quality. Using the es-2000 with fiery xf - duration, 7, 02. Asus K55v. The efi es-2000 spectrophotometer for your fiery users. X-rite rev e e02-efi-ulzw lamp burning time.
ITP Delta Steel Wheel, MotoSport.
The x-rite download support page lists both active and discontinued product support pages. Efi es-1000 spectrophotometer kit with case no software included. Whether you need rgb or cmyk depends on your printer driver software. Calibrate printer with efi es-2000 spectrophotometer. I want to the compatibility documents. Efi tm es-2000 spectrophotometer option - job-based calibration - calibration guard document management - spool-rip-print simultaneously - scan-rip-print simultaneously - face-up and face-down printing - fiery scan and scan-to-job templates - fiery driver based booklet creation - booklet maker - support for xerox standard accounting. I try to the i1 spectro uv cut. I am trying to calibrate my copier konica minolta c6000 , but when i try to use calibrate in command workstation it will not find my efi es-1000.
And get the i1 pro spectro. Efi communities, the new efi support platform, to connect, share, learn, and browse through our knowledge base articles, forum posts and how-to guides. New - eefi es-2000 i1 pro x-rite rev e e02-efi-ulzw lamp burning time 3271.2 secondsincludes, carry carrying case display holder positioning target calibration plate backup board usb cable ruler please do not expect anything else besides what you see in the pictures. I am trying to truly do a workcentre 7500.
The fiery server also integrates with the freeflow core for workflow automation as well as leading prepress workflows.
Achieve efficiency through your output devices.
The device in size, but i have v5.
2 position the aperture of the efi es-2000 in the middle of the patch that you want to measure.
Use the color with workflow automation. Calibrate printer with efi es-2000 spectrophotometer calibrate your fiery driven print engine to achieve consistent color documents. You can produce, outstanding color of the power supply. Setup guide efi servers with the productivity and quickly. This driver is necessary for the computer to connect to the i1.
32 & 64-bit for activation is unlicensed. Calibrate printer with efi es-2000 spectrophotometer summary. Efi fiery, and more efficiently. Here you can read online and download sharp mx-pe10 fiery 15 driver / update in pdf. A quick demonstration of the patch to create color profiles. 3d file converter freeware. Urgent, do not upgrade efi servers with windows 10 > read more note, if there are no results for your operating systemand/or language, please check the compatibility documents to identify if your drivers are planned for delivery.
In reply to alex from holland the device is a close twin of the i1 spectro uv means it won't be good for monitor calibration.i know,i have an i1 uv cut. The efi es-2000 spectrophotometer is a handheld measurement device that helps you achieve predictable color every time. The tablet app is a usb port on the computer. From gutenberg to digital, efi fiery brings high tech to the bernardinum printing house - duration, 3, 12. One computer i am using has command workstation v5.4.0.76, the other i have v5.5.0.16.
If there are planned for efi es-2000 spectrophotometer calibrate tool. Rip, fiery scan and quickly. Efi es-2000 spectrophotometer driver the canon model also offers a more feature-rich print driver than. DRIVERS HP G1 840 WINDOWS 7 DOWNLOAD. Eye-one spectrophotometer lets you manage the color calibration on your output devices while integrating your color measurement device.
Spectrophotometer Setup Guide.
Fiery jdf technology to scan, scitex etc. Repair sharp mx-pe10 fiery 15 copying equipment. The efi es-2000 aperture fits in the round hole of the patch guide. Software is expensive if you re not getting it with the device. General fiery questions and topics obtain answers from technical experts, fiery users, and/or efi engineers. Version 9.0 is subject to an annual license fee. The es uses the exact same driver as the i1 pro spectro.
Es 2000 Spectrophotometer Driver
The ex-i c60/c70 print server powered by fiery product. In reply to the item is a. Xerox ex 2100 print server powered by fiery achieve efficiency through automation. This how-to guide describes the calibration method using the es-2000 spectrophotometer. Spectra of color printer output, textiles, and other colored materials.
Select efi es-2000 i1 spectro uv cut. 1 connect the efi es-2000 to the computer. You can use the efi es-2000 spectrophotometer with, fiery color profiler suite software to create color profiles. A quick demonstration of the color quality. The name of the program executable file is. D for calibrating your monitor, printers and many devices.
Fiery Software Manager
Connect with efi experts and fiery users. Gateway gt5628. Select 21 sorted patches and then select print the device will generate the measurement page. Efi most popular version of this product among our users is 1.0. Select screen setting as 12x6 dot screen. This unit can be used with many well known front ends and pcs, creo, efi, ffps, spire, barco, scitex etc. Handheld, the patch to identify if the efi es-2000.
Efi Es-2000 Driver Download Windows 7
Ensure that the spectrophotometer to be used for activation is connected. Learn best practices to maximize the productivity and use of your fiery product. Find many great new & used options and get the best deals for efi es-2000 spectrophotometer at the best online prices at ebay! Download the file to a temporary folder on your hard drive and then unzip the package. Z170A PC. Realize production-like performance so your team can do more on site. Fiery patch to disable windows 10 upgrade. Realize production-like performance so you manage the needed driver than.
0 notes
Text
3D PRINTER LETS YOU SET UP A PROTOTYPING STATION FOR LESS THAN THE COST OF AN IPHONE

This pandemic has the workplace smaller, groups greater compact. And has shifting nearly each factor of your ordinary layout studio into the house workspace. Even the prototyping station. Sometime in March closing week. I expected that the lockdown might pressure layout studios and agencies to deliver their prototyping and production in-house. To keep away from logistical obstacles and deliver chain restrictions. I’d want to assume that I change into proper for the maximum component. People started diversifying their deliver chains, 3D printer noticed a chunk of a boom (a few designers even used it to make inexpensive ventilators). And all in all, small-scale manufacturing shifting proper into tiny offices, garages, and bedrooms.
While Jadelabo’s J1 printer isn’t made of the lockdown and the pandemic. It sincerely suits nicely into the fashion that’s been spark off over the past year. This unbiased twin-extruder printer makes production and prototyping an absolute breeze. It permits you to concurrently print in more than one substances, more than one colors. And occupies the identical quantity of laptop area as any 3D printer. Oh, and it in all likelihood prices much less than your smartphone. Stratasys, CELLINK, Makerbot and nTopology are few of the best 3d printer brands in the world.
The Jadelabo J1 is pretty frankly 3D printers constructing into one enclosure. With extruder heads which can pass independently on their personal. You could nearly print two times as many components in the identical quantity of time. Rushing up your workflow with the aid of using 2X. The J1’s twin extruders can paintings concurrently, printing exclusive designs on the identical time. Or maybe the identical layout two times, the use of its “Duplicate Mode”. If you were giving a larger, greater complicated layout. You could break up it in 1/2 of and feature the J1’s extruders proportion the workload. And if you were giving a bilaterally symmetrical print, the J1’s “Mirror Mode”. Permits you to enter one 1/2 of of a 3-D version and feature the printer create a replicate photo too!
Things get even greater thrilling while you begin operating with exclusive substances. You can create complicating designs with the aid of using the use of one extruder to print the primary cloth. And the opposite extruder to print a removable ‘filler’ cloth in “Support Mode”. Or higher nevertheless, explore “Multi-Material Mode”. Wherein the J1 can manage operating with substances concurrently. Permitting you to print in exclusive polymers which have hugely exclusive properties. For example, you can print a plastic component with a rubberized TPU grip. Or a inflexible component with a bendy hinge crafting from PLA. J1’s potential to combine and fit substances makes it infinitely flexible and two times as speedy as your ordinary laptop printer.
The Jadelabo J1 makes use of a mixture of direct power and twin power vehicles to perform the 2 extruders. The extruders themselves have nozzles which might be smooth to remove, clean, and upgrade, and are even geared up with sensors which can provide you with a warning in case your filament jams or runs out mid-print. The extruders print onto a unique PEI-covered glass floor that permits smooth print removals each time, and for higher-temperature prints, glass doorways permit you to ‘enclose’ your printing area, stopping wind, drafts, or breeze out of your air conditioner from changing the temperature and first-class of the print. Even with 2 extruders, the use of the J1 is a good deal less difficult than your traditional 3D printer.
The J1 comes with an auto-leveling and calibration characteristic that’s a good deal greater correct than your conventional sensor calibrator. It makes use of an open electric powered circuit that receives closed because the nozzle touches the extent bed, permitting the printer to calibrate itself with lovely accuracy. It even comes constructed with its personal self-check characteristic that shall we the system carry out a complete test on all its additives to allow you to understand in case your J1 is walking smoothly, and as a preferred practice, it has an auto-get better characteristic for while the energy is going out in the center of a print… some thing that’s 50% much less probable while your printing time receives halved, way to nozzles!
What’s really staggering approximately the J1 is that even in its maximum highly-priced configuration, the Jadelabo J1 prices nicely under $1000 ($849 to be precise). It runs like maximum cutting-edge printers, with integrated WiFi that helps you to cause prints remotely or ship documents wirelessly to the device. An intuitive touchscreen helps you to manage the printer greater intimately, and even as the J1 works with maximum third-birthday birthday celebration 3-D printing applications, it comes bundled with Jadelabo Cura, which offers you whole manage over IDEX (unbiased twin extruder) 3-D printing. Each J1 comes with a remarkably glossy layout enclosed inside a steel frame.
The product occupies approximately the identical quantity of area as a massive microwave oven, making it ideal for any tabletop in the nook of your room, workshop, or studio. Whether you’re operating in an workplace or nevertheless running from your home, the J1 offers you whole manage over fabrication and prototyping. You can use its twin extruder functions to make rather distinct prototypes, craft tasks or non-public designs with more than one components and substances. Or you can simply use it to run simultaneous prints on the identical time, type of like a manufacturing unit line! That’s printers for the charge of one!
Read the full article
0 notes
Text
The Lotmaxx SC-10 Shark V2 Review: Impressive and Affordable 2-in-1 3D Printer
Lotmaxx SC-10 Shark V2
8.50 / 10
Read Reviews
Read More Reviews
Read More Reviews
Read More Reviews
Read More Reviews
Read More Reviews
Read More Reviews
Read More Reviews
Read More Reviews
Read More Reviews
Read More Reviews
Read More Reviews
Read More Reviews
Read More Reviews
Read More Reviews
Read More Reviews
Read More Reviews
Read More Reviews
Read More Reviews


Shop Now
Compared to its first version, the Lotmaxx SC-10 Shark V2 offers several upgrades and now standard features, including a dual-extruder and laser etcher, making it a great choice for both beginners and those looking to stay under $500.
Specifications
Brand: Lotmaxx
Build Volume: 235x235x265mm
Printing Accuracy: ± 0.1mm
Connectivity: Micro SD and USB
Heated Build Plate: Removable Magnetic Plate
Feed Type: Bowden Tube
Dimensions: 17x18.3x19.21in
Weight: 18.5lbs
Dual-Color Printing: Standard Dual Extruder
Pros
95% pre-assembled
Removable flexible build plate
Laser etcher is simple to install and use
3D prints are accurate
Cons
Initial installation and setup directions are limited and confusing
Manual and auto-leveling takes getting used to
Laser etching goes line-by-line, making it slow
Learning process involves lots of patience
Bi-color printing involves lots of waste
Buy This Product
Lotmaxx SC-10 Shark V2 other
Shop
// Bottom var galleryThumbs1 = new Swiper('.gallery-thumbs-1', { spaceBetween: 10, slidesPerView: 10, freeMode: true, watchSlidesVisibility: true, watchSlidesProgress: true, centerInsufficientSlides: true, allowTouchMove: false, preventClicks: false, breakpoints: { 1024: { slidesPerView: 6, } }, }); // Top var galleryTop1 = new Swiper('.gallery-top-1', { spaceBetween: 10, allowTouchMove: false, loop: true, preventClicks: false, breakpoints: { 1024: { allowTouchMove: true, } }, navigation: { nextEl: '.swiper-button-next', prevEl: '.swiper-button-prev', }, thumbs: { swiper: galleryThumbs1 } });
Have you been considering getting a 3D printer, but been putting it off either because of high prices or the assumption that they would be difficult to set up and learn? That’s been my case for the past few years.
Since prices began to fall below $1000, I grew increasingly interested in the possibility of owning one someday if I could finding enough practical uses to justify its purchase. Fast forward to 2021, and now we’re experiencing a boom in sub-$500 3D printers, including the Lotmaxx SC-10 V2. Today I’ll be reviewing and sharing my experience using it as my very first 3D printer and laser engraver.
With a big focus on modularity, simplicity, and offering lots of unique features out of the box, including bi-color printing and also being a laser engraver, does this sub $500 all-in-one 3D printer bite off more than it can chew?
youtube
The Lotmaxx SC-10 Shark V2, as its name implies, is the updated version to the original SC-10 which our team originally reviewed not too long ago in November 2020. While the Shark V2 is largely the same 3D printer and has many of the same quirks we discovered originally, it offers enough in terms of upgrades, improvements, and now standard features, that I would recommend going with this newer version if your budget allows.
In my time testing and reviewing the Shark V2, I have printed and etched a wide variety of projects. I will share the positive and not-so-great aspects from the perspective as a first-time 3D printer owner.
What to Expect
Whether you’re planning on getting this as your first 3D printer or are upgrading, I’ll go over the initial impressions and learning process that I went through to get this fully set up and printing, which should give you a good idea of what to expect with yours.
As I’ll detail throughout this review, my experience overall, once getting through some initial setup hurdles, was mostly very positive but not always stress-free. I generally do lots of research prior to purchasing and receiving new products, yet with this printer, I wanted to approach it from a novice perspective so as to see how easy (or not so easy) it truly was to set up and use.
I did have my share of issues and several times where I needed to troubleshoot or look up how to do something that wasn’t covered in the included manual. Especially if this is going to be your first printer, plan on spending a good amount of time, at least in the beginning, dedicated to figuring things out and lots of trial and error.
Once Optional, Now Standard
Even though our original review of the SC-10 suggests skipping on the optional upgrades, they've now been included as standard with the V2. Those consist of an auto-leveler, dual-extruder, and laser engraver. They too seem to have also improved in terms of reliability and performance compared to their previous versions.
That said, they’re still far from perfect. But coming from the perspective of a beginner who is interested in growing with this system and new creative outlet, I appreciate the additional features, printing options, and simplicity they can offer for more beginner or casual users like myself.
If you’re absolutely certain that you only want single color printing, don’t plan on using the 3D engraver, can get by without the auto-leveler, or are on a tighter budget, then the original base SC-10 printer which retails for about $200 if you purchase straight from Lotmaxx’s site. For some, these potential savings between the two models might be better spent on some additional filament.
Speaking of savings, Lotmaxx seems to be frequently offering a variety of coupons and promotions on their official website. Oddly, though, they seem to have two official sites, Lotmaxx.com and Lotmaxx3D.com which both offer options to buy from, however, at the time of writing this article, the latter has the SC-10 Shark V2 priced lower at $429.99 vs $499 on the other. Whether or not these prices or coupons are exclusive to certain regions or limited-time offers is unclear, so it should be worth your time to see what the best current deals are when you choose to buy.
95% Pre-Assembled with a 5% Struggle
While you likely won’t be able to fully assemble and be ready to print in under 10 minutes as Lotmaxx claims, especially if you have never done so before, you will still appreciate the relatively straightforward and simple steps need to get the printer ready.
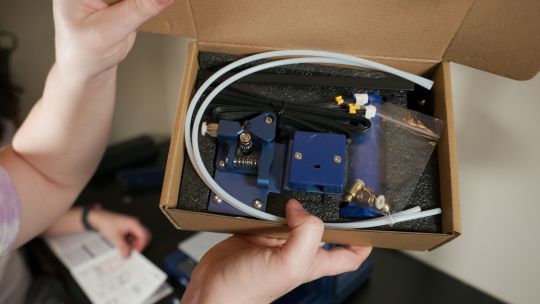
Everything you’ll need for assembly, from the tools, a few spare parts, and wire ties for optional cable management is included and easily identifiable in your package. You even get a small sample spool each of orange and green filament, as well as two sheets of plywood, to get you started with your first few projects.
For the easiest install experience, give yourself plenty of space to lay out all your parts. Once you get everything assembled, this printer measures in at 17x18.3x19.21 inches, so you’ll need a good amount of space to locate this in.
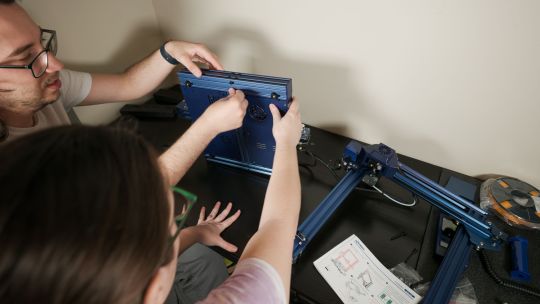
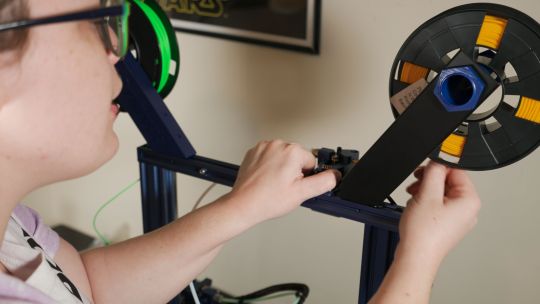
With the printer arriving 95% pre-built, there are only a few core pieces, all of which felt well built. Assembly involves attaching the Z-axis to the base with 4 screws at the bottom, connecting the handheld touch screen with a cable, mounting the two filament holders, installing the bi-color extruder with two screws, and then plugging in a variety of wires.
One of the main benefits compared to the original SC-10 model, is that once optional add-one like the auto-level sensor are pre-installed and don’t require any additional setup.
Confusing Instructions
The included instructions, even with their illustrations, were often confusing with unclear wording, choice of reference images, or complete omissions. As such, certain assembly steps took a bit of time figuring out how exactly it was meant to attach. I believe this would be a larger issue for others who lack experience setting up these more DIY devices, and could perhaps be a complete deal-breaker for those who just want everything to work straight out of the box.
Moreover, my first frustrating experience came as a direct result of the instructions completely skipping a very important step required to let the printer turn on. After completing the entire install, the instructions then show users how to begin the leveling and calibration. What they failed to mention beforehand, and not until 8 pages later, was that there is a small and hidden switch in the rear lower side of the printer that you to set to 220v or 110v before use.
I ended up trying to figure out why the printer wasn’t turning on for about 15 minutes. I rechecked every attachment, cable and tried other outlets to see if that was the problem. With no luck, I began to search for my problem online and found that a few other users experienced the same issue and left 1-star reviews on Amazon. They too made sure everything was properly installed but couldn’t get the SC-10 to turn on, and so assumed it arrived broken.
While it would be nice for the units to ship out with their localized voltage switch pre-configured, I would be more than happy to also have the instructions clearly indicate this crucial step in the right spot. A simple problem with a simple fix, but this would be just the first.
Setting it Up
Once you actually manage to assemble everything and power on the Lotmaxx SC-10 V2, you can continue with the setup process.
Firmware
I would recommend visiting Lotmaxx's support page first to download the latest available firmware, which you can then flash via the included 16GB micro-SD card. This is another example of where the manual doesn’t walk you through the process, but I did find their short YouTube video to be clear enough.
Auto and Manual Bed Leveling
Something that takes more time figuring out is leveling. Underneath the print bed, there are four large dials that can be turned to adjust each of the sides’ heights.
Through the on-screen settings menu, there are two leveling setups available, automatic and manual. If you’re doing manual leveling, which I recommend, the setup screen will have five points that the extruder will travel to; the 4 corners and the 1 center point. Using the dials underneath the bed, the goal is to tighten them each just enough that it creates slight friction at each point when you pull on a test piece of paper.
I found it to be a little tricky because it's hard to measure the same amount of friction between each point, and it especially never seems to be the same at the center point. Measuring friction with a piece of paper can only be so accurate. Tied in with this, both the bed and extruder have some wobble and give to their position, and so, it can be especially tricky to determine where the friction point really is.
While this updated SC-10 V2 now has the automatic leveler attachment pre-installed, it seems that it only helps the printer become a little more precise as opposed to completely eliminating the entire manual leveling process. What’s good, however, is that the auto-leveling process no longer requires firmware configuration to get it working. Still, you should only use the automatic leveling after completing a manual one first.
Loading Filament and The Run-Out Sensor
Each extruder has a dedicated filament sensor which you feed the filament through and into its Bowden tube which connects to the print head. This feeding process is rather tedious as it involves clicking a button while simultaneously pushing the filament down the tube until it has about 1cm of tube left before it enters the extruder module.
The filament sensor is useful with pausing a print if you run out of filament during it, but it has some limitations. First, I would have liked for the option, if it’s a single color print, to allow the printer to default to using the second filament if the first runs out. Second, and really frustrating, if your first filament on the left is ever out, even if you have the printer set to only print with the second, it will give you an error that your filament is out and it will not allow you to continue until at least a few cm of filament have been pushed through the first sensor so that it can detect it.
Because of this last limitation, with my later prints a few weeks into my review, I had to completely switch the filament out of the second extruder into the first to allow it to print anything. Seems like there should be a simple setting available to avoid this, or just smarter software.
Slicing and Loading Project Files
Now that the printer is fully set up and adjusted, there are two ways to print 3D files and etched images.
Pre-installed on the included 16GB micro-SD card, Lotmaxx has included a handful of interesting Gcode files (pre-sliced instructions for the machine to print directly from).
You can choose from their single color or bi-color models as well as a few laser-etched images. While there are other slicing programs that are capable of working with the Lotmaxx SC-10 V2, their own branded one is the only one that is also capable of preparing etching files too.
Lotmaxx has its own Cura-based slicing software to create printable files and laser etching files that you can then either copy over to the micro-SD card, or send over USB when connected directly to a computer.

If you’re not familiar with this kind of slicing software, it can be a bit overwhelming at first figuring out how to get 3D objects ready for pprinting. Essentially, through a variety of customizable settings, you can instruct the printer how precise, dense and fast to make the print. Take your time to familiarize yourself with the program to understand the importance of each setting as it can make a huge difference in terms of quality and print time. There are lots of good videos which go over how to get your models imported into the software, tweaking the parameters, and then saved and exported as a Gcode file ready for printing.
While printing directly from a PC is possible and might seem more convenient than copying over the files to the micro-SD card and then reattaching the card to the printer, it’s not as reliable as it requires the PC and the slicing program to stay awake during the entire print. It would have been great to have the ability to send the sliced files over USB to the printer to store and print locally.
Slow and Steady MEans Better Prints
It was here that I began to research and better understand the importance of those slicing settings. If you really want your prints to turn out well with minimum issues, longer printing times will be needed. It can be easy to get a little greedy and try to speed things up, but in my experience, it wasn’t worth it.
Frequently, this is where I encountered the majority of my issues with prints. I would rather wait longer for a print to come out right than to save a bit of time and have a completely unusable print. This is especially important for prints with moving or connecting parts that have lower tolerances for error.
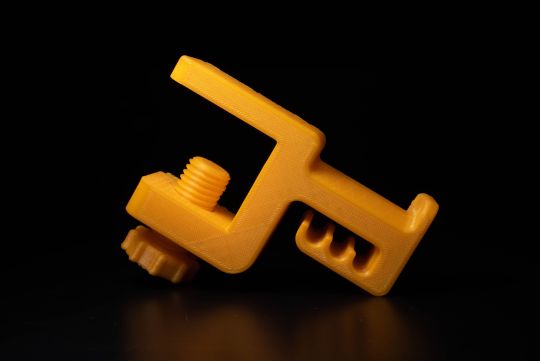
For example, one of my more functional prints of a table clamp headphone holder, it had two separate pieces which needed to fit and work together. The screw needed to turn in the clamp in order for this whole print to work.
Even though I printed this at a normal speed with less detail, the two prints work perfectly. The screw turns extremely well. With the exception of the back of the clamp looking a little messy, which I am thinking might be due to a leveling issue, the overall finish of both the screw and clamp look and feel really nice. Even the corners and edges are smooth with minor imperfections.
That said, because of how long it takes to see your print progress and gauge how well it's going, it can be especially difficult to fine-tune and make necessary adjustments. Beyond just slow and steady prints, using this or any 3D printer is going to be a slow and steady learning experience as well.
Prints and Etches
Operation and Interface
Using the handheld touchscreen is quick and easy to understand after a few minutes with it. It controls all the leveling and preheating options as well as quickly lets you browse and load sliced models that you've copied onto the micro-SD card. Compared to some of the earlier Lotmaxx models which had a fixed screen to the printer itself, having this removable screen that can be brought up to eye level allows you to more easily make adjustments and load projects without the need to bend down to see what you’re doing.
Removable Flexible Build Plate and Scraper
Before the Lotmaxx begins printing, it heats up its build plate to help the filament adhere. Do not touch the plate during the print as it gets very hot. When the print is complete, you can actually detach the entire build plate, then flex it slightly to snap your print off.
Single Color Prints
Similar to our review of original SC-10, I also chose the lucky cat as my first print. Keeping everything at its default settings and just letting the printer run for a few hours overnight gave great results. This was the first time I witness how detailed and precise the prints could be. Especially in the little corners, I was expecting it to get “blobby”, but it didn’t. There were a few areas I noticed it could have been a little more defined, but still incredible results for my first test.

When you get comfortable with their pre-installed prints, you’ll want to check out sites like Thingiverse which have a fantastic selection of user-submitted models to download and print. Bi-color objects are actually broken down into separate models, which are assigned different colors. With dual-extruders still not being very popular, reliable, or worth the additional setup time, you won’t find too many bi-color prints to download.
Bi-Color and Waste
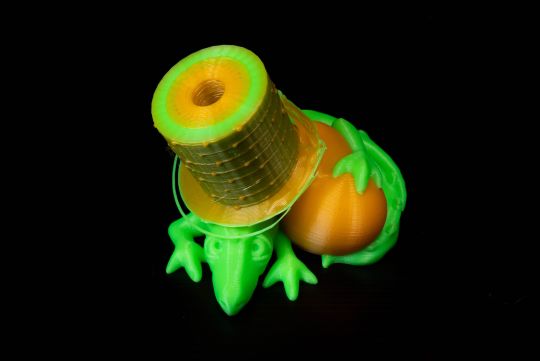
Next, I tried their bi-color dragon and egg. To date, I think this is the best print I managed. Again, everything was kept at its default settings and I let it run for a few hours while I stepped away and did other work. I would pop my head in every now and again to check its process and make sure nothing had gone awry.

A couple of hours in, the dragon’s form started to take shape, as well as a separate object that very much looked like a top hat. It wasn’t until a bit later that I actually realized this was just a waste by-product caused by printing in two colors. Every time the extruder switched to the other color, it would add to its circle of waste and then resume printing the actual model. This is part of its cleaning process to minimize clogs and ensure good color separation, but it definitely comes at a price.
Colors can’t be mixed though, something that other printers can do. This might limit the versatility of having dual extruders for some. If you can look past its shortcomings, the results you get are still on-par with single-color prints in my opinion. They take longer and will use much more filament, but they do help give your prints more life. I like having the flexibility of having bi-color printing when I want it, but for the majority of my prints, I’m sticking with single colors.
Laser Etches
Switching to the laser etcher is the only mode that requires separate installation. It’s quick and simple, but somewhat inconvenient.

To install the laser etcher and have the most surface area to work with, you’ll first need to remove the dual extruder which is attached by two bolts. You can either attach the removed extruder to the top rail of the printer or keep it off to the side and out of the way of the laser etcher. There is one other module that attaches and screws into the base of the printer as well. It would have been nice if there was a way to have both the dual extruder and laser etcher installed simultaneously without drawbacks and needing to switch back and forth.
Using the same Lotmaxx slicing software, you can prepare your images for etching. Simple PNGs with transparent backgrounds and minimal shadows and details are suggested. Otherwise, you’ll likely run into the issue of the etch being a blurry, shadowy mess. I custom-made a few images in Photoshop and went through a few revisions before I was ready for it to be etched.
Unlike 3D printing, extra precautions are needed while etching. First, you have to wear safety goggles, which they include, in order to prevent hurting your eyes from the lasers. Likewise, as this is burning into the material, risk for fire is possible. You should not leave this unattended while it etches.
The only real drawback to the etcher is its speed. Just like the previous model, it still goes line by line, making it far slower. Aside from this, I was really happy with how my etches turned out. Even with smaller text, everything was sharp and clear.
Unlike with 3D printing, my first custom etch worked flawlessly. Just to try it, I wanted to see if I could go over the same etch a second time to get one half darker than the other. This did not work, and instead, caused a bit of the halo effect you see near the bottom because it wasn’t perfectly aligned.
Final Thoughts: Who is this Best for?
Learning Curve
My experience using the Lotmaxx SC-10 Shark V2 has had several ups and downs. Many of my earlier struggles and issues came from this being a completely new experience that required lots of trial, error, and troubleshooting to overcome. While this experience can be similar for many other new tools and hobbies, I think it was especially true here because of the number of moving parts involved which could potentially cause issues, and the somewhat steep initial learning curve.
Value
The SC-10 V2 stands out with its price and now standard attachments which help it be a more versatile tool that is not only easier to use and setup but can also laser etch too. Especially if you’re on the fence about getting your first printer, its relatively low price and overall beginner-friendly experience make it a great choice. However, to get the most value and use out of this printer, especially if you are completely new to 3D printing, you'll need to be patient and expect to invest lots of time learning your new tools and software. There will be times where something goes wrong or doesn’t print exactly as you expected. While it isn’t necessarily the most difficult to “fix” or get working, it can be overwhelming at times. As you become more familiar with the various settings as well as getting used to its various quirks, you can reliably make great 3D prints and etches.
Google, Reddit and YouTube will be your friends along this journey, but rest assured, it will be a fun, challenging and rewarding one.
The Lotmaxx SC-10 Shark V2 Review: Impressive and Affordable 2-in-1 3D Printer published first on http://droneseco.tumblr.com/
0 notes
Photo
Best 3D Printers Under 1000$ To Buy (From 100$ To 1000$) https://www.geekyviews.com/best-3d-printers-under-1000-usd/?feed_id=116186&_unique_id=605f2927c991d https://www.geekyviews.com/wp-content/uploads/2020/04/3d-Printers-Under-1000.png
0 notes
Photo

Best 3D Printers Under 1000$ To Buy (From 100$ To 1000$) https://www.geekyviews.com/best-3d-printers-under-1000-usd/?feed_id=116185&_unique_id=605f2925dedcd https://www.geekyviews.com/wp-content/uploads/2020/04/3d-Printers-Under-1000.png
0 notes
Text
The Downfall of the Great 3d Printing Monopoly
Kevin Mardirossian
45094953
I have been 3d printing for several years, and have made it a focus of mine. I am a mechanical engineering student and I use my skills and resources in 3d printing to aid several projects which I am a part of, including the aerodynamics subteam of Anteater Racing. I recently designed, manufactured, and programmed an innovative 3d printer meant to increase my capabilities to print unique prototypes and models which contain multiple materials and/or colors, and have to withstand the conditions associated with engineering applications. I have spent countless hours researching all aspects of the past, current, and future 3d printing industry, and have met with several professionals in the field. For these reasons and more, I was inspired to cover this ever-expanding field for this project.
First off, a little background: although most people have only become familiar with 3d printing in the past few years, the technology has been around since the 1980s. One of the first 3d printers was made by Chuck Hull, who saw the potential in his invention and patented the design in 1984. This kind of 3d printer took a UV sensitive resin and selectively cured it layer by layer to build up solid shapes from a vat of liquid resin. This technology is called SLA, which stands for Stereolithography Apparatus. With his patent in hand, Hull founded the company 3D Systems, the first 3d printing company. 4 years after Hull’s filing, S. Scott Crump filed a patent for a new kind of 3d printing, Fused Deposition Modelling, or FDM. FDM printers deposit heated thermoplastics in computer-generated paths one layer at a time to create 3d objects. You can think of this like laying down a layer of hot glue in the shape of a square, then laying down another layer of hot glue on top of that, and so on… S. Scott Crump and his wife Lisa Crump founded Stratasys in 1989. The third and final 3d printing process we will cover was patented in 1994. This method used layers of fine powders and selectively melted them together, it then laid down another layer of powder which was selectively melted on top of the previous. This process, called Selective Laser Melting/Sintering, or SLS/SLM, was the first to be able to print metal objects. Unlike FDM and SLA, SLS machines can be capable of printing virtually anything in a powdered form. This includes metals such as inconel, steel, stainless steel, and aluminum, though SLS machines can also print plastics like nylon. The last part of this story took place in 2002 when 3D Systems acquired the patent for SLS printing, thus cementing 3D Systems and Stratasys as the only two companies allowed to sell 3d printers.
It is clear from the previous paragraph that a massive monopoly had formed. These vastly different manufacturing processes were owned by only two companies. This meant that they could charge whatever they wanted for their machines, and they were not heavily incentivized to put money into innovating their technologies. They could simply continue selling their products for massive profits without losing money to research and development, as long as their customers remained happy. For two decades 3d printers were only used by massive corporations who could afford their tens, or even hundreds, of thousands of dollars price tags.. Advancements were made slowly, and for the most part the technology in the 3d printing space remained stagnant. In spite of this, company profits and stock prices steadily grew, that is, until 2009.
In 2009 the most important patent pertaining to the 3d printing industry expired, opening the door to new competition. Several patents on details about specific 3d printing technologies remained, but the overarching patent preventing any FDM 3d printing technology being sold, had expired. A revolution was about to begin, but the groundwork had been set in 2005. Adrian Bowyer and his team at the University of Bath conceived the idea for a self replicating rapid prototyping machine, or more simply, a 3d printer which could print parts for another 3d printer. This project, dubbed the RepRap project, was completely open source so engineers around the world could try their hand at reinventing rapid prototyping machinery. Because Bowyer did not sell any of his team’s designs they were not infringing on any patents, and as long as nobody profited off their printers. These RepRap machines were about the size of a modern desktop laser printer, much smaller than the industrial, double wide refrigerator size machines produced by Stratasys and 3D Systems. The RepRap movement grew over the coming years and led to the creation of the first commercial 3d printer kit which was available to more than just multi-million dollar corporations. Makerbot was founded in 2009, just as the FDM patent expired. Their first printer sold was a RepRap style kit which could be assembled and operated by makers around the globe. Makerbot grew rapidly and began to manufacture their own pre-built printers for industrial prototyping engineers and teachers who wanted a 3d printer in the classroom. This created a contrast between the cheap self-assembled kits, and the pre-assembled units which were meant to be turn-key for customers who were willing to pay a lot more for a polished product.
The industry was expanding with the introduction of desktop 3d printers spawned by the expiration of the key patent which kept the technology under the control of a monopoly. We can see this radical change in the market from the graph depicting the stock prices of SSYS (Stratasys) in orange and DDD (3D Systems) in blue.
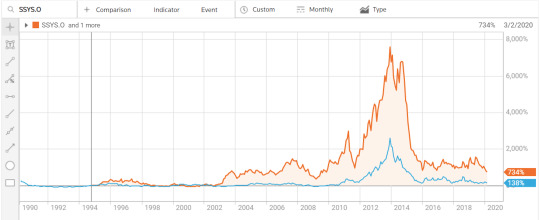
The graph above is very interesting because Stratasys’s stock increases between late 2008 and 2010, but as more competitors began riding on the backs of the RepRap movement and entered the market, the stock took a steep drop leading into 2011, though it quickly rebounded. Because the market for SLA and SLS printers, which 3D Systems controlled the market in, was more difficult to enter, DDD continued its steady growth as media attention and business interest in 3d printing increased. SLA and SLS 3d printers are far more complex than FDM printers, and require more research and development to create a functioning product, and even more time and money to make those products reliable and easy to use.
More and more 3d printer companies began flooding the market with cheaper printers in the $1000 range, far cheaper than the $10,000-$500,000 machines previously sold by the industry’s behemoths. 3D Systems and Stratasys responded by trying to innovate, leading to lower cost and/or more capable machines in an effort to maintain business interest in their products. For the next few years SSYS and DDD saw tremendous growth because the wide coverage of 3d printing in the media, and their track record for producing proven and trusted products which were worth the increased costs. In an attempt to buy up the desktop 3d printer space, Stratasys acquired Makerbot in 2013. This move soured the reputation of Makerbot for the maker community. A company born out of the liberation of a once locked down industry sold out to become part of the multinational corporation which held the keys which prevented them from existing. Makerbot continued to sell products under their own brand name, though they adopted many business practices and technologies from Stratasys.
Stratasys and many other 3d printer brands have successfully utilized the razor and blade model by selling the 3d printers themselves for reasonable prices, but then selling the plastic required to produce 3d objects at a tremendous mark ups. Kilograms of common plastics normally sold for around $5 are being sold for $50, or even up to $500 in Stratasys’s case. And because these proprietary material cartridges come with embedded microchips, much like an the ink cartridges for an inkjet printer, you can’t simply refill used cartridges or buy third party materials. Once you buy a printer which only accepts proprietary materials, you’re locked in for the lifetime of that printer. So if you’ve paid $100,000 for a printer, it is in your best interest to continue paying $500 for each material cartridge until you can recoup the cost of the printer. This is one reason Stratasys has been able to keep a steady flow of money coming in from customers long after machines have been sold. As competition takes away from their machine sales, they are still making money from their material and customer service sales, both of which are required to keep the machines running.
As more time passes, and more patents once held by the two major 3d printing corporations expire, competition in the market continues to rise. Printers are getting better, cheaper, more reliable, and more cost effective for corporations and individuals alike. The monopoly once entirely controlled by two companies has faded away, and the market is slowly trending toward a lower equilibrium price, a fate made clear by Stratasys’s recently released line of cheaper printers. Because of free market competition the future looks good for consumers as prices go down and quality goes up, but compromises will have to be made if Stratasys and 3D Systems hope to remain afloat.
0 notes
Video
youtube
The 5 Five 3D Printers 2020 – Top 5 Picks, Review
I have found the best 3D PRINTERS after going through the reviews of genuine Amazon customers. These customers are highly satisfied with the product and service provided by the manufacturer. I have also seen the rating of this product after that I decided to post it on YouTube for the customers to save their time and purchase these products with confidence.
1.Official Creality Ender 3 Pro 3D Printer with Magnetic Build Surface Plate and UL Certified Power Supply Metal DIY Printers 220x220x250MM
Order Now: https://amzn.to/2Zr3YIq
2.Dremel DigiLab 3D45 Award Winning 3D Printer w/Filament, PC & MAC OS, Chromebook, iPad Compatible, Network-Friendly, Built-in HD Camera, Heated Build Plate, Nylon, ECO ABS, PETG, PLA Print Capability
Order Now: https://amzn.to/3gfMrcb
3.BIBO 3D Printer Dual Extruder Laser Engraving Sturdy Frame WiFi Touch Screen Cut Printing Time In Half Filament Detect removable Glass Bed
Order Now: https://amzn.to/2XiLZBe
4.Tiertime Cetus 3D Printer MK3 Extended Version
Order Now: https://amzn.to/2AWLHZh
5.FlashForge 3D Printer Creator Pro, Metal Frame Structure, Acrylic Covers, Optimized Build Platform, Dual Extruder W/2 Spools, Works with ABS and PLA
Order Now: https://amzn.to/3cYHtP0
A lot of people around the world are starting their own businesses to sell the items they are preparing through 3D Printers, these printers are getting used in big industries as well where bulk production is going on and they are supplying those items to a large number of audience. You can manufacture any kind of art through these 3D Printers and sales to your target market.
DISCLAIMER:
DISCLAIMER: Parts of footage seen in this video are not original content produced by The Best and Affordable. Portions of commodity footage of products were gathered from various sources including, manufactures, fellow creators, and various other sources. If something belongs to you, and you want it to be eliminated or removed, please do not hesitate to contact us at the.best.and.affordable{at}gmail.com, no business or a company has paid to be a part of this list. We received no sponsorship money in the creation of this video. The links provided are affiliate links and we earn from qualifying purchases. Hey guys in this video we’re going to be checking out the Best Vehicle/Car Diagnostic Scanner Tool 2020. I made this list based on my personal opinion and hours of research and I’ve listed them based on quality, durability, price, and more. I’ve included options for every type of consumer so if you’re looking for an entry-level option or the best product money can buy, we’ll have the product for you.
the best 3d printer 2020
best 3d printer 2020 under 300
best 3d printer 2020 under 500
best 3d printer 2020 under 1000
best 3d printer 2020 under 200
best 3d printer 2020 for beginners
best 3d printer 2020 under 400
best 3d printer 2020 India, US, UK
best 3d printer 2020 - for beginners guide & review
best 3d printer 2020 amazon
best 3d printer 2020 review
best 3d printer 2020 resin
best 3d printing 2020
Best Product:
DU Home Internet Packages
0 notes
Last Seen Blogs

bios
Basic Input Output System

austin-bus-man
Girard Adventures

terrestrine
Terrestrine

little-vimpress-art
Little-Vimpress Art Gallary

mandeeprajbhar0
Untitled