#I’m posting Timelapse footage there as well
Text
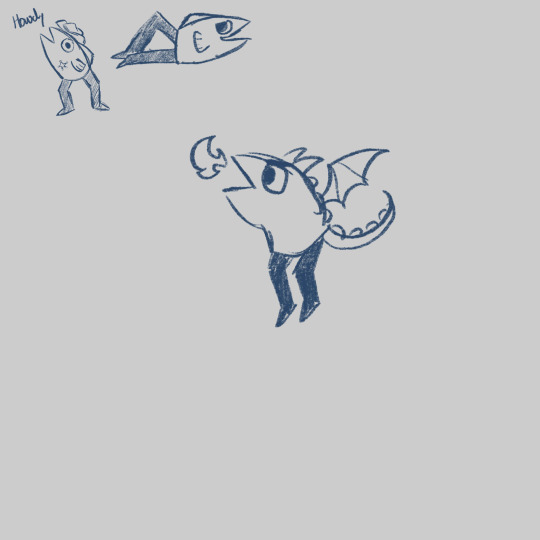
MerMay Day 3

Today’s MerMay prompt features Rae’s husband, Jack. Also a doodle of a reverse mermaid dragon because I felt like it.
#my ocs#oc art#mermay#mermay 2024#ngl I drew Jack today so that he and Rae would be looking at each other on my insta page#oh yeah go follow my Instagram btw#I’m posting Timelapse footage there as well
5 notes
·
View notes
Text
JJ: Booktube
premise: dating jj and being a booktuber.
masterlist
Lets ignore the fact that JJ would be fired without a doubt from the FBI if this stuff actually happened and her life would be threatened by criminals.

-She knew that you were really into books.
-She just didn’t know how much. You two had met through tinder believe it or not, she was sick of being alone at night and didn’t want a fling. Luckily, you felt the same way and you two matched.
-The team did know that she was on Tinder, but not that she had officially met someone.
-Reid was sitting at a table on the plane, watching something on his laptop. But then she heard your voice, your upbeat, happy voice. She glanced back to see your bright and beautiful face holding a book. “What’re you watching?” JJ asked. Which grabbed the attention of Emily.
“A video on what books to read if you want to get into ‘young adult’ books.” Reid said, thoroughly focused on the beautiful woman on his screen.
“She’s pretty.” Emily saw you.
“She is.” Reid mumbled, blushing.
“Who’s pretty?” Morgan said, leaning over the back of the seat, “oooh who’s the cute nerdy girl?”
“A youtuber, and be nice.” JJ said crumpling a piece of paper and throwing it at him.
“Her shirt literally says ‘Nerdy Bitch’, I think she knows she’s one. She's hot too.”
-JJ quickly sent a picture of the screen to you. “My teammates think you’re pretty, have to say I agree.”
“OMG, please tell me you aren’t watching my videos 😭”
“I am now baby 😉”
“FUCK.”
She huffed a small laugh at your response, then continued watching with Reid.
-Little did she know you tweeted to your followers, “THE GIRL I’M DATING IS WATCHING MY YOUTUBE VIDEOS FOR THE FIRST TIME WITH HER COWORKERS. PLS KILL ME.”
-When she came home from that case, she wanted to hear all about your job, which you happily told her and tried to ignore your embarrassment over how she found out.
-Since then she has been a loyal subbie.
-You met the team and they were all very shocked that it was you that they were watching on their computer screen. They also all subscribed, and you had to make Rossi and Hotch youtube accounts because they didn’t know how.
-Your viewers knew of her, knew how you always called her “Rapunzel,” and she always called you, “Flynn” in response.
-But because you explicitly said you won’t be showing her because she asked you not to, you got hate comments for respecting your girlfriends privacy.
-When she came over one night, she saw all of the publishing houses boxes on your front step. She knocked on your door because she saw that your car was in the driveway. She got her key out of her pocket and opened your door. Then, she carefully put all the boxes into your foyer, as well as her overnight bag and shut the front door.
-What she saw next warmed her heart, you had fallen asleep on the couch with a book on your chest. She saw your tripod and camera, she realized you were filming a timelapse for a reading vlog. She remembered you telling her that you were filming one this week.
-She decided not to turn off the camera, instead, she gently took the book off your chest, placed a bookmark to mark your spot. Then she crawled on top of you. You were laying on your back, she laid her head in the crook of your neck, she giggled as she felt you wake up. You wrapped your arms around her, “hey baby.” You croaked.
-You felt her whisper against your skin, “you left the camera on, thought I’d give a little show of affection for those subscribers who think I’m a bad girlfriend.”
You sighed, “please tell me you haven’t been reading the comments.”
“No, well, sometimes I do. Garcia sees them and gets mad.”
“So she’s the commenter, TheBlackQueen causing fights on my channel. Gotcha.”
JJ laughed, “oh god, I didn’t know she was doing that.”
“Don’t worry about it, I’ve been liking her comments, not deleting them.”
JJ laughed at that, then you continued, “you want me to get up and turn off the camera? It should turn off in…” she didn’t have to open her eyes to know that you were looking at the red light on the camera and the clock on the wall behind it. “Oh jeez, five minutes maybe, it has a 40 minute timer before it automatically turns off.”
“No,” JJ shook her head, “I really need to just stay here, Y/N.”
“Okay.”
-When the video was posted, she saw the comments on it. There was not a negative one, of course there were ones making a comment about why JJ was just showing herself on Y/N’s channel.
-After that, she was slowly showing herself in your videos more. Handing you something, delivering a package to your little library in your home.
-She made a lot of appearances in your moving vlogs for your channel because you two moved in together. The kids also made a brief appearance but very vague, you didn’t show their faces.
-She was memed within your fanbase because of the faces she pulled while you were moving books, and her helping you move them, she was like “????”
-When she knew she wanted to propose to you, her and Garcia watched a couple of YouTube videos to learn how to use your camera, then they devised a plan to vlog the engagement together. The ring picking, her talking to the camera and introducing herself. “Hey as you can tell I am not Y/N, I’m her girlfriend, as you guys know we’ve been together for some time but I’m gonna propose to her!” She cheered, then the team in the background were like “finally!” and cheering as well.
Then she broke down the plan to them, “so, we’re gonna go to our favorite greenhouse in D.C. I shot some footage of picking her ring, which I’ll have her insert here,,,,gah I’m no good at this.” Then she continued, “so we have a friend who’s hiring some professional photography, which is exciting.” She did a lil shimmy, then Prentiss popped in, “hey! This is a friend of theirs and the reason our friend is hiring photographers is because we’re gonna be sobbing too much to take good photos, as well as he’s rich as fuck”
Everyone laughed at that.
“And, well, we’re going tonight, so wish me luck!” JJ gave an awkward peace sign to the camera and turned it off.
-She then handed the camera to Garcia who would hide and record the footage, the photographers that Rossi hired posed as regular ole pedestrians. The others hid in bathrooms, waiting for the text saying that JJ did it.
-JJ almost spilled the beans that she was nervous on the way over there to you. That would’ve ruined it.
-Luckily, the part of the greenhouse that you two had your first kiss in was empty. The fairy lights were lit inside, it looked beautiful.
-They had a flower there that the greenhouse called “the wishing lilly.” The owner of the greenhouse says that those lilies bring good luck, he wished on it then his wife was pregnant with twins, then he won the lottery and managed to build the greenhouse into something bigger.
-Per as tradition, you both closed your eyes to make a wish, but she opened hers and got down on the ground, Garcia quietly followed you guys in with the other photographers.
“Y/N..” she trailed off, you opened your eyes to find her kneeling on the ground, your eyes instantly filled with tears as your hands went up to your mouth. “Y/N, you are the light of my life, the Flynn to my Rapunzel, will you do me the honor and be my wife?”
“Yes!” You nodded and cried. She quickly stood up and pulled you into her arms.
-Garcia started crying and shaking, “yay!” You looked up to see her there.
“Oh my god, hi, there’s a lot of people in here.” You said seeing the two photographers and Garcia.
“Rossi hired photographers. And the team is waiting for a text to come in and congratulate us.” JJ laughed and leaned up to kiss your head.
“Oh god, I look like a mess!” You laughed, yet cried at the same time.
“We both do, baby. Welcome to marriage.” She slid the ring on your finger, just in time for photos to begin.
-At the end of the video, you made an introduction part for the subbies to meet JJ. Filled with questions and such to know her. Briefly mentioning her sons as well.
-After you two got engaged, you started filming fiance challenges, (my fiance picks my next read, my fiance tries to guess the plot of books based off their covers). Hell, you two even do some baking and cooking videos.
-Your marriage blew up on booktube, you two were The Lady Lovers on booktube, as you had been labeled. You both loved that there were so many people resonating with your love. You shared a pre wedding video talking about the insecurities you both had, and a talk about discovering sexuality when you’re in your mid thirties after a divorce from a man and having two kids. And you, someone who’s never been in a serious relationship, giving your advice to people.
-It was a big video and an emotional one. But it resonated with a lot of people which you both were glad for.
-Then your wedding video came out and everyone lost their shit. People were sending in love, there was a lot of adorable footage from the wedding, people crying.
-You even incorporated books into the wedding decor.
-While your career was quite different then JJ’s, people saw you as a perfect fit. You stayed home all the time, writing, putting videos up, writing reviews and partnering with brands on your channel, you were able to be there for the boys when she couldn’t be. She was all over the country constantly, she made it a point that every night before bed she’d watch one of your videos, and it helped that you sent videos to her of Henry and Michael.
-You were the calm to her storm, where her life was hectic and constantly on the move, she knew she always had a home waiting for her.
#Jennifer Jareau#jennifer jareau x reader#jennifer jareau x you#aj cook#jj criminal minds#Criminal Minds#criminal minds x reader#criminal minds x you#criminal minds x y/n
113 notes
·
View notes
Text
Episode #197

Simpson Tide
Season 9 - Episode 19 | March 29, 1998
Well suck my dick and call me catholic, I literally resized the browser window I was writing this into and lohan behold my entire write-up disappeared. Better write a crappier one before I get too pissed off to continue.
This is a season 7 episode that was held-over till season 9. It was produced by Al Jean & Mike Reeces “Pieces” Reiss with a batch of other episodes they produced during season 7 that aired much later. I’m pretty sure that this episode was written and recorded significantly earlier than 1998 because who would be making a 1994-style dig at Margaret Cho like Homer does in this? Cho was the star of All-American Girl, a sitcom that aired briefly on ABC that made a big old deal about staring an Asian family. I remember it being a bit of a target. The perception at the time was that Cho was a young comic who hadn’t *quite* paid as much dues as her contemporaries but was being bolstered by a form of network tokenism. I remember her on Comics Come Home and her Pulp Comics and thinking she was funny at the time. I’ve never watched any of her stand-up movies. She was funny on Hollywood Handbook. I have never felt ill-will towards Cho, despite the fact that most of the times people say her name it’s an example of a bad comedian. But, I also don’t really care.
Anyway, this one is a very funny episode, and I”m sorry that I spent most of this post talking about Margaret Cho. That’s what happens when an entire write-up gets deleted by tumblr’s graphic interface. I’m not sure what makes this episode so much better than the other Scully-produced episodes. It has a lot of the same qualities. A thin story (though Bart’s earring coming back to save the day is pretty nice), lotsa zany gags, Smithers just showing up to dance with the Villiage people on the submarine for no reason (Jesus, it’s so stupid and yet maybe the hardest I’ve laughed at a gag I’ve seen 20 times).
The exploration of Moe’s soft side also continues in this episode: Homer imagines Moe cuddling a kitten and Moe, despite being conjured by Homer’s imagination, looks at Homer’s mind camera and scolds him for peering in him during an unguarded moment of kindness. It’s a gag that only works if Moe is the rough character that he once was in the classic era.
Also, I am endlessly disappointed that this episode, which features Bart getting an earring, doesn’t actually include the line “Sparkle sparkle, Homer” (he merely says “sparkle sparkle” TO Homer). Being from solid homophobic Northern California stock it was very common for me to mock the practice of men wearing earrings in the 90s. I have a genuine but shallow distaste for vain/fashionable accoutrements of all kinds, and the diamond stud is something that repulses me to this day, and I take great joy and childishly ribbing modern men who wear them, calling them “girls” like I would have in grade school. “NICE EARRING YOU GIRL”. But one time a friend of mine absolutely slayed me by saying “Sparkle Sparkle Homer” when an audience camera cut to Will Smith at the Oscars. It was one of those insane laughs that caused me to have to desperately catch my breath after 2 straight minutes of uproarious laughter. Had to be there? PROBABLY!
MAIL BAG
It's very funny and interesting that you said you would vote now to Homer when the election has been over for almost two weeks. lol. I wonder if you knew that!
(obviously this was sent shortly after the election) hot tip friend, they let you vote late if you have a gun
IF YOU DON'T UNRIP THE B-SODE I WILL RE-RIP YOUR A-HOLE - Dr. Richard "Bitchtard" Dunn
Sent back when I first killed off the B-SODE! I’m glad I did!!!!! Okay I’ll let you behind the curtain this is one of my friends and the Richard Dunn reference is that I had a doctor with the same name as Tim & Eric’s Richard Dunn who sucked and misdiagnosed my hernia. I had to have emergency surgery and almost missed my friends funeral. IT WAS LIKE A TIM & ERIC SKETCH!!
from the makers of Me So Horny (the thing the prostitutes [erm EXCUSE ME? Sex WORKERS, hello!?!] say in Full Metal Jacket) and Miso Brody (Brody Stevens head in a bowl of Miso Soup, may he broth in peace) bring you a once in a life time moment...B-SODE GROADY (timelapse footage of the b-sode feature rotting away into a perfect skeleton).
This was nice :)
3 notes
·
View notes
Text
Internet Personality AU

John is an Instagram model
He advertised fyre festival but didn't actually go.
Joseph does really well produced religion themed videos.
He also does q&a videos a lot.
Jacob does survival vlogs. Kind of like one of those shows where they only take the bare essentials/or nothing and teaches you to survive in various environments.
He may do some dog training videos/the educational shows he does at the F.A.N.G. center.
He seems like he'd hate doing shows, and he says he does, but Joseph and John have never seen him happier than when he's talking about his favorite subject, animals.
Faith mostly records the church choir and her own art.
Sometimes she does some pretty intense/intresting magic tricks.
Sharky does videos where he just lights stuff on fire and records it burning.
Hurk Jr does travel vlogs with wrong facts about the places he goes.
When he's not traveling he's just like rambling into a camera for like 5-10 minutes
Sharky and Hurk have a prank channel, they mostly prank each other but sometimes they have guests.
Jess does trick shots with her bow.
She has a secret channel for recording timelapses of her graffiti art.
She will only appear in sharky and hurks channel when they mess with Jacob, she will do anything to fuck with him.
Grace does instructional marksmanship videos.
She also answers questions about life in the army and dealing with battle related trauma.
Adelaide mostly does lifestyle videos frequently featuring Xander and his yoga.
She also uses it to defame Hurk Sr. While he runs for office.
Nick Rye talks about his business and flying.
Nick and Kim have a family channel where they talk about pregnancy and getting ready for a baby.
The Deputy just kind of vlogs there life.
"What's up everybody! Today I'm going to bro night with my bros Sharky, Hurk Jr, Jess Black, and of course Olympic gold medalist GRACE ARMSTRONG."
Whenever they stop at the pumpkin farm they get 5-20 minutes of footage of just Boomer.
They get coffee w/ one of the Seed's and post the selfie to there Instagram.
John only appears in Joseph's or the Deputy's videos.
You know John is in the comments of all of the Deputy's pictures flirting relentlessly.
Are they dating or is John just a flirt? The audience can only speculate, there are videos that have every moment they're in the same video, theories that they're secretly married, or that time the Deputy didn't post for awhile was because she had a secret baby with John.
Someone swears they have a video of John and the Deputy kissing but has yet to post it.
Maybe John sent them a cease and desist notice, maybe it never existed.
John and the Deputy like to keep people guessing.
Look me in the eye and tell me I'm wrong about fyre festival.
#far cry 5#far cry au#john seed x deputy#john seed#joseph seed#jacob seed#sharky boshaw#hurk drubman jr.#adelaide drubman#grace armstrong#jess black
77 notes
·
View notes
Text
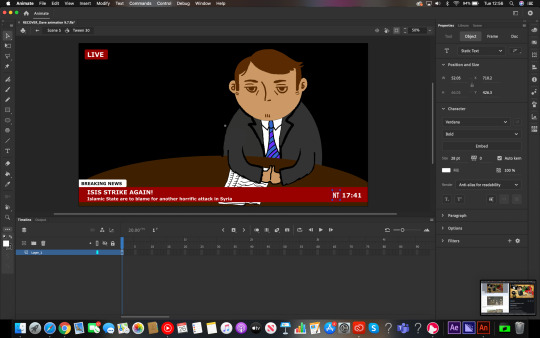
Scene 5 - Reporter
I’ve been shying away from any character animation but in this section i felt i had to give it a go because its the perfect opportunity and it offered me the perfect opportunity to improve my skills in character design as well as more advanced adobe animate skills. It poses the oppotunity to use the armature and lip sync features, two features I’ve spoken about using since i chose to use animated.
Process
I started by creating the overlay design to make the scene look like a news report. I used the BBC news style as its very visually recognisable.
I then followed this with the character and set design (table and papers). The inspiration for the news anchor i will post below.
Following this i then looked into animating with the bone tool. Before descovering the bone tool i was trying other more basic techniques but they were in effective.
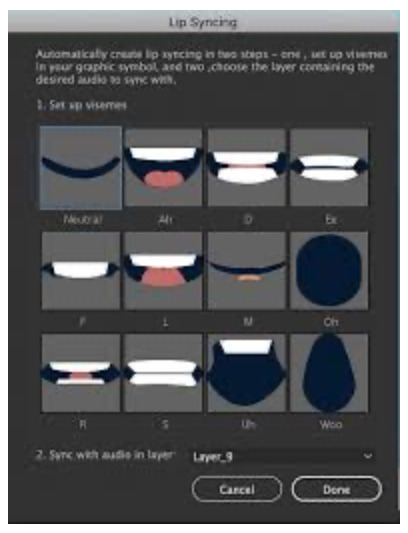
Continued on to start using the lip sync options. (Much more complexed than i anticipated, ITS HARD TO DRAW MOUTH SHAPES😆😆)
Finally finishing the scene off with a green screen idea. I’m going to play some real life film footage in the background and use green screen to put it in. I did this through after effects.
I spent a lot of time on this scene, probably as much as the rest combined haha.
Here are some of the resources i used to assist me with lip syncing.

https://youtu.be/HCMReUfvx7U
youtube
https://youtu.be/dX7cke0aMQs
youtube
Timelapse
Technical skills learnt
-Character design
-Character Animation
-Lip Syncing
0 notes
Text
Reflection 24/03/2020: Middle Stages
So, here we are in the middle stages of the FMP, or as I call it, the TFMP. Here, I’m going to reflect on what I have done so far, and what I’m going to do in the next 6 weeks. While that may not be a lot of time, I’ll do my best to do as much as possible.
Week 1 - 03/02/2020 - Start

It all began with what everything starts out as... an idea. I started out doing some concept art, which is not one of my best features, but I gave it a shot anyway as I was going to have to make some at some point, because I wanted to.
Here is the concept art for my main character. The name in the top left “Darohn Terlex” is just a random name I came up with by combining multiple names together (Darren, John, Terry and Alex). I did this because I couldn’t think of a suitable name for my character who both has a male and female variant, as seen in the picture above.
But how about the actual design of it? Firstly, I chose to focus on an outfit style. I had ten in mind, five for both male and female individually. Each of them follow a different outfit (and hair style) that is worn by that, or both gender(s), excluding the headsets.
While the headset styles were wildly random ones I have thought of with no inspiration or facts, I chose to stick with the first one (Virtual Reality) as it is more realistic than the other ones. Like... have you ever seen anyone wear a headset that looks like a pair of bog-standard glasses? ...me neither.
As for colour schemes, I chose to stick with the grey, red and black one I mentioned in my Colour Schemes post. I have added those colours to the concept art, which is not a thing people normally do as concept art is mostly outlines and rough sketches. More on that in an upcoming post.
Week 2 - 10/02/2020 - Creating the character + base game logic
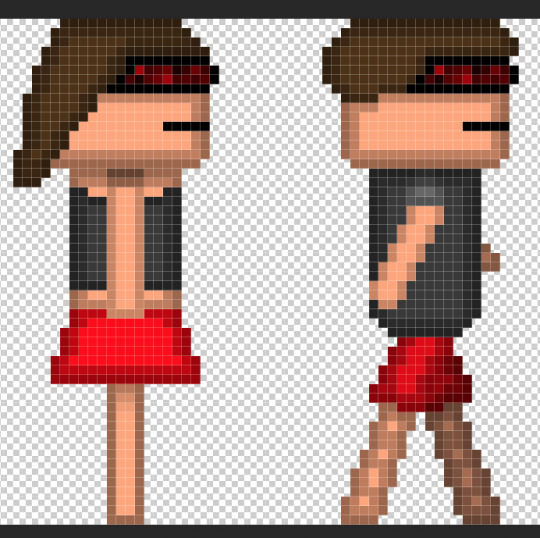
Creating the character in Adobe Photoshop proved to be tricky at times. Mostly because I didn’t know what outfit to pick. I chose to go with the Fashion style for the male character, and a mix of Summer and Fashion for the female. I have chosen to do this because I liked both designs, but didn’t feel comfortable with using just one. That, and I felt it was more appropriate.
As you can see, in the concept art, the character is wearing boots, while in the sprites, they’re barefoot. This is because I was originally going to give them jet-boots in the game, but decided to go with a more advanced approach instead, as I’m using this time to expand upon my skills. However, that doesn’t mean I’m going to keep them barefoot. I’ll probably give them basic shoes or something, but it all depends on if I feel like it or not.
After the characters were finished, I took to the game. This allowed me to experiment with animations and sound effects. During this time, I was using placeholder sound effects that were dumped from a video game called Undertale (more info on that in posts mentioning it), which I quickly removed shortly afterwards.
Unfortunately, I came down with an dizzy illness near the end of the week, causing me to feel dreadful throughout the majority of February half-term, unable to work on anything. I recovered just before the next week started, though.
Week 3 - 23/02/2020 - Enemy intelligence

What is a game without intelligence... ARTIFICIAL intelligence. Okay, granted, it is not programmed intelligence that lets a virtual being learn as things goes, it’s just hard-coded intelligence (meaning it cannot be edited without editing the source files).
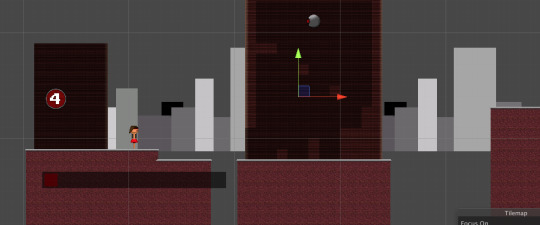
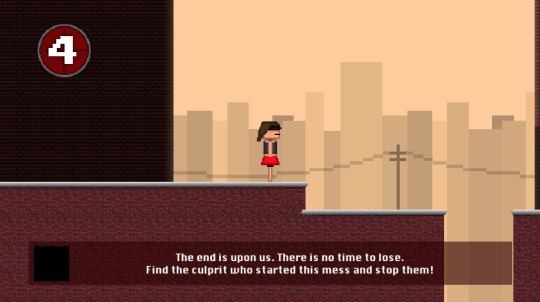
During this time, I got to work on the first level of the game. While doing that, I also got to work on the parallax background (learn more about that in my 2.5D Platforming post).
You can also see that I have implemented a pie chart. But not just any pie chart... a life pie chart!

Basically, this pie chart is the artistic way of telling the player how many hits they can take before dying. More info on that in an upcoming post. Alongside the pie chart, there is a semi-transparent shape at the bottom of the screen with text on it. That is the game’s way of guiding you through what to do. It has been programmed to show for 6 seconds, after which it goes completely transparent, hidden from view.
You’re probably wondering how I keep track of every detail I have implemented... that is because I have been taking videos and screenshots of development! I won’t share any footage yet, but here is a picture of every video I have taken (as of 16/03/2020).

As you can see, I have captured over 13 hours of footage! I actually have over 17 hours now, as some of it has been recorded recently but isn’t shown in this image. I am not uploading these raw, but I will provide a link to an unlisted playlist on YouTube with these videos in, except for #5, which dragged on for too long. I’m putting all of these raw videos into an hour long time-lapse so you can see how this game was made from the ground up if these screenshots aren’t enough for you.
Week 4 was mostly bug fixes, I’ll post a video here when I have created it, and as such this section will be edited.
Week 5 to 6 - 09/03/2020 to 16/03/2020 - Sound design and playtesting
youtube
This video goes over what program I used to create the sounds. Adding them to the game wasn’t hard, as I knew exactly how to add sounds and trigger them to play on demand at random intervals.

The source code needed to play the sound isn’t hard to understand when looked at, but since I’m not posting source code online (apart from small extracts in images I’m posting here), I’m pointing out what does what, since you probably don’t understand source code anyway.
The Break... Out
As you’re probably already aware, the UK became part of a pandemic called the SARS-CoV-2 outbreak, which affected over 5,000 people in less than a month. To contain the spread of the virus, all schools, colleges and universities had to shut... including mine. I picked up everything digital and stored it online via Google Drive (except for the timelapse video, which I exported then uploaded it in private to YouTube for me to download it later on so I can still edit it), YouTube and GitHub (which is a development platform that I can upload and download my source code from), seeing as we may not be back in college until the summer holidays... which would be too late to do anything.
Now that I’m stuck in my house for goodness knows how long, I can still work on my project with ease seeing as I have a powerful computer to deal with the situation, as well as having all the software I use at college, which has been made free for students by the software developers so that we can temporarily work with them during this difficult time without having to pay a penny.
Soon, I will have my time-lapse video ready, as well as a full playthrough (and download link) of the game when it is finished. Keep an eye out as I will have more development posts coming soon.
0 notes
Video
youtube
Check this illustration on RedBubble HERE !
Art Process
Hi everyone and welcome back to Timelapse Tuesday! This was a really fun experimental illustration that I posted last week in between editing last week's Color Challenge video. I only had two main objectives for this illustration: a) I wanted to experiment gouache on black paper, b) I wanted a nice front page for my big Mixed Media Sketchbook. I'm a huge art history nerd and I love how complex chiaroscuro paintings are, so I wanted to try it out on a pad of Artagain paper I received as a birthday gift a few years ago. I used my DIY Gouache Palette I carry around everywhere for this (click on the link if you want to try it out with watercolors).
I knew my Royal & Langnickel gouache could layer well on it but I hadn't really tried to paint on it...rather I was never happy with the results. I tried to make illustrations on it before but I realized I didn't know as much about gouache and tonal painting as I thought I did so I left it alone for a few months while I continued my art practice. I honestly recorded this on a whim, since I'm trying to make a habit of recording whenever I'm at my workspace. On most days I write and sketch out a plan for the next day on my Bullet Journal and my draft sketchbook so I can get good footage for the next day. It works well but sometimes it's good to go into art making without a plan just for the sake of experimenting.
To you, my reader, remember to take time to just create for yourself and play with your materials. It's never time wasted and you'd be surprised with what may come out! See you all soon!
Materials
Royal & Langnickel Gouache
Strathmore Artagain Drawing Paper
Royal Langnickel Brushes in Round #5 and Flat #10
Sakura GellyRoll 08 Pen in White
Prismacolor Colerase Pencil in White
Support the Artist!
If you want to support my work: check out Ko-fi page | Digital Commissions | Store & Traditional Commissions | Redbubble! Every little bit helps keep me making art & videos for you all! If you have any suggestions for videos, let me know in the comments below!
#art#traditonal art#gouache#royal langnickel#succulents#Illustration#timelapse#art tutorial#art timelapse#timelapsetuesday#original art
1 note
·
View note
Text
Sticky AutoContents Panel
Update - 2018.01.27This is “Offer and Review Score” Post Layout. You can also add sticky contents panel
While the GoPro Hero5 has many of the same specs as the previous generation when it comes to video and photo resolutions, there are some new features in it. Individually no single feature is a massive leap forward in the action cam industry, but collectively they represent a notable and substantial difference over the Hero4 Black. This section is mostly focused on these new features, while the remaining sections take a deeper dive into the core functions of the camera, as well as touch on these new features in more detail.
Fully Waterproofed: Probably the most notable item is that the GoPro Hero5 Black is now fully waterproofed without the need for a separate case, just like the GoPro Hero4 Session was. In fact, it has nearly the same rubberish material on the outside.
What is of more concern though is the USB-C/HDMI port door. This door pops off for placement into the Karma gimbal/drone, as well as just for charging:
Deals
Gopro 7 deals
GoPro HERO7 Black — Waterproof Action Camera
$342.78
Buy this item
GoPro HERO7 Black — Waterproof Action Camera
$365.95
Buy this item
GoPro HERO7 Black
$399.00 $459.00
Buy this item
GoPro - HERO7 Black HD Waterproof Action Camera - Black
$399.99 $424.11
Buy this item
Now this won’t easily pop-off while it’s locked in place, as you have to press a button down to open it (plus slide it). But, the trick will be not losing it after charging your camera or while the charging cable is attached. GoPro does sell the door as an accessory (albeit over priced), and I know I plan to buy an extra door and then seal it up somewhere special in my backpack/suitcase for traveling. Because I guarantee you that I’ll lose it at the most inopportune time on a trip to some beautiful watery location and be unable to take pictures of The Girl underwater in a bikini without the door.
Speaking of doors that we don’t want opening up, we’ve also got the battery compartment down below. That holds both the battery as well as the micro-SD card:
Touch Display:
The Hero5 takes the touch display found on the Hero4 Silver and advanced it forward. As you might remember, the Hero4 Black actually lacked a display. This was one reason that the Hero4 Silver was actually a more day to day favorite of mine than the Hero4 Black was.
However, the touch display acts and feels significantly different here than the Hero7 Silver.
The entire menu system has been redone to make it more intuitive to find settings. Along the bottom it shows you the basics for that mode. For example, in the video mode it shows you resolution and frame rate.
You can tap on it to change these specs. Only the available frame rates will display for a given resolution. In theory this looks beautiful, but in practice it’s actually more cumbersome than I expected. I think this is because there’s just too many resolutions too closely together for a normal sized finger to hit the right resolution on that small display.
On the right side of the display you can enable various advanced settings for that mode, such as ProTune, Image Stabilization, and Audio Control:
All of this is of course waterproof as well. Though, it won’t work underwater. For that you’ll need to use the push-buttons on the top/side of the camera to change modes.
Speaking of a wet display, in general I found it doesn’t work well when wet either. Especially if your fingers are wet, it all goes to crap and fails to respond.
You can turn this option on/off, and it’s available in seven languages. Also, if you have the Remo accessory remote, that’ll accept voice commands too in the event the camera is out of range of your voice.
But…it’s not perfect. I found that it works most of the time when standing still. But once you start moving I found both it and the Hero5 Session actually perform worse than Garmin does. At about 10MPH (15KPH) I find the ability to give commands pretty much dies no matter which way the camera is facing. Whereas with Garmin it’ll continue working above that speed as long as the camera is facing you.
Video & Audio details
Ahh yes, video time. No better place to start diving into features than video modes. In many ways the Hero5 is similar in these modes to the Hero4 Black. After all, it too has 4K @ 30FPS and 720P @ 240FPS, the two ends of the spectrum that people often talk about. The footage looks beautiful in 4K – no doubt.
youtube
So what’s new and notable here? Well we’ll start with the video stabilization. Technically this is ‘electronic image stabilization’, which works by taking a larger resolution video clip (i.e. 4K) and then smoothing the video by offering a reduced resolution rate while stabilized (up to 2.7K). By doing this it essentially stabilizes by cutting the edges off the corners to make the video appear smooth. It’s the same thing that Garmin does on their VIRB Ultra 30 (but the Garmin is limited to 1440 vs the higher 2.7K), but is different than what Sony does with their new X3000R, where they use optical image stabilization. That’s better because it doesn’t crop any of the image.
To enable image stabilization, you’ll simply swipe from the right. It’ll warn you about cutting about 10% of the field of view:
For cases where you’ve got some light chop in the roadway, or even for hand holding the unit, image stabilization can dramatically improve things. Though, that’s at the sacrifice of resolution. If your final output product’s 1080p, then it’s largely a no-brainer. Do note that it generally works better when you’re shooting something that has a large portion of the image facing one direction constantly. Versus on a helmet mount, it can get a bit wonky as you move the view around a bunch.
What’s even more interesting though is the ability to record the native audio files from each microphone separately. If you enable ProTune, you’ll see a new option to do this. Within that you have three levels:
All of these were simply taken at room temperature; obviously aspects like environmental temperature will impact things considerably, as will other modes and increased frame rates. But those give you some basic bounds to work within.
Photo mode:
While the Hero7 Black doesn’t offer any more resolution than the Hero4 Black did, it does offer a number of substantial photo-focused features. First, the basics though. To get into the photo mode you’ll go ahead and tap the mode button until you see photos. Or, just tell the GoPro to take a photo using voice commands.
Now there are technically different photo modes, including the ability to take a burst photo, a series of photos as a timelapse, or night photos. Note that this photo timelapse is separate from the video timelapse option. This produces a crapton of photo files, whereas the video timelapse produces a single video timelapse file.
That’s the basic differences. Again, both cameras are very good, you won’t go wrong with either. For me, I prefer the Hero5 Black because I like to be able to see and frame up what I’m taking a photo/video of. Whereas the Hero5 Session it’s shoot and pray that you’ve got it lined up. Sure, you can use your phone for certain shots – but most of us won’t do that.
Our score
from WordPress https://www.geekyviews.com/sticky-autocontents-panel/
0 notes
Text
The Zhiyun Smooth-Q2: The Gimbal That Fits in Your Pocket
Our verdict of the Zhiyun Smooth-Q2:
If you are looking for a portable smartphone gimbal that actually fits in your pocket, the Zhiyun Smooth-Q2 delivers. Tiny, well made, easy to use and budget-friendly, this is the perfect gimbal for all smartphone users.1010
Mobile phones have turned us all into videographers. Whether we are posting stories and videos to social media, or capturing important moments in our lives, more video is created daily than in any other time in history.
A gimbal can give shaky smartphone footage a smoother, more professional look. There’s only one problem: any gimbal worth buying is too bulky to transport easily or expensive.
Until now.
The Zhiyun Smooth-Q2 is a pocket-sized gimbal and is currently the subject of a successful Kickstarter campaign. At $109 for the basic package, it’s budget-friendly—but is it any good?
youtube
Small Gimbal, Big Claims
Smartphone gimbals are not a new concept, but what sets the Smooth-Q2 aside is its size. At just over 20 cm high, it fits comfortably in trouser pockets. This is one of the main focuses of the Kickstarter campaign for this gimbal, which will be shipping to Kickstarter backers starting in October.
The basic early bird package for the Smooth-Q2 on Kickstarter costs $109, with a premium kit including accessories for $119. There are other Kickstarter price options, but the cost of the gimbal on release will likely be $30 more on top of the early bird prices.
My review of the Smooth-Q2 coincided with covering IFA 2019, a large and busy tech conference. As such, there were long periods in between filming things, and at no point did it feel cumbersome in my pocket.
Unboxing or Lack Thereof
Since this an unreleased pre-Kickstarter product, there are a few caveats to this review. The Smooth-Q2 came in simple packaging and without an English language manual. Even after translating the Chinese manual, I discovered that the “ZY Play” app which accompanies Zhiyun products wasn’t yet compatible with the Smooth-Q2.
This means that the promised timelapse, object tracking and Hitchcock dolly zoom effect were not available during the review. I was, however, able to connect my phone using Bluetooth and use the in-handle record button.
Everything I am reviewing today is the gimbal “as is”, though given our previous experience with Zhiyun it’s fairly safe to assume these extras will work as promised.
Included in the pre-Kickstarter kit were the gimbal, a USB-C charging cable, and the quick start guide in Chinese.
The Specs
In terms of specs, at 8 x 4 x 1.63 inches (204 x 102 x 41.5 mm) and 1 pound (450g) it’s both small and light.
It supports smartphones from 2.17-3.19 inches (55-86mm) wide, and 0.17-0.57 pounds (75-260g) in weight. The internal battery is a 4500mAh 21700 Lithium-Ion cell which gives up to 16 hours of run time. Charge time is around 4 hours.
The body is made of CNC-machined aluminum with a rubber handle, and the build quality feels excellent. Robust without being too heavy, it’s not rugged but it’s also unlikely to get damaged in your pocket or bag.
Now would be a good time to mention that the gimbal also doubles as a battery bank. There is a micro-USB port on the top arm of the gimbal for charging your phone, or powering it when in use. While this will undoubtedly cut into the gimbal usage time, it’s a neat feature.
Even better, in an age where batteries are sealed inside devices, inaccessible to the user, the Smooth-Q2 has a screw-cap base allowing quick swapping of batteries.
Zhiyun Smooth-Q2 In Use
Setting up the Smooth-Q2 was quick and easy. After charging I added my phone to the quick release clip and slid it into the gimbal before locking it in place. The gimbal auto leveled the phone, and I was ready to go.
Bluetooth pairing was simple and linked the onboard record button to both the default camera and Open Camera app. While the “ZY Play” app does not yet support it, the app is simple to use with other Zhiyun products, and there’s no reason to think the Smooth-Q2 will be any different. The gimbal has five settings as standard:
PF – (Pan Follow): Follows twisting of the wrist left and right but locks the tilt, which is controlled by the joystick.
L – (Lock): Locks the position of the camera, giving the “chicken head” effect. The joystick effects both pan and tilt in this mode.
F – (Full Follow): Follows wrist movements for pan and tilt, the joystick effects roll.
POV: Tilt, pan and roll are all affected by wrist position, the joystick is deactivated.
Vortex Mode: Spins the gimbal continously via the joystick.
Every mode here has its uses. I found myself using the full follow mode the most, simply as it allowed the greatest freedom. The vortex mode is a little different as you need to hold the gimbal out in front of you like a torch to use it.
The different modes are all fairly intuitive to use, and switching between them on the fly is simple with one joystick press moving forward through the choices, and two presses moving backward. Pressing the power button once displays battery level using the onboard LEDs.
Portable and Practical?
The combination of the small size of the gimbal and the quick release mechanism makes the Smooth-Q2 very quick to set up. From getting it out of my pocket to filming took under 10 seconds. While the clip makes my already large phone a little cumbersome, it has a surprisingly low profile.
The bottom of the gimble has a 1/4 inch screw thread which fits a regular tripod mount, and the premium Kickstarter package includes a mini desk tripod. I found in my testing that the gimbal will quick happily stand alone without a tripod on a flat surface.
The motors felt solid at all times, even with my phone slightly off-center due to the position of its buttons.
Any Problems?
Throughout testing this gimbal, I found it to operate much as promised. The footage remained smooth, and the battery never gave out on me. The simplicity of the device is one of its major plus points, and there is no learning curve using it. I’m confident anyone could pick it up and use it more or less immediately.
At the time of review, to use the gimbal in portrait mode, you need to hold it sideways. This could get tiring pretty quickly, but I’m still in the camp of vertical video being unacceptable at any time, so it didn’t particularly bother me.
I could imagine someone with a wider angle lens on their phone having issues with the gimbal arm coming into shot in certain modes. While you could flip your phone in the mounting clip, you’d then have it covering the screen when recording. This is only an issue when holding the gimbal straight up, tilting it forward would put the arm totally out of the way, and for a gimbal this tiny I think it’s an acceptable trade-off.
I suspect for many users the quick release clip might be somewhat redundant as it’s straightforward to put your phone in. In my case, the clip is a little too thin for my phone, and it didn’t sit correctly, though it was still secure. Any phone with a power button halfway down the side of the body will not sit centrally.
Despite my phone being heavier than most, the gimbal only struggled when I was moving my hand so erratically that it couldn’t compensate.
Should You Buy The Zhiyun Smooth-Q2?
Kickstarters are always a risk, and no matter the company, you should be aware that many people have been burned by them. That said, Zhiyun has plenty of previous examples of delivering great products, so we think it’s safe to treat this campaign as a pre-order.
Even without the extra smartphone app features, this gimbal is solid and simple to use. It would be equally suited to someone wanting a budget device to up their social media game, and someone wanting to incorporate serious cinematic effects into their creations. Whether you pay $109 for the early-bird package, or the $139 it may cost on release, this gimbal is an absolute steal, and I cannot recommend it enough.
Enter the Competition!
Zhiyun Smooth Q2 Smartphone Gimbal Giveaway
Read the full article: The Zhiyun Smooth-Q2: The Gimbal That Fits in Your Pocket
The Zhiyun Smooth-Q2: The Gimbal That Fits in Your Pocket published first on http://droneseco.tumblr.com/
0 notes
Text
The Zhiyun Smooth-Q2: The Gimbal That Fits in Your Pocket
Our verdict of the Zhiyun Smooth-Q2:
If you are looking for a portable smartphone gimbal that actually fits in your pocket, the Zhiyun Smooth-Q2 delivers. Tiny, well made, easy to use and budget-friendly, this is the perfect gimbal for all smartphone users.1010
Mobile phones have turned us all into videographers. Whether we are posting stories and videos to social media, or capturing important moments in our lives, more video is created daily than in any other time in history.
A gimbal can give shaky smartphone footage a smoother, more professional look. There’s only one problem: any gimbal worth buying is too bulky to transport easily or expensive.
Until now.
The Zhiyun Smooth-Q2 is a pocket-sized gimbal and is currently the subject of a successful Kickstarter campaign. At $109 for the basic package, it’s budget-friendly—but is it any good?
youtube
Small Gimbal, Big Claims
Smartphone gimbals are not a new concept, but what sets the Smooth-Q2 aside is its size. At just over 20 cm high, it fits comfortably in trouser pockets. This is one of the main focuses of the Kickstarter campaign for this gimbal, which will be shipping to Kickstarter backers starting in October.
The basic early bird package for the Smooth-Q2 on Kickstarter costs $109, with a premium kit including accessories for $119. There are other Kickstarter price options, but the cost of the gimbal on release will likely be $30 more on top of the early bird prices.
My review of the Smooth-Q2 coincided with covering IFA 2019, a large and busy tech conference. As such, there were long periods in between filming things, and at no point did it feel cumbersome in my pocket.
Unboxing or Lack Thereof
Since this an unreleased pre-Kickstarter product, there are a few caveats to this review. The Smooth-Q2 came in simple packaging and without an English language manual. Even after translating the Chinese manual, I discovered that the “ZY Play” app which accompanies Zhiyun products wasn’t yet compatible with the Smooth-Q2.
This means that the promised timelapse, object tracking and Hitchcock dolly zoom effect were not available during the review. I was, however, able to connect my phone using Bluetooth and use the in-handle record button.
Everything I am reviewing today is the gimbal “as is”, though given our previous experience with Zhiyun it’s fairly safe to assume these extras will work as promised.
Included in the pre-Kickstarter kit were the gimbal, a USB-C charging cable, and the quick start guide in Chinese.
The Specs
In terms of specs, at 8 x 4 x 1.63 inches (204 x 102 x 41.5 mm) and 1 pound (450g) it’s both small and light.
It supports smartphones from 2.17-3.19 inches (55-86mm) wide, and 0.17-0.57 pounds (75-260g) in weight. The internal battery is a 4500mAh 21700 Lithium-Ion cell which gives up to 16 hours of run time. Charge time is around 4 hours.
The body is made of CNC-machined aluminum with a rubber handle, and the build quality feels excellent. Robust without being too heavy, it’s not rugged but it’s also unlikely to get damaged in your pocket or bag.
Now would be a good time to mention that the gimbal also doubles as a battery bank. There is a micro-USB port on the top arm of the gimbal for charging your phone, or powering it when in use. While this will undoubtedly cut into the gimbal usage time, it’s a neat feature.
Even better, in an age where batteries are sealed inside devices, inaccessible to the user, the Smooth-Q2 has a screw-cap base allowing quick swapping of batteries.
Zhiyun Smooth-Q2 In Use
Setting up the Smooth-Q2 was quick and easy. After charging I added my phone to the quick release clip and slid it into the gimbal before locking it in place. The gimbal auto leveled the phone, and I was ready to go.
Bluetooth pairing was simple and linked the onboard record button to both the default camera and Open Camera app. While the “ZY Play” app does not yet support it, the app is simple to use with other Zhiyun products, and there’s no reason to think the Smooth-Q2 will be any different. The gimbal has five settings as standard:
PF – (Pan Follow): Follows twisting of the wrist left and right but locks the tilt, which is controlled by the joystick.
L – (Lock): Locks the position of the camera, giving the “chicken head” effect. The joystick effects both pan and tilt in this mode.
F – (Full Follow): Follows wrist movements for pan and tilt, the joystick effects roll.
POV: Tilt, pan and roll are all affected by wrist position, the joystick is deactivated.
Vortex Mode: Spins the gimbal continously via the joystick.
Every mode here has its uses. I found myself using the full follow mode the most, simply as it allowed the greatest freedom. The vortex mode is a little different as you need to hold the gimbal out in front of you like a torch to use it.
The different modes are all fairly intuitive to use, and switching between them on the fly is simple with one joystick press moving forward through the choices, and two presses moving backward. Pressing the power button once displays battery level using the onboard LEDs.
Portable and Practical?
The combination of the small size of the gimbal and the quick release mechanism makes the Smooth-Q2 very quick to set up. From getting it out of my pocket to filming took under 10 seconds. While the clip makes my already large phone a little cumbersome, it has a surprisingly low profile.
The bottom of the gimble has a 1/4 inch screw thread which fits a regular tripod mount, and the premium Kickstarter package includes a mini desk tripod. I found in my testing that the gimbal will quick happily stand alone without a tripod on a flat surface.
The motors felt solid at all times, even with my phone slightly off-center due to the position of its buttons.
Any Problems?
Throughout testing this gimbal, I found it to operate much as promised. The footage remained smooth, and the battery never gave out on me. The simplicity of the device is one of its major plus points, and there is no learning curve using it. I’m confident anyone could pick it up and use it more or less immediately.
At the time of review, to use the gimbal in portrait mode, you need to hold it sideways. This could get tiring pretty quickly, but I’m still in the camp of vertical video being unacceptable at any time, so it didn’t particularly bother me.
I could imagine someone with a wider angle lens on their phone having issues with the gimbal arm coming into shot in certain modes. While you could flip your phone in the mounting clip, you’d then have it covering the screen when recording. This is only an issue when holding the gimbal straight up, tilting it forward would put the arm totally out of the way, and for a gimbal this tiny I think it’s an acceptable trade-off.
I suspect for many users the quick release clip might be somewhat redundant as it’s straightforward to put your phone in. In my case, the clip is a little too thin for my phone, and it didn’t sit correctly, though it was still secure. Any phone with a power button halfway down the side of the body will not sit centrally.
Despite my phone being heavier than most, the gimbal only struggled when I was moving my hand so erratically that it couldn’t compensate.
Should You Buy The Zhiyun Smooth-Q2?
Kickstarters are always a risk, and no matter the company, you should be aware that many people have been burned by them. That said, Zhiyun has plenty of previous examples of delivering great products, so we think it’s safe to treat this campaign as a pre-order.
Even without the extra smartphone app features, this gimbal is solid and simple to use. It would be equally suited to someone wanting a budget device to up their social media game, and someone wanting to incorporate serious cinematic effects into their creations. Whether you pay $109 for the early-bird package, or the $139 it may cost on release, this gimbal is an absolute steal, and I cannot recommend it enough.
Enter the Competition!
Zhiyun Smooth Q2 Smartphone Gimbal Giveaway
Read the full article: The Zhiyun Smooth-Q2: The Gimbal That Fits in Your Pocket
The Zhiyun Smooth-Q2: The Gimbal That Fits in Your Pocket posted first on grassroutespage.blogspot.com
0 notes
Text
Small Camera, Big Potential | A Hands-On Review Of DJI’s Osmo Pocket
Well, DJI has done it again – they’ve blown my mind and proven how little I know about what’s possible in a piece of gear. And, I’ll be honest, when I had the chance to review the DJI Osmo Pocket, I wasn’t entirely sure what I would be looking to say. Handheld gimbal setups aren’t really “in my lane” creatively, so-to-speak, and for one as small as the Osmo pocket is with its own native camera, I half anticipated it to be toy-ish.
Yeah, no, it’s not a toy.
With a 3-axis mechanically stabilized gimbal, 1/2.3″ sensor that can capture 4k video up to 60fps at 100Mbps, and 12-megapixel stills in either JPEG or DNG formats this little thing is an amazing travel companion that is about the size of an egg roll – and, boy do i love egg rolls.
Even if all it had going for it was it’s ability to capture super slow motion b-reel clips at 1080p, 4k video and raw photo that would be enough, but DJI doesn’t stop there. Using its FaceTrack feature, it can automatically keep the subject’s head in the center of the frame – so for all of you vloggers who walk around with a camera pointed at yourself, it’s a double win; you get a much smaller piece of equipment to get a lot less attention (not that I think that bothers you if you make a living off of people’s voyeurism of your life), and the ability to move around freely without constant frustration of your movement taking you off or out of frame. With its ActiveTrack feature, you can make more broad selections for the Osmo to track with – amazing for moving interviews and sport video. The FPV mode will lock the camera in place, while stabilizing, but allowing for a straight on view of the action in any angle you’re facing.
story mode
Sometimes, for the traveler, there are only small windows of time to upload and share your footage. Whether it’s unreliable WiFi or a busy schedule, having the ability for some automation in how we share our experiences for some would be a game changer. Using the Osmo and the DJI Mimo app you can use some of their presets like sport, jazz, rhythm, party, Inspire, and more to have the Osmo go through some automated capture sequences, stitch them together for you, and create something more compelling or professional in a pinch.
Click here for more information on the Osmo Pocket Story Mode.
https://www.slrlounge.com/wp-content/uploads/2019/03/videosampleosmo.mp4
all the other modes
The selfie, photo, pano, video, slow motion, and timelapse modes are all fairly self-explanatory. Within each mode there are further options that continue to expand and get more controllable, including more professional options with each released firmware update. On the onboard screen you are able to navigate via swiping to the modes, then another swipe in the same direction opens up that mode’s submenu. With photo you can select things like aspect and format. With video you can select video size and frame rate. Slow-motion is a locked 120fps at 1080p. With timelapse you can select a standard timelapse or motionlapse, and set up the desired interval for footage there. It’s also really efficient that you can just rotate the Osmo 90º to have it orient itself in portrait, or turn upside down for it to orient itself to underslung mode.
handheld gimbals are really cool
Before the Osmo pocket ever came out, or the Osmo Mobile, or even before the Ronin, I was holding my drone by its legs and getting handheld footage with it. The concept of having the amazing DJI technology in a handheld device is incredible. As someone who has had plenty of time with handheld stabilizers where you spend painstaking hours getting the balance correct, not to mention the amount of money at stake of it failing, or the mounting failing, the relief of that stabilization being digitized makes those old rigs feel archaic and clunky.
Usually when a piece of technology comes along that replaces its predecessor, it has its own awkward stage and tends to be wildly more expensive – not so with the Osmo Pocket.
opinion – speed round
I wish the way to connect the phone to the osmo had some kind of clamp native to the gear without having to get another accessory. Because I didn’t have something holding my phone, having to hold my phone and the Osmo with both hands doesn’t free me up to make timely setting changes as quickly as I’d need to.
I love the case it comes with, super secure. Over two hours of battery life is fantastic. I was worried I’d lose the small phone plug adapter – it would be amazing to have some kind of spot on the handle to keep it attached when it’s not being used. Quality of the 1080 superfine video was more impressive than I was anticipating. Stills are acceptable but leave me wanting – reminded me of editing my Phantom 3 images a couple years ago. I wish it had an input to take an external microphone, like a lav mic to do some better selfie videos with stronger audio. The default color/look from the automatic camera settings were strong in contrast, but the colors were not abrasive or unnatural.
This would be a great piece of gear for someone traveling to a country where having ‘professional’ gear wouldn’t make it past the gate security. And, finally, I’m sure my experience would have been even better with the massive lineup of already available accessories you can find here.
If you’re really looking to step your game up you can also look at PolarPro’s lineup of filters and accessories.
In conclusion
In case any of you are reaching for the ‘fanboy’ comment, don’t, because I don’t think I’d end up with this in my bag – not because it’s not worth the price tag, but because I couldn’t imagine myself using it too often. I am impressed with the kinds of improvements they’ve made to the firmware and software for the Osmo pocket to allow it to accommodate the needs of professional creators, or more meticulous hobbyists.
The introduction of advanced menu options like RAW photo and Cinelike video profiles are always going to make the experience better for me with how involved I love getting into the post-processing space. And, while it may not have anything to do with the Osmo Pocket itself, it is an increasing reality that laws and regulations are cracking down on professional photo equipment, especially in travel, so the smaller gear just has a better chance of making it to the destination, which is a legitimate consideration.
If you’re looking to pack light, get a solid introduction into vlogging, travel journaling, or hobby filmmaking, this is worth a second, third, and fourth look. If you’re not in a hurry though, I’d say keep an eye peeled for whatever the Osmo Pocket 2 is bound to have. My vote would be a Hassleblad camera, onboard WiFi, a mic input, and make the handle a little bigger to accommodate a bit bigger screen and sturdier grips – all of which would send this already impressive handheld gimbal into the realms of truly insane.
from SLR Lounge https://ift.tt/2TCH0Yj
via IFTTT
0 notes
Photo
New Post has been published on https://www.updatedc.com/2018/12/03/dji-osmo-pocket-hands-on-review/
DJI Osmo Pocket hands-on review

The DJI Osmo Pocket was just announced, and luckily here at Newsshooter, we have been able to get hold of a full production version for a couple of days to review. So without further ado, let’s get on with it.
From the air to the ground
The Osmo Pocket is quite literally a drone camera that has been attached to a handle. Just like the original Osmo, the Pocket leverages DJI’s drone technology and a lot of the tech that they have developed over recent years. DJI has always pushed the boundaries with what is possible. The Mavic Pro really was an engineering marvel, given its capabilities and small size. The Osmo Pocket builds on this philosophy of miniaturizing tech and making a product that is as small as possible. But will it be a case of style over substance?
If you compare the original Osmo which was only released 3 years ago, to the Osmo Pocket, you can see just how far technology has come. DJI is essentially giving you a very similar product that is a fraction of the size at a lower price.
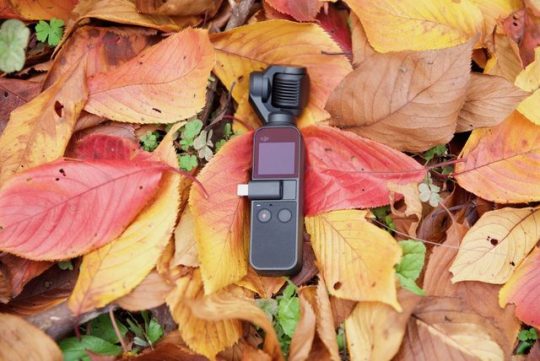
It’s tiny
The Osmo Pocket is absolutely tiny and unlike the BMPCC 4K, this actually does fit in your pocket. I wasn’t quite ready for just how small and lightweight it actually is. It’s 4.8″ (12.19cm) tall and weighs just 4 oz (113.4g). It’s physical size (or more specifically, it’s lack of) is what sets it apart from any other product on the market.
What it is and what it isn’t
I’m going to come out and say it, the Osmo Pocket is a consumer product, not a professional one, and I have absolutely no problem with that. That’s not to say it can’t be used in a professional environment, but you really need to be aware of its limitations. Anyone who buys an Osmo Pocket and expects it to be some sort of miracle device that can replace other more expensive gimbals and cameras is probably going to be disappointed.
The image quality is not going to rival a GH5, BMPCC 4K, X-T3, Sony a7, or any other similar camera. The Osmo Pocket uses a tiny 1/2.3-inch sensor and a fixed f 2.0 lens. The focal length is around 26-28mm (35 mm format equivalent).
It’s certainly not a replacement for a larger gimbal, but more of an additional tool you can keep in your bag. Even though it is squarely aimed at the massive consumer market, there is no reason it can’t be used by a professional. If you were, or still are an Osmo owner or user, you will probably be quite happy with what the Pocket has to offer. In saying that, it does have quite a few limitations, and as long as you are aware of those limitations, you can get fairly decent results in the right conditions.
For Vloggers, VJs, news crews, people wanting to shoot BTS footage, and anyone who needs to get the occasional stabilized shot and not draw attention to themselves, the Pocket is a nice bit of kit to have in your bag.
Buttons and control layout
The buttons and layout of the Osmo Pocket are simple and straightforward. With this device being aimed at a large consumer market, DJI needed to design the Pocket to be easy to use and operate.
There are only two buttons on the Pocket, a record button and a multi-purpose button that acts as the power on/off, menu button and as a function button when you are shooting. There is also a kind of locking hot shoe style interface where the lighting connector, USB-C connector, and accessories can be attached.
When you are shooting the multi-purpose button does three things:
One press – A single press of the button toggles between Video and stills mode.
Two presses – By pressing the button twice, you recenter the gimbal and camera.
Three presses – By pressing the button 3 times, you flip the gimbal into selfie mode. If you press it three times again it will spin back into its original position.
At the bottom of the gimbal, there is a USB interface for charging.
On the side, there is the slot for the Micro SD card.
There are no mounting points anywhere on the Osmo Pocket. If you want to mount it to something you will need to buy the additional accessory mount. I found a way around this by just using a simple smartphone mount.
Build quality
The Osmo Pocket is surprisingly fairly solidly made. I guess that DJI had to take into account that it was going to mainly be a consumer product and people are bound to drop it. The body of the Pocket is a lot more robust than the gimbal and camera (no surprises there). The weakest link is definitely the camera. That’s not to say it’s going to break easily, but it will break before the body of the Pocket does.
The locking hot shoe style interface is nice and robust and I found that the lightning and USB-C connectors stay firmly in place.
What do you get?
The Osmo Pocket comes with a lightning and a USB-C connector, a USB charging cable, a lanyard, and a nice carry case.
Touchscreen
The gimbal camera uses a 1-inch integrated touch screen that is reasonable quality and can act as a live view as well as allowing you to toggle through the various shooting modes, adjust settings, and review your footage.
The inbuilt screen is postage stamp size and you can’t realistically expect to be able to judge anything more than framing on it. I do like that the Pocket does have a screen because at least you can see what is being recorded and frame up your shots (well sort of). The weird thing about the touchscreen is that it displays a 4:3 image and not a 16:9 one. This means what you are seeing and what you are actually recording are two totally different things.
Speaking of the touchscreen, it is very responsive to the touch and easy to use. DJI has done a nice job with the interface on such a tiny screen. This is how it works:
Swipe left – This gets you into your shooting modes where you can choose from Photo, Video, Slow-Mo, Timelapse, and Pano.
Swipe Right – This goes into playback mode so you can view your clips.
Swipe Up – This goes into your gimbal control mode where you can press to recenter the gimbal, flip the gimbal into selfie mode, change from slow follow to fast follow (or vice versa), and change between tilt lock, FPV, and Follow modes. the gimbal. What I like is when you press on the icons it tells you exactly what they are.
Swipe Down – This goes into the settings mode where you can see your battery level, Calibrate the gimbal, turn the tilt control on and off, enable the auto power off function after 5 minutes, see how much media storage you have and reformat your card, change the antiflicker setting, change the operating language, find out what firmware you are running, change the panorama mode, and change the brightness of the touchscreen.
It’s very easy to get out of the menu system, all you need to do is press one button. While the controls are pretty good on the touchscreen, they are somewhat limiting and you really do need to use the app on a smartphone to make a lot of the key changes. There is no way on the touchscreen of changing, let alone seeing key information like shutter speed, ISO, and white balance. You also can’t change between the auto and manual video shooting modes.
If you have made manual settings with a smartphone attached and then you disconnect your phone, the Osmo Pocket will keep those same settings.
The touchscreen display is really only useful if you are primarily shooting in the Auto mode. By default, the Osmo Pocket automatically goes to 4K 30p if you don’t have a smartphone attached and aren’t using the app.
You can change the resolution and frame rates by swiping left once you are in the video menu. Strangely this only allows you to choose between either 30p or 60p. There are no options to choose 24, 25, 48 or 50p. If you want to shot in these resolutions then you need to select them using the Mimo app. Hopefully, this will change with a firmware update.
Battery
The Osmo Pocket uses a built-in LiPo 875 mAh battery. This can’t be replaced or removed. DJI quote an operating time of 140 mins when shooting 1080p 30 fps video continuously and a charging time of 73 mins.
Yes, it’s a pity the Pocket doesn’t have a removable battery that you can swap out, but the good news is that the battery charges up really quickly. I was finding that it took just over an hour for a completely dead battery to get charged up to full capacity.
I found the battery life to be more than acceptable if you are just going to use the Pocket for a few hours or a handful of shots. If you are taking it somewhere remote or you want to shoot with it for a whole day then you will need to get hold of a USB power bank.
The nice thing is, you can actually charge and operate the Pocket at the same time. If you have a USB power bank it’s pretty easy to just plug it in and use it with the Pocket. I recommend you use a long cable and perhaps place the USB power bank in your pocket (not the Pocket, but your actual pocket!) because you can’t really attach it to the Pocket or your phone.
DJI Mimo app
To get the most out of the Osmo Pocket you really do need to use the Mimo app and a smartphone. The Mimo app lets you monitor the Pocket’s image in real time as well as control all of its functionality and features. The only downside to using the app is you have to connect your smartphone to the Pocket, which takes away from the compact nature of the product.
Ideally, I think the best solution is to probably get the optional Wireless Module. That way you can connect via Bluetooth and make changes and monitor on your smartphone while maintaining the small footprint that the Pocket has. It’s strange that the Bluetooth wasn’t built into the Pocket, maybe they just ran out of room, or they just want to you spend more money by buying additional accessories.
Frame rates and resolution
Despite being a consumer product for the masses, the Osmo Pocket has quite a few frame rates and resolutions to choose from. If you want to shoot in anything other than 30p or 60p you need to be in the Pro mode and not the Basic mode. Once in the Pro mode you can select 24 (23.976), 25, 30 (29.970), 48 (47.950), 50 or 60 (59.940). Now anyway you look at it, 4K 60p is impressive in a device this size. Even the new Mavic Pro 2 can’t do 4K 60p.
The Pocket can record in .Mov or .MP4. The H.264. Mov codec being used is a variable bitrate YUV 4:2:0 codec that records in an ITU-R BT.709. color space. I did a few tests where I shot the exact same shot (a moving shot to stress the codec) in both HD and UHD at 25p using the Fine and the Superfine setting. I also tested both UHD and HD at 60p (this can only be done in the Fine setting). I wanted to see exactly what bitrates were being recorded in the various modes and resolution.
Here are the results:
HD Superfine 25p – 30.71 MBit/s
HD Fine 25p – 24.85 MBit/s
HD Fine 60p- 67.16 MBit/s
UHD Superfine 25p – 87.75 MBit/s
UHD Fine 25p – 79.88 MBit/s
UHD Fine 60p – 100.23 MBit/s
Now as this is a variable bit rate codec these figures will change depending on the shot you are doing. It was interesting to see that the HD bitrate is still very low, regardless of whether you are shooting in Superfine or Fine. The difference when shooting in Superfine or Fine in UHD is very marginal and I’m not sure you would actually be able to tell the difference between the images.
DJI likes to spruce that the Osmo Pocket can record at 100 MBit/s but this is only the case if you are shooting in UHD 60p.
Auto and Manual shooting modes
You can choose to shoot in an Auto mode or M (manual) mode. If you use the Auto mode your ISO and Shutter speed are changed automatically. The only thing you can manually adjust is the EV, but even if you do adjust it, the ISO and shutter speed will automatically adjust to compensate.
The Auto mode allows you to just turn the gimbal on, hit record, and capture usable footage in a hurry without having to do anything. Given how quickly the Osmo Pocket turns on, you could literally pull this out of your pocket and capture an event that was unfolding in front of you in seconds.
I found that the Auto mode worked ok in nice even lighting conditions, but it does struggle in high contrast or high dynamic environments. The auto exposure does take a bit of time to adjust (although it does do it quite smoothly). Just like the exposure, the AFC (Auto focus continual) works ok if you are in nice even lighting situations, but as soon as you try to use it in contrasty conditions it starts to struggle and is very slow at making adjustments.
Manual Video controls
For any professional user of any camera, having manual control over key parameters is a must. While the Osmo Pocket doesn’t give you a ton of manual controls, a lot of the key parameters you would want to change manually can be changed. The Pro mode will also have a Color tab where you can change between normal and D-Cinelike (this wasn’t available on the version of the app I was using).
You have to be in the Pro mode in video settings to take advantage of most of the manual control options that are available on the Osmo Pocket. In the Pro mode, you have the ability to control the following:
White Balance
You can choose from a variety of preset white balances or you can dial in your own Kelvin color temperature. I found that the auto white balance did a pretty good job unless you were in mixed lighting conditions. When using the custom white balance setting I still found that the white balance never quite looked right to my eye. Without being able to do a physical white balance the colors you will get will always be slightly off. Again, in nice even normal lighting conditions it’s fine, but as soon as you get into mixed lighting it does struggle.
Anti-Flicker
This is very useful to have and can help you avoid flicker from fluorescent lights. There is a setting where you can choose to select either 50 or 60Hz, but you can only change this in the Auto shooting mode. In the manual shooting mode, it defaults to whatever frame rate you have chosen to use. It’s strange that you can’t change it in the manual shooting mode as if you want to shoot in say 25p in a country that is 60Hz, you can’t change the anti-flicker to 60Hz, it will be stuck on 50Hz.
Volume Amplification Level
This allows you to adjust the in-built microphone between Auto, Low, Moderate, and Fine.
Noise Reduction
This turns on/off noise reduction.
Overexposed
Overexposed is actually zebras. There is no way of changing this, it simply just shows you zebras on areas that are overexposed.
Histogram
There is a basic histogram you can bring up on the Pocket. This is handy to have as there aren’t any other exposure assist tools available on the Pocket, apart from the EV. You can change the position of the histogram by simple dragging it on the screen.
Focus Mode
There are two focus modes available on the Osmo Pocket, AFC (Auto focus continual), and AFS (Auto focus single). When you use the AFC mode, whatever the yellow box is on is what will be in focus. When the yellow box is thicker it has grabbed focus, when it is thinner it hasn’t locked onto anything yet.
You can lock the focus by holding down the yellow box until a little lock symbol comes up.
I found the AFC to be fairly slow in a lot of cases and it takes quite a long time for the focus to transition from something that is close to something that is far away. It also doesn’t work well in constrasty scenes or low light conditions.
I found the AFS mode to be a lot quicker and more responsive, but it does mean you have to physically touch the screen to select focus.
ISO
In video mode, the ISO can be adjusted from 100 up to 3200.
Shutter Speed
In video mode, the shutter speed can be changed from 1/25 up to 1/8000. The shutter speed can only be shown in degrees and can’t be shown as a shutter angle. The shutter speed always has to be manually adjusted it won’t follow the 180-degree shutter rule. If you select 60p for example, the shutter speed won’t automatically jump to 1/120. The only exception is if you choose the slow-motion shooting mode. In this mode, the slowest shutter speed available is 1/120.
EV
The EV is a nice way of at least being able to know whether your exposure is in the ballpark or not. If you are in the Auto shooting mode there is a brightness slider so you can overide the exposure. But it is important to note that this conversely affects your ISO and shutter speed.
The only manual feature that is missing is aperture control and that’s missing because the camera has a fixed F2.0 lens. It would have been nice if the Osmo Pocket had an adjustable aperture, but it doesn’t. For a stabilized 3-axis gimbal that can capture UHD 3840 x 2160 60p images and costs $349 USD, it’s hard to complain that it doesn’t have an adjustable aperture lens.
Superfine
There are two quality setting modes, Fine and Superfine. When using the Superfine video setting, footage gets recorded at a higher bit-stream.
Superfine can only be used when you select Pro in the video settings. If you are in the Basic video mode then the option for Superfine is greyed out. You cannot use the Superfine setting when you choose frame rates above 30p in either HD or UHD recording.
There is a warning that comes up if you do select Superfine that says, Shooting superfine video may cause the camera to heat up. This is a fairly vague warning that may leave people a little confused. Does it mean that the camera will get really hot and shut down, or does it mean that it will just get a little bit warmer to the touch but everything will still be ok?
From my time testing the camera I did definitely notice that the Osmo Pocket did get a lot hotter when selecting the Superfine setting. It didn’t turn off or come up with any warnings, it simply just got hotter to the touch.
Picture profiles, adjustments, and D-Cinelike
There are no picture profiles available on the Osmo Pocket and no D-Log. There is also no way of changing sharpness, saturation, or contrast. Basically what you see is what you get. It would have been nice to have had the ability to change the image parameters, but at the end of the day this is a consumer product, so it’s not a massive surprise to me that DJI didn’t include any of these features.
The Osmo Pocket will have a D-Cinelike color profile option you can choose, but in the version of the app I was testing, it wasn’t yet available. According to DJI, D-Cinelike video will be available for app updates that will be released soon.
Tracking
Just like on some of the DJI drones, you can track an object or a person by simply drawing a box on the screen. This can only be done on a smartphone using the app.
The tracking function is available in almost all the shooting modes (including slo-mo), but not when doing 4K 50/60p.
I found the tracking to be a little hit and miss. Sometimes it worked fairly well and other times it didn’t. It also seems to have a bit of a slight delay where it is always trying to catch up with the subject you are tracking.
How do you get into underslung or briefcase mode?
DJI recommends two methods for doing this:
Method 1:
Lock the gimbal, hold the Osmo Pocket handle, tilt the camera until the camera faces straight ahead, and the Osmo Pocket will enter Flashlight mode automatically. Hold the Osmo Pocket upright to exit Flashlight mode.
Method 2:
In Follow mode, hold the Osmo Pocket handle, tilt the camera until it faces straight ahead, swipe up on the screen, and click Recenter to enter Flashlight mode. Hold the Osmo Pocket upright, and click Recenter again to exit Flashlight mode.
Slow motion
youtube
If you select to shoot in the Slow Motion mode it does this with quite a substantial sensor crop.
It also seems to default to 1080 30p and there is no way you can change the frame rate to anything else. This is bizarre, to say the least. The Pocket also doesn’t tell you anywhere what the actual frame rate is. All you get is a little icon that says 1080 4x. The video that is captured is 120fps in a 30p file. This means it is already slowed down and you don’t need to conform it later on. The max bitrate when recording in slow motion is around 25 MBit/s.
As far as the image quality goes in slow motion, it’s actually ok, but it’s not nearly as good as the normal modes. The low bit rate and compression certainly don’t help and there are quite a lot of image artifacts and noise present in the image. In nice shooting conditions the slow motion can look decent, but if you try and use it in tricky lighting conditions you will quickly see its limitations.
UPDATE: Apparently there have been reports that this feature is going to be removed from the shipping units. I contacted DJI directly and found out that it won’t be in the shipping version, and neither will Story Mode. Both Slow Motion and Story Mode will, however, be available at some stage, but that availability is not yet known.
Image quality
The actual video quality really depends on what you are doing with the Osmo pocket. It’s fairly decent in controlled conditions, but it struggles in certain shooting scenarios.
What separates the big boys from the little boys is how a camera handles mixed lighting conditions, high dynamic range scenes, and shooting scenarios that aren’t perfect. Any camera can look good in nice even light or controlled conditions and its hard to pick a cheap camera from an expensive one. Where cheaper cameras fall over is in difficult conditions that aren’t controlled or when you using them in mixed lighting.
This is exactly the case with the Osmo Pocket. The footage looks pretty good in nice even light, and scenes without a lot of dynamic range. As soon as you try and use the camera in mixed lighting, high dynamic range scenes, or where there is a strong light source, it tends to fall over. That’s not to say the image becomes unusable, but you do need to know this camera’s limitations.
With no picture profiles (although D-Cinelike is coming), you really do need to shoot in a way that is going to very close to how you want your final image to look. As I mentioned earlier it’s a 4:2:0 code that has a fairly low bitrate unless you are shooting in UHD 60p. You can’t go pushing it or trying to correct issues in your edit. There is also no way of adjusting sharpness, contrast or saturation so the images you get do look overly sharp in a lot of situations.
Now I did purposely try and push the Osmo Pocket by shooting in very difficult lighting conditions to see how it held up. There is no point in reviewing any type of camera if you are just going to go and shoot some shots in nice even lighting conditions. You really need to see how a camera performs in the real world. Some of the conditions I shot in would have been a challenge for even the most capable of cameras.
You can still get nice results, but again, and I’m going to keep stressing this throughout the review, you need to know its limitations. In saying all of this, I was fairly happy with quite a lot of the shots I got.
In my opinion, the footage you can obtain from the Osmo Pocket is very similar to that of the original Mavic Pro at most frame rates. It has a similar look and feel to it, but overall it’s a little bit sharper and has slightly less issues due to compression. That’s not to say the Pocket still doesn’t suffer from compression issues because it certainly does in some shooting scenarios. I don’t think this is a camera that is available on any of DJI’s drones, I have a feeling it is a brand new camera. There is a good chance this may be the same camera that ends up on something like the Mavic Air 2.
The camera also has that quite nasty and not very pleasing flare that is reminiscent of what you will get from most fixed camera DJI drones.
Any light that is shining straight down the barrel of the lens tends to cause a magenta tinge to your images. This is not something that can be easily corrected later on.
It’s no coincidence that the best looking images are when you record in UHD in 60p. I did do some tests in HD, but with the low bitrate I found the images looked quite soft comapred to when you shoot in UHD.
Dynamic range
The Osmo Pocket’s dynamic range is not great. Above you can see the lack of information in the mids and shadows if you try and protect the highlights. The way DJI are processing the image seems to elude to the fact that they want to crush the mids and shadows to reduce noise.
Above you can see that even though the highlights are clipping, there isn’t much detail being preserved in the shadows or mids.
Above is an extreme example, but if you try and expose for your mids in a high dynamic range scene the highlights become massively blown out and the overall image falls apart.
Unfortunately, I wasn’t able to test the D-Cinelike color profile. Whether you could obtain better results using D-Cinelike given the fact that it’s a relatively low bitrate 4:2:2 8-bit codec that is being recorded, I’m not so sure.
In pointing out all of these limitations, you do need to keep in mind that this is a $349 USD camera/gimbal that can capture 4K 60p that fits in your pocket. I’m willing to give the Osmo Pocket a hall pass when it comes to image quality because, in all honesty, I was never expecting it to be any better than it actually is.
How does the image compare to an iPhone?
As far as an image comparison goes I wanted to see how the Osmo Pocket compared to an iPhone, in this case, an iPhone 7+. Now you may why be asking, why is he comparing this to an iPhone? Well, everyone is carrying around smartphones these days and they are quite capable of capturing pretty good results in the right conditions. The Osmo Pocket is no different. Both the iPhone and the Osmo Pocket use small sensors so I think it is a fair comparison.
I did a couple of short tests with both the Osmo Pocket and the iPhone 7+ recording UHD 30p in their auto modes. I wanted to see how the overall image quality compared, as well as to see how they both dealt with noise and mixed lighting conditions. Both cameras looked quite different in their auto settings. The iPhone image is a little cooler and the black levels are slightly raised. The iPhone also has quite a desaturated image compared to the Osmo Pocket, but the image from the Pocket is far sharper and more detailed than that of the iPhone.
As far as noise goes, they are fairly similar, but I found that the iPhone seemed to be cleaner when used in dark environments. The iPhones cleaner image does come at the expense of sharpness and detail. The Osmo Pocket’s image is sharper and more detailed.
The iPhone (at least when the auto settings are used) seems to handle mixed lighting conditions a lot better than the Osmo Pocket. The iPhone image looks more natural, while the Osmo Pocket seems to take on quite strong color casts. In saying that, this could come down to the auto white balancing functionality of both cameras.
As far as highlight handling goes, again they were very similar. In the auto settings, the iPhone 7+ does seem to capture a lot more information in the mids and shadows, whereas the Osmo Pocket seems to crush them down quite a lot.
The ISO and shutter speed shift in Auto mode is quite a bit slower on the Osmo Pocket than it is on the iPhone.
You really do need ND
The optional ND filters that will be available for the Pocket are in my opinion, an absolute must. Even at 100 ISO on normal sunny days, you will have to run upwards of 1/400th shutter to maintain correct exposure. Running such high shutter speeds does give the images a very almost overly sharpened look.
Low light performance
The Osmo Pocket isn’t a low light powerhouse. If you have ever used a DJI Phantom, Mavic or Spark you will be well aware that you can’t really push the ISO very much. The Osmo Pocket performs well at 100 and 200 ISO, 400 is ok, 800 and beyond start to get quite noisy. At 1600 and especially 3200 you start to see very blocky fixed pattern noise. I would be happy using it up to 800, and in a pinch, I would use 1600 or 300 if I had absolutely no other options.
There is a Noise Reduction mode you can activate, but in all honesty, I couldn’t really tell much of a difference with it turned on or off at higher ISOs.
I tested the camera’s low light performance in HD as well as UHD. In HD there is significantly less noise than when shooting in UHD, particularly at higher ISOs. Above you can see a 200% crop in at 800 ISO on both the UHD and HD images. The HD images have far less fixed pattern noise and are generally cleaner at any ISO levels above 400. If you shoot in UHD and then edit in 1080, the noise becomes slightly less noticeable.
Usability
This is probably the cameras biggest selling point. Its tiny size and weight mean it can be literally kept in your pocket and you can just pull it out and use it at any time. The convenience factor of this alone makes the Osmo Pocket worth getting.
The usability of the Pocket if you don’t want to connect it to your smartphone and use the app is quite limiting. You really do need to use a smartphone and the app to get the best results out of the Pocket.
The app is simple and easy to use and being able to hook up a large, bright screen to it certainly helps with composition, framing, and getting proper exposure and focus. This is something that can’t easily be done with just the Pocket alone.
The only problem with using a smartphone is that all of the weight is being supported by the lightning or USB-C connector. This means that quite often both devices (your phone and the pocket) are wiggling around slightly. This causes your gimbal shots to not be as smooth as they could be. You really do need to hold both the Pocket and your phone at the same time. I can see a lot of people breaking the lightning or USB-C connector on the Pocket.
If you place the Osmo Pocket down on a flat surface with the phone attached, it is going to lean to the left. While this isn’t a big problem, you should be aware of it.
I actually found that by placing the included USB-C connector under the left hand of the phone, put everything back up to the right height.
Gimbal performance
I’m not going to sugar coat it, I didn’t find the gimbal performance of the Osmo Pocket to be that amazing. It’s not nearly on the same level as say a one-handed gimbal from Zhiyun or DJI’s own Ronin -S. When using the Osmo Pocket the gimbal performance just never seems smooth or refined. The Pocket’s gimbal was probably originally designed for drone use and not for use on the ground.
While it does to an adequate job for following subjects I found it was a little shaky if you start trying to move around too much. A lot of this could be related to having a smartphone attached to Pocket that is causing the balance to get thrown off ever so slightly. To check I did some tests with using the Pocket with a smartphone attached and without. I didn’t find any noticeable difference in the gimbals performance.
As the gimbal is based on drone technology, it’s no real surprise that the Pocket performs well at high speeds. I found the smoothest shots I was able to obtain actually came when I was riding a pushbike.
Audio
The Osmo Pocket does have a built-in microphone, actually two built-in microphones. DJI says that the microphones adopt a noise-reduction algorithm, greatly improving the Osmo Pocket’s recording quality. The quality is ok, but it is not great, it’s also quite susceptible to wind noise. You wouldn’t want to rely on the internal microphones in the Pocket for any kind of quality audio capture. It’s best to think of it as a scratch mic.
What you do need to be aware of is that no audio meters get displayed on the Pocket’s touchscreen, and you can’t see any audio meters on the Mimo app until you hit the record button. You can’t physically set any audio levels, all you can do is choose either Auto, Low, Moderate, and Fine. These sort of act as audio level controls, but I think it would be far easier to have just had an option for Auto as well as the ability to manually set a level.
There is also no headphone jack so you can’t monitor the audio in any way. When you play back clips using the Mimo app you can listen to the audio.
You will be able to attach an external microphone to the Pocket, but that can only be done by purchasing the optional DJI Osmo Pocket 3.5mm Adapter.
Timelapse
youtube
The timelapse options on the Osmo Pocket are actually pretty good and you can manually set the recording interval (from 3-60 seconds), the length of the timelapse you want, as well as your ISO and shutter speed.
The only problem I found, is just like the Slow Motion recording, the file only gets recorded in HD in 30p. You can’t do a UHD timelapse and you can’t select any other frame rates.
Playback
You can see and play back all of your video clips and photographs on the Osmo Pocket. You can see key information, export the clips straight from your phone, or trash anything you don’t want to keep.
Accessories
I can never quite work out why DJI releases a product and then you have to wait for ages for the accessories to become available. Wouldn’t it make more sense to have all of them available at launch?
Here is the entire line of accessories will be available.
Accessory Mount- The accessory mount makes Osmo Pocket compatible with action camera accessories so you’re able to capture your adventure footage, such as when mounted on a helmet, backpack or your wrist.
Wireless Module– The wireless module supports Wi-Fi and/or Bluetooth transmission between Osmo Pocket and your smartphone, providing remote access to the camera feed and control of Osmo Pocket; perfect for setting up a Timelapse or Motionlapse on a busy city street.
Controller Wheel– The wheel allows you to precisely control gimbal movement (left-right or up-down) enabling you to easily adjust the composition of your shot. Re-center the gimbal or switch to selfie mode easily with dedicated buttons on the handle.
Expansion Kit– The expansion kit includes the Accessory Mount, Wireless Module and Controller Wheel.
ND Filters Set- Specifically designed for Osmo Pocket, ND filters attach to the front of the camera to reduce the amount of light entering the sensor. The ND Filter Set offers several levels of filter darkness and allows for more control over the camera’s aperture, exposure time, and sensor sensitivity settings.
Waterproof Case- Bring a unique underwater perspective to your footage using the Waterproof Case which can be placed at a depth of 60 meters.
Extension Rod– The Extension Rod attaches to the Lightning or USB-C port and provides 31 inches of reach to Osmo Pocket, opening a world of new creative angles that are normally difficult or impossible to get. A gimbal control joystick and camera button on the handle were designed for remote control when using the Extension Rod and a tripod was added to the bottom for expanded use cases
Charging Case– This dual-purpose case not only protects Osmo Pocket while in transit but charges it as well. Dedicated sections were added into the case for your MicroSD card and ND filters so you can quickly grab your Osmo Pocket and know you’re ready to capture those moments and adventures.
3.5mm Adapter– The 3.5mm Adapter allows you to connect an external microphone if you prefer to capture audio using a separate device.
Competition
I know the Osmo Pocket is bound to get compared to the GoPro HERO7, but in all honesty, I feel like they are two completely different tools, despite their similarities. The HERO7 has a much wider field of view (6mm min – 33mm max) and is a lot more robust for use in action sports and mounting on cars etc.
I actually think the Osmo Pocket’s main competition is from smartphones. With the video and still recording capabilities continually improving on smartphones, you can get some pretty decent results in the right conditions. Just about everyone has a smartphone and it’s something that we almost always have with us. Despite the Pocket’s portability, you will have to convince potential buyers that it’s worth carrying around another device that offers similar image quality.
Hopefully, there is an Osmo Pocket Pro in the works
A lot of professional shooters would be fairly happy if DJI released an Osmo Pocket Pro that utilizes the same camera that is on the Mavic Pro 2. If it had a larger 1″ sensor, H.265 recording and 10-bit, even if it had to be physically bigger, I think it would tick a lot of boxes for people looking for a small, compact and more professonal solution.
Is it too expensive?
$349 USD doesn’t sound like a lot of money, heck most of the media cards I own cost more than this, but for a consumer market, it might be a little on the pricey side. I’m surprised DJI didn’t actually make something with slightly less functionality and market it for $199 USD.
I personally think the price is ok given what it can do and its feature set.
Conclusion
Despite some of its limitations, I really like the Osmo Pocket. It’s just a really cool product that is bound to find its way under a lot of xmas trees this year. Even though it costs $349 USD (which is expensive for a consumer product like this), I still think it will sell in droves. Just look at how many people have bought drones.
No, it doesn’t have any picture profiles, it can’t shoot in Log, it’s not particularly great in mixed light, it doesn’t handle highlights particularly well, and the gimbal performance could be better, but you know what, none of that matters. The size, convenience factor, and capabilities of the Osmo Pocket make you forget about what it can’t do, and remind you what it can do.
The Osmo Pocket is a bit of a jack of all trades, master of none. It’s a capable device that I think a lot of shooters will buy just to keep in their kit. I like to think of it as a nice emergency camera that I can keep in my pocket or a bag and pull out in situations where I need to shoot something that isn’t possible with another camera.
0 notes
Text
DJI Mavic 2 Pro Review: Movie Magic
New Post has been published on https://www.articletec.com/dji-mavic-2-pro-review-movie-magic/
DJI Mavic 2 Pro Review: Movie Magic
Drone season is raging so hard right now. I am positively itchy with drones. The Mavic 2 Pro, however, is the first one whose footage has made my tongue fall out of my mouth and unroll like a Loony Toon. Not only is the video quality incredible, but it’s gotten way better at tracking subjects. There’s also the Mavic 2 Zoom to consider, the Pro’s plucky sibling. Let’s break this thing down.
DJI
There’s really just one Mavic 2 drone with two camera options. Apart from the camera, the Pro and the Zoom are identical. Both retain the same foldable design as the original Mavic Pro, but they’re slightly bigger and heavier now. That’s not what you generally hope for, but what you get in return is considerable: a larger battery with up to 31 minutes of flight time (in my testing, 25 minutes was about the average) and the ability to travel and track objects up to 45 miles per hour.
Arguably the most-important addition, though, are the new sensors giving the Mavic omnidirectional obstacle avoidance. Not only that, its revamped version of ActiveTrack—now ActiveTrack 2.0—can predict where you’re going to go. The previous incarnation would stop and hover in place if it encountered an obstacle while tracking you; you had to grab the remote and navigate it to safety yourself. With the new version it will encounter, say, a tree branch, then go around it and continue tracking you. It works remarkably well.
LEARN MORE
The WIRED Guide to Drones
The drone maxes out at 12 miles per hour with obstacle avoidance switched on, so you aren’t going to be able to go full-tilt on a mountain bike through a densely-wooded area. Still, I ran in and around some fairly dense trees and bushes and it did a commendable job of staying with me. I was certainly able to lead it into situations it couldn’t get out of, and it would lose me here and there, but it never once crashed. That’s really the key thing here: This is the most crash-proof drone I’ve ever flown, by a long shot. For amateurs, that’s a major selling-point.
youtube
In general, the Mavic 2 just feels more polished than the first generation. There’s less wobble in the joints. The lens cover is easier to use and really locks the gimbal in place. Significantly, the remote control seems to have far greater range and throughput. At one point the drone was more than three miles away from me (deep in the wilderness, I promise!) and I still had solid, real-time video coming through with nary a glitch.
One of the new features in the drones is Hyperlapse, which I was very excited about, but which left me underwhelmed. The video is not stabilized, so there’s a fair amount of shake, and it’s limited to 1080p. This feels like a big misstep. It has some cool features, like the ability to control the length you want the finished video to be, and some clever ways of controlling the drone while shooting the hyperlapse, but it’s let down by the end result. I’d love to see them fix this with a software update. If a GoPro Hero7 can make a stabilized 4K hyperlapse, then the Mavic 2 really should be able to as well. It’s worth noting that you can save the full resolution photos from a timelapse and put them together later on your own, but that takes some doing.
This Drone, That Drone
There real differences between these two drones is in the cameras. The Zoom has a very decent camera with 2x optical zoom capabilities—24mm to 48mm equivalent—and you can push that all the way to 96mm if you’re shooting at 1080p and don’t mind some digital zoom. It’s a cool feature that would be useful for, say, filming animals you don’t want to get too close to.
It also allows you to do a pre-programmed dolly-zoom shot (a.k.a. the Vertigo shot that Hitchcock made famous), like the Parrot Anafi. It does produce a really cool effect, but only if you have the background lined up just right. The dolly-zoom pulls the drone back while the camera zooms in, keeping the subject the same size in the frame while the background appears to grow and come closer. The Zoom also a “Super Resolution” mode for photos, which zooms in and automatically stitches together nine photos into one 48-megapixel with truly impressive detail. Pretty neat, but only for still subjects or far-off scenes.
This is the most crash-proof drone I’ve ever flown, by a long shot.
For the Mavic 2 Pro, DJI partnered with high-end camera-maker Hasselblad to build a camera with a one-inch sensor. That’s four times larger than the image sensor on the Zoom, and the difference is striking. It’s much better in low-light, and its max ISO (that’s the sensor’s sensitivity) jumps from 3200 to 12,800. The Pro can also shoot 10-bit 4K Dlog-M at 100Mbps. That’s basically like shooting RAW video. When you first look at the footage it’s kind of flat and gray, but it’s retaining a huge amount of information. All you have to do a slap a LUT (a package of color-grading presets, basically) on it in Premiere or Final Cut and it looks incredibly professional.
Even if you leave everything on auto, you still get killer results. The vast majority of the video I shot was with the standard, out-of-the-box settings, because I think that’s how most consumers will use it, at least for starters. Detail is still terrific, colors pop, and everything has a very cinematic sheen to it. It certainly does better with well-lit subjects than backlit ones, like any camera. The one weird thing with the Pro was that if I set it to Auto White Balance (AWB) sometimes it shifted in the middle of a shot, seemingly for no reason. Something like that makes it really difficult to color correct your footage in post. Obviously, you can just turn off AWB and it’s not an issue, but it’s still something that should be fixed.
So what’s the verdict? As a platform, the Mavic 2 is fantastic. Personally, I’m not as drawn to the Zoom. It’s just not a feature I see myself using that often, and frankly I’d rather stick with the DJI Mavic Air because it’s just so much lighter and more compact. The Pro, however, has me thinking twice. The image quality is just so dang good that, when combined with the improved tracking and omnidirectional obstacle avoidance, it’s hands-down my new top recommendation for drones.
It is, however, $1,500 (the Zoom is a bit more reasonable at $1,250). First-time drone buyers should probably buy the cheaper Air. For those who want the prettiest footage possible from a compact drone, well, the Mavic 2 Pro is the first consumer-oriented drone that actually earns the Pro name. The footage really does look that good.
Source link
0 notes
Photo
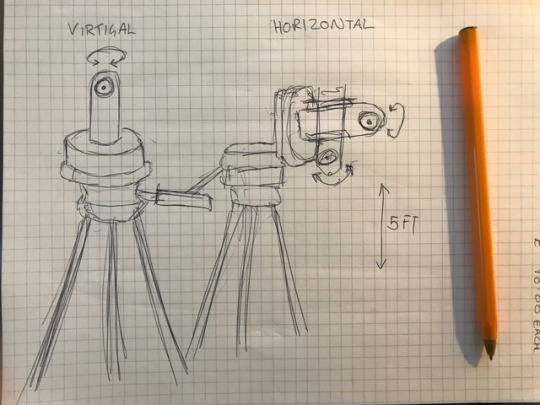


These a my rough designs for the rig I’m going to try and set up to create motion with the 360 camera. The problem is that it shows everything including the rig. I’m going to try it out at home first before moving it outside to make the final film. The idea is simple, an egg timer with a screw on top and underneath designed for timelapses will rotate on the tripod slowly. I can then speed up and slow down the footage to what suits the film best in post. I’m going to rotate it straight on top of the tripod and tilted on its side at a nineteen degree angle as well. I’m going to have to be precise with my measurements to make sure each shot integrates well with the film as a whole.
0 notes
Text
Skyline Drive 360 - Reading, PA
The first blog post of the year and it isn't even going to be about Lancaster. We rang in the new year with some sick days here at home, so we haven't been getting out much yet. Anxious to get out, but also needing to avoid the cold, we took a little drive up to Reading, Pa so I could capture a 360 video of the infamous Skyline Drive.
Since getting my SP360 setup back in December I've been looking for unique spots for 360 experiments. 360 Video definitely has a bit of a learning curve, BUT I like to share what I capture as I continue to learn. I've been converting a lot of the videos to tiny planets and such for Instagram. Be sure to follow along over there to see what I'm up to!
Some 360 timelapse footage at the Reading Pagoda. Getting a little today turvy with #insta360studio #timelapse #timelapsevideo #best_timelapse #kodakpixpro #pixpro #kodak #sp360 #360 #vr #grandlancaster #berkscounty #readingpa #reading #pa #pennsylvania_life #centralpascenery #onlyinpennsylvania #uncoveringpa #overlook #video #ipulledoverforthis #everything_imaginable #nothingisordinary #royalsnappingartist #instacrew #all2epic #transfer_visions @kodak @kodakpixpro @insta360official
A video posted by Seth Dochter (@sethdochter) on Jan 14, 2017 at 1:12pm PST
I find Skyline Drive to be very interesting. We make it up to the area quite a bit throughout the year. In this video I drive down from North to South passing the William Penn Memorial Firetower, a few Overlook pull-offs, and of course the Reading Pagoda. While some of the stonework and other features are in need of repair there is lots to explore and discover, and tons of photos opportunities. Just check out the slideshow below from my Skyline Drive Gallery on http://dochterdigitalmedia.com.
Photo Gallery
Videos
The first video is the 360 driving footage from the north side of Mount Penn. After turning onto Skyline Drive from McKnights Gap Rd I pulled over quickly to turn on the camera. So I began recording at the Northernmost edge of the Park property and filmed until just after passing the Reading Pagoda.
youtube
The second video is shorter than the first and flattened. While trimming for Instagram I selected some of the highlight portions of the drive and controlled the perspective using Insta360 Studio. While I enjoy 360 and using VR headsets three is still much to learn on my end and many advances to come in the technology. I think flattening the 360 footage using Insta360 Studio is a great way to utilize the advantages of 360 video in a format most people use to consume their content (i.e. not looking around frantically with a giant thing strapped to your face). I hope you've been enjoying these short 360 clips. Feel free to leave a comment below and let me know what you think.
youtube
For more details on what is available to do on Skyline Drive, as well as information about the Reading Pagoda, The William Penn Memorial Firetower, events, and more simply visit http://www.pagodaskyline.org/
0 notes
Text
Example of AutoContent List and Review
Update - 2018.01.27This is “Title outside Content” Post Layout. You can also add sticky contents panel
While the GoPro Hero5 has many of the same specs as the previous generation when it comes to video and photo resolutions, there are some new features in it. Individually no single feature is a massive leap forward in the action cam industry, but collectively they represent a notable and substantial difference over the Hero4 Black. This section is mostly focused on these new features, while the remaining sections take a deeper dive into the core functions of the camera, as well as touch on these new features in more detail.
Fully Waterproofed: Probably the most notable item is that the GoPro Hero5 Black is now fully waterproofed without the need for a separate case, just like the GoPro Hero4 Session was. In fact, it has nearly the same rubberish material on the outside.
What is of more concern though is the USB-C/HDMI port door. This door pops off for placement into the Karma gimbal/drone, as well as just for charging:
Deals
Gopro 7 deals
GoPro HERO7 Black — Waterproof Action Camera
$342.78
Buy this item
GoPro HERO7 Black — Waterproof Action Camera
$365.95
Buy this item
GoPro HERO7 Black
$399.00 $459.00
Buy this item
GoPro - HERO7 Black HD Waterproof Action Camera - Black
$399.99 $424.11
Buy this item
Now this won’t easily pop-off while it’s locked in place, as you have to press a button down to open it (plus slide it). But, the trick will be not losing it after charging your camera or while the charging cable is attached. GoPro does sell the door as an accessory (albeit over priced), and I know I plan to buy an extra door and then seal it up somewhere special in my backpack/suitcase for traveling. Because I guarantee you that I’ll lose it at the most inopportune time on a trip to some beautiful watery location and be unable to take pictures of The Girl underwater in a bikini without the door.
Speaking of doors that we don’t want opening up, we’ve also got the battery compartment down below. That holds both the battery as well as the micro-SD card:
Touch Display:
The Hero5 takes the touch display found on the Hero4 Silver and advanced it forward. As you might remember, the Hero4 Black actually lacked a display. This was one reason that the Hero4 Silver was actually a more day to day favorite of mine than the Hero4 Black was.
However, the touch display acts and feels significantly different here than the Hero7 Silver.
The entire menu system has been redone to make it more intuitive to find settings. Along the bottom it shows you the basics for that mode. For example, in the video mode it shows you resolution and frame rate.
You can tap on it to change these specs. Only the available frame rates will display for a given resolution. In theory this looks beautiful, but in practice it’s actually more cumbersome than I expected. I think this is because there’s just too many resolutions too closely together for a normal sized finger to hit the right resolution on that small display.
On the right side of the display you can enable various advanced settings for that mode, such as ProTune, Image Stabilization, and Audio Control:
All of this is of course waterproof as well. Though, it won’t work underwater. For that you’ll need to use the push-buttons on the top/side of the camera to change modes.
Speaking of a wet display, in general I found it doesn’t work well when wet either. Especially if your fingers are wet, it all goes to crap and fails to respond.
You can turn this option on/off, and it’s available in seven languages. Also, if you have the Remo accessory remote, that’ll accept voice commands too in the event the camera is out of range of your voice.
But…it’s not perfect. I found that it works most of the time when standing still. But once you start moving I found both it and the Hero5 Session actually perform worse than Garmin does. At about 10MPH (15KPH) I find the ability to give commands pretty much dies no matter which way the camera is facing. Whereas with Garmin it’ll continue working above that speed as long as the camera is facing you.
Video & Audio details
Ahh yes, video time. No better place to start diving into features than video modes. In many ways the Hero5 is similar in these modes to the Hero4 Black. After all, it too has 4K @ 30FPS and 720P @ 240FPS, the two ends of the spectrum that people often talk about. The footage looks beautiful in 4K – no doubt.
youtube
So what’s new and notable here? Well we’ll start with the video stabilization. Technically this is ‘electronic image stabilization’, which works by taking a larger resolution video clip (i.e. 4K) and then smoothing the video by offering a reduced resolution rate while stabilized (up to 2.7K). By doing this it essentially stabilizes by cutting the edges off the corners to make the video appear smooth. It’s the same thing that Garmin does on their VIRB Ultra 30 (but the Garmin is limited to 1440 vs the higher 2.7K), but is different than what Sony does with their new X3000R, where they use optical image stabilization. That’s better because it doesn’t crop any of the image.
To enable image stabilization, you’ll simply swipe from the right. It’ll warn you about cutting about 10% of the field of view:
For cases where you’ve got some light chop in the roadway, or even for hand holding the unit, image stabilization can dramatically improve things. Though, that’s at the sacrifice of resolution. If your final output product’s 1080p, then it’s largely a no-brainer. Do note that it generally works better when you’re shooting something that has a large portion of the image facing one direction constantly. Versus on a helmet mount, it can get a bit wonky as you move the view around a bunch.
What’s even more interesting though is the ability to record the native audio files from each microphone separately. If you enable ProTune, you’ll see a new option to do this. Within that you have three levels:
All of these were simply taken at room temperature; obviously aspects like environmental temperature will impact things considerably, as will other modes and increased frame rates. But those give you some basic bounds to work within.
Photo mode:
While the Hero7 Black doesn’t offer any more resolution than the Hero4 Black did, it does offer a number of substantial photo-focused features. First, the basics though. To get into the photo mode you’ll go ahead and tap the mode button until you see photos. Or, just tell the GoPro to take a photo using voice commands.
Now there are technically different photo modes, including the ability to take a burst photo, a series of photos as a timelapse, or night photos. Note that this photo timelapse is separate from the video timelapse option. This produces a crapton of photo files, whereas the video timelapse produces a single video timelapse file.
That’s the basic differences. Again, both cameras are very good, you won’t go wrong with either. For me, I prefer the Hero5 Black because I like to be able to see and frame up what I’m taking a photo/video of. Whereas the Hero5 Session it’s shoot and pray that you’ve got it lined up. Sure, you can use your phone for certain shots – but most of us won’t do that.
Our score
from WordPress https://www.geekyviews.com/example-of-autocontent-list-and-review/
0 notes
Last Seen Blogs