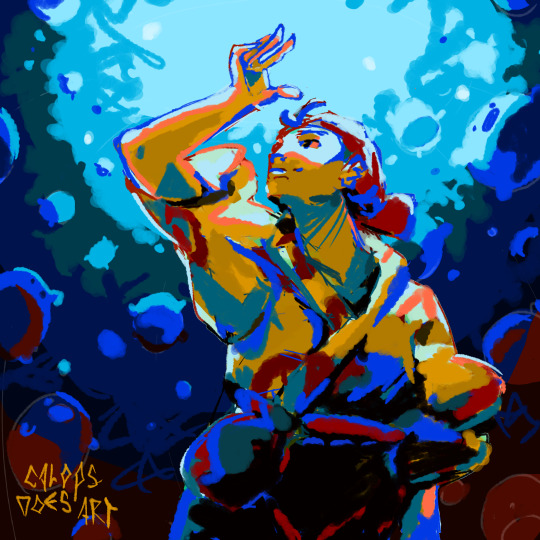
#calops draws
Note
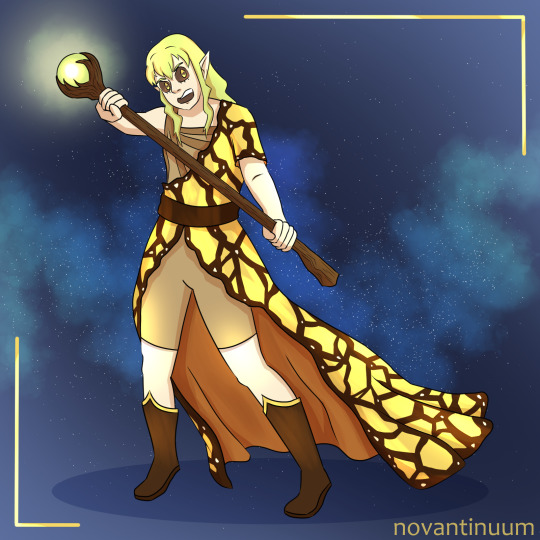
If you are still up for fanon swap stuff, maybe a moth Tango..? :o
ty ^^`

the image was so clear in my brain
#calops draws#calops paints#calops dies#artists on tumblr#hermitcraft#hermitcraft fanon swap#hermitcraft fanart#tangotek#tango tek#tango fanart#moth#cinnabar moth
789 notes
·
View notes
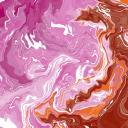
Photo
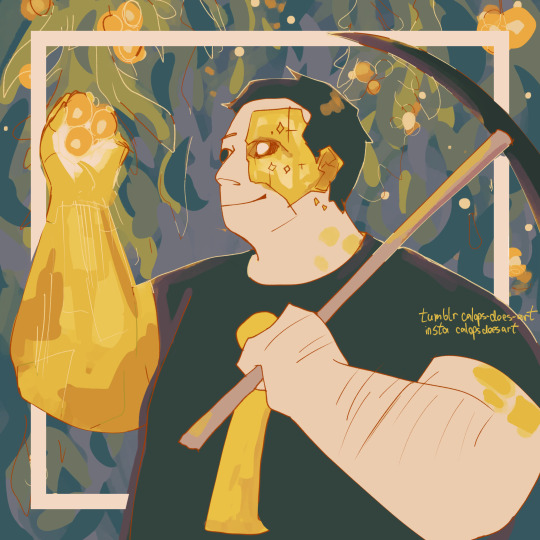
Art Fight defense #2, Silica for @calops-does-art! Very fun design to draw <3
Calops34′s profile
My profile
19 notes
·
View notes
Text
How to Create an Instagram-Inspired Neon Text Effect: Photoshop in 60 Seconds
What You'll Be Creating
Create awesome text effects like your favorite Instagrammers. Check out this video below!
Photoshop in 60 Seconds: Neon Text Effect
There are so many ways to bring your photos to the next level. In this video, I'll show you how to create an Instagram-worthy neon text effect in Adobe Photoshop. This text effect is inspired by amazing photographers like Calop and more, and you can create it with the font of your choice or with helpful smart objects.
Watch the steps unfold and get all the details you need in the process below. Check out more amazing fonts and resources on Envato Elements.
How to Create a Neon Text Effect in Photoshop
Start with the photo. Landscape photography usually works best for this effect. Consider compositions like roads where the viewer automatically gets drawn to the text.
Here I'll be using this Scenic Route Yosemite photo.
There are several ways you can create this effect. You can use the Neon Type from the video or the font of your choice, or you can even draw the text yourself.
If you're using the Neon Type smart objects:
Select the Neon On Group. Right-click to Rasterize the layer for each letter, and then apply the Layer Mask. Use the Rectangular Marquee Tool (M) to select the letter, and then Copy and Paste each letter onto your photo.
Build the entire quote you would like to use, letter by letter. Then Merge all the letters together, and adjust the size of the words with the Free Transform Tool (Control-T).
Go to Image > Adjustments > Hue and Saturation. Change the color to one that fits the scene better, but feel free to use any color you'd like. Here I changed the color to:
Hue: 26
Saturation: 87
Lightness: 64
To create the glow, create a New Layer set to Vivid Light. Then use a rich orange color (or one of your choice) #ffa369 to paint glow onto the letters, ground, and surrounding environment with a Soft Round Brush (0% Hardness/20-60% Opacity).
Darken the scene with a new Color Lookup Adjustment layer, setting the 3DLUT File to LateSunset.3DL. Adjust the Layer Opacity as desired.
Continue to adjust the glowing text. You may need several layers to do so. Then finish up with a quick vignette by creating an orange Radial Gradient set to Multiply on a New Layer.
Here is the result below!
Learn More With Our Tutorials!
Inspired to learn more tricks for Instagram? Start with one of our Photoshop tutorials! Create fun and inspiring graphics to post on all your social media profiles.
Get Amazing Design Resources
Want to create videos like this? Download the resources used in this video:
Scenic Road Stock
Neon Type
Check out these tutorials to learn more from our experts:
Adobe Photoshop
How to Decorate Photos for Instagram With Drawings: Photoshop in 60 Seconds
Melody Nieves
Adobe Photoshop
How to Create a Wall of Lights Photo Effect: Photoshop in 60 Seconds
Melody Nieves
from Envato Tuts+ Design & Illustration http://ift.tt/2u5BHc8 via http://www.webmasterforum.ws/rankwyz-discount-code-2015-coupons/
0 notes
Note
Oh sorry i didn't see that what i sent in my previous ask is actually one of the fanon examples already akdndj
Cyborg Impulse for the fanon swap?
gold cyborg.... wildly impractical, extremely cool-looking
388 notes
·
View notes
Note
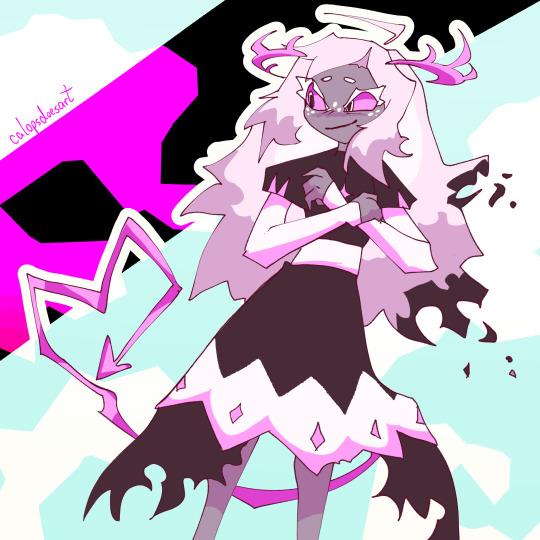
Wolf pearl??
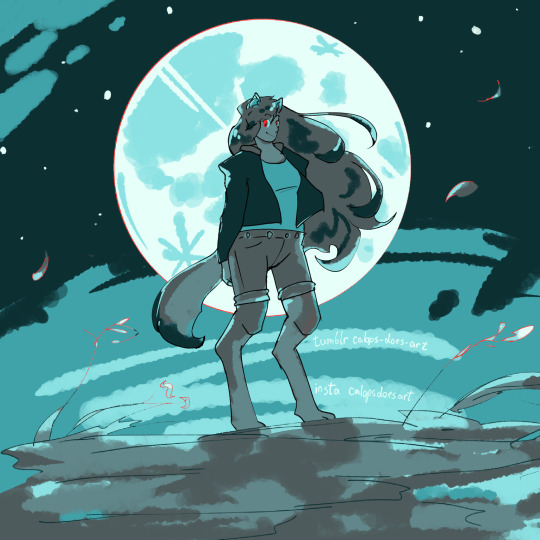
get it? pearlescentmoon... wolf.... moon.....
319 notes
·
View notes
Note
Hello hello! Your art is so pretty omg <3!!!! Thatd a banger art style you got there!!
Also mayhaps can i interest you in moss etho arctic bdubs :> for the fanon swap pffff
thank you!!
warm palette go brrr
189 notes
·
View notes
Note
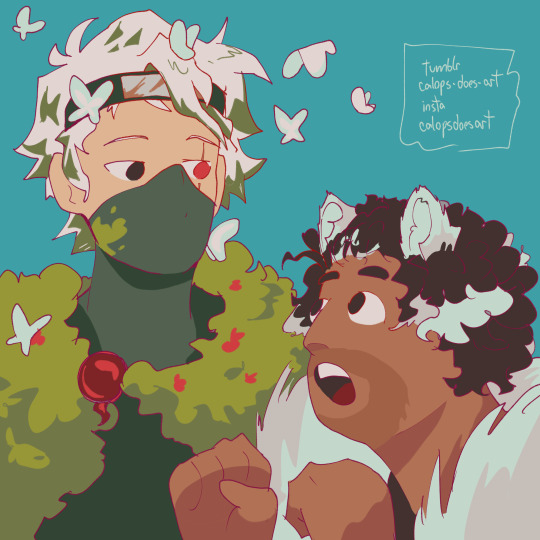
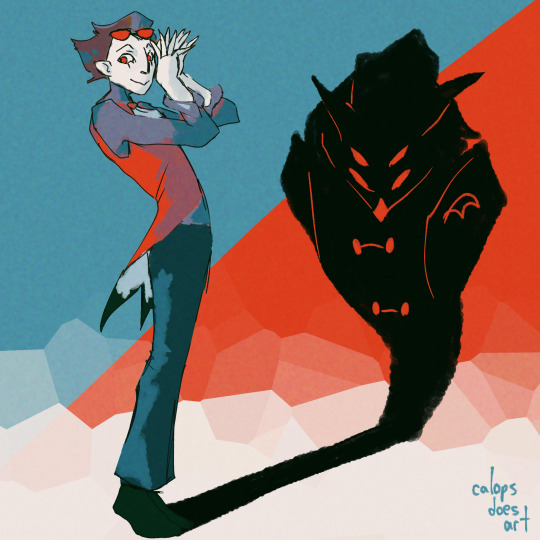
So what if, butterfly Xisuma, for the fanon swap.
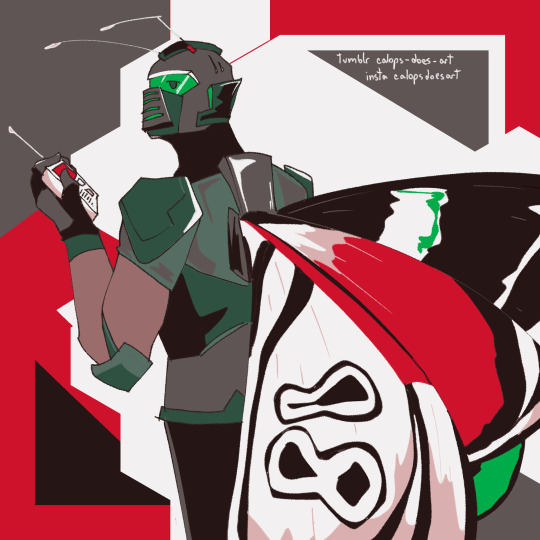
hell yeah
butterfly is Diaethria anna!
177 notes
·
View notes
Note
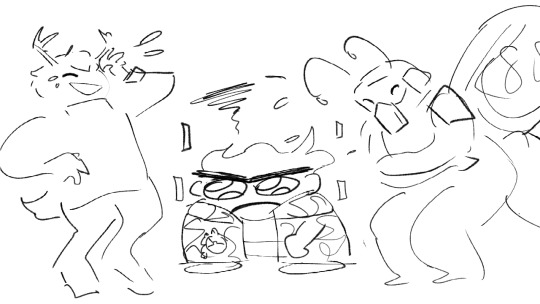
For fanon swap, Blaze Bdubs! Bonus points for Sun God based!
…(and bonus bonus points if you squish him and make Grian and Xisuma laugh at him - empires x HC ref)
I absolutely adore your butterfly Xisuma btw, it is so gooood, you magician <3
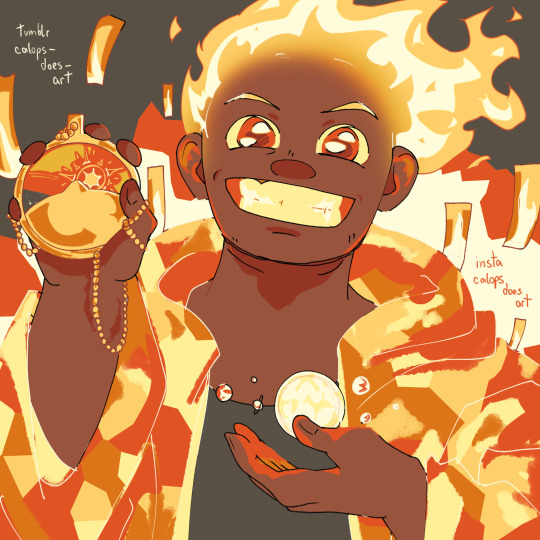
tysm!!!!!!!! I loved the idea on this one so I went all out >:D
and here's the bonus doodle ^^"
#calops draws#calops dies#calops doodles#hermitcraft fanon swap#hermitcraft#hermitcraft x empires#bdoubleo100#bdubs#grian#xisumavoid#xisuma
117 notes
·
View notes
Text
everyone's already made designs for fallen emily but here's my two cents
122 notes
·
View notes
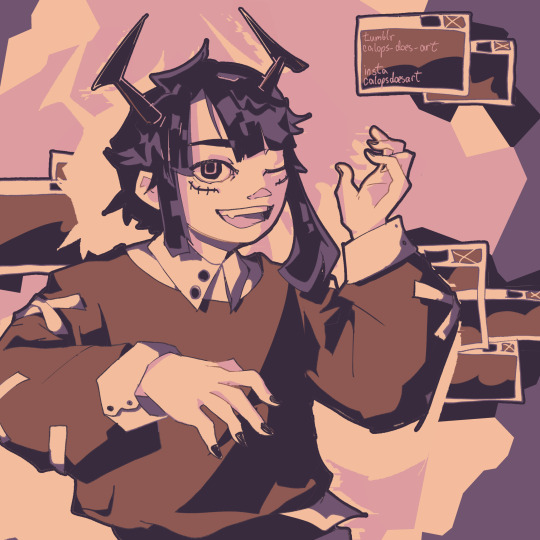
Text
him.. the owl man
#calops draws#artists on tumblr#helluva boss#helluva fanart#helluva stolas#stolas#stolas goetia#helluva boss stolas#vivziepop#hellaverse
66 notes
·
View notes
Text

@calebthedirtyhobo I got carried away and spent twice as long on this as the other requests ^^" this was so much fun, the palette fits them perfectly!
#calops draws#calops dies#artists on tumblr#colour palette challenge#ghost and pals#team 6x111#vane lily#qualia automata#tamari#tamari ghost and pals#reckless battery burns
119 notes
·
View notes
Text


@tsuki-tariyo here! screenshot redraw go brrr :D
#calops draws#artists on tumblr#colour palette challenge#mystery skulls animated#msa#vivi msa#vivi mystery skulls animated
81 notes
·
View notes
Note
Can you do mitch (from glitchtechs) with Summer shells? Thank you if you do :>

I think I made him look older than he is ^^"
#calops draws#artists on tumblr#colour palette challenge#glitch techs#mitch williams#mitch glitch techs
103 notes
·
View notes
Note
You tagged the post as amphibia so I cannot resist..
General Yunan with muted memories or saccharine sunset perhaps?

she's fruit ninja
81 notes
·
View notes
Note
Alright you knew this was coming >:3
Darkstalker from wof
big stinky dragon hours
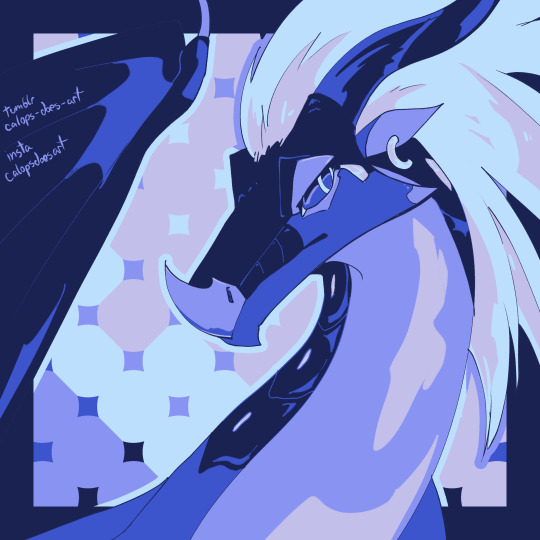
darkstalker design by @periltheskywing!
#calops draws#artists on tumblr#colour palette challenge#wings of fire#darkstalker#darkstalker wof#wof darkstalker#nightwing#icewing
57 notes
·
View notes
Last Seen Blogs

mooniiify
lexiii

jasper-rayne
be the change
dumbputalostheraccount
Itztliquiahuitl
roccboy
Just Waddling Through Life

eddymadness
Untitled