#i also reduced the sharpening which i think makes it look softer
Text


BAEKHYUN filming the Let Me In MV
#baekhyun#baekhyunedit#exoedit#exosnet#ultkopnetwork#kpopedits#kpopedit#kpopccc#midolsedit#mgroupsnet#mgroupsedit#kpopsoloists#byun baekhyun#byunbaekhyunedit#my gifs#let me in#spent so long trying to get the coloring to fit the lighting#anyway i hope y'all like it#i also reduced the sharpening which i think makes it look softer
50 notes
·
View notes
Text
Dirrath pt 11

Masterlist
word count: 3,201
AN: finals are officially over and i’m finally free! here’s the next part of Dirrath and 13′s story that surprisingly doesn’t have all that much Dirrath in it.
“Are you sure you can do this?” Dirrath asked, withholding the knife from you just before you could take it from him, “You have to concentrate, even if the pain becomes unbearable.”
“I know, I’m the one who told you that,” you scoff in exasperation, “and if I can’t, you can scrape my guts off the floor and heal them back into place.”
The demon begrudgingly relinquishes the knife to you, watching silently as you bring its sharpened edge to your leg and making a long stripe up your thigh, barely breaking the skin.
You glance briefly up at your coconspirator as you hand him back the knife, your eyes meeting as you both steeled yourselves in preparation for what you were about to attempt.
The certainty with which Dirrath had accepted your proposition was replaced with anxiety now that you were on the verge of going through with the plan. He had been fairly easy to convince with your theory for healing yourself, even if you couldn’t exactly show him the proof of your healed paper cut.
But the apprehension was understandable. A lot of things could go wrong with this. You could lose your focus and set back your healing even further or be unable to perform the same trick twice. Or you may die of exhaustion or blood loss before you even got close to healing your stab wound. There was a lot at stake here, but the potential reward could be you regaining your strength faster and actually be able to use your magic again for the remainder of your time in Roquechade’s castle.
You weren’t going to be able to fix the glamor issue in a week, but with Dirrath’s growing impatience for a cure, you might finally be able to at least convince him to tell you more about his curse.
For now, however, you concentrate your entire attention on healing the wound on your gut. You weren’t sure how you can focus the strain of using magic to the cut on your leg, but you tried first visualizing it; imagining the magic exiting your thigh and entering into your stomach.
You didn’t know much about the theories behind magic, your tutors believing it much more important to learn its applications and teaching you extensively means of harnessing magic easier. This was the easiest method for you, imagining magic as a tangible object, moving and acting upon the world around you. So, instead of questioning whether this was possible, you instead focus on making the magic work.
For a few tense moments, nothing happens. Dirrath says something, but you quickly tune out all outside distractions and focus harder. Soon enough, you feel a tug in your abdomen.
It isn’t like the work done by the castle healers in Altruria; they could undo an injury completely, turn back time on broken bones, cuts and bruises until the patient was as good as new. This was the distinct sensation of your wound stitching itself together.
You don’t feel the pain in your thigh immediately, so you don’t realize it’s actually working until you feel warm liquid running down your leg. A good sign that the deterioration only happens there, at least.
The pain grows steadily as the cut deepens but just as it begins to grow unbearable, Dirrath begins to heal it.
It gets harder to focus as both wounds now heal simultaneously, constantly catching yourself before you can flip your attention to the wrong one. Dirrath also heals faster than you, constantly having to stop his own healing to allow the wound to deteriorate again but also serving as another distraction for you.
Your body was also quickly tiring. The tutors always said you had a bad habit of using magic incredibly inefficiently, falling back to these bad tactics even after learning less taxing methods and counteracting any natural talent you may have held. It didn’t matter to you much then, having very little practical use for magic in your life until that point.
Now, however, you felt it, realizing they had been right as your strength began to crash. You forced yourself onward, the muscles of your arms and legs convulsing as you pulled energy from them.
Dirrath was yelling, you think, but you still don’t break your concentration even after you no longer felt the pull of healing in your abdomen.
Suddenly, Dirrath was shaking you out of your trance and your magic halting with your broken focus. You felt as though you just ran a marathon, drenched in sweat and panting for air.
You look down at your stomach, relieved to see the stab wound had been reduced to a white line. You were just about ready to pass out, no longer concerned with the task of healing as Dirrath finished up healing on his own end.
“Stay awake,” the demon said, snapping his fingers in front of your dazed eyes, “You didn’t concentrate it on the cut at the end there. You have some deterioration everywhere.”
You blink away the sleep, though you can’t help but relax into the plush mattress and pillows. You know Dirrath’s right, this point the most critical in keeping you alive, but it’s difficult to fight how sore you feel everywhere or how your eyes throb with the need to close immediately. However, the moment you feel your eyelids begin to slide down involuntarily, the door slams open.
“What the hell happened here?” Olek demanded from the doorway, his sudden entrance succeeding in keeping you awake, adrenaline coursing through your veins at being caught by the one person who you did not want to catch you.
Your captain looked downright livid as he took in the scene before him. Granted, you could imagine exactly how bad it looked. You were definitely looking a complete mess; sweat rolling down your face into your eyes, your legs still twitching with residual spasms and your entire body feeling like one giant bruise. Worst of all, standing next to you with knife still in hand was Dirrath, the one person still in the castle who wasn’t currently locked away that the captain still mistrusted.
You try to explain, your words coming out so hoarse and stilted even you had trouble understanding what you were trying to say. You instead switch tactics to tapping one finger on the small scar that now adorned your stomach, a sharp contrast to the angry red, puckered flesh that had been there before.
“Gods above, what have you done? You could have died!” Olek snarled, an all-too-familiar vein beginning to pop out of his forehead once he turned to Dirrath, “And you- I’ve held my tongue about your for long enough. This was the final straw!”
Olek stalked into the room straight towards Dirrath, slamming the door shut behind him. The demon, to his credit, didn’t outwardly flinch, but it was clear by the way his body tensed that he was not underestimating the captain.
Before Olek could reach him, Dirrath thankfully let the knife fall onto the bed, making the captain’s grip on the handle of his sword lessen slightly. Only slightly.
“Stop,” you croaked, mustering the strength to swing your legs over the edge of the bed and somehow managing to stand on wobbly knees. No matter how precarious your balancing act, you’re determined to take the few steps necessary to put yourself in between your captain and the demon.
“You shouldn’t even be able to stand right now,” Olek chided, stepping forward to try and sit you back down.
“Well, I couldn’t go to the banquet injured, and this way I can be of more use if something does go wrong,” you retort, your patience running thin, “What’s done is done. It’s over now.”
“What you’ve done- it was stupid. If you had killed yourself, then everything would have been for nothing! You should have told me instead of trusting this idiot-”
“Well, he’s done more to help me than you! What would you have been able to do, Olek?” You snap, the words that left you sinking in just moments later and all anger immediately dissipating as you tried to backpedal, “Wait, Olek-”
Your stomach twists as Olek’s expression also drains of anger, unreadable as he abruptly turns to leave. He pauses, not looking at you as he turns back to grab Dirrath by his collar and drag the demon out the room with him. You flinch as the door slams shut behind him, leaving you alone once more.
You sit heavily on the edge of the bed, your body still aching but unable to fall asleep with the lingering regret on your mind as your words repeated themselves on it.
Garreth was the one to bring your food that afternoon - a testament to Olek’s current standing - standing nervously in the center of the room while he waited for you to finish eating.
“Sit,” you gesture to one of the couches, unable to handle the formalities normally shoved upon you at the moment.
Most of the members of your guard refused to speak informally with you. Whether that was because they found you unworthy of your title or because they respected it too much to get comfortable with you, you had no clue. Garreth was one of the few that normally reciprocated your attempts at small talk, but evidently word had gotten around about your spat with Olek. But while you didn’t quite feel up to the normal chitchat, you did take the opportunity to interrogate the guard.
“He didn’t say anything when he returned. Just started ordering everyone to stop lazying around. Then he ordered me to bring your food when the servant brought it. He still tasted it, of course, my princess.”
You frown at the sudden inclusion of your title, which deepens with the new information that Olek would test your food. You had no doubt it was in case of the eventuality that it was poisoned, but you couldn’t help the bitterness settling deep in your belly at how you now had to be constantly watched over and protected for the rest of your life. But now was not the time for that, still trying to gauge how badly you’d ruined things between you and Olek.
“Is this your first time arguing with him?” Garreth asks slowly, the awkwardness of his tone shifting into something softer, understanding even. You nod glumly, the urge to right your wrong overpowering any sense of embarrassment.
“That’s… surprising,” he replied, shifting in his seat, “He was always arguing with the 13th, er- the one before you. The 8th was always breaking up their fights.”
Your head shot up to stare at Garreth, studying his expression for any sign of deception. A million questions circle in your mind, each vying to be the first out your mouth. You didn’t know which new piece of information to address first. The fact that Garreth thought Olek particularly belligerent or that Olek would actually come to blows.
But what you truly wanted to ask about was your predecessor; the 13 before you. You knew nothing of the person you replaced. The only bit of information you’d been given was when you first arrived, the castle still grieving at the time. All you knew was that you were replacing them because they had died, not the usual vacancy left in the court after an older member retires or dies and all the subsequent titles shift down a number. You didn’t ask questions at the time and no one bothered to fill in the details for you.
What would they fight about? How could it get so heated they would actually, physically fight? Olek was a stick in the mud, sure, but you never thought he’d actually fight you over the things he’d get annoyed with you about. In fact, he was always so patient with you, it used to make you feel bad how he would have to explain things about the capital or your studies.
“It got so bad, the High Queen would threaten to intervene. In retrospect, I suppose if Captain Olek had been the problem they would have just transferred him out,” Garreth continued, seemingly unaware of your inner turmoil.
“What were they like? The 13th?” You ask, feeling it somehow wrong to condense the magnitude of a person with all their complexities into such a simple question, but unable to keep yourself from asking it.
“Captain Olek could tell you better than I,” Garreth said truthfully, smiling sheepishly as you deflated at the reminder of your ongoing conflict with your captain, “Can I ask what exactly happened?”
“I did something stupid- and when Olek tried to tell me that, I said something very insensitive that I regret,” you grimace, wanting to fold in on yourself at the very memory of what exactly you said, unable to bring yourself to repeat them to Garreth, “Thank you, I’m done.”
You present your empty plate, watching as the guard takes it and leaves. Before he closes the door, Garreth turns to look at you one last time, seemingly deep in thought before he speaks.
“Olek is tough and loyal. I’m sure he wasn’t hurt by what you said, but he would definitely be worried about you doing something that would put you in danger.”
You’re left alone once again, Garreth’s kind words unfortunately doing little to assuage your guilt. And, despite clearing your plate, you were still starving, your body seeking to restore the energy lost in your earlier misadventures.
Eventually, you’re able to briefly fall into a fitful sleep, jolting awake with every errant noise in the castle - which was many in such a large structure.
You wake suddenly one final time when you hear your door creak open. For a brief moment, you think it will be Dirrath bringing the cart of sayerba before remembering there’s no more need for it with your healed stab wound. Instead, it’s Olek, carrying in another tray of food.
Your stomach growls at the aroma of the hot meal, but you say nothing, feeling as though you had to address the elephant in the room but unsure how to proceed.
Olek shouldered that burden for you, clearing his throat as he approached your bedside, “I knew you’d still be hungry after expending that much energy.”
“I’m sorry, Olek,” you blurt out, unable to take his offered truce without at least saying as much, “what I said was a low blow and-”
“It’s alright, Princess,” Olek smiled for a brief second, setting the tray down on the bed for you to take, “I’ve head far worse things growing up. I know you did not mean it maliciously.”
You ate in relative silence, Olek sitting on his usual armchair in the corner. You try to think of something to say as you shovel the food down your gullet, wanting to alleviate some of the tension you still felt, even if only imagined.
“Growing up in the outskirts, no one really had any magical ability. You would have been pretty normal out there,” you finally manage, though it doesn’t come out as quite the compliment you imagined, so you quickly add, “well, the girls in the villages would have been all over you, probably. You look like you’d be a strong farmer.”
Your joke elicits a snort from Olek and you beam.
“I don’t think I’ve every heard you talk about your life from before,” Olek said, the silent prompting not going unnoticed by you.
“Oh yeah, everyone was too afraid to ask in front of you, but they all wanted to know if we really had no plumbing or electricity, or if we all had to make fire from rocks,” you smile wryly, Olek frowning, “In truth, yeah. With no magic, people had to rely on other contraptions, but supplies were hard to come by from the capital and resources were better spent putting them back into the farms.
“The only ones I knew of back then were me and my mother. But there was once a young man who had serious talent,” you falter a bit as the memories flood back, Olek thankfully remaining silent as you worked out what you wanted to say, “He even went to study in the capital for a time. But when he came back, he wasn’t the same, or so his family said. Obsessed with becoming stronger in magic. We got called out after one of his many failed attempts at doing higher magic, but my parents were busy so I was sent ahead. When I got there, he was a mess of innards held together only by his skin.”
Olek sucked in a breath and you realized at some point while you spoke he had leaned forward in his seat, “How old were you?”
“Hm. Twelve?” You ponder, not too sure but settling on that. It had been a long time ago, either way, “But that’s not the point. The point is, he survived for six days like that, his family watching as my mother and I tried to fix him. For a long time, I never wanted to do magic because I was scared of it, thinking that would happen to me.
“But then I was taken to the castle and I learned that magic wasn’t some scary, unknowable force, just a tool that can be used incorrectly like any other. And that I wasn’t scared of magic in and of itself, but that it would drive me to do something as selfish as to watch the people I care about have to see me like his family saw him… and I did that to you today.”
You trail off, losing momentum as you tried to put your concluding thoughts into words. You didn’t feel much lighter, as was commonly said of divulging such burdensome memories to someone else. You just felt sad, all over again. There was no weight lifted, or release after having said it. It was still there, just as heavy and omnipresent as it had been before, but now Olek knew. And perhaps that made you feel the tiniest bit better.
“You’re right,” Olek murmurs, and you sink into the mattress, “Magic is a tool, and while you did use it stupidly… you weren’t using it selfishly. You were trying to help, be useful in a way only you could be. And that’s something that makes you fitting for your title.”
“Thank you, Olek,” you smile, though it quickly falls when you sigh, “But that doesn’t excuse what I said out of anger. You’ve done so much to help me without magic. Remember when I first arrived in the castle? You were the only one who would stop to help me understand things that were happening. And don’t say it was just your job. I know it wasn’t your job to help me cheat on that aptitude test my first week.”
Olek’s mouth fell open and a sound of pure indignation escaped him, but when he was ultimately unable to say anything in his own defense, he burst into laughter. You join in immediately, relieved there’s no searing pain in your abdomen as you laugh.
53 notes
·
View notes
Note
How do you layer gifs? Or am I just dumb?
Hey there. It’s not dumb, lovely anon, it is a bit tricky and I only learned it last year myself. I guess the method for layering gifs really depends on the general gif making method you are using. I’m gonna try to explain the way I’m doing it and I hope it makes sense to you.
Unfortunately I can’t find an earlier ask where I explained my general gif making method anymore but here it is very quickly:
Step 1: screen record scene I want to gif
Step 2: use KMPlayer to extract frames
Step 3: load frames into Image Ready where they will be automatically animated (then “reduce frames to layers”)
Step 4: import frames from Image Ready to Photoshop CS2 (yes, that’s an ancient PS version but it’s freeware and I’m used to it so I’m fine making gifs like a medieval peasant.)
Step 5: crop, sharpen, colour, add text
Step 6: “save for web”
So with this as a basic explanation of my gif making process, I can get into how I layer them. [Disclaimer: My Photoshop is set to German and I don’t always know how the functions are called in English but it should be something similar and at least in the same place, regardless of the language your Photoshop is set to. Also I think this should work similarly for newer PS versions as well.]
prep work: I have two gifs with the exact same number of frames readily imported to Photoshop, they are already sharpened and maybe cropped but that’s it (so basically steps 1-4 and some of 5)
Step A: choose the gif that you want to put on top ➞ select frame 1 and layer 1 ➞ click that little triangle in the animation window ➞ click “select all frames” (in my case I want to put Liz on top of Red because that’s just the kind of person that I am, you know?)
Step B: select “copy all frames”
here is a screenshot of where to find that:

and a close up:
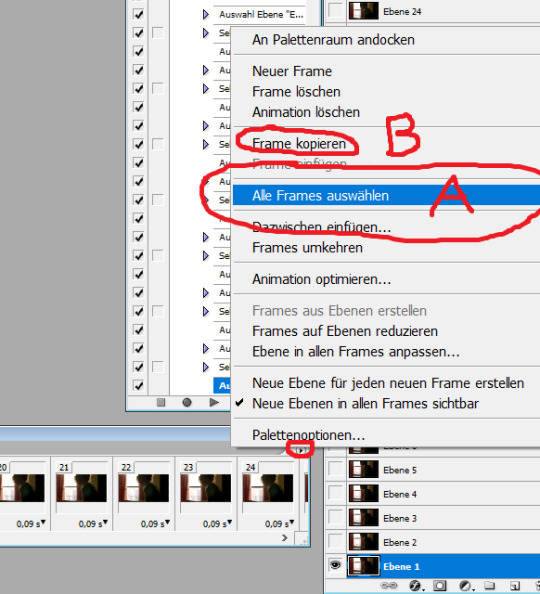
Step C: go to the bottom gif (=Red) and repeat step A (frame 1, layer 1 ➞ little triangle ➞ select all frames) ➞ click on what’s called “Frames einfügen” in German (should be ”paste frames” or “add frames” or something like that in English)
Step D: a little window should pop up ➞ select... well... whatever the second option is called in your Photoshop’s language. It means to paste the frames over/above the selected ones (as opposed to adding them before or after).
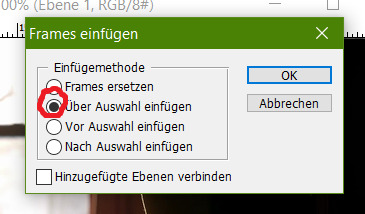
If you’ve done that correctly you should now have the same number of frames as before (29 in my case) in the animation window but twice as many layers (so 58 for me) in your layers window - note that this process gives you two sets of layers that are called “layer 1″, “layer 2″,...., “layer 29″. One set would be all of the bottom gif’s (Red’s) layers, the other one all of the top gif’s (Liz’s) layers. It is important for the next steps that you do not get these confused so make sure your layers window shows you the little preview images.
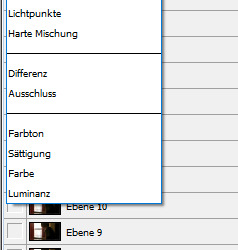
In order to make Liz semi-transparent I have unfortunately not found a more effective method than to go manually through every single layer and frame and change the layer style to “reverse multiply” or something else that makes the bottom gif “shine through”. I do this as follows.
Step E: Select frame 1 and layer 1 (of the top gif/Liz’s frames!!!) ➞ click on the “layer style” drop-down-menu (it should be set to “normal” as default ➞ choose a layer style you like. And here comes the tedious part: Repeat for every layer/frame of the top gif (= select frame 2, layer 2, change style / select frame 3, layer 3, change style / ....). I circled the styles that I usually find work best. “Umgekehrt multiplizieren”/”reverse multiply” is my fav but sometimes one of the other three in that category look better depending on the specific colours so just try it out for one frame and then settle for the one you like best.
After doing that for all frames the gif I made looks like this:

if you like you could leave it at that. but I want to move Liz a little further to the left so here comes...
Step F: I select all frames (see step A) and all of the top gif layers and then use the moving arrow tool (or the arrow keys if you prefer those) in order to drag all layers over to make it look like that:

but now I don’t like that sharp line across Red’s face sooooo
Step G: now I go in and delete some pixels in the Liz gif with a soft edge so it blends better. I do this using the masked mode (no. 1 below) first to select the pixels I want to delete (no. 2 below), then leaving the masked mode and deleting manually, again going like this: frame 1, layer 1, delete / frame 2, layer 2, delete /... [alternatively you can do this step BEFORE step A (and be clever and write an Action for that to save you from getting carpal tunnel syndrome from all the damn mouse-clicking) but then you really gotta be sure which parts you want to delete beforehand or else you’re fucked]
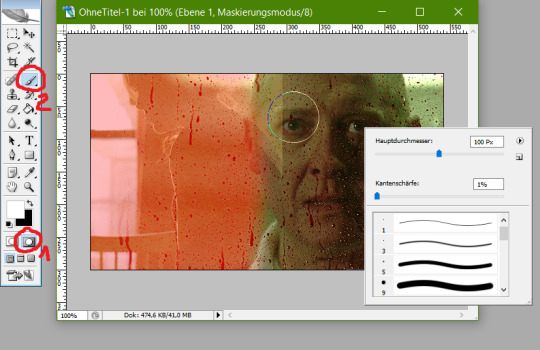
After doing that the gif looks like this:

see? Much softer edge! All that’s left to do now is colouring the hell out of it and you’re good to go! I hope this makes sense for you and works with your gif making method. Again, it is a bit tricky and you have to use your brain a little more than for usual gif-making to make sure you get the order of steps right and also kinda have to plan the placement of the two gifs beforehand. Also, not every scenes work together. Sometimes it just looks weird or the vibes and colours don’t go together. But when it does work out it looks damn amazing and you’ll feel very accomplished!
#Photoshop CS2#gif making#gif tutorial#gif making tutorial#Photoshop tutorial#about me#hey there gif making tags#may I offer you some James Spader in these trying times?#Anonymous#long post
50 notes
·
View notes
Photo
Relax America: Putin Controls the Horizontal
When did you first wake up from the collective sleep? For me, it was right before the Sochi Olympics of 2014. The roll-up blinds turned loose and snapped open, letting the bright morning sun rush into my sleepy brain. I remember thinking, “Wait a minute, us Americans, we’re supposed to be sportsmanlike.” So, something went was all wrong about Russia’s big Winter Olympic extravaganza. Only it had nothing to do with the Russians. The “something” was the onset of Russophobic chaos, you can call it Cold War II. All that hate leveled on Russia at her shining moment, it was the trumpeting of the end of peace in our time.
“There is nothing wrong with your television set. Do not attempt to adjust the picture. We are controlling transmission. If we wish to make it louder, we will bring up the volume. If we wish to make it softer, we will tune it to a whisper. We will control the horizontal. We will control the vertical. We can roll the image, make it flutter. We can change the focus to a soft blur, or sharpen it to crystal clarity. For the next hour, sit quietly and we will control all that you see and hear. We repeat: There is nothing wrong with your television set. You are about to participate in a great adventure. You are about to experience the awe and mystery which reaches from the inner mind to… The Outer Limits.”
Cut scene away from the 1962 TV series to 2021. Russian strongman Vladimir Putin now controls the world. An American billionaire president is run like a sock puppet by the former KGB Colonel. The great democracy is a push-button Russian toy. Putin’s GRU operatives in secret cyber pods across Russia monkey with the inner workings our America’s system. And now, even the Democratic Party candidates of a once-great nation are nothing more than little wooden Pinocchios for Vladimir to have fun with. It’s over. The Ruskies have won the game. Before long Starbucks will be serving blinis and borscht with a shot of Belebeyevskaya classic vodka.
At least this is the rumor from CNN and The New York Times.
GQ Magazine asks the question; “Why Does Putin Love Bernie?” James Carville, President Clinton’s former adviser, and campaign manager says; “the Nevada caucuses are a big win for top vote-getter Bernie Sanders, and for Vladimir Putin.” Google promotes the topic of “Russia and Bernie Sanders” to the top of any news search for Putin. Mike Bloomberg is telling the world Bernie Sanders is Putin’s choice because he can’t beat Donald Trump come November. And the United States of America is reduced to a great big mess of finger-pointers and Chicken Little fraidy-cats hollering “THE SKY IS FALLING!” Bloomberg likes China’s President Xi Jinping, Trump’s in Putin’s pocket, Sanders is the Russian interference super-cop, and the people of my country are a fragmented mess of dizzy Disney characters hell-bent on self.
The world can go to hell, as long as we can feel like America is great again. In the meantime, the globalists who got the world in the current mess are creating a bipolar power struggle that can only lead to confrontation. From my perspective, everything we are seeing is the beating of war drums in preparation for some ultimate confrontation. The tension feels a lot worse than the original Cold War, in many ways. It’s as if some Wizard of Arms is behind the curtain pulling the strings to take us to a massive arms buildup. This hate and fear Russia narrative can only end in greater world crises. Just the other day Putin commented that Russia is ready for another “Cuban Missile Crisis” scenario if the west takes things that far. But the game big problem is not the complexion of this new Great Game. The more dangerous issue is the fact that policy analysis and geostrategy have become impossible now. The current situation cannot be looked at objectively anymore. Nobody is the expert in a cosmic mind mashing of misinformation and tailored rhetoric coming from all sides. Media is no longer news. Research is tainted by the big money. Profit superimposes an invisible will on everything we hear, see, think, and do. Putin the villain. Crazy Trump. And now the useless Bernie comes under the Russian mind control beam. Nuts. The world has gone nuts. We might as well be in the Dark Ages waiting for the total demographic, cultural, and economic deterioration to come.
The New York Times’ On Politics writer Lisa Lerer says “the Russians don’t have to help President Trump or Bernie Sanders. They may already be winning.” It’s funny to me that none of these genius journalists and experts ever ask “What if?” Think about it. Let’s say Vladimir Putin is the great wizard pulling all the levers. What happens when the evil genius Putin finally wins it all? I guess, worst-case scenario, every Russian has two SUVs in their two-car garages in their Vladivostok or Yekaterinburg suburbs. Hell, America operates as if there are not enough gas-guzzling 4x4s to go around.
A moment of pause, please. Why was it that the United States and Russia were enemies in the first place? Was there a purpose in all this west-east maneuvering?
In my honest opinion, Vladimir Putin has done everything in his power to reconcile relations with the United States. In fact, he’s bent over backward to moderate the situation that came about because of the Ukraine coup. Yes, I said coup. The United States was behind Ukraine-EU integration all along, and Russia has only been on the defensive since before the Georgia War, which was also instigated by the United States. Even though the analysis of the overall geopolitical situation has become impossible, evaluating Putin’s role is not so complex. If the Russian president had wanted this bipolar power struggle, all he needed to do was to forge a military alliance with Iran and/or China. If his grand idea was territorial dominance, air dominance land-based military control of Asia, the Persian Gulf, and satellites in Latin America like Venezuela would pretty much do it.
Sadly, this scenario looms darkly over the current situation we face. Americans are totally brainwashed and blinded by controlled media. The MAGA nonsense ripped the United States right down the middle. One provocation, a Gulf of Tonkin, and the next Vietnam or Korea is a reality. There’s nobody and nothing to stop it. Hell, a full-scale revolution is not beyond the scope of imagination if there is a close 2020 presidential race. The stage is set on that. With Putin and Russia as the convenient instigators, try and imagine how a silent or loud coup in America works. Think like the 21st Century robber barons in charge of this whole mess.
Somewhere in London or New York, a room thick with cigar smoke and old leather echoes with the casual planning of powerful men. And no, there are no ladies present, I am sorry for those among you who believe in things like equality. This mahogany clad penthouse overlooking us peons is where the fates are being calculated. Two, five, six, or seven old and angry men decide it all. The end game. What Putin will do. How Trump’s play will impact the big win or lose of west versus east. Bernie or Bloomberg. None of this really matters, don’t you see?
I can assure you, these people are there planning and plotting based on foreknowledge that presidential outcomes are controlled. Come on America, we know this since forever. The only question is; “Are they planning for the ultimate takeover of the world, or do they already control it?” My only hope is that I am right in betting on Vladimir Putin being on the level. I hope Putin does control the horizontal in this case, because the vertical is controlled by the worst of the worst among us.
1 note
·
View note
Text
What do you think is the best knife?
A good knife should have several key factors: ergonomics, aesthetics and maintaining sharpness. A good knife is the cornerstone of a good meal, but if you ask chefs what a good knife is, you may get at least five answers. The truth is, what is the best knife for you depends on many factors, including how comfortable you are with the knife, the size of your hand, and the type of food you like to cook. Of course another thing to keep in mind before buying a knife is that it all depends on personal preference and how the option feels in your hands. Whether you like Japanese-style original price or German-French chef’s knife, you want to love your knife. Like, it’s actually love, which makes cooking more interesting.

The right tool material
High-quality knives usually use one of three different materials:
High-carbon steel
Stainless steel
A combination of both
“High-carbon steel has sharp edges, but if left unattended, it will rust and pits. Stainless steel can’t keep the edges, but it’s easier to take care of. Composite materials have the best of both worlds in terms of durability and ease of use. Take care, “Said Frank Proto, Director of Culinary Operations, Institute of Culinary Education.
However, if the budget is tight, maybe you can try ceramic knives. The sharpest knives I have right now are ceramic knives. You can put them in the dishwasher. They keep their advantages-and their colors are beautiful. !

Ergonomics
This is very subjective. Depending on the size of the user’s hand, for larger hands, a thicker handle may be more comfortable than a thinner handle, and vice versa. The point at which the user holds the knife determines the balance of the knife-if you usually hold the handle, the lighter blade and heavier tang/handle will feel more balanced, while the heavier blade and lighter tang will feel more balanced /The handle will be more balanced to maintain balance when held on the knife.
The more balanced the knife is in your hand, the less the “repetitive stress” of long-term use over time, which is important for professional chefs who have used the knife for a long time every day for many years. To be honest, in most households, using it for a few minutes a day, the balance has no physical effects-more often it feels just right.
What is the best size for a chef’s knife?
Most chef knives have 8-inch or 9-inch blades, which is a very safe choice if you are unsure. Depending on your skill level and the size of your hand, you may need a longer or shorter blade. Some chef’s knives are as short as 6 inches, but you may not want to be shorter than 7 inches. You can also find blades up to 10 or 11 inches long, but these blades are more difficult to control and are generally not recommended for ordinary home cooks.
What is the best material for a chef’s knife?
You can find chef blades in alternative materials, including ceramics, but certain ingredients steel is the material of choice for 99.9% of knife manufacturers worldwide. For the purpose of this list, we have only tested many different grades of steel blades. Generally speaking, softer steel blades are easier to sharpen, but may not last long. For amateur home cooks, the difference in durability is negligible, and the ability to sharpen should be prioritized.

The composition of the handle may be the more critical decision at hand. Chef’s knife handles are made of a variety of materials, including wood, bone, carbon fiber, steel, and many other materials. Wood and certain polymer blends may feel slightly softer to the touch. There are also handles with contours and ergonomic shapes, while some — namely Japanese swords — have a more linear design.
Tools selected for you:
The best-looking knife-Shun classic 7-inch Santoku knife
Shun is a classic Japanese Damascus steel blade. The dent directly above the blade helps reduce the friction when the knife passes through the food and helps prevent the food from sticking to it when shredding. Shun maintained its edges well in my tests, but I found it more difficult to sharpen. You need some high-quality gems to make them sharp, or just give them to a professional.
The Damascus steel coating gives the knives using this material a unique corrugated pattern and is known for being difficult to maintain, but in my experience, it is not more picky than carbon steel.
YIER Knife Set
Material: X50Cr15 Superior high-Carbon stainless steel
High quality forged blades, which are made of German stainless steel, W-Nr. 1.4116.
It contains 0.45 to 0.55% carbon, 14 to 15% chromium, 0.5 to 0.8% molybdenum and 0.1 to 0.2% vanadium.
The purpose of the molybdenum alloy is to increase the resistance to pitting of the material.
Transparent acrylic knife holder. Beautiful acrylic knife holder, you can clearly see the knife you want to use, and pull out the knife you want.
One-piece design. The handle and the blade are an integrated design, so there is no problem of the blade falling off the handle, and there is no possibility of the knife handle becoming loose.

Easy to store and maintain. YIER knife set is made of high-grade German stainless steel, with sharp blades, not easy to rust, and long service life.
Excellent sharpness.
100% satisfaction guaranteed. Every knife set produced by YIER is backed by outstanding quality assurance, so you can buy it with confidence. If you have any questions, please feel free to contact us, we are always by your side.
Maintenance tips: In order to protect the sharpness and gloss of the knives, please do not wash the knives in the dishwasher. Keep the knives clean and dry after use.
● The complete knife set contains all kitchen knives.
● Delivery from the local warehouse, within 3 days.
● Manufactured in our own factory, cost-effective.
● Transparent acrylic knife holder, like a work of art
● Excellent materials, safe and durable.
● Free returns
● We listen to customer needs and feedback.
0 notes
Text
for the serpent has died and i'm leaning by your side (1/6)
this fic can also be found on ff.net and ao3.
NEXT CHAPTER
written for the 2017 fma bigbang! i was lucky to work with @rebbi-sonnenhell on here! it was a pleasure to work with her, and i hope u enjoy what we have produced.
He hates being reduced to the role of civilian – a convalescing civilian, even more. He hates the red tape that surrounds his recovery; hates that Riza still hasn't come out of her coma like the doctors said she would.
The aftermath of the Promised Day isn't pleasant for anybody involved.
There’s a lot of noise in the time immediately after Edward deals the killing blow to the homunculus that nearly became a god.
The eerie silence which he expects from all the old stories of good versus evil is instead enveloped very quickly by cheering and yelling and shrieks of jubilation which clatter around in his head like a rouge bouncy ball. He feels the ground trembling beneath him, and he tenses – before realising it is simply the footfalls of soldiers around him and Hawkeye. He estimates that entire battalions pass the two of them and it makes him laugh a little at how easy it is for him to tell which soldiers come from Fort Briggs, and which come from Central. The Briggs men are softer, quicker in their pacing and barely bely the exertion they must feel – the Central soldiers, on the other hand, are heavy and clumsy in their gait, and have no idea of what fitness is apparently.
He feels Hawkeye shift next to him, resting her weight on her other foot, gripping his side a little tighter than he expects as she does so. Her breathing is laboured, and for the first time since the battle has finished Roy really thinks about how much he has put her through today.
It is too much. He should never have had to ask this much of her – and yet she would broker no deal where her role was less. It was difficult to try and ignore the dark circles under her eyes as they woke early this morning, nor the slight gauntness to her frame as they dressed for the battle that would come. The months she spent under the watchful eye of not just one homunculi, but two – took a toll on her physically in ways he didn’t want to think about.
Mentally was another problem altogether.
“Hawkeye…” he begins, his mouth dry and cracking over her name. He feels her breath hitch, followed by a tensing of her muscles.
“Sir?” she responds quietly. Her voice is jagged and rough and he wonders just how much of a patchwork job the young girl from Xing had done. Her cut had been clean, and he would vehemently argue it was the only blessing to come out of that awful situation – at the time all he could think of was her blood spilling out of her like a grotesque necklace, dripping down the hollow of her throat, but in actuality he should – she should – count themselves lucky that a clean cut was all she got. He’s well-aware of how cruel the homunculi could be.
He would never admit this to her, but he had woken up more times than he could count in a cold sweat, images of her impaled on Bradley’s swords like an animal left to be bled (he had read the reports of what had gone down in Dublith the last time the Elric’s had visited, and his informants based there had not spared him any detail). He imagined her being left on his doorstep, gutted and bloodless like a carcass ready to be cut for consumption, ribs brutally smashed open: there would only be hollow where her heart ought to be and damn him for not doing enough to protect her.
He doesn’t know too much about the physiology of homunculi, only that they fought well and burned better, but it doesn’t take much to assume that all of them were capable of eating humans. He wonders if it would have come to that, and whether Wrath was possible of the empathy to make her death a quick and clean one.
He doesn’t want to think about the kind of pain that she’s in – what she is doing just to remain upright for his sake – he feels like he has been hit by a truck and ran over at least half a dozen times. Both of his hands are aching and cramping and stinging in a way that is far worse than when he had to burn himself; he feels the blood still dripping down his gloved fingers slowly – the warmth of which makes him feel ill. There’s a pain behind his eyes that reminds him of the migraines he used to get when he was a teenager, and he idly wonders why he didn’t suffer a worse fate with Truth. The Elric’s had lost their bodies in extremely violent and distressing ways; it didn’t make sense that he wouldn’t also suffers something similar. He doubts Truth cares how people come to the Gate – like his refusal to perform human transmutation himself meant anything to the weird not-entity that he can still recall (and he’ll be damned if the last thing he remembers seeing is something like that, he would much prefer a view a little closer to home).
“Sir?” Hawkeye asks him again, her voice barely a whisper this time.
“Am I bleeding out of my eye sockets?” The question is so inane and he has to try his best not to crack a smile – he feels the adrenaline lessening now; his heart no longer feels like it is lodged in his throat, and he feels his pulse strongly in his fingers, a steady but painful tha-thump, tha-thump. Tha-thump. The pain is sharpening now in his hands, and he grimaces as he tries to adjust his right hand that is loosely curled into her side. The stiffening in his tendons is a bad sign – he knows enough about first aid to realise that he needs to be seen by at least a nurse soon, but his men are his first priority. His bleeding, while continuous, has slowed – he feels the gummy texture of the haemoglobin stick around the entry and exit wound on his hand as he shifts it from Hawkeye’s waist to her shoulder, his gloves fraying seams catching on her loose hair. It’s a familiar sensation under his fingertips, even through the fabric of his gloves – she was blessed with thin hair, but plenty of it.
He puts the slightest amount of tension on her hair - not a tug, his head is throbbing and he doesn't imagine how badly she must be feeling, what she isn't letting on to him. The Lieutenant inclines her head ever so slightly – it's an old code of theirs – older than their names; than the well-placed taps of pens on wood; than a lifted eyebrow across an office.
"You shouldn't be speaking," he murmurs, twisting her hair in between his fingers more until he thinks he will not be separated from her. The noises around them are becoming more frequent and loud as every second passes; as every breath passes through his lungs. The air is tinged with gunpowder and smoke. It comes in waves as the wind shifts and Roy is suddenly reminded an awful lot of Ishval. It is the same sounds as after a heavy attack gone successfully; the same atmosphere when the commanders officially declared the end of the war – there is chaos here, but it is tinged with relief, with joy that is barely restrained. He knows there are dead bodies littering the parade grounds here, as there were amongst the sand dunes and rubble.
These soldiers, at least, will be noticed and taken care of with the respect they should not even have to deserve. The Promised Day – whatever the military decides is a fitting name – will immortalise these men and their ranks in stone. There will be parades and minutes of silence as people pay faux penance for sins that they let grow instead of addressing.
A band of Northern soldiers suddenly sprints by, yelling loudly and frantically – their accents a stark contrast to the reserved tones of Central. There is more movement their way now, and eventually Riza stands a little straighter, taking slightly deeper breaths that he can almost feel rattle around in her lungs. “We should move, sir,” she tells him firmly, her voice only wavering a little. “Triage tents are being set up to the north.”
Roy hesitates before he nods, and lets himself be guided by her hands. The cacophony grows louder with every steady, laboured step they make – the familiar screams of makeshift surgery; the frustrated yells for help; the hoarse sobs that are a constant beat in this human symphony. It is too reminiscent of Ishval, and Roy feels ill at the implications of what that means.
He doesn’t need to tell Riza what he is feeling. He knows that she understands, that she too, remembers. Her fingers grip into his coat even tighter as they pass what sounds like a rudimentary operating theatre. They might be walking on polished stone instead of stone carved by sand, but the horrors remain the same and the cruelty of humanity is still laid bare for anybody to see.
He has no idea where they are anymore on the parade grounds. His mind’s eye is hopelessly lost – though he supposes even with eyesight it would still be difficult to recognise the parade grounds now. Riza explains that the middle is torn beyond repair, alchemic or otherwise, and so what’s left of the Central troops and the Briggs battalions find themselves on the perimeters of the land, skirting structural faults that look ready to collapse at a moment’s notice.
They walk in silence for a bit, both intently focused on staying upright amongst the chaos around them. The tang of iron is palpable in the air, and he feels it coat his tongue in a greasy film.
“Hawkeye-” he starts, but she roughly yanks him down suddenly onto what feels like a cot, and he’s still as she lets out a pained sigh, her hand that was so tightly gripping his side loosening. She breathes deeply for a minute, and he can hear how exerted she is. His hand finds her wrist and he strokes over her pulse point, marvelling at how frantically it beats and flutters under his touch. Eventually he feels the tempo lessen and her body begin to relax next to him, leaning into him a little more than what would be considered strictly appropriate. He doesn’t care. She’s warm next to him, and smells faintly of his soap and sweat.
He wonders what will become of the Briggs soldiers, the ones he saw that were soaked with Amestrian blood. General Armstrong would be wise to make a hasty exit from Central if she wanted to keep her men relatively intact. Central soldiers may have been taken by surprise in this attack, hopelessly under-skilled and out-manoeuvred: but vengeance was something that was bred into their bones, into their very beings.
It is cooler here, and all he can hear is the familiar cadences of Amestrian, with the heavy Northern accent thundering out every so often. Northerners were such loud people.
Riza huffs a little and he doesn't stop the smile growing on his face. Against each and every insurmountable obstacle that they faced today, they still made it through – every single one of them, and every single one of his men. Anticipating causalities was a necessary evil of their plan - and it wasn't entirely unlikely that at least one person in his team would get severely injured or worse.
He hadn't been anticipating Riza, however. The entire day had been a flurry of emotional highs and lows and he could still hear her choked-out pleas ringing in his ears to just stop, please don't make me do this, this is not you, this is not who you are this is not –
She truly was his weakness – only she could render him immobile, it was only her now that he could not raise a hand to.
"Thank you for following my orders, Lieutenant," he begins lowly. She shifts a little next to him and it must be killing her that she can't respond but it is killing him more knowing that he is the reason she cannot in the first place. "Without you today..." he sighs and trails off, his gloved thumb rubbing against the bare skin of her neck carefully.
"I fear today might have turned out very differently if not for you. Thank you." His tone is soft, barely carrying over the cacophony surrounding them - soldiers are passing the two of them more frequently where they sit, near what he can only assume is the main triage camp being frantically set up. He knows it is not coincidence that she has moved them both to be near it – not for her sake, of course, but for his. Her ridiculous and at times maddening ability to put him above everything else (including herself) never fails to amuse him as much as it annoys him.
She shifts against him again and the hand resting on his back curls into his side, and he feels the indent of her fingernails, even through the heavy cloth of his coat. He doesn’t stop the small smile he can feel growing on his face, but instead lifts his head up. He can feel the sun on his skin, despite the cool spring breeze that moves through the parade grounds every so often. In spite of the pain that is slowly ebbing from his hands and eyes to the rest of his body, he feels lighter than he has in months.
It wasn’t like his plans (which were always very well-laid, thank you very much) normally went awry, but it was honestly refreshing to realise he wouldn’t need to worry about almost anything for a while now. He wouldn’t need to worry for his life – for her life. He could spend just a little bit of time remembering that he had helped defeat the greatest evil to befall his country in living memory and almost everyone had come out the other side relatively intact.
“Thank you for not dying,” she responds after a while, her voice barely above a whisper now. She shifts a little closer to him, her leg warm against his own. They’re quiet for a while, Riza rubbing his back in a soothing motion, sometimes stopping to trace messages instead. Roy doesn’t care what people must be thinking, at this blatant expression of familiarity that most certainly goes beyond the safe boundaries of a superior officer and his subordinate. He realises that she’s rested her head on his shoulder, and her breathing has slowed, no longer stiff and rattle-like. Her hand still traces letters lightly on the small of his back but they are lazy now, no longer urgent.
Home, he realises after another while, focusing on the languid strokes and the barest pressure of her nails as she begins the word again. Her m’s are beyond recognition, but the kiss she presses into the shoulder her head rests on speaks far more than her bruised and bloody fingers.
His hand shifts from where it had been resting on the edge of her shoulder back to the fragile and mottled skin of her neck, careful not to agitate her wound with the roughness of his ignition gloves as he splays them against the space where her shoulder meets her neck. His thumb slips under the thin fabric of her turtleneck, rubbing firmly against the bone at the top of her spine. It juts out a little more than what he was expecting – and though she’s allowed to relax her posture now, for crying out loud, it certainly points to an underlying concern that she’s not in the healthiest of conditions.
She needs the rest. They all do.
37 notes
·
View notes
Text
Best Motorcycle Tires 2019
We have put together a comprehensive list of the best motorcycle tires for Cruisers, Sportbikes, Sport touring, Off-road, Touring, and Harley Davidson motorcycles so you don’t have to. Check out our in-depth video reviews of the best motorcycle tires at prices that will shock you.
Best Motorcycle Tires For…
Cruisers
Sportbike
Sport Touring
Budget Sport Touring
Adventure Off-Road Bikes
Hypersport Sportbike
Touring Motorcycles
Harley Davidson Motorcycles
Wet Weather Riding
Bias-Ply vs Radial Motorcycle Tires
How To Tell If Your Tires Are Worn To The Limit
Motorcycle Tire Pressure and Why It’s Important
Michelin Anakee Adventure Tire For Adventure Bikes
iFrame is not supported!
The first tire we are going to look at today is the Anakee adventure tires. You should be checking out a set of Michelin Anakee adventure tires for your bike if you have a real mix of on-road and offer riding for your adventure machine.
These tires are currently in production in a wide variety size, we’ll talk about that a little more but as I said, you will see these primarily on adventure bikes and we may see them on a couple of dual sports here and there.
Installation of these tires is about standard for most tires if you know how to install tire these installs just like all the rest of them do. So let’s get right into the Aniki adventure and why you might want to consider this tire.
I think of this sort of as the realistic everyman tire, if you’re honest about your adventure use you’ll probably realize you’re like most folks and you use your bike primarily on the pavement with some occasional forays offroad.
You’re not doing any crazy technical singletrack, instead, it’s more gravel roads, fire roads, on improved roads as well. In that case, the Anakee adventure should work for you just fine.
I mentioned we would talk about sizing just a little bit. To me, these things are super cool because they come in a wide variety of sizes. We’re seeing the rear tires in both 17 and 18-inch sizes, we’ve also got fronts in 19 and 21.
What this means is if you have a 17/19 bike, something that’s a little bit more street-oriented you can still use an anarchy adventure. However, there are some of you out there who may have a bike setup instead with an 18 rear and a 21 front, something it’s obviously a little bit more dirt oriented.
You may not be using it off-road and that’s perfectly okay, I know often times when I jump on an adventure bike I tend to just treat it like a tall upright touring motorcycle so if that happens to fit your riding style, the Anakee adventure might be just right for you.
This tire sort of slots between the Anok III which is almost a straight-up street tire from Michelin and the Anakee wild which is more of a 50/50 very aggressive tire, great offroad not so great on the road.
However, it’s going to feel a little bit squirmy and it’s also not going to give the mileage that you’re going to see out of something like an Anakee adventure, instead, I’d call this more of an 80/20 tire meant for 80 percent on-road 20% off-road use. Again going back to those light off-road situations I recommend it a little bit earlier
To give you an idea of exactly where this tire sort of lies in terms of its street ability. What I think is really neat about this tire is that it is a dual-compound tire, we’ve got two CT + 2 CT + technology and this tire effectively a dual compound tire. It uses a harder rubber down the center of the tire where you’re putting most of your miles, it on really helps get good mileage out of the tire.
Then there’s a second softer rubber compound out on the shoulders of the tire, this gives a little bit of additional grip when you really need it. When you’re leaning over on your bike you’re not going to see that in every single adventure your tire out there so it is kind of a nice value add-on.
The other really nice part is it’s indicative of exactly what this tire is intended to do. Aas I mentioned installation on these things is pretty easy. If you know how to install tires these pop on just like all the rest of them.
Michelin Commander II Tires For Touring Motorcycles
iFrame is not supported!
The Michelin Commander II is a replacement for the original commander that had been around forever. At first glance, you can see this is a much more contemporary looking tire but there are some nice feature upgrades to this tire that are going to improve the life span as well as the handling,g we’re going to get into in a second.
The big thing that we’re expecting everyone to be talking about this year is the claim that Michelin has made that you’re going to get double the life out of this tire compared to its competing tires from some other manufacturers.
What you have with the Michelin Commander II is a tire built for the cruiser market, the Harley-Davidson, the metric cruisers with a lot of different size sizes and styles that will conform to a lot of different types of bikes. It comes in radial, it comes in bias with rear tires up to 200 and a front tires up to 130 millimeters.
Some of the other features you’re going to see with this tire is the contemporary styling in both the sidewall and the tread pattern but it’s not just the aesthetic. What you’re getting with the Michelin Commander II is a lot of rain technology that’s been developed over the last decade.
It will increase traction maneuverability and stability in wet conditions through the longitudinal grooves on the tire. You’re also getting the SRT technology which is a silica rain
technology that adds additional compounds into the grooves, which improves the performance further.
You also get the aromitic fibers that are placed within the plies of the tire that allow you to increase the density without gaining any weight, this gives you a stronger construction that will deform less without adding any weight to the tire.
Kevlar aromatic panels which are aromatic plies is really another way of saying Kevlar applies are very lightweight but very very strong. That’s the key standout point for the Michelin commander II.
We are seeing a lot of tire advancements in the way that the tires are form and the rubber compounds that have been used over the last decade and it’s nice to see that technology making its way into the cruiser market.
Metzeler ME 888 Marathon Ultra For Cruisers
iFrame is not supported!
The Metzeler ME888 or triple 8 as we’re calling is the successor to the long-running highly popular MEA 280 tire from Metzler.
For those of you there seeing it for the first time, the predecessor is the long-running, long-wearing heavy bike metric Cruiser Harley-Davidson big bike touring tire that offers a very very comfortable ride and a great lifespan.
The Metzeler ME888 has a few key changes that really take it into the next realm from Metzler. The key differences for this year are new rubber compound, it’s going to be long-wearing and to get all technical on you it has a high higher hysteresis rating which means it’s more resilient.
What that allows Metzler to do is do a deeper channel, deeper tread pattern design which allows you again to have longer running wear especially when you get into wet weather handling.
The tire will perform in dry and wet grip scenarios for longer while still keeping its hypermiling rating. Other key changes as you look at the groove pattern is it went from a V pattern to now more of a U pattern and they even made some subtle tweaks that allow you better help with the road harmonics.
The original ME880 was great at being anti nibbling, you don’t lose anything with the triple 8 here. What they’ve done is even if you look at where the tread pattern comes towards the middle on the inside of the tire, towards the contact patch, these are actually staggered by sixteenth of an inch of where they end so again it’s breaking up that road harmonics
It’s about comfort, it’s about being quiet, it’s about heavy bikes, this is a great stock tire replacement that’s going to just give you a great feel for longer distance touring.
If you want to go sport-touring the Z8 is your guy, if you want to go a little bit more adventure touring like an off-road or dual sport you’re going to look at something like the tour odds. Over time we expect the triple eight to be rolled out in over 100 sizes just like the 881
was over a 10-year period and really provide that great hypermiling tire that’s going to go head to head with something like the Michelin commander.
Bridgestone Battlax Hypersport S21 For Sportbikes
iFrame is not supported!
Compared to the S20 Evo which replaces the Battlax Hypersport S21 has taken some big steps forward as far as dry performance and wear is concerned. Bridgestone claims 30% better wear while dry grip handling and stability are also all also improved.
Bridgestone acclaiming a two-second gain in lap times at the Sugo testing track and on top of this wet weather performance is on par with the outgoing S20 Evo. You’re not losing any wet
performance while there are massive gains to be had in dry performance.
The front tire features two compounds and the rear tire features three which is in line with the new generation of hyper sport tires. It allows the manufacturers to maximize performance
across the different sections of the tire, particularly for those central sections where wear is so important and then on the sides of the tire where grip is even more important.
Where the front features a smaller crown to sharpen up that steering, which is quite noticeable the rear actually goes in the opposite direction by with a larger crown. It is designed to improve stability while cornering and reduce slip.
A new shoulder compound is featured on both tires as well which allows for greater cornering speed and that’s particularly noticeable with those improved track testing times that Bridgestone is boasting.
The treads have also been updated from the S20 Evo and it’s been tweaked quite significantly as to where it’s positioned across the tire to further improve performance and the removal of water.
Wet weather grip proved really strong, it was mild weather while testing, however, warm-up times worked quick and I never really felt like I needed to hold back when it came to the morning or even in commute and setting out.
It’s just a matter of avoiding the greasy slicks, the tires tracked extremely well and there were no train tracks. Overall the tires gave me confidence in the wet. In the dry, the more aggressive profile was particularly noticeable as I was going from a set of sports tires that were much less aggressive and to start with that felt far more aggressive.
However, as I spent more time with these tires I actually found it became very natural and it does give the bike a lively a feel when it comes to cornering and even just riding
around town.
It’s a very linear transition from upright to leaned over and it doesn’t demand any force of the rider, stability and confidence mid lane are a real strong point. On the road, you’re exercising a bit more caution so you’re not as far out onto the tire shoulders but at the same time I found it very easy to make small Corrections mid-corner on these S21 tires
Getting back on the throttle is also very confidence-inspiring, you can do that nice and early while free-riding which makes up quite a lot of my riding. The center of the tire after 1500 kilometers was looking barely worn at all which I have to say, bodes well for the overall life of the tire.
When it comes to the track as an everyday riding myself I found the S21 tire was extremely confidence-inspiring, I spent a couple of hours doing lots and lots of laps. On the track, warm-up times were very very quick. There was great stability while hard on the brakes and trailing the brakes into the corner.
Transitioning to full lean was effortless for my pace, I just found again the tire profile offers a very linear and neutral experience making it very very easy to ride. The Bridgestone Battlax Hypersport S21 gives you heaps and heaps of confidence.
The track that I was testing on had an extremely good surface and that’s something that does come into it as well, I wasn’t personally pushing the limits of the tire to any extent but I can say as a more casual track day rider they gave me great confidence.
All in all, I’m really looking forward to my next track day on these tires, the road wear and performance has been absolutely exemplary and I have to say I’m really impressed with these tires overall.
I definitely recommend the Bridgestone Battlax Hypersport S21’s, they’re a great road tire, they’re still great in the wet and they’re an ideal option if you’re doing some track days as well.
Michelin Pilot Road 4 For Sport Touring
iFrame is not supported!
New for this year again improving on what was one of the best tires we’ve ever seen for the sport-touring community in the Michelin Pilot Road 3 is now the Pilot Road 4. The big things they are claiming are better handling but increased longevity, so if you can believe it in the sport-touring since we’re going to get a 20% better lifespan out of these tires.
I’m going to walk through each of these changes from the Pilot Road 3 to the Pilot Road 3 4 one by one but let’s break down why you would use this tire. The Pilot Road 3 was in many cases the Goldilocks of tires because it was just right for so many applications, the Pilot Road 4 only continues that tradition.
There are three versions, the Pilot Road 4 which both the front and rear both are dual compounds, there are 17-inch rims throughout. Then you move into the Pilot Road 4 GT which is for bigger touring bikes, for grand touring bikes with luggage with two riders.
Then you move up into the Pilot Road 4 trail which is used for big dual sport bikes like a 12 GS KTM 990 adventure. You get different front tire sizes but that’s exclusively an on-road tire. This tire is great for handling as well as longevity for all riding scenarios.
They have all season silica charged compound which they have tweaked for this newer version, again you can see all of the saiping on the tire as well as the tread pattern which is very aggressive to give you phenomenal grip and handling in multi-season riding scenarios.
Let’s take a step back and walk through the tires one by one, the key commonalities of the Pilot Road 4. It is a dual-compound tire, meaning it has a harder compound in the middle with a softer compound out into the wings.
On the front tire compared to the previous version you will see a few key changes. The first thing they’ve done is a decrease in the groove pattern or the tread pattern, what that’s
going to do and especially when you get out here onto the sidewalls is it’s going to create more surface area for more grip.
They’re trading off some of the saiping, some of the water rejecting qualities to give you more dry grip and better grip handling with more rubber on the road. What they also found was under heavy braking, especially with bigger bikes is it tended to be a little more flexible than people were expecting under heavy braking.
It is still dual compound but it is medium in the center and softer on the sidewalls, that is the same as it was in the previous Pilot Road 3 version.
On the rear tire, there are a few other changes from the previous version. These tires have X site plus technology just like on the front tire versus regular X site which again changes the siping pattern. It’s still great for getting rid of the water but now you’re getting much more rubber to the road, especially on the sidewall.
The Pilot Road 4 has a new silica charged compound but here’s the big key of this 20% increase in longevity, the previous version the Pilot Road 3 was medium through the center it was 80% of the tire and soft way out on the sidewalls 10% on both sides now when you move into the Pilot Road 4 there is a complete change.
It has 20% hard down the center so your rubber on the road in upright acceleration is hitting the ground. There’s a big increase in longevity by doing that and what you have is 20% down the middle and you have 40% on either side which is going to be a medium compound so now your rears have no soft compound.
Again you’re getting better longevity, it’s going to last longer and remember tire companies are working on different compounds to increase the longevity as well as the performance of these tires so it is a completely new style of rubber. If you looked at the Pilot Road 3 you would see the sheen is different than the PR4, it’s much more of a matte finish.
The oil compound also looks slightly different and again the tread pattern is optimized for better performance in wet weather and dry weather at higher lean angles along the side of the tire.
One key difference is if you look at the Pilot Road 4 for trial or trail tire, which again is for on-road dual-sport adventure bikes the rear compound is similar to the PRr3. This means it’s a medium and a soft versus a hard medium on the Pilot Road 4 GT and the Pilot Road 4 or in it’s simple or regular version.
Continental Conti-Motion For Budget Sport Touring
iFrame is not supported!
The Continental Conti-Motion is one of our best selling tires for sport touring motorcycle and there are some good reasons for that.
Number one is bang for the buck, the value that you get with the Contin motion is pretty much unparalleled when you’re looking at budget sport or sport-touring tires. These tires can come in at around $200 for a set in most sizes which for s set of tires it very reasonable.
The Contin motion has a good reputation for lasting pretty well, they have a polymer compound in the rubber tread and if you dig your fingernail into the tread you will find it’s definitely a little bit firmer rubber than what you’d find on a pure sport tire.
If anyone ever asks me what my favorite tires are and because I’ve tried tons of tires it really comes down to what kind of riding you’re doing. With the Continental Conte Motion’s I have no problem recommending to anybody who’s just looking for a tire that’s going to get them down the road safely in wet or dry conditions.
Any budget-oriented tire or sport touring tire that’s not designed to be pushed really hard can overheat if pushed over the limit of traction. If you push really really hard if you aren’t a rider that is going out there and pushing it to nine-tenths or maybe you have a couple of different bikes and you’re looking to just you have a bike that you mainly just cruise around on Contin motion is a great choice.
A lot of people love this tire because of the tread pattern if you take a look at the way the front and the rear look it’s definitely a good-looking tire. It’s got a nice modern looking
tread pattern to it, very nice large grooves that will evacuate water really well so in wet weather conditions it will disperse water and get it away from the center of the tread.
You have plenty of adherence to the road even in wet conditions if you take a look at the contour the profile of the tire is a very even round profile, it tends to almost even be a little flatter in profile than a lot of sport tires.
That means that it has a very stable feel, especially at speed so if you do a lot of highway riding it’s will be very stable. The rear tire uses a zero Degree belted radial, which also helps with comfort and stability and it turns in very predictably.
It’s wont feel like it’s falling into the turns and it’s also going to turn in with a reliable predictable rate so it won’t just flop over on you. It’s not going to feel like you’re fighting the tires either so Continental definitely did their homework.
Pirelli Diablo Rosso Corsa 2 For Hypersport Sportbike
iFrame is not supported!
Today I’m here looking at the Pirelli Diablo Rosso Corsa 2. This is a new tire with a brand new tire carcus. It has a two compound front and a three compound rear and it’s just an awesome tire. What you’re looking at and what Pirelli are describing is a 50% track and a 50% road tire.
It’s got much stronger Road performance in a lot of areas, not to mention they’ve also beefed up the performance on the track showing some considerable performance gains and time gains in comparison to the old Rosso Corsa.
These tires definitely aimed at people who want a really high-performance track tire but also something that they can ride on the road as well. For those people who are looking at the high
performance so it’s just a really great option if that’s what you’re considering.
The Diablo Rosso Corsa 2 sits below the very race and track centric options of the Diablo Rosso Corsa SC and the SP in Pirellis lineup of the hyper sport tires and it’s above the Rosso 3 as far as to track performance.
Ther are some trade-offs made there so it’s all about you as a rider picking the right tire and the Diablo Rosso Corsa 2 is designed for those who want really high performance on the track and also a viable road tire.
It’s much more of a relevant choice if you’re a high-performance rider on the track than say the Rosso 3 without getting quite to the extremes of the super courses which are all out track tires.
Wet performance is something that Pirelli have improved on this tire over the outgoing Diablo Rosso Corsa, they’re claiming a 3 second faster lap time at Mugello with their test riders with a 3 compound rear and 2 compound front tire.
You get the full carbon black on the shoulders of the tire which gives you heaps of grip on the back tire. Moving to the front you’ve got a full silica center compound which gives you lots of feel and lots of tire grip.
This tire is intended for someone who’s not just doing track days but also doing high-performance Road riding, someone who uses their bike every day. This is how they’ve managed to offer that additional longevity in the tire.
They’re not saying that the track wear is better than the outgoing tire but it does provide extra performance and in doing so if the tire wears at the same rate as the old tire, which is what they’re claiming it certainly seems to be true from our testing you’re getting more performance with the same level of wear.
My impressions on the road of the Diablo Rosso Corsa 2 are that you’ve got a very nice handling tire, it doesn’t fall aggressively onto its side like some sports tires do, however, it’s very neutral so you’re not having to muscle the bike over regardless of what kind of machine you’re on. That’s a real boom because it just makes it a very fun very nice tighter ride with exceptional grip.
We did get an opportunity to test the Diablo Rosso Corsa 2 on wet roads, we did ride on some very wet roads but there was no real noticeable drop-off of confidence. Obviously, in the wet, you’re riding slightly differently but at the same time, I at no point felt like the tire is restricting me which is a really good sign.
As it is such a high-performance tire quite often the wet grip is what you lose, whereas, as really represented here this is a tire that you can go out and you know if it did rain on the track and you’re doing a track day and you paid all that money, you can keep going out so that’s a real boom.
Switching to the track I have to say these tires warmed up really really quick, quite often we were jumping on bikes which someone had ridden before us but that wasn’t always the case and the warmup time was really really quick.
Again, just having that really nice profile design and that balanced profile design between the front and the rear makes for a very linear and seamless transition onto the side of the tire. Getting it over to full lean was just an exceptional grip.
For someone who mainly rides on sports cheering tires these tires were just beautiful, the amount of grip and the amount of feel on offer on the track, especially on a new track it was
just exceptional.
They’re very well supported on the brakes, even trailing the brakes into a corner which is important. There’s no aggressive standing up of the bike as I come out of the corners as I’m
still leaned over, it is just a real confidence-inspiring tire.
I’m not the fastest track rider, there were plenty of much faster riders than me there who seemed to mirror my thoughts, it’s pretty safe to say that these are an exceptional track
day tire
What Pirelli have been saying about the tire is definitely true and I think it’s just going to be a great option so if you’ve enjoyed using the Diablo Rosso courses in the past this is
a significant step forward pretty much across the board and it’s definitely a tire you should try both on and off the track.
Continental Legend For Whitewall Cruisers
iFrame is not supported!
Continental designed these tires for Cruiser riders who want a white wall tire that can hold up to heavier motorcycles and deliver touring level mileage. These tires are made in wide 16 17 and 18 inch rear sizes and are geared to Harley-Davidson motorcycles as well as some metric cruisers.
These tires Sport a very unique tread pattern designed to optimize water evacuation, the Conti legends also come in a white wall variation size mostly for Harley-Davidson machines.
Dunlop American Elite For Harley Davidson
iFrame is not supported!
The American elite American Li is a new series of tires from Dunlop’s Bothwell new york’s factory to fit Harley-Davidson motorcycles. When Harley redesigned their FL touring models for the 2009 model year, Dunlop engineers worked right along beside them designing all the original equipment tires.
These same Dunlop engineers took all that technical knowledge of the Harley bikes and combined it with all Dunlop’s knowledge of Harley riders and what they want to put it all together into the Dunlop American wheat tire line.
The first two sizes of the American elite are the 1380 B-17 and 180 65 V 16 sizes to fit 2009 and later Harley FL touring bikes. The American elite is a great handling long-lasting confidence-inspiring tire, it even looks good on your bike, let’s look at the tire from the inside out.
The Dunlop American Elite rolls on a finely-tuned tire carcass tested extensively in the lab and on bikes at Dunlop’s test track. Other tracks across the US-controlled real-world mileage testing and on select high mileage customers bikes. Remember, Dunlop designed the original tire to work on the Harley FL and used this knowledge in designing the Dunlop American Elite tire.
The tire carcass is made of three plies of polyester in three fiberglass belts, this internal framework of the tire provides the basis for the American Elite combination of handling wear and feel.
Working our way out from the inside of the tire, the tread compound the part of the tire where we say the rubber meets the road uses Dunlop’s proprietary multi tread in the rear American Elite tires.
As you know when you ride you mostly ride on the center part of the tire so that is where the most wear occurs, as you lean the bike over you want grippy rubber to hold the road as you corner. Dunlop’s multi tread gives you this combo with a long-wearing center compound flanked by lateral grip compounds down each side, once again the best of both in one tire.
Continuing our journey to the surface of this tire we come to the all-important tread pattern. If it never rained we would all ride on bikes with slick tires with no tread pattern, the tread
pattern is necessary to evacuate water from under us as we ride in the damp or wet.
Since we need a tread pattern we need to make sure it does a few other things for us. It must, of course, work well in the wet, it needs to be designed in a way that wears well over time and it can add to the looks of the tires and bike too.
Dunlop has a motorcycle test track in Huntsville Alabama and they can wet that course in a controlled manner and test and compare different motorcycle tires to determine how well they work in the wet.
The American elite is a good performer in the wet conditions, the American elite pattern was also tested tweaked and optimized to wear well over the life of the tire. They tested in the lab and in thousands and thousands of real-world miles in all kinds of conditions.
The American elite sports an aggressive bold pattern that looks good on your Harley, speaking of looks the last thing to talk about regarding the Dunlop American elite is that the rest of its good looks.
The tread pattern looks good but so does the sidewall, the American elite was designed to look at at all angles on your bike under your fender, it also flies the flag prominently in several places around the sidewall.
The Dunlop American elite is made in Buffalo New York in the USA. This is important because it means these tires are made for US ride, not designing them for somewhere else and just selling them in the US.
The Dunlop American elite tires for Harley-Davidson motorcycles will give you the handling wear and overall confidence on your Harley. It means you don’t have to think about what the tires are doing so that you can just enjoy the ride.
Metzeler Roadtec 01 For Sport Touring For & Wet Riding
iFrame is not supported!
You should be looking into a Metzler Road Tech tire if you want a tire for your sport, sporty or sport touring bike. It’s will give you good mileage and handle well in wet weather, perfect for those of you who are commuting and also for those of you who are doing some long haul mileage.
Keep in mind these are being made for sportbikes so whether you’re on a 600 or 1,000 or perhaps you’re on some of the newer crops of naked out there, the FZ07 FZ09 maybe you’re zipping around on a Z800 a road tech is a tire for you.
This tire is competing against such entrance as the Bridgestone T30 Evo, it’s also competing loosely against the Michelin Pilot Road 4. Keep that in mind you’re looking for these tires there are some pretty stiff competitors in the arena.
RoadTech 01 is a new entrant to that sport touring tire market and this is an iteration of the earlier z8 interact tire. I put the RoadTech 01 on my R1200 RS and they were a really fantastic tire, the wet weather performance definitely impressed me.
Ther are two big changes that they’re promising us with the new road tech and the first is wet weather braking. I think that’s actually a pretty bold claim and the reason I say that is not because I don’t think Metzler can deliver but because of the wet weather braking on the original Z8 interact was fantastic.
It was phenomenal to start with so improving that it seems like a very tall order but Metzler is a short asset that is going to happen.
One of the other big changes they made which I’m going to say probably defines the road tech is the fact they revised the land to C ratio. When we talked about land to C ratio in the world of motorcycle tires we talked about land, the raised sections of tread, and then C the voids between the raised sections.
Metzeler went ahead and revised this a little bit to combat some of the funky wear that can happen with tires. What they did was they reworked things to get better wear, lower road noise and give you a longer life out of what was ready a pretty long life tire.
The Metzeler RoadTech 01 is a fantastic tire for those of you who are trying to put in long miles and who are going to hit the real-world whether. Those of you who are commuting and those of you taking long trips, you know you’re going to hit some bad weather and the road Tech is going to see you safely through it.
Bias-Ply Motorcycle Tires vs Radial Motorcycle Tires
iFrame is not supported!
There’s a lot rolling on your motorcycle tires, but do you know what is below the tread rubber or do you know the difference between a bias-ply tire and a radial tire?
Despite all the different sizes and purposes and appearances motorcycle tires only really come in two varieties, you’ve got your bias-ply or cross belt tires as they are sometimes called and you’ve got your radials.
Up until the 70s, all bikes used bias-ply but then as motorcycles started to get more powerful and people were riding faster it became clear that better technology was needed, hence radials.
Before I explain how bias ply and radial tires are different let’s do a brief tire anatomy lesson because the parts of a tire are going to be similar regardless of the design.
If you take a look at a cross-section of a tire you will see the tread cap which is the rubber portion that rolls down the road. Beneath that are layers of fabric that create the tire’s carcass and give it its structure and those layers extend down to create the tire sidewall and wrap around the bead which is a thick steel cable.

All of it is splashed in rubber and more or less represents the components of a tire whether that tire is a bias-ply or a radial.
The difference between the two is in how those fabric layers called carcass plies are oriented. On a bias-ply tire, the layers which are often made of aramid or polyester or nylon are laid down diagonally, hence the term bias, in a crisscross pattern from one bead of the tire all the way over to the other bead.

Occasionally an additional layer or two of fabric will be laid just on the tread portion to strengthen that section, but the fabric is still at a diagonal and in general the construction of both the tread and the sidewall are similar so they have similar thicknesses and flex properties.
On radial tires, however, the carcass plies are laid down perpendicular to the bead than at an angle and that gives you a more flexible sidewall, there’s also going to be a belting package beneath the tread and that is going to be made of either steel cable or aramid thread and it only exists beneath the tread and it’s there to stiffen that area of the tire.
With a radial tire the tread and the sidewall have independent constructions and what that means is if those areas of the tire have different flex properties, that’s obviously really important if you’re trying to design a tire with very particular behaviors.

With the radial, you’re not stuck compromising the tread rigidity versus sidewall flexibility like you are on a bias ply, which again, has that uniform construction.
What it boils down to is two families of tires with different behaviors, in general, bias-ply tires are going to have a more robust construction with taller sidewalls and rounder profiles.
That may have worked well for bikes back in the day and it might still be a good fit for bikes like cruisers and touring rigs but back in the 70s bias-ply tires were overheating because they couldn’t handle the horsepower. The bikes were making and they weren’t providing the handling that riders needed, enter the radial tire.
First seen in the automotive world shortly after World War two radials first appeared on motorcycles in the 80s on the 500 GP bike of one fresh-faced Freddie Spencer.
Rather than relying on layer after layer of fabric to build its structure, as a bias-ply does, a radial tire might have just two carcass plies and one steel belt.
What you get is a light tire that manages its heat better and because you can tune the stiffness of the tread and the sidewall independently, you can design a tire with optimized flexibility which gets you a better grip that is handling and a lot of other benefits.
With radial technology, you’re able to design a tire that has a large tread area in a short sidewall, as is common on modern sportbikes. So radials are better for high-speed applications where handling and outright traction is a priority.
Meanwhile, bias-ply even though it is an old technology is still a good fit for larger heavier slower bikes because the tire’s more robust design offers more load capacity and durability. Also, bias-ply tires are a must if you’re rolling on old school spoke rims since modern radials aren’t meant to be used with the tube.
That’s all because the soft lining on a tubeless radial will supposedly create a lot of friction and thus heat is used as a tube and that’s not a good situation. With that being said I will admit that I have run tubes in radial on spoke wheels without a problem but in general, the manufacturers do not recommend it.
In the end radials are the newer more sophisticated technology and they claim the lion’s share of the marketplace, still, bias-ply tires are popular on a certain kind of motorcycle.
It’s not about which technology is newer or more advanced but more about what type of motorcycle the tire is being put on and how that bike will be ridden.
How To Tell If Your Tires Are Worn To The Limit
iFrame is not supported!
Do you know how to tell if your tires are toast? Your tires are the only thing connecting your motorcycle to the road, so it’s really important that they’re in good condition for both safety and performance. Here’s how to tell if your tires need to be replaced.
Where is the most common reason a tire needs to be replaced? To help you determine if your tire has enough tread there’s a treadwear indicator molded into the tire, it’s marked on the sidewall by a little triangular symbol in the letters TWI.
If that sucker is level with the surrounding trend anywhere on the tire it’s time for some fresh rubber, the legal limit is 1/32 of an inch which is about the height of old Abe’s head on a penny. Even if the tread isn’t worn to the limit it might be worn unevenly.
The most common types of uneven wear are squaring off of the rear tire, nearly as common is cupping or scalping of the front tire when the tire tread wears unevenly along the length of the tread. This condition can cause stability handling and traction issues. If you notice this type of wear on your bike it’s not only time for new tires, it’s also time to have your suspension service since scalping is often indicative of poor suspension setup.
Another thing to check for is tire damage like puncture cuts or bulges, any damage to the tire is cause for concern as it could lead to a blowout. We have an article that shows you how to plug a tire. Butt plugs are a temporary repair and your safest course of action is to replace the tire.
Finally, even if your tires have ample tread and look great they might simply be too old to ride on. Most tire manufacturers say five years is a lifespan of a tire because oil is in the rubber evaporate and the rubber will dry out and harden. How can you tell how old your tire is? Its birthday is molded right into the sidewall
The four-digit code at the end represents the week in the year of manufacture, this tire was born in the twenty-fifth week of 2006. This tire looks good but it is way too old to ride on and since tires are really pricey you should make sure that yours lasts as long as possible.
The best way to do that is to make sure they are properly inflated. If your tires are overinflated or underinflated it’s not only going to affect in traction it’s also going to impact the tread wear.
Motorcycle Tire Pressure and Why It’s Important!
youtube
Tire pressure is not the most exciting topic but it is important after all your motorcycles tires are the only thing connecting it to the road and tire pressure affects things like traction, comfort, stability, handling and tread wear.
As a rule, you want to check your tire pressures at least every other week, make sure using a quality tire gauge and check your pressures when the tires are cold. That does not mean waiting until winter, just means doing it before you ride since the tires are going to heat up as they roll down the road.
Left alone your tires are going to deflate, tubeless tires bleed down more slowly than tube-type tires but the simple fact that air molecules like to skate the tire all on their own means that under-inflated tires are pretty common.
If your tires are under-inflated you end up with a soft tire and a big old contact patch, that leads to heavy steering, sloppy handling, premature tire wear, excess friction, and tire temperature and poor fuel economy.

On the other hand, if the pressure is too high you’re going to have a small contact patch and a really hard tire, which means less traction and a really rough ride.

So how do you know what the correct tire pressure is?
Some people go by the number listed on the tire sidewall, that is the wrong place to look. That is the maximum allowable tire pressure, the recommended tire pressure is sure to be a lot lower. The right place to look is in your owner’s manual or right on your motorcycle. There will be a sticker on your bikes swing arm or the frame, it will list your bike’s front and rear tire pressures.
Since the tire pressure is so critical you should use a quality tool to check it, pencil gauges are cheap and convenient but they are notoriously inaccurate so you should invest in a decent gauge to do the job.
So in review. Check your tire pressures at least every other week, use a good quality gauge and take the measurement when the tires are cold.
The post Best Motorcycle Tires 2019 appeared first on Motorcycle Gear 101.
0 notes
Text
🌷ACNL Screenie Edit Guide🌷
By request, I’m going to teach you how I edit my screenshots!
I feel like my setup is very simple, so I don’t think this will be confusing.
(though there will be many screenshots throughout)
You will have A+ screenies in no time fam!
Program Used: Photoshop CS5 Portable (Message me for link to Windows download!)
~*Starts under the cut*~
First: Take your screenshot!
I use the easy L+R way, because I’m lazy lol
To use Miiverse: Press home menu on your DS once you think you have a good shot and go to the Miiverse (obv)~ From there save to screenshot album or Play journal. Whichever is fine. The pictures will be of slightly better quality, hence this is a popular yet tedious method.(IMO)
To download the photo(s) simply login to Miiverse from your computer/phone and save it~*
I’ll be using this one:

(yup, looks terrible)

Second: Use THIS website to reduce noise & resize photo!
URL: http://waifu2x.udp.jp/
I usually use these settings:

*Important* ALWAYS choose Artwork!
Now we’re lookin’ like this:

(A little better)

Third: Time to open Photoshop!
I use CS5 Portable bc I like to save as much space on my computer as possible - It works just like any regular Photoshop version.
Open image in Photoshop; Now we have this:

Its looking a bit meh, so first I’m going to reduce noise some more!
Go to: Filter > Noise > Reduce Noise

I use these settings, but feel free to play around w it;

Now:

(softer~*)

Fourth: Change curves / levels or add a PSD / run ATN
Click the circle dude on the right to get to the adjustments tab!
Click the play button at the top for actions (ATN files)!


Mess with them until you’re happy!
I usually like to sharpen the image a bit more, and brighten it up using an ATN, which i’ll provide for you upon request!
To LOAD an Action / ATN File:

After running the action, editing layers I didn’t like, flattening image, my photo looks like:

Tweaking the curves, levels, color balance, I got this:


Fifth: Add Texture!
After you’ve tweaked your image with curves/levels/ect, it’s time to add some grain - to give it less of a “flat” effect, if that makes sense.
Go to: Filter > Texture > Grain
These are my settings:

Tweak to your liking!

Now all you have to do is resize to 540 px for Tumblr, and you’re done!
My end result (after tweaking it a bit more):

I hope this helps! Have fun!
*Disclaimer: ATN used is not made by me, I just can not remember the source. PSCS5 download was also not created by me!
CREDIT:
TEXTURE SETTING CREDIT // settIngs for noise reduc. : @fxwne
Also, please remember to adjust all settings according to the photo you’re editing and your own taste! Have fun with it!
#tutorial#screenshot tutorial#acnl#animal crossing#animal crossing new leaf#animal crossing nl#ac:nl#animal crossing: new leaf#acnl edit#acnl edits#acnl screenshot#acnl screenie#acnl screencap#mine#acnl help#long post
79 notes
·
View notes
Text
knives benchmade
nože
Just what is the difference between Japanese Knives and traditional western cutlery?
The good thing is, either outlines hold world-class design and style and performance. They are manufactured by following era-outdated techniques put together with modern day techniques. We likely will never know which can be greater apart from by going into the specifics of these principal differentiation - the blade. Even though one particular excellent element of a blade is metal, merely the stainless steel by yourself will not be sufficient. You have to think about the helping to make procedure, tradition and common fads in order to determine a knife's leading edge and ability.
The Metal
Typically, Japanese cutlery use tougher metallic than their traditional western comparable version. They may be astonishingly light in weight with an excellent geometry and a nice stability. These knives possess a incredibly extreme benefit that marks the durability and benefit-holding element next to the selection of extremely high-finish knives, 62-64HRC. They may be sharper and simpler to re-sharpen and identified with hardly any negative aspect. Due to the fact Japanese knives have slimmer sides, they actually do significantly better as cutters.
For your assessment, european knives are created from softer stainlesss steel which generally clocks in at 54-56HRC, a reduced hardness on Rockwell scale. This could cause european knives considerably powerful and weightier with thicker ends that may endure recurring and considerable use. Even so, although cheaper solidity may also mean simpler honing, 56HRC benefit quickly dings than 64HRC will scratch. Moreover the nicks and moves inside the blade can uninteresting advantage much more with carried on utilization. Leading conclude models go more at 67HRC.
Honing Advantage
The common edge of a european blade is sharpened from the order of 40 to 50 degrees, even though Japanese knives are sharpened using a very much finer viewpoint from about 30 qualifications or less, producing the angles in the blade exceptionally sharpened. Some Japanese cutting blades may be sharpened among 6 to 8 diplomas generating the sides of your blade even finer than your normal right razor.

Style and design
The mix of equally society practices has surfaced perfectly designed plus more efficient cooking area knives. Regular Japanese designs have solitary-edged blades with curved addresses no grip marks, limiting the cutlery to particular decreasing duties, but now we can easily see traditional western-fashion Japanese cutlery in american-style grips and increase-edged rotor blades. We already see ergonomically sharper and more robust kitchen knives versatile enough to address diverse slicing wants as opposed to basic regular Japanese or european Kitchen knives.
Value
Price wise, I feel it's a mistaken perception that Japanese kitchen knives are extremely costly. In case you take a look at rates on common parts from Western, American and Oriental companies, conventional Japanese knives use more challenging metallic and usually get the bigger selection of especially-designed knives getting the concept they frequently search greater and therefore are very expensive. Because distinct knives come from diverse method in style, operate and satisfaction, it truly is only constant that selling price also has the around-all character in the kitchen knives.
0 notes
Text
Are You Sharpening Your Photos Enough?
I’ll own up to this and say that I’m guilty of being stuck in my ways. But age is no excuse for not being as adaptive as I should be to the changing times. But let me explain.
I’ve been shooting for many years now and nearly 20 years ago, when I started out, there were zero calls for digital copies of images. Sure, in the early 2000s I was shooting digitally commercially, but we always got requests for prints, not digital files for the web.
Back then I would export my file at the largest size we’d be requested for (usually 12×18 [A3]) and I’d sharpen it a little for print but that was it, I’d just sharpen it the once for that large print size. Of course, times have changed, but I’ve been guilty of not changing or adapting with them and me not sharpening my images enough has become one of those areas that I’ve overlooked for too long.
Before, my print sharpening version.
After, the version I upload to the Web.
It’s important to point out at this stage that there is no ‘correct’ level of sharpening. The purpose of this article is not about telling you that you’re doing it wrong, but really more about getting you to look at your own images and try a few different sharpening amounts on your own shots. You wouldn’t want to get ‘stuck in your ways’ now, would you?
The Rise of Ultra-Sharp Shots
Many of you who follow a large proportion of professional photographers online may have already noticed this emerging trend for overly sharp images. You have to remember that this look is something that simply could not exist 20 or even 10 years ago due to limits in technology.
In recent years we’ve seen the rise of Fuji and Sony stomping all over the market with eye-wateringly sharp images straight out of camera thanks to not only their lenses but their sensor technology too. With this has come the ability to then sharpen those shots even more in post. The reason I make this distinction of “even more in post” is because regardless of what Mr. Adobe tells you, you can’t refocus and ‘sharpen’ a soft focus shot, it simply doesn’t work.
You need a razor sharp image to begin with before you can even consider sharpening your shot in these incredibly tack-sharp ways. So like I said, we’re only now seeing these ultra sharp images because even though sharpening in post has been around for years, the technology to create a sharp image to begin with has never been so strong.
Remember: You can’t refocus an out-of-focus shot to make it sharper. The ‘sharpen’ tool in Photoshop doesn’t go back in time and retake your shot with a little more accuracy. It simply increases the contrast of adjacent pixels to present the illusion of your shot being ‘visually’ sharper at a distance.
Are You Sharpening Your Images Enough?
So, are you sharpening your images enough? Well, this is subjective, of course, and I think this trend of razor-sharp images will see an ebb and flow as time goes on. We see a lot of commercial advertising images online and a lot of these are pin-sharp right now. As a result, the aspiring photographers take note and we see a rise of pin-sharp images filter down.
But as with any new trend, there will always be those that purposefully steer clear of the mainstream, commercial look. There is even now a rise in photographers who purposefully only shoot with older lenses due to a dislike of the ultra-sharp more modern lenses.
There are other reasons to avoid these overly sharp images produced by modern cameras and lenses purely due to the aesthetics of it and we are seeing a lot of that from the world of cinematography right now. Many movies rely heavily on CG and 8K quality, but others believe that images with enough resolution and sharpness to see your DNA on screen is not what they want. For example a while ago I was at Panavision HQ here in London, whereupon I was told that Tom Cruise will not work on a film shot with the newest and sharpest lenses. He prefers the softer, slightly more flattering, older lenses. There’s nothing wrong with that, as like I said, sharpness is subjective, and it’s far from ‘the sharper the better’.
Location, Location, Location
In this section, I’ll explain the process of how to sharpen your shots, but in all honesty, you most likely already know ‘how’ to sharpen your shots, it’s the ‘how much’ we need to sharpen them we’ll address.
My post-pro process involves me importing my raws into Lightroom, adjusting exposure, white balance, etc, but NO sharpening whatsoever (beyond the very basic default amount already set on import). I then export my full size (12”x18”/4500x3000px) shots to Photoshop where I retouch the skin, do some local dodge and burn, etc, and then lastly I’ll sharpen them before saving.
Here is where I’ve been very lazy in the past. I simply sharpen the full-size file appropriately and then I re-save multiple versions out for the web from that one file. This results in that the original sharpen is completely unnoticeable when viewed on somebodies phone screen on Facebook. I literally may as well not have bothered sharpening it at all, because whatever I did to that huge A3 file is all but lost when downsized to the web.
We need to consider the location that these files will end up when sharpening our shots and unfortunately, one size will not fit all.
If you’re interested in my Photoshop sharpening process then you can view all the details here.
The Three Levels of Photoshop Sharpening: Detail, Global, Local
The Re-Size
My advice would be to do your retouch process as normal and even do your subtle large file sharpen as normal too. But at the end of all of that, be sure to add yet another step to the process and re-size and re-sharpen everything based on its intended final viewing location. So for example, if you’re going to post the shot on Facebook, resize it and re-sharpen it accordingly.
Cool, so I just resize my shot in Photoshop, sharpen it and then save it right?
To be fair, yes that is one option. But for me, I like to save out a few versions and I also like to add a little grain to my final images to trick some of the compression algorithms in social media sites.
Wait, what?
Thankfully I’ve already done a complete article on why and how I do this here. This is a trick I use to essentially fool the file compression engine into thinking there is more data in a shot than there really is. This can really help when it comes to reducing color banding in your shots too, so for me and my color work that’s incredibly useful.
So in short, no, I don’t just resize it once, sharpen it and then save it out. I use a slightly different method but please feel free to do what suits your workflow and requirements.
Back to Lightroom
This may seem a little counterintuitive, but when I’ve done all of my Photoshop work, I now save my image once, at its original full size and unflattened. Once all of the images from a set are completed, I fire up Lightroom, resize them all there via the export tool and then I lastly reimport them one last time and sharpen and add grain accordingly for their size before finally saving it out one last time.
Seems ridiculous right? Well you’re not wrong, but this is really only necessary if you a. want to add grain, b. want multiple versions of all different sizes, and c. want your images to look their best online.
Is All That Really Necessary?
One of the steps I really tried to skip was the resize. Unfortunately, this is very important and simply cannot be skipped. For example, I just tried to over-sharpen my large A3 file knowing that it would be viewed smaller. This really does very little and even with very high amounts of sharpening on the big file, the effect was almost unnoticeable when viewed online.
No supplemental sharpening
Lightroom +35 Sharpen
Lightroom +100 Sharpen
So by viewing the shots above, you should see that even though these shots all have drastically different amounts of sharpening applied, they visually look almost identical when seen online.
Note: When I say ‘sharpened in Lightroom’, I’m referring to the sharpen adjustment window halfway down in the Develop module.
What Size do you Recommend for the Web?
You’ll likely hear varying amounts for this one, but for me, I use 2048px on the longest side. I’ve found that this offers the best results on platforms like Facebook where this is the largest size you can get away with before some very heavy-handed resizing and compression kicks in on their end.
Step 1. Import your final Photoshop document into Lightroom.
Step 2. Go to export and then make the relevant size adjustments prior to actually exporting them.
Step 3. Resize to fit. Long Edge. 2048 pixels. 72 Pixels per inch
Step 4. Be sure not to check the ‘Sharpen For’ box.
How Much Sharpening is Too Much?
So now that we’ve resized our shots, import them back in and now we’re finally ready to start sharpening.
But how much sharpening is too much? Personally, I really believe you need to do your own tests, with your own camera, lenses, and workflow, but by all means, look at mine and see what I determined to be the best sharpening amount for me and my work online.
I tried a multitude of amounts and combinations, exported them and then uploaded them all to my site so that I could see what was looking best. Here’s a link to the results and my notes, but be warned, there are a lot of images here some of the tests may not make sense. But don’t worry as I’ve pulled out all the salient points and I’ll share them down below.
From these tests, I concluded that somewhere between 75-100 of Lightroom sharpening was a good amount on a 2048px file.
Take a look below at some of the varying amounts and see for yourself.
Final export at +25 sharpening
Final export at +100 sharpening
Final export at +150 sharpening
As I said, I found the sweet spot for me to be between +75 and +100 sharpening. For the other sliders, I leave them at the default amount which is Radius 1.0, Detail 25 and Masking 0.
I would again urge you to do your own tests as your camera brand and lens choice will play a significant role in your final decision. These images were all captured on the Nikon D850 with the 24-70 f2.8 zoom lens attached.
What About the Grain?
The eagle-eyed among you will likely have noticed the grain already being applied in the above shots. I was very concerned about applying the grain at the same time as sharpening due to sharpened grain looking horrendous in images. One test I did was to resize, add grain, export, import, sharpen, final export. I then compared this to simply applying grain and sharpening simultaneously before the final export. Take a look at the results below.
Resized and then sharpened +100 – No grain
Resized and then sharpened +100, exported, imported, grain applied, final export.
Resized and then sharpened +100 with grain applied simultaneously prior to export.
In a perfect world you’d do it properly by resizing, import, sharpen, export, import and then finally add grain. But to be fair, I was actually very happy with how Lightroom handled the final file when you do both the sharpen and grain at the same time. Take a look for yourselves and compare the shots above, but for me, doing them together is fine and cuts out another step.
How Much Grain?
This will vary from shoot to shoot but here are the settings I use. The Grain window can be found in the ‘Effects’ tab towards the bottom of the pane in the Lightroom Develop module.
Amount: 15
Size: 25
Roughness: 50
Again this is a situation where I would recommend you play with varying amounts and looks to see what works for you. I tend to stick between 15 and 25 but black and white contrasty shots will visually respond well to larger amounts of grain compared to softer color images that require less. But all of this is subjective and you may well hate the idea of adding grain to your shots altogether… which is also fine.
Simple as That
So I fully appreciate that some of you may think that this way too much info. After all, we want to eat the burger, not meet the damn cow, Jake. But for those interested in furthering their understanding of why and how certain things are achieved and arrived at, I’ve included all of my tests and thoughts above. For those with ADHD though, I’ve also included a quick-fire, step-by-step process below which outlines what to do, not why to do it.
Sharpening your Images for the Web
Step 1
Be sure to resize your images for the web prior to sharpening. I import my retouched files from Photoshop into Lightroom and then export them at the new size of 2048px on the longest side. Be sure to do no sharpening at this point.
Step 2
Reimport your resized files back into Lightroom. Now apply the adequate amount of sharpening for your taste. I personally go for a sharpen amount of around 75-100 with a Radius of 1, Detail 25 and Masking 0.
Step 3
Add a small amount of grain to your image via the ‘Effects’ window in the ‘Develop’ module in Lightroom. I tend to keep the amount low, but enough so that it will reduce any color banding that may appear under the heavy compression algorithms of sites like Facebook. For most of my images, I tend to stick to around 15-20 grain amount, 25 size, and 50 roughness.
Step 4
The final export and again, I just use exactly the same settings as in the original export earlier. 2048px on the longest side at 72dpi.
Closing Comments
Once again, I apologize that this article was so long for a topic that simply could have stated ‘be sure to resize your shots before sharpening them’. But as with all of my teachings, I do believe that understanding the reasons you do things is just as important as doing them… this isn’t a 10:01 YouTube video after all ;)
One of the biggest takeaways from this, though, is to reiterate once again how subjective sharpening is. I shared my thoughts on this with a before and after shot on social media the other day and several people mentioned that they preferred the original. That’s totally fine and I may find that I get tired of overly sharp shots too in the future. The point I’m making here is that you may have looked at this article and not agreed with what I’m saying and felt confused. If you prefer the softer version shot, that’s totally okay and there’s nothing wrong with that.
Wherever you sit on this, I will just say that I thought the same thing until recently. I felt that I was sharpening my shots enough and it wasn’t until I did these tests that I actually decided to swallow the humble pie and decide to change my workflow to reflect a shift in the industry.
Resizing and sharpening your shots may already be basic practice to you. In fact, if you started shooting in the last ten years this is basic, common sense to you and the fact that somebody made an article about it is laughable to you. But for those that come from print *cough* old people *cough*, we may not be doing this and, myself included, needed to get with the times.
About the author: Jake Hicks is an editorial and fashion photographer based in Reading, UK. He specializes in keeping the skill in the camera and not just on the screen. If you’d like to learn more about his incredibly popular gelled lighting and post-pro techniques, visit this link for more info. You can find more of his work and writing on his website, Facebook, 500px, Instagram, Twitter, and Flickr. This article was also published here.
source https://petapixel.com/2019/04/10/are-you-sharpening-your-images-enough/
0 notes
Text
Are You Sharpening Your Photos Enough?
I’ll own up to this and say that I’m guilty of being stuck in my ways. But age is no excuse for not being as adaptive as I should be to the changing times. But let me explain.
I’ve been shooting for many years now and nearly 20 years ago, when I started out, there were zero calls for digital copies of images. Sure, in the early 2000s I was shooting digitally commercially, but we always got requests for prints, not digital files for the web.
Back then I would export my file at the largest size we’d be requested for (usually 12×18 [A3]) and I’d sharpen it a little for print but that was it, I’d just sharpen it the once for that large print size. Of course, times have changed, but I’ve been guilty of not changing or adapting with them and me not sharpening my images enough has become one of those areas that I’ve overlooked for too long.
Before, my print sharpening version.
After, the version I upload to the Web.
It’s important to point out at this stage that there is no ‘correct’ level of sharpening. The purpose of this article is not about telling you that you’re doing it wrong, but really more about getting you to look at your own images and try a few different sharpening amounts on your own shots. You wouldn’t want to get ‘stuck in your ways’ now, would you?
The Rise of Ultra-Sharp Shots
Many of you who follow a large proportion of professional photographers online may have already noticed this emerging trend for overly sharp images. You have to remember that this look is something that simply could not exist 20 or even 10 years ago due to limits in technology.
In recent years we’ve seen the rise of Fuji and Sony stomping all over the market with eye-wateringly sharp images straight out of camera thanks to not only their lenses but their sensor technology too. With this has come the ability to then sharpen those shots even more in post. The reason I make this distinction of “even more in post” is because regardless of what Mr. Adobe tells you, you can’t refocus and ‘sharpen’ a soft focus shot, it simply doesn’t work.
You need a razor sharp image to begin with before you can even consider sharpening your shot in these incredibly tack-sharp ways. So like I said, we’re only now seeing these ultra sharp images because even though sharpening in post has been around for years, the technology to create a sharp image to begin with has never been so strong.
Remember: You can’t refocus an out-of-focus shot to make it sharper. The ‘sharpen’ tool in Photoshop doesn’t go back in time and retake your shot with a little more accuracy. It simply increases the contrast of adjacent pixels to present the illusion of your shot being ‘visually’ sharper at a distance.
Are You Sharpening Your Images Enough?
So, are you sharpening your images enough? Well, this is subjective, of course, and I think this trend of razor-sharp images will see an ebb and flow as time goes on. We see a lot of commercial advertising images online and a lot of these are pin-sharp right now. As a result, the aspiring photographers take note and we see a rise of pin-sharp images filter down.
But as with any new trend, there will always be those that purposefully steer clear of the mainstream, commercial look. There is even now a rise in photographers who purposefully only shoot with older lenses due to a dislike of the ultra-sharp more modern lenses.
There are other reasons to avoid these overly sharp images produced by modern cameras and lenses purely due to the aesthetics of it and we are seeing a lot of that from the world of cinematography right now. Many movies rely heavily on CG and 8K quality, but others believe that images with enough resolution and sharpness to see your DNA on screen is not what they want. For example a while ago I was at Panavision HQ here in London, whereupon I was told that Tom Cruise will not work on a film shot with the newest and sharpest lenses. He prefers the softer, slightly more flattering, older lenses. There’s nothing wrong with that, as like I said, sharpness is subjective, and it’s far from ‘the sharper the better’.
Location, Location, Location
In this section, I’ll explain the process of how to sharpen your shots, but in all honesty, you most likely already know ‘how’ to sharpen your shots, it’s the ‘how much’ we need to sharpen them we’ll address.
My post-pro process involves me importing my raws into Lightroom, adjusting exposure, white balance, etc, but NO sharpening whatsoever (beyond the very basic default amount already set on import). I then export my full size (12”x18”/4500x3000px) shots to Photoshop where I retouch the skin, do some local dodge and burn, etc, and then lastly I’ll sharpen them before saving.
Here is where I’ve been very lazy in the past. I simply sharpen the full-size file appropriately and then I re-save multiple versions out for the web from that one file. This results in that the original sharpen is completely unnoticeable when viewed on somebodies phone screen on Facebook. I literally may as well not have bothered sharpening it at all, because whatever I did to that huge A3 file is all but lost when downsized to the web.
We need to consider the location that these files will end up when sharpening our shots and unfortunately, one size will not fit all.
If you’re interested in my Photoshop sharpening process then you can view all the details here.
The Three Levels of Photoshop Sharpening: Detail, Global, Local
The Re-Size
My advice would be to do your retouch process as normal and even do your subtle large file sharpen as normal too. But at the end of all of that, be sure to add yet another step to the process and re-size and re-sharpen everything based on its intended final viewing location. So for example, if you’re going to post the shot on Facebook, resize it and re-sharpen it accordingly.
Cool, so I just resize my shot in Photoshop, sharpen it and then save it right?
To be fair, yes that is one option. But for me, I like to save out a few versions and I also like to add a little grain to my final images to trick some of the compression algorithms in social media sites.
Wait, what?
Thankfully I’ve already done a complete article on why and how I do this here. This is a trick I use to essentially fool the file compression engine into thinking there is more data in a shot than there really is. This can really help when it comes to reducing color banding in your shots too, so for me and my color work that’s incredibly useful.
So in short, no, I don’t just resize it once, sharpen it and then save it out. I use a slightly different method but please feel free to do what suits your workflow and requirements.
Back to Lightroom
This may seem a little counterintuitive, but when I’ve done all of my Photoshop work, I now save my image once, at its original full size and unflattened. Once all of the images from a set are completed, I fire up Lightroom, resize them all there via the export tool and then I lastly reimport them one last time and sharpen and add grain accordingly for their size before finally saving it out one last time.
Seems ridiculous right? Well you’re not wrong, but this is really only necessary if you a. want to add grain, b. want multiple versions of all different sizes, and c. want your images to look their best online.
Is All That Really Necessary?
One of the steps I really tried to skip was the resize. Unfortunately, this is very important and simply cannot be skipped. For example, I just tried to over-sharpen my large A3 file knowing that it would be viewed smaller. This really does very little and even with very high amounts of sharpening on the big file, the effect was almost unnoticeable when viewed online.
No supplemental sharpening
Lightroom +35 Sharpen
Lightroom +100 Sharpen
So by viewing the shots above, you should see that even though these shots all have drastically different amounts of sharpening applied, they visually look almost identical when seen online.
Note: When I say ‘sharpened in Lightroom’, I’m referring to the sharpen adjustment window halfway down in the Develop module.
What Size do you Recommend for the Web?
You’ll likely hear varying amounts for this one, but for me, I use 2048px on the longest side. I’ve found that this offers the best results on platforms like Facebook where this is the largest size you can get away with before some very heavy-handed resizing and compression kicks in on their end.
Step 1. Import your final Photoshop document into Lightroom.
Step 2. Go to export and then make the relevant size adjustments prior to actually exporting them.
Step 3. Resize to fit. Long Edge. 2048 pixels. 72 Pixels per inch
Step 4. Be sure not to check the ‘Sharpen For’ box.
How Much Sharpening is Too Much?
So now that we’ve resized our shots, import them back in and now we’re finally ready to start sharpening.
But how much sharpening is too much? Personally, I really believe you need to do your own tests, with your own camera, lenses, and workflow, but by all means, look at mine and see what I determined to be the best sharpening amount for me and my work online.
I tried a multitude of amounts and combinations, exported them and then uploaded them all to my site so that I could see what was looking best. Here’s a link to the results and my notes, but be warned, there are a lot of images here some of the tests may not make sense. But don’t worry as I’ve pulled out all the salient points and I’ll share them down below.
From these tests, I concluded that somewhere between 75-100 of Lightroom sharpening was a good amount on a 2048px file.
Take a look below at some of the varying amounts and see for yourself.
Final export at +25 sharpening
Final export at +100 sharpening
Final export at +150 sharpening
As I said, I found the sweet spot for me to be between +75 and +100 sharpening. For the other sliders, I leave them at the default amount which is Radius 1.0, Detail 25 and Masking 0.
I would again urge you to do your own tests as your camera brand and lens choice will play a significant role in your final decision. These images were all captured on the Nikon D850 with the 24-70 f2.8 zoom lens attached.
What About the Grain?
The eagle-eyed among you will likely have noticed the grain already being applied in the above shots. I was very concerned about applying the grain at the same time as sharpening due to sharpened grain looking horrendous in images. One test I did was to resize, add grain, export, import, sharpen, final export. I then compared this to simply applying grain and sharpening simultaneously before the final export. Take a look at the results below.
Resized and then sharpened +100 – No grain
Resized and then sharpened +100, exported, imported, grain applied, final export.
Resized and then sharpened +100 with grain applied simultaneously prior to export.
In a perfect world you’d do it properly by resizing, import, sharpen, export, import and then finally add grain. But to be fair, I was actually very happy with how Lightroom handled the final file when you do both the sharpen and grain at the same time. Take a look for yourselves and compare the shots above, but for me, doing them together is fine and cuts out another step.
How Much Grain?
This will vary from shoot to shoot but here are the settings I use. The Grain window can be found in the ‘Effects’ tab towards the bottom of the pane in the Lightroom Develop module.
Amount: 15
Size: 25
Roughness: 50
Again this is a situation where I would recommend you play with varying amounts and looks to see what works for you. I tend to stick between 15 and 25 but black and white contrasty shots will visually respond well to larger amounts of grain compared to softer color images that require less. But all of this is subjective and you may well hate the idea of adding grain to your shots altogether… which is also fine.
Simple as That
So I fully appreciate that some of you may think that this way too much info. After all, we want to eat the burger, not meet the damn cow, Jake. But for those interested in furthering their understanding of why and how certain things are achieved and arrived at, I’ve included all of my tests and thoughts above. For those with ADHD though, I’ve also included a quick-fire, step-by-step process below which outlines what to do, not why to do it.
Sharpening your Images for the Web
Step 1
Be sure to resize your images for the web prior to sharpening. I import my retouched files from Photoshop into Lightroom and then export them at the new size of 2048px on the longest side. Be sure to do no sharpening at this point.
Step 2
Reimport your resized files back into Lightroom. Now apply the adequate amount of sharpening for your taste. I personally go for a sharpen amount of around 75-100 with a Radius of 1, Detail 25 and Masking 0.
Step 3
Add a small amount of grain to your image via the ‘Effects’ window in the ‘Develop’ module in Lightroom. I tend to keep the amount low, but enough so that it will reduce any color banding that may appear under the heavy compression algorithms of sites like Facebook. For most of my images, I tend to stick to around 15-20 grain amount, 25 size, and 50 roughness.
Step 4
The final export and again, I just use exactly the same settings as in the original export earlier. 2048px on the longest side at 72dpi.
Closing Comments
Once again, I apologize that this article was so long for a topic that simply could have stated ‘be sure to resize your shots before sharpening them’. But as with all of my teachings, I do believe that understanding the reasons you do things is just as important as doing them… this isn’t a 10:01 YouTube video after all ;)
One of the biggest takeaways from this, though, is to reiterate once again how subjective sharpening is. I shared my thoughts on this with a before and after shot on social media the other day and several people mentioned that they preferred the original. That’s totally fine and I may find that I get tired of overly sharp shots too in the future. The point I’m making here is that you may have looked at this article and not agreed with what I’m saying and felt confused. If you prefer the softer version shot, that’s totally okay and there’s nothing wrong with that.
Wherever you sit on this, I will just say that I thought the same thing until recently. I felt that I was sharpening my shots enough and it wasn’t until I did these tests that I actually decided to swallow the humble pie and decide to change my workflow to reflect a shift in the industry.
Resizing and sharpening your shots may already be basic practice to you. In fact, if you started shooting in the last ten years this is basic, common sense to you and the fact that somebody made an article about it is laughable to you. But for those that come from print * cough * old people * cough *, we may not be doing this and, myself included, needed to get with the times.
About the author: Jake Hicks is an editorial and fashion photographer based in Reading, UK. He specializes in keeping the skill in the camera and not just on the screen. If you’d like to learn more about his incredibly popular gelled lighting and post-pro techniques, visit this link for more info. You can find more of his work and writing on his website, Facebook, 500px, Instagram, Twitter, and Flickr. This article was also published here.
from Photography News https://petapixel.com/2019/04/10/are-you-sharpening-your-images-enough/
0 notes
Text
The Beginner's Guide to Product Photography [Tutorial + Examples]
If a picture is worth a thousand words, a stunning product picture is worth a thousand website visits.
I don't have data to back up that statement (yet). Nevertheless, product photography can become this valuable to your ecommerce website strategy.
According to Trellis, 51% of Americans with internet access prefer to shop online, and that segment of buyers is poised to keep growing. But that also means 49% of Americans might still be more comfortable buying certain things in the store -- where they can see, touch, and demo the product before handing over their money.
The convenience of ecommerce isn't everything to every customer; being able to browse merchandise from the living room couch is just one part of what makes an internet storefront successful. To reach the 51% of people who do prefer buying online, you also need to give your audience clear, eye-catching photos of your products, or these visitors aren't likely to have confidence in your offerings -- confidence they can get by walking into a store and seeing the item in person.
But product photography isn't as simple as pointing and shooting. Even the most basic products need the correct equipment, lighting, and space to produce beautiful images that sell shoppers right from the purchase page.
Don't worry, your shopping list isn't as big as you think. Some items you already own!
Here's an easy list of tips and tools to get you started, along with real examples of product photos that demonstrate this advice.
6 Product Photography Tips (and Examples) for Taking Pictures That Sell
1. Don't Be Afraid to Use Your Smartphone Camera
This is the part where I'm supposed to convince you to invest in a high-end, 50-megapixel (MP) camera with a 100-millimeter screw-on lens. But I'm not going to do that. If you already own a camera that fits this description, take advantage of it. But for many types of products, it's completely acceptable to shoot product photos on a smartphone.
Some of the earliest smartphones had cameras that operated on fewer than 4 megapixels, which made it difficult to capture important visual elements of products where detail matters.
But newer smartphones such as the iPhone 7, Google Pixel, and Samsung Galaxy S4 boast 12MP and 13MP lenses along with numerous "temperature" settings to optimize your shots for the different types of light you might shoot in (we'll talk more about light in just a minute).
Here's a product photo you won't believe was shot with just an iPhone 4s and clever desk lamp placement:
Image by Andrew Griswold
2. Shoot From a Tripod for Photo Consistency
Before explaining tripods, I'm obligated to start with a cardinal rule: Don't prop your phone against something sturdy to aim your lens toward the subject. It's just too easy for this makeshift setup to slide around during the shoot and cause inconsistencies in your photos' appearance. If you rest your camera on, say, a stack of books, just be sure this arrangement doesn't change over the course of the shoot.
There's no harm in holding your camera yourself when shooting just a few product photos for your ecommerce website. But as your business grows, and you take more photos of more products, it can be difficult to standardize the product's orientation in each photo when shooting handheld.
To ensure consistency across your products, you'll need a tripod. And luckily, buying one isn't always the big, industrial-sized investment it used to be. Here are two types of tripods to consider and one accessory you'd need when shooting on a smartphone:
Traditional vs. Flexible
Images via AmazonBasics | Sunpak
The one on the left is a traditional, extendable tripod stand, and the one on the right is a shorter but flexible mount with legs you can bend to achieve the camera angle you want.
(You can't tell from the two photos, but the mount on the right is roughly a foot high -- considerably shorter than a traditional tripod, which can extend to more than five feet high.)
Mobile Grip
You'll notice a screw on the top of both products. This screws into your camera and holds it in place when you're shooting from the tripod. The underside of most professional-grade cameras has a screw hole just for this purpose, but smartphones can use the following adapter:
Image via Vastar
The adapter grips the sides of your smartphone, and can screw into either type of tripod, allowing you to operate the camera controls with the phone screen facing outward and toward you. Once you determine which mount you'll need, set it up in front of your product, and consider putting three pieces of tape on the ground to mark where you'd like to keep each leg of your tripod over the course of the shoot.
3. Natural Light vs. Artificial Light: Choose One
Never underestimate how certain types of light can improve (or hinder) your product photography. Remember, buyers get the best look at an item in person, where they can see everything they need to before purchasing. The right lighting arrangement helps you reveal those critical decision-making product features when all website visitors have to go on is a photo.
A single lighting setup might not work for every single product -- a lighting arrangement that works for some products might weaken the appearance of others. There are two types of light you can choose as your main light source:
Natural Light
Natural light refers to sunlight -- simple as that. It's also known as "soft light" because the sun casts a larger, softer range of light than, say, a lamp shining directly on the product. Ecommerce product shots thrive in natural light if:
The product is shot outside or meant to be used outside.
The product is used by, worn on, or shot with a person (people tend to look better in natural light).
You're trying to emphasize the product's surroundings, rather than specific attributes of the product.
Below is an appealing product photo taken under natural light. The sun coming in from the left lights the briefcase perfectly, while casting a gentle shadow on the legs of the man carrying it to emphasize the product.
Image via WP Standard
Artificial Light
Artificial light includes candles, fire, and more commonly, light bulbs. It's also referred to as "hard light" because it produces a smaller but more focused light surface. This type of light caters to products with physical details that need to be highlighted to impress an online shopper.
Here's an appealing product photo taken under artificial light, where the watch's texture and clock face design are its main selling points.
Image via Modahaus
As a general rule, you should stick to just one type of light per photo -- natural or artificial. Adding natural light to an artificially lit photo can soften a product that's meant to look sharp, and adding artificial light to a naturally lit photo can sharpen a product that's meant to look soft. You don't want to get in your own way.
4. Fill or Bounce Your Light to Soften Shadows
Whether you use natural light or artificial light, you'll need to lessen the shadows any potential hard light casts on the opposite end of a product. There are three ways to do this:
Fill Light
Include another, less-intense light source to supplement your main light. This additional light is called your fill light, and is used as a counterbalance to soften the natural shadow your main light produces behind an object. To do this, place your fill light opposite your main light so your product sits between both light sources.
Flashbulb Bounce Card
A bounce card, or reflector card, is a small card that "reflects" or "bounces" the main light back onto the surface beneath your product to reduce shadows.
Some bounce cards attach to the flashbulb of a professional camera lens to diffuse the light from the camera's flash. This card splashes a softer light onto the subject from above your set -- rather than straight at it -- so you don't have long shadows trail behind the object you're shooting. See two versions of this item below -- both white (left) and foil (right) screens can diffuse the flash.
Image via Andoer
Standalone Bounce Card
If you're shooting from a smartphone, a flashbulb bounce card isn't an option, since you don't have a physical flash you can attach it to. Instead, make your own standalone bounce card positioned opposite your main light source. For beginners to product photography, this bounce card can effectively replace your fill light, which counters the hard light from the camera flash or lamp that's facing toward the front of your product.
See a standalone bounce card below, set up behind the miniature horse:
Image via Photojojo
No matter which type of light counter you use, your goal is to reduce shadow while still highlighting the qualities of your product that make it valuable to website visitors. If shot just right, you'll see a huge difference:
Image via GetMeAShop
5. Use a Sweep or Portrait Mode to Emphasize the Product
There isn't one right way to position your product, lights, and bounce cards – they can change dramatically depending on your background. But don't choose a background based on what's easiest to create. Backgrounds should resemble how you want your buyers to perceive your product when viewing it online.
Consider first whether you'd like a white background or a more dynamic, real-world background. There's an easy way to achieve each one.
White Background: Sweep
For white backgrounds, it's not as simple as setting up a table against white drywall. Even smartphone cameras can pick up little blemishes on a white wall that you wouldn't notice with the naked eye. To capture a perfect white background with no corners or blemishes, use a sweep.
A sweep is a large bendable sheet of paper, whose bottom acts as the surface beneath your product and then curves up into a white wall behind the product. On camera, the sweep's curve is invisible, emphasizing key product details and allowing the item to own all of a website visitor's attention. Here's a side-by-side comparison showing why a sweep matters:
Images by Taylor Mathis
Real-World Background: Portrait Mode
Dynamic, real-world backgrounds are very appealing when shooting products that have a specific use or are being modeled by a person -- as you saw in the picture of the briefcase earlier in this guide. But, it's easy for a real-world background to steal the focus of the photo, making it unclear which item in the photo you're actually selling.
Give your product depth and emphasis with portrait mode, a picture setting on most professional cameras and also available on many new smartphones. This setting blurs the background so the context of the product is clear but not competing against the product itself.
Below is a super awesome photo of a HubSpot pen taken in portrait mode on a Google Pixel 2 (I took this picture myself). You can tell the pen sits on a desk with a computer behind it, but the pen is still the focal point for viewers:
"It's such an incredible photo, Braden. I totally want my own HubSpot pen now." Get one here!
6. Shoot a Variety of Images
My last ecommerce photography tip to you is to not stop at one photo per product. Just as your customers look, hold, use, and even try on merchandise in a store, your website should shoot a variety of images to simulate this very experience.
If you're shooting clothing, for instance, capture the garment of clothing alone -- that is, spread out on a white surface -- as well as on a mannequin whose color contrasts the color of the product. Then, for additional photos, have the clothing modeled on a person, allowing you to take pictures of the product from the person's different poses and angles.
Don't feel obligated to invest in every tip and piece of equipment at once. Apply these product photography tips gradually to see what makes your store look the most presentable, and change your approach as your photography chops get better.
0 notes
Photo

New Post has been published on http://www.buildercar.com/first-drive-2018-mercedes-amg-gt-and-gt-c-roadster/
First Drive: 2018 Mercedes-AMG GT and GT C Roadster
SEDONA, Arizona — It’s a crisp, sunny spring day along Highway 89a and we’re headed toward the spectacular red rock formations that made the area famous. The top is down, we just passed a squiggly road sign warning of tasty miles ahead, and I’m desperate to unleash the handcrafted, 4.0-liter twin-turbo V-8 monster lurking under the long, sloping hood of the 2018 Mercedes-AMG GT Roadster. There’s only one catch: two cars that won’t move the hell over. It’s absolute torture.
Suddenly, a tiny stretch of passing lane appears. With the AMG dynamic select dial turned to Sport+, my foot goes to the floor. The boost gauge instantly pins, the turbos spin furiously, and the seven-speed dual-clutcher kicks down as the grumbling V-8 is finally let off its chain. It. Is. On.
We begin our mountain attack sequence and the exhaust note’s guttural, baritone roar echoes into the canyon. We’re carving up the twisty asphalt Ginsu style and the GT Roadster utterly unfazed, its power band staying in its sweet spot, its AMG-tuned suspension keeping the car balanced into the tighter esses, and its adaptive ratio steering offering up more than ample feedback. This is what the crew in Affalterbach made this car for.
Annnndddd just like that we roll up on more four-wheeled roadblocks. Damn.
We pump the roadster’s stout brakes with 14.2-inch perforated discs all around (15.4-inchers at the front for the harder edged, higher spec GT C, with carbon ceramics optional for both), the exhaust crackles and pops, and our fun run ends all too soon.
But hey, the sun’s still beaming into the GT roadster’s elegantly trimmed cabin – now with 100 percent more beige if you desire (Macchiato Beige Nappa leather is an option) – and we’ve got its impressive Burmester sound system turned up, so it’s not all bad. I dial it back to Comfort (softer suspension and more relaxed transmission, steering, and engine response) and we take in the stunning scenery unfolding before us on the slow roll into Sedona. So far, we’ve spent our drive in the base version of the roadster — the other being the aforementioned GT C, which cribs several elements from the track-star version of AMG’s two-seat halo model, the GT R. But lest you think the base GT roadster is a slouch, we’ve got 469 reasons and a claimed 0 to 60 mph time of 3.9 seconds why you should think again.
The GT and GT C drop tops are the latest variants to join Mercedes-AMG’s GT lineup, making it seven in all for the division’s only exclusive model, with one more on the way (all but certain to be a four-door version). The roadsters were in the cards since the onset of the GT’s development, so the extra bracing applied in order to further strengthen their aluminum intensive architecture and keep them as free from chassis flex as possible was meticulously planned. And as is the case with the rest of the GT lineup (which is starting to resemble the 911’s dizzying array of variations), they both offer an impressive performance envelope while appealing to slightly different customers.
On the way up the mountain, we spent ample time traversing swaths of Arizona’s well-maintained freeways and the GT Roadster easily ate them up with a suspension that’s tight but far from punishing at any setting. You’ll want to keep it out of Comfort if you’re planning to be aggressive, though, as throttle response was a tad lazy. The cabin’s amenities are befitting a car in this range, with impressive trim and stitching accents, the Burmester sound setup, and a version of Benz’s now familiar and logically laid out, dial-controlled COMAND infotainment system. An interesting feature available for both cars is the AMG Track Pace iPhone app, which hooks into the car to record lap times and even takes video of your hot laps. The AMG sport seats are an acquired taste, however. While they’re plenty supportive during aggressive cornering and now come with the Airscarf system that blows air around your neck, they can also feel pretty stiff in normal driving situations. It’s also a little tight inside overall, with cargo space at a premium in the cabin and the trunk, though that’s somewhat expected of a roadster.
Flatten the pedal and the twin-turbo eight bellows in your ears as you easily reach hair-messing speeds in mere seconds. And while it can feel like a big car at times, especially during confined city cruising, out on the open road is where the GT Roadster does its best work. Speed limits are simply unfair when you’re in a car so clearly geared to run all day long at triple digits.
As you’d expect, Mercedes-AMG has spent an inordinate amount of time making sure its GT cars perform at the highest levels. To that end, both cars utilize elements like the active air shutters that lurk behind AMG’s mean, gleaming chrome 15-rib ‘Panamericana’ grille to aid air flow and cooling and are fitted with an AMG sports suspension (the GT C gets AMG’s uplevel ride control system with active dampers). Weight saving tricks including a trunk made of composite materials help keep the gain over their coupe siblings to roughly 77 pounds in the GT and 110 in the GT C (the GT Roadster is 3,683 pounds, the GT C 3,825).
Then there’s the stonking 4.0-liter twin-turbo eight, rated at 469 horsepower and 465 lb-ft of torque in the GT and 550 hp and 502 lb-ft in the GT C – thanks primarily to the turbo boost being turned up. Both variants are hooked up to AMG’s seven speed dual clutch automatic, although the GT C gets a taller ratio in first gear, a lower one in seventh, and a taller final drive. The GT gets a mechanical rear differential with AMG’s quicker responding electronic rear diff fitted to the GT C. Looking to launch? The GT C has a feature that lets you step on the brake with your left foot as you mash the accelerator while adjusting the revs using the shift paddles. Then let off the brake and you’re off to a reported 3.7-second 0 to 60 mph sprint.
As we approached the midway point of the drive, we figured it was a good time to see how the lightweight, magnesium, steel, and aluminum constructed soft top operates. We hit the button at about 31 mph and it went up quickly with zero drama. Benz quotes 11 seconds and it was easily that fast. With it up, its triple-lined fabric design was effective in quelling outside noise, while headroom and visibility were acceptable. It’s not the prettiest looking top when it’s up, but you can get it in red, black, and, oh yes, beige.
The GT roadsters are best viewed with the top down of course, and according to AMG designer Vitalis Enns, the cars feature a “positive and strong stance” and are “really, really low, wide and aggressive.” Enns said one of the team’s primary design goals was to develop a car with a high beltline and a low rear end. Mission accomplished.
Most of the rear of the GT C Roadster is similar to the GT R, with a wider track (2.2 inches), bigger tires and 20-inch rims at the rear, and different bodywork to accommodate. The GT C also employs AMG’s rear wheel steering from the GT R as part of the car’s uprated suspension setup. Sadly, our time in the GT C was primarily limited to 100-plus miles of freeway driving, so we didn’t get a chance to experience rear steer to any extent. But our man Georg Kacher drove the GT R, here’s how he described its handling at speed on a track:
The AMG GT R’s variable-rate steering systems (plural) deserve a separate chapter. Depending on speed, mode, and lateral acceleration, driver input has complex consequences. At the inception of a slide, for instance, steering effort is reduced so that correction maneuvers require only minor adjustments, adhering to the line is playfully easy, and lock can be unwound pleasingly early. Above 62 mph, the system switches from countersteer to synchronicity. Similar to the setups in the 911 Turbo and Lamborghini Centenario, this transition is executed progressively and smoothly. In Race mode, direction changes occur with physical immediacy; in Comfort, however, the wheels turn with pursed sidewalls. Further enhancing this by-wire muscle-tensing exercise for the hind legs are over a dozen uniball joints in lieu of the commonly used rubber mounts.
We did get enough time in the GT C Roadster to discern that it’s perceptibly quicker and brakes harder than its GT cousin. It also features a Race mode that further sharpens the car for track duty, is fitted with the brand’s performance exhaust, and comes with a more upscale interior including a leather and microfiber trimmed steering wheel, among other special touches. The GT C is obviously the edgier car, the GT is slightly more of a grand tourer, but both are eminently capable. It really boils down to personal preference and maybe pocketbook considerations.
There are other super high performance convertibles out there with more established reputations and different setups that some may find more appealing. But as is the case with the rest of its GT line, Mercedes-AMG’s GT and GT C Roadsters have an appeal all their own – especially when the twisty road ahead is clear of four-wheeled obstacles.
2018 Mercedes-AMG GT and GT C Roadster Specifications
ON SALE Fall 2017 PRICE $130,000/$155,000 (base, GT/GT C)(est) ENGINE 4.0L twin-turbo DOHC 32-valve V-6/469 hp @ 6,000 rpm, 465 lb-ft @ 1,700-5,000 rpm (GT); 5,750-6,750 rpm, 502 lb-ft @ 1,900-5,750 rpm (GT C) TRANSMISSION 7-speed twin-clutch auto LAYOUT 2-door, 2-passenger, front-engine, AWD convertible EPA MILEAGE 15/21 mpg (city/hwy) L x W x H 178.9/179.2 x 76.3/79.0 x 49.6 in (GT/GT C) WHEELBASE 103.5 in WEIGHT 3,683/3,825 lb (GT /GT C) 0-60 MPH 3.9/3.7 sec (GT /GT C) TOP SPEED 188/196 mph (GT /GT C)
Source link
0 notes
Text
The Fuji XF 18-135mm – a Versatile Travel Lens
From one article comes another – One plus of being a Fuji X Photographer is that Fuji will lend you gear to try. When I did an overview of the 18-55 Kit lens, a commenter asked about the difference between it and the Fuji XT 18-135mm. I don’t own that lens, but through my Fuji connection, I was able to borrow one for a short while and give it a go. So thank you to the commenter that allowed me to find out I could borrow stuff to test!
The sunrise on New Years Day. I had no hesitation using the lens, over lenses I own already, to capture this image.
First thoughts on the Fuji XF 18-135mm lens
Straight up, I think this is a great travel lens, despite the issues with the lens that are common to most kit lenses. But, these issues are outweighed by the usefulness of this lens. The weight and size were fine in general use, and I never felt that I was being let down by the lens. When I got the lens, I did a walkabout locally where I familiarized myself with it.
A wide shot of Long Walk in Galway. The Museum is on the left of the shot.
Here’s the Museum from the same position at 135mm.
Galway Cathedral at 18mm.
A detail shot of the roof to the left of the some at 135mm.
Salthill with the sun setting near Blackrock Diving Tower.
I moved slightly to frame the sun in the tower, but still roughly the same distance away, zoomed in to 135mm.
The sunset didn’t quite pan out, but I used the 135mm end of the lens to frame it with the diving tower.
Specs of the Fuji XF 18-135mm lens
The Fuji XF 18-135mm weighs 409 grams (just shy of one pound). It’s not lightweight, but it’s not heavy compared to similar lenses in this class. Aperture runs from f/3.5 at 18mm to f/5.6 at the 135mm end. The full frame equivalent is 27-200mm. I owned the Canon 28-200mm for a while and sold it because of the softness. This Fuji 18-135mm, while not as sharp as the XF 18-55mm, is not as soft as the Canon version.
The lens extends in length as you zoom it. The lens barrel doesn’t rotate, so attached filters remain in the same relative position. It comes with a plastic lens hood, and the filter ring is 67mm. As with the 18-55mm, the lens has OIS to reduce camera shake. Fuji claims that this offers up to an impressive 5-stops of camera shake reduction. It’s in the WR (Weather Resistant) range of lenses also, meaning you can use it out in the rain, something I did when visiting London.
Travel and the Fuji 18-135mm lens
Super zooms, by and large, make for great travel lenses. The width is usually good enough for any situation. If you need more, it’s easy to shoot two overlapping shots and create a panorama later. The longer focal length means you can easily capture street portraits or zoom in to get details. Wide shots often have to include other tourists, especially when handheld. Detail shots can give a better flavor of an attraction, and give you something not everyone else thinks to shoot. The best part? Not having to change your lens to get both shots.
The weight of the lens isn’t a cause for concern, even carrying around all day. With a small messenger bag like the Think Tank Retrospective 10, you can use the lens mounted on a Fuji X-T2, while carrying a bottle of water and all your accessories. When traveling I had this combo, a 35mm f/1.4, a flash and trigger set, along with a small shoot-through umbrella. Also in the bag were an iPad mini, a power bank, and a foldable bluetooth keyboard. I never felt like I was weighed down and was quite productive with this setup. Whenever a shot presented itself, I simply grabbed the camera and was ready to go.
London
During the time I had the lens, I was at The Societies convention in London. It was a perfect chance to use the lens as a tourist. Some of the attendees organized a night shoot down by the river Thames. We walked along South Bank to the Millennium Bridge, shooting along the way.
A shot of the London night skyline showing the OXO tower and St Pauls’ Cathedral.
The same view at 53mm
And again at 70mm, longer than the 18-55mm could do.
The Millenium Bridge and St Pauls.
Under the Millenium Bridge I light painted the beams with a torch (flashlight) to get a little more detail into them.
A wide view of the river showing the Moon and the Shard
A 135mm zoomed-in view of the Shard with a plane flying past.
I also did a little walkabout the morning I was leaving. It was raining, but I kept the lens in the bag when not in use and it performed perfectly. Knowing it was weather sealed also made me more inclined to shoot in these conditions.
The Albert Memorial, complete with tourists.
The Asia Group visible in the bottom left of the previous image at 135mm.
The Houses of Parliament from Westminster Bridge. Technically the bell is called Big Ben, not the clock tower.
The clock tower that houses Big Ben.
People
I also made use of the lens in the studio, where it performed equally well. Shooting in studio tends to be around f/8-f/11, which is the sweet spot of most lenses. The Fuji XF 18-135mm lens didn’t disappoint.
A model shot taken in the studio.
Issues
The main problem with the lens is that shots are a little soft. It’s simply a function of producing the zoom range to a price point. This isn’t really a problem, as the files can be sharpened in Lightroom or another raw converter as a batch process.
Versus the Fuji 18-55mm lens
As both the 18-55mm and the 18-135mm are offered as kit lenses, you may wonder which is better for you. The 18-135mm is larger, heavier, and slower than the 18-55mm. It’s also not as sharp. If a smaller size and faster aperture are important to you, go for the 18-55mm. If you want more reach and don’t want to bring two lenses while traveling get the 18-135mm. Here’s what the two lenses look like side by side.
The Fuji XF 18-135mm lens with the XF 18-55mm.
Here’s the full extension on both lenses. I had to tape the back of the 18-55mm to stop it from slipping (zoom creep) for this shot. The 18-135mm was solid the whole time.
TheFuji XF 18-135mm lens with the XF 18-55mm, both at full extension.
Verdict on the Fuji XF 18-135mm lens
This is a great travel lens that needs a little post-processing to bring out its best. Despite already owing the 18-55mm, I would consider getting this lens specifically for travel
Pros
Great reach (zoom or focal length range).
You only need one lens for travel making it really convenient.
It’s still compact compared to full frame equivalents, like the Canon 28-200mm or 28-135mm IS.
The built-in OIS (stabilization) is great for handheld shots.
It’s Weather Resistant.
Cons
It’s still heavier than the 18-55mm lens.
This lens is a little softer than other Fuji lenses, especially at 135mm.
The edges of the frame are a little softer than the centre.
Shop for this lens on Amazon.com or on B&H Photo’s website.
googletag.cmd.push(function() {
tablet_slots.push( googletag.defineSlot( “/1005424/_dPSv4_tab-all-article-bottom_(300×250)”, [300, 250], “pb-ad-78623” ).addService( googletag.pubads() ) ); } );
googletag.cmd.push(function() {
mobile_slots.push( googletag.defineSlot( “/1005424/_dPSv4_mob-all-article-bottom_(300×250)”, [300, 250], “pb-ad-78158” ).addService( googletag.pubads() ) ); } );
The post The Fuji XF 18-135mm – a Versatile Travel Lens by Sean McCormack appeared first on Digital Photography School.
from Digital Photography School https://digital-photography-school.com/fuji-xf-18-135mm-versatile-travel-lens/
0 notes
Text
The Fuji XF 18-135mm – a Versatile Travel Lens
From one article comes another – One plus of being a Fuji X Photographer is that Fuji will lend you gear to try. When I did an overview of the 18-55 Kit lens, a commenter asked about the difference between it and the Fuji XT 18-135mm. I don’t own that lens, but through my Fuji connection, I was able to borrow one for a short while and give it a go. So thank you to the commenter that allowed me to find out I could borrow stuff to test!
The sunrise on New Years Day. I had no hesitation using the lens, over lenses I own already, to capture this image.
First thoughts on the Fuji XF 18-135mm lens
Straight up, I think this is a great travel lens, despite the issues with the lens that are common to most kit lenses. But, these issues are outweighed by the usefulness of this lens. The weight and size were fine in general use, and I never felt that I was being let down by the lens. When I got the lens, I did a walkabout locally where I familiarized myself with it.
A wide shot of Long Walk in Galway. The Museum is on the left of the shot.
Here’s the Museum from the same position at 135mm.
Galway Cathedral at 18mm.
A detail shot of the roof to the left of the some at 135mm.
Salthill with the sun setting near Blackrock Diving Tower.
I moved slightly to frame the sun in the tower, but still roughly the same distance away, zoomed in to 135mm.
The sunset didn’t quite pan out, but I used the 135mm end of the lens to frame it with the diving tower.
Specs of the Fuji XF 18-135mm lens
The Fuji XF 18-135mm weighs 409 grams (just shy of one pound). It’s not lightweight, but it’s not heavy compared to similar lenses in this class. Aperture runs from f/3.5 at 18mm to f/5.6 at the 135mm end. The full frame equivalent is 27-200mm. I owned the Canon 28-200mm for a while and sold it because of the softness. This Fuji 18-135mm, while not as sharp as the XF 18-55mm, is not as soft as the Canon version.
The lens extends in length as you zoom it. The lens barrel doesn’t rotate, so attached filters remain in the same relative position. It comes with a plastic lens hood, and the filter ring is 67mm. As with the 18-55mm, the lens has OIS to reduce camera shake. Fuji claims that this offers up to an impressive 5-stops of camera shake reduction. It’s in the WR (Weather Resistant) range of lenses also, meaning you can use it out in the rain, something I did when visiting London.
Travel and the Fuji 18-135mm lens
Super zooms, by and large, make for great travel lenses. The width is usually good enough for any situation. If you need more, it’s easy to shoot two overlapping shots and create a panorama later. The longer focal length means you can easily capture street portraits or zoom in to get details. Wide shots often have to include other tourists, especially when handheld. Detail shots can give a better flavor of an attraction, and give you something not everyone else thinks to shoot. The best part? Not having to change your lens to get both shots.
The weight of the lens isn’t a cause for concern, even carrying around all day. With a small messenger bag like the Think Tank Retrospective 10, you can use the lens mounted on a Fuji X-T2, while carrying a bottle of water and all your accessories. When traveling I had this combo, a 35mm f/1.4, a flash and trigger set, along with a small shoot-through umbrella. Also in the bag were an iPad mini, a power bank, and a foldable bluetooth keyboard. I never felt like I was weighed down and was quite productive with this setup. Whenever a shot presented itself, I simply grabbed the camera and was ready to go.
London
During the time I had the lens, I was at The Societies convention in London. It was a perfect chance to use the lens as a tourist. Some of the attendees organized a night shoot down by the river Thames. We walked along South Bank to the Millennium Bridge, shooting along the way.
A shot of the London night skyline showing the OXO tower and St Pauls’ Cathedral.
The same view at 53mm
And again at 70mm, longer than the 18-55mm could do.
The Millenium Bridge and St Pauls.
Under the Millenium Bridge I light painted the beams with a torch (flashlight) to get a little more detail into them.
A wide view of the river showing the Moon and the Shard
A 135mm zoomed-in view of the Shard with a plane flying past.
I also did a little walkabout the morning I was leaving. It was raining, but I kept the lens in the bag when not in use and it performed perfectly. Knowing it was weather sealed also made me more inclined to shoot in these conditions.
The Albert Memorial, complete with tourists.
The Asia Group visible in the bottom left of the previous image at 135mm.
The Houses of Parliament from Westminster Bridge. Technically the bell is called Big Ben, not the clock tower.
The clock tower that houses Big Ben.
People
I also made use of the lens in the studio, where it performed equally well. Shooting in studio tends to be around f/8-f/11, which is the sweet spot of most lenses. The Fuji XF 18-135mm lens didn’t disappoint.
A model shot taken in the studio.
Issues
The main problem with the lens is that shots are a little soft. It’s simply a function of producing the zoom range to a price point. This isn’t really a problem, as the files can be sharpened in Lightroom or another raw converter as a batch process.
Versus the Fuji 18-55mm lens
As both the 18-55mm and the 18-135mm are offered as kit lenses, you may wonder which is better for you. The 18-135mm is larger, heavier, and slower than the 18-55mm. It’s also not as sharp. If a smaller size and faster aperture are important to you, go for the 18-55mm. If you want more reach and don’t want to bring two lenses while traveling get the 18-135mm. Here’s what the two lenses look like side by side.
The Fuji XF 18-135mm lens with the XF 18-55mm.
Here’s the full extension on both lenses. I had to tape the back of the 18-55mm to stop it from slipping (zoom creep) for this shot. The 18-135mm was solid the whole time.
TheFuji XF 18-135mm lens with the XF 18-55mm, both at full extension.
Verdict on the Fuji XF 18-135mm lens
This is a great travel lens that needs a little post-processing to bring out its best. Despite already owing the 18-55mm, I would consider getting this lens specifically for travel
Pros
Great reach (zoom or focal length range).
You only need one lens for travel making it really convenient.
It’s still compact compared to full frame equivalents, like the Canon 28-200mm or 28-135mm IS.
The built-in OIS (stabilization) is great for handheld shots.
It’s Weather Resistant.
Cons
It’s still heavier than the 18-55mm lens.
This lens is a little softer than other Fuji lenses, especially at 135mm.
The edges of the frame are a little softer than the centre.
Shop for this lens on Amazon.com or on B&H Photo’s website.
googletag.cmd.push(function() {
tablet_slots.push( googletag.defineSlot( “/1005424/_dPSv4_tab-all-article-bottom_(300×250)”, [300, 250], “pb-ad-78623” ).addService( googletag.pubads() ) ); } );
googletag.cmd.push(function() {
mobile_slots.push( googletag.defineSlot( “/1005424/_dPSv4_mob-all-article-bottom_(300×250)”, [300, 250], “pb-ad-78158” ).addService( googletag.pubads() ) ); } );
The post The Fuji XF 18-135mm – a Versatile Travel Lens by Sean McCormack appeared first on Digital Photography School.
from Digital Photography School http://digital-photography-school.com/fuji-xf-18-135mm-versatile-travel-lens/
0 notes
Last Seen Blogs

mrsmotiwala770
Toxic Love

leslieannfierro
Animal Feelings

economy-wonderglue
fast writing and slow art

zoloft-and-anime
•Mira•

omgpeoplearemonster
people are monster