#may pwm
Text

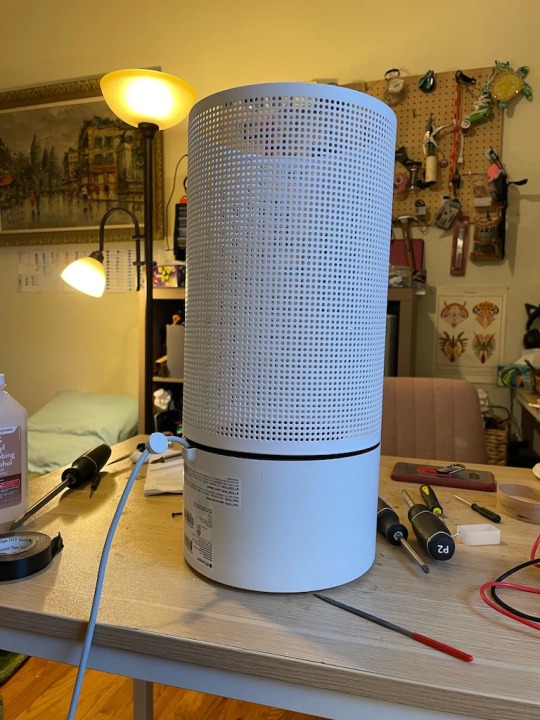
Kimchi (left) may or may not have thrown up on @fishteriously's air purifier (right) and killed it. Either way, it was dead and out of warranty, so we grabbed a multimeter and pried it open.
Ok so, the 12V power supply was working, regulated 5V power was getting where it was supposed to go, all the cables were secure and I couldn't find any shorts, but the thing was still dead. Also there was a mysterious brown goo all over it (mostly wiped off in this image).
Now, I'm a mechanical engineer, not an electrical engineer. But from what I understand, this state – where the power is good, but nothing is happening and there's something gross on it – is known as "turbo fucked."
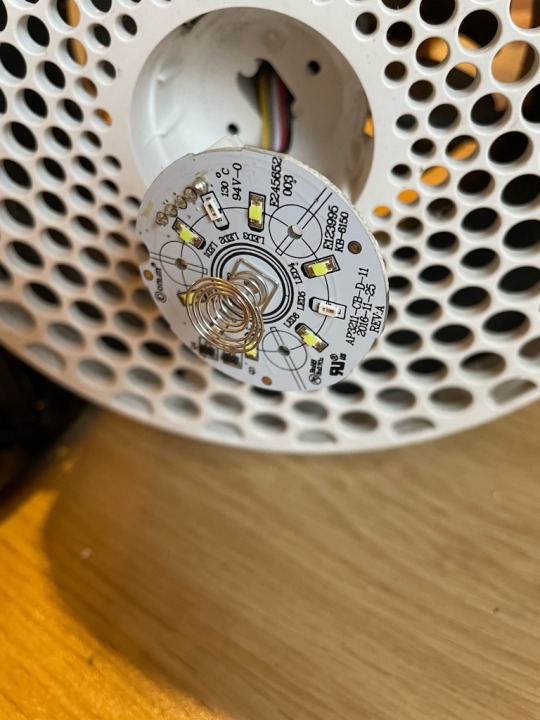
But like, okay, once you get rid of all the bells and whistles such as "a user interface" and "selectable speed" and "digital electronics," an air purifier is just a fan, a cowl, and a filter, right? All analog components. There are plenty of places here to tap 5V power, so if I disconnect the microprocessor entirely, grab a jumper wire, and short 5V directly into the PWM input...

lol. lmao. It spins.

There we go! All put back together and working like a charm. I mean, the LED's and computer aren't connected to anything, but the fan is going and it purifies the air just fine.
I didn't like the look of the dead pcb sticking out of the top. But the wire cutters were on the other side of the room, and I hurt my fingernail last time I futzed with the ribbon cable...

Perfect. Good as new.
98 notes
·
View notes
Text
Below the break: a way-too-deep explanation of the behavior in this patch, and an alternate version:
Hey there! It's been a minute since I've had something to share. Life has been pretty crazy these last couple of weeks. Honestly, it may be spotty the next month and a half or so, but I want to make and share things when I can. It's one of the best things.
This patch has a lot going on. The first half is pretty simple: further exploring pseudo-complex oscillator setups with Banshee Reach and Ts-L, and compelling harmonic compositions with Bloom and Bard Quartet. A lot of this section is just "what I've done in the past, but better. I'm finally using a buffered mult to keep the carrier and modulator oscillators with a consistent ratio instead of half-assing it. Ts-L's sine is modulating BR's frequency, and wavefold is going to PWM - both attenuated to not drive the sound crazy. Envelope controlling a VCA on varishape output into Ikarie, which I now have FM'd by BR's sine output. It's all about the relatedness in this format after all!

I do want to say that as fun as it is patching up such behaviors, I totally understand the appeal of ready-to-go complex oscillator modules. This just eats up cables and space.
Now, the fun and more compelling part: the rhythm going on here. This patch was inspired by a conversation with my friend about wishing Data Bender had a "repeats" gate output, like Mimeophone and Nautilus do. As we talked things out, we figured that you could probably use some kind of boosted envelope follower on a mult of the output to create a gate, and friends, it works! Mostly.
I'm using a stackable to run the right channel of Data Bender's output into Strega's gain circuit and envelope follower, then sending that to the trigger in (1) of Tyso Daiko to trigger the kick. Now, this doesn't work every time. But I've found that with Data Bender in Micro Mode with saturation at about noon, it creates interesting sub-rhythms at quite a handful of time/repeats combinations. You can get it more or less reliable by scrubbing through the buffer (break knob in Micro mode) but there's no one setting there that works for every combo.
Since the signal needs to be just repeats (100% wet) to get this to happen, I had to use the full mixing capabilities of Cockpit as well: Desmodus (receiving the signal from Ikarie) is multed to both Cockpit and the Data Bender inputs. Drums of course go directly to the mixer as well. Of course, this is working as intended, but the nice thing about mix controls is I can usually be lazy and run a single voice through a single fx chain.
The initial experiments sounded great, and got me thinking about how much better this could sound with some additional percussion which is related but not so closely constrained by the DB parameters. I quickly threw this together, using IDUM as a rhythm generator by feeding it a clock and setting it to break mode at 100% probability. Additional percussion comes from Akemie's Taiko and Daiko(2) through Sinc Bucina (the latter two are on separate sequences for more complex sounds)
Honestly, I don't think this sounds as good in this recording, but has the potential to sound far better. In the primary recording featured above, I'm really playing the parameters as I feel out what does and doesn't work. It's constantly changing, but with oh-so-many sweet spots. With the added percussion though, it feels stagnant so much faster, and I'm overall performing the patch less. With a few more things added, a bit more variation programmed into the percussion voices, and a more complex pattern, I think this concept could far surpass the original. Sadly, it's already getting late and I need to un-patch to clear the desk for work tomorrow, so that's that for now. I'm certain to revisit the core concept in the near future, and I hope to really take it to the heights it deserves.
...So, why did I write so much for this patch? Part of it is that it's been so long, and I love writing these patch notes, so I need to make up for lost time. The other part is that this isn't just some normal patch, or more fundamentals - this is an original patch programming idea that I was through from conception to execution. It's so satisfying, and exciting, and everything I love about this format. I want to, and will, do more of it, and it's so exciting that I'll keep getting better.
#modular synth#modular synthesis#synths#eurorack#gearporn#glitch#glitch art#glitch music#music#electronic music#idm music#patch notes#long post#flashing gif#gif#aesthetic
13 notes
·
View notes
Text
a diferença do controlador mppt por vpn
🔒🌍✨ Ganhe 3 Meses de VPN GRÁTIS - Acesso à Internet Seguro e Privado em Todo o Mundo! Clique Aqui ✨🌍🔒
a diferença do controlador mppt por vpn
Funcionamento do controlador MPPT
O controlador MPPT, ou Maximum Power Point Tracking, é um componente essencial em sistemas de geração de energia solar, sendo responsável por otimizar a eficiência na captação de energia dos painéis fotovoltaicos. Seu funcionamento baseia-se na busca constante do ponto de máxima potência do painel, ajustando a tensão e corrente de saída para garantir a máxima produção de energia.
Ao contrário dos controladores PWM convencionais, que simplesmente reduzem a tensão de saída dos painéis para o nível da bateria, o MPPT monitora constantemente a potência gerada pelo painel e ajusta sua operação para obter a máxima potência possível em todas as condições de radiação solar. Isso significa que, mesmo em dias nublados ou com incidência de sombra parcial, o controlador MPPT consegue extrair mais energia do painel do que um controlador PWM.
O funcionamento do controlador MPPT se dá através de algoritmos inteligentes que calculam continuamente a melhor relação entre tensão e corrente para obter a potência máxima. Este processo de rastreamento do ponto de máxima potência garante uma eficiência superior na conversão de energia solar em energia utilizável, aumentando significativamente a produção de eletricidade em sistemas fotovoltaicos.
Em resumo, o controlador MPPT é fundamental para garantir o melhor desempenho e eficiência dos sistemas de energia solar, permitindo aproveitar ao máximo o potencial energético dos painéis fotovoltaicos em diversas condições ambientais.
Vantagens da utilização do controlador MPPT
Os controladores MPPT (Maximum Power Point Tracking) são dispositivos utilizados em sistemas de energia solar fotovoltaica para otimizar a eficiência na geração de energia. Existem várias vantagens em utilizar esse tipo de controlador, sendo algumas das principais:
Aumento da eficiência: O controlador MPPT é capaz de rastrear o ponto de máxima potência dos painéis solares, garantindo que a maior quantidade de energia seja gerada e aproveitada, resultando em uma eficiência global do sistema mais elevada.
Melhor desempenho em condições variáveis: Com a capacidade de se ajustar de acordo com as mudanças nas condições de irradiação solar, temperatura e sombreamento, o controlador MPPT consegue manter a produção de energia em níveis mais altos mesmo em circunstâncias desfavoráveis.
Proteção da bateria: Os controladores MPPT ajudam a proteger as baterias do sistema solar, garantindo que sejam carregadas de forma otimizada, o que contribui para aumentar a vida útil das mesmas.
Monitoramento avançado: Muitos controladores MPPT vêm com recursos de monitoramento remoto e em tempo real, permitindo que os usuários acompanhem o desempenho do sistema e façam ajustes conforme necessário.
Flexibilidade de design: Com a utilização do controlador MPPT, é possível projetar sistemas solares mais eficientes e dimensionados de forma adequada para atender às necessidades de energia de forma mais precisa.
Em resumo, a utilização de um controlador MPPT em sistemas de energia solar traz benefícios significativos em termos de eficiência, desempenho e durabilidade, sendo uma escolha cada vez mais popular para aplicações residenciais, comerciais e industriais.
Funcionamento de uma conexão VPN
Uma conexão VPN (Virtual Private Network) é um recurso que permite estabelecer uma ligação segura e privada entre um dispositivo e a internet. O funcionamento de uma VPN baseia-se na criação de um túnel de comunicação criptografado que protege os dados transmitidos, garantindo assim a privacidade e a segurança do utilizador.
Quando um dispositivo se conecta a uma VPN, este passa a enviar e receber informações através de um servidor remoto, localizado num local geograficamente distante. Este servidor funciona como intermediário entre o dispositivo do utilizador e a internet, mascarando o endereço IP original e ocultando a localização real do utilizador.
Além de garantir a privacidade dos dados, uma conexão VPN permite contornar restrições geográficas impostas por determinados serviços online, tornando possível aceder a conteúdos que de outra forma estariam bloqueados. Por exemplo, é possível aceder ao catálogo completo da Netflix dos Estados Unidos a partir de Portugal ao usar uma VPN.
Outra vantagem de uma VPN está relacionada com a segurança em redes Wi-Fi públicas, uma vez que protege os dados sensíveis de possíveis ataques de hackers que possam estar a monitorizar a rede. Assim, uma VPN é uma ferramenta essencial para quem valoriza a segurança e privacidade online.
Importância da segurança em uma conexão VPN
A importância da segurança em uma conexão VPN
A utilização de uma conexão VPN, ou Rede Privada Virtual, é uma prática essencial nos dias de hoje para garantir a segurança e privacidade dos dados transmitidos pela internet. A segurança em uma conexão VPN é fundamental para proteger as informações pessoais e profissionais dos usuários contra possíveis ataques cibernéticos.
Uma das principais vantagens de uma VPN é o processo de criptografia, que consiste em codificar os dados transmitidos, tornando-os ilegíveis para terceiros mal-intencionados. Dessa forma, a segurança em uma conexão VPN impede que hackers e outros invasores tenham acesso indevido às informações sensíveis dos usuários.
Além disso, ao utilizar uma VPN, o usuário pode mascarar seu endereço IP real, tornando sua localização virtual mais segura e protegida. Isso é especialmente importante ao se conectar a redes Wi-Fi públicas, que são conhecidas por serem alvos fáceis para ataques de hackers em busca de dados confidenciais.
Outro aspecto relevante da segurança em uma conexão VPN é a capacidade de acessar conteúdos restritos geograficamente, como sites e serviços de streaming, de forma segura e anônima. Isso garante uma experiência de navegação mais livre e protegida, sem correr o risco de ter seus dados interceptados.
Em resumo, a segurança em uma conexão VPN é essencial para proteger a privacidade e a integridade dos dados dos usuários, proporcionando uma experiência de navegação mais segura e tranquila. É importante escolher um serviço de VPN confiável e seguro para garantir a proteção adequada de suas informações online.
Comparação entre controlador MPPT e VPN
Os controladores MPPT (Maximum Power Point Tracking) e os VPNs (Virtual Private Networks) são tecnologias essenciais em diferentes áreas, cada uma com suas características e funcionalidades específicas. Vamos comparar esses dois tipos de soluções para entender melhor suas diferenças e aplicações.
Os controladores MPPT são amplamente utilizados em sistemas de energia solar para otimizar a eficiência na captação de energia dos painéis solares. Eles rastreiam continuamente o ponto de máxima potência dos painéis, ajustando a tensão e corrente de saída para garantir que a maior quantidade de energia seja gerada. Por outro lado, os VPNs são ferramentas de segurança que criptografam a conexão de internet, garantindo a privacidade e segurança dos dados transmitidos.
Enquanto os controladores MPPT são essenciais para maximizar a eficiência energética em sistemas solares, os VPNs são fundamentais para proteger a privacidade e segurança das informações online. Ambas as tecnologias desempenham papéis distintos, mas igualmente importantes em suas respectivas aplicações.
Em resumo, os controladores MPPT são ideais para otimização de energia em sistemas solares, enquanto os VPNs são essenciais para garantir a segurança e privacidade na transmissão de dados pela internet. Cabe às empresas e usuários escolherem a combinação ideal dessas tecnologias de acordo com suas necessidades específicas.
0 notes
Text
Fallen at the last fence. We could not compete on Sunday April 21st 2024 because during last minute testing and bug fixing on the evening before, one of the 4988 motor drive modules overheated and failed with no spare replacement. My (Pete) own silly fault for not realising that the stepper motors had become energised and the cooling fan for the drivers was not running.
This is not the end of development, as we are pasionate about autonomous robotics. So where do we go from here?
1) A re-build of the Pi-Hat.
This board has evolved during the last year of development and has become very messey and unmanageable, with lots of connecting cables and wires to other modules. The number of interconnects will remain the same or increace but can be made neater with boxed headers instead of open pin headers and the motor drivers board can bcome part of the hat, reducing the bunched up ribon cable between the seperate boards. Also etch a PCB rather than using matrix board.
2) The coolin fan will no longer be powered via on/off control, but will insead be powered directly from the 12V rail. So when the power is on so is the fan.
3) Try to incorporate a Teensy microcontroller on the Pi-hat too and use it for all servo pwm generation as the Raspberry Pi is useless for pwm. The reason for that is because the Pi pwm is software generated and jitters like crazy. The Teensy on the other hand is perfectly stable.
4) build a complete and identical second robot, so parts could be taken from it should they be needed as spares for the primary.
5) Look at the possibly of adding a 2:1 reduction gearbox to the wheel/motor assemblies, halving the motor rpm at the wheel but doubling the torque. This would also permit better cooling of the motors with heatsnks on the motor backs, venting out of the top of the robot's bodywork.
4) Add all the flashy LED's that we didn't have time to do for 2024.
That is what we have so far. This list may increase as time passes.
0 notes
Text
ELG-75-12DA-3Y Constant Power Driver by Mean Well
Enhance Your Lighting Control: Exploring the Versatility of Constant Voltage PWM Dimming LED Drivers
In the realm of LED lighting technology, constant voltage PWM dimming LED drivers stand out as powerful tools for achieving precise illumination control. As a leading provider of lighting solutions in the US, Marvel Drivers is committed to offering innovative products that meet the evolving needs of our customers. In this article, we delve into the capabilities and benefits of constant voltage PWM dimming LED drivers, highlighting their role in enhancing lighting control and efficiency. Buy LD50W-48 Constant Voltage PWM Dimming LED Driver by EPtronics from our online store.
Understanding Constant Voltage PWM Dimming LED Drivers
Constant voltage PWM dimming LED drivers are designed to regulate the output voltage to a consistent level while modulating the pulse width modulation (PWM) signal to adjust the brightness of LED fixtures. This dynamic control mechanism allows for seamless dimming capabilities, enabling users to achieve the desired lighting ambiance with precision.
Benefits of Constant Voltage PWM Dimming LED Drivers
Flexible Dimming Control: With constant voltage PWM dimming LED drivers, users have the flexibility to adjust the brightness levels of LED fixtures according to their preferences. Whether it's creating ambient lighting for relaxation or bright illumination for task-oriented spaces, PWM dimming offers versatile control options.
Smooth Dimming Performance: Unlike traditional dimming methods that may result in flickering or uneven light output, constant voltage PWM dimming LED drivers ensure smooth and consistent dimming performance. This seamless dimming experience enhances visual comfort and reduces eye strain, particularly in environments where lighting quality is paramount.
Energy Efficiency: By leveraging PWM dimming technology, constant voltage LED drivers optimize energy usage by delivering only the required power to LED fixtures. This efficient operation not only reduces energy consumption but also extends the lifespan of LED luminaires, resulting in long-term cost savings for users.
Applications of Constant Voltage PWM Dimming LED Drivers
Constant voltage PWM dimming LED drivers find applications across various lighting environments, including residential, commercial, and industrial spaces. From architectural lighting and accent lighting to retail displays and hospitality settings, PWM dimming technology enhances the ambiance and functionality of illuminated spaces.
Introducing Marvel Drivers' Range of Constant Voltage PWM Dimming LED Drivers
At Marvel Drivers, we offer a comprehensive selection of constant voltage PWM dimming LED drivers tailored to meet the diverse needs of our customers. Our drivers are engineered with advanced PWM dimming capabilities, ensuring seamless integration and reliable performance in any lighting application. Buy ELG-75-12DA-3Y Constant Power Driver by Mean Well from Marvel Drivers website now.
Conclusion
Constant voltage PWM dimming LED drivers represent a versatile and efficient solution for achieving precise lighting control in diverse environments. With their flexible dimming capabilities, smooth performance, and energy-efficient operation, PWM dimming drivers are poised to shape the future of LED lighting technology. Explore Marvel Drivers' range of constant voltage PWM dimming LED drivers to unlock the full potential of your lighting projects and elevate the ambiance of your space.
Top of Form
0 notes
Text
Speed control of fan motors
Speed control of fan motors is essential for various applications where precise airflow management, energy efficiency, and noise reduction are required. Here are several methods commonly used for speed control of fan motors:
Variable Frequency Drives (VFDs): VFDs are electronic devices that control the speed of AC motors by adjusting the frequency and voltage of the electrical power supplied to the motor. By varying the frequency, VFDs enable precise speed control of fan motors, allowing them to operate at different speeds based on the system’s requirements. VFDs are highly efficient and can lead to significant energy savings by matching motor speed to the actual load demand.
Pulse Width Modulation (PWM): PWM control involves rapidly switching the power supplied to the motor on and off at varying duty cycles. By adjusting the width of the pulses, PWM controllers regulate the effective voltage supplied to the motor, thereby controlling its speed. PWM control is commonly used in DC fan motors and offers precise speed control with minimal energy losses.
Voltage Control: Voltage control involves adjusting the voltage supplied to the motor to regulate its speed. This method is often used with single-phase AC induction motors and can be achieved using autotransformers or solid-state voltage regulators. While voltage control is relatively simple and cost-effective, it may result in reduced motor efficiency and increased heating at lower speeds.
Multi-Speed Motors: Some fan motors are designed with multiple windings or taps that allow them to operate at different speeds. By selecting different windings or taps, the motor speed can be adjusted to meet the desired airflow requirements. Multi-speed motors are commonly used in HVAC systems and other applications where preset speed options are sufficient.
Electronic Commutation: In brushless DC (BLDC) fan motors, electronic commutation is used to control motor speed. BLDC motors rely on electronic circuitry to switch the current flow through the motor’s windings, allowing for precise speed control without the need for brushes or commutators. Electronic commutation offers smooth operation, high efficiency, and quiet performance.
Thermal Control: In some applications, fan speed is controlled based on temperature feedback from sensors. As the temperature increases or decreases, the fan speed is adjusted accordingly to maintain optimal operating conditions. Thermal control is commonly used in electronic devices, computers, and HVAC systems to regulate airflow and prevent overheating.
Each method of fan motor speed control has its advantages and limitations, and the most suitable approach depends on factors such as the type of motor, application requirements, and desired level of control. By selecting the appropriate speed control method, engineers can optimize fan performance, energy efficiency, and overall system reliability.
Click here for more information
0 notes
Text
Arctic Liquid Freezer III: Powerful Cooling for CPUs
Ready Right Out of the Box – Simple to Install
The Arctic Liquid Freezer III comes with push-style radiator fans already mounted, making it ready for use right away. There is just one cable that has to be attached to the motherboard since the fan cables are incorporated into the hose jackets. You will get the MX-6 thermal compound with your order, so everything you need for a simple and rapid installation.
Arctic Liquid Freezer III, Future-Proof Accordance
Both AMD and Intel sockets are compatible with the Arctic Liquid Freezer III. In the future, Intel plans to introduce the new Arrow Lake CPUs on the LGA1851 socket. Customers in the Arctic don’t have to worry about buying new cooling in addition to the new CPUs. Complete compatibility is what we promise. With Intel’s new LGA1851 socket, everything Liquid Freezer III is compatible without restriction.Image credit to Arctic
Superb Work
The Liquid Freezer III clearly outperforms the competitors in all price ranges according to independent testing, especially given its exceptional performance. The Arctic Liquid Freezer III demonstrates its full strength in noise-normalized testing, beating several rivals with its strong but silent performance.Image credit to Arctic
Intel LGA1700 and LGA1851 Contact Frame
The CPU is distorted by Intel’s Independent Loading Mechanism (ILM), which presses the CPU into the socket twice with more than 40 kg of force. Pressure builds up as a result of the PCB, die, and solder layer between the die and integrated heat spreader (IHS). When the heat load is significant, this might cause long-term issues. The ARCTIC mounting frame is fast and simple to install, significantly lowers the mechanical pressure on the CPU, prevents the CPU from deforming, and enables the cooler to be bolted into the CPU’s backplate. This minimises mechanical stress on the CPU and mainboard, maintains constant cooling performance, and makes installation simple and fast.
Strong and Quiet VRM Fan
When coupled with CPUs that use a lot of power, motherboard voltage converters often operate at their highest temperature. The updated VRM fan on the Arctic Liquid Freezer III makes up for the absence of airflow from a tower cooler. When there is inadequate VRM cooling, poor airflow, or overclocking, the 60 mm PWM-controlled fan provides almost quiet cooling of the socket region. This gives the voltage converters a longer service life and allows for a continually greater load.
Enhanced, Internally Developed Water Pump
A newly designed PWM-controlled water pump that has been further tuned for both performance and noise level comes installed in the Liquid Freezer III. With its longer fin surface and optimised water pipes, the Arctic Liquid Freezer III has an enhanced coldplate that boosts performance without sacrificing silent operation.
Total Command or Basic Command
Two control choices – two connecting cords
Separate regulation:
The radiator fan, VRM fan, and pump may all be operated separately by utilizing a splitter wire with three different connectors. For instance, this makes it possible to manage the VRM fan’s speed separately from the CPU and to use PWM to modify it analogous to the voltage converters’ temperature.
One-stop shop:
Similar to the Liquid Freezer II, this enables one connection to operate the whole machine, with the radiator fans’ speed serving as the output. This makes it simple to manage the pump, VRM, and radiator fans with a single PWM setting.
Installing Native AMD Offset
AMD has been producing Ryzen desktop CPUs utilising a multi-die chiplet architecture for a number of generations. In contrast to Intel CPUs, these processors have a slightly offset hotspot that is situated somewhat below the IHS (Integrated Heat Spreader). Thus, to achieve optimal heat dissipation, the AMD mounting option includes a 5 mm offset.
Better Design for Radiators
By lengthening the fin stack, the 38 mm thick radiator’s cooling surface has been increased by 23%. This permits increased liquid volume in addition to better heat dissipation. As a result, the water cooling system’s heat buildup is slowed down, allowing power and temperature peaks to be efficiently controlled over an extended period of time.
Elevated Static Pressure
ARCTIC is dependent on the well-established P fans, who have won several accolades for their exceptional work. High fin density heat sinks and radiators are an ideal application for the P series. When compared to fans designed for high air circulation, they perform noticeably better because of their high static pressure.
Limited Support for a Small Number of Motherboards
Because certain motherboards include excessive SSD coolers in the M.2_1 slot, they cannot be used with the Arctic Liquid Freezer III. For impacted motherboards, we provide an appropriate M.2 cooler without charging you anything.
Extensive Variety
Image credit to Arctic
The Liquid Freezer III comes in three variations and four distinct sizes, all offering exceptional cooling performance. The A-RGB variants come in both black and white, with digitally programmable lighting for the radiator fans and pump head, while the Black version is entirely black. The Arctic Liquid Freezer III delivers the perfect blend of performance, technology, and style for everyone, with radiator sizes ranging from 240 to 420!
Dependability in Quality
In order to guarantee the durability of their goods, they conduct extended testing in various, sometimes quite harsh environments. They discover ways to continuously enhance their goods for their clients in this manner. Furthermore, the exceptional outcomes of extended testing provide them with the certainty that their goods are exceptional not only in terms of quality but also in terms of longevity. They are glad to transfer this assurance to their clients, which is why they provide a 6-year manufacturer’s warranty.
Read more on govindhtech.com
0 notes
Text
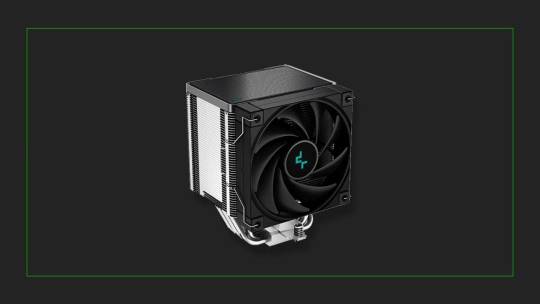
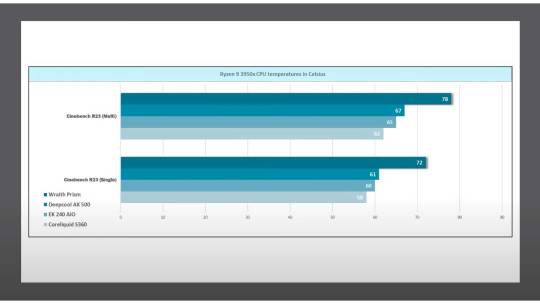
DEEPCOOL AK500 CPU COOLER | HOW GOOD IS IT?
The DeepCool AK500 is a high-performance CPU cooler designed to keep your system running cool and quiet. This single-tower cooler boasts a variety of features that make it a compelling option for both budget-minded builders and those seeking a balance of performance and noise levels. Let’s explore it thoroughly:
Design and Construction:
Heatsink:
Unlike bulkier dual-tower coolers, the AK500 employs a single-tower heatsink, making it ideal for mid-tower and smaller cases where space is a concern. Despite its single-tower design, the AK500 boasts a large heatsink measuring 127 x 90 x 158mm, providing ample surface area for efficient heat dissipation.
The AK500 utilizes DeepCool’s signature black matrix fin design. These fins are strategically staggered to create micro-channels, increasing airflow and heat exchange with the surrounding air. The heat pipes directly touch the CPU’s integrated heat spreader (IHS), eliminating thermal resistance and ensuring rapid heat transfer from the CPU core.
Heat Pipes:
Five 6mm nickel-plated copper heat pipes efficiently transfer heat away from the CPU core and distribute it evenly across the large heatsink. Balanced Bidirectional Heat Pipe Technology optimizes the heat pipes’ layout to counteract the effects of gravity, ensuring efficient heat transfer even in vertical PC cases.
Fan:
The fluid dynamic bearing (FDB) fan uses a lubricating fluid to reduce friction, resulting in smoother operation, lower noise levels, and increased lifespan compared to sleeve bearing fans. The fan speed is intelligently controlled by the motherboard based on CPU temperature, ensuring optimal cooling while minimizing noise when the system is under low load.
Additional Details:
The heatpipes are angled slightly to ensure 100% compatibility with most standard and high-profile RAM modules, eliminating clearance issues. The AK500 is built with high-quality materials, including a nickel-plated base and aluminum fins, ensuring long-lasting performance and reliability.
Performance and Cooling:
Credit: Dannys Tech Channel
Cooling Capacity:
240W TDP rating signifies the maximum amount of heat the AK500 can effectively dissipate, making it suitable for cooling most modern CPUs, including mid-range and high-performance processors with a TDP of up to 240W. The combination of a large heatsink, five heat pipes, and Direct Touch technology facilitates efficient heat transfer away from the CPU core.
The black matrix fin design and PWM-controlled 120mm FDB fan work together to generate optimal airflow throughout the heatsink, effectively transferring heat to the surrounding environment.
Performance in Practice:
While real-world performance can vary depending on specific system configurations and usage scenarios, independent tests and user reviews consistently show that the AK500 is capable of maintaining safe CPU temperatures even under demanding workloads. Depending on your specific CPU and other system components, the AK500 may offer limited headroom for overclocking. However, it should be sufficient for moderate overclocking on most mid-range CPUs.
Noise Levels:
One of the AK500’s key strengths is its quiet operation. The FDB fan and PWM control work together to minimize noise generation. The fan operates at speeds between 300 and 1,500 RPM, depending on the CPU temperature. At its lowest speed, the AK500 is nearly inaudible, making it suitable for noise-sensitive environments.
While the AK500 prioritizes quiet operation, it’s important to remember that noise levels will increase as the fan ramps up under heavier loads to maintain optimal cooling. Users seeking absolute silence at the expense of some cooling performance might need to consider alternative cooling solutions.
Installation and Compatibility:
The DeepCool AK500 boasts a user-friendly and straightforward installation process. This makes it a great choice for both experienced builders and beginners.
Installation Process:
Prepare your system: Before installation, ensure your system is powered off and unplugged. Locate the motherboard socket and remove any existing coolers or thermal paste.
Mount the backplate: The AK500 utilizes a universal backplate design compatible with various Intel and AMD sockets. Position the backplate on the backside of your motherboard and secure it using the provided screws.
Attach the mounting brackets: Depending on your specific CPU socket, attach the designated mounting brackets to the backplate using the included thumbscrews.
Apply thermal paste: Apply a thin, even layer of thermal paste (not included) onto the center of your CPU’s integrated heat spreader (IHS).
Position the heatsink: Carefully place the heatsink onto the CPU, ensuring the heat pipes make proper contact with the CPU’s IHS.
Secure the heatsink: Secure the heatsink to the mounting brackets using the provided thumbscrews. Tighten them evenly in an alternating pattern to avoid uneven pressure.
Compatibility:
The AK500 is compatible with a wide range of Intel and AMD CPU sockets, including:
Intel: LGA 115x, 1200, 1700, 2066
AMD: AM4, AM5
Installation Process:
Prepare your system: Before installation, ensure your system is powered off and unplugged. Locate the motherboard socket and remove any existing coolers or thermal paste.
Mount the backplate: The AK500 utilizes a universal backplate design compatible with various Intel and AMD sockets. Position the backplate on the backside of your motherboard and secure it using the provided screws.
Attach the mounting brackets: Depending on your specific CPU socket, attach the designated mounting brackets to the backplate using the included thumbscrews.
Apply thermal paste: Apply a thin, even layer of thermal paste (not included) onto the center of your CPU’s integrated heat spreader (IHS).
Position the heatsink: Carefully place the heatsink onto the CPU, ensuring the heat pipes make proper contact with the CPU’s IHS.
Secure the heatsink: Secure the heatsink to the mounting brackets using the provided thumbscrews. Tighten them evenly in an alternating pattern to avoid uneven pressure.
Compatibility:
Read Here
Originally Published @ Gamers' Guide
0 notes
Text
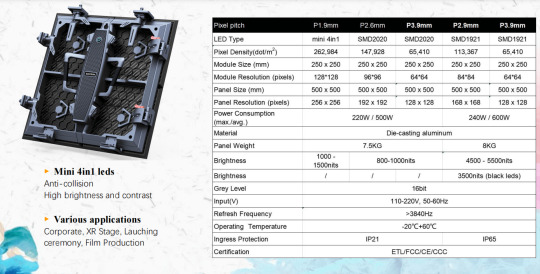
Refresh frequency and gray scale of LED display
With its wide application in various indoor places, LED display screens have received more and more attention, whether in command centers, monitoring centers or studios. However, in terms of the overall performance of the LED display system, can these displays meet the needs of users? Does the displayed image meet the viewing requirements of the human eye? Will these displays stand up to the camera's different shutter speeds and angles? These are all issues that LED displays need to face and consider. Below, we will briefly analyze several major factors that affect LED display effects, including refresh frequency and gray scale.

Refresh frequency of LED display (visual refresh frequency)
"Visual refresh rate" refers to the rate at which the screen updates, usually expressed in Hertz (Hz). Generally speaking, a visual refresh frequency above 3,000Hz is considered a high-efficiency LED display. The higher the visual refresh frequency, the more stable the picture display and the smaller the visual flicker. A low visual refresh rate may result in the appearance of horizontal horizontal stripes, which may be uncomfortable or even harmful to the human eye.
Although the visual refresh frequency of continuous images perceived by the human eye is above 60Hz, a higher visual refresh frequency can make the image more stable and reduce eye fatigue. In high-quality videos, in order to obtain more detailed pictures, such as highlight playback or close-up shots, high-speed cameras with a frequency of more than 1,000Hz per second are often used for shooting. It is a huge challenge for the photographed LED display screen to still be able to present continuous images (without black scanning lines) or continuous color levels at high speeds.

Gray scale of LED display
"Grayscale" refers to the varying levels of various colors between the darkest and brightest. Generally speaking, grayscales above 14 bits are considered high-efficiency LED displays. If the number of grayscale levels is insufficient, it may result in insufficient color levels or insufficiently smooth gradient levels, which cannot fully display the color of the video, thereby reducing the LED display effect. On some low-efficiency LED displays, the distribution of color blocks can already be clearly detected at a shutter speed of 1/500 seconds. If the shutter speed is increased to, for example, 1/1,000 seconds or 1/2,000 seconds, the situation will be even worse. obvious. Here's what you need to know about nit brightness.
What affects the refresh frequency and gray scale of LED displays?
The core components of LED displays include LED switching power supplies, LED driver chips, and LED lamp beads. Regarding the refresh frequency and gray scale of the LED display, the LED driver chip directly determines the visual refresh frequency and gray scale performance of the LED display. Teach you the driving and control methods of LED display.
Currently, the most advanced technology in LED driver chips is "ScrambledPWM (S-PWM) technology". S-PWM technology is an improvement on traditional pulse width modulation (PWM) technology, which disperses the image on-time into multiple shorter on-times to increase the overall visual update rate.
S-PWM technology provides different counting modes, so the image refresh frequency can be increased up to 64 times. When using S-PWM to take photos at high-speed shutter speeds, there will be no horizontal black scanning lines or color patch distribution on the LED display. Its visual refresh frequency and gray scale performance far exceed that of LED displays using traditional switch-type driver chips. Here are 4 common sense about LED display chips.
The high-quality LED driver chip and built-in S-PWM technology enable the LED display screen to have a refresh frequency of up to 3840Hz and a grayscale of up to 16bit. When shooting at a high-speed shutter, there will be no horizontal black scanning lines or color block distribution.

Thank you for watching. I hope we can solve your problems. Sostron is a professional LED display manufacturer. We provide all kinds of displays, display leasing and display solutions around the world. If you want to know: LED display unit board: see the quality details from the appearance. Please click read.
Follow me! Take you to know more about led display knowledge.
Contact us on WhatsApp:https://api.whatsapp.com/send/?phone=8613570218702&text&type=phone_number&app_absent=0
0 notes
Text
Séance 2 S4
Nous nous sommes occupé de créer un programme nous permettant de générer un signal PWM qui vas permettre de faire allumer nos LED à la bonne fréquence.
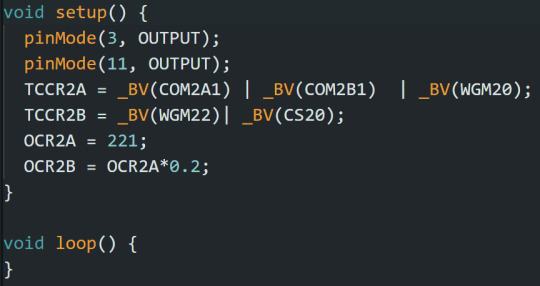
Nous utilisons le principe du Timer2 déja présent dans la carte arduino UNO.
Nous avons aussi lancer la construction de notre balise en commencant par le support des LED.

Et comme nous avions terminer plus tot que prévue, nous nous sommes remits à faire des tests de déplacement et d'esquive du robot. Mais nous nous sommes rendues compte que des problèmes persistes et nous allons donc devoir trouver des moyens de régler cela. Par l'utilisation de plus de capteurs ultrasons qui vons nous permettre détecter les obstacles lorsque nous arrivons en biais d'un obstacle.
Et nous comptons changer de moteurs et de roues pour régler nos problème de manque de couple et d'adérence au sol.
Ils devraient nous permettre une meilleurs précision dans nos mouvement car ils ont un couple plus élever mais nous allons perdre en vitesse.
0 notes
Text
Illuminating the Way: LED Flicker Mitigation for a Smoother Lighting Experience
Introduction: In the realm of modern lighting solutions, Light Emitting Diodes (LEDs) have become the go-to choice for their energy efficiency and longevity. However, an often overlooked aspect of LED lighting is flicker, which can have detrimental effects on human health and well-being. In this blog post, we will delve into the significance of LED flicker mitigation and explore effective strategies to create a seamlessly illuminated environment.
Understanding LED Flicker: LED flicker refers to the rapid and repetitive changes in light output, typically imperceptible to the naked eye. Although the flicker may go unnoticed, it can lead to various issues such as eye strain, headaches, and fatigue. Additionally, prolonged exposure to flickering light can impact individuals with photosensitive conditions, exacerbating their symptoms.
The Impact on Health and Productivity: Research has shown a direct correlation between flickering light and adverse health effects. Headaches, migraines, and disruptions to circadian rhythms are just a few examples. In work environments, flicker can lead to decreased productivity and increased discomfort among employees. Recognizing these concerns, LED manufacturers and lighting designers are actively working on implementing LED flicker mitigation measures.
LED Flicker Mitigation Techniques:
Driver Technology Advancements: LED drivers play a crucial role in controlling the power supplied to LEDs. Advanced driver technologies, such as constant current drivers, help stabilize the current flow, reducing the likelihood of flicker. Manufacturers are investing in driver improvements to ensure a smoother and more consistent lighting experience.
Dimming Technologies: LED dimming can introduce flicker, especially at lower light levels. To address this, manufacturers are incorporating advanced dimming technologies like PWM (Pulse Width Modulation) and 0-10V dimming. These technologies allow for precise control over light output, minimizing flicker during dimming operations.
Quality LED Components: The quality of LED components, including the diodes and phosphor coatings, significantly influences flicker. By investing in high-quality materials and rigorous manufacturing processes, LED manufacturers can produce lights with reduced flicker. Consumers should look for lighting products with certifications indicating compliance with flicker standards.
Regulatory Standards and Testing: Governments and industry bodies have established standards to limit flicker in LED lighting. Compliance with these standards ensures that products meet specific criteria for flicker mitigation. Rigorous testing during the manufacturing process helps identify and rectify potential flicker issues before products reach the market.
Conclusion: As LED lighting continues to dominate the market, addressing the issue of flicker becomes paramount for ensuring a healthy and comfortable lighting environment. Manufacturers, designers, and consumers all play crucial roles in mitigating LED flicker through advancements in technology, adherence to standards, and informed decision-making. By prioritizing LED flicker mitigation, we can pave the way for a future where LED lighting not only excels in energy efficiency but also provides a visually pleasing and health-conscious illumination experience.
0 notes
Text
Today we are reviewing the compact system on module based on the versatile Rockchip RK3588 Octa Core SoC, the MIXTILE CORE 3588E. you may also like Mixtile Blade 3 Best New PICO-ITX and Stackable Single-Board
MIXTILE CORE 3588E Module
Mixtile launches this new high-performance AI board (6 TOPS), with a small form factor (69.6 x 45 mm) with a 260-pin edge connector. It can be used on carrier boards that are compatible with NVIDIA Jetson TX2 NX developer boards. This system-on-module has enough power to run high-resolution video encoding/decoding, graphics processing, and artificial intelligence applications.
It is basically a computing module, so all inputs and outputs on the board are made through 260-pin connectors, communicating through four PCIe 3.0 x4 lanes and one PCIe 2.1 lane. The operating systems supported by MIXTILE CORE 3588E are Debian 11, Android 11, Ubuntu 22.04 and Armbian 23.07.
Specification of MIXTILE CORE 3588E Module
Feature
Details
Brand
Mixtile
Model
CORE 3588E
Processor
Rockchip RK3588 (8nm)
CPU
4 x ARM Cortex-A76 cores (Up to 2.4 GHz)
4 x ARM Cortex-A55 cores (Up to 1.8 GHz)
GPU
ARM Mali-G610MC4
RAM
Options: 4/16/32 GB LPDDR4
Storage
Options: 32/128/256 GB eMMC 5.1
Form Factor
Compact System-on-Module (69.6 x 45 mm)
AI Performance
6 TOPS
Edge Connector
260-pin
PCIe Lanes
- Four PCIe 3.0 x4 lanes
- One PCIe 2.1 lane
Operating Systems
Debian 11, Android 11, Ubuntu 22.04, Armbian 23.07
Video Outputs
- DisplayPort 1.2a (Up to 8K resolutions)
- HDMI 2.1 (Up to 8K resolutions)
Camera Interfaces
- 3 x 4-lane or 5 x 2-lane MIPI CSI @ 2.5 Gbps/lane
- 48MP ISP
Network Connector
10/100/1000 BASE-T
USB Ports
- 1 x USB 3.0 (Gen1)
- 3 x USB 2.0
Other Connectors
- UART DEBUG x1
- UART flow control x2
- SPI x2
- I2C x4
- CAN x1
- I2S x4
- SD 4.0, SDHOST 4.0, and SDIO 3.0
- PWM x3, GPIO x15
The MIXTILE CORE 3588E system-on-module is powered by the Rockchip RK3588 8nm processor. A chip that integrates 4 ARM Cortex-A76 cores at 2.4 GHz and another 4 ARM Cortex-A55 CPUs capable of reaching 1.8 GHz. In the graphics department we have a powerful ARM Mali-G610MC4 GPU.
Thank you for completing the Mixtile Core 3568M/3588E Concept Survey! Pre-orders for the Mixtile Core 3568M/3588E system-on-module are now available! You can purchase it at the Mixtile store: https://t.co/YiEPk5b6n1 pic.twitter.com/OBlE21wUaW
— Mixtile (@Mixtile) September 1, 2022
For RAM, we have options for all needs, including 4/16/32 GB LPDDR4 versions. For storage, we also have the option of 32/128/256 GB eMMc 5.1.
You Can also like
Mixtile Blade 3
Mixtile Cluster Box
Mixtile Blade 3 Case
Mixtile Edge 2
Mixtile Edge 2 Kit
Mixtile Core 3588E
Mixtile Core 3568
Mixtile Core 3568M
Mixtile Core 3568J
Mixtile Core 3399E
Mixtile Hub
Mixtile Telematics Gateway 3
With this board we can use different types of ports such as DisplayPort 1.2a and HDMI 2.1 video output up to 8K resolution. We control up to 3x 4-lane or 5x 2-lane MIPI CSI interfaces with 2.5 Gbps/lane cameras and a 48 MP ISP. We have access to a 10/100/1000 BASE-T network connector, a USB 3.0 (Gen1) and 3 USB 2.0 ports.
Price and availability
The MIXTILE CORE 3588E SoM can be purchased from the official Mixtile store starting at $109 with shipping at the end of January.
Optionally we can add a specific Heatsik for this board with dynamic speed adjustment between 0 and 5000 RPM. The board supports customization, please contact Mixtile for more information.
0 notes
Text
Oppo Find X7 Series l Design l Display l Specifications l Price: Oppo Find X7 flagship smartphones will debut next week. The company's newest premium products, with top specifications and features, are widely awaited. A complete Find X7 and Find X7 Ultra review follows.
Design & Display
After speculations and leaks, the Find X7 series design was revealed. Their design was detailed in a recent hands-on video. The Find X7 comes in Sea and Sky, Desert Moon Silver, Smokey Purple, and Starry Sky Black. Black and Purple have a glass back panel with a vast circular camera module, while the other two have a dual-tone design with a leather bottom half.
This design is used on the Desert Moon and Sea and the Sky Find X7 Ultras; however, the Pine Shadow Ink is the only one with a glass panel. Hasselblad emblems are adorning the module of the circular camera. An alert slider with three stages is said to be included in the Find X7 Ultra, according to speculation.
A large 6.82-inch LTPO BOE 8T OLED display with 2K resolution, 2160Hz PWM dimming, and a refresh rate that can be customized from 1 to 120Hz is included on the front of the Find X7 Ultra in the form of a display. Featuring a 6.78-inch LTPO BOE 8T OLED display with 1.5K resolution, 2160Hz PWM dimming, and a 120Hz refresh rate that can be customized, the Find X7 may be purchased in its most basic configuration.
Both variants have curved sides and rounded corners with a center-aligned selfie camera punch hole. The Find X7 series is supposed to provide a high framerate with optimization for smoother gameplay. With 3Pulse/1Pulse DC dimming, getting a higher peak brightness is feasible.
Specifications
The Oppo Find X7 series has powerful specs. A MediaTek Dimensity 9300 system-on-chip (SoC), up to 16 gigabytes of LPDRR5X RAM, and one terabyte of UFS 4.0 storage are included in the vanilla model. The Ultra, conversely, is equipped with a Qualcomm Snapdragon 8 Gen 3 CPU, up to 16GB of RAM, and 1TB of storage space. Both should have batteries with a capacity of 5,000 mAh and a charging power of 100 watts.
The Find X7 Ultra may include 50W wireless fast charging. A third Find X7 Ultra Satellite Communication model will also be included in the Find X7 series. It's the same as the Ultra model but with a two-way satellite connection. Future flagships will run Android 14 with ColorOS 14 custom skin. NFC, WiFi 7, and Bluetooth 5.4 are also significant.
Camera
The Find X7 and Find X7 Ultra include triple and quad rear cameras, respectively, for photography. With a primary sensor of 50 megapixels and optical image stabilization (OIS), a Samsung JN1 ultra-wide angle lens of 50 megapixels, and a 64-megapixel OmniVision OV64B periscope telephoto lens with 3x optical zoom, the vanilla model is equipped with these features.
It is the first smartphone to feature two periscope telephoto lenses since it is equipped with the Sony IMX890 sensor, which has a resolution of 50 megapixels and a 3x optical zoom, as well as the Sony IMX858 sensor, which also has a resolution of 50 megapixels and a 6x zoom.
Last, the extreme includes a 50-megapixel Sony LYT-600 extreme wide-angle lens. Front-facing 32-megapixel sensors are anticipated on all Find X7 models for selfies and video calls.
Price And Launch
Beginning on January 8, 2024, it is projected that Oppo will introduce the Find X7 series of smartphones. A new leak suggests the Find X7 would cost 3,999 Yuan (465 US Dollars) for 12GB RAM + 256GB storage. Other storage configurations may cost more.
Unfortunately, the Find X7 Ultra price is unclear. In China, the gadgets have over 1 million online bookings across all channels, generating much buzz. Watch for our launch event coverage next week.
0 notes
Text
realme Debuts Powerful GEN Z 10 Series in India and China on November 9th
<h3>realme Announces Launch Date for new GEN Z 10 Series Flagship in India and China</h3>
<p>Realme recently made an official announcement that the all-new realme GEN Z 10 series will debut first in India on November 9th. As the successor to realme's popular GEN Z line of smartphones, the new device will also be launching in the Chinese market later.</p>
<p>With the release date approaching, realme has been steadily increasing promotion of the upcoming device. Most recently, the realme GEN Z phone account shared a new teaser poster on social media.</p>
<p>The poster highlights the GEN Z 10 series debut with the slogan "Powerful Performance, Global Dominance". Notably, previous GEN Z devices were only released overseas, so the return to the Chinese market promises an elevated experience. The large blue-purple gradient "10" in the poster hints that the phone may come in a striking blue-purple gradient color option.</p>
<p>Past leaks reveal the GEN Z 10 will feature an ultra-narrow bezel curved display with the world's smallest 2.3mm chin. It is expected to be the slimmest chin on a curved screen phone globally. The display will also debut Realme's proprietary 2160Hz PWM dimming technology to reduce eye strain. </p>
<p>Under the hood, the flagship will be powered by a MediaTek Dimensity 1080 chipset with up to 12GB RAM and 512GB storage. Its quad-camera system includes a 108MP main camera with OIS, 8MP ultra-wide, 2MP macro, and 16MP selfie camera. A 5000mAh battery and 67W fast charging round out the specs.</p>
<p>On November 9th in India, realme will unveil the GEN Z 10 series to compete against the recently announced Redmi Note 12 lineup. Global brand ambassador Yang Mi will promote the launch, generating maximum buzz in both India and China.</p>
0 notes
Text
How Honor Makes a Powerful Comeback to Dominate Smartphone Sales with Cutting-Edge Innovation
Assessing How Honor Makes a Grand Return to the Smartphone Market
It may have been expected that Honor would launch the Honor 50 series in 2021, but the official release of the Honor Magic4 series in the first quarter of 2022 came as somewhat of a surprise to the media and netizens.
On March 25th, the standard version of the Honor Magic4 had its first sale and immediately captured the top spot for single product sales on JD.com and Tmall. At the same time, when interviewed by the media, Honor CEO Zhao Ming revealed that sales of the standard Honor Magic4 exceeded other comparable products by 2-3 times, making for an outstanding debut.
According to Zhao Ming's revelation, about 60% of initial Honor Magic4 users came from Apple and Huawei consumers, representing high acceptance of the Honor Magic4 series by high-income users. It should be noted that in developing the Magic4 series initially, Honor defined it as the "pain point terminator" for users and insisted on breakthrough user experiences through bottom-up technological research and joint innovation with the supply chain.
For example, in the screen experience, Honor established a Joint Innovation Laboratory for Displays with BOE to ensure user experiences balanced to an even higher and stricter standard. While the industry still only supports 480Hz LTPO displays, the Honor Magic4 series led the way with 1920Hz high-frequency PWM dimming for a far superior eye protection experience surpassing industry standards. As Honor CEO Zhao Ming said, Honor focuses on true innovation breakthroughs that are valuable and meaningful to consumers, deeply engaging the front-end of the industrial chain through joint innovation with suppliers to define future breakthrough points.
Looking at the imaging capabilities users rely on most in their daily use, we can see that many flagship phones in 2022 weakened performance in telephoto lenses, representing a unilateral decision against user needs. The Honor Magic4 series is equipped with a 64MP high-resolution telephoto camera supporting up to 100x digital zoom photography. The long focal length camera also supports OIS+EIS dual-stabilized shooting and preview to effectively mitigate shaking and focusing difficulties at high magnifications, delivering clearer distant shots.
In terms of guarding user privacy, the Honor Magic4 series partners with Qualcomm to create a whole new privacy and security protection system through built-in independent secure storage chips and dual TEE systems to safely protect users' private information. At the same time, to address user issues with audible leakage during calls, Honor brings innovative Smart Privacy Call functionality that focuses sound while ensuring the user can clearly receive audio without disturbing others and ensuring the privacy of call details. In Zhao Ming's words, this technology is purely Honor's own. This also demonstrates Honor's commitment and deep cultivation of self-developed technology.
From the Honor Magic4 series striking first in sales, we can see this is the result of Honor's persistence in high-standard technological innovation and joint innovation with suppliers. The essence of high-end market competition is a long-term commitment, and Honor chooses to focus on user pain points and meet user needs through useful technological innovation. The initial user base including about 60% from Apple and Huawei represents users voting with their wallets to show high-end market consumers have high expectations for Honor.
0 notes
Last Seen Blogs

thoughtsfromthecorneroftheroom
Untitled

godsoflightmusic
(o´▽`o)


sparkzz-sky
extremely normal about things I enjoy (lie)

depicspirit
The art of symbols