#minecraft guide
Text
Copy/Paste-able Minecraft Brew Guide
Since y'all seemed to like the Basic Brew Guide, how about one you can bring in-game with you?
(Ok the main thing the last one had going for it was prettiness and this one isn't but I tried)
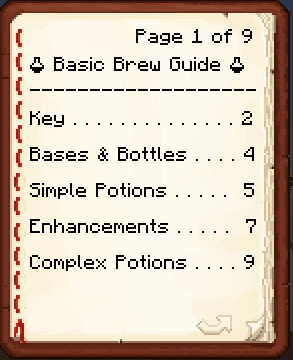
(it looks funny now but don't worry - the beakers will turn into potion bottles)
P1
🧪 Basic Brew Guide 🧪
-------------------
Key . . . . . . . . . . . . . . 2
Bases & Bottles . . . . 4
Simple Potions . . . . . 5
Enhancements . . . . . 7
Complex Potions . . . . 9
P2
Key
-------------------
🧪w = water bottle
🧪a = awkward potion
🧪[ ] = [ ] potion
⚗ = splash potion
☀ = gunpowder
✴ = redstone
✳ = glowstone
P3
Key - Cont.
-------------------
♅ = netherwart
♣ = rabbit paw
❄ = sugar
☽ = glistening melon
❦ = ferm. spider's eye
♭ = ghast tear
☉ = magma cream
☼ = pufferfish
^ = golden carrot
♯ = turtle shell
♮ = phantom membrane
P4
Bases & Bottles
-------------------
Most potions require an awkward potion base:
🧪w + ♅ = 🧪a
You can also add gunpowder to make it a splash potion:
🧪a + ☀ = ⚗
P5
Simple Potions
-------------------
🧪a + ♣ = 🧪leaping
🧪a + ❄ = 🧪swiftness
🧪a + ✳ = 🧪strength
🧪a + ☽ = 🧪healing
🧪a + ❦ = 🧪poison
🧪a + ♭ = 🧪regen.
P6
Simple Potions - Cont.
-------------------
🧪a + ☉ = 🧪fire res.
🧪a + ❄ = 🧪swiftness
🧪a + ☼ = 🧪w. breath
🧪a + ^ = 🧪darkvision
🧪a + ♯ = 🧪turtle
🧪a + ♮ = 🧪feather fall
P7
Enhancements
-------------------
Extend time with ✴:
🧪 Poison
🧪 Swiftness/Slowness
🧪 Leaping
🧪 Strength/Weakness
🧪 Turtle
🧪 Nigiht Vision
🧪 Feather Falling
🧪 W. Breathing
🧪 Fire Resistance
🧪 Regeneration
P8
Enhancements - Cont.
-------------------
Strengthen with ✳:
🧪 Poison
🧪 Swiftness/Slowness
🧪 Leaping
🧪 Strengt
🧪 Turtle
🧪 Regeneration
🧪 Healing/Harming
P9
Complex Potions
-------------------
🧪w + ❦ = 🧪weakness
🧪heal + ❦ = 🧪harm
🧪poison + ❦ = 🧪harm
🧪night + ❦ = 🧪invis.
🧪swift + ❦ = 🧪slow
🧪leap + ❦ = 🧪slow
#mineblr#minecraft#minecraft tutorial#minemath#video games#minecraft related#game guide#minecraft guide
293 notes
·
View notes
Text
Complete guide to the new Minecraft wolves

Note: the new wolf variants were added in snapshot 24w10a for update 1.20.5, this guide will not work for any earlier updates.
Where do new wolves spawn naturally?
Wolves can spawn naturally on grass blocks, dirt, corse dirt, snow blocks, and podzol.
Rusty: spawns in the Sparse Jungle biome in packs of 2 to 4.
Pale: spawns in the Taiga biome in packs of 4.
Black: spawns in the Old Growth Pine Taiga biome in packs of 2 to 4.
Striped: spawns in the Wooded Badlands biome in packs of 4 to 8.
Snowy: spawns in the Grove biome as lone wolves.
Ashen: spawns in the Snowy Taiga biome in packs of 4.
Woods: spawns in the Forest biome in packs of 4.
Spotted: spawns in the Savanna Plateau biome in packs of 4 to 8.
Chestnut: spawns in the Old Growth Spruce Taiga biome in packs of 2 to 4.
How to breed the new variants
If two tamed wolves are bred, the puppy will be the same variant as one of the parents, regardless of the biome the puppy was born in.
What collar colors make it look like the wolf isn't wearing a collar?

Rusty: brown
Pale: white
Black: gray
Striped: brown or yellow
Snowy: white
Ashen: light gray
Woods: brown
Spotted: gray
Chestnut: light gray
How to spawn wolves with spawn eggs
The variant spawned is determined by the biome the spawn egg is used in.
Rusty: will be spawned in all Jungle biomes.
Pale: will be spawned in all other biomes.
Black: will be spawned in the Old Growth Pine Taiga biome.
Striped: will be spawned in all Badlands biomes.
Snowy: will be spawned in the Grove biome.
Ashen: will be spawned in the Snowy Taiga biome.
Woods: will be spawned in the Forest biome.
Spotted: will be spawned in all Savanna biomes.
Chestnut: will be spawned in the Old Growth Spruce Taiga biome.
How to spawn wolves with commands
/summon minecraft:wolf
These will summon the specified variant regardless of biome.
/summon minecraft:wolf ~ ~ ~ {variant:rusty}
/summon minecraft:wolf ~ ~ ~ {variant:pale}
/summon minecraft:wolf ~ ~ ~ {variant:black}
/summon minecraft:wolf ~ ~ ~ {variant:striped}
/summon minecraft:wolf ~ ~ ~ {variant:snowy}
/summon minecraft:wolf ~ ~ ~ {variant:ashen}
/summon minecraft:wolf ~ ~ ~ {variant:woods}
/summon minecraft:wolf ~ ~ ~ {variant:spotted}
/summon minecraft:wolf ~ ~ ~ {variant:chestnut}
#Minecraft#Minecraft Wolf#Minecraft Wolves#New Minecraft Wolves#Minecraft Guide#Minecraft Update#Minecraft Commands#Wolves
6 notes
·
View notes
Text

How to use coordinates in both Minecraft & Zelda Tears of The Kingdom?
Yep coordinates.. I did not expect it to be such an issue where many people still don't know how to use them to navigate around.
First things first, you have to know 3 dimensional space games have got 3 normal vectors (axises) constituting an orthonormal mark generally (cartesian) noted x, y and z respectively (by the way the x, y & z may be switched up as well as the orthonormal mark's direction).

In Minecraft, the x axis represents longitude (east or west), the y axis represents the altitude (upwards or downwards) and the z axis represents latitude (north or south).


In Zelda Tears of The Kingdom, the x axis represents longitude (east or west) as well, though the y axis represents latitude (north or south) and the z axis represents the altitude (upwards or downwards).


Now by using coordinates I imply using them to find back a location or go to a specific location (with coordinates) as quickly as possible.
So the following method actually regards for both games having a set position to go to only using your current coordinates:
# 1) Do not pay attention to the altitude coordinate.
It isn't really relevant, if you're going back to place you already know/visited, you'll eventually recognize & find the way to go on your own.
# 2) Fix the longitude coordinate value.
Get your longitude coordinate value as close as the one indicated for the place you wanna go to by moving around to decrease/increase your x value to reach for the final longitude value.
# 3) Fix the lattitude coordinate value.
Do the same for your lattitude value and try to keep your longitude value not changing too much (quite constant).
# 4) Fix the altitude coordinate value.
Once you fixed and got both longitude value & lattitude value stabilized enough, you can focus on the altitude value (if you still hadn't reconize the place or are exploring/visiting the place for your first time) move up or down depending on how high or deep the place is located.
Obviously, as you keep practicing you'll end up managing to fix the longitude value and almost at the the same time ;)
For example, if we want to get to a place located at (longitude : 342, latitude : 45, altitude : -98) while we are at (longitude : -22, attitude : 112, altitude : 402).
Move around and when we see the longitude value increasing, keep the direction we're going to until you reach for about 342.
Subsequently, while we keep our longitude value constant enough, we have to decrease our latitude value.Again, as soon as it's decreasing, we have to keep about the same direction till we reach for about 45.
Finally, with longitude and latitude coordinate fixed values, we only have to look get down to -98 in altitude (in our case it may be going down a cave/hill/cliff/path...).
So that's pretty much how to use coordinates in Minecraft & in Zelda Tears of The Kingdom, I hope it helps :p
Tip: In Zelda Tears of The Kingdom, you should set your mini-map pointing towards north in order to easily tell the direction you follow (at the moment) and travel throughout the world in a more simple way.
Sidenote: I know there might be some more optimized way to travel with coordinates from a location to another.
Nevertheless, I'm only basing these explanations from my experience and from what I judge optimal and efficient to be taught.
#minecraft#zelda tears of the kingdom#totk thoughts#ztotk#zeldablr#mineblr#deep thinking#deep dive#video games#gaming#mc#minecraft bedrock#minecraft java#java edition#bedrock edition#nintendo#sony#minecraft guide#minecraft oc#minecraft coordinates#totk#tears of the kingdom#tears of the kingdom coordinates#deep thoughts#zelda fandom#game guide
4 notes
·
View notes
Text
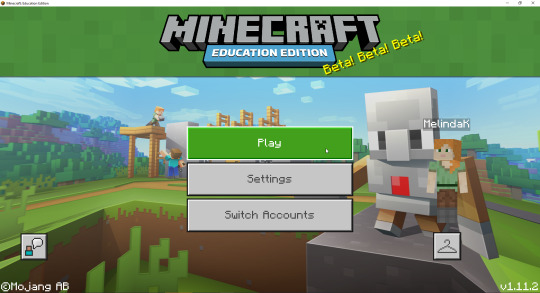
how to play minecraft education edition
Minecraft Education Edition is a version of the popular sandbox video game Minecraft, designed specifically to be used in an educational environment. It provides an immersive, fun way to learn and explore new concepts, while also enabling teachers to assess their students' progress. In this article, we’ll provide you with a comprehensive guide on how to play Minecraft Education Edition. We’ll walk you through the basics of the game, from setting up your server to creating your first world. Additionally, we’ll cover some additional features that make this version of Minecraft unique and help you get the most out of your educational experience.
What is Minecraft Education Edition?
Minecraft: Education Edition is a version of Minecraft that was created specifically for educational purposes. It is similar to the regular version of Minecraft, but includes a number of features that make it more suitable for use in schools.
Some of the key features of Minecraft: Education Edition include:
-A user-friendly interface that makes it easy to get started
-A library of resources, such as lesson plans and tutorials, that can be used by teachers to integrate Minecraft into their curriculum
-The ability to easily connect with other players around the world, making it ideal for collaborative learning
-A safe and secure environment that is monitored by staff to ensure appropriate behaviour
How to Get Started with Minecraft Education Edition
Minecraft: Education Edition is a version of the popular sandbox game designed specifically for classrooms. The game is available for free to anyone with a Microsoft account, and there are no in-app purchases.
To get started with Minecraft: Education Edition, you'll need to create a class in the app. Once you've done that, you can invite students to join your class and start playing together.
There are a few things to keep in mind when playing Minecraft: Education Edition. First, the game is intended for educational purposes, so there are some features that are different from the regular version of Minecraft. For example, players can't hurt each other in Minecraft: Education Edition, and there's a built-in chat system that lets students communicate with each other without leaving the game.
Second, because Minecraft: Education Edition is designed for classrooms, it's important to follow the rules set by your teacher. For example, your teacher may want everyone to stay on the same level or may want players to build only certain types of structures.
Third, while Minecraft: Education Edition can be played offline, it's best to play it online with other people. That way, you can take advantage of all the features the game has to offer, like collaboration and communication tools.
Finally, have fun! Playing Minecraft: Education Edition is a great way to learn about teamwork, problem-solving, and digital literacy.
Tips for Using Minecraft Education Edition
Minecraft: Education Edition is a game-based learning platform that promotes creativity, collaboration, and problem-solving in an immersive environment. The game is free to download and play, and there are no in-app purchases. Here are some tips for using Minecraft: Education Edition in the classroom:
1. Establish ground rules with your students before starting to play. Discuss expectations for behavior and teamwork, and set up a system for dealing with problems that may arise during gameplay.
2. Use the built-in tutorials to introduce students to the basics of the game. These can be found in the world editor after creating a new world.
3. Encourage students to collaborate and communicate with each other while playing. One way to do this is by setting up teams of students and assigning specific tasks to each team.
4. Utilize the many resources that are available online for Minecraft: Education Edition. There are lesson plans, printables, and videos that can be used to supplement your instruction.
5. Take advantage of the feedback feature in Minecraft: Education Edition to give students immediate feedback on their work. This is a great way to help them improve their skills and understanding of the game mechanics.
Conclusion
Minecraft Education Edition is a great way to learn and have fun at the same time! By following this guide, you now know how to set up your game and make sure that it runs smoothly. With its vast array of features, Minecraft Education Edition can be an incredibly powerful tool for learning. So go ahead and start exploring new worlds with your friends or even using it in the classroom—the possibilities are endless!
platforms Facebook,Pinterest,YouTube,Twitter,Game bloggers,get the latest game guide
3 notes
·
View notes
Text
recording this down for posterity:
If you want to transfer worlds stored externally in mcpe (on androids afaik) to new devices here is generally what you need to do.
1st, send the world files to the new device. This may be done by usb connection, wifi dircet sharing, etc. Go to your default file app and go to the "Internal storage" folder then to the "Android" folder, "data" folder, "com.mojang.minecraftpe" folder or likewise. Take the worlds you want to transfer from the "minecraftWorlds" and transfer them.
If you are unable to access folders past "Android" folder, you will need to get a laptop or similar and connect via usb to that computer to transfer the worlds. Copy to the computer from the old device and/or move the world folders (which, btw, will all end in an "="; copy the whole thing) to the new device. Place in the appropriate "minecraftWorlds" folder.
If you are unable to copy or move world folders to the "minecraftWorlds" folder then you will need to be a bit sneakier. Create a new folder on your new device in a place where it won't interfere with anything such as the download folder. add folder named "game" inside that folder. Add folder named "com.mojang" in the new "game" folder. Finally, add a new folder in the "com.mojang" folder called "minecraftWorlds". You should be able to do all of this from your computer (not sure about on the device itself). Put all the transferred world folders into the "minecraftWorlds" folder
If you have recently installed minecraft, you will be prompted on the worlds menu to see where external worlds are. Press the button there and choose the "minecraftWorlds" folder you made. This will make the game store world files there, but should not interfere with other functions.
Congrats! You transferred your minecraft worlds!
#minecraft#mcpe#minecraft guide#yeah i just had to do all this :/#anyways idk if this works if you already have worlds on the new device so uhh...good luck?
0 notes
Photo
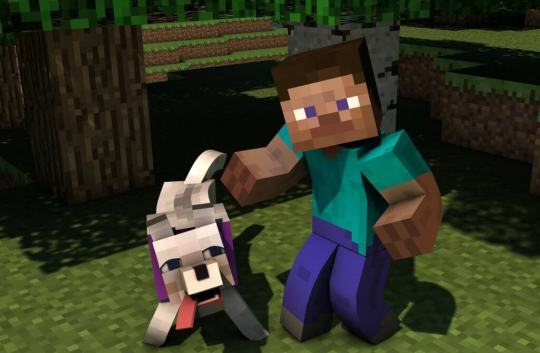
Minecraft Steve – Learn about the character
Read more about Minecraft Steve.
1 note
·
View note
Text

*snort*
430 notes
·
View notes
Text
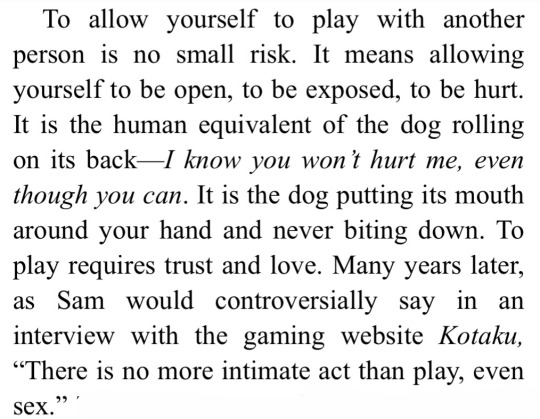
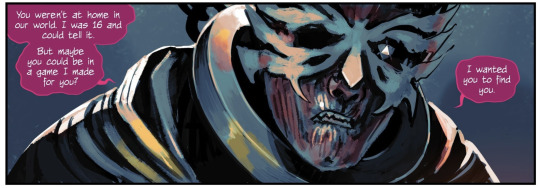
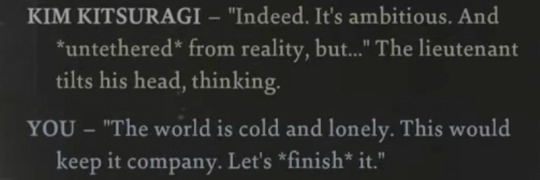

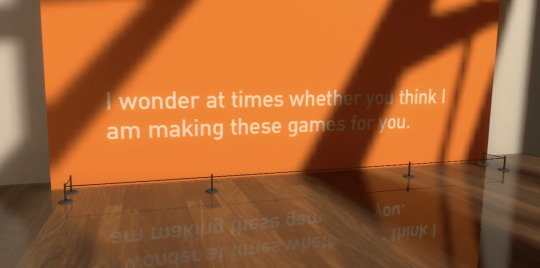


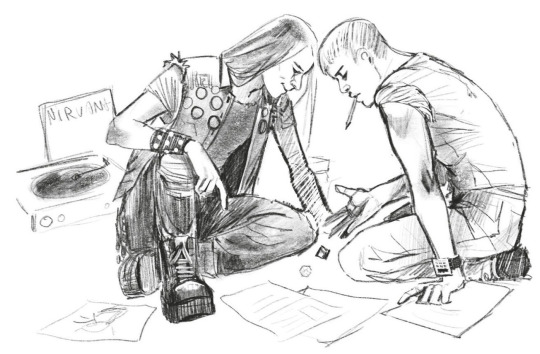
GAMES AS INTIMACY
Tomorrow and Tomorrow and Tomorrow, Gabrielle Zevin // DIE, Kieron Gillen and Stephanie Hans // Disco Elysium, ZA/UM // Existenz (1999) dir. David Cronenberg // The Beginner's Guide, Everything Unlimited Ltd // Tomorrow and Tomorrow and Tomorrow // Black Mirror "Striking Vipers," Charlie Booker // DIE concept sketches by Stephanie Hans // Minecraft End Poem, Julian Gough
#THIS HAS BEEN IN THE WORKS FOR A WHILE FUCK IT LETS POST#please support my only love having gay video game sex#tomorrow and tomorrow and tomorrow#die comic#disco elysium#existenz#the beginners guide#black mirror#minecraft#warlock wartalks#web weaving
749 notes
·
View notes
Text
#minecraft#i mostly play normal survival but ill switch to peaceful if i need to guide animals back and i know itll take a while#or if combat is getting too annoying. i have no shame about it.
451 notes
·
View notes
Text
They’re Friends :]
//click for better image quality//


One of them doesn’t like loud noises, the other doesn’t like bright lights, and the world hates them both—I think Herobrine and the Warden would be friends :]
Second pic includes Herobrine sticking his head in the Warden’s soul-chest-thingy bc who wouldn’t if given the opportunity. Red is probably Steve but I don’t have a set design for him yet so idk? And the screenshot in the third pic was provided by @liches-covered-in-lich after my dumb ass summoned a Warden and then just stood there with a map lol
#Herobrine#warden#minecraft warden#warden minecraft#minecraft#mineblr#sculk#deep dark#my art#resting#agtr#a guide to resting
223 notes
·
View notes
Text
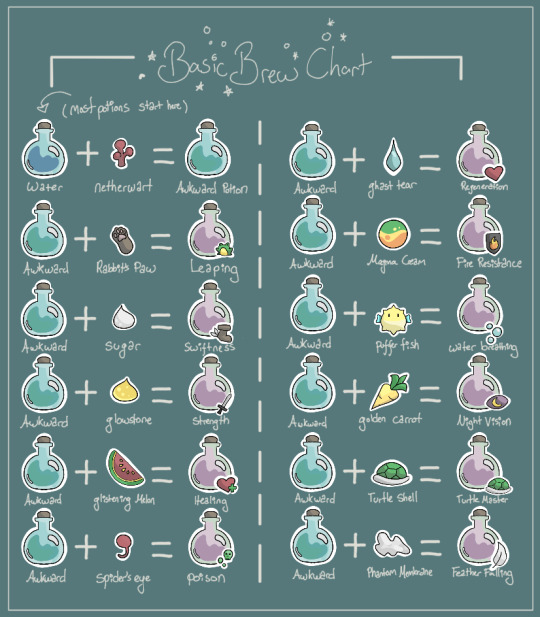
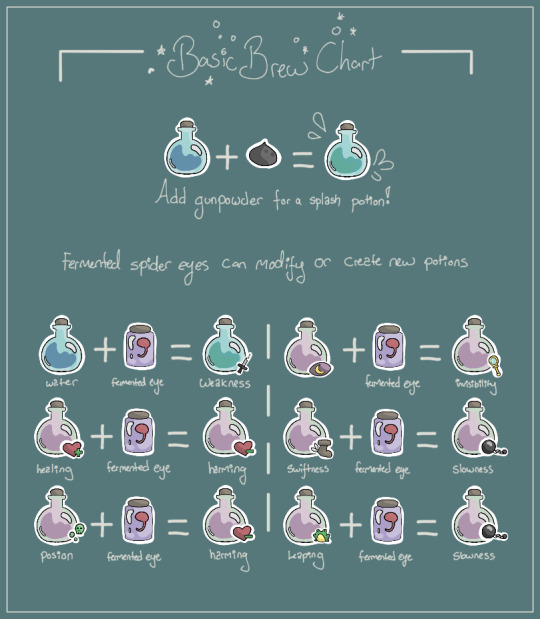
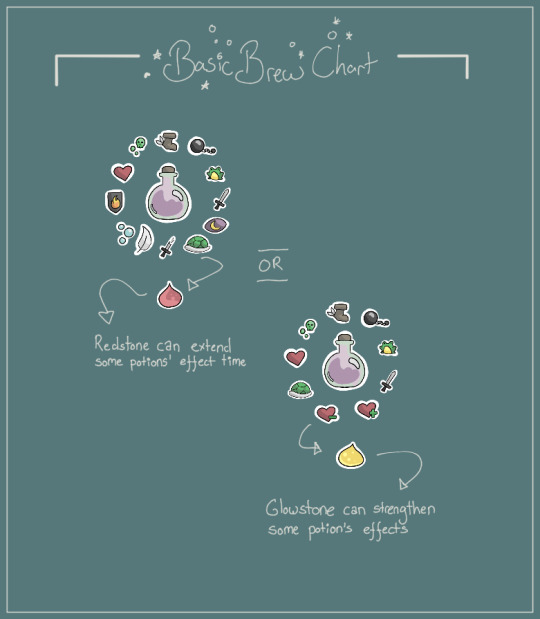
Basic Minecraft brew chart - perhaps a text version to copy/paste into in-game-books soon?
#mineblr#minecraft#minecraft oc#minecraft tutorial#minemath#video games#minecraft related#game guide#minecraft guide#ibispaintdrawing
261 notes
·
View notes
Text
I drew Steve and Alex in my Terraria art style for shits and giggles.
Feat. whatever this is:

#terraria#minecraft#minecraft steve#minecraft alex#steve minecraft#alex minecraft#the guide terraria#terraria guide#guide terraria
1K notes
·
View notes
Text
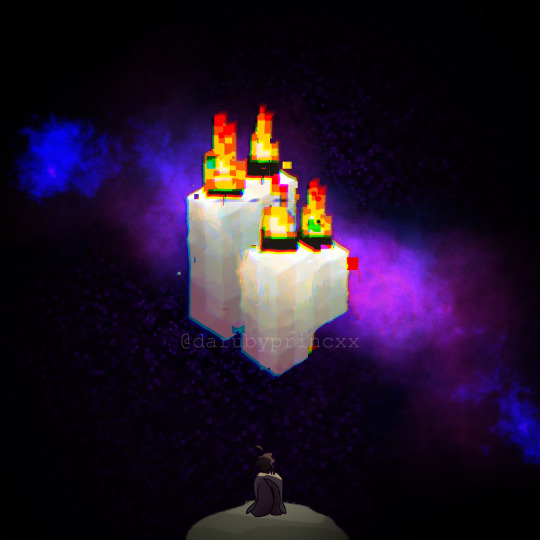
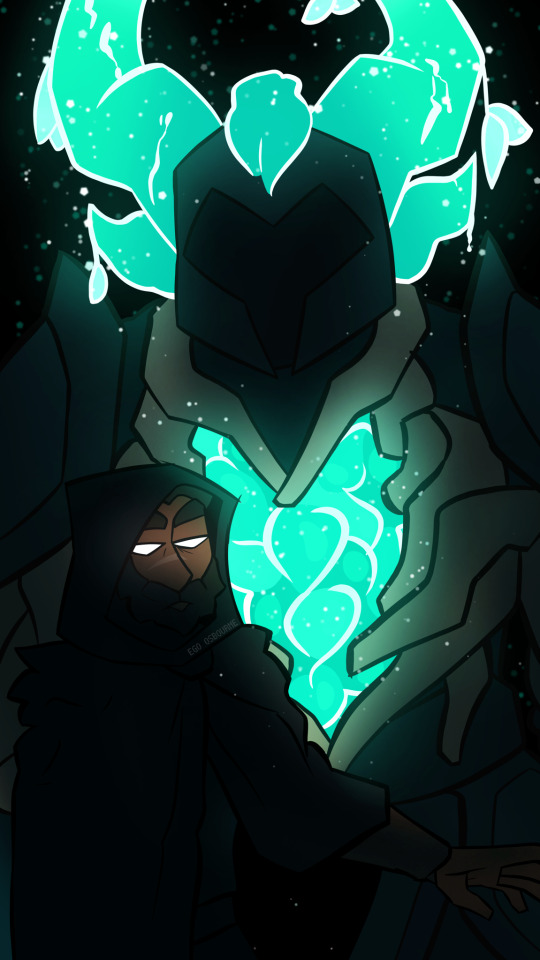
BE NOT AFRAID
#ray's tag#mcyt#empires smp#empires smp s1#keys' art#pixlriffs#undescribed#yes! those candles are hand-painted! i used an actual screenshot of minecraft candles as a guide :]#thank you procreate for having the chromatic aberration and glitch effects built in. literally so useful they fuck so hard especially#when used in pieces like this#anyways this drawing was inspired by Son of Nyx by Hozier (i started it while looping it)
141 notes
·
View notes
Text
Theres many things I absolutely adore about Philzas community for the few years Ive been in it but one that has brought me to tears from joy is that the community especially the artists & writers of the community have turned Technoblade truly into a legend. Its really beautiful.
#minecraft#technoblade#philza#The whole story of chayanne hearing the tale of technoblade only to be GUIDED BY HIS SPIRIT IN BATTLE FIGHTING ENDERKING ... MY HEART#I love you crows you beautiful winged talented fluffballs#my mom actually knows a bit about philza and she adores him mainly because of the whole crow thing
45 notes
·
View notes
Text
Some Old Minecraft animations <3
🟩.🥘||🥚.🎂||🪧.⛏️
#minecraft#gifs#an egg's guide to minecraft#epic minequest#dan bull#sam green#old youtube#don't mine at night#element animation#old web#unlocked memories#nostalgia#nostalgic#2000s nostalgia#2000s kids#2000s kid#early 2000s#memory lane#remember this#minecraft youtube#2000s internet#2000s web#2000s youtube#2010’s#2010's#2010#2010s#2010s youtube#2010s internet#gif warning
135 notes
·
View notes
Text

ONLY I KNOW THE WAY
Dude shut up the way to the ditch sure leave him alone he has a family find another guy to annoy you dead pile of bones ass motherfucker-
Lmao sorry.
I love the idea of him possessing qPhil, and that could be a nice AU, but if we talking canon, he most possibly can get kidnapped by him by New Year since he's leaving for a few weeks cuz that'd be a perfect timing to drop the angstiest lore and just fuckn dip))
#philza#philza minecraft#philza qsmp#ender king#philza fanart#qsmp fanart#qsmp#dude hes traumatized#if you guide him anywhere else but therapist ill throw you in the wall#ill throw you in the wall anyway
78 notes
·
View notes
Last Seen Blogs

a2visualizationvietnam-blog
Untitled

unplugtraveller-blog
Unplugtraveller

thepanicoffice
THE PANIC OFFICE

sparks-will-fly1
Smartie🌻

lqb2reads
lqb2 reads