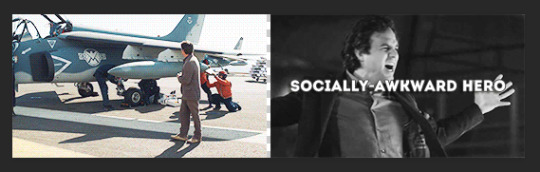
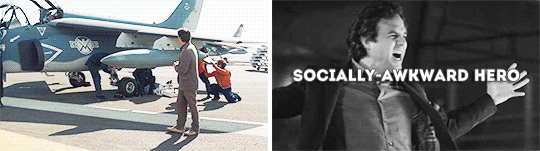
#the coloring consistency in this gifset when out the window
Text


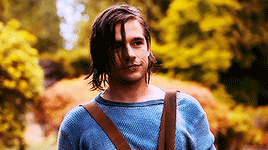
Mysterious Lotus Casebook | 2023
#mysterious lotus casebook#cdramasource#cdramaedit#dramasource#cheng yi#dailyasiandramas#mygifs#the coloring consistency in this gifset when out the window#m:cheng yi#m:li xiangyi#m:shan gudao#m:mysterious lotus casebook
146 notes
·
View notes
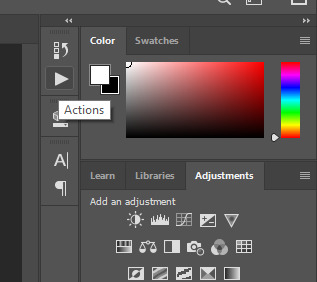
Photo

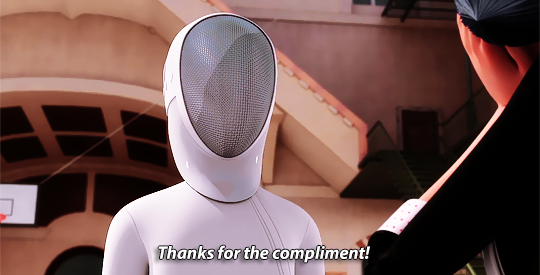
Hey guys! I got an ask wondering how I make my gifs and some people have asked me how I color my gifs, so here you go!
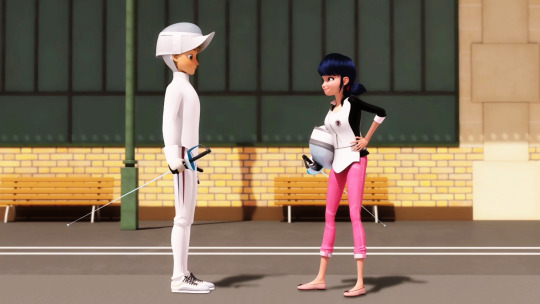
We’re going to be making this:

You’ll need:
VLC Media Player
Photoshop with working Import Video Frames to Layers function and timeline. I use Photoshop 2020, but any older versions with these functions will work!
A high-quality video (preferably 1080p)
Tutorial under the cut!
PART ONE: MAKING YOUR GIFS
You’re going to want to open up your video in VLC Media Player and open it to around a few seconds before your scene appears. If you’re giffing from a small YouTube video you can ignore this step, but for movies and TV, you’ll want to use VLC to extract the tiny part of it you want.
Pause it before your scene and click View >> Advanced Controls.
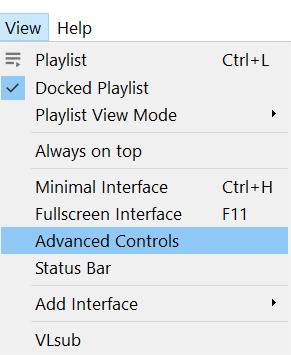
Above the play button, you should see a bunch of new controls. Focus on the red button I circled below:

Click this button and press play. VLC records are a little bit off, so this is why you want to be a few seconds before your scene actually starts so you catch it all! When your scene has played, press the button again. You’ve now recorded your scene and you can record as many scenes as you like for a full gifset.
You can find your recorded videos in the Videos folder. It’ll be named something like vlc-record-a bunch of letters and numbers.
Now that you have your scenes, it’s time to open Photoshop! When Photoshop has loaded, go to File >> Import >> Video Frames to Layers, which is a bit down to the bottom. It’ll prompt you to select a video; click on the video you just recorded, and a screen like this will pop up:
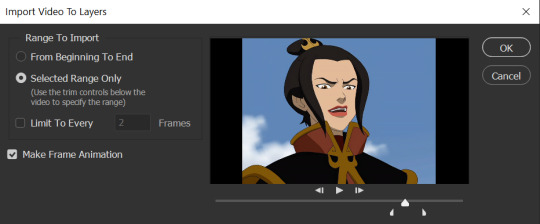
Use the white sliders to select the parameters of your scene. I would recommend going a little bit more on both sides so you catch your whole scene.
TIP: Make sure you do NOT select the button that says “Limit to Every 2 Frames,” because that will make your gifs look choppy and ugly. Love yourself!
Once your frames have loaded, you might not see them on Photoshop the way mine looks. If that’s the case, make sure you go to Window >> Timeline so you can see the frames!
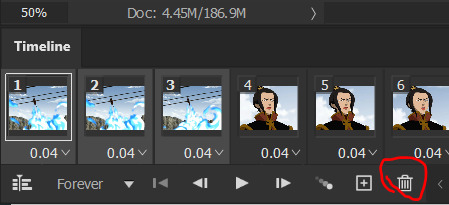
Delete the extra frames in your gif that you don’t need by selecting the frames you want to delete and pressing the trash can button, circled below:
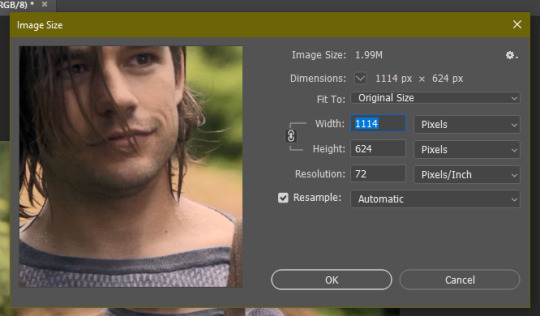
Now that you’ve done that, it’s time to crop. For this particular gif, I’m going for a full-width one, so the width I chose is 540px and I chose a height of 290px. Click on the crop tool and make sure your crop settings are at W x H x Resolution, or you won’t be able to input specific dimensions the way I’ve done here:

Position the crop tool where you want your gif to be:
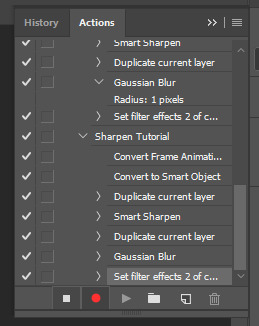
And now that your gif is all cropped and sized, it’s time to sharpen! I have a pretty specific sharpening process that I’ll outline in detail here, but I have an action for this purpose so as to save time. I’m just making this part of the tutorial so you know what you’re meant to do in Photoshop.
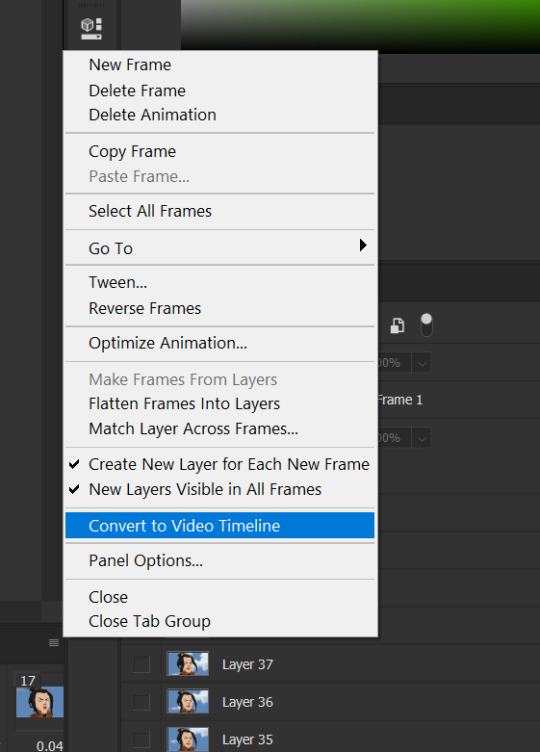
First, go ahead and click the three little bars at the right edge of the Timeline/Frames tab and hit Convert to Video Timeline.
Now, your timeline should look like this:

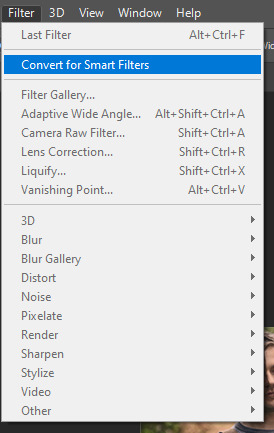
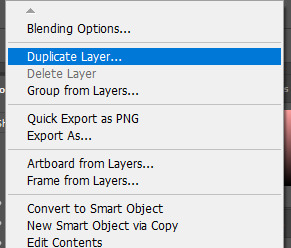
Go to Select >> All Layers, and right-click on one of the layers in the Layers tab once they’ve all been selected. Select Convert to Smart Object. This allows us to sharpen the entire gif at once as opposed to by frame! Your timeline should now look like this, with all the little purple parts condensed into one:

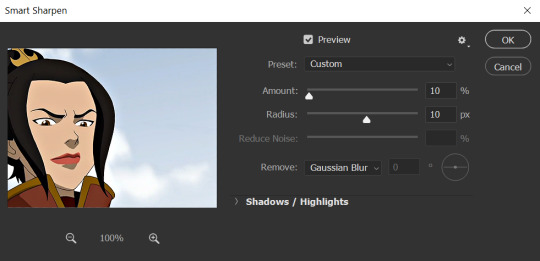
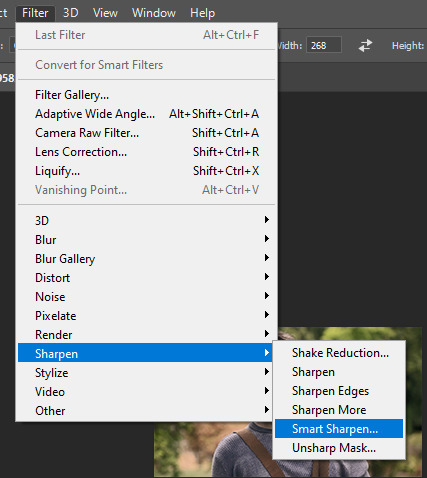
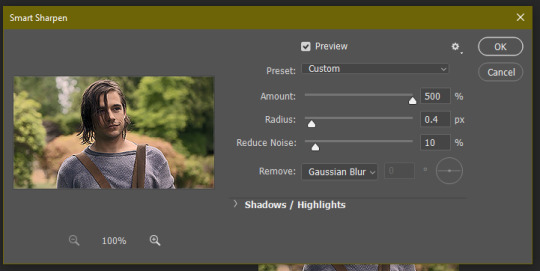
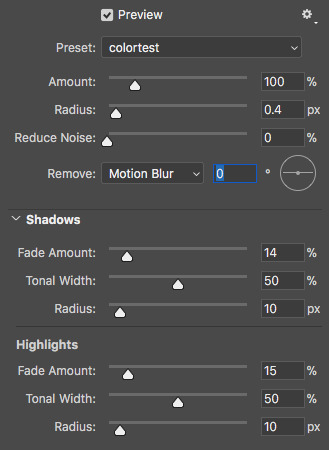
It’s time to sharpen! Go to Filter >> Sharpen >> Smart Sharpen. I do two passes with the Sharpening tool; here are my settings for both:

It’s not too apparent in the pictures, but it does make a difference. Don’t worry about your gifs looking too sharp; I use this action on every single one of my gifs and it always works like a charm.
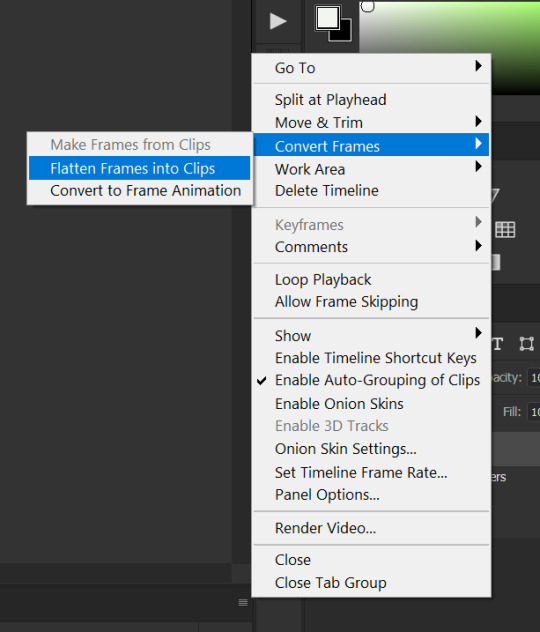
Now that our gifs are nice and sharp, it’s time to take them back to frames. This is because of a glitch in Photoshop that makes gifs saved in Smart Object form much faster than they would be in frames. Click on the small bars on the right of the timeline again and select Convert Frames >> Flatten Frames into Clips.
Your gif should have all those little clips that we had before we converted it into a Smart Object.
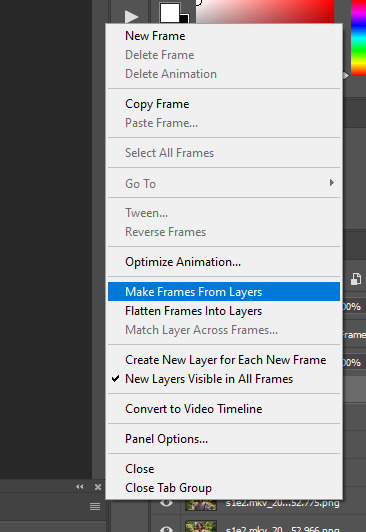
Then, go to Convert Frames >> Convert to Frame Animation.

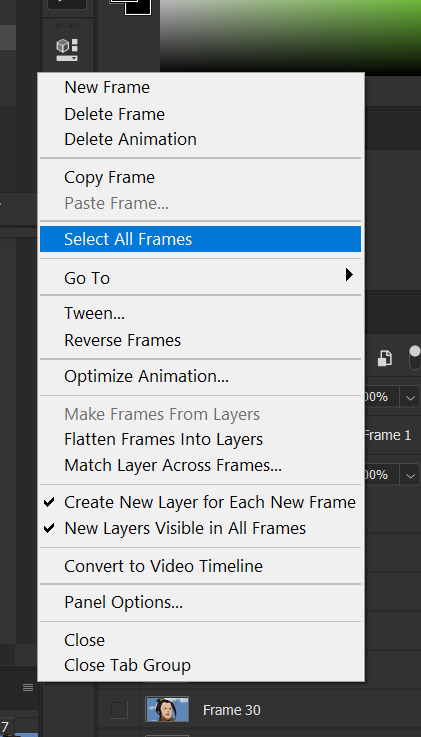
Your gif should be back in frames again, but it’s all one frame. Don’t worry; we’re going to fix that by clicking Make Frames from Layers from the menu with the three little bars again.

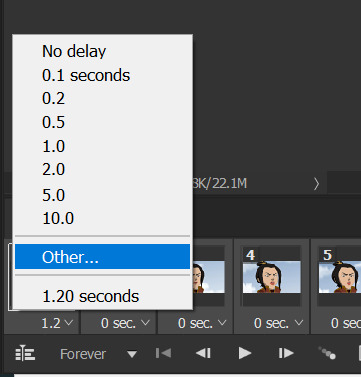
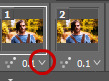
Now all your frames should be back! We’re going to set the speed of the gif now. Hit those three little bars again and click Select All Frames. Now click on the little triangle under any frame and click Other, and a little popup will appear. I always set my gifs to a speed of 0.05.

At this point, I save my gifs as a .PSD file. You can delete these PSDS after you’ve posted your gifset (I usually do to save space!), but it helps to have them so you can edit your gifs later if you want. Hit Ctrl+S, and now the screen to save it should pop up. Make sure you save it as a PSD file and not something else.

Now you have a gif that you can color! Which brings us to…
PART TWO: COLORING, ADDING SUBTITLES, AND SAVING YOUR GIFS
I do run a pale blog so this is going to be a pale coloring tutorial. You can check some popular resource blogs to see if they have any tutorials for colorful gifs!
I start out by making a group with the little folder below the layers tab; I title it “coloring.” (Not pictured: I added a layer mask and painted one black dot over it so I could reference the original!)

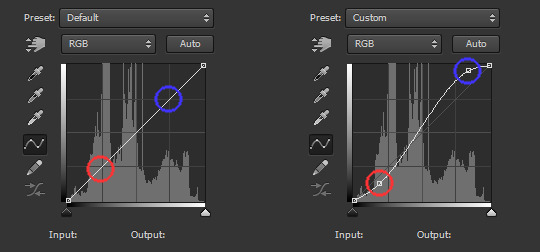
I always start out with a Curves layer; here are my settings:
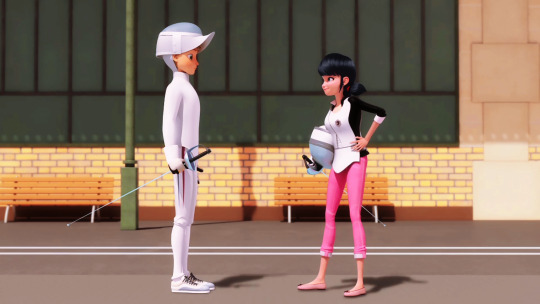
The gif at this point:
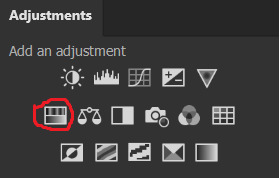
Next, I decrease saturation using the Hue/Saturation adjustment:

After this, I add a black and white Gradient Map layer and set it to blend mode Exclusion at 10% Opacity.


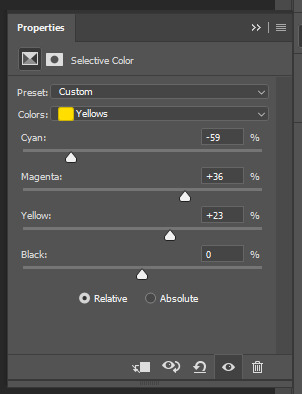
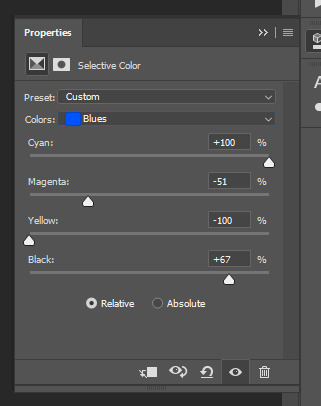
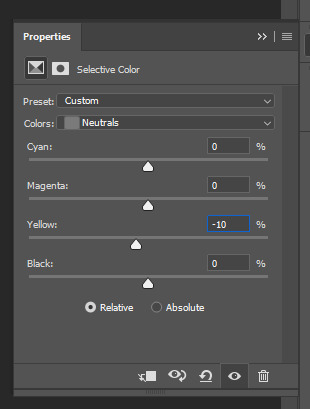
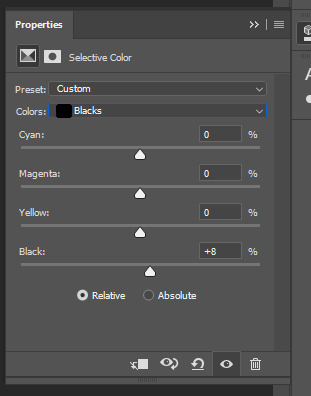
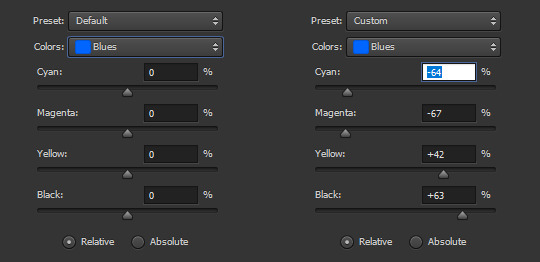
Then, (not pictured), I add a Selective Color layer and reduce blacks in Whites and Neutrals while increasing them in Blacks.
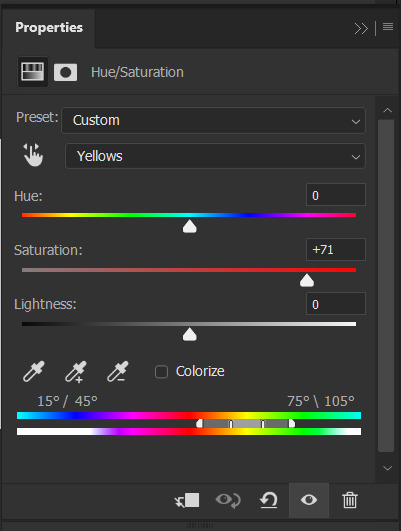
To make the background pale, I added a Hue/Sat layer, applying 100% Lightness to the Cyan and Blue channels and adding color to Azula’s skin by saturating the Yellows.

Here’s the gif after those adjustments:

Now I’m going to restore color to Azula’s skin following my own tutorial, so I’m not going to go into those details here. However, here’s the gif after all this. It’s not totally the same as Azula’s skin, but going any pinker makes the gif look awkward and oversaturated, which isn’t a good look:

After some minor adjustments and removal of the layer mask:

Now for subtitles!
Use the Text tool and make a rectangle at the bottom of your gif where subtitles go. I use Arial Rounded MT Bold, with Regular style, at 3.36pt and Sharp anti-aliasing.


Create a rectangle at the bottom of the gif where subtitles go and type in your text; then right-click on the text layer and select Blending Options and check Stroke, and these are my settings:

Now your subtitles are all ready! I’d recommend duplicating one frame of the gif and then duplicating the text layer onto a new canvas and saving it as a PSD so your settings and placement are always consistent across your gifsets!
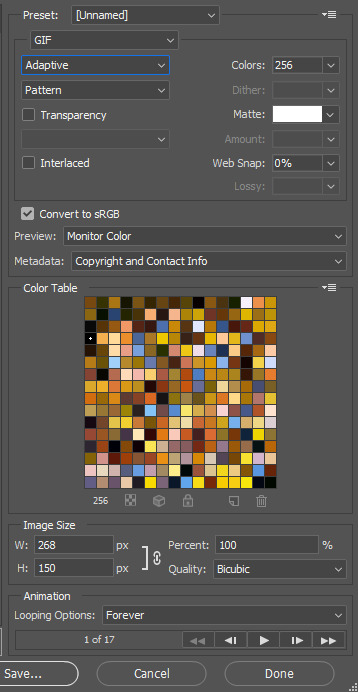
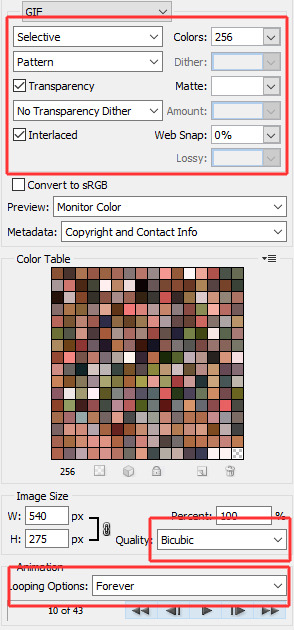
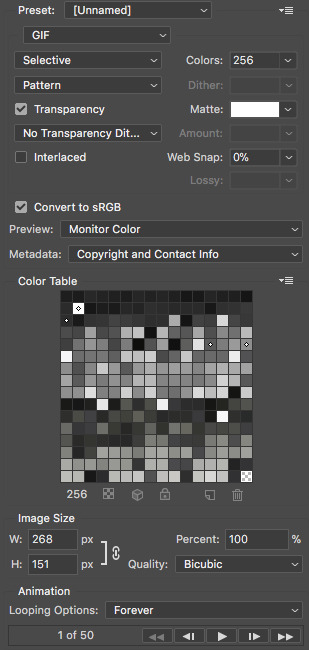
Time to save your gif. Here are my settings, circled ones important:
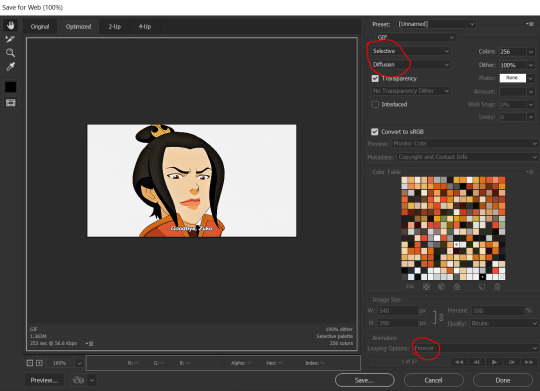
I’ve seen gifmakers use Adaptive+Pattern but I personally think that looks grainier and the pattern is really obvious; in my opinion Selective+Diffusion looks smoother, but it’s all up to you! Experiment with what you think looks best.
Make sure your gifs are set to loop Forever or they’ll only loop a limited amount.
Here’s your finished gif!
I hope this tutorial was helpful! Please reblog this if you learned something, and I hope you have a wonderful day. Happy gifmaking ❤
#allresources#chaoticresources#yeahps#biresources#resourcemarket#useradeela#usermaira#userdanisaur#userchelsea#tuserivy#*mine#resources#tutorial
408 notes
·
View notes
Text
detailed giffing + basic coloring tutorial for beginners
so a lot of gif/coloring tutorials are pretty outdated or not that detailed & i wanted to put my own out there! in this:
how to get the screencaps for your gifs
how to make a general gif
basic coloring (no psds here, it just gives you a basic idea for making colors pop and look nice. you can look up how to use psds, but i prefer making my own for every gif as it’s much more personal, gratifying, and creative. there’s nothing wrong with using psds as long as you don’t claim them as your own, it’s just not my personal thing)
how to save a gif
we’ll be going from this:
to this
what you need:
photoshop (cc 2019 is what i’m using, but this works with any version of photoshop really as long as you download a version with the timeline feature) i won’t add download links here since i don’t want this deleted, but you can look some up on tumblr or use the pirate bay (current url is pirateproxy.blue as of 4/29/2020) & follow the instructions there.
for windows: potplayer/kmplayer (both use literally the exact same instructions) this tutorial uses potplayer but kmplayer uses like literally the same instructions, it just doesnt work right on my computer
for mac: mplayer. this tutorial does NOT cover this so find a tutorial on tumblr on how to take screencaps with mplayer & then skip to the “how to make a general gif” section. though, again, i’m on a pc so i have no idea if this is entirely accurate for mac.
if you’re downloading from youtube: clipconverter
if you’re Definitely Legaly torrenting: utorrent + the pirate bay (again, current url is pirateproxy.blue as of 4/29/2020) or another torrent site + you should really consider getting a VPN when torrenting (i use privateinternetaccess but you can find one that suits you)
note: download an adblock of some kind, disable automatic downloads on your computer, & download an antivirus program if you want because some sites are sketchier than others! this is ESPECIALLY crucial on sites like piratebay. keep your computer safe babes.
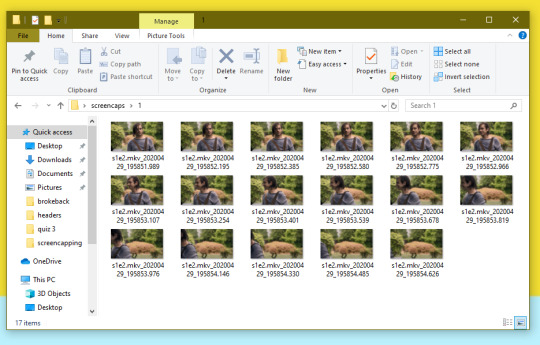
1. screencapping
there’s several ways to get screencaps on photoshop, but this is the easiest imo and i’ve never done the whole convert video frames to layers thing. like i said, you’ll need potplayer or kmplayer. i’m using potplayer. important note: don’t accidentally download viruses here! read each screen carefully & make sure you’re not hitting accept to download any secondary programs.
1. download your .mp4/.mkv. you can go to youtube & find a clip/scene/whatever and use clipconverter to download it. just make sure you download it at 720 (or higher) as anything lower than that will give you a poor quality gif. you can also download using somewhere like the pirate bay, but for this you need utorrent & i would HIGHLY recommend using a vpn if you live in a country where torrenting copyrighted content is illegal, as your internet provider may flag your ip address if you don’t & you torrent too often.
2. download potplayer/kmplayer & get it set up
3. create a screencaps folder. i always put mine on my desktop. in your screencaps folder, make a folder for however many gifs you want in your set. i just have one for mine so:
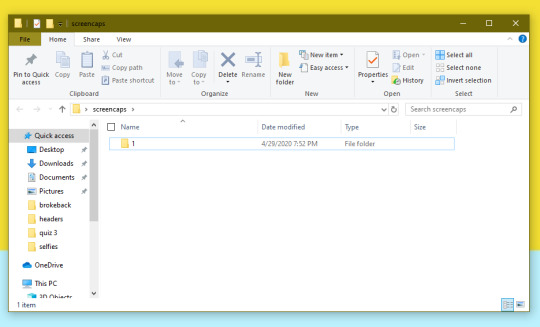
4. open up your .mp4/.mkv

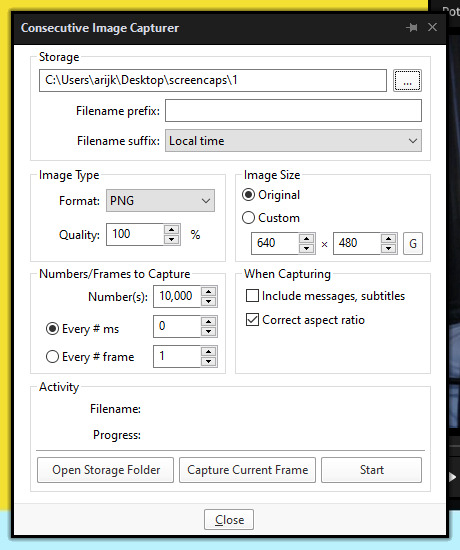
5. hit ctrl + g to bring up the screen capture pop-up & set your settings to these. click the button w/the three dots next to the storage option & select the folder you created for your first gif
6. navigate to the scene you want to gif. when you’re there, pause it and hit the start button on the consecutive image capture screen, then play the video. how many screencaps you need depends on the size of your gif. for larger gifs (so like 540px wide gifs), you’re probably going to want to keep it below 30 frames. for smaller gifs (268px wide or less) you can maybe stretch it to 60, depending on how much coloring you add. you can always delete screencaps later though in photoshop, so don’t worry about it too much. for this gif, i only had 17 frames because the scene was really short lmao
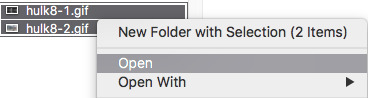
7. go to your screencap folder you made & delete any unnecessary frames. it’ll look like this:
8. repeat the process for any other gifs, making new folders in your “screencaps” folder, numbered for however many gifs you’re making. make sure to change the folder you’re loading the images into on the image capture pop up though so they don’t all go into folder 1.
2. making a simple gif (+sharpening)
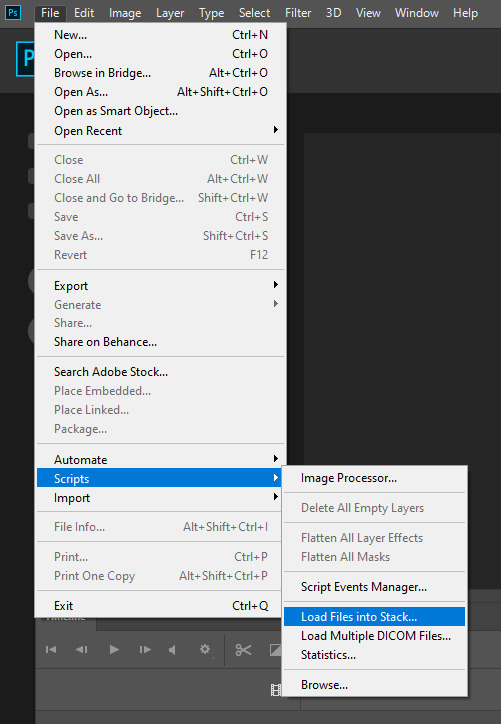
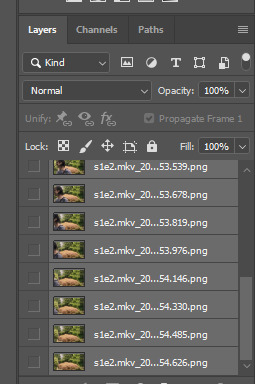
1. first, you need to load your screencaps. when you open up photoshop, go to file > scripts > load files into stack
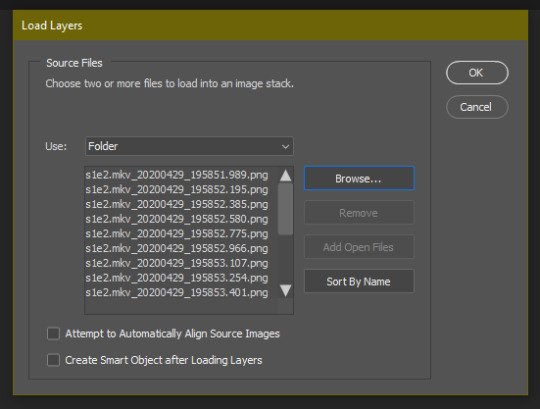
2. when the window pops up, switch the “file” option to “folder”

3. click browse and find your screencap folder for your first gif (in my case, desktop > screencaps > 1) once it’s all loaded, click “OK”
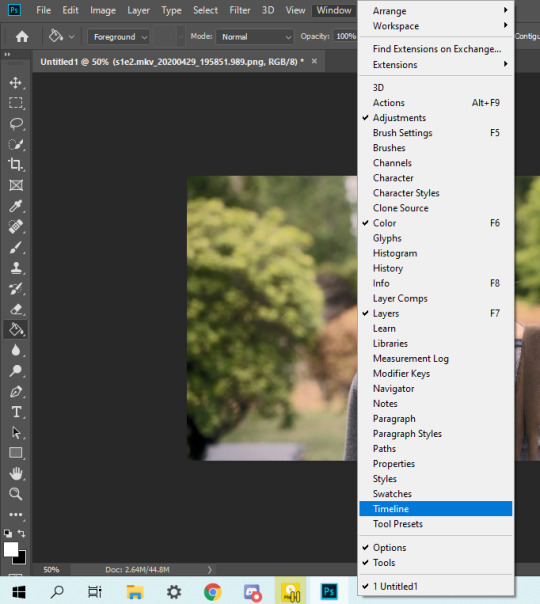
4. it’ll take a minute to load all your screencaps into photoshop. when they do, go to the upper bar on photoshop > windows > timeline
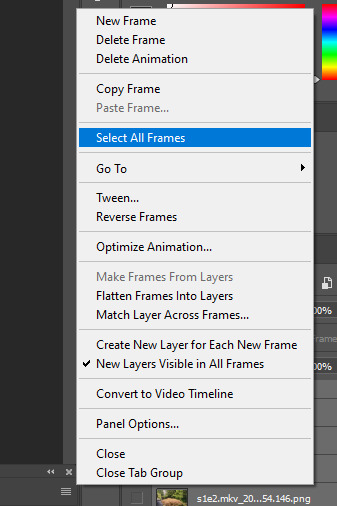
5. when the timeline bar shows up, click “create frame animation”

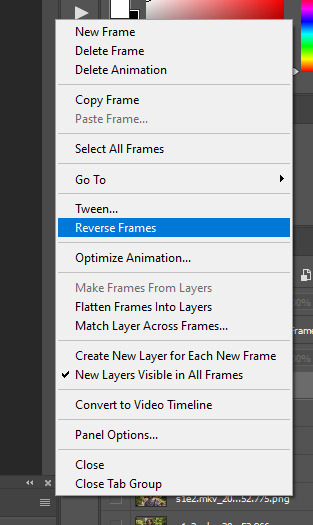
6. hit this button and click “make frames from layers”

7. hit the button again and click “reverse frames”
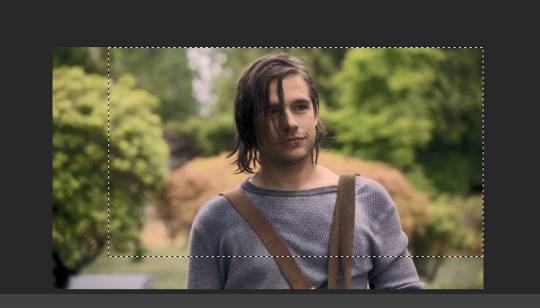
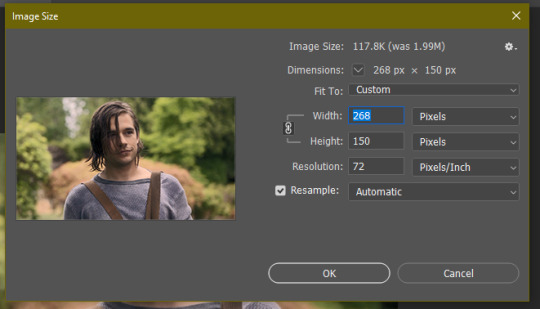
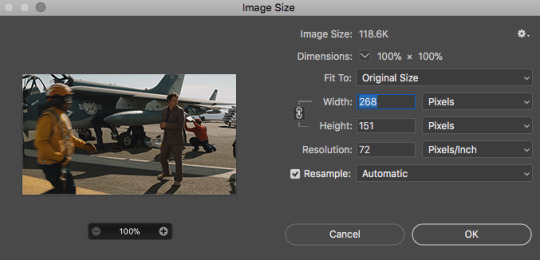
8. click back onto your first gif. then select the rectangular marquee tool and set it to whatever gif size you want. the width for 2 small gifs next to each other is 268px, the width for full size gifs is 540px. most people use 268x150 px for gifsets of 4+


9. use the marquee tool to select what area you want for your gif, like this. it’s up to you how to crop it! get creative!
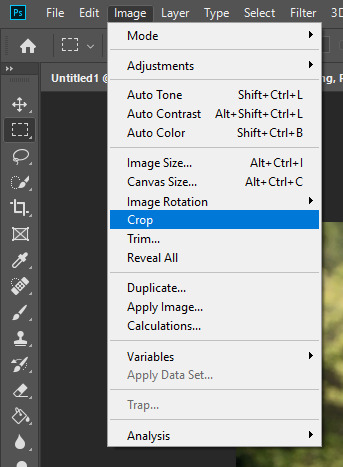
10. go to image > crop
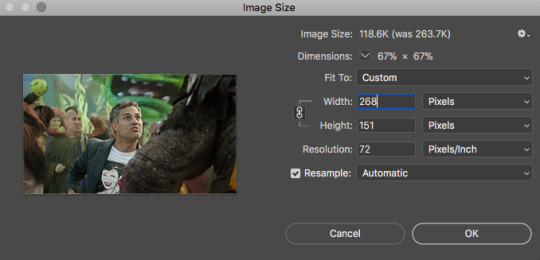
11. now that your image is cropped, go to image > image size. change the size to your desired gif size (in this case 268x150). hit “OK”. then make sure it’s zoomed in to 100%

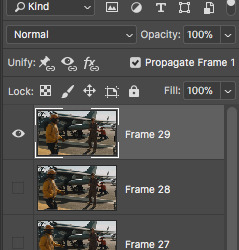
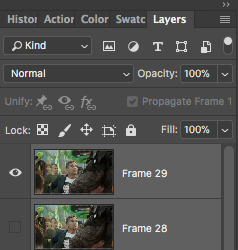
12. now, you COULD just save this gif, but they look way better sharpened. so you need to convert this to a smart object. to do so, first select all your layers in the righthand layer window. to select all the layers, click on your top layer, hold shift, and scroll down to your bottom layer & click on it as well while still holding shift
13. next, you need to select all your frames. go back to the options button from part 6 > select all frames
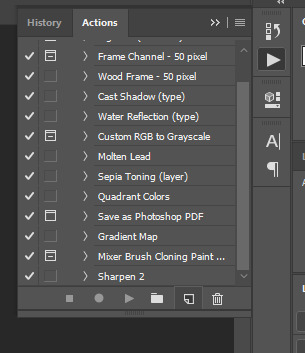
14. next, we’re going to create an action to make your life 100x easier when it comes to sharpening gifs in the future. to do so, go to the actions icon (may look different on different versions of photoshop, but basically just find the actions window)
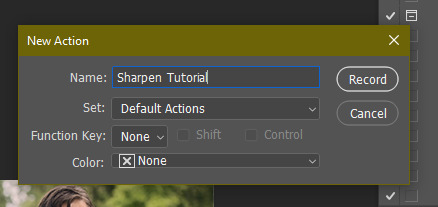
15. create a new action with this button. name it something. i named this one “sharpen tutorial” and hit “record”
16. click this button to convert to video timeline
17. go to filter > convert for smart objects
18. go to your single created layer and right click and click duplicate layer. this helps get rid of the transparent border around the gif.
19. go to filter > sharpen > smart sharpen & use these settings
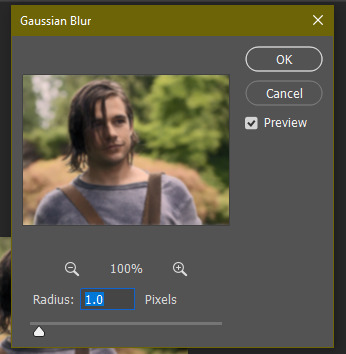
20. go to filter > blur > gaussian blur. set it to these settings.
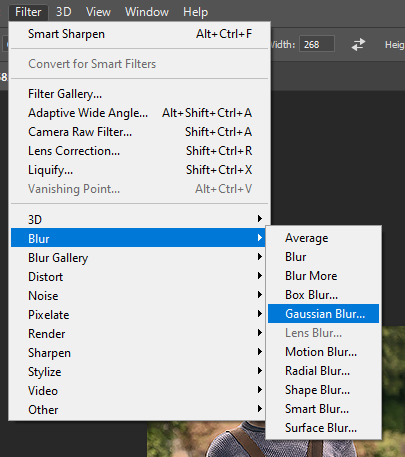
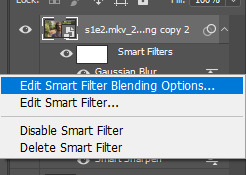
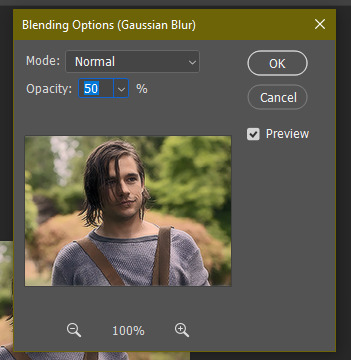
21. go to your second layer with the filters on it & right click on the gaussian blur filter to select “edit smart filter blending options” and set the opacity to 50%. you can mess around with this for different levels of sharpness. the closer to 0%, the sharper your gif will be.
22. hit the stop recording button on your sharpen action. now you’ll have an action to use next time you make a gif! after you’ve followed all the steps 1-13 you simply go to actions, click on your saved sharpening action, and hit play instead & it’ll do steps 14-21 in a few seconds. here’s a pic of the stop button on the actions window
23. our gif is now sharpened! you can end with this & skip to the saving a gif section, or you can continue to coloring. here’s what we have so far.
3. coloring
now on to coloring. this is pretty basic coloring and it probably won’t work if you follow my numbers exactly, as every single scene is different color + lighting wise. but this is just an example of the kind of thing you could do. basically, if you’re making vibrant gifs, you want to up the brightness + contrast + vibrance and make the colors already present pop. if you want anything more complicated (pale gifs, changing the colors to make, say, quentin’s shirt in these gifs red instead of blue), you’ll have to find other tutorials or experiment on your own. learning how to color & finding your style takes time! you can download psds if you want, but imo those kinda take the fun out of making gifs? that’s just me though.
after each step, i’ll show you what the gif looks like.
1. i usually start with a curves layer. i usually don’t mess with the color curve options, just this one:

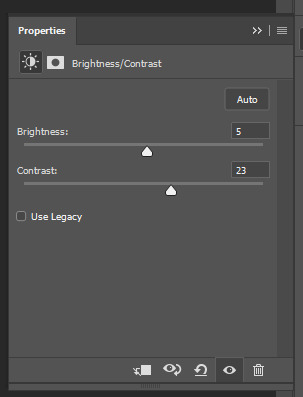
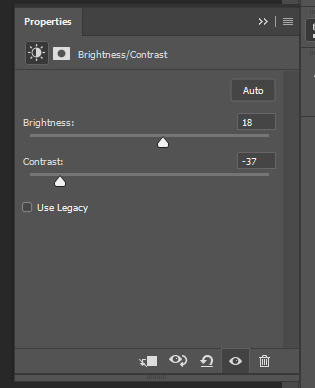
2. next, i do a brightness/contrast layer

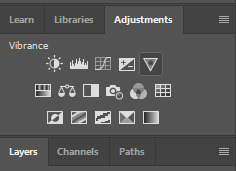
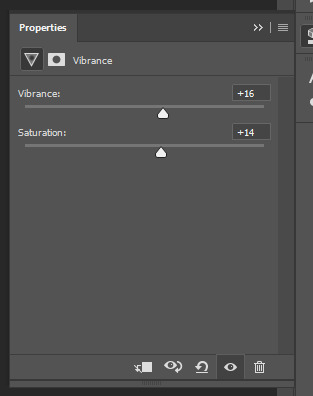
3. next, i do a vibrance layer. make sure not to make it TOO saturated or it’ll look bad.
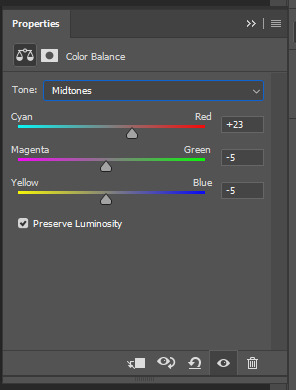
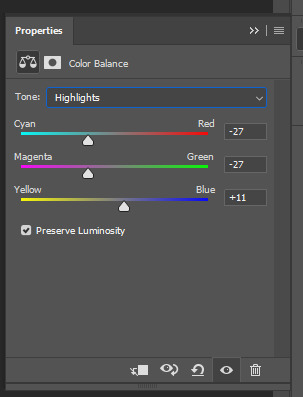
4. next i do a color balance layer. this is where it really starts differing depending on what color you want your gif to be.

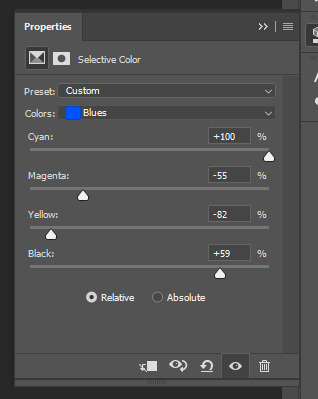
5. next we move to the selective color layers, which are arguably the most powerful. here you can make colors pop, change colors, etc. it’ll take lots of practice & messing around with, but here’s what i did with this gif. this one is making yellow + blue pop
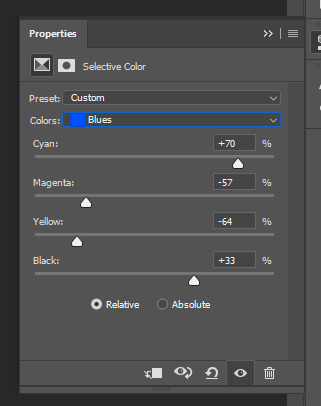
6. next, i did two more selective color layers editing the blue tab to make the blue pop even more


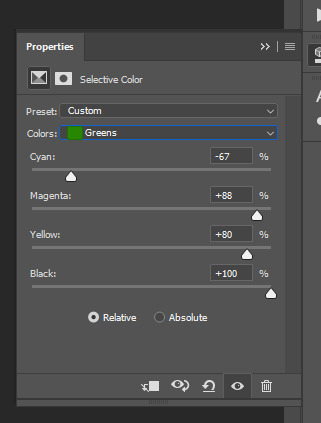
7. i still wasn’t quite happy with it, so i added another selective color layer to edit the blacks + neutrals + greens
8. for good measure, i added one more brightness/contrast layer

9. and the gif is done! however, you can play around with various adjustment layers until you’re happy. again, this is just an example of how to do basic coloring. it’s a skill like any other & takes practice. to keep consistent coloring in a gifset,
9b. you may want to make a psd of this coloring. to do so, you need to put all your adjustment layers in a folder, delete your frame layers, and click file > save as. save it as a .psd. then you can open it and drag it onto any other gifs you make, adjusting the coloring accordingly but still with the same vibes. you don’t have to do this, but it makes life easier. here’s how to use your saved psd, though obviously you’re using your own in this case and not a downloaded one.
4. saving your gif
1. on photoshop cc 2019, you go to file > export > save for web (legacy). for other versions, you can just go to file > save for web. use these settings. the gif size limit is 3mb per gif, so make sure your file size is under that. if it’s not, you’ll need to delete some frames or some adjustment layers.
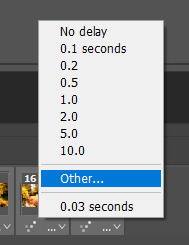
2. now, photoshop is a bit of a pain & this gif timing will not be right. so you need to open your newly saved gif. then you hit this button + select all frames
3. click this button & select “other”. tumblr gifs are typically .05-.08. my photoshop is glitchy and i have to set mine to .1-.15 or they’re WAY too fast. but usually, go with .05-.08 unless yours ends up glitching too.
4. save it like you did the first time and ta-da! you’ve made a gif!
#gif tutorial#photoshop tutorial#edit tutorial#coloring tutorial#yes im using the magicians its my hyperfixation and i get to choose the gifs
164 notes
·
View notes
Text
tutorial: how to make gifs (part 2)
Before proceeding, please check out the first part here. In this part, I’ll explain how to do gif colouring, how to add subtitles and how to save gifs.

PART A: GIF COLOURING
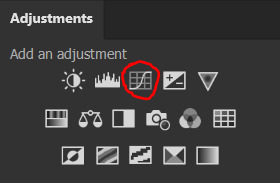
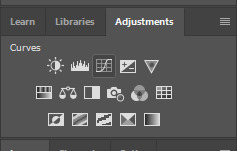
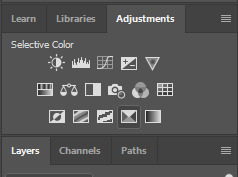
Gif colouring is done using the adjustment layers. If you haven’t enabled this option, you can do so by selecting Window > Adjustments. A panel of sixteen (16) adjustment layers will appear, as shown below:
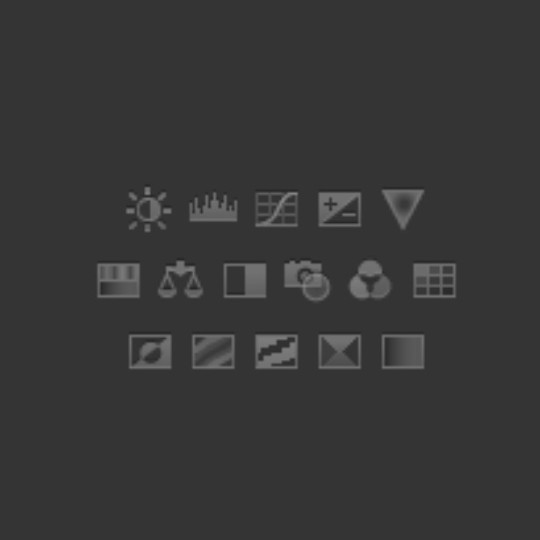
The adjustment layers, from left to right, top to bottom, are:

Now, there’s no hard and fast rules when it comes to colouring. My best advice is to experiment until you find your own colouring style. When I make gifs, the way I make gifs don’t change but the way I colour gifs will periodically change.
This is one of my earliest gifsets, made in 2015.
This is my latest gifset, made in 2019.
As you can see, I didn’t start off knowing how to colour gifs. Back then, I wasn’t concerned in making my gifs look nice, I wanted to make gifs because people don’t make the gifs that I want to see.
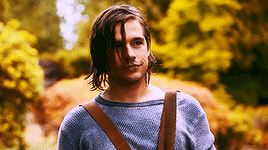
Despite my constant complaints of the reds, the blues and the yellows of the show, I don’t hate the colours themselves, I just hate the fact the colours don’t pop. Take a look at the scene below:

It looks fine after sharpening and blurring filters, but personally, the original colours look dull. 🤷♀
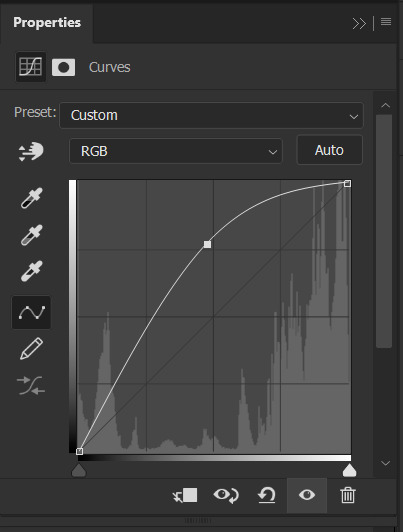
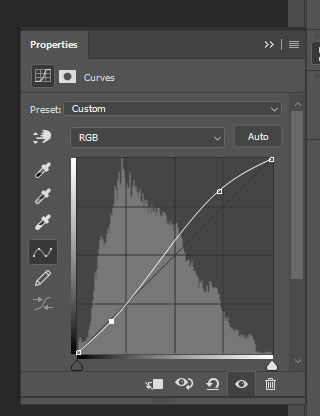
Step 1: Curves
I create two markers, then pull one downwards and one upwards, careful not to stray too far from the original line. If the scene is dark and you want to make it brighter, pull the marker that’s usually going downwards, upwards, but again, don’t stray too far from the original line.
Besides ‘Curves’, you can also use ‘Brightness/Contrast’ and ‘Levels’.
Step 2: Selective Color
The bulk of your colouring takes place here. There are nine (9) colours: Reds, Yellows, Greens, Cyans, Blues, Magentas, Whites, Neutrals and Blacks. For this scene, I adjusted seven colours, minus Neutrals and Blacks.
(I don’t recommend messing around with Neutrals and Blacks since they usually affect the entire scene instead of specific areas. If you are like me who want the black to be true black, you are better off adding another ‘Curves’ layer.)
I don’t have any specific method besides -- adjust the sliders until you see the colours that you want. In fact, if the scene is stubborn, you may use multiple adjustment layers. Below is how I remove the blues from Marinette’s hair:
Step 3: Gradient Map
I wish I know how to explain why I use Gradient Map besides it being part of my finishing touches. For this adjustment layer, it is set to Soft Light at 75% opacity. For the scene above, I used this gradient:
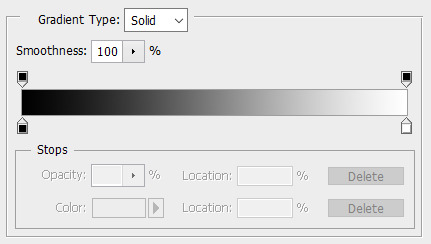
#000000 | #ffffff
My usual choice is this one:
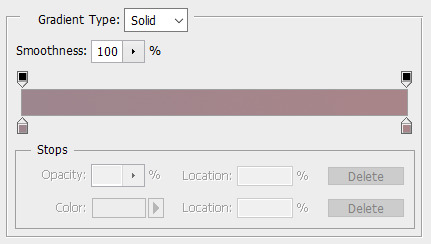
#9e868e | #a88589
My second usual choice is this one:

#383332 | #6f5b55
Do you have to make your own gradients? No. For my usual gradients, it’s actually from the gradient pack here. I encourage you to explore resources websites because they are helpful, besides, they are mostly free!
Q1: Do you need more adjustment layers?
For daytime scenes like the above, I usually maintain three adjustment layers. However, you may encounter scenes where one colour dominates the entire scene or the colours look out of place or the lighting is completely wack.
In order to fix the colours, I use either Hue/Saturation or Color Balance or Photo Filter, usually before, but may also be after, the three layers. It may or may not work successfully but at least it reduces your frustration at fixing the colours.
I will have mini tutorials covering how to colour these specific scenes later.
Q2: Do you have to use the same adjustment layers as mine?
Again, no.
As I said before, you need to experiment until you find your own colouring style. I may use 3 layers, you may use 6 layers, someone else may use 9 layers. In fact, I may use 6 layers for a specific colouring and then 9 layers for another.
It’s best to study the scenes and figure out what colours you want to bring out, what colours you want to eliminate, and what colour theme you want to present.
Q3: Can I use others’ colouring psd instead?
You can, but consider if it’s better if you learn how to colour from scratch, especially if the series in question has inconsistent colours, such as ML.
However, that doesn’t mean you aren’t allowed to use colouring psds. If you are making multiple gifs and they have the same theme (e.g. outdoor, daytime, blue skies), it’s easier to just use the same colouring for consistency.
Eventually, once you are used to colouring the series, you may find it easier and faster to colour manually because the results are more or less the same.
PART B: SUBTITLES
Subtitles are great for providing context, but it can be time consuming. I advise starting off with small scenes, then work your way up until you are comfortable with the entire scene.
Step 1: Choose your font
The most important aspect of your font choice is readability, even in small sizes. Common examples of fonts used for gif subtitles are Arial, Calibri and Myriad Pro. All are set to 'bold italic’.
Step 2: Add the text
Drag your cursor to the right to create a text box, then type out the text. For 268px gifs, the font size is 14 pt. For 540px gifs, the font size is 18 pt. The font colour by default is black, so change it to white.
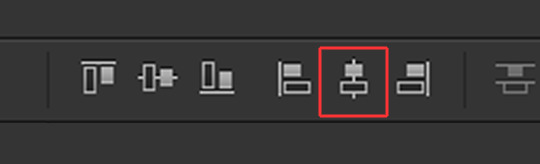
As you can see, the text is unclear. Before we solve that problem, we need to make the text box centered. Select the ‘Move Tool’ and choose the icon below:
The text box will be centered, but the text is too far from the bottom. Using your keyboard, press the down arrow key until you reach the bottom, but leave some space between the text and the bottom.
Or, you can position the text box close to the bottom then make it centered. Either way, it should look like the above.
Step 3: Blending options
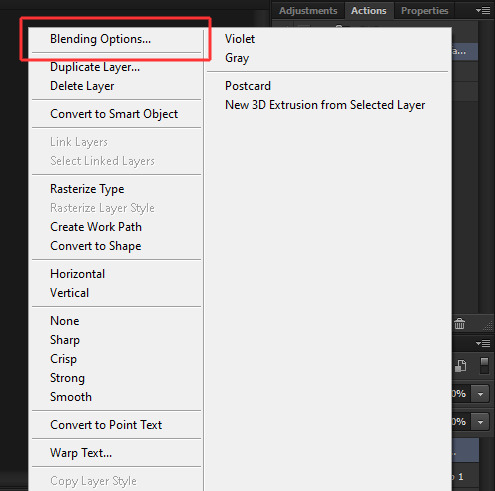
Right-click on your text layer and select ‘Blending Options’.
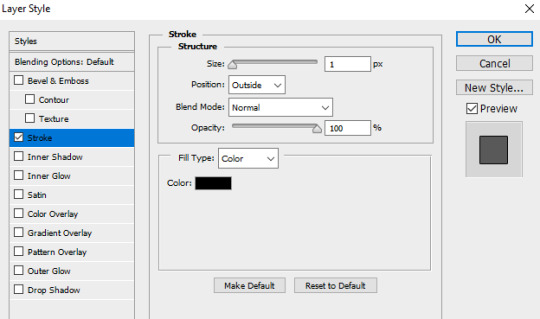
Select ‘Stroke’ and copy the settings.
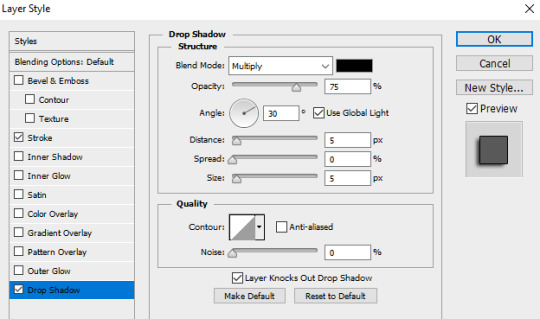
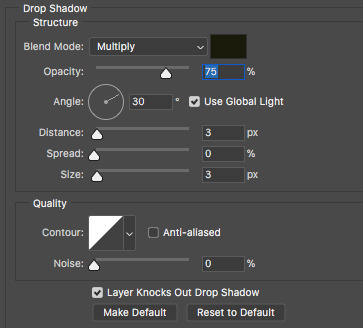
Select ‘Drop Shadow’ and copy the settings.
Press OK.
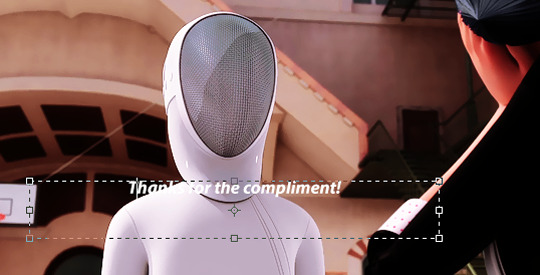
Your text should look like the above. Your text layers should look like below:

Step 4: Timeline
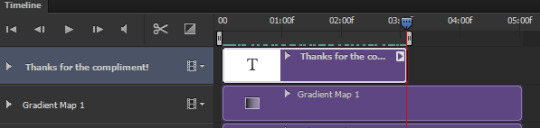
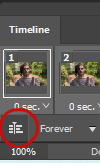
If you have multiple scenes in the gif but only one scene has subtitles, you need to adjust the timing so the subtitles don’t appear in the other scene. Use the slider to find the scene, then drag the text layer so it aligns with the scene.
Let’s say the scene is short and you want to find the exact frame but the timeline is short, use the icons below to shrink or expand the timeline:
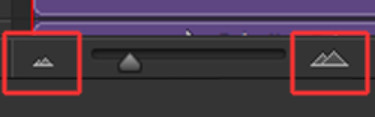
The left is to make the timeline shorter, the right is to make the timeline longer.
PART C: SAVING GIFS
You’re almost done!
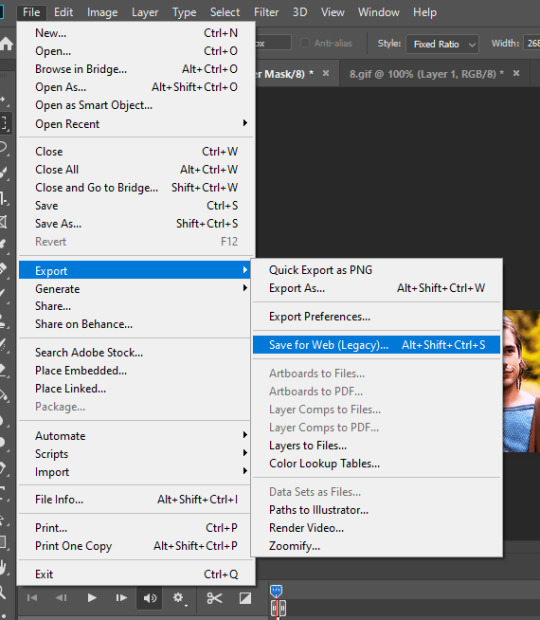
Use the markers to determine the scene you want to save, then select File > Save for Web (or Alt+Shift+Ctrl+S) and these are my gif save settings:
Voila, this is how a gif with subtitles look like!
If you have any questions, don’t hesitate to send me an ask or a DM. Thank you so much for checking out the tutorial and I hope it has been useful. I look forward to see gifs from you!
171 notes
·
View notes
Text
i was tagged by @mollyweasly to answer the following 73 questions! thank you for tagging me steph ♥
on a scale of 1-10, how excited are you about life right now? i'm actually pretty content and the only thing that i'm rdreading right now is my upcoming finals so maybe 6!
describe yourself in a hashtag? #alwaystired
if you could do a love scene with anyone, who would it be? no one comes to mind but steph's answer was chris evans and i'd say the same tbh 👀
if your life was a musical, what would the marquee say? uh maybe "dumb bitch" or "chaotic mess" LMAO idk honestly my life isn't that interesting most of the time
what’s one thing people don’t know about you? that i'm lowkey depressed. most of my old friends know this but they don't rlly know how bad it makes me feel sometimes & i don't think i'll ever tell my college friends abt this except for one person!
what’s your wake up ritual? lay in bed for another 5-15 mins, check the time, and brush my teeth. next i'd either shower, workout, or attend online class
what’s your go to bed ritual? just on my phone looking at useless things and answering my friends' messages. i'll get tired soon so i'll just daydream and sleep. lately i've been listening to music to help me sleep!
what’s your favorite time of day? late night and early morning
your go to for having a good laugh? i love watching lip sync battles. my favorites are by emma stone, tom holland, anne hathaway & channing tatum!
dream country to visit? the UK! my cousin talks abt it all the time and now she's taking her postgrad degree there which makes me incredibly jealous 😢 but honestly i'm dying to travel europe as a whole!
what’s the biggest surprise you’ve ever had? probably when my high school friends bought me the doc martens shoes that i LOVE for my 17th birthday! i love them and miss them even tho many are not in touch with me anymore
heels or flats/sneakers? flats/sneakers definitely! i've never tried heels tbh i can only endure wedges and they alr hurt SO much
vintage or new? both
who do you want to write your obituary? probably my best friend!
style icon? taylor swift during the red era, noora sætre, orion carloto, ashley aka best.dressed!
what are three things you cannot live without? books, internet, family
what’s one ingredient you put in everything? salt
what 3 people living or dead would you want to make dinner for? taylor swift, chris evans, audrey hepburn
what’s your biggest fear in life? the unknown, anything horror & reptiles esp lizards (i can't stand reptiles AT ALL i'd literally cry and die if i have to touch one or sleep in the same room with one)
window or aisle seat? window
what’s your current tv obsession? haven't been watching any tv lately but i've been watching mukbangs on youtube a lot
favorite app? line (a messaging app mostly used by indonesians. i rlly like the stickers and themes i own lmao)
secret talent? i can play guitar just a lil bit
most adventurous thing you’ve ever done in your life? either drinking beers with my friends on a school field trip or not telling my parents that i went to the city alone during college just to hangout by myself
how would you define yourself in three words? introverted, chaotic, anxious
favorite piece of clothing you own? an adidas jacket that was on a 50% sale for international women's day!!!
a must have clothing item that everyone should have? black pants
a superpower you would want? invisibility and mind control!!!
what’s inspiring you in life right now? since i was a little kid, i've always been inspired by my cousin. she's my role model!
best piece of advice you’ve received? to literally BELIEVE in yourself
best advice you’d give your teenage self? don't be so self-aware bc everyone's busy with themselves, make more friends, cherish your time in school more
a book everyone should read? harry potter series, the raven cycle
what would you like to be remembered for? for being a good, positive person
how do you define beauty? beauty is whatever that evokes a positive feeling out of oneself i guess!
what do you love most about your body? my eyes
best way to take a rest/decompress? skincare, listen to soothing music, drink a warm beverage, watch smth that's easy to watch, and just sleep!
favorite place to view art? galleries, but i've only been to one sadly
if your life was a song, what would the title be? maybe "paradox" or "misunderstood"
if you could master one instrument, what would it be? piano! but it's expensive and not portable so if i'm being realistic, it'd be guitar
if you had a tattoo, where would it be? in the back of my neck! also maybe on any of my fingers or below my ribcage
dolphins or koalas? koalas
what’s your spirit animal? deer!
best gift you’ve ever received? doc martens shoes given by my friends!
best gift you’ve given? i think i wrote my friend letters to open when she's in different moods once
what’s your favorite board game? monopoly
what’s your favorite color? pink, purple, yellow, monochrome
least favorite color? i just dislike bright obnoxious colors
diamond or pearls? diamonds
drugstore makeup or designer? both, but i mostly can't afford designer anyway so..
blow-dry or air-dry? both
pilates or yoga? i've never tried any actually
coffee or tea? both, but i'm leaning towards tea
what’s the weirdest word in the english language? can't think of any right now..
dark chocolate or milk chocolate? milk chocolate!!!
stairs or elevators? elevators
summer or winter? winter
you are stuck on an island, you can pick one food to eat forever without getting tired of it, what would you eat? burgers!!
a dessert you don’t like? basically i won't like anything with fruits
a skill you’re working on mastering? photoshop i guess? i'm planning to learn coding too now that i have the time!!
best thing to happen to you today? probably finishing my gifset! but honestly, i was supposed to be studying lmao
worst thing to happen to you today? i didn't study lmao
best compliment you’ve ever received? i don't think it's anything that memorable so i can't really think of one
favorite smell? jasmine
hugs or kisses? both
if you made a documentary, would it be about? space, mythology
last piece of content you consumed that made you cry? i get a little teary eyed if i come across a touching content on instagram/twitter tbh lmao. but i'd say the last movie that made me cry so bad was her (2013)
lipstick or lipgloss? lipstick
sweet or savory? savory
girl crush? emma watson
how do you know your in love? don't think i've ever been in love, i've only experienced like a very long crush so...
a song you can listen to on repeat? there are a lot... but for now, woman by mumford & sons and anything by taylor swift
if you could switch lives with someone for a day, who would it be? taylor swift!!!
what are you most excited for about this time in your life? i've just been enjoying editing for tumblr a lot, i haven't really posted consistent content in my 10 years of being here so that's been fun. i also want to learn coding and become an overall healthier person by working out regularly & eating mindfully! honestly i'm trying to build my confidence and become healthier, both mentally and physically
tagging: @dianaprincie @cllianmurphy @cinderllas @edgarallan @rosamunqpike @gamoora @nataliamaximoff (sorry if you've done this before, feel free to ignore!)
7 notes
·
View notes
Photo


how i make my tropes gifs - a tutorial
here’s a quick tutorial on how i make my tropes gifsets! they’re pretty simple to do once you know the basics of gif-making (i have a basics tutorial here just in case you’d like to start there first), and it’s my personal favorite gif series to make. this tutorial is mostly about how to combine gifs onto one canvas, if that’s what you’d like to know how to do!
program: adobe photoshop (i have cc 2018)
note: i’m on a Mac, specifically macOS High Sierra, so it may look/function slightly different if you’re on an older version of macOS or on a PC
requested by: @the-singing-dove
instructions with screenshots under the cut! feel free to send me an ask if anything is unclear :)
to prepare (aka the non-tutorial section of this tutorial)
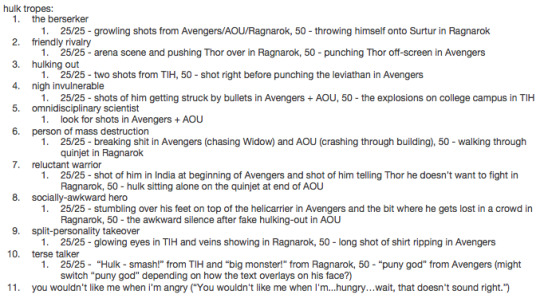
obviously, the first thing i do when making my tropes gifsets is open tvtropes. it helps if whatever it is you’re giffing has its own tropes page, because they basically do the work for you! i make a list of tropes that i want to use in alphabetical order, and then do a breakdown of what scenes go with what trope. this helps cut down on time spent in photoshop trying to find a good bit. for example, here’s me planning out my set for the hulk. in this tutorial, i’ll be making #8.
for each “set”, i pick two scenes for the colour gif which is split into 25 frames each (for a gif of 50 frames total), and a third scene for the black and white gif that is 50 frames total and has the trope text on top of it. i tend to adjust the cropping of the latter in a way so the text hopefully doesn’t block too much of what’s going on. since tumblr has a ten photo per photoset limit, i combine these two gifs so that i can fit up to ten tropes per character (as i will explain later!).
quick overview of my settings
if you haven’t seen my basic gif tutorial, all you need to know is that i limit my 268px gifs to 50 frames each and that i use a frame delay of 0.05. below are my respective settings for smart sharpening and exporting!
step 1 - making the black and white gif with text
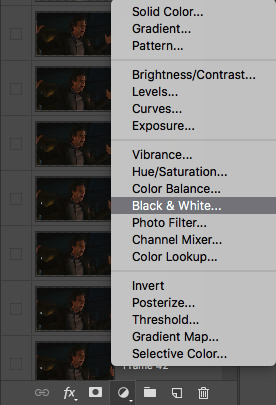
the black and white gif is pretty simple - make a 268px-wide gif as you normally would, and apply and adjust a black-and-white filter as needed by going to the fill and adjustment layer menu.
then, create your text layer. make sure it’s positioned where you want by selecting the layer and using the adjustment options (circled).

use the “match layers across frames” option in the timeline menu to keep it consistent.


these are the font settings i use for the tropes gifs specifically.
to make the text pop a little more, either double-click the text layer or right-click and go to "blending options”.

check off “stroke” and “drop shadow”.
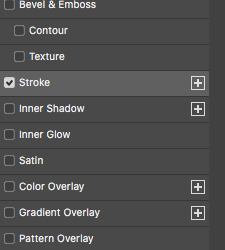
click on them to open up their individual settings. these are the settings that i use for both. note that the stroke colour i use is dark grey (4e4e50) instead of black, since i personally feel it blends better on top of a black and white gif.

sharpen and export the gif as you would, and you’re finished with the first gif!
step 2 - making the colour gif
as mentioned previously, i want the colour gif to have two scenes of 25 frames each. often, these come from completely different files (different episodes, movies, etc.). go through the normal gif-making process as you would for both files - change the frame delay, size (268px wide), and adjust frames as needed. remember to keep the image size the same on both, or else you end up with gaps and/or scaling issues.
once both your scenes are ready to go, figure out which one you want to play “first”, as in, what will be seen during the first half of the black and white gif. click on the very last/top layer of this file (it will save you the headache of dragging your frames around later).
select all the layers of the other scene, and drag it into your first file.
now all your frames should be stacked together in the layers panel. if necessary, delete frames from the timeline and “make frames from layers” again.
the rest of it is pretty simple - apply your psd, sharpen and export as you usually would. however, if your two scenes are vastly different in coloring, lighting, etc., you may need to alter your psd between the two scenes. here’s how i do it:
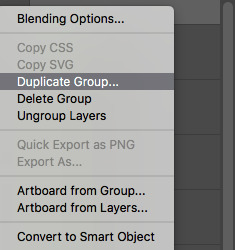
start by putting it your psd layers in a folder they aren’t already. then, you can either hold and drag the folder to duplicate, or right-click and select “duplicate group”.

in the timeline panel, select all the frames of the first “scene”. click the eye next to the duplicate psd to deselect it. repeat this for the other “scene”, but with the original psd instead. this way, your first “scene” only has the original psd appplied, and the second “scene” has only the duplicate psd applied. edit these individually as you wish, and they’ll be completely separate from each other.

sharpen and export once you’re done. almost there!
step 3 - combining the two gifs
now, you should have two gifs. one black and white gif with 50 frames and text, and one colour gif with two scenes of 25 frames for a total of 50 frames. to get around tumblr’s ten photo per photoset limit, it’s now time to combine them onto one canvas. first, open them both back up in photoshop, now as gifs instead of psds.
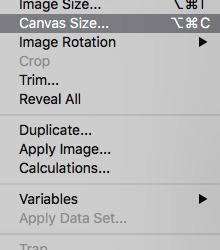
next, choose one of the files and go to image -> canvas size.
decide whether you want it on the left or the right. for the tropes series, i number mine off in alphabetical order of the trope names from 1 to 10. anything odd-numbered puts the text gif on the left, and anything even-numbered puts it on the right, since we tend to read from left to right. again, completely personal preference. then, change the width to 540px, and click the arrow that directs which side your gif will go (circled).
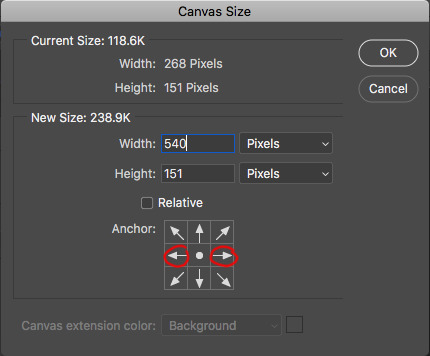
it should look something like this!
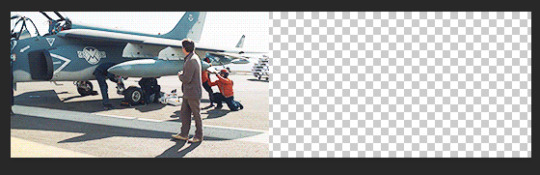
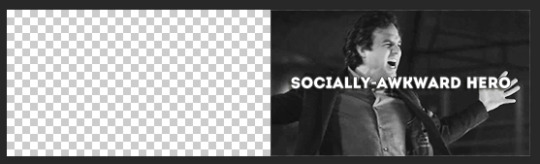
repeat for the other gif, placing it on the other side.
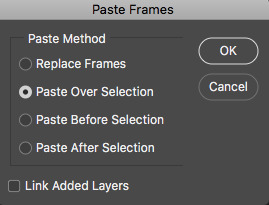
for one of the gifs, select all frames, then “copy frames”.

go to the other gif. select all frames, and then click “paste frames...”.

at the prompt window, select “paste over selection”.
you should now have two gifs running together at the same time, side by side, with a gutter in between to emulate the spacing that tumblr has for photosets. you may need to readjust the frame delay.
do NOT sharpen it again, just go straight to export and you should have one gif that looks like two!
so that’s it! if you have any questions about anything that was unclear or maybe i skipped over it too fast, feel free to send me an ask :) good luck!
#photoshop tutorial#gif tutorial#edit tutorial#photoshop#gif#mytutorials#please like and reblog if this was helpful in any way! i'd love to know if this was of any assistance to anyone haha
17 notes
·
View notes
Text
GIF Manipping Tutorial
I couldn’t really think of anything to do when I passed a follower milestone, so, belatedly--and because @dreamofspring suggest-requested it--I’m going to write up a tutorial on gif manipping/merging/whatever you want to call it/the process I use to make gifs like the ones below.


Some notes before we begin:
I use Photoshop CS 6 on a Macbook Pro.
I use @patchface‘s gif making process by and large, with some additional tweaking. I’m pretty attached to using smart objects in the gif making process so this tutorial relies on that, rather than keeping frames in a timeline form. I won’t be explaining how to make gifs. @patchface‘s tutorial is pretty solid, and there are plenty of others out there if you want to dip your feet if you search around Tumblr.
I’m also going to be using Layer Masks, but not explaining how they work so much as why I use them. Here’s a tutorial that explains them, and I’ll link it again below when relevant.
Thanks to the members of the creatorsresourcenetwork for looking this over before I posted!
I. General Process
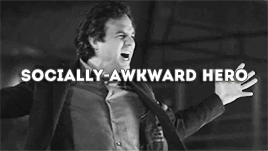
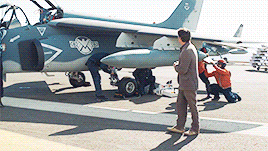
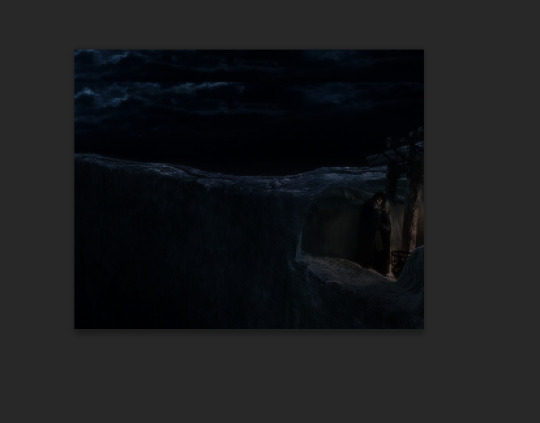
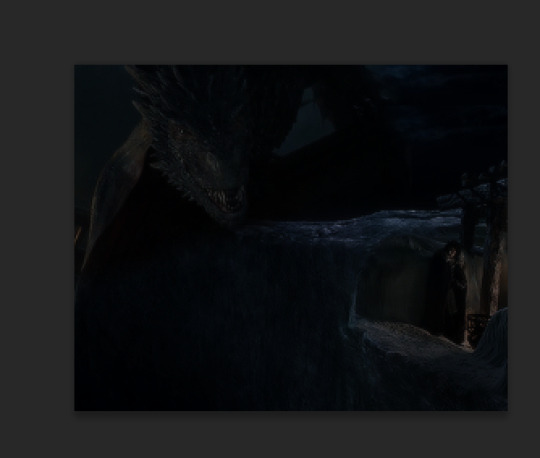
Since the reason for this is because Sarah asked, I’m going to show my process for making the last of the four gifs above--Jon & Drogon on the Wall.
1) Select your clips. This is challenging and things don’t always fit easily. The number of times I’ve had an idea, set out to make it work and then given up is very very high.
If you want, you can work with individual caps first before making your gifs. I don’t usually do that but if I’m feeling particularly frustrated I do.
Here is what I came up with for Jon (in S1) & Drogon (in Meereen) respectively

2) Crop, Make & Sharpen your gifs in two separate photoshop files.
3) Here’s where the fun begins. Depending on how you make your gifs you should put them in a folder (if you do a copy & gaussian blur technique).
Pick the gif of the two gifs you want to be your “home base” gif and drag the other one into that base gif’s canvas. Photoshop lets you have two canvases side-by-side (this is something I find useful generally for gifsets since you can see colors side-by-side before saving and exporting for tumblr). You click on the file name section

and drag it down or to the side. When you hit the edge of the photoshop window--before your tools begin or your timeline--it should highlight. Release the file and you should now see both files side by side and you can easily click and drag files from the layer section of one canvas
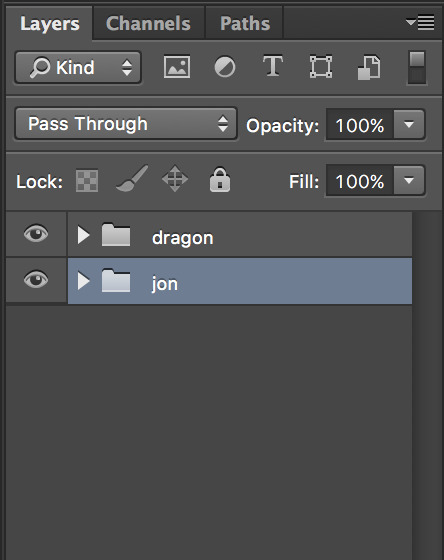
on top of the other canvas, which will add it to the second canvas’ layer section.
Doing so should maintain the size of the gif, based on how you cropped it, but the cropping won’t be maintained. But that’s ok-- you can click-drag the gif around on the canvas until you get it to line up the way you want it to:
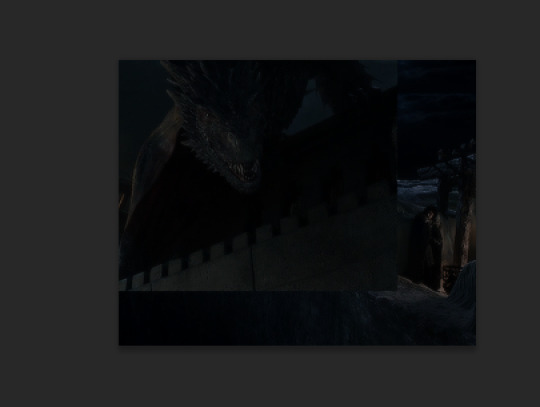
I dragged Jon a little bit to make room for Drogon on top of the wall, which mean there was a gap in the top of the gif:
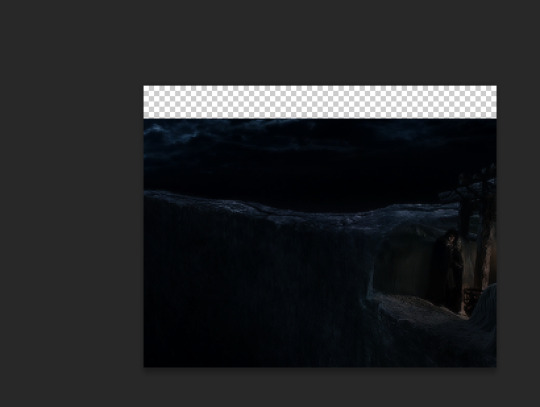
I duplicated the Jon gif and moved the bottom of the two gifs up to have some sky consistency. It made a texture in the upper-right corner in the final gif that, six months later, I’m annoyed at, but that’s what I did and you live and you learn.
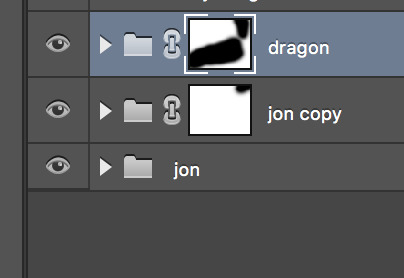
4) Layer Mask time! As I said above, I won’t necessarily be explaining how to use layer masks, but you can read about that here. Layer masks aren’t just great for this way of manipulating gifs but also wonderful for coloring since it lets you “hide” part of your layer. In coloring that means that you can really make some colors vibrant, or dark, or desaturated, or whatever you’re going for. For this, it means you can work on blending the two gifs together.
I applied some layer masks to both gifs/gif folders to make it a little smoother. This was an initial stage--a way to get it rolling before coloring so I could see vaguely what I was aiming for. I definitely went back in after I colored and did some cleaning up:
5) Coloring time! This isn’t a coloring tutorial so I won’t go into the details of how I colored. Here’s a solid list of the psds I use most frequently (though some have been taken down unfortunately!) As I mentioned above, I definitely went back in and played more with the layer masks after I’d done my coloring to make sure that things looked as good as I could make them.
I ended up with this gif from there:

II. Some Tips
Some general tips I’ve found that are helpful for gif manipping:
1) Layer Masks--this is a personal taste thing: I tend to use a very low hardness % when I’m using my brush on layer masks. This tends to be because I want to allow for movement since it’s rare that gifs are perfectly static--it lets things fade in and out imperfectly rather than having something choppy and jarring. It’s really hard to make something line up perfectly and I tend not to aim for perfection so much as my own level of “good enough,” which tends to get more precise each time I do this. Coloring can really help ease the transition between gifs. The seams between gifs also look the smoothest in dark sections (in the above, the darkness of the wall and the night helps hide a good amount of the seam) but that’s not always possible.
2) It helps a lot to pic footage where characters don’t move a lot. It makes it easier to paint your layer mask without accidentally cutting out part of a face or something. If you do end up picking something with a lot of movement, you may want to use a frame-by-frame technique rather than this one which relies heavily on smart objects.
There are some fantastic manips out there that I think are done in frame by frame animation form. For this you’d have a layer mask on each individual frame hiding the parts of the gif you don’t want to include in the final manipulation. I choose to manip the smart object rather than the frame by frame because I think it looks smoother. That’s a personal preference thing--it’s also a...laziness thing. It’s definitely easier to manip one smart object than to go through each frame and try and make it look smooth. When I was first trying to manip gifs (which would have been two years ago at this point lorddddd) I tried the timeline thing and this was what I was able to pull off:
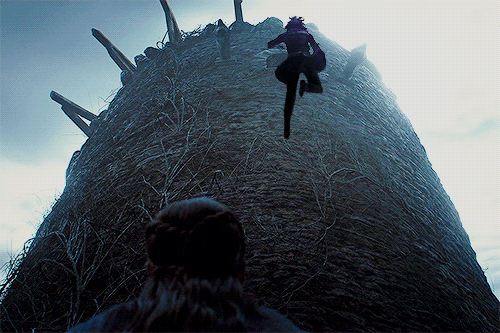
For a gif like this, I think the only way to have done it was frame by frame (since Bran’s falling from the tower and the tower is shifting underneath him and the perspective of the video is shifting) but it was very painstaking to the point of not being fun for me and I want to enjoy myself when photoshopping or else I wouldn’t do it.
3) As with any gifset for which you want the color scheme to look cohesive, it helps tremendously to work with gifs whose scenes have the same general coloring. That doesn’t mean you have to, obviously. I’ve done a lot of manipping of Jon & Daenerys together. Jon tends to be filmed in cooler scenes (since he’s in the North) while Dany’s tend to be warmer in Essos.
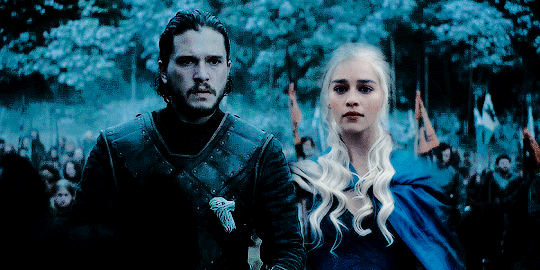
Dany is lighter than Jon in this gif, and there is more of a yellow hue to her, even beneath the cooling filters and color adjustments I put there. And while I still think it looks good (obviously, or else I wouldn’t have posted it), I think it’s less of a smooth manip than this one:

where the coloring of Dany’s scene is originally much cooler and wintery. Having the same baseline color saves a lot of energy in terms of coloring.
4) You don’t have to crop the gifs to the same size. This took me a while to realize. I was worried about preserving image quality, but I realized that frequently it’s manageable and so gifs like this
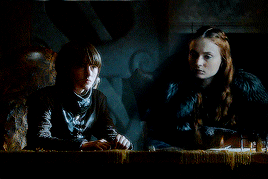
where Sansa and Bran seem to both be sitting at the same table even though in their original clips they’re taking up different amounts of space on the screen are possible. If I’m trying to get something right, I’ll sometimes save the actual gif making process until I’ve worked two caps together to the right proportions. Or I’ll go back and undo a resize in the revision history.
5) If you really want to get courageous with your coloring, you can change the blend mode on one of your gifs. I....don’t do this a lot, but one of my all time favorite gifs that I’ve ever made entailed this so I can’t say don’t ever do it ever:

I was an idiot and didn’t save this psd so I don’t remember how I did it :sigh: oh well, but it’s why the whisps of her hair are whispy.
274 notes
·
View notes
Last Seen Blogs