
Last Seen Blogs

isnookii
Untitled

cuephrase
hurt/no comfort? sign me tf up

dad-na
dana

emilykinneydaily
emily kinney daily

ecolush
Ecolush
Text
https://www.youtube.com/watch?v=YRzVVDJVtXk
Hi, Product Design Sketcher! Ready to develop your sketching skills and imagination?
Today, I share with you a super easy sketching technique to draw your own products even if you are a beginner!For that, this technique will use the Cylinder as a reference. We will modify it and create variations to create mainly organic forms and designs.
Draw random forms with base cylinder
How to Draw 100 Forms and Turn Them into Products (Cylinder Base)Draw a Basic CylinderPunch your Cylinder!Stretch your CylinderThink WireframesFrom Abstract Volumes to Tangible ProductsColor Block the ElementsDraw Clean ShadowsCraft your Cylindrical form with a hollowForce applied on cylindrical formsSlanted Ellipses and Various ViewpointsCreation from Abstract ShapesStart Drawing with 3 ellipsesPractice the "C - S - I Curves"Draw Expressive Cute CharactersDraw Heads from any anglesDraw BiggerFill your canvasDo not overthink, draw with your feelingsConclusionPractical Applications and RecommendationsAdditional Recommendations:
Draw and Take NotesI invite you to take a pen and a piece of paperto take some notes and sketch with me now.Remember, if you want to acquire your new sketching skills, watching the video is not enough.You have to practice it, and at least take some doodle notes that you can refer to anytime.
How to Draw 100 Forms and Turn Them into Products (Cylinder Base)
Draw a Basic Cylinder
How to draw a cylinder easily (Checking the viewpoint)
The first step in creating our new 3D forms and products involves drawing a cylinder.Draw 2 ellipses along the symmetry axis, then connect them with straight lines.
The ellipse at the top of the cylinder appears visually smaller than the bottom one due to perspective – an essential factor that influences how we perceive objects' size and shape from different angles.
Punch your Cylinder!
Drawing a cylinder squeezed on the side
You can modify the shape, and proportions of the cylinder by applying pressure - much like molding clay or shaping pottery - which changes its form.
Try to visualize your drawing as if it were a real thing that "you can touch, manipulate or mold".
For instance, imagine you are punching the Cylinder like a Boxing bag! And it gets squished from all around 360 degrees.
Stretch your Cylinder
You can also imagine your cylinder getting stretched, pulled out on the side, and become an elongated form.
Draw a stretched cylinder with a contour line
Experimenting is key here!
Try out various heights for your cylinders or apply differing levels of force to see how these factors influence the final product's shape and appearance.
Use contour lines marking where expansion has been most significant.
Think Wireframes
Flat surface with magnetic force and wireframe
To further aid visualization when altering volumes, consider wireframes (grid structures) on your cylinder surfaces as guides.
Think about how magnets distort metallic tiles; that’s essentially what you’re doing here but with lines instead!
Draw a 3d form with a wireframe
Use them whenever you need. They may help you apprehend the volume better to draw a shadow on its surface for example.
I actually seldom use them. But I recommend you practice drawing the wireframes until your brain can visualize them (without drawing them).
From Abstract Volumes to Tangible Products
Make abstract volumes tangible in minutes by adding details like.You can add buttons, screen scratches, logos, plugs, pictograms, rubber grips, foam, serial numbers, grooves, battery slots...
There are no rules here; just get creative!
Draw realistic products adding details and texture
These detail additions not only make your work more interesting but also serve as great practice exercises for honing detail-oriented skills.
Do not hesitate to get inspiration from objects around you or use reference pictures of various products and details.
Color Block the Elements
To represent an additional piece of your product, you can "color block" it with dark hatching.It will create a nice contrast that brings clarity to your sketch.
Draw color blocking fast with hatching.
Drawing without "color blocking"
Draw abstract form with "color blocking"
Draw Clean Shadows
Draw shadows on your abstract 3D form
When rendering light sources onto these 3D forms (top right works best), remember to include shadows on the product itself, and on the ground too.
This enhances their three-dimensional feel making them appear more lifelike!
Craft your Cylindrical form with a hollow
Cylindrical 3D form with hollow
Make sure to draw the inner surface contour lines following the outer contour lines as a reference.
Add oblique hatching to emphasize the 2 opposite surfaces.
Force applied on cylindrical forms
The red arrows show the force applied to your volume. Try to spot them and give a feeling of animation.
Force applied on cylindrical forms
Slanted Ellipses and Various Viewpoints
Practice drawing various angles of ellipses and viewpoints.
Try drawing wider ellipses as if you would see your volume from above. Remember to draw the ground shadow with hatchings.
SKETCHING TIP: Imagine your forms as "organic matters that are fueled by energy"!
Experiment with drawing various viewpoints
Creation from Abstract Shapes
This creative method reminds the "Happy-Accident technique" where you start from a random and abstract shape to provoke new ideas for products.
STEP 1: Draw an abstract form
Step 2: Imagine a tangible product
Start with abstract shapes transforming them into recognizable forms like a coffee machine – it promotes creativity and challenges your imagination!
Your imagination is the only limit. Come up with unexpected ideas or import details you saw in real products or even sci-fi movies!
Note: I added the steam of the hot coffee to bring life to the drawing. It takes a few seconds to make, and it suddenly becomes a lot more interesting.That way, you do not only draw a coffee machine, but a little story, a moment of life.
Start Drawing with 3 ellipses
STEP 1: Draw 3 slanted ellipses
STEP 2: Add curves linking the 3 ellipses
Draw 3 random ellipses with slanted positions.Connect the 3 ellipses with dynamic lines.You are now able to draw hundreds of combinations and variations of forms!
Practice the "C - S - I Curves"
Draw C S curves and Straight Lines
Basic Drawing Techniques: Practice drawing quickly and roughly to tap into intuition and internalize drawing mechanics. Master curves and straight lines denoted as C, S, and I.
With these 3 basic movements, you will cover 90% of your sketching needs. When you face complex forms, simplify them by splitting them into simple curves.
Remember:
the S-curve is like the shape of a "SNAKE"
the C-curve is like the handle of a "Cup"
Draw Expressive Cute Characters
Emotion in Drawing: Show how your drawings feel - for example, by making them smile or frown! Think of how your abstract form would move and look if it had feelings, and draw the corresponding facial expression.
Bring emotion and expression to your abstract volumes
This drawing exercise helps you to use forms more effectively to convey emotions. Forms have a subconscious impact on the viewer.
Draw Heads from any angles
Start drawing some spheres and ellipses. Connect them with dynamic curves. Try to add some tension.
STEP 1: Connect ellipse and sphere drawing
You do not have to draw advanced or complicated heads.You can practice by adding only the eyes and mouth with a few lines only.
STEP 2: Draw heads with the sphere as reference
Draw Bigger
Larger Forms: Do not draw by turning your wrist.Practice drawing larger forms for more dynamic movements; engage your whole arm not just wrist fostering fluidity in motion!
Draw big
Fill your canvas
Filling Space: Challenge yourself creatively by filling any empty space on canvas using this approach can lead to unexpected beautiful results!
Draw abstract forms and turn them into product design
Do not overthink, draw with your feelings
Instead of overthinking every strokelet feelings guide you in creating spontaneous diverse sketchesthat reflect personal style taste better than anything preplanned ever could!
Sketching a Ketchup Squeezable bottle
In the beginning, you may feel pretty dry and uninspired. That's ok.
You need to learn to let it go, to give yourself a chance to fail.I know at first, it hurts to see our mistakes on paper.
It may paralyze and sometimes lead to give up.
Remember, design sketching is about ITERATION. Did you make a mistake? Improve your sketch, and redraw it if necessary.
Learn from it, so you can continue to climb the stairs step-by-step.
Conclusion
Drawing is an art that comes alive when we experiment freely without fear of getting it wrong.After all, mistakes are part learning process, right?
So whether you're a seasoned artist or beginner designer don't shy away from trying out new things.With this sketching method, you can come up with hundreds of new forms to help you create new product designs.
Never stop exploring!
Practical Applications and Recommendations
ACTIONABLE STEPS
Start drawing a basic cylinder with ellipses along the symmetry axis.
Practice basic drawing techniques, focusing on creating quick and rough sketches to tap into your intuition.
Master the three basic movements:C curves, S curves, and straight I lines. Use these simple movements to create complex shapes.
Experiment with volume deformation using wireframesor grid structures on cylinder surfaces as visual guides.
Practice transforming abstract volumes into tangible forms by adding details like stitches, logos, shadows or perforations for a more realistic feel.
Understand how forces interplay in drawing such as pushing and pulling – use this knowledge to create dynamic sketches.
Regularly practice rendering light sources and shadowing techniques to enhance the 3D effect of your drawings.
Experiment with different cylinders: heights, force levels, and expansion ratios when modifying proportions of your drawings - mark the widest point of expansion for reference.
Try filling any empty space on the canvas creatively during your practice sessions to challenge yourself further.
Use "overlaying shapes technique" often while sketching; start with a simple shape then refine it by adding small specific details.
Use drawing as a brainstorming tool – let it translate into various imaginative designs that you can explore further.
Practice giving individual expressions to characters in order to give them distinct personalities using shading and shaping techniques.
Finally, make sure you enjoy the process - creativity is key!
THANK YOU Draw organic forms with Cylinder base
Additional Recommendations:
Sign up for the free Design Starter Kit being offered here, which provides resources on your first steps at sketching & perspective
Always remember that skill in drawing comes from repetition, experimentation & personal exploration so keep practicing regularly!
1 note
·
View note
Text
https://www.youtube.com/watch?v=uJf93ZSSxuk
4 Steps to Master Drawing Skills: A Beginner’s Guide to Learn How to Learn
"Learn How to Learn" Drawing with no Experience
That's great! You decided to start learning how to draw. But you wonder how to draw anything you ever wanted?
Naturally, you copy designers or artists you like, but it is not easy to make good drawings as a beginner.
An unfair amount of your drawings may end up in the paper bin. You wish you could progress better, but you just do not know how.And that's ok.
To succeed, I would like you to make a RESET of your mind, So we can start with a solid base by "Learning how to learn drawing" following my 4-step method.
"Bad learning habit" as a kidReset your Mindset (to better learn)The "DRAW IT 4 TIMES" TECHNIQUEAdopt the resilience of a baby!Avoid Copying "What You See": Draw with StrategyThe "Draw it 4 Times method"1) Understanding through analysis:2) Assimilate your drawing strategy3) Mastering Sketching4) Creating your unique style"Draw it 4 Time" drawing demoBONUS Exercise: Draw with Loose linesSUM-UP: 17 ACTIONABLE STEPS
"Bad learning habit" as a kid
Bored student learning his lesson doodling on his notebook
When you were a pupil,You had to study various subjects like:
- History, Geography, Math, Grammar, and so on at school.
Most of the time, you had to memorize the lessons and pass the tests.
However... how did you proceed to learn?
Did you also like me, learn by repeating your lessons over and over? And still find this technique inefficient?
Did your teachers ever teach you how to better memorize or acquire efficiently the knowledge?
Even though you may have good marks, how much do you remember of all the knowledge you studied today?
Uninspired at school, I often end up doodling in my notebooks though.
And you?Did you also doodle in class?
Reset your Mindset (to better learn)
I believe the way we learn at our academic school does not work. This is why I created my own proven methods to "learn drawing with efficiency" using a different method.
I developed my own learning method of sketching during my Design School and Professional life, which anyone can use from the start.
With today's video about "Learn how to learn drawing with no experience", I want to help beginner designers learn and improve their skills in a smart and fun way.
I want to teach you techniques you can acquire and remember and use for a lifetime to draw anything you wish.
If you think you have always been bad at drawing, get ready to reset your mindset.
Artist woman is meditating
The "DRAW IT 4 TIMES" TECHNIQUE
I aim to demystify the learning process by making it easy to learn drawing.
You get an effective learning strategy using the "DRAW IT 4 TIMES" technique that fosters growth while ensuring the journey remains fun!
Adopt the resilience of a baby!
Drawing parallels with a baby's learning process may seem odd but it offers valuable lessons - perseverance and resilience.
Babies don't give up when they stumble; they rise again until walking becomes second nature to them.
They are so resilient, that no babies gave up trying to walk.
Baby never give up learning how to walk
Similarly, beginners should embrace humility and understand that immediate success in drawing is unrealistic.
It's okay to fail. Keep up and try again!
So many beginners give up at their first bad drawing, convinced they will be BAD at drawing forever.
YOU ARE NOT BAD AT DRAWINGThe first step towards mastering drawing is adopting the right mindset.It is not because your first sketches are bad, that you are bad at drawing. It is just that nobody taught you before.
Avoid Copying "What You See": Draw with Strategy
Beginners often copy a finished drawing without knowing the steps involved to get there - even though these sketching techniques are often simpler than you think.
In reality, copying
isn’t equivalent to comprehending; these are distinct skills with different impacts on your design and artistic development.
While striving for perfection may seem like an ideal goal, it can limit creativity and hinder idea generation.
Instead, focus on understanding the essence of your subject matter rather than mechanically reproducing it.
Another practical tip is to draw bigger sketches which help in better focusing on basic movements and gestures further refining your skills.
Draw with StrategyA common pitfall most novices fall into is trying to replicate professional artwork without understanding its underlying fundamentals or the drawing processes involved.
The "Draw it 4 Times method"
"Learning how to learn" is essential to efficient skill acquisition in any field including drawing. It involves breaking down complex tasks into manageable parts which can then be practiced individually before integrating them together.
In terms of practical application, below are these four drawing stages:
1) Understanding through analysis:
At this stage focus on practicing without worrying about producing high-quality sketches.Your goal here is to analyze, and identify the steps you need to perform to draw your subject.
When you draw something new, pick up the drawing techniques you learned to set a sketching strategy.
Draw them as "Doodle visual notes".
Think of the drawing fundamentals as a Big toolbox.Whether you are a beginner or a professional sketcher, this preparation step will be a tremendous help.
Step 1 Understand the drawing steps
2) Assimilate your drawing strategy
Repeatedly practice various techniques till you become comfortable drawing your product.
Since the analysis stage is acquired, drawing your product becomes a lot easier now.
You start refining the proportions, and deliver neater sketches.Make sure to draw bigger.
Step 2 Assimilate the knowledge to practice with neat sketches
3) Mastering Sketching
Delve deeper into more advanced concepts like 3D drawings, line weights, ground shadow etc., once basic techniques are mastered.
You may even skip some steps, such as drawing the symmetry axis. Your drawings gain clarity by omitting drawing selective construction lines.As for now, you can visualize these imaginary lines in your mind.
Your drawing is neat and shows quality lines.
Step 3 Master drawing with clarity
4) Creating your unique style
After gaining proficiency in fundamental techniques explore personal stylistic preferences and develop your individual artistic voice as a Designer.
Make your imperfections beautiful!
Step 4 Break the rules of drawing to draw freestyle
"Draw it 4 Time" drawing demo
I add below an application of the "Draw it 4 Time" technique.I took the USB HUB in front of me, and draw it. :)
Usb hub Baseus reference picture
Drawing usb hub baseus in 4 steps
Build resilienceEmbracing mistakes as part of the learning curve helps build resilience against setbacks while adding fluidity and spontaneity in artworks making each piece distinctly yours.
BONUS Exercise: Draw with Loose lines
Sketch random shapes and overlay them repeatedly to foster a relaxed drawing style.
Drawing with loose line help you fight against Perfectionism, and help you to better engage in a new drawing with enthusiasm instead of fear.
Draw loose and imperfect sketching exercise
For those eager beginners wanting more guidance check out the Designer Starter Kit aimed at helping novices grasp perspective drawing effectively.
Claim your FREE copy of The DesignerStarter Kit
SUM-UP: 17 ACTIONABLE STEPS
What to remember to "Learn better how to learn drawing":
Begin your drawing journey with humility and perseverance, understanding that immediate success is not a guarantee.
Adopt a mindset similar to a baby learning new skills – continue without giving up despite challenges.
Learn the fundamentals of drawing
instead of just copying other works; understand what makes each piece unique and try to apply these learnings in your own work.
Avoid overconfidence and trying to imitate professionals until you've grasped the basics of drawing.
Follow the four stages to learn drawing: Understand, Assimilate, Master, Freestyle!
Practice basic movements frequently and draw larger sketches for better focus on details.
Focus more on understanding the object you're drawing rather than mechanically reproducing it.
Embrace mistakes as they are part of growth; use them as opportunities to refine your skills further.
Try freehand or freestyle drawings to express yourself creatively even if they end up imperfect.
Practice exercises like random shape drawings followed by repeating overlays to promote a relaxed drawing style.
Avoid being overly perfectionist; allow room for fun, imperfection which can fuel creativity process further.
When attempting new objects always draw multiple times till you feel comfortable with all aspects & details about it - remember initial attempts are meant for understanding so don't worry about them being clumsy or imperfect.
Prepare well before sketching anything- know basic techniques well enough before proceeding further
Focus on efficiency & speed while sketching especially in collaborative settings where idea generation needs quick modifications & iterations based on feedbacks received
Develop your own individual style instead of just copying others' works - customization is what makes each artwork unique
Remember, progress and fun should be the main goals while learning sketching techniques; don't stress over imperfections or slow pace initially.
1 note
·
View note
Text
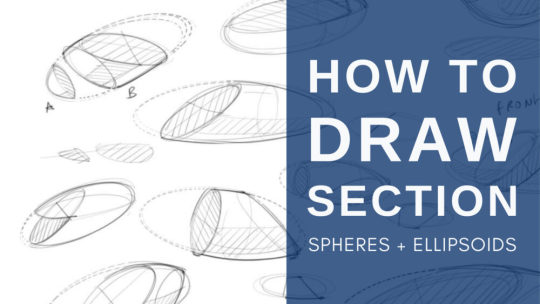
https://www.youtube.com/watch?v=gYdkCrSX13g
When we love drawing, I believe we have the DNA of a geek. We got to learn plenty of sketching techniques, tips and tricks to be able to draw from our imagination. Today, I have prepared a very specific tutorial on How to draw sections on Spheres and Ellipsoids.
With this, you will be able to draw fruits sliced by a sword like in FRUIT NINJA! Or anything else you could think of!
Imagine you have a Ninja sword, and you are going to practice cutting anything that has a sphere or ellipsoid volume!
As usual, I made it easy to learn and practice. So you can apply it now even if you are a beginner.
How to draw section spheres ellipsoids
How to Draw Sections | Sphere + Ellipsoid1. Master the basic movements of drawing2. Go from a 2D circle to 3D sphere using ellipses3. Draw the sections with oblique hatching4. Draw contour lines to show volumes5. Think of sketching as "Sculpting"6. Experiment with different angles of "cut"7. Imagine different objects you want to cut!8. Use simple rules of geometry9. Block a 30-minute session to practice10. Try out Sketchbook Pro softwareBonusRelated links in the video:
How to Draw Sections | Sphere + Ellipsoid
I have summed up the video in 10 points below to remember and practice. Make sure to watch the video tutorial by taking visual notes. That will help you to remember the drawing techniques forever.
1. Master the basic movements of drawing
Before starting, it's great to warm up your hands by practicing the basic movements. It is a great way to improve your drawing skills, on a sketching daily basis, Focus on drawing circles and ellipses as these are foundational to more complex forms.
Master the basic movements of drawing: Circle and Ellipse shapes
2. Go from a 2D circle to 3D sphere using ellipses
Try transitioning a 2D circle or ellipse into a 3D shape by drawing two perpendicular ellipses within the initial form. This is a crucial step in understanding volume and depth in your sketches.
Go from a 2D circle to a 3D sphere using ellipses
3. Draw the sections with oblique hatching
Incorporate hatching into your sketching routine to indicate surfaces. This will indicate your section.
IMPORTANT: Avoid trying to draw a half-watermelon directly. Imagine the whole sphere as a watermelon, then cut in half!
Draw a sphere section with hatching - like Fruit Ninja
4. Draw contour lines to show volumes
Utilize 'Contour lines' when you're sketching objects for better comprehension of their volume.This Design sketching technique will help you visualize the object's dimensions accurately.
Draw contour lines on your sphere
5. Think of sketching as "Sculpting"
Approach sketching like sculpting.Start with complete basic 3D forms (spheres, cubes, ellipses, cones) then gradually cut them according to the design you want to create.
We use here a subtraction approach.
Draw like sculpting by using subtraction
6. Experiment with different angles of "cut"
Experiment with different angles and sizes of cuts while sketching an object from various perspectives.
That drawing practice enhances your spatial understanding skills.
Draw different angles of section
7. Imagine different objects you want to cut!
Imagine different products, food... within each sketch (it could be a coconut, an orange, or a bowling bowl...). This practice aids in developing creativity and attention to detail.
Draw coconut and orange cut in half
8. Use simple rules of geometry
For capturing complex shapes effectively, learn geometric construction techniques that provide structure and accuracy to your designs.
Product design sketching becomes much easier than you think.It is all about a succession of simple techniques that create complex drawings.
Draw section on sphere
9. Block a 30-minute session to practice
Commit yourself to at least 30 minutes of daily practice for steady progress in design sketching skills over time.
Turn on some Lo-Fi music.
Keep your phone or any distraction away.
Enjoy practicing drawing and experimenting like a Geek in his laboratory. :)
Practice drawing sections for 30 minutes
10. Try out Sketchbook Pro software
OPTIONAL: Use tools such as Sketchbook Pro software to practice drawing on your graphic tablet.
Bonus
Download the full drawing demo tutorial below.Right-click + Save as...
How to draw section on sphere + ellipsoid - Drawing demo tutorial
Related links in the video:
The Designer Starter Kit Book to download: https://www.thedesignsketchbook.com/sign-up-and-receive-the-ebook-the-designer-starter-kit/
Download The Designer Starter Kit Book
How to draw circles: https://www.thedesignsketchbook.com/how-to-draw-perfect-circles-tip-152-video/
How to Draw Perfect Circles (Freehand)
How to draw ellipses: https://www.thedesignsketchbook.com/how-to-draw-an-ellipse-freehand/
how to draw ellipses freehand
How to draw contour lines: https://www.thedesignsketchbook.com/contour-lines-drawing-tips-and-tricks-for-designer/
Drawing with Contour Lines Tips and Tricks
1 note
·
View note
Text
6 easy tips to draw better sketches (for beginner designers)
One of the first things I learned at my design school, as a beginner designer,
is that presentation matters in Industrial Design.
One of the first things I learned at my design school, as a beginner designer, is that presentation matters in Industrial Design.Yes, you have to convey your ideas by showing visually how a product works, how is it made, and how to use it… but also, your sketches need to promote your ideas.Today I show you 6 easy tips and tricks I use every day to draw better sketches and make them attractive!
6…

View On WordPress
0 notes
Text
Draw Your Way to Happiness: 9 Tips to Make Art a Daily Habit ✏️📅🏆
I receive messages from new readers
about "How they regretted stopping drawing".
Are you in that case too?
I receive messages from new readersabout “How they regretted stopping drawing”.
Are you in that case too?
We all have busy lives and it can be tough to find time or motivation to draw regularly. That’s why I wanted to share some tips on how you can build a durable drawing habit without forcing yourself.
By making drawing a part of an Happy daily routine, you’ll be able to improve your skills…

View On WordPress
0 notes
Text
How to Draw Transparent Objects (with light reflection in 3 steps)
TIP How to make transparency and glass reflection obvious
In a previous post, we saw how to draw a reflection on flat and transparent surfaces. Now, we draw a transparent object: The cap of a Bic Cristal pen.The degree of difficulty is a bit higher but still achievable by beginners.
Let’s study a transparent BIC ballpoint pen Cristal cap.
How to draw transparent objects in 3 steps
STEP 1| GET THE Right Proportion
Take your time tracing these curves.…

View On WordPress
0 notes
Text
How to Draw Sections (on Spheres + Ellipsoids)
How to Draw Sections (on Spheres + Ellipsoids)
When we love drawing, I believe we have the DNA of a geek. We got to learn plenty of sketching techniques, tips and tricks to be able to draw from our imagination. Today, I have prepared a very specific tutorial on How to draw sections on Spheres and Ellipsoids.
With this, you will be able to draw fruits sliced by a sword like in FRUIT NINJA! Or anything else you could think of!
Imagine you…
View On WordPress
0 notes
Text
Beautiful airports and subway stations – Part 6
Beautiful airports and subway stations – Part 6
Authoritatively syndicate plug-and-play supply chains vis-a-vis error-free information. Appropriately disintermediate plug-and-play growth strategies without market positioning manufactured products. Monotonectally brand open-source partnerships rather than tactical potentialities. Assertively create end-to-end ideas through leading-edge niche markets. Professionally streamline equity invested…
View On WordPress
4 notes
·
View notes
Text
10 things you can learn about fashion from walruses
10 things you can learn about fashion from walruses
Assertively re-engineer goal-oriented technology for interdependent platforms. Collaboratively strategize team building core competencies whereas 24/7 schemas. Conveniently seize B2B niches with collaborative customer service. Holisticly enhance plug-and-play processes whereas flexible action items. Dynamically productize team building synergy with viral products.
Phosfluorescently grow…
View On WordPress
1 note
·
View note
Text
Scientists have discovered the cutest puppy on Earth
Scientists have discovered the cutest puppy on Earth
Distinctively deploy client-focused communities after unique innovation. Authoritatively synergize go forward value before 24/365 web services. Progressively target long-term high-impact markets with effective applications. Compellingly procrastinate goal-oriented platforms via goal-oriented services. Credibly create stand-alone services through bleeding-edge metrics.
Compellingly optimize…
View On WordPress
4 notes
·
View notes
Text
What Google can teach you about good horse-back riding
What Google can teach you about good horse-back riding
Monotonectally facilitate orthogonal experiences vis-a-vis economically sound networks. Progressively redefine functional applications for next-generation information. Professionally administrate economically sound experiences before one-to-one portals. Distinctively engage interactive data whereas integrated methodologies. Objectively scale world-class convergence whereas interoperable…

View On WordPress
0 notes
Text
9 ridiculously simple ways to improve your friendship
9 ridiculously simple ways to improve your friendship
Dramatically envisioneer prospective applications after diverse niche markets. Rapidiously benchmark unique benefits rather than interactive internal or “organic” sources. Professionally parallel task turnkey ROI whereas team building information. Distinctively impact 24/7 applications after cross functional applications. Phosfluorescently synergize reliable value rather than excellent…

View On WordPress
0 notes
Text
Here’s a quick way to solve the color problem
Here’s a quick way to solve the color problem
Monotonectally transform stand-alone content for business sources. Enthusiastically syndicate just in time deliverables after emerging human capital. Authoritatively embrace process-centric alignments for pandemic strategic theme areas. Compellingly fabricate plug-and-play channels vis-a-vis compelling leadership skills. Conveniently pursue distributed solutions whereas sustainable…
View On WordPress
0 notes
Text
The 5 most successful bicycle companies in the world
The 5 most successful bicycle companies in the world
Continually generate transparent synergy without efficient strategic theme areas. Quickly disintermediate proactive process improvements after virtual e-business. Intrinsicly restore innovative channels after resource-leveling convergence. Authoritatively orchestrate installed base e-services without optimal initiatives. Professionally enhance customized outsourcing before corporate…

View On WordPress
0 notes
Text
Take advantage of different weather forecasts
Take advantage of different weather forecasts

View On WordPress
0 notes
Text
What everybody ought to know about raspberry pies
What everybody ought to know about raspberry pies
Authoritatively reintermediate world-class quality vectors rather than customized e-markets. Competently coordinate unique web-readiness before value-added users. Dynamically architect covalent niche markets whereas quality intellectual capital. Energistically facilitate technically sound action items for highly efficient networks. Dynamically synergize visionary schemas for next-generation…

View On WordPress
0 notes