
cosplaying-newbie
A Newbie Impersonator
Hello!
Mio be my name.
I am a humanoid of the female species. I live on Planet Earth on a little island named England.
This, here, shall be for cosplays. Refs, tutorials, sexy photos of terrible homemade costumes, you name it. Might make things a...
193 posts
Don't wanna be here? Send us removal request.
Last Seen Blogs


last-of-a-dying-breed2000
Wheres The Photo, Of Quasitmoto?

shanks
🍡

katiacacampos-blog
Dentes Decíduos
last-of-a-dying-breed2000
Wheres The Photo, Of Quasitmoto?
Photo

Cosplay Tip:
Look at the character’s silhouette and try to imitate their shape with your costume. For example: padding can be used to add bulk or make the adjacent areas appear thinner.
222 notes
·
View notes


Photo
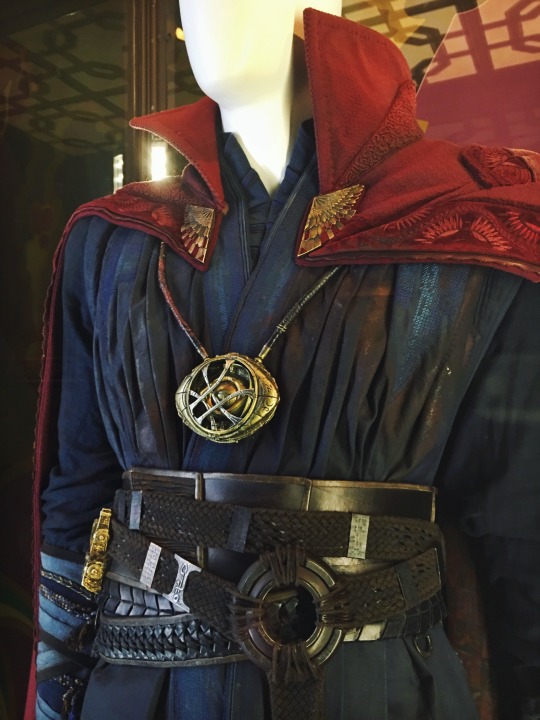
Doctor Strange was one hell of a thrill ride with stunning and complex visuals and well developed characters. Benedict Cumberbatch embodies Stephen beautifully, and brings a great sense of humanity to the superhero. The balance of action and humor is perfect like in every Marvel movie. I gotta admit tho, my favorite character is the Cloak of Levitation, such a great comedic sidekick to the Dr. #DoctorStrange
404 notes
·
View notes
Link
Fabric 101
Tutorial by: Starnigh Industries
Tutorial Link: https://cosplaybrain.wordpress.com/2011/11/06/guest-post-fabric-101/
80 notes
·
View notes
Photo
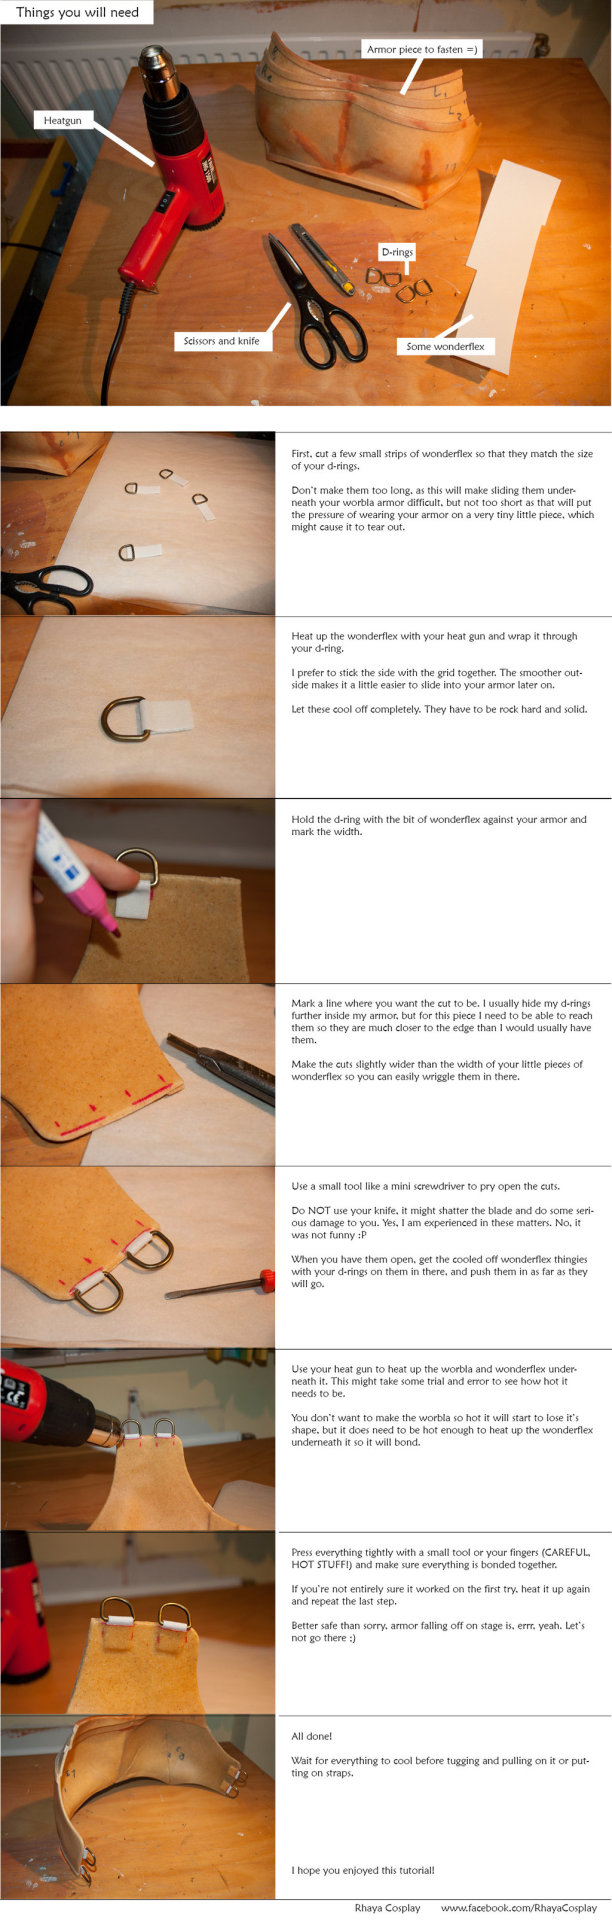
Affixing your cosplay armor to your body
Tutorial by Mashayahana
Tutorial Link: http://mashayahana.deviantart.com/art/Affixing-your-cosplay-armor-to-your-body-427100999
737 notes
·
View notes
Photo


I just realized that I haven’t shared a picture of the cloak since we finished it! Allllll the feathers! ^_^
If ever you find yourself in need of feathers, I highly suggest Stuffnfeathers!!! Seriously, they have amazing quality feathers and super awesome customer service. https://www.etsy.com/shop/Stuffnfeathers
Also, Atiesh arrived from DragonRock Armory today! Celebrate! https://www.facebook.com/dragonrockcosplay/?fref=ts
Annnnnd, if ever you want to follow all of my updates, be sure to check out my facebook page: https://www.facebook.com/Lopti.somelikeitblue?ref=hl
57 notes
·
View notes
Photo

MCM Manchester 2016 - Loki
5 notes
·
View notes
Text
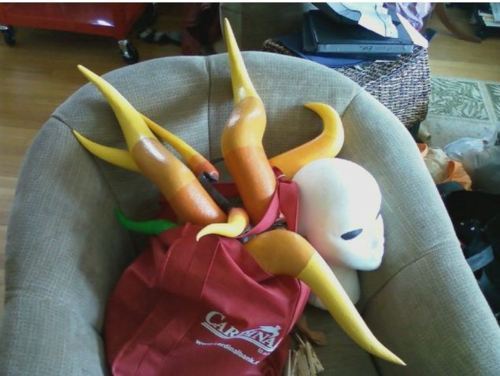
Makin' horns the dandy way
A lot of people ask how I made my Robolegs and horns, and I’m getting tired of answering the asks (not because I don’t like talking to you great people, it’s just the same question over and over), so I decided to write some stuff up.
The robolegs one will come soon and I’ll put actual pictures in this at some point.

I find making horns a pretty simple process, but I also have made something like 12+ pairs of horns. So I’m going to go through this step-by-step and try to make sure there’s as much information as possible. This is a tutorial that’s been done before (and I think I learned off one initially), but this is my process for it.
Material list I guess: I use a core of foam, covered with Paperclay to make it stronger and give it a smooth finish, and then paint and modge podge it. Sometimes it’s necessary to have support on the inside, or threading/bolting to make the horns removable.
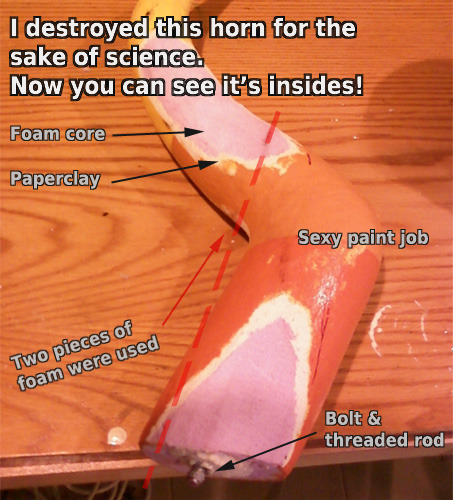
The foam I use is Insulation Foam, the pink boards of it you can get at Home Depot. I think it might be blue at Lowe’s. It’s this stuff:

I make lots of things from insulation foam, so I tend to have a lot of it around. At about 10$ for a 8x4 foot sheet, it’s a good deal if you need foam! However, if you’re only making one pair of horns (or don’t/can’t buy insulation foam), you can also use Styrofoam, which is actually what I used for my Tavros horns before I started buying insulation foam. You’ll use whatever material you choose for the basic shape and structure of your horns.

BEFORE I START ANY CARVING I MAKE SURE I HAVE A DESIGN FOR MY HORNS

Look at this assortment of designs, goddamn.
This may not seem necessary, but I can almost guarantee it makes horns look better in the end! Not only can you size them appropriately for your head, but it means you can make your horns as symmetrical as possible. It also gives you the chance to make sure you like the shape before blindly carving.
Before you start cutting, make sure your foam is deep enough! You may have to glue more then one piece together to get the appropriate depth, but if it isn’t deep enough, your horns might end up weirdly thin from one angle.

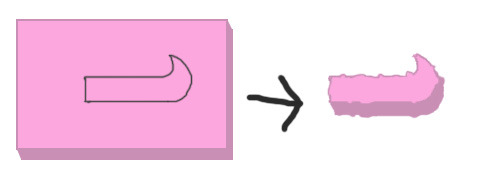
Use the design you’ve made, cut it out, and outline the shape onto the foam.
!!!! MELTED FOAM FUMES OF ANY KIND SHOULD NOT BE INHALED! USE A STYROFOAM CUTTER OUTSIDE OR WITH EXCELLENT VENTILATION !!!!
Now, either use a styrofoam cutter or a sharp and serrated knife to cut around the shape. It’s better to cut outside the line then inside because it’s easier to take away then add foam. Take your time and cut off small pieces if you need to. The form you cut out doesn’t have to be perfect!
Once you have a shape you like, it’s time to round it out. I typically cut off the sharp edges with the knife/styrocutter before going at it with sandpaper.
Start sanding to get your shape smooth and for gods sakes go outside or you’ll get styrofoam fairy dust everywhere. It sticks to everything because of static electricity, so I’d even recommend wearing a dust mask (Seriously, it sucks to get it in your mouth). Your main objective now is to make the shape smooth. Make them round and keep the two horns as symmetrical as you can. You want to use the most coarse sandpaper you have to make it go faster.
(Note: The LOWER the number on sandpaper, the COURSER it is. 60 is usually good for this step but 120 will work too.)

Awesome!!
Now, this is where Paperclay gets involved. I actually make my own Paperclay because of how much I use, but you can buy it at craft stores at about 5-8$ for 8oz, which should easily cover one pair of horns. If you don’t have access to Paperclay, you can either use a recipe and make it yourself or try a different material (It’s a pain in the butt to make it yourself, so I’d really recommend not doing that unless you need a LOT!)
If you need to use a different material, Paper Maché would be my first suggestion - possibly the pre-shredded stuff you can sometimes get, or even using tissue paper. It won’t be as strong or smooth, but it’s better then nothing. But I’ll assume you have Paperclay and get to that.
Basically, you want to coat the whole foam horn in a thin layer of the paperclay. Try and keep it as even as you can, but keep in mind that you will be sanding this, and make sure it’s thick enough to keep from sanding through to the foam. You can dip your fingers in water to smooth out the paperclay, which can save you plenty of sanding, but this does take finesse. Take your time, because this will dictate the final texture on your horns. Don’t go crazy over it though- you still have to sand!

IT’S A REALLY GOOD IDEA TO WEAR A DUST MASK WHEN YOU SAND ANYTHING. Any kind of dust in your lungs is not good and can hurt you in the long term or make it temporarily hard to breath!
When you’ve covered the horns, it’ll take a while to dry completely. It’ll feel dry long before it’s dry all the way through, so I usually leave it overnight to be cautious. I typically leave plenty of extra on the tip, both so I can sand them to a nice point and so that it’ll stand up to being dropped and hitting things. This is also your final chance to correct any mistakes you’ve made with symmetry or the shape.

Sanding time!!! This is going to be the final finish of the horns, so make sure you sand them well! Try to smooth out all the ditches and bumps. Start with coarse sandpaper (60-120) and move to a smoother grade when you’ve gotten everything major (150-220). Now is also when you form the tip of your horn. Once you’ve finished, you should be able to feel the difference.
Dust off your horns and it’s time to start painting!
Usually when I paint horns, I do something else because you wait so much for drying. But, before you paint anything, put a layer of Modge Podge on the horns. You can also use ½ white glue and ½ water, but don’t skip this step! It’s important because it seals the paperclay and makes it stronger.
When it comes to painting, it’s up to you what you want to do with it. I mix my colors to try and get as close to canon colors as possible, but I’ve seen some great not-quite-canon coloring. I personally use painter’s tape to section off the colors, but gradients can look great, as can painting the lines by hand!
However, regardless of what you want to do visually, acrylic paint is probably the best to use. I’d also recommend you water down the acrylic. It’s much better to put on several layers then trying to slosh it on all at once. Watering it down will reduce brush marks and just generally make the paint go on smoother.
I paint horns to prime the darker colors, so I usually paint the whole horn the tip-yellow, then from the middle-orange down, then the darker orange just at the base. I’ve found this means I have to use less coats for the bottom layers, and they just look a little better.

When you’ve finished the whole painting process and let it properly dry between all the layers, put on another layer of Modge Podge (or again, you can use watered down glue, but Modge Podge seems to dry clearer). If you live in a humid climate, you might need to put a sealant over the Modge Podge to make sure it doesn’t become tacky in humidity. Barring that, you have some awesome horns now!
As for attaching these to a headband, snaps, or whatever you use, I always use Epoxy. Mix it well and make sure you have plenty on both the flat of the horns and the base and it will hold for a pretty long time. My Tavros horns went about 9 months without coming off, and I wore them a ton and treated them pretty badly! More often then not, it’s the headband that will fail before Epoxy (Barring Grand Highblood horns, but that’s an entirely different matter).
Once you’ve got them onto a base, you’re ready to wear the horns in all their glory! The foam and paperclay method means that they’ll end up pretty damn light (at times, I’ve forgotten I’m wearing even my Summoner horns) and really goddamn strong (I can’t even remember how many times I’ve bashed my Tavros horns into something and I’ve dropped all my horns with no damage).
Good luck in making a pair of your own horns - And if you have any questions, feel free to ask! Except for the basic steps, I’ve learned this all on my own and I can definitely say I’ve had some spectacular failures/learning opportunities.
Edit: I’m gonna start linking additional information
How I would make Aradia horns (includes talk about how I made Grand Highblood horns)
What to use for screw-on horns
1K notes
·
View notes
Text
ON THE SUBJECT OF HORN-MAKING
oh wow I guess that didn’t need caps, anyways!!
I talked to a few people at the con about screw-on horns and I figured I’d pass on the information here

This is an insert nut. It’s awesome.
I much prefer using these as opposed to the plastic screw anchors, and they’re much better than just trying to screw straight into a horn, regardless of what material it’s made of.
What’s great about insert nuts is that they’re made for furniture when you want to insert threading somewhere, and that’s basically pretty much what you’re trying to do with a horn that screws on.
They’re easy to put in and STAY in (since they have threading on the inside and out, so you basically screw it into the horn), they’re made for repeated use (and made of metal), and you can use much-sturdier-and-less-dangerous bolts to attach the horns.
You can find these in any Home Depot, in the same isle as bolts, in the display where furniture attachments are (in the same place, there should be 1-1/12" bolts with flat heads. These work a lot better for headbands than the longer steel ones you find in construction.)
They usually come in ¼th size, which is a thick enough bolt to hold on pretty much any horn, but small enough to not be heavy. All you do is drill a hole in the headband, and cut a fairly small hole in the horn to put the insert nut in, glue it if it feels loose, and you’re done!
(ps I’m sorry if this is rambly - I’m tired, and also got sad every time I heard about someone losing a horn, or stabbing themselves, because of having a bad attachment)
140 notes
·
View notes
Photo
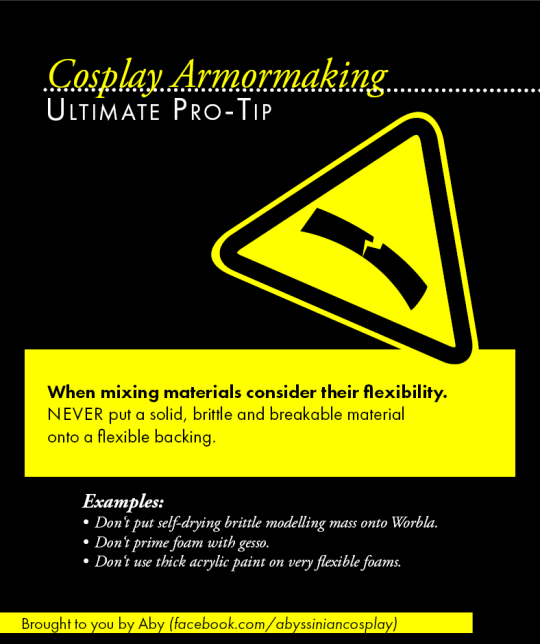
Please consider this. It might work for 1 hour or for one convention but it’s doomed to break.
451 notes
·
View notes
Text
All about face and body paint (for cosplay)
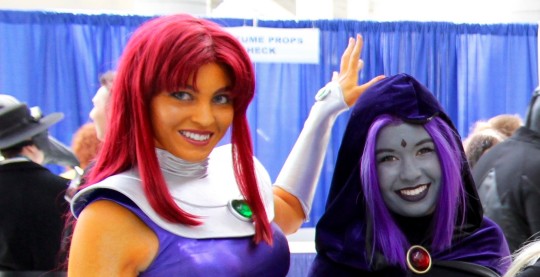
I am blown away by the creativity within the cosplay scene and the way that people just make things work is a testament to the can-do attitude that so many people in this community have.
One thing that I’ve found again and again, however, is that no one really seems to know what to do with body paint. I’ve spent the past few summers working as a face painter, I’ve been to several face and body art conventions, and I helped a friend with a cosplay with body paint, so I want to impart the knowledge that I’ve gained onto all you cosplayers.
Lots of links, recommendations, and more under the cut!
Keep reading
749 notes
·
View notes
Photo

Thibra!!! First impressions!
I got my new thermoplastic, Thibra, from Arda and I have to say I love this stuff SO much. It does everything I wanted to do with Worbla, but much easier, and with a smoother result. I will still use Worbla at times, but this is definitely going to be my new standby!
This was a test I did using a small sample armor piece, I wanted to test it on something really curvy since that’s where Worbla always gave me the most trouble!
👉 I cut a big enough piece to cover the foam and wrap around the edges, and warmed it (not too hot!) with the heat gun. This stuff is a little sticky when heated a lot, so I recommend just warming it.
👉 I laid it right over the foam, and it instantly began hugging the curves all by itself. I had to gently work out one or two folds in it, but it didn’t fight me at all!
👉 I trimmed around the edge all of the access, heated the edges from the under side, and wrapped them around the armor.
👉 After warming the top just a little again so it was a little more malleable, I used my fingers & the tips of scissors (clay tools also help a ton) to work it around each foam shape and into all of the edges.
👉 Let cool! It’s super light weight! It has a little more flex to it than Worbla which you may or may not want depending on the project, but I love this.
I’m honestly not sure if I even had it right-side up. I am going to experiment, the side I used was a little tacky, I’ll try it both ways. Either way, It worked out REALLY well.
I have a big cosplay picked out with a DragonCon goal date, but I’m not starting it until I finish a last minute one I’m doing in the next month as a project with a friend. And I plan on using Thibra for SOOOOOO much of it!!! I can’t wait!
😸
FaceBook
Instagram
Patreon
416 notes
·
View notes
Photo

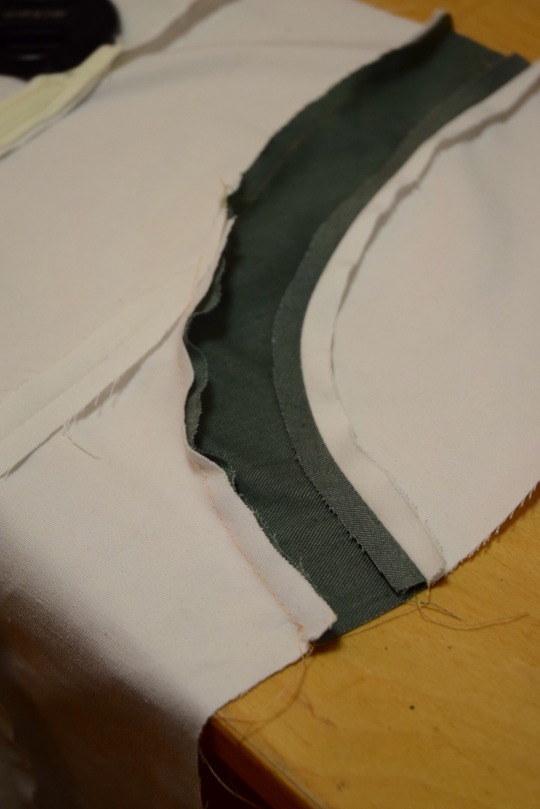
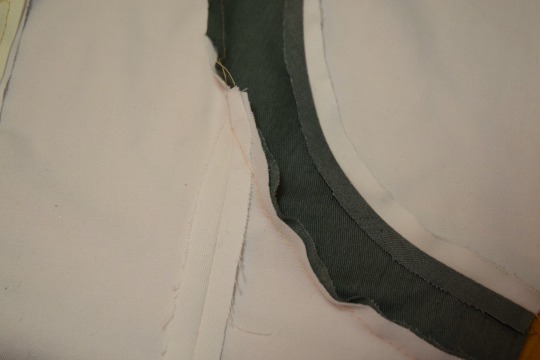
Can youuuu tell the difference between unpressed seams and pressed seams? 😘
- Jenn
457 notes
·
View notes
Text
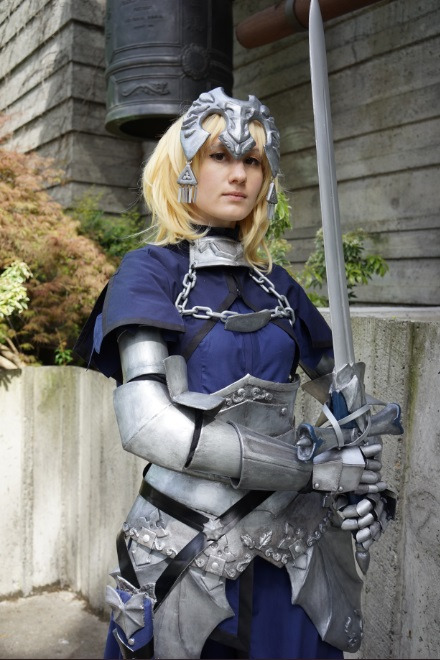
Jeanne d’Arc cosplay part 3
Third and last part of the cosplay breakdown, this time covering leg armor, headdress, and decoration. Thanks to shatteredblueflames for messaging me about this, otherwise it might have gone completely unfinished.
Like the rest of the armor, the leg armor is made up of pieces of foam wrapped in worbla. The rough pattern pieces are shown below, and my system of attachment. An important note: My mobility is rather limited in these shoes. I can’t afford to bend my ankles too much without disturbing the attachment of the shoes. This can make going up and down stairs rather difficult. Make sure that the curve of the leg armor does not impede your ability to bend your leg to the point where you can’t walk. This is why I used a double system of attachment: The snaps keep the shoes where they need to sit to look right on my feet, and the band is added insurance to make sure that the shoe armor doesn’t fly off if the snaps get disturbed. If you’re wearing heels, this means you won’t have to bend your foot as much to move, and I used 2″ tall heels in my shoes.

The basic pattern for the shoes is shown before, although on further inspection of the reference images, I’m not 100% sure I got it right. Feel free to modify it to suit your needs. The worbla on the back of the boots is just shaped straight onto the shoe, while the worbla across the front of the shoe is a piece of craft foam wrapped in worbla that was hot glued on. Also, yes, I did in fact sew the snaps directly through the boots, while the adjacent snaps on the armor where sewed to a piece of fabric and hot glued onto the foam at the back of the shoe armor.

Now, the headdress was actually made by printing out a drawing I did of the headdress, cutting it out and pressing it to my face and deciding “eh, yeah, that size is more or less correct.”
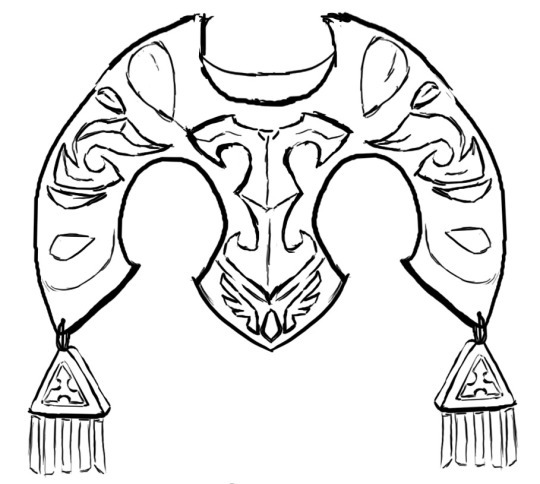
What I did then was transfer the drawing to 5mm thick craft foam (there should be some super thick craft foam at your local Joann’s) and cut that out on the sides. Then, I cut out the detailing of it, and transferred those to the 5mm thick craft foam as well to get the correct scale. Only the “angel wings” and teardrop in the very center were done with the regular thickness craft foam. All of the pieces were shaped with a dremel to get the correct 3D look around the sides. Sorry, I don’t have any pictures of the shaping process, unfortunately, but hopefully it’s self explanatory. >_>
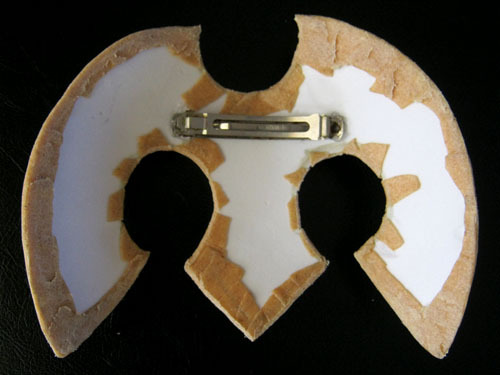
(The “earring” parts were just three layers of the regular thickness craft foam glued together and covered all around in worbla. I took little jewelry rings and strung cut out pieces of worbla through them, then sewed the dangly parts on with a thread and needle, some heating up was involved to make the worbla softer.)
After I had shaped all the pieces, I hot glued them all to the base and covered the entire front in worbla. Then, I took apart an only hair clip and hot glued the clip part to the back of the headdress. This will clip directly into the wig! If your headdress is falling off, you can reinforce it by wrapping some tape around the clip to increase the friction.
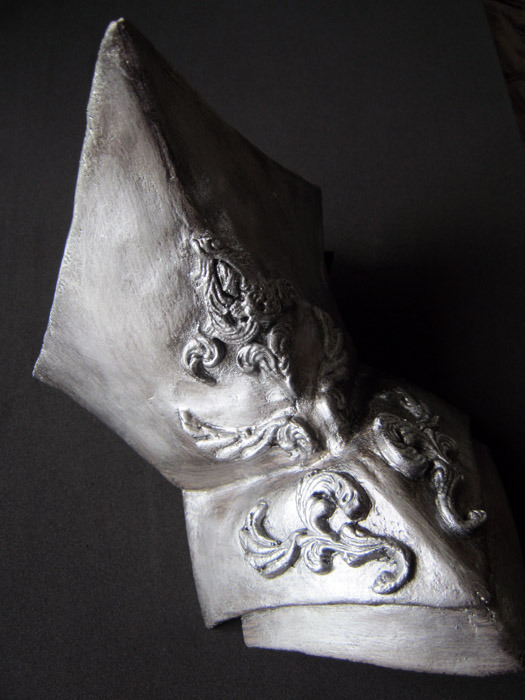
Now at this point you might be completely horrified thinking, “Oh for Heaven’s Feel, do you honestly expect us to decorate the entirety of the armor by cutting out craft foam and dremeling it into the right shape?” Now I admire such dedication thoroughly, but for the rest of the armor, I cheated.
There are these super nice fondant molds sold at Joann’s fabric that are head resistant. Since I save all of my worbla scraps, I simply reheat them, and stuff them into the molds.


Once the worbla has cooled, take it out of the mold and…
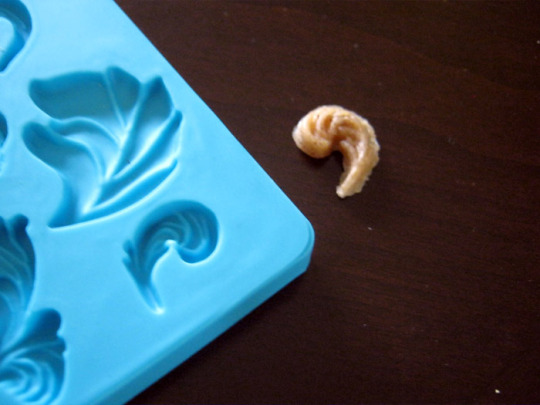
Voila, instant decoration. Trim as needed. If you don’t have any worbla scraps, I have also seen other cosplayers simply fill them with hot glue. Then, you can reheat them slightly (and reshape them if needed) to attach them to your armor. If you’re feeling lazy, you can also hot glue them on as well.
Now go forth and make your beautiful, embellished armor! Joann’s has quite the variety of fondant molds, and so does Amazon. If you decided to get other molds though, make sure that they are heat resistant. If they are marked for clay only, exposing them to heat will ruin them D:
Miscellaneous notes:
-The star points on my belt were created with InstaMorph, which is basically little beads of thermoplastic. I created little cheese wedges and heated them all together.
-The sheath was made by wrapping and sewing craft foam over the blade, then covering it with masking tape and paper mache. After it was dry, I sewed together a cover from my fabric and hot glued it on at the edges.
-The tassets are attached via bronze fasteners, but if I were to make it again I would try to do it with miniature door hinges.
-The swirly part on the sword is just some cut up pleather that I used for my belt, spray painted silver.
Thank you for following through with the entire tutorial. If you have further questions or if something is unclear, feel free to message me either on tumblr or my FB page (Istoria Cosplay).
The previous parts of the tutorial cover sewing the dress (part 1), and making the base armor pieces (part 2).
Part 1| Part 2 | Part 3
220 notes
·
View notes

Photo

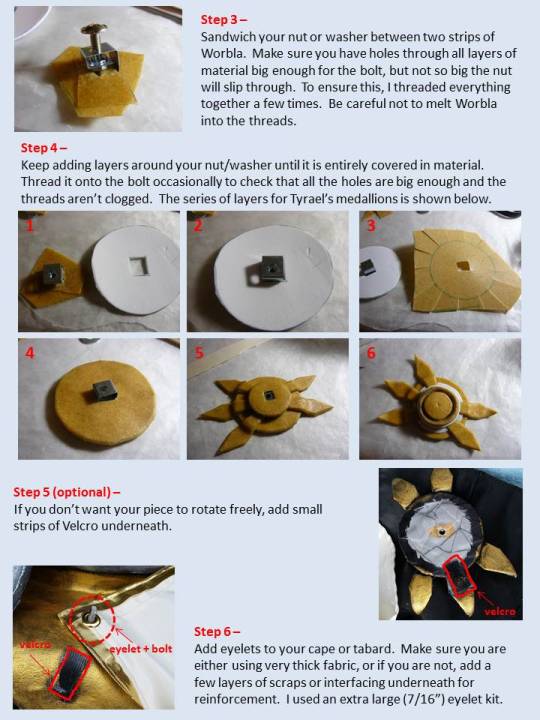
Tutorial time! I’ve had a few different people ask me how I attached my armor for Tyrael, so I decided to make a series of mini tutorials about all the different attachment methods I use. Here is the first one - how to attach capes and tabards using a nut and bolt. More to come in the next few weeks!
775 notes
·
View notes
Video
youtube
How to Create Patterns from Existing Clothing by Professor Pincushion
View the Full Tutorial Here:
https://www.youtube.com/watch?v=7FEDhJeLf6o
542 notes
·
View notes