
heehoohatman
Hatster
Barely exists, but I'll try to use it
429 posts
Don't wanna be here? Send us removal request.
Last Seen Blogs

pocasu
koreanification beam

hypnospects
Untitled

cristaldehaluro
Haluro de Clara

professorjaskier
professorjaskier
Text
The one biggest thing of note with this video was the fact that everyone was trying to make different variants of it and yet not a single one was actually good due to how many effects are used on the original alone
998 notes
·
View notes
Text

I know practically nothing about Guilty Gear but the key guy reminds me of the Wall-Nut
22 notes
·
View notes

Text
4K notes
·
View notes
Text

what if nintendo started porting game and watch titles to actual video game consoles way way earlier? part 2
7 notes
·
View notes
Text
spongebob is a show about an autistic man who is bothered by consistently being called a 'kid' or some other form of 'immature' because of his "childish" interests, his social misunderstandings, and the joy in his heart despite the fact that he is a fully independent, grown man in his 30s with a full time job he's good at, a house he owns, and a pet he takes good care of.
658 notes
·
View notes

Text
10K notes
·
View notes
Text

Handala (حنظلة) is a symbol of Palestinian resistance. He was created in 1969 by political cartoonist Naji al-Ali, critical of Israel as well as Arab regimes.
Handala is 10 years old, the age Naji was when he was forced to leave his home during the 1948 Nakba, and is always seen from his turned back. Today, Handala is still 10 years old. On the day Handala is able to return home, he will then grow up and be seen from the front.
Naji died on August 29, 1987, victim of an assassination. Naji lives on through Handala.
14K notes
·
View notes


Text


saving my favourite twitter thread here just in case
38K notes
·
View notes
Text
so you're taking care of your computer's software health. NICE! but what about its physical health?
because yes, computers do need the occasional real-world checkup to make sure that they're running well. but what exactly does that entail? i see many posts about maintaining software health: limit your browser tabs, ensure your antiviruses are working properly, so on and so forth, but checking the physical components is something i sparsely see discussed here.
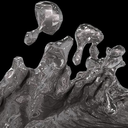
so what's the deal with physical maintenance? well, have you ever had your computer hack and wheeze trying to keep up even if your OS and all your drivers are up to date and functioning? if you've never opened up your computer before, you may be shocked to find just how FILTHY it can get in there:
take a closer look at that snout dust! PTOOEY .. BLECKH
computers are much more likely to accumulate internal dust if they're sitting on the floor, and especially if they're near any vents and/or if you have pets.
ok, you've figured out how to open your device and now you're staring at the second coming of the dust bowl in your gaming rig. what now? let's explore some basic cleaning tips, deep cleaning pointers for your CPU/GPU, and tips to help keep maintain your computer's physical health in the future.
first of all, turn off your computer and unplug it (for my computer, i turn it off, turn off the PSU switch, unplug it, and then press the power button for about 30 seconds to drain the capacitors and minimize static risk)
generally, you're gonna want to have THESE items:
some sort of face mask (dust masks are best, but anything that'll help keep the harmful dust out of your lungs will generally work)
a can of compressed air (or an electric duster if you're ~fancy~. they look and function like turbo blowdryers)
a vacuum will be useful if there's a LOT of dust, best to use in combination with an anti-static cleaning kit
if you ARE gonna use a vacuum, spray every attachment you use with an anti-static spray. disturbing large amounts of dust creates a lot of static, and electronics are very sensitive to that.
it's never a bad idea to grab an grounding wristband as well, but as long as you wear loose clothes and always keep some part of your skin in contact with the case, you should be ok. (i don't know how much this applies to laptops and smaller devices, since the cases for those are typically plastic)
if there's staining (like from smoke) or there's more gunk caked on than you thought, you can gently clean electronic components with a brush/paper towel/microfiber and medical-grade isopropyl alcohol ONLY. do not use any other cleaning alcohols for this task.
before you do anything, TAKE THAT FUCKER OUTSIDE! always clean a dusty device where the wind can carry that shit away, because oh my GOD will it fuck up your lungs like crazy. (that, and compressed air cans have fluorocarbons in them, which isn't great to breathe in either)
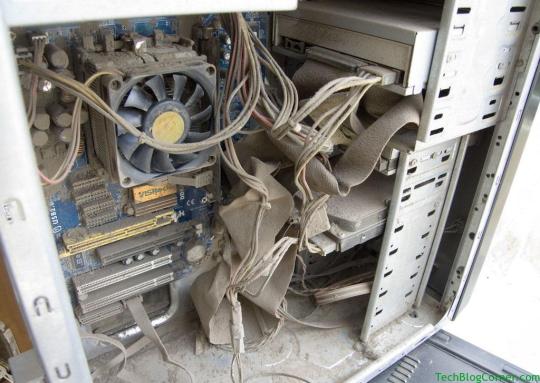
most of the time, you'll probably be fine just using an air duster. for compressed air cans, spray the dirty surfaces in short bursts. an electric duster can be constantly blown. when dusting fans, make sure that you're holding the blades still as to not accidentally make them spin too fast (ESPECIALLY with an electric duster!), since that can damage the mechanism that makes them spin.
however, if there's a lot of dust, it may be better to give it a vacuuming first. anything from a handheld to a shop vac will work, and attachments with brushes on the end will help tons with loosening up even more dust. and of course ALWAYS make sure that you're spraying any attachments with anti-static spray, and keep a hand on the case of the computer to electrically ground yourself since the hose will be in contact with the internals.
if there's any left over, give it a blast with the duster.
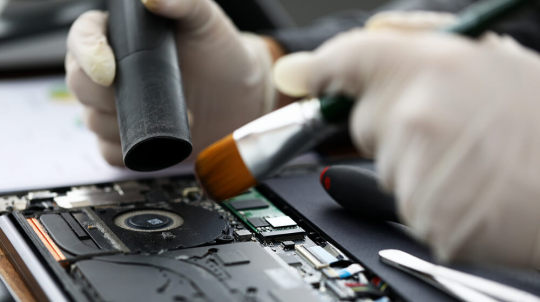
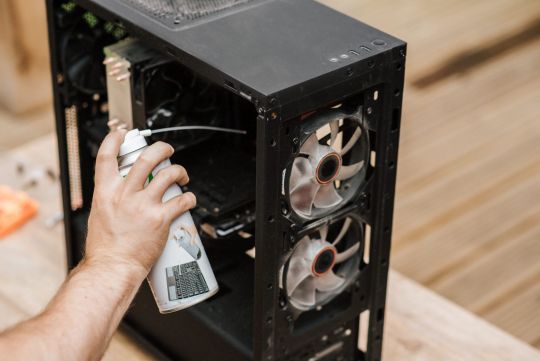
in some rare cases, there may be some extra gunk caked onto the internals, and you may have to really get your hands in there or take components out individually. if you don't have an anti static wristband (the ones with an alligator clip) do your best to ALWAYS keep your skin in contact with the case as you're finagling around in there.
it's probably a good idea to have disposable gloves on for this. grab your isopropyl and towel of choice (microfiber is ideal, but dirtier PCs may need disposable paper/shop towels), soak it a little bit, and gently scrub off the gunk n' grime as needed.
with heat sinks specifically, since they're just big blocks of metal, they're the one part of a component that can be cleaned under water. if a dusting doesn't suffice, gently scrub it with a brush under warm, soapy water, rinse thoroughly, and let it dry on a towel for a few hours before reassembling it into the electronic components.
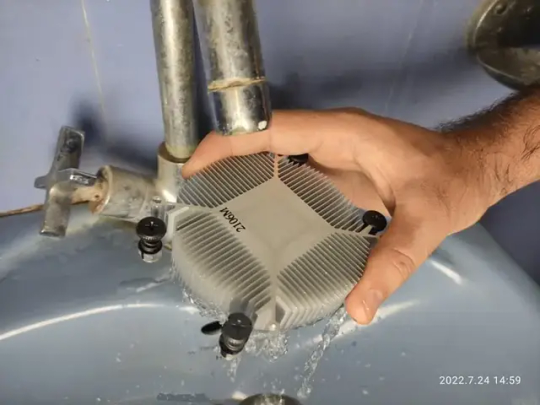
if there's still little bits stuck in the radiator fins, stick an isopropyl-soaked q-tip in there to push it out.
the dust settles, everything's put back together, and it's all clean in there again. YAY!!!!! but what if you're still experiencing temperature problems? well, it typically comes down to either the CPU or GPU:
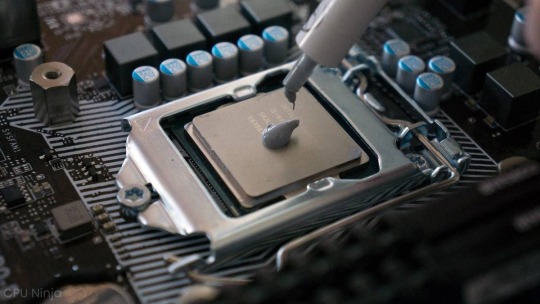
IF ITS THE CPU: if you took off the cooler to clean it, then i hope you remembered to dab some fresh thermal paste on there. you should be replacing thermal paste few years, otherwise it dries out and loses its effectiveness.
the type you use makes a huge difference too; i like to use arctic's mx-4, it has excellent thermal conductivity while still being an electrical insulator, so spillover isn't a problem. if you go for a liquid metal compound, please do your research first, since some of them can run the risk of corroding the cooler pipes and/or the CPU's outer casing.
to replace thermal paste, make sure that the crusty old paste is sufficiently scrubbed off the contact points of both the CPU and cooler. again, use isopropyl for this. once it's all cleaned off, put about a pea-sized amount of paste on the CPU and carefully lower the cooler onto the mounting bracket before fastening it in place. (also it really doesn't matter how you put the paste on, as long as it ends up covering most of the contact area)
also if you're still using the cooler your CPU came with, you should probably get a better cooler. especially if you're doing gaming or using graphically/mathematically intensive software. sorry. the stock coolers that most CPUs come with are mid as hell. you can get a nice ARGB one for less than 20 USD i promise its worth it
IF ITS THE GPU: like CPUs, your graphics card also needs to have its thermal paste cleaned out and replaced every so often. but they also utilize a second thermal material called thermal pads. these are usually made of either silica gel or a very thick clay-like grease, and come in different thicknesses. my favoured pads are owltree's 12.8w grease pads, the assorted pack comes with enough for about 4-5 GPUs.
taking apart a GPU seems scary, and understandably so; they're incredibly expensive and hard-working pieces of technology! but i've done it twice now, and it's actually surprisingly simple (as long as you keep track of all the damn screws... im lucky there's a magnetized screw mat in the house i can use)
i recommend watching a deep clean/teardown video of the GPU model you have before digging into it yourself. generally, they separate into 4 distinct portions: the outer shell, the heatsink, the board, and the backplate.
the shell contains the fans and any possible RGB elements. it'll have 1-2 controllers plugged into the board, one for the fans and one for the lighting elements if there are any. once the case is unscrewed, unplug these connectors with a firm squeeze and tug.
these tend to be surprisingly dusty on the inside, so it's probably a good idea to blast it with a duster. again, make sure to hold the fans so they don't overspin. you can also remove the fans from the shell and clean them individually if you'd like.
the heatsink is BIG and heavy, and you can do all the same stuff here that you would with a CPU cooler heatsink. it may take a bit of effort to tug off if the thermal materials are really making it stick to the board. once it's off, scrub the old thermal paste, blast it with a duster, and wash under soapy water if needed before rinsing thoroughly and leaving it to dry for a while.
the backplate is just a flat piece of metal that protects the back side of the board. usually all this will need is a simple wipedown.
the board is where all the magic happens, and will usually have a layout that's something like this:

clean up as needed; gently scrub off old thermal paste, scrape off the old thermal pads (but take close note of how thick they are so you can replace them with the correct pads), and brush/wipe down the dust and grease on each side as needed. take care to avoid touching the PCIe connector too much (the bar of golden pins that juts out from the bottom)
thermal padding varies from card to card (i recommend checking thermal pad placements for your gpu in water cooling guides, even if you're not doing water cooling) but it's typically gonna be on THESE spots:
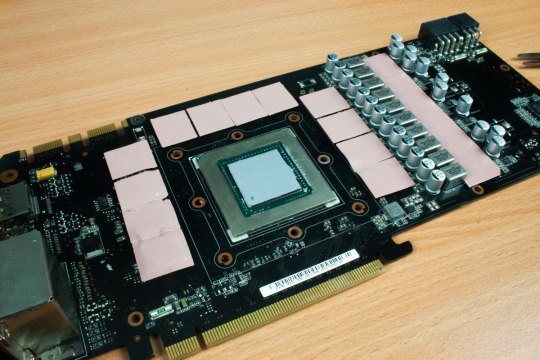
the VRAM chips surrounding the die (main chip) along with the small black chips next to the capacitors will require thermal pads the most. cut each one to size, carefully peel off the plastic films, and press each piece onto the chips.
now you can grab your thermal paste and put some on that big shiny die. now take your freshly pasted/padded board and CAREFULLY lower it back onto the heatsink. i highly suggest having a good source of lightning for this, since shifting around the pieces too much trying to get them to align properly can displace the thermal pads and mess with how the paste spreads.
screw the heatsink tight to the board, and double check to make sure that the pads and paste are snug against the heat sink. now put the backplate and shell back on and BAM YOU'RE DONE! with the paste and pads i used, i was able to bring down the temperature of my cards by a good 10-15 °C.
ok you've done all this deep cleaning shit and your computer is happy and healthy. what can you do for your computer's health in the future?
DUST AT LEAST ONCE A YEAR. haul that thang outside and spray that shit out to stop it from building up for too long.
KEEP IT OFF THE FLOOR. if you can, of course, not everyone has the desk room for it. computers accumulate dust easier when they're close to the floor. if you do need to keep it on the floor, you might have to dust it every 6-8 months rather than once a year.
AND STOP PUTTING YOUR LAPTOPS ON SOFT SURFACES I SWEAR TO GOD
GET A FAN CONTROLLER. motherboards are DOGSHIT at maintaining fan speeds!!!! there are physical fan hubs that use controller software, but if you can't afford that, fancontrol by rem0o is a stellar software-only option.
IF YOU DON'T ALREADY HAVE CASE FANS, GET THEM. the number of fans depends on the motherboard form factor your case can accommodate (ATX cases typically have 6-8), but having that air circulation is very important to maintaining ideal temperatures. arctic makes fantastic budget-friendly fans.
IF YOU HAVE AN NVMe HARD DRIVE: please put an aluminum heat sink on that thang. they get toasty :(
OK THATS IT I THINK. if anyone else has tips they wanna add, go right on ahead. ok thank you bye your computer will love you
13K notes
·
View notes

Text

Happy 2024 bitchesssss
15 notes
·
View notes

Text
MARIO BROS: before they became SUPER

This drawing was made earlier this year since in 1983, Luigi made his TRUE appearance to assist his brother in the hit game, MARIO BROS. (His first appearance was in a Game & Watch game by the same name that came out a month before.)
Hope you enjoy my contribution to the 40th Anniversary of the Arcade classic!
My first introduction to Mario was playing the remake thanks to Super Mario Advance! And I wouldn’t have it any other way honesty. ⭐️
52 notes
·
View notes