#20dollarlolita does patterns
Text
Can you believe it? 20dollarlolita Pattern School Step 2!
Only took me a year and a half. For people who don't remember a year and a half ago, we've started a project about learning to sew from patterns. The eventual goal is to help people become proficient enough at reading patterns to be able to tell what's going on in a pattern with instructions in another language, taking a pattern that doesn't fit and resizing it so that it does, and taking a pattern that isn't technically lolita and make it work in lolita fashion.
Step 1 was to make a non-fitted item from a commercial pattern. There were two goals of step 1: first to ensure that everyone was familiar with notches, grainlines, and other pattern markings; second was to give people experience with selecting fabric and trims to help give a non-lolita pattern a more lolita feeling.

For step 2, we're modifying a commercial pajama pants pattern into bloomers. In this step, we're going to become familiar with how to prepare a commercial pattern for modification, to compare pattern size to body size and to use your tape measure to judge added fullness, and how to do some basic flat pattern manipulation to add in style ease. Bloomers are a great first manipulation/fitted project due to the loose fit and the fact that, in most lolita applications, the vast majority of it is under your skirt and therefore invisible.
For this specific sample, I'm going to use Gertie's Harlow Pajama Pants pattern for this. I'm doing this because I bought a commercial pattern from Green Store and then promptly lost it, and these pajama pants are a free download. If you are printing the tiled version on your home computer printer, you only need pages 41-52 and 58-71, which will save you about 40 pages of printing.

I highly recommed doing some research and having a good idea of how long the bloomers you want to make should be, as well as how they are decorated. This is my research board.
You can use any pajama pants pattern that has a casing (elastic or drawstring) at the top, and no zipper. In this case, pants with a looser fit are going to be easier to turn into bloomers. If you like wearing your pants at a certain point on your body, I'd check for pajama pants that are at that waistline. The pants that I'm using are designed to sit at your natural waist, which might be too high for some people.

Your first step is to assemble and fortify your pattern. If you're printing this on copy paper, it's going to be strong enough, provided you use enough tape when tiling your pattern. If you're using a tissue paper pattern, like the kind you'd buy at the craft store, it helps to fuse some inexpensive interfacing onto the back of the pattern. We're going to work with these patterns a lot, so it's important to make them a little bit stronger.
Now, you are going to need to go into your pattern instructions and find two important things. The first is your overall seam allowance. In most commercial patterns, this is 5/8 of an inch. Some other patterns might have different seam allowance.
The second is how big your elastic casing at the top will be. In this case, my seam allowance is 5/8" of an inch. Because my hem casing is .25"+1.25" (the amount you turn up plus them amount you turn up the second time), I know that my elastic casing will take up 1.5".

You're now going to mark on your pattern what the stitching line is. Your pattern has seam allowance included. This is very useful for when you cut out the pattern. However, if we take our pattern measurements with seam allowance, we won't have accurate numbers. So we have to clarify where the seam allowance is.
The first thing that I do (not pictured) is to write how much I'm removing along each line. In this case, I write 5/8" along the side and crotch seams, and "1+1/2" at the top where the casing is. Since we're going to drastically shorten these pants, it doesn't matter what the hem allowance is.
Then, I take my ruler, and I mark my stitching line. I do it in pencil, check that I'm correct, and then go back and re-draw it with a red marker. This helps me make sure that I'm following the correct lines.
Make sure you transfer your notches onto your new stitching line. You can see in the picture above how I'm using the ruler to measure where the notch is going to go.
The next step, walking the pattern, is a little tricky to explain. Here's a post that goes into it in great detail.
Basically, you're going to overlap the seam lines, to make sure they line up. The only problem with doing this is that both seam lines are curved. So, instead of lining it all up at once, you're going to go about an inch at a time, letting the pattern rotate so that it stays flat on the table. At any given point, you're only going to have an inch or so of the line overlapping, but that's all you need. If you run into notches that don't line up, cross one out and re-draw it so that it matches the other notch.
If this seems really complicated, you don't really need to do that on this project. It just is a good practice to have.
So you now should have a pattern with all the commercial markings, but where you've drawn the stitching line.

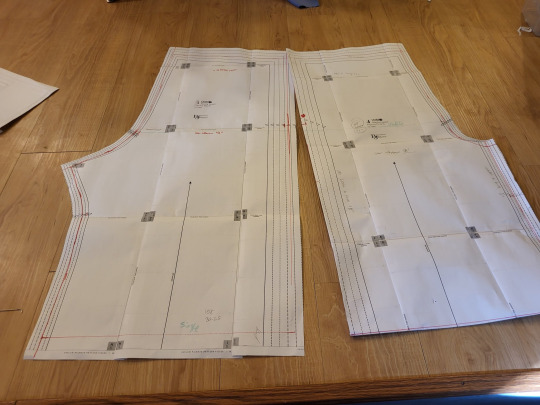
So now, you're going to put your two pieces together along the outseam. Since this is a pretty straight part of a pajama pant, it shouldn't be too difficult to get them to line up. Remember to overlap them on your stitching line, and not on the edge of the pattern.
We're putting them together so that you can measure them both at the same time. it saves us some math.

In bloomers, there are three major measurements to take into consideration. You need to know how big you want the leg to be, how big you want the booty to be, and how long you want the leg of the bloomer to be. In addition, you need to make sure that the waist of your pants will be big enough to fit your waist. In most pajama pants patterns, this isn't a problem, but checking it is good practice.
So, in this picture, you can see that I've measured the cuff of the pants. These two pieces together make up one pant leg, so I just need to measure the two pieces to know how big the pant leg will be.

I then take my tape measure and hold it around my leg at the same size that the pattern is at that point. I just use my eyes and judge if I think that'll be enough room to make my bloomers nice and poofy.
If your pattern doesn't tell you your hip line (mine didn't), it's usually at the point where the two notches on the crotch curve are. One of the reasons why we're doing this on a commercial pattern is that someone did the work for us and put those notches where they should be.
Now, remember, these two pieces are only half of the pant pattern. When we measure the hips of the pattern, we have to multiply this measurement by 2. Half the hip measurement x 2 is the full hip measurement.

Once again, hold this out next to your body and make sure that you like how much fullness you need. Remember that, in addition to having extra fullness because bloomers are poofy, you need room to be able to move and sit down. This measure between the size of my body and the size of the pattern looked pretty good to me. I could definitely have gone a little bit bigger.
The pant leg measurement is okay to be a little bit too long. You can always make it shorter. However, feel free to chop about 18" off the bottom of a full length pant leg. This just makes things a little easier.

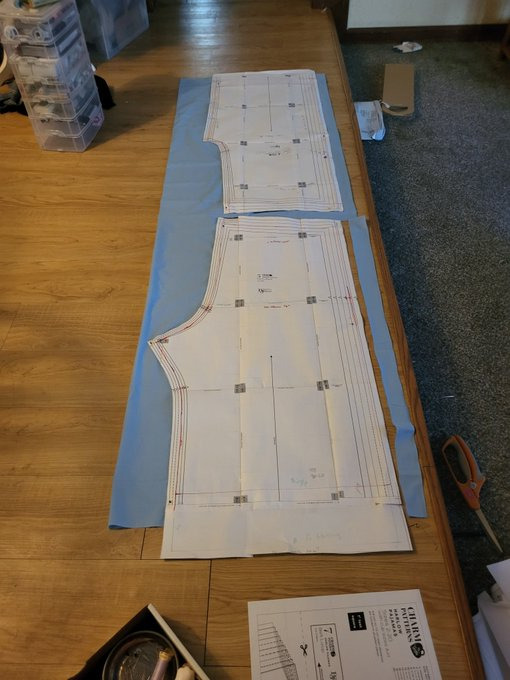
Now, we're going to move the two pattern pieces until they're the size we like. If both the hip measurement and the leg measurement are too small, we're going to move both pattern pieces apart. To turn pajama pants into bloomers, this is likely to be the most common adjustment.
If the hip measurement is pretty okay, but the cuff measurement is too small, you're just going to move the bottom part of the pattern apart.
You'll notice that this is still enlarging the hip measurement a little bit. This is fine for bloomers since the style is for a lot of fullness in that area.

And if your cuff is the correct size, but your hip measure is too big, you can keep the cuff size the same and move the hip line apart until it's the size you want.
This technique of lining up the pattern pieces, and then moving them until they're the size you want, is the basics of flat patterning. As long as you follow the philosophy of keeping the measurements you like roughly the same, and moving the areas that you don't like until they measure what you need, you can easily resize a pattern without having to re-draw everything.
If you had to spread your pieces apart, tape some paper underneath the gap. This piece of paper should bridge the gap between the two pieces, turning them into one piece. Really quickly double-check that these pieces measure how you want. Then, mark a line in the middle of the paper bridge. Draw your notches onto the cut line. Cut the two pieces apart on that line. You've now made both pieces bigger. Tape another little piece of paper onto the cut edge of each piece, mark out your seam allowance, and cut that off.
Bonus points: swap the position of the pattern pieces, so that the crotch curve is one continuous line. Measure the length of that. Then, hold your tape measure along where the crotch curve of your pants will fit, and make sure that you have clearance there. I'm not going to photograph that, andi t's not super necessary with most pajama patterns.
Go ahead and cut your pieces out.Even though I'd shortened the pattern, mine were still too long to fit on a 2-yard cut of fabric. Since I knew that my pants were a little long, I just let the end hang off the edge of the fabric.
Here's the really magical part about this. Even though you've resized your pattern, you still have all your seam allowance, notches, grainlines, and your pattern instructions. Since you kept all your pattern markings consistent, you can now follow the instructions that came with your pattern. Go up until it tells you to hem the pants, and then try them on.
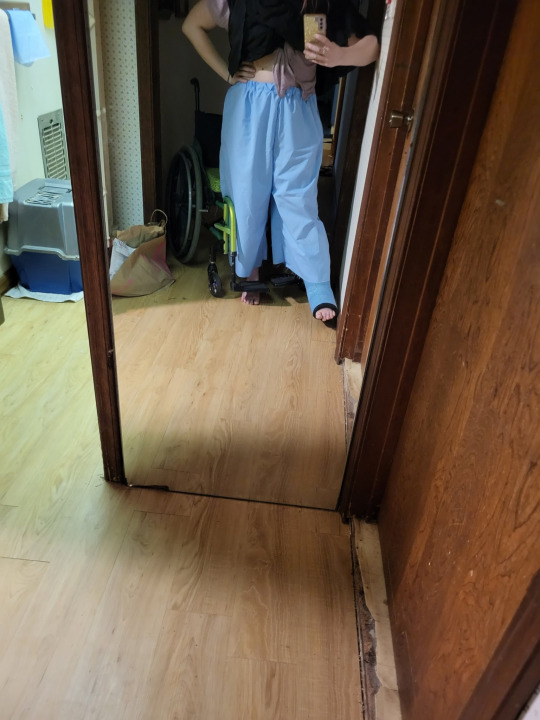
In my case, my pants were way too long to be bloomers. I knew that I wanted to do a casing with a heading, which does use s pretty big hem allowance, but even so, I'd need to shorten them.
Check out your bloomer research board to see how long you want them to be. I wanted some long ones that did the old-school bloomer peek, so I made them on the longer side. I also didn't want them to ride up into my butt when sitting in a wheelchair.
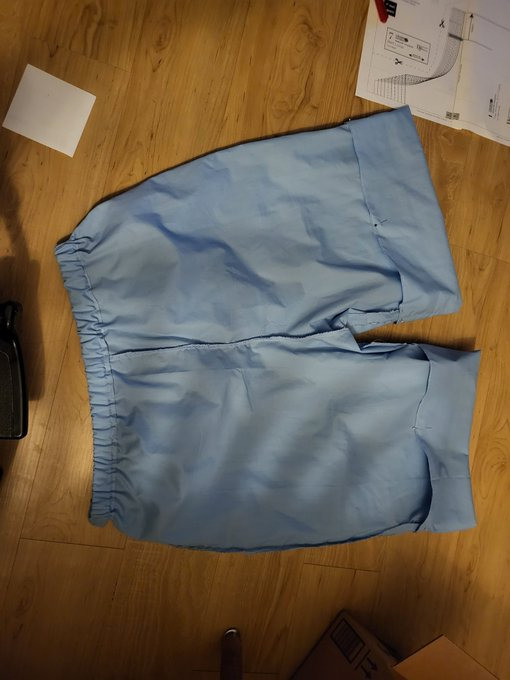
So, time to fold up the bottoms, add my elastic, and call the basic construction finished.
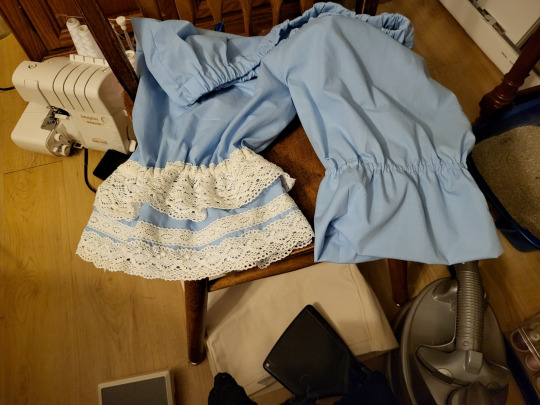
I looked up on my research board to try to find a good way to decorate these. One of the nice things about bloomers is that you can wear them with a wide variety of coords. This makes them one of those items where you can add some extra lace, and then use that lace in multiple coords. I feel like, since these bloomers are a good way of adding detail in multiple coords, it's a good excuse to add a little bit extra lace. You can see how much of a difference it makes in this picture. It really turns them from baggy shorts into real bloomers. I really recommend sometimes investing in a couple of big purchases of lace. If you have lots of lace on hand, you're more likely to include it in your projects, which can really help push a meh project into proper lolita fashion territory. I have a rule that I don't spend more than $1.50 a yard on lace unless it's really fantastic, and I manage to find things at that point on Aliexpress and sites like Cheeptrims.

Now go on and let them peek out of your favorite skirt. And remember, definitely don't press that skirt before putting this picture in your tutorial.
#20dollarlolita#dollar chan's pattern school#step 2#lolita fashion#patternmaking#handmade lolita#lolita bloomers#sewing tutorial#hey guys look i actually made somethign#long post
92 notes
·
View notes
Text
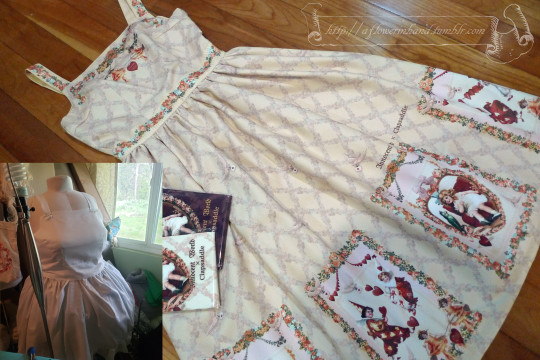
I’m in a potentially funky legal situation. I made a pattern for personal use, which was based off the pattern for the Innocent World JSK in GLB#49, which was published 7 years ago. I didn’t actually do any tracing or copying, but I did look at the pattern before I made mine, and I didn’t modify the actual JSK to make it a different final design. All I did was take a pattern designed for a 85cm (US size 4) bust and resize it for a 130cm (US size 24) bust.
I’m pretty sure that selling the same pattern, of an out of print pattern, of an no longer made garment, in a size that the pattern and the dress were never offered in, is still not legal in my country. I probably can’t go to Fed Ex and scan this and post it like I have for other patterns I’ve made.
On the other hand, if I have any friends out there who would like to test this pattern and can contribute about $2 for shipping costs, I’m pretty sure I’m allowed to hand-trace this pattern onto vellum, stick it in an envelope, and drop it in the mail. I made it for personal use (both to make a post about half-back shirring and so that my dress form isn’t naked) so I don’t have great instructions or any real plans to grade it up and down in size (especially if I can’t sell it), but the dress design itself has shirring in the back, so it fits a variety of sizes the same way that mainstream lolita dresses tend to fit several sizes.
So, if you want to be my friend, shoot me an ask.
(I’ve got five friends who are interested, and I’m going to cap it at 5 for now, until I know for sure that I can’t get sued over this. If I get sued over this, however, this blog will change from being called 20dollarlolita: budget, offbrand, diy and will start being called 20dollarlolita: I Once Got Sued By Innocent World
But for real, I’ve been sued once in my life and that’s enough for now)
39 notes
·
View notes
Text
BootstrapFashion.com’s DIY dress form pattern (standard plus sizes) review:
When I decided I was going to start making patterns specifically for plus sizes, (instead of trying to grade my existing patterns up to plus sizes, which is less accurate), I knew I also wanted to model them on a properly sized dress form.
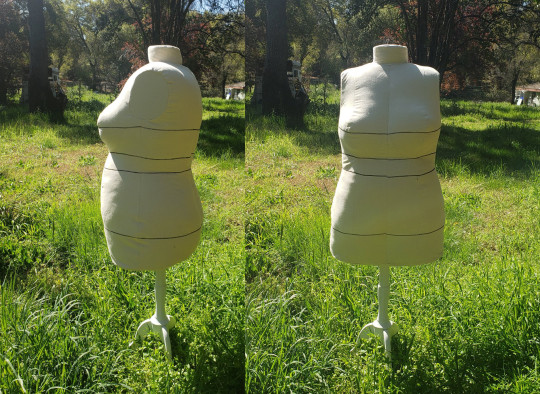
Turns out that it’s a freaking pain to get large size dress forms, so I made one.
(May future readers please excuse a bit of sloppy matching and stuffing here; there was a plague)
There’s a company called Bootstrap Fashion, and they make patterns to sew your own dress form. They have a service where you can measure yourself, put the numbers in their form, and get a pattern customized to your size. They also offer patterns in standard sizes, which is the route I went.
The custom patterns are less expensive, but this standard size pattern set me back $37.
(Yes, I know about duct tape dress forms, and I’ve made several paper-tape dress forms. Paper tape works a lot better than duct tape, btw. There’s several reasons why I didn’t go this route, including accuracy, pinnability, wanting it to fit a specific size and not a specific person, and visuals of the finished project. I’ll go into those later, under the jump).
So, let’s go into some things about this pattern.
Price: $37 gets you several sizes of pattern, all of which are a PDF download. Each size is its own PDF, so you don’t need to get confused with multi-size. $37 is not inexpensive. Once you get your download, you print out your pages on your home printer (mine was 45 pages), tape them together, and cut them out. You then need to add seam allowance and cut.
Note: there is no option to get the pattern printed and sent to you. Also note: I HATE piecing together patterns and would happily have spent $50 on a pattern printed on large paper.
Final result: The pattern worked up pretty nice. It’s got an inner stabilizing piece to hold the tube for the dress form stand, and that piece also stops it from ballooning where it shouldn’t when it’s stuffed. It’s got markings for the horizontal foundation lines. The neck has a sponge that’s nice for putting pins in. It’s firm enough to do what I want but also lightweight (though it’s stuffed with almost eight pounds of fiberfill. If I need to mail it anywhere, I can unstuff it, send it, and buy fiberfill to restuff it at the final location, making this one of the only dress forms I can find that could be sent in the mail.
Mine was a little messy in some parts because I’m in a GOTTASEWFAST mood due to avoiding thinking about current life things. Excuse a bit of sloppiness; there was a plague, and I’m avoiding thinking about how I just dumped the last piece of stability in my life over its misalignment with my morals.
Instructions: Oh boy. I want to begin by saying that I spend 5 years in costume design school working from patterns with various levels of instruction competency and making my own patterns and instructions, and that I also once built a harp with nothing but a good book of instructions and a 4 week scene shop class. I know how to follow instructions, and I don’t believe my difficulty with these instructions was PEBCAK or inexperience.
I took notes for this post as I made this dress form. I looked at them today to realize that they’re utter gibberish. Original notes here with transription here: https://pastebin.com/sGEtfz8A
But here’s a summary of the main points:
1) Notches. This pattern uses about twelve different kinds of notches. This is a valid route to take. However, the kinds of notches are not always distinct. On the busts, for example, there is a wide 3-notch and a narrow 3-notch. If there are twelve kinds of notches, why are two nearly-identical ones on the same pattern piece, where you’re expected to note the difference and do this properly? This pattern HAS distinct kinds of notches and there is no reason why those two similar kinds had to be on the same piece. This would have cost $0 to do better.
2) More notches. The purpose of notches is that if the notches match, the piece is pinned properly. There should be no situation where the notches match and the piece is not pinned properly. This pattern had a situation where the proper notches matched each other, but the piece was upside-down. This should not happen. To prevent this, you can use different kinds of notches at each end, like maybe one of the twelve different kinds of notches this pattern already uses.
3) Level of education in the pattern. This pattern flips between explaining to you how to use interfacing in deep detail, to telling you “make sure notches match” with no guide for what to do if the notches don’t match. Is your customer a beginner sewer or an experienced one? Why do your instructions not know this? How did you decide what to give in detail and what to gloss over? Why were those decisions made, if they were made at all?
4) Terminology. Some of this is me being pedantic. Some of this is not me being pedantic. Words like “interlining” and “stay-stitching” mean things. When people see those words, they assume that those words mean those things that the word means. That is the purpose of language. That’s why we have it.
Interlining is a material placed between the face fabric and the lining. It is not a piece of inner structure. Stay-stitching is done on a single layer of fabric to prevent distortion and to force the fabric it’s sewn over to stay the shape it is. It is not done on two layers to attach them together. (Yes, I’m in the USA and yes, the pattern people are in the UK, and yes, I checked to make sure these terms mean these things in both countries).
Some terms, like “self”, are a bit more vague. I was trained that the fabric that you’re making the garment out of is the “face”, and if you’re using the face fabric for something traditionally made from a different fabric, like a facing or a lining, it’s made of self. Thus self-faced and self-lined. This one isn’t universal but it annoyed me because it left another layer of “what does this mean” after i deciphered what they think interlining is.
5) Using generic instructions for patterns that exceed those instructions. This happens a lot with plus-size instructions. I wasn’t aware of it until I started researching these things, and holy wow it is annoying. You can use a 7″ or 9″ zipper for most of these patterns, so the instructions say “7″ or 9″ zipper” on them.
With the plus sizes, you need a 9″ zipper, as a 7″ will be too short. Does the pattern tell you this? No. Because they wrote the instructions for one size and then send them out for all sizes.
This sounds like it was nit picking but this pattern was almost $40 and it came without specific instructions.
6) I would murder for some dimensions on this pattern. On the website, but not included with the pattern, are the finished dimensions of the form. This covers bust, underbust, waist, and hips. It would have been really handy to have these included in the pattern.
In general, when I’m working on a pattern for someone, I don’t just have their hips and bust and etc measurements. I’ve got an entire 8.5x11 page of measurements, including four hip measurements, the distance between nipples, the front yoke, the back yoke, around the neck, armpit to waist, etc. It’s really, really hard to find a standard measurement for plus sizes (since the standard that was made in the 50′s didn’t cover that) and it’s annoying to not know what the patternmakers thought was the right size. I would have loved to be able to measure this as I went to make sure it was the right size. I also would have greatly appreciated if the foundational measures were printed on the pattern pieces. That’d be a simple thing to add and would have made my life much easier.
As I said in my original notes, instructions unclear: petticoat stuck in garbage disposal
In summary: I had a really good result with this, and I think the product is fine, but due to the instructions, I cannot recommend this to anyone who isn’t somewhat experienced with sewing and who doesn’t have enough time and patience to figure some of this out on their own. This is a disappointment, because the pattern itself is a really good product, and I’d love to recommend it.
And, like I promised, why (if you can slog through the instructions) this is better than doing a tape form.
First, because any form you make by putting it on top of your existing body will be bigger than your existing body. You’ll easily add inches, maybe a full size. Second, because any time you have your tape bridge a gap, you create distortion. If you don’t have a strategy for how to apply tape to the bust, you’ll end up with weird shaped busts. Third, because a tape form makes the form of a specific human, and I wanted the form of a generic human. There’s no way I know to make a tape form of a specific standard size. Fourth, because tape forms kind of just look bad. I’m going to be using this for modeling samples for etsy, and I wanted something that looked a little bit professional. If I’m going to take this patternmaking seriously, I should be supplying myself with serious tools. Fifth, because I wanted a form that was pinnable and could be taped onto without damage to the form. I wanted a form that I could use like my other dress forms.
Anyway, that’s how that went. Since I have the wide format printer mostly up and running (as long as you don’t need magenta or yellow) and I have the dress form, my next steps are to get my sewing room clean and clear so my brain can be (as) clean and clear (as the situation permits). I’m going to start by making some blouse patterns, since that’s the fabric I have on hand, so if you’ve ever wanted a pattern for a specific lolita blouse in a size 18+, shoot me a picture and I’ll add it to the list of things I might do.
To everyone who has sent me an ask or asked for help in the past few weeks, I’ll probably answer those in a couple of days, with apologies for leaving it so long. Now, if you’ll excuse me, I’m going to go drill eleven 1/4″ holes in my wall. Thank you all for reading.
#long post#lolita fashion#20dollarlolita does patterns#bootstrapfashions#diy dress form#handmade lolita#20dollarlolita quality posts
43 notes
·
View notes
Last Seen Blogs

willieaustin-blog1
http://www.click2trial.com/alpha-pro-testobuild/

bahansedapp
AHHH SEDAP SAYANG🍑💦

lakecountylibrary
Lake County Public Library

2129888
woe my special interests be upon ye 🪤
shadowlinktheshadow
HE FALL