#bootstrapfashions
Text
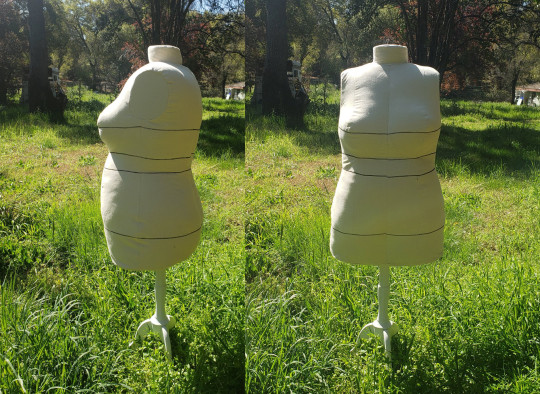
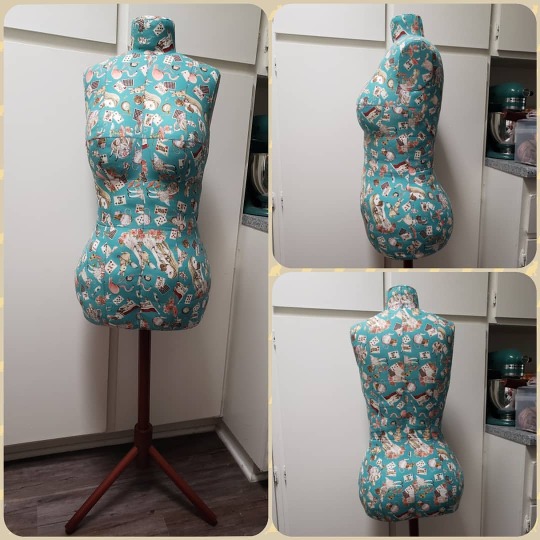
BootstrapFashion.com’s DIY dress form pattern (standard plus sizes) review:
When I decided I was going to start making patterns specifically for plus sizes, (instead of trying to grade my existing patterns up to plus sizes, which is less accurate), I knew I also wanted to model them on a properly sized dress form.
Turns out that it’s a freaking pain to get large size dress forms, so I made one.
(May future readers please excuse a bit of sloppy matching and stuffing here; there was a plague)
There’s a company called Bootstrap Fashion, and they make patterns to sew your own dress form. They have a service where you can measure yourself, put the numbers in their form, and get a pattern customized to your size. They also offer patterns in standard sizes, which is the route I went.
The custom patterns are less expensive, but this standard size pattern set me back $37.
(Yes, I know about duct tape dress forms, and I’ve made several paper-tape dress forms. Paper tape works a lot better than duct tape, btw. There’s several reasons why I didn’t go this route, including accuracy, pinnability, wanting it to fit a specific size and not a specific person, and visuals of the finished project. I’ll go into those later, under the jump).
So, let’s go into some things about this pattern.
Price: $37 gets you several sizes of pattern, all of which are a PDF download. Each size is its own PDF, so you don’t need to get confused with multi-size. $37 is not inexpensive. Once you get your download, you print out your pages on your home printer (mine was 45 pages), tape them together, and cut them out. You then need to add seam allowance and cut.
Note: there is no option to get the pattern printed and sent to you. Also note: I HATE piecing together patterns and would happily have spent $50 on a pattern printed on large paper.
Final result: The pattern worked up pretty nice. It’s got an inner stabilizing piece to hold the tube for the dress form stand, and that piece also stops it from ballooning where it shouldn’t when it’s stuffed. It’s got markings for the horizontal foundation lines. The neck has a sponge that’s nice for putting pins in. It’s firm enough to do what I want but also lightweight (though it’s stuffed with almost eight pounds of fiberfill. If I need to mail it anywhere, I can unstuff it, send it, and buy fiberfill to restuff it at the final location, making this one of the only dress forms I can find that could be sent in the mail.
Mine was a little messy in some parts because I’m in a GOTTASEWFAST mood due to avoiding thinking about current life things. Excuse a bit of sloppiness; there was a plague, and I’m avoiding thinking about how I just dumped the last piece of stability in my life over its misalignment with my morals.
Instructions: Oh boy. I want to begin by saying that I spend 5 years in costume design school working from patterns with various levels of instruction competency and making my own patterns and instructions, and that I also once built a harp with nothing but a good book of instructions and a 4 week scene shop class. I know how to follow instructions, and I don’t believe my difficulty with these instructions was PEBCAK or inexperience.
I took notes for this post as I made this dress form. I looked at them today to realize that they’re utter gibberish. Original notes here with transription here: https://pastebin.com/sGEtfz8A
But here’s a summary of the main points:
1) Notches. This pattern uses about twelve different kinds of notches. This is a valid route to take. However, the kinds of notches are not always distinct. On the busts, for example, there is a wide 3-notch and a narrow 3-notch. If there are twelve kinds of notches, why are two nearly-identical ones on the same pattern piece, where you’re expected to note the difference and do this properly? This pattern HAS distinct kinds of notches and there is no reason why those two similar kinds had to be on the same piece. This would have cost $0 to do better.
2) More notches. The purpose of notches is that if the notches match, the piece is pinned properly. There should be no situation where the notches match and the piece is not pinned properly. This pattern had a situation where the proper notches matched each other, but the piece was upside-down. This should not happen. To prevent this, you can use different kinds of notches at each end, like maybe one of the twelve different kinds of notches this pattern already uses.
3) Level of education in the pattern. This pattern flips between explaining to you how to use interfacing in deep detail, to telling you “make sure notches match” with no guide for what to do if the notches don’t match. Is your customer a beginner sewer or an experienced one? Why do your instructions not know this? How did you decide what to give in detail and what to gloss over? Why were those decisions made, if they were made at all?
4) Terminology. Some of this is me being pedantic. Some of this is not me being pedantic. Words like “interlining” and “stay-stitching” mean things. When people see those words, they assume that those words mean those things that the word means. That is the purpose of language. That’s why we have it.
Interlining is a material placed between the face fabric and the lining. It is not a piece of inner structure. Stay-stitching is done on a single layer of fabric to prevent distortion and to force the fabric it’s sewn over to stay the shape it is. It is not done on two layers to attach them together. (Yes, I’m in the USA and yes, the pattern people are in the UK, and yes, I checked to make sure these terms mean these things in both countries).
Some terms, like “self”, are a bit more vague. I was trained that the fabric that you’re making the garment out of is the “face”, and if you’re using the face fabric for something traditionally made from a different fabric, like a facing or a lining, it’s made of self. Thus self-faced and self-lined. This one isn’t universal but it annoyed me because it left another layer of “what does this mean” after i deciphered what they think interlining is.
5) Using generic instructions for patterns that exceed those instructions. This happens a lot with plus-size instructions. I wasn’t aware of it until I started researching these things, and holy wow it is annoying. You can use a 7″ or 9″ zipper for most of these patterns, so the instructions say “7″ or 9″ zipper” on them.
With the plus sizes, you need a 9″ zipper, as a 7″ will be too short. Does the pattern tell you this? No. Because they wrote the instructions for one size and then send them out for all sizes.
This sounds like it was nit picking but this pattern was almost $40 and it came without specific instructions.
6) I would murder for some dimensions on this pattern. On the website, but not included with the pattern, are the finished dimensions of the form. This covers bust, underbust, waist, and hips. It would have been really handy to have these included in the pattern.
In general, when I’m working on a pattern for someone, I don’t just have their hips and bust and etc measurements. I’ve got an entire 8.5x11 page of measurements, including four hip measurements, the distance between nipples, the front yoke, the back yoke, around the neck, armpit to waist, etc. It’s really, really hard to find a standard measurement for plus sizes (since the standard that was made in the 50′s didn’t cover that) and it’s annoying to not know what the patternmakers thought was the right size. I would have loved to be able to measure this as I went to make sure it was the right size. I also would have greatly appreciated if the foundational measures were printed on the pattern pieces. That’d be a simple thing to add and would have made my life much easier.
As I said in my original notes, instructions unclear: petticoat stuck in garbage disposal
In summary: I had a really good result with this, and I think the product is fine, but due to the instructions, I cannot recommend this to anyone who isn’t somewhat experienced with sewing and who doesn’t have enough time and patience to figure some of this out on their own. This is a disappointment, because the pattern itself is a really good product, and I’d love to recommend it.
And, like I promised, why (if you can slog through the instructions) this is better than doing a tape form.
First, because any form you make by putting it on top of your existing body will be bigger than your existing body. You’ll easily add inches, maybe a full size. Second, because any time you have your tape bridge a gap, you create distortion. If you don’t have a strategy for how to apply tape to the bust, you’ll end up with weird shaped busts. Third, because a tape form makes the form of a specific human, and I wanted the form of a generic human. There’s no way I know to make a tape form of a specific standard size. Fourth, because tape forms kind of just look bad. I’m going to be using this for modeling samples for etsy, and I wanted something that looked a little bit professional. If I’m going to take this patternmaking seriously, I should be supplying myself with serious tools. Fifth, because I wanted a form that was pinnable and could be taped onto without damage to the form. I wanted a form that I could use like my other dress forms.
Anyway, that’s how that went. Since I have the wide format printer mostly up and running (as long as you don’t need magenta or yellow) and I have the dress form, my next steps are to get my sewing room clean and clear so my brain can be (as) clean and clear (as the situation permits). I’m going to start by making some blouse patterns, since that’s the fabric I have on hand, so if you’ve ever wanted a pattern for a specific lolita blouse in a size 18+, shoot me a picture and I’ll add it to the list of things I might do.
To everyone who has sent me an ask or asked for help in the past few weeks, I’ll probably answer those in a couple of days, with apologies for leaving it so long. Now, if you’ll excuse me, I’m going to go drill eleven 1/4″ holes in my wall. Thank you all for reading.
#long post#lolita fashion#20dollarlolita does patterns#bootstrapfashions#diy dress form#handmade lolita#20dollarlolita quality posts
43 notes
·
View notes
Photo

Spent more time working on my dressform. I've definitely been dilly dallying on progress but its fun to see it come together. Especially because it is long torsoed like I am. I know that is the reason I did it this way, but it's still nice to see! _________________________________ #zephyrmakesthings #bootstrapfashion #bootstrapdressform #dressform #sewing #behindtheseams #memadewardrobe #toolsofthetrade https://www.instagram.com/p/CFdEBftDck_/?igshid=60551ihlbgr5
#zephyrmakesthings#bootstrapfashion#bootstrapdressform#dressform#sewing#behindtheseams#memadewardrobe#toolsofthetrade
2 notes
·
View notes
Photo

Sometimes sewing fails happen and we gotta fix 'em 🧵 I was just about done with my @bootstrapfashion dressform when I realized that I had some wrong measurements in the chest height area. My... ahem... apex height was a whole inch higher on my preview pattern compared to the pattern I purchased (my mistake oops), so I did what any seamstress does best and seam-ripped the front bit of the mannequin to restart. All this to say, it happens sometimes, never beat yourself up over a messed up seam ^^ #sewingfail #sewing #seamstress #bootstrapfashion #dressform #mannequin #cosplayer #cosplayerofinstagram https://www.instagram.com/p/CEkZultjAo5/?igshid=19ca6g6ype9wm
0 notes
Photo
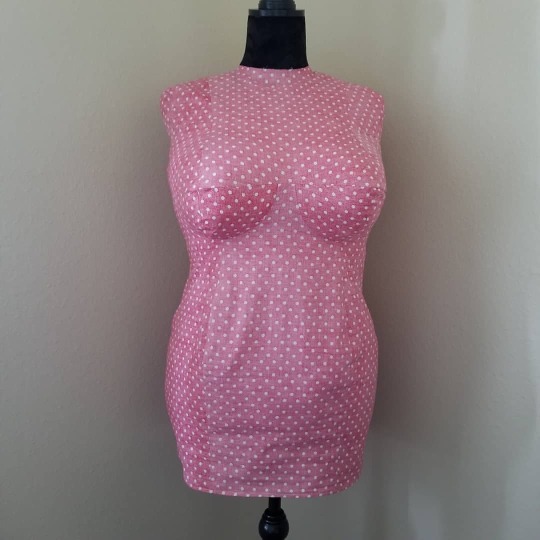
My new dress form cover is done! This project has been on the ufo pile for so long because, well, life. I am so excited to finally have a dress form that is closer to my real body. I don't mind sharing my numbers because that's all they are numbers and I know how uneasy they can make us feel. The original dress form was about a 36-27-36, and I am 46-35-43. This was my first time sewing a cover and lessons were learned 😅 but it was way easier than expected. I started with a very small dress form and padded out the form to my measurements using quilting batting. I used cotton fabric from my stash so it was not the recommended one but it worked. I got my pattern from @bootstrapfashion . If you buy a pattern from them, please consider accessing their site using my affiliate link https://bit.ly/3iGN6DM . This will give me a little comission to help fund more sewing projects. The midsection looks a little loose because back when I bought the pattern, I was a little fuller there. I think I also picked the wrong belly protuberance. The form was padded closer to my current waist number. This actually helps because since our sizes can change a bit throughout the months this will let me pad it out more if needed. I used a different fabric than recommended, to stash bust, so it did make it a bit harder to get the cover over the padding. This caused some of the padding to shift but I am not that concerned about it, what I have now is going to work a lot better than any form I can buy so I am really happy with it. For the bust padding I ended up having to cut the batting down the middle because I forgot the pattern had cups 🤪. Let me know if you have any questions about the process. I have added my link to my stories/highlights to make it easier to use. . . . . . . #historicalgarments #sewist #sewcialist #curvystyle #fashionhistory #dresshistory #costumedesign #costura #dressform https://www.instagram.com/p/CEAcOIUBZ8K/?igshid=14n5m8yasy5x9
#historicalgarments#sewist#sewcialist#curvystyle#fashionhistory#dresshistory#costumedesign#costura#dressform
61 notes
·
View notes
Photo
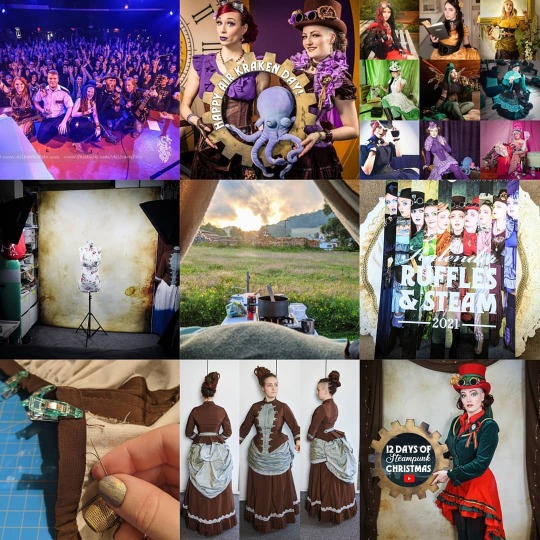
Since none of my favourite moments of 2020 made it into the most liked I decided to make my own #bestnine 1 In January I had the opportunity to join my boyfriend on stage with @aeronauticaband for a concert. I LOVE singing and even more to support my boyfriend's band which is the reason we even met years ago. (I did an interview with them for a #steampunk magazine) (Photo by All Dark Photo) 2 The #photoshoot with my favourite Co-Model @nana_model_official and the ever-awesome @fantasticpeoplepictures at @petersschokowelt was one of the few I had this year and I highly miss working with other creative people. The "Chocolate Breakfast" at Peters #Schokowelt also was the only event we organised this year with @anachronikaevents 3 Doing the #steampunkrainbow Video with a bunch of amazing ladies was one of the long-distance projects this year and I LOVE how I got to "meet" new people for it. (And also other similar projects like the #DroptheWatchChallenge, or twinning with @angebeesley ❤️) 4 I acquired a lot of new photo equipment this year like a "new" camera with the option of linking it to my smartphone (which has been a lifesaver for my self portraits) by @rekii.fotografie or lights by @kittydeloryva, as well es some backdrops. All of which allowed me to at least be able to shoot at home. I also started my little YouTube Journey and my video about how I made my @bootstrapfashion Dressform is one of the best performing videos ever. 5 In summer this year we not only visited @zahnradzylinder but finally had a real vacation with #camping, visiting museums and castles and our friends @kaddycorsair and McDrok of @jessnesband in Dresden. 6 Inspired by our video project I did my personal #colourfulsteampunk series which ended up in a calendar for which I FINALLY set up an #Etsy store. I plan on adding more items to it in the future. 7 2020 has been the year I took up a lot more handsewing, mostly thanks to the #Costube Community. 8 I also took on a project that has been my biggest most complicated yet: a full bustle gown plus hat and everything. I believe it's been my most time consuming project yet but I'm proud I did it (more pictures will follow soon) ⬇ https://www.instagram.com/p/CJlVmbFDWaN/?igshid=91xic0747yzj
#bestnine#steampunk#photoshoot#schokowelt#steampunkrainbow#dropthewatchchallenge#camping#colourfulsteampunk#etsy#costube
1 note
·
View note
Text
Ordered a mannequin pattern off of bootstrapfashion...20 minutes my ass, it’s like five whole hours later and no sign of it. :(
3 notes
·
View notes
Text

Finished my half scale dressform :D
I used Bootstrapfashion’s patterning services, the instructions are super easy to follow and honestly love this so much more than my duct tape dressform.
It’s less messy, easier to fix filling mistakes if you over or under fill certain areas, and less likely to fall apart over time. Unless of course you use rotten thread (if you can snap the thread with no effort then throw it away) or fabric (love yourself, this is a tool that needs good fabric to assist you go buy something nicer)
If you have a asymmetrical figure, you will need to make special padding pieces to accommodate those areas, but otherwise the dressform pattern should work. There is a video tutorial on their website if the written instructions are unclear!
13 notes
·
View notes
Photo

This is a dress form I made with a personalized pattern from @bootstrapfashion It was my first time using a pattern, so there were some mistakes made due to me being unsure about what certain markings meant, but now I have a better idea of what I’m doing. This form will be great help with future projects! https://www.instagram.com/p/CTfp1Wlp7gw/?utm_medium=tumblr
0 notes
Photo
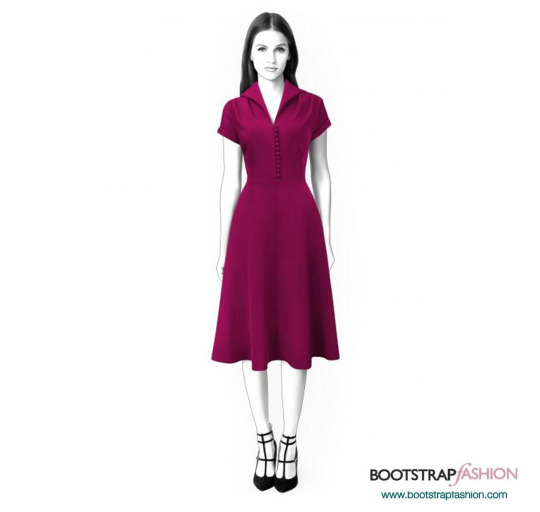
The Classic Shirtwaist Updated: BootStrapFashion
The shirtwaist dress was invented by taking a blouse pattern and attaching it back to a skirt. It usually only buttoned to the waist and then had a side-opening as well in order to make it possible to get it on. Only later did we get the full buttons down the front which then creates the problem of it flipping open or gaping. This update from Boot Strap Fashion goes back to the traditional look with 12 tiny buttons down the front of the bodice and an invisible zipper on the side. It comes with cap sleeves cut-in-one with the bodice and a winged collar. The skirt is 4-gored and flared. In short, a trim look for this coming spring season. They recommend a medium weight fabric with a bit of drape, so one of the softer cottons or heavier rayons would do. It’s a bit more serious in a solid, but you can imagine it in a small, pretty print for frivolity.
This pattern is offered as a pdf download in a variety of forms. You enter in your measurements, and their program creates the pattern.
http://patterns.bootstrapfashion.com/index.php/sewing-patterns/women/new-arrivals/fashion-designer-sewing-patterns-dress-with-short-sleeves.html#
12 notes
·
View notes
Photo

Wedding Guest dress reveal and full SEW & Tell and @bootstrapfashion pattern review on the channel now. Includes fitting tips for working with customizable sewing patterns. Link here or in bio:: https://youtu.be/jS37u4WZ-D4
0 notes
Text
BootstrapFashion Indiegogo Video
BootstrapFashion Indiegogo Video
View On WordPress
0 notes
Photo
She is a little lumpy, but she is finished! I'm very impressed with how the pattern matches my body so WELL! If you've been considering trying out the @bootstrapfashion DIY dressform I definitely recommend the project. Its going to be such an amazing addition to my tools and it is made from such a cute fabric. _________________________________ #zephyrmakesthings #bootstrapfashion #bootstrapdressform #dressform #sewing #behindtheseams #memadewardrobe #toolsofthetrade https://www.instagram.com/p/CFvCQd8DFp0/?igshid=gom0kac4lyi0
#zephyrmakesthings#bootstrapfashion#bootstrapdressform#dressform#sewing#behindtheseams#memadewardrobe#toolsofthetrade
0 notes
Photo
This isn’t as exciting as my usual posts, but here’s what I'm up to when I'm not working these days! This thing is a @bootstrapfashion dress form in the making! Having a custom-fit dress form has become a necessity for my upcoming costumes. I needed something more than my old adjustable form and just as I was about to give in and roll myself in duct tape when I randomly stumbled upon someone who made one of those. So far the making process is super easy and I should have a brand new custom dress form by the end of the week! After that, I will have unlimited poweeeers! 🌩 #seamstress #seamstressesofinstagram #sewing #dressform #customdressform #bootstrapfashion #cosplayer #cosplayersofinstagram #customfit #pattern https://www.instagram.com/p/CER3PgxjJpF/?igshid=12pli0uvac38j
#seamstress#seamstressesofinstagram#sewing#dressform#customdressform#bootstrapfashion#cosplayer#cosplayersofinstagram#customfit#pattern
0 notes
Photo

I finisged the sewing for my dressform yesterday and started stuffing her. I am reusing this giant yarn(it's wool roving) that one my partner's coworkers gave me as the stuffing, because I had no idea what I would use it for and it really makes great stuffing. I had to frog the project and Raiden made herself a noodle babe. My arms are sore so I haven't returned to the stuffing process, but we are close! ______________________________ _________________________________ #zephyrmakesthings #bootstrapfashion #bootstrapdressform #dressform #sewing #behindtheseams #memadewardrobe #toolsofthetrade https://www.instagram.com/p/CFkvJNKD_sX/?igshid=1bm95tzs6gx7e
#zephyrmakesthings#bootstrapfashion#bootstrapdressform#dressform#sewing#behindtheseams#memadewardrobe#toolsofthetrade
0 notes
Photo

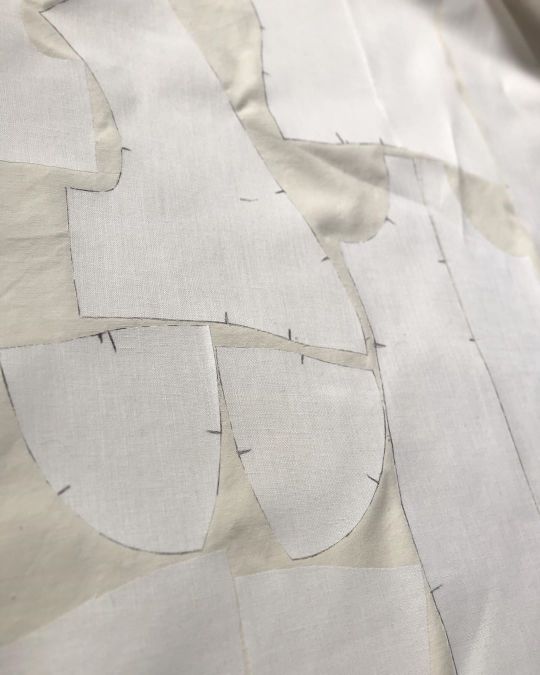
Started a new project yesterday because...well...I need a dressform for patternmaking since I prefer to drape versus flat drafting. My adjustable never truly matched as I am very long torsoed and as I was using it recently it broke at the waist when I moved it from one side of the room to the other. Not that I needed an excuse, but I had one! I'm very excited to try out the DIY sewn dressform from @bootstrapfashion because i used all of my measurements and the 3D model they sent actually looks like my body proportions. So yesterday, with Sir Didymus' help I cute out this wonderful Alice in Wonderland cotton print I had been hoarding for years. It's so aesthetically me, I'm glad it's literally gonna be a staple tool and decoration in my sewing nook! Now to fuse interfacing 5ever. _________________________________ #zephyrmakesthings #bootstrapfashion #bootstrapdressform #dressform #sewing #behindtheseams #memadewardrobe #toolsofthetrade https://www.instagram.com/p/CFVSVCqDlKu/?igshid=kuriapkejuyr
#zephyrmakesthings#bootstrapfashion#bootstrapdressform#dressform#sewing#behindtheseams#memadewardrobe#toolsofthetrade
0 notes
Text

Taking a short break from my ball gown to make a half scale dressform for future mini tutorials.
I used Bootstrapfashion’s custom patterning for this project.
With this I want to be able to show how to drape and pattern costumes and clothes, and if someone has a question on how to do a certain character I can justify it by knowing it won’t take much of my own materials to explain.
And a book I recently picked up has a section about drafting basic pattern sloppers, so once I get that figured out I’ll be good to start :D
2 notes
·
View notes
Last Seen Blogs

bluepandadraws-log
BluePanda's Tumblr Log

lovefearsme
Death And Destruction

juhhgomeez
apenas continue respiraaaaaando 🎵


sophiesarah24-blog
Sophie Sarah