#GFI tutorials ;
Text
xmoonglowx replied to your post: need something? here’s a post for you to reply to...
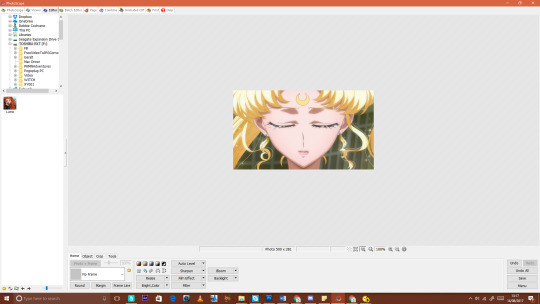
I do need a bit of help however on Photoscape. For large scenes such as this sailormooncrystalscreen… Is there anyway to shrink the image down?

Hey there @xmoonglowx, let me see if I can help you out a little! I’m not sure if you want to resize the image to make it smaller, or to crop it and resize it to icon quality so I will show you how to do both!

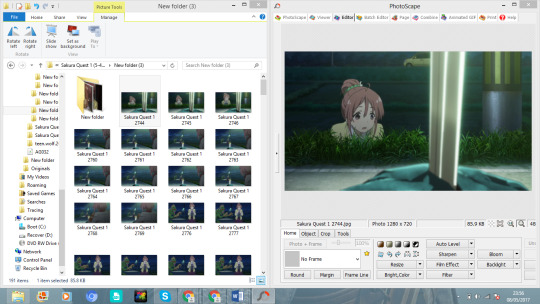
To resize a large image on Photoscape:
Step 001: drag your image or copy/paste your image onto Photoscape’s editor mode.

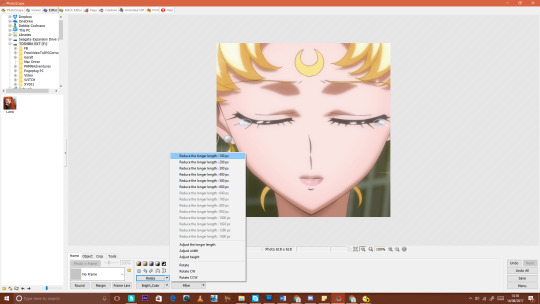
Step 002: Underneath the heading of home you will see your different drop down menu options. Click on the arrow that points down beside “resize” as you can see in the above picture.

You will see many different options here - for example, “reduce the longer length: 600px”. You can experiment with these until you find a size that is perfect for what you’re looking for. Here is an example outcome:
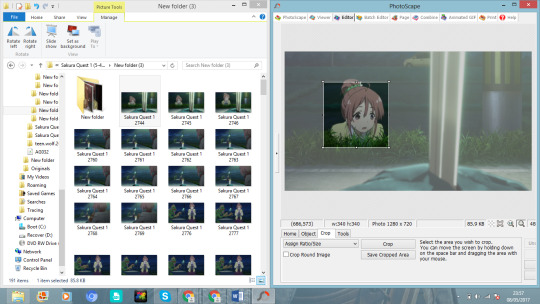
To crop a large image into an icon:
Step 001: drag your image or copy/paste your image onto Photoscape’s editor mode.

Step 002: Click the heading Crop which is above above the “No frame”, and next to “Home,” | “Object” | “Tools”. Click the option ‘Assign ratio/size’ and set it to 100 width/100 Height as seen in my previous tutorial. Then move the cursor till you have the icon you desire.

Step 003: Hit enter, or press crop.

Step 004: Underneath the heading of home you will see your different drop down menu options. Click on the arrow that points down beside “resize” as you can see in the above picture.You will see many different options here, the one you’re looking for the standard icon size is “reduce the longer length: 100px”.
Step 005: Select this option and then you can save/save as.

End outcome:

15 notes
·
View notes
Text
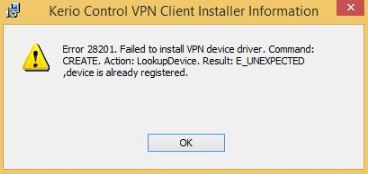
Kerio VPN Client - errore durante l'installazione su Windows 8 - FIX

In questo articolo ci dedicheremo alla risoluzione di un problema particolarmente fastidioso che può verificarsi durante l'installazione del Kerio Control VPN Client su una macchina Windows 8, Windows 8.1 o Windows Vista. Il tutorial che segue indica i due principali messaggi di errore che è possibile ricevere durante il setup e corrispondenti passaggi da effettuare per risolvere il problema.
Gli errori
Questi sono i due principali messaggi di errore che è possibile ricevere durante l'installazione del Kerio VPN client, entrambi legati al tentativo da parte del software di installare il servizio VPN.
LookupDevice Error
ERROR 28201. Failed to install VPN device driver. Command: UPDATE. Action: LookupDevice. Result: E_UNEXPECTED,device is already registered.
RemoveDevice Error
ERROR 28201. Failed to install VPN device driver. Command: UPDATE. Action: RemoveDevice. Result: 0x800F020B,unspecified error.

Entrambi i messaggi produrranno un codice di errore all'interno dell'event viewer di Windows, che potrà variare a seconda della versione di Windows in uso e della release di Kerio VPN client che si sta cercando di installare:
Failed to install VPN device driver, 0x800F020B
Failed to install VPN device driver, 0x800F0244
Nei paragrafi successivi ci dedicheremo ad elencare i passaggi necessari per risolvere ciascuno dei due errori.
I workaround
In questo paragrafo presentiamo due workaround che si sono dimostrati efficaci per risolvere le problematiche di cui sopra: nel caso in cui siate riusciti a determinare il codice di errore corrispondente al vostro problema potrete andare a colpo sicuro, altrimenti non vi resterà che provarli entrambi (uno alla volta): non preoccupatevi, nessuna delle procedure elencate provoca effetti negativi o collaterali sul vostro sistema.
#1. Codice di errore 0x800F020B
Dal menu Start, recatevi all'interno del menu Pannello di controllo > Programmi e funzionalità e disinstallate (se presente) qualsiasi versione di Kerio VPN client dal sistema.
Lanciate lo strumento Start > Esegui e digitate regedit per eseguire lo strumento Editor del registro di sistema.
Individuate ed eliminate la seguente chiave di registro: HKEY_LOCAL_MACHINE\SOFTWARE\WOW6432Node\Kerio
Recatevi all'interno del Pannello di Controllo, quindi navigate all'interno di Gestione Dispositivi > Network Adapter e disinstallate il Kerio Virtual Network Adapter.
Nel caso in cui, all'interno del medesimo pannello, vi siano anche adattatori di tipo WAN Miniport (WAN Miniport adapters), disinstallate anche quelli.
Riavviate il PC.
Disabilitate temporaneamente tutti gli antivirus presenti sul sistema.
Scaricate e installate una versione precedente del Kerio VPN Client da questa pagina (tutte le URL elencate sono link diretti al sito ufficiale): suggeriamo di utilizzare la 9.2.2 o la 9.2.1, entrambe dovrebbero poter essere installate correttamente senza incorrere nell'errore di cui sopra. Nel caso in cui l'errore si verifichi anche in questo caso, non preoccupatevi e proseguite con i passaggi successivi.
Scaricate lo strumento Kerio VPN Recovery tool (la URL è un link diretto al sito ufficiale): si tratta di un archivio ZIP che dovrete scompattare in una cartella temporanea.
Eseguite l'eseguibile contenuto nell'archivio ZIP così scaricato con privilegi di amministratore: questo passggio è molto importante, poiché questo strumento andrà a sostituire alcuni file di sistema ai quali dovrà necessariamente avere accesso in scrittura. Nel caso in cui vogliate controllare le operazioni effettuate dal tool, consigliamo di lanciarlo da una finestra command-line, ovviamente anch'essa da aprire con privilegi di amministratore, così da poter visualizzare l'output della console.
Dopo aver effettuato lo step #10 sarà possibile installare l'ultima versione del Kerio VPN Client: la procedura di installazione provvederà a sovrascrivere automaticamente la versione precedente installata nel corso dello step #8.
#2. Codice di errore 0x800F0244
Questa procedura, decisamente più complicata della precedente, può essere tentata sia in caso il codice di errore 0x800F0244 che nell'eventualità in cui il workaround precedente non abbia sortito l'effetto sperato.
Dal menu Start, recatevi all'interno del menu Pannello di controllo > Programmi e funzionalità e disinstallate (se presente) qualsiasi versione di Kerio VPN client dal sistema.
Lanciate lo strumento Start > Esegui e digitate regedit per eseguire lo strumento Editor del registro di sistema.
Individuate ed eliminate la seguente chiave di registro: HKEY_LOCAL_MACHINE\SOFTWARE\WOW6432Node\Kerio
Recatevi all'interno del Pannello di Controllo, quindi navigate all'interno di Gestione Dispositivi > Network Adapter e disinstallate il Kerio Virtual Network Adapter.
Nel caso in cui, all'interno del medesimo pannello, vi siano anche adattatori di tipo WAN Miniport (WAN Miniport adapters), disinstallate anche quelli.
Riavviate il PC.
Disabilitate temporaneamente tutti gli antivirus presenti sul sistema.
Scaricate e installate una versione precedente del Kerio VPN Client da questa pagina (tutte le URL elencate sono link diretti al sito ufficiale): suggeriamo di utilizzare la 9.2.2 o la 9.2.1, entrambe dovrebbero poter essere installate correttamente senza incorrere nell'errore di cui sopra. Nel caso in cui l'errore si verifichi anche in questo caso, non preoccupatevi e proseguite con i passaggi successivi.
Scaricate il file VPN.zip (l'URL è un link diretto al sito ufficiale) e scompattate il contenuto all'interno di una cartella temporanea (ad esempio, C:\Temp).
Recatevi all'interno del Pannello di Controllo, quindi navigate all'interno di Gestione Dispositivi > Network Adapter.
Individuate l'elemento Kerio Virtual Network Adapter, fate click con il tasto destro e selezionate Proprietà.
Navigate all'interno della tab Dettagli, quindi selezionate Inf name dalla casella a discesa "Proprietà".
Prendete nota del nome del file corrispondente al Valore della chiave sopra indicata (dovrebbe essere qualcosa come "oem22.inf").
Recatevi nella cartella dove avete scompattato il file VPN.zip (step#9) e rinominate il file oem.inf file con il nome del file corrispondente al Valore della chiave di cui sopra (step #13).
Copiate il file così rinominato all'interno della cartella C:\Windows\INF, avendo cura di sovrascrivere l'eventuale file già esistente.
Copiate il file kvnet.sys, presente nella medesima cartella di origine, all'interno della cartella C:\Windows\System32\drivers, avendo cura di sovrascrivere l'eventuale file già esistente.
Una volta effettuati questi passaggi, sarà possibile installare l'ultima versione del Kerio VPN Client: la procedura di installazione provvederà a sovrascrivere automaticamente la versione precedente installata nel corso dello step #8.
Riferimenti
Questo tutorial è stato realizzato sulla base di una serie di suggerimenti pubblicati all'interno di questo articolo (pubblicato nel febbraio 2020 sul sito ufficiale GFI Software) e nelle risposte contenute all'interno di questo thread pubblicato all'interno del community forum GFI: poiché GFI Software ha acquistato Kerio Technologies nel gennaio del 2017, quei siti costituiscono a tutti gli effetti una risorsa ufficiale.
Read the full article
0 notes
Link
Date: 2018-10-01 12:44:55
In diesem kurzen Video zeige ich dir, wie du ein Impressum und die Datenschutzbestimmung auf Builderall-Seiten einfügen kannst. Jetzt Builderall 7 Tage ...
0 notes
Text
CIS- 502 GFI company networks*****Already A++ Rated Tutorial Use as Guide Paper*****
The site will go down for maintenance today, 5 September at midnight PDT. Maintenance is expected to take a few hours.Fees for own question purchase will increase by about 7%. This fee increase is required to support our development activitiesTechnical Paper: Risk Assessment TIME IS CSTAbove (ATTACHED)is the Global Finance, Inc. (GFI) network diagram. A […]
The post CIS- 502 GFI company networks*****Already A++ Rated Tutorial Use as Guide Paper***** appeared first on Novelty Essays.
0 notes
Text
Festo fluidsim 4.5 keygen
Festo fluidsim 4.5 keygen Sitemap Magix music maker 2016 premium keygen Keygen kaspersky 2010 free Grahl pdf annotator keygen Gta iv keygen download free Historykill 2013 keygen Keygen extremecopy pro Keygen tuneup utilities 2014 full version Imtoo video converter ultimate 6 keygen mac Keygen crack photoshop cs3 Keygen generator cod4 download Keygen keyshot 2 Keygen autocad 2011 ingles 64 bits Mus3 cinema 4d r16 keygen Keygen acid pro 7.0 rar Keygen do gta 5 pc Keygen icon toy 4.7 Mapamap keygen android chomikuj Microsoft office keygen 2013 Microsoft office 2013 keygen activation v3.7 download Mirc keygen tutorial Microsoft office 2013 keygen download free Keygen realvnc 5 Omnigraffle pro 5.4 keygen Kaspersky activation code 2013 keygen Flobo photo digital recovery 1.5 keygen Mercedes benz das xentry keygen Network inventory advisor crack serial keygen Flash album creator keygen Hi slider keygen Fish tycoon crack and keygen+download Keygen ssh windows Fwsim pro keygen Keygen rhinoceros 4 sr8 Norton 2014 all in one keygen Lfs keygen s2 alpha download Outpost firewall pro 8.1.2 keygen Icoolsoft hd video converter 5.0.6 keygen Oxygen xml editor 12 keygen Microsoft office 2010 vl keygen download Microsoft frontpage 2003 keygen download Keygen crack garmin jmkg 1.5 final Olympian est electronic service tool 2011b keygen Keygen para office 2010 professional plus gratis Gta 5 keygen password Keygen photoshop cs3 extended Keygen autocad 2014 pour mac Paint shop pro x4 ultimate keygen Flip4mac serial number keygen Keygen autocad 2012 32 bits english Folder guard professional v7 91 included keygen Finale 2005 serial keygen Keygen para muvee reveal x 9 Nfs mw keygen deviance Magix xtreme photo designer 7 keygen Grammarly crack keygen Hd-audio solo ultra v4.1 keygen Keygen generator deutsch How to open keygen on mac Keygen generator gta iv Gfi languard network security scanner 2011 keygen Free download windows 7 serial keygen Keygen wavepad sound editor master's edition Jetclean pro 1.5 keygen Microsoft office professional plus 2010 crack serial keygen Gsview crack keygen Hide my ip 5.3 keygen mac Keygen corel x5 download free Keygen corel draw x6 only Keygen camtasia studio 8.1.2 Global mapper 14.2 crack keygen Mapilab pop3 keygen Keygen games fifa 14 Mobiola web camera registration keygen Keygen corel videostudio x6 ultimate Goodsync 9.7.9.9 keygen Keygen office 2010 windows xp Keygen tuneup utilities 2010 free Internet download manager free keygen crack Fineprint 6.20 keygen download Kls backup keygen Keygen para dvd cloner 2013 Free download router keygen for iphone Jetbrains intellij idea ultimate 15 keygen Keygen windows 7 manager 4.0 Maya 13 keygen Kaspersky pure 3.0 keygen 2013 Izotope alloy 2 keygen mac Imtoo video converter ultimate 6.8 keygen Gta iv offline activation code keygen Free download idm software keygen Longtion application builder 5.8 keygen Keygen winrar password cracker 4.2 Getbackdata serial keygen Gfi webmonitor 2012 x64 keygen Keygen para autocad architecture 2014 Microsoft visual studio 2010 keygen download Filefort backup keygen Hdguard 8 keygen Nik software snapseed 1.2 full keygen Idm full keygen remo xp Keygen windows 7 ultimate 64 bit Keygen para the treasures of montezuma 3 Iobit advanced systemcare 7 keygen Mavis beacon teaches typing deluxe 17 keygen free Ithmb converter keygen Newbluefx totalfx 3.0 keygen Magix music maker 17 premium keygen only Fontlab studio 5 keygen Keygen windows 7 edition integrale 32 bits Keygen office pme 2007 Fifa 2008 keygen code Office 2012 pro plus keygen Mdk arm keygen download Microsoft windows xp sp2 keygen Keygen para anno 1404 venice Keygen lcg jukebox 2.73 s60v2 Netcam watcher pro 3.1 keygen Keygen connectify 3.7 Keygen kitchendraw 5.0 Free download tuneup utilities 2012 with keygen Msdict cambridge advanced learner's dictionary 3rd edition keygen Hdd regenerator 2011 serial crack keygen Iexplorer 3.2.2.4 mac keygen Microsoft expression encoder 4 product keygen Malwarebytes anti-malware premium v2.1.6 keygen Itaskx mac keygen Keygen mixcraft 5 Gilisoft ramdisk 4.1 keygen Fontcreator 9.0 keygen Internet download manager keygen and patch Keygen office 2010 gratuit Keygen photoshop mac Free download microsoft office 2007 full version+keygen Imtoo 3gp converter keygen free download Microsoft office 2010 keygen download Icoolsoft mp4 converter keygen License key for optimizer pro keygen Free luxand blink keygen Keygen para acid pro 7 descargar Microsoft office 2011 mac keygen Linplug relectro keygen Mediamonkey gold 4.06 keygen Keygen doshttp 2.5.1 Iblacklist keygen source cydia Holdem manager 2 serial number keygen Ipod rip keygen Imtoo ogg converter keygen Final draft 8 keygen 8fd Hard disk sentinel 4.0 pro keygen Flip professional keygen Keygen hawx 2 pc gratis Iobit malware fighter pro keygen 1.7 Microsoft office professional plus 2010 activator keygen Mixcraft 6 keygen download Keygen rar password unlocker Genuine windows 7 validation keygen Keygen ea sports cricket 2002 cd key Melodyne keygen mac osx Microsoft security essentials win32 keygen Nfs hot pursuit keygen free download I-sound wma mp3 recorder professional 6.9.7.0 keygen Free download nero full version with keygen Nfsu 2 cd keygen Mercedes-benz epc net 08.2012 keygen Keygen para desktop icon toy 4.0 Matlab 14 keygen Mobiola xplayer keygen Hd audio solo ultra 4.1 keygen Keygen bluesoleil 8.0.356.0 Karaoke cd g creator pro 3.12 keygen Keygen photoshine 3.5 Keygen connectify hotspot 2015 Nfs most wanted cd key keygen Jetbrains intellij idea 13 keygen Mem patch keygen autocad 2010 Parallels 7 keygen tpb Free download keygen for idm 5.18 Innoetics tts reader keygen File recovery angel 1.17 keygen Keygen corel x7 32 bit Hide my ip 5.0 serial keygen Need for speed shift crack and keygen only-reloaded Magic iso maker version 5.5 keygen Keygen pdf to excel converter Keygen 3d max 7 free download Jetbrains phpstorm 6.0.2 keygen Magix photostory 2014 deluxe keygen Guitar rig 5 serial keygen everg0n 2013.rar Microsoft office 2007 phone keygen Jalbum 10.8 keygen Hackear redes wifi con android router keygen Micro flight 5 keygen download Keygen g data internet security 2014 Idm 6.08 serial number keygen Free download idm 6.17 with crack and keygen Keygen corel x4 descargar Keygen adobe premiere elements 11 multilingual full Music editor free 9.5.1 keygen
0 notes
Text
cropping and editing icons with photoscape;
Hello everyone!
I took a while to get my tutorial out compared to my fellow Mods, but being in the stone age sadly accidents with concrete happen... (quite literally, a concrete slab split my big toe in two and I’ve been recuperating! This is why we need to invent shoes.)
I am going to be giving you a tutorial on how to make icons much like the GFI icon with using the freeware Photoscape. These are what we will be making:


First of all I will direct you to Bubbles’ ‘Cropping and Editing Icons in GIMP’ Tutorial. Why? Because the first few steps on how to make your frames is exactly the same as to how I do it!
P.S. I apologise if this tutorial is hard to follow because it is simply in bullet points but I did try and do detailed paragraphs but even I found them difficult to follow. Hopefully the simple program of Photoscape and the screenshots I have provided will assist you.
First we crop our frame.
Choose your first frame. This is the one that I have chosen.

Now Open Up Photoscape.
Select EDITOR from the taskbar.
Drag and drop your chosen frame.
Select the Crop option from the task-bar above ‘No Frame’.
Select the drop down menu > assign ratio/size.
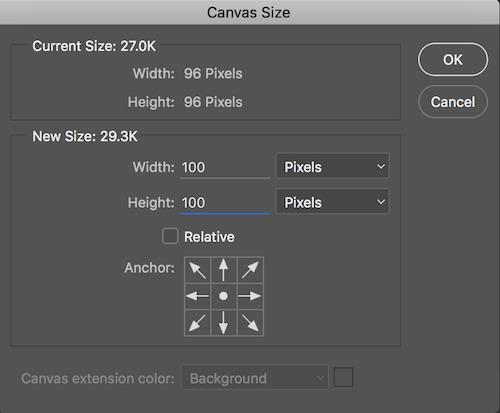
Check size setting.
Change width/height to 100.
Click ok.


Highlight your crop area on the image by adjusting the squares.
Hit enter or select crop.
On the task-bar choose Home.
Select Resize.
Select Preserve Aspect Ratio and type 100.
Hit enter or select OK.

Select Save As, save your icon. Congrats you have made your BASE.
It will look like this:

Now we move onto EDITING our icon.
Select BATCH EDITOR from the taskbar.
From your windows folder drag and drop into Photoscape.

Resize > Crop > Width/Height: 90.
Check: Apply Margin & Round > Modify.

Background Colour: White.
Round (Pixel): 0
Check Assign same margins > Margin: 5
Click OK.

Select Object from the Task-bar.
Photo 1 > ... > Photo...
Select the border you wish to use. Here is a selection of different colours that you can download here.
Open.

YOU CAN HIT CONVERT NOW, OR, YOU CAN ADD A FILTER/EDIT THE ICON.
To edit the icon, select Filter.
Mess around with the different options until you are happy. You can see what I chose in the provided example below:

Now we select convert ; or convert all. And our icon will save like this:

56 notes
·
View notes
Text
Cropping & Editing Icons in GIMP

Hello everyone!
This is Bubbles-mod here with your second tutorial! Like Jerry-mod, I’ll also be going from start to finish on how I crop and edit icons on the wonderful program known as GIMP. GIMP is a lovely alternative for anyone that’s seeking Photoshop and cannot afford it because -- guess what? It’s free! It’s also able to run on Windows, Mac OS, and Linux which makes it very versatile. Whether you’re an old timer with GIMP like myself, or a newbie, I’ll guide you through the many steps on how to complete this. And if you don’t have GIMP and wish to learn with this tutorial you can grab it from here!
That being said there is a few things you might need while working with this tutorial.
Important things to have
Of course having a method of downloading your video is a must. So there’s many sources you can get videos from, youtubemp4s converters and also Kissanime/Kisscartoon (the latter once they get the site back up and running).
Next you’ll need your trusty GIMP program.
Then we’ll need my favorite plugin: BIMP -- the Batch Image Manipulation Plugin which you can also get from here. Now if you’re not familiar installing Plugins, I recommend following the instructions they have there as this won’t be the main focus of my tutorial.
Finally, you’ll want a frame ripper. The one I tend to use DVDVideoSoft’s Video to JPG
One other script that can be added is the ExportAll script. This just allows you save all the images you have opened at one time to a location. This comes in handy if you don’t want to save images one by one later on while cropping. It is not necessary needed. Remember to add it to GIMP like you would any other script/plugin.
Now, this is going to get a bit image heavy so I’m going to be putting everything under a cut from this point on. Good luck and happy iconing everyone!
Step 1: Making your Frames

So upon opening DVDVideoSoft’s convertor, you’ll receive a screen very similar to this:
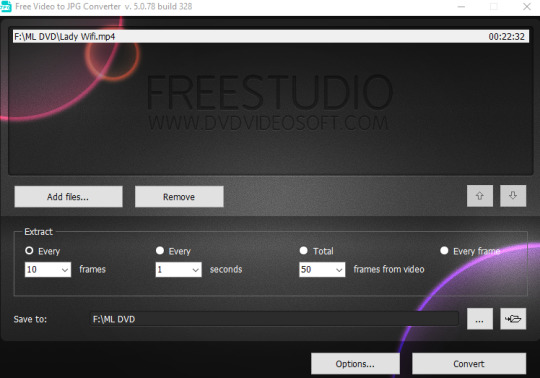
Most of the buttons are pretty self explanatory with adding your video file and the output location. The one thing I want you to pay attention to is that the setting I have at the far left for frames. I always go with every 10 frames no matter what project I’m working on. It does offer other options, but this gives me the most frames to work with -- minus the option for every second but that’s a bit too much. Once you have everything in order, go ahead and click that convert button and let it do its thing!
I will forewarn, depending on how long the video is and how fast your computer is, the time can vary. If you don’t believe your video is powerful enough then play around with some of the setting until you find one that works for you!
Step 2: Pick your Frames

There isn’t much to add for this section here. Like Jerry-mod mentioned, I too can agree this the worst part. You’ll have to scroll through the frames you have to select the ones you wish to keep for iconing. I recommend either deleting the frames you don’t want as you go OR set up a folder to stash the frames you wish to keep and then delete the folder containing the miscellaneous once you’re done. I tend to flip back and forth, usually going with the latter if I plan on cropping more than one character from a video.
So let’s move onto the next step once you’re finished!
Step 3: Loading & Cropping

Okie dokie! Now that we’ve selected all the screencaps we wish to use, let’s go ahead and open up GIMP. Once it’s open, make sure that you have it in Single Window mode. You can check this by going to Windows and clicking Single Window -- or if it has a check by it then you’re good! Next, let’s go back to the folder that contains all the lovely caps you’re going to be using today.
Since I’m using a windows computer, I’m afraid I only know this command, but what we’re going to do is select the very first image in your folder. Once that’s done, press the Shift key on your keyboard. Then, if you have arrow keys, move down until you’ve selected 25 images. If you don’t have arrow keys, your mouse can suffice. You’re more than welcome to do more or less than 25 images, but I like working with this multiple.
Now that they’ve all be selected, we’re going to drag them over to our GIMP window where GIMP will now help us out and load all 25 images into separate tabs.

Pretty handy eh?
Now it’s time to set up a few things before we start cropping. If you’re unfamiliar with the GIMP tools it’s this guy:

And these are the settings we’ll wish to make for it in the dialog box:
That way while cropping, your images will keep to the size of a square. You can navigate to the different images just by clicking them and the arrows on the left and right side so you can pan through more tabs if your screen resolution isn’t big enough to have them all on one line. Once that’s completed, it’s time to save these bad boys.
Step 4: Saving the images

If you didn’t bother saving my ExportAll script, then you can save/export these images as you normally would in GIMP under the File > Overwrite [filename]. However, if you did use my script, then I’ll show you how to use it real quick. Like you would with saving a regular image, you’d click File but now you’ll go to a new option I’ve given you called Save All:
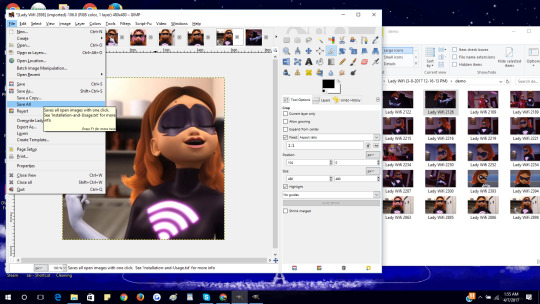
Selecting it will give us a new dialog box that we’ll have to work with. In it you’ll select the folder that your screencaps are located and you can leave the rest of the information alone.

Now go ahead and click okay and let the script run so we can move onto your next set. Just don’t forget to close all these lovely images as you move through each set. Close All can also be found under File as well. Once you’ve completed all of your cropping it’s time to move onto the next phase.
Step 5: Make the Border

I know what you’re thinking. Bubbles-mod, why would I make my border now when my images are still so gigantic? Don’t worry there silly, we’ll worry about that in a few. The reason I like to create a border if I want to use them on an icon is because batching allows us to color them, resize, reshape and add a border all at the same time! It’s pretty snazzy. But if you already have a border in mind, then go ahead and skip this step.
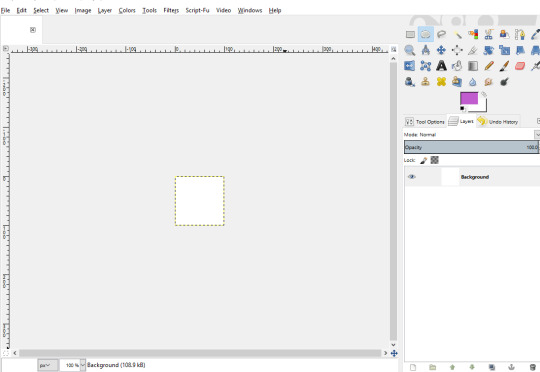
So before we move onto that, likes go ahead and make an image the size that you’re going to make your icons. For simplicity, I’m going to make a canvas of 100 x 100. You can do this from File > New
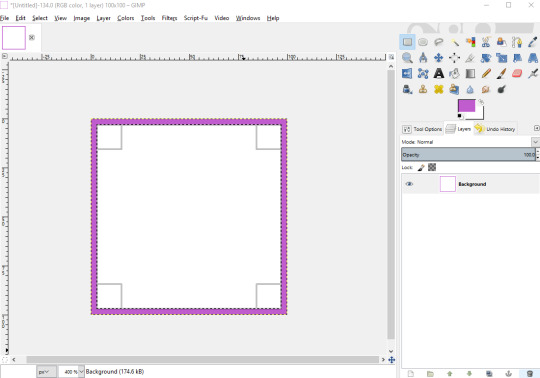
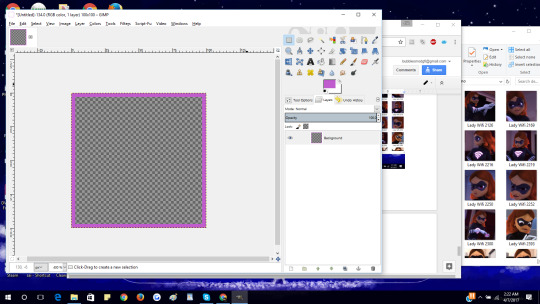
Now if we’re sticking to square icons then this will be a piece of cake! Let’s go ahead and select the color we want our border to be. As you can see from above I’m going with a dashing fluorescent purple to meet Lady Wifi’s needs. Next, we’re just going to fill the box with the paint bucket tool. Then, select the Square Select tool from your tool box. It sort of looks like a rectangle:

Fix up it’s settings like we did before with cropping so it can have an aspect ratio before we start our selection on the square. Now how much you select is up to you. Keep in mind, we will be deleting the content of the square we’re selecting so if you want a really big border then make it a smaller selection. Otherwise, making a very huge selection if you want a thin one. Once it’s done hit the delete key.
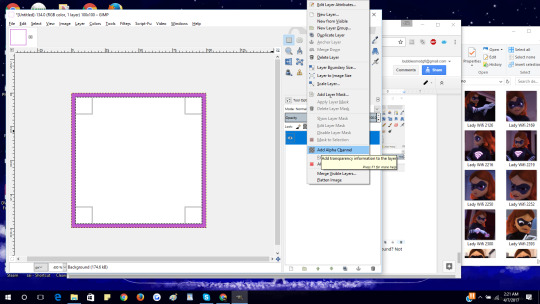
Now you’re probably wondering if this happens so to you, what to do about this white background? Not to worry! Just go and right click on your background layer so we can add an Alpha Channel:
And then we’ll happily hit the delete key again and now we have our square border!
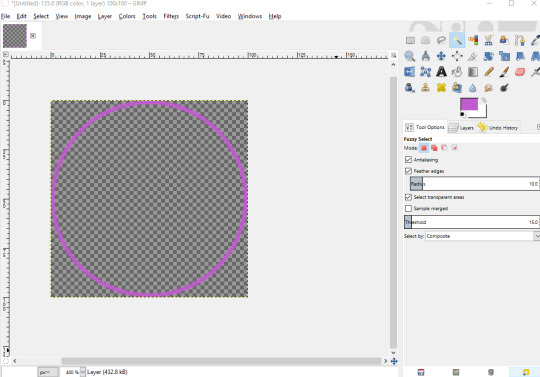
Now if you’re going for a circle icon border, the steps are pretty much similar. Just instead of the Square/Rectangle select tool, you’re going to want to use the circle one:

Like before fill in your canvas, select the tool, change the aspect ratio and create your circle size. Now with Circle, you’re going to want to do something instead of deleting your selection. I want you to copy it. You can do this with Ctrll+C and then make a new layer with Shift+Ctrl+N or selecting Layers > New from the top bar. Now paste that circle you copied into the new layer.
At first you may not see anything different, but that’s because we have to delete our bottom layer. So we’ll need to right click and select Delete Layer:
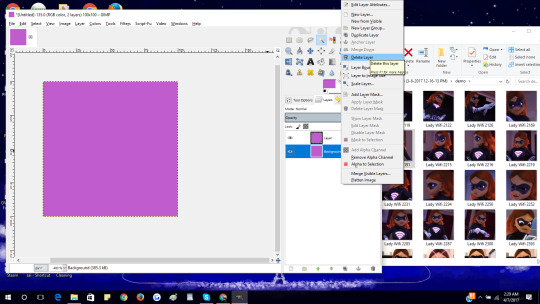
Now you should see the circle you were looking for! Now we’re back to our old steps with the rectangle, we just need to select the Circle tool again to make the selection of the Circle that we’ll be deleting this time. Like before this is also your call for the size border that you want.
Once you’re done remember to save the border so we can move onto our next phase: Batching!
Step 6: Batch to Resize Images

Now we’re at one of my favorite parts in the entire tutorial. Batching!! Now I hope you already downloaded the Batch Pluggin before starting and set it up, otherwise you’ll have to close GIMP out first so it can reload with it properly added. Great! So we’re going to open up the Batch by selecting it from the File Menu and you should see its entire name:
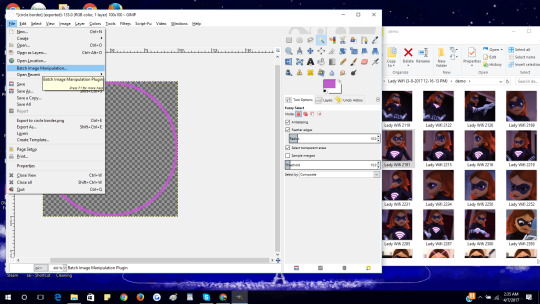
Go ahead and selection and you’ll get Batch Manipulation to open!
Since we finally have it open, let’s do the easy stuff like add in the images we’re going to use and also select their output folder. I suggest making a new folder so you don’t accidentally overwrite your old ones. Once you’ve completed that I want you to click on the giant plus sign with add below it.
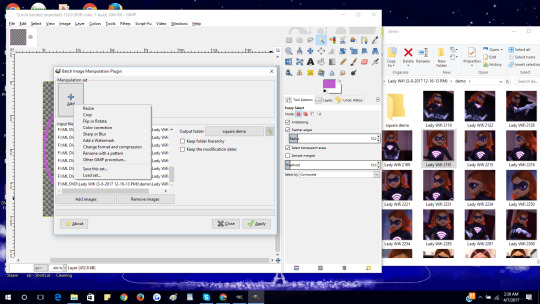
These options will allow you to complete different services for your icons! Most of them are pretty self explanatory but the one I want you to focus on first is change format. I love my icons always in the .png file so if you like that as well, go ahead and select it so that will be the first task it will complete. After you’ve made the option, you will notice the BIMP is allowing you to add another option. This is when we’ll do our resizing by clicking Resize.
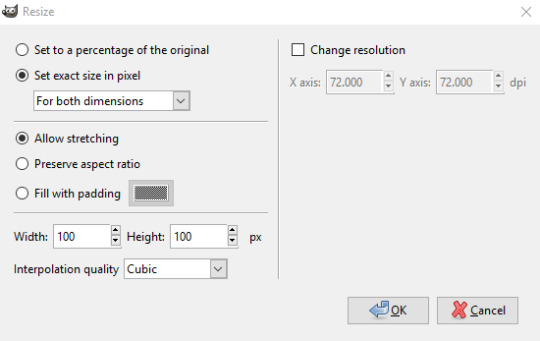
In Resizing, I always select the radio button for “Set Exact size in pixel” so we can set the complete size of our image. The width and height boxes is where you can finally select to make our icons go to the size of 100 x 100.
Go ahead and click okay so we can add our next step.
********** (only for circle icons): **********
Now if you want to make circle icons, we have to resize all of our icons to this perfect shape. BIMP can allow us to do that as well. So when clicking the plus/add button, select “Other GIMP Procedure”. A search box will appear along with many other options that GIMP can complete. In the search box the term we’re going to look for is “round” and you’ll see a few return results. The one we wish to go with is the “script-fu-round-corners” so click it.
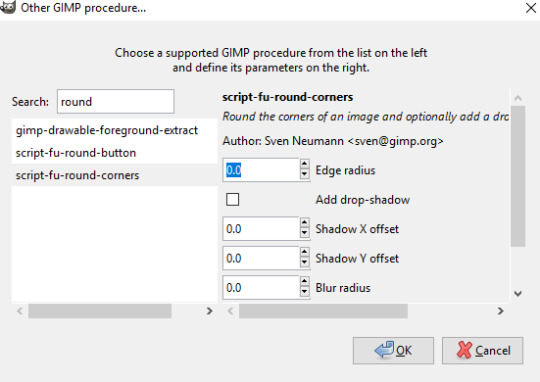
On the right side you’ll see a few other options appear on the right side of the box like above. The only thing we’re worried about here for now is the Edge Radius. Change the value to 50 so you can get a complete circle. I’ll leave it to you to play around with this later to find out what other values and the drop-shadow can do. After changing the 0.0 to 50.0 let’s click OK so we can move onto our next step: our border.
********** (end of only for circle icons): **********
In the add options, you want to select “Add a Watermark”. This allows you to make watermarks in a text or image, we want to go with the image option. From the dropdown, navigate to your border image and open it. You don’t have to mess with any of the other settings of the box there so yours should look like this:
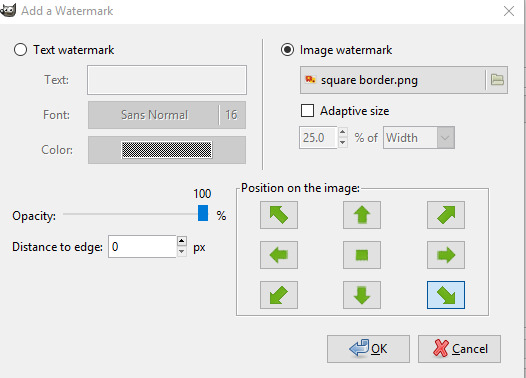
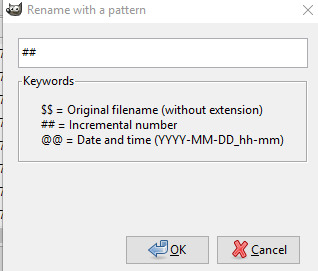
You’re free to hit OK from here. The final step is renaming the images. That’s because DVDVideoSoft gives files really long names. If you have no problem with this, you can skip this last add on. Otherwise, hit the plus add again and pick “Rename with a pattern”. It has a few options to pick from but for simplicity, go with the option to rename them increasing numbers or the ## as they suggest:
Now you can hit okay once again so it can return you to the BIMP main console. We’ve finished making all of our selections so the final step is to hit Apply to allow it to run. Depending on how many files it is the time length can vary but once everything is complete you’ll get the solid green bar, notifying you the process has finished and whether or not any errors occurred. If you’ve finished with zero errors, you’re in business! Go ahead and close out BIMP and GIMP and navigate to your output folder to see your final results:

243 notes
·
View notes
Text
tutorial: cropping & editing icons on mac

Howdy everyone!
jerry-mod here with your first tutorial! we’re going to go all the way from start to finish, so depending on how much you know, you’ll probably be able to skip some of this. i, however, am leaving no stone unturned. so before we dive in, let’s gather our materials!
first of all you’re gonna make sure you’re using a macOS. duh right? it’s in the title.
if you have a mac, you have Quicktime, but you know i figured i’d mention it.
this tutorial will use Photoshop CC6, however i have used this method on CS5 as well. (really, as long as you can use timeline, you SHOULD be good. the positioning may be a little different though.)
you’ll want a frame ripper for this method... unless you’re using pre-made frames or print-screening. i personally use SnapMotion but i’m sure there are more comprehensive ones.
Photoscape is a bonus feature for this tutorial. i’ll show you how to mass edit file names with and without it.
okay! this tutorial WILL be image-heavy so if you’re ready, click the cut!
step one: clipping your media

now if you’re lucky, you may not have to do this. but in my experience, my computer likes me a LOT more when i don’t try to run an entire 11-22 minute video through a frame ripper. (read: my laptop crashed once; would not recommend.)
so first we’re going to open our video with quicktime. i work with .mp4s or bust, because photoshop really only likes to import .mp4s and .movs in my experience. they can be a pain to find if you’re not ripping from a dvd but kissanime/kisscartoon has treated myself and bubbles-mod very well.
next we trim. i don’t suggest any more than one minute segments. you can open the trim tool with command+t in quicktime to save you some seconds. if you want to be precise and just cut out the character you need, i’d suggest pressing and holding the yellow bar until you see the frame preview stretch like so:
trimming is otherwise self-explanatory. you drag both ends to the place you want it to be and that’s your section. but, a tip for remembering where you left off:

this number on the right end is going to be your starting point if you’re going minute by minute.
step two: ripping your frames

this is where your frame ripper will come in. now snapmotion is a pretty simple program. you click. you drag.

click that auto button to switch it to well... auto. (i find that the settings it comes with are usually fine, but if you’re clipping something that’s very SHORT maybe change it from .100 to .050 or even .025 depending on how short we’re talking.)
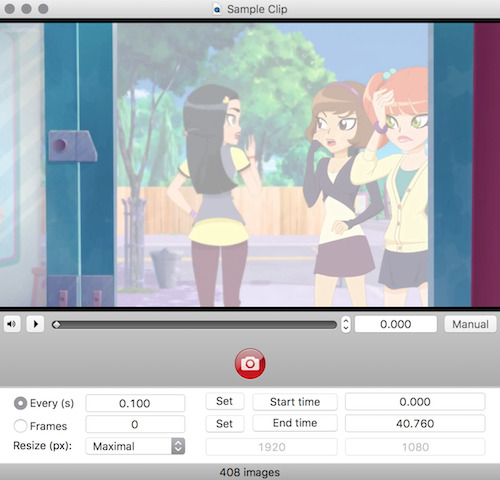
once you’re here, click the red button to rip those frames. it will bring you to a file screen so you can choose where to save it. (i suggest a new folder EVERY time.) oh and don’t try pressing enter. you HAVE to push that red button. enter just plays the video in this program. annoying, i know.

and there you go! all the frames are there! on to the next section-- which is really only a sentence...
step three: picking your frames

pretty sure all three of us mods can agree this is the worst part but... literally just scroll through and pick out which frames you’re keeping and which you’re tossing. here’s how i set it up for the most part:
first i preview using the space bar. (you can scroll through images this way too hella convenient.)
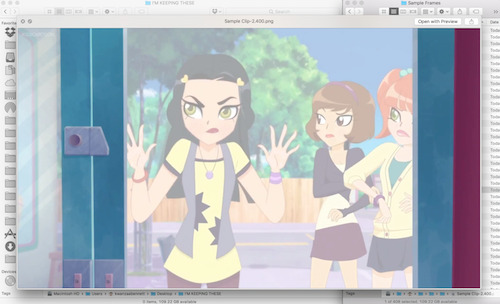
then i drag it over to a fresh folder titled so i know i’m keeping the frames.

rinse repeat tbh.
step four: cropping & resizing

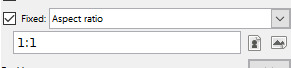
you’re probably like: why do we even need explanation here? well you probably DON’T but a nifty little trick photoshop offers you is the ratio tool. so once you have your marquee tool open, go to the top where it says style and select fixed ratio.

set it to 1:1.

and just like that: you have squares. no guesswork. (this trick also works with circles, just sayin ;3)

as for resizing, i resize all of my photos at once when i’m done with cropping. it’s easiest to do this in preview because you can select all x00 files and resize them to 100px or whatever your jam is all at once.
step five: loading files into photoshop

now we're getting close to the fun part. (at least i think this is the most fun part.) the first thing we need to do is upload all of your frames to photoshop.
(i will warn that if you’re an order freak; photoshop will require you to use as many digits as the largest number or else you’ll get 1, 11, 12, 13, 14 before you get to 2s, etc. it. is. annoying. i personally run my files through photoscape and set them to 3 or 4 digits to avoid this but this is an optional step. if you want to know how to do this, i get to photoscape at the end.)
now. to mass-import: go to file > scripts > load files into stack

it’ll bring up this box:

click browse, select your files, and:
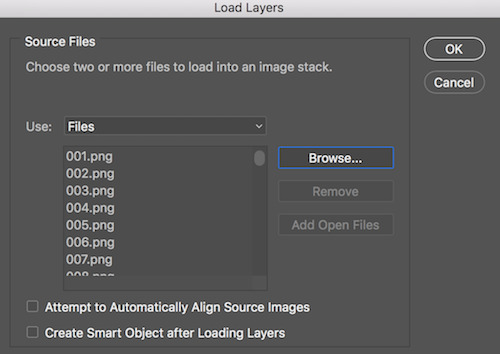
BAM! there they are. now click okay and... be patient. uvu”
step six: prepare for mass editing

now photoshop should look about like this:
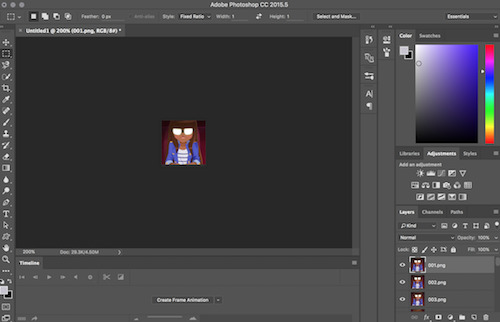
so go ahead and click that blurry “create frame animation” at the bottom. once you do, click the little lines to your right and make frames from layers.

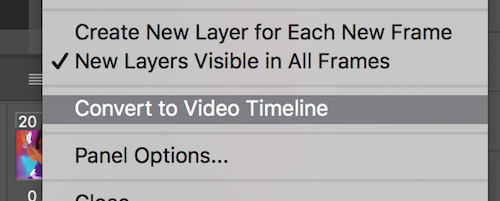
once that’s done, go back to the same menu and convert to video timeline.
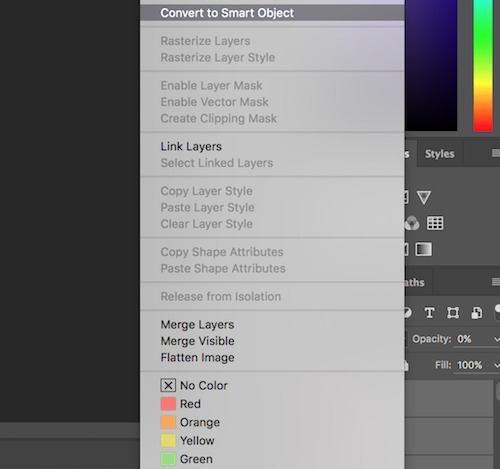
last step before we start editing is to go over to the layers. select ALL of them. then right click to open the menu and click convert to smart object.
step seven: mass editing (circular borders)

once your document looks like this, i suggest saving. because now you’re free to edit! i’m going to show you how to make a basic circular border for this tutorial. color editing will be left for another time because that’s a tutorial all its own.

first thing’s first: we need to make this slightly smaller. for this one, i’ll be using 96 x 96, but you can go smaller if you want a bigger border or a drop shadow. so resize in image size:

then we move over to canvas size

and take it back up to 100px.
next we need guides. they make making perfect circles MASSIVELY easier. you find lock guides here:
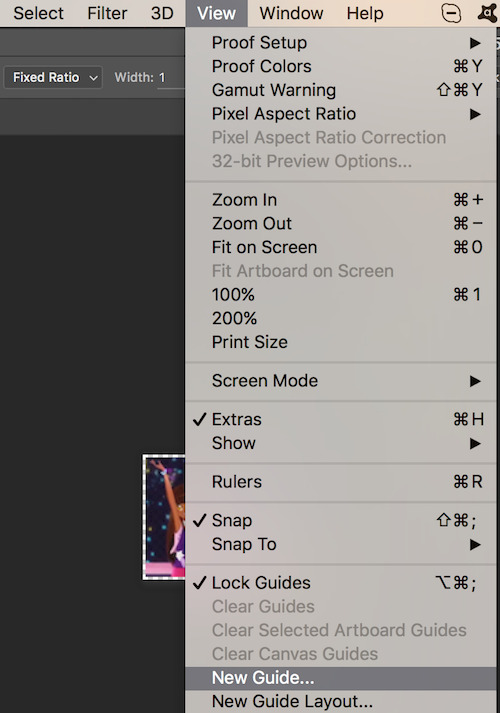
once you have the dialogue screen up (you’ll need to do these one at a time) set them to 2px and 98px both vertically and horizontally. your icons should be perfectly outlined.
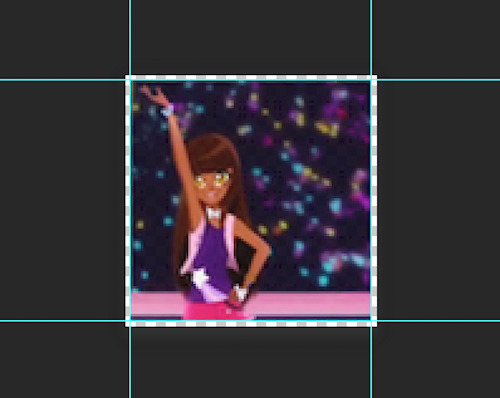
go to the marquee tool and change it to oval/circle. now you can drag it from one corner to the opposite corner (assuming you left ratio in 1:1) to make a perfect circle. looks like so:

make sure you don’t accidentally deselect this, and make a new layer. i name it clipping mask so it’s easy to find but you don’t technically HAVE to. make sure to move it DIRECTLY BELOW the icons’ layer.

now go to the fill tool and fill it with literally whatever solid color. (the color you use won’t matter unless you mess with the icons layer’s opacity or style but again; another tutorial.)
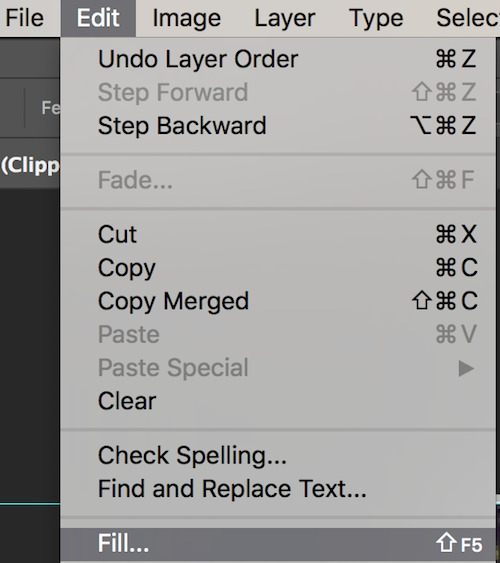
once you’ve done that, right click the icon layer and select create clipping mask. Bam! It’s a circle.

next we add a border. your circle marquee should still be up (but if it’s not, just command click the icon on the clipping mask layer and it will re-select the circle you made). make another new layer and place it below your clipping mask layer. once this is done, go to the stroke tool. for the size we’ve chosen, 3px is the maximum we can do. pick the color that matches in the dialogue box; i chose magenta for this icon:

at this point we could call the icons done, but for grins and giggles, we’re gonna add a quick effect. head over to the clipping mask layer and right click it to bring up the effects menu and select inner glow.
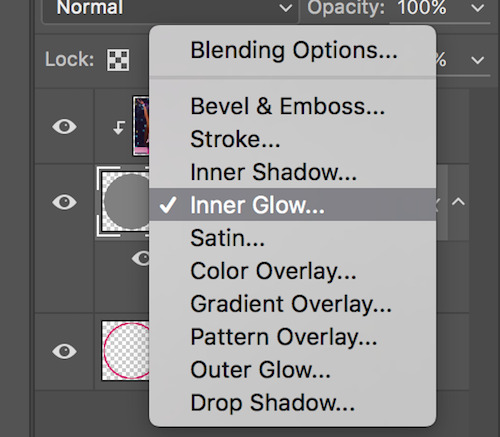
you can honestly play around with the settings and see what you like but here’s what i did for this set:

Before I reveal the icons, there’s one last thing we have to do: fix the timeline at the bottom. For some reason CC hates us and new layers do not automatically match the length of the timeline you’re working with. Easy but sometimes tedious fix. Just go down into the timeline and drag the layers that AREN’T the icons to match length:

Et voila! We’re ready to export.
step eight: mass exporting

alright fam we’re almost there! head on over to file > export > render video. make sure your settings match this screen (‘cause in all honesty i’ve had it set this way for so long i don’t remember what i changed... smh...)

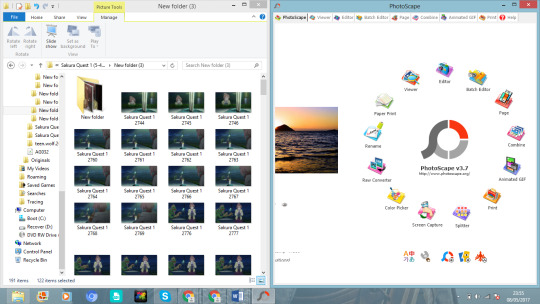
that’s it! once you’ve set your title, click render and it’ll automatically name it Title000 and so on. (You can set it to start at 1 where it says Starting #). You’re going to have to use this method to export regardless, but if you want MORE naming options (like having JUST numbers for example), then photoscape has you covered:
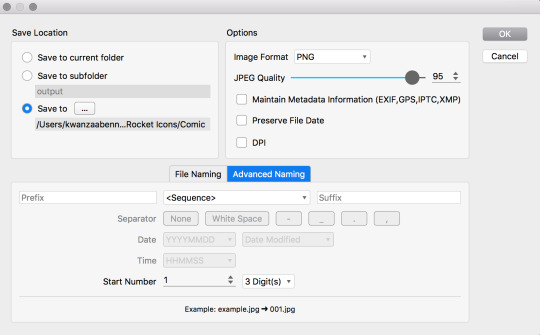
i find photoscape easier to understand, anyway.
in either case, be sure to SELECT YOUR FOLDER before you click okay/render. in photoshop that’s “select folder” in the top left. in photoscape, that’s “save to” in the same location. don’t do what i’ve done on multiple occasions and accidentally start rendering files to your desktop. the worst.
final product!

#icon tutorial#tutorial#photoshop tutorial#ps tutorial#graphic tutorial#mod post ;#by Jerry Mod#GFI tutorials ;
101 notes
·
View notes
Text
Kerio VPN Client install error on Windows 8 and Vista - FIX

If you've stumbled upon this post, it most likely means that you're getting an odd error when rying to install Kerio Control VPN Client on a Windows 8, 8.1 or Vista machine. In this post you'll find a simple tutorial that might help you to fix such issue for good.
The error(s)
Here are the two errors that you might see when trying to install the Kerio VPN client.
LookupDevice Error
ERROR 28201. Failed to install VPN device driver. Command: UPDATE. Action: LookupDevice. Result: E_UNEXPECTED,device is already registered.

RemoveDevice Error
ERROR 28201. Failed to install VPN device driver. Command: UPDATE. Action: RemoveDevice. Result: 0x800F020B,unspecified error.
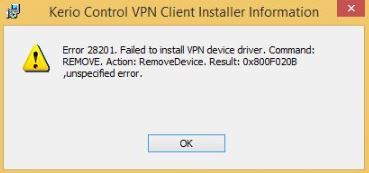
These errors might produce the following error codes in the Windows event log:
Failed to install VPN device driver, 0x800F020B
Failed to install VPN device driver, 0x800F0244
In the following paragraph we'll take a look at the available fixes.
The Fix(es)
Here's a list of the know fixes: if you know the above error code you can use the corresponding one, otherwise you can try both of them (one at a time) and see if it works for your specific scenario: both fixes won't be harmful for your Windows environment.
#1. 0x800F020B error code
Go to Start > Control Panel > Programs and features panel and uninstall any existing version of the Kerio VPN client from your system.
Go to Start > Run and type regedit to execute the Windows Registry Editor.
Locate and delete the following key: HKEY_LOCAL_MACHINE\SOFTWARE\WOW6432Node\Kerio
Navigate to Device Manager > Network Adapter and Uninstall the Kerio Virtual Network Adapter.
If you see WAN Miniport adapters, please uninstall all of them as well.
Disable any antivirus running on the machine.
Reboot the PC.
Download and install an older version of Kerio VPN Client from this page (all URLs are direct links to the official website): we suggest to use 9.2.2 or 9.2.1, as they usually install without issues on Windows 8: in the unlikely scenario that you're getting the same error, don't worry and continue.
Download the Kerio VPN Recovery tool (the URL is a direct link to the official website).
Unzip the tool and run it with administrative priviledges: it's very important to do that, because the tooll will need to overwrite some protected files. If you want to be sure that the recovery tool actually worked, run it from the command line (opening it with administrative rights) so that you can properly check the output from the console.
Right after the step #10, you'll be able to install the latest version of the Kerio VPN Client: the new version will automatically upgrade/overwrite the "older" version installed during step #8.
#2. Fix for the 0x800F0244 error code
This fix is a bit more complex than the previous one, but could help you to fix your issue for good if the above method didn't work.
Go to Start > Control Panel > Programs and features panel and uninstall any existing version of the Kerio VPN client from your system.
Go to Start > Run and type regedit to execute the Windows Registry Editor.
Locate and delete the following key: HKEY_LOCAL_MACHINE\SOFTWARE\WOW6432Node\Kerio
Navigate to Device Manager > Network Adapter and Uninstall the Kerio Virtual Network Adapter.
If you see WAN Miniport adapters, please uninstall all of them as well.
Disable any antivirus running on the machine.
Reboot the PC.
Download and install an older version of Kerio VPN Client from this page (all URLs are direct links to the official website): we suggest to use 9.2.2 or 9.2.1, as they usually install without issues on Windows 8: in the unlikely scenario that you're getting the same error, don't worry and continue.
Download the VPN.zip file (the URL is a direct link to the official website) and extract it to a separate folder (such as C:\Temp).
Go to Control Panel > Device Manager.
Click Network Adapters > Kerio Virtual Network Adapter.
Right-click and select Properties.
Go to the Details tab, select Inf name from Property select box.
Take note of the name shown in the Value section (such as "oem22.inf").
Rename the oem.inf file that came out from the previously unpacked VPN.zip archive so that it matches the above Value name (see step #6) and copy it to the C:\Windows\INF system folder, overwriting any existing file (you will need administrative privileges to do that).
From that same source folder, copy the kvnet.sys file to the C:\Windows\System32\drivers system folder (again, you'll need administrative rights).
Once done, you should be able to install the latest version of the Kerio VPN Client.
Official site
This tutorial is made from various suggestions taken from this article from the GFI Software official site and this community post on the GFI forum community site (GFI Software acquired Kerio Technologies in January 2017).
Read the full article
0 notes
Text
Happy Anniversary GFI Family!

That’s right, A YEAR AGO TODAY (March 26th, to be exact), Pebbles-mod and Jerry-mod acted on an incredible impulse and pulled together a blog that would change three retro-toons’ lives forever! So let’s not leave Bubbles-mod out of the celebration! Without her who knows if we’d have made it to the big ONE YEAR!
Now of course we’re going to thank all of the lovely followers and even just passers by who made this possible. But before we do, we’ve never been the kind to beat around the bush here at GFI, so let’s get down to BUSINESS first:
First the bad news:
We regret to inform everyone that we will NOT be opening requests or restarting the queue today. The unfortunate truth is that Jerry-mod simply hasn’t been able to stay home long enough to heal, and the Spring semester can be hard on anyone--much less an upcoming graduate (everyone congratulate Bubbles-mod early, by the way, Jerry-mod and Pebbles-mod insist)! At current, the plan is to wait until Jerry-mod is stabilized. We do realize that is very vague, but if the other two mods’ schedules clear up before that happens, of course we’ll be back for you!
So on to the fun stuff?
We hope you didn’t think we were actually gonna let our anniversary pass by without giving something back to our followers! So check out the treats coming your way!
An Icon PSD giveaway! Three lucky followers will win a custom PSD for any pre-existing icon set (GFI’s preferably, but yours or someone else’s with written permission are accepted too)! All three of us like to consider ourselves talented graphic artists, and we’ll show off our skills in the giveaway post!
Three separate tutorials! Since each one of us makes our icons in a significantly different manner, we thought: why limit it to just one? We’ll each share our secrets, which will cover Mac, PC, Gimp, Photoshop, and Photoscape! You’ll have loads of options by the time we’re done with you guys!
And our favorite: a very special Pokémon giveaway! We’ve finally named our mascot, and we’ll be giving away this shiny to one lucky GFI follower who’ll take good care of our dear ol’ Poli! Be sure to look out for the post in which we reveal the name!
Remember:
This post does NOT function as the giveaway post for any of our giveaways, and while reblogs are welcome (to celebrate, spread the news, whatever your vibe is), they will not count towards any of the giveaways. Be on the lookout for their posts coming up this week! Today will be dedicated to spreading the news!
And as always:
Stay awesome GFI family! We love you to pieces! We hope we can be here in full again real soon, but for now, let’s have some good fun, ya?
❤ the mods!
48 notes
·
View notes
Text
Epub to pdf converter keygen download
Keygen medal of honor airborne download Leawo dvd creator 5.1 keygen Office 365 famille premium keygen Keygen autocad 2010 64 Korg legacy digital collection mac keygen Leawo video converter 4.1.0.0 keygen Keygen autocad 2010 32 bit download Iexplorer keygen 3.8.4.0 Mac blu-ray player 1.9.6 keygen Keygen do convertxtodvd 4 gratis Mindjet mindmanager pro 6 keygen Kaspersky internet security 2014 crack keygen Eset endpoint security keygen Lfs2 keygen download Goldwave v5.70 keygen J link license keygen Microsoft office 2011 mac keygen generator Fifa 13 online keygen Imposition studio keygen Malwarebytes anti-malware keygen youtube Navicat for mysql download keygen Intellix pharmax keygen Jprofiler 8.0.5 keygen Keygen movavi video suite 11 Keygen zamzom wireless network tool Net monitor for employees professional 4.9.11 keygen Nod32 keygen serial Navicat 11.2.4 keygen Office 2010 serial keygen free Goodsync keygen tutorial Keygen de adobe illustrator cc Need for speed undercover keygen crack download Imtoo blu-ray creator 2 keygen Myvideoconverter 2.38 keygen Mathematica 10.1 keygen Fl studio 9 crack keygen Jonathan kane the protector keygen Keygen studio one 2.5 mac Heroes of might and magic 5 mac keygen Metro 2033 steam version keygen free download Nch inventoria stock manager crack keygen Imagenomic portraiture keygen free Macdrive 8 full keygen Magix music maker 16 keygen only Idl 8.2 license keygen Hamachi serial keygen Keygen need for speed rivals pc Hacktool win32 keygen cs6 Keygen driver genius professional edition 2011 Nebulosity 4 keygen Keygen mackeeper 2.7 Free mcafee internet security 2014 keygen download Kaspersky internet security 2010 keygen crack Keygen guitar pro 6 linux Keygen the sims 2 czas wolny Keygen advanced systemcare pro 5 Helix universal media server keygen Mep escreen keygen Microsoft office 2010 activation keygen free Exsys corvid keygen Keygen drivers genius professional edition 11 Keygen trilian 1.1.4c Microsoft office 2007 keygen activation crack Gforce imposcar2 v2.0.2 incl keygen-air Keil uvision 4 c51 keygen Illformed glitch 2 v2.0.2 incl keygen merry xmas Finale 2008 keygen edge Guitar pro 6 crack keygen mac Motionbuilder keygen 2012 Grindeq crack serial keygen Fileviewpro 1.5 keygen download Magix movie edit pro 2016 keygen Esi tronic 4q 2012 keygen Keygen para uniblue driver scanner 2012 Navitel activation keygen Fifa 11 cd keygen download Navigator 12 keygen Keygen ronyasoft poster designer 2.01.47 Keygen gta eflc Office 2013 plus keygen Gfwl keygen 2012 download Nero 8 micro 8.3.20.0 keygen Keygen para advanced systemcare 7 pro Keygen serial number autocad 2012 Imacsoft iphone to mac transfer serial keygen Flash menu factory 1.3 keygen Logixpro plc simulator keygen Nero multimedia suite 10 keygen only download Fishdom frosty splash keygen Imtoo video converter ultimate 6 mac keygen Iskysoft video converter 3 mac keygen Nitro 8 64 bit keygen Free mirc registration keygen Facemorpher 2.51 keygen free download Free download keygen guru Finale 2011 pc keygen only Movavi video suite 11 keygen Keygen ischeduler 1.3.9 Gfi languard 2015 keygen Free cs2 serial number keygen Long path tool 4.8.3 keygen Finale 2012 keygen password Keygen para 3ds max 6 Keygen coreldraw x6 windows 7 Idm 6.07 build 10 keygen Nethergate resurrection keygen mac Keygen office 2010 professional plus 2012 Jcreator keygen 4.5 Malwarebytes anti malware premium keygen Luxand facesdk 4.0 keygen free download New blue essentials 2 keygen Keygen my business pos 2011 descargar Movavi video editor 9 keygen download Free keygen net tag minecraft download Mplab xc8 pro compiler keygen Mac free any data recovery keygen Keygen blackberry apps 2012 Need for speed carbon pc keygen download Imtoo converter ultimate keygen Keygen smadav pro free download Materialise mimics 10.01 keygen How do keygens work Keygen download windows 7 ultimate Idm 6.25 build 3 keygen Keygen wifi id 2013 Keygen corel x4 download Everest ultimate edition product keygen Norton 360 new 2012 keygen Football manager 2009 keygen download Keygen cracks serial key generators Fake cam keygen free download Keygen autocad 2010 64 bits windows 8 Mass effect bring down the sky dlc keygen Keygen max uninstaller 2.0.0.924 Free download alcohol 120 full version and keygen Ipad file explorer 2.2 keygen Keygen iexplorer 3.2.3.2 Keygen keyshot 6 Ilwis 3.3 keygen Mainconcept aac encoder v1.0.5 keygen Idm full crack with keygen Flex type 2k download keygen free Game jackal keygen download Keygen para mindmanager pro 7 Noteability pro keygen Keil arm mdk 5.00 keygen serial crack Keygen serial number photoshop cs6 Micro sd card recovery pro keygen Kaspersky internet security 2011 keygen generator free download Logic pro 8 serial keygen mac Keygen mixcraft 6.1 build 217 Keygen call of duty ghost free Fl studio 9.1 crack keygen Modbus poll 5.6.0 keygen Esi tronic 2011 2 keygen Mackeeper license keygen Movavi video converter 6 keygen Nanjing swansoft cnc simulator 6.9 keygen Guitar pro 5.2 keygen mac download Keygen corel x6 win 8 Magix video pro x7 keygen Filemaker pro 12 advanced keygen Keygen for rar password recovery v1 1 rc17 Magix movie edit pro 17 hd keygen Free download keygen for idm 6.10 Free profimail keygen Keygen for sony vegas pro 12 64 bit Magix photostory on dvd mx deluxe keygen Flex builder 3.0.2 keygen Enterprise architect 12 keygen Handy blacklist keygen Memory card recovery keygen free download Office 2013 crack activator keygen download Eyetv keygen 3.5 Free keygen generator for microsoft office 2010 New york studios vol 3 keygen Gps map edit keygen Gmail hacker pro key keygen Omniplan 3 keygen Iphone backup extractor 4.0 5 keygen Mediaget voucher code keygen Komodo ide 8 keygen linux Incomedia website evolution x5 v8 keygen New blue fx sony vegas 10 keygen Live interior 3d pro 2.7.3 keygen Keygen generator online free Html password lock keygen Flughafen feuerwehr simulator 2013 keygen Goodsync 9.9.35 keygen Minitool partition wizard home edition 8.1.1 keygen Nch wavepad 4.40 keygen Ewqlso pro xp silver keygen Max 8 keygen free download Goldwave 4.26 keygen How to get any software free keygen Keygen softwares chess 1.2 Ms office small business 2007 keygen Keygen for rar password unlocker Free download pipe flow expert keygen Excel password recovery crack keygen Epub to pdf converter keygen download Sitemap
0 notes
Last Seen Blogs