#gimp tutorial
Text
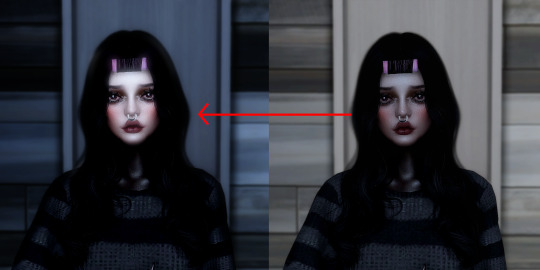
So I recently found a way to lighten up my sims whenever I take a screenie or do a render and it’s SUPER simple. I had to share! All you need is either gimp, photoshop, etc.
Here’s my original pic:
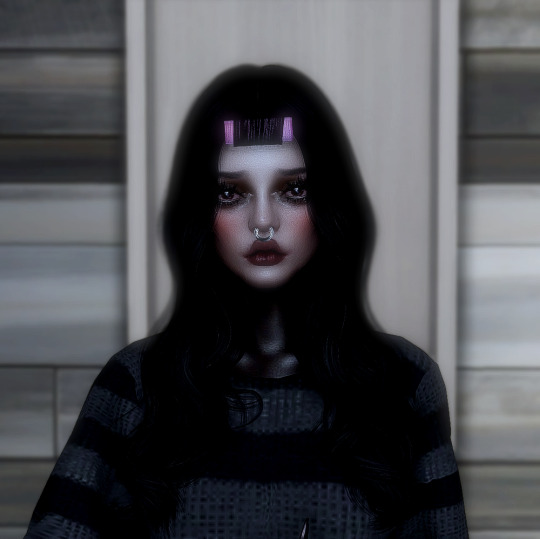
now we gonna enter gimp!
add a new layer (make sure it’s an alpha layer)
make sure the new layer is set to “soft light”

now go into paint

select a fuzzy brush and the color of your light. I chose white.
now paint over your sim’s face and/or body then go under filters -> blur -> gaussian blur (to your liking, I tend to go pretty high) and you’re done!
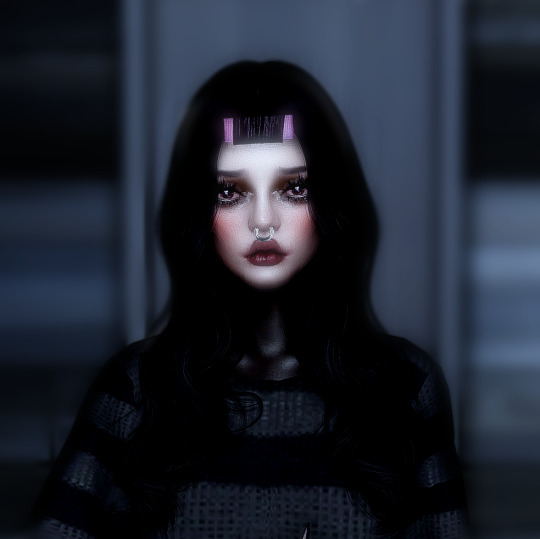
final pic is doing soft light on the background (color black and another layer is blue) and also gaussian blur on the background as well with erasing my sim so she’s unaffected.
#tutorial#gimp tutorial#ts4 tutorial#sims 4 tutorial#ts4 edit#ts4 screenshot#ts4 screenshots#sims 4 gimp#sims 4 tut#sims tutorial
136 notes
·
View notes
Text
Rolling playlist gif for GIMP: a tutorial ▬ by Joy from @creativexspirit
Credit where credit is due, I fell in love with this gif tutorial but EH I don't use Photoshop anymore so I made it my mission to recreate the effect in GIMP.
This tutorial uses AnimStack, a Script-Fu script for GIMP to give you tools for the creation of animated GIFs. As it's super useful, even if you don't follow this tutorial I highly recommend to download. How to install AnimStack to GIMP in tumblr's FAQ: https://animstack.tumblr.com/faq
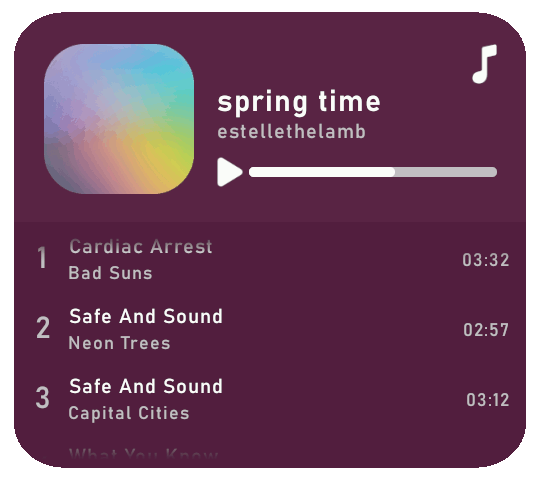
This tutorial uses my playlist template.
Tutorial with screenshots is under the cut.
Like or reblog if you download. Please don’t request as your own, respect my work. Don’t hesitate to tag me if you follow the tutorial! I would love to see your edits.
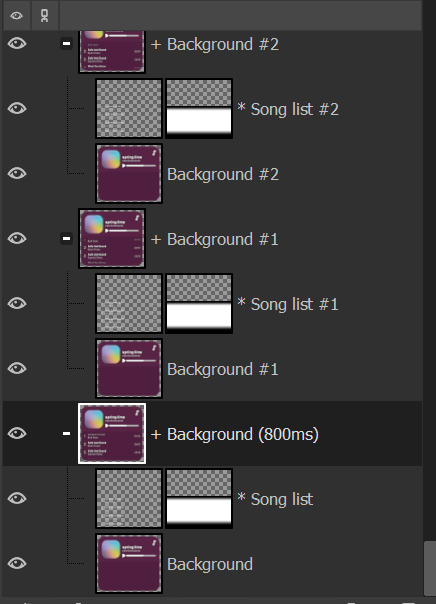
STEP 01.
Change the titles, the colors, the icons. Tip if you want to change the song title that are not visible: move the layers group "Song list", so you can see the text you modify.
Add songs by copy/pasting the "Song 5" layers group. Keep this layers group inside the "Song list" group.
Try to move the layers group so that it is aligned with above songs.
To place back correctly the "Song list", here's a tip: use the align tool and click on the "Song list" group. In the tool's options, in the "relative to" drop down menu, choose "Selection". Back to the layers window: in the "Background" group, right click on the "Color nuance" layer and choose "Alpha to selection". Now you are free to align your "Song list" layer group to the top and center of that selection, and it should be alright!
STEP 02.
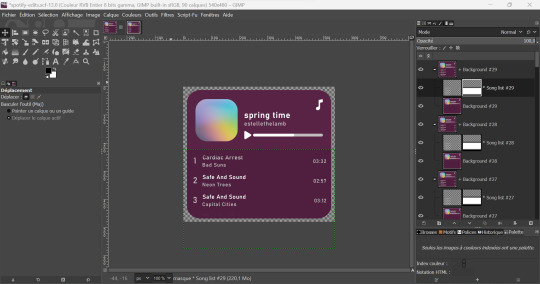
Now the tutorial actually begins. Flatten all layer groups using Image > Flatten Layer Groups. (Don't mind my GIMP language, it is in French but the AnimStacks tools are in English, you should have the same menu.)

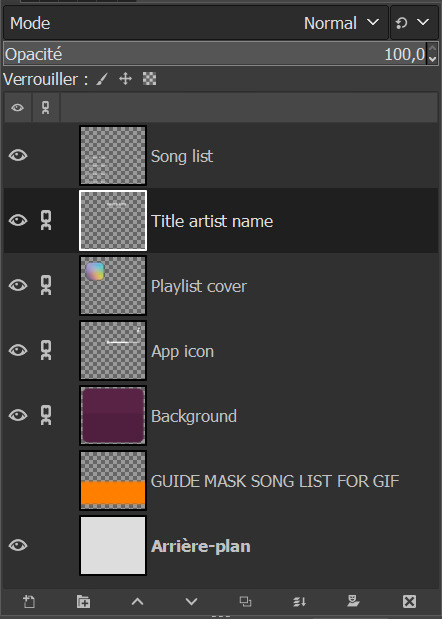
And now your layers window should look like mine, minus the links on the layers.
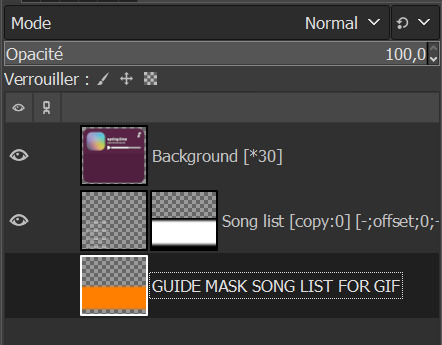
Now, see the linked layers? Merge them all together. You should end up with only 4 layers: "Song list", "Background", "GUIDE MASK SONG LIST FOR GIF", "Arrière-plan".
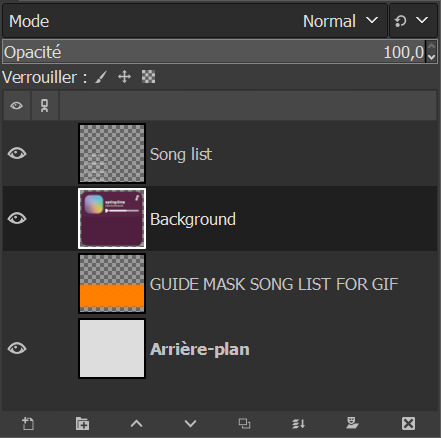
Note: you don't really need the "Arrière-plan" layer, so if you want to, you can delete it or you can merge it with the background layer. In my case, I will delete it.
STEP 03.
Reorder your layers. This is very important as AnimStacks will process the layers from top to bottom, so the layers order counts.
Put your "Background" layer on top, your "Song list" layer under it. As for the guide mask, we don't really care as we will delete it later.
STEP 04.
We are now going to add AnimStacks tags to our layer names. Here you'll have to do a bit of maths because you can choose the number of frames your gif will ultimately contain and adjust the tags parameters accordingly. This might seem complicated but it really isn't. I'll start by showing the tags to add, and explain how this will be processed. I will then give you the maths to choose your parameters accordingly.
Below, the tags I have added to my layers. You will have to write the same things as I do but what you might change is:
the number of "30" in Background.
the y parameter of the offset tag "-12".
YOU ARE NOT ALLOWED TO REMOVE THE [copy:0] and change it.
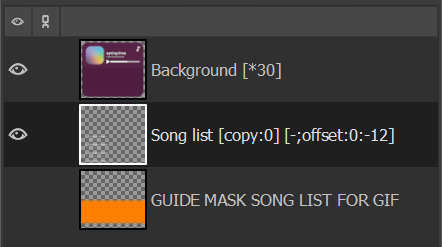
OK but what does each tag do? Remember, AnimStacks process is from top layer to bottom. Here the first layer is our Background layer: [*30] means it will duplicate the "Background" layer 30 times.
Now, onto "Song list" layer: [copy:0] will check all layers above the "Song list" layer that has no tag (at this point, all of our 30 "Background" layers have no tag), create a group for each found layer and place the "Song list" layer at position 0. Ok this explanation is wacky, for better explanation, please check the documentation.
The offset tag is necessary for the rolling effect: at each addition of the "Song list" layer, it won't just be a simple duplicate of the "Song list" layer, but the layer will have moved a little by (x,y) = (0,-12), allowing us to get that "rolling" effect in our gif. (And now you get why I said "y parameter".)
OK now, but how did I choose my parameters? So for reference, I only have 5 songs - I didn't add any song to the song list. For my maths, you need the height of the "Song list" layer. Check it with the scaling tool.
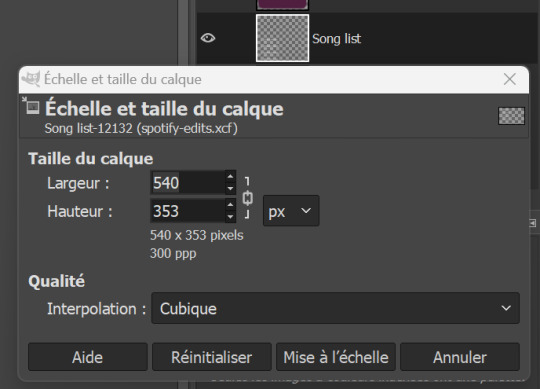
The height of my layer is 353 pixels (awful number meh). I choose to have 30 frames. So the move of the layers will have to be of 353/30 = 11.77 pixels. I choose 12 pixels because you can't have floats for the number of pixels, can you?
DO NOT FORGET the minus in front of the y parameter. My y parameter is "-12". Otherwise, the playlist will roll towards the bottom.
STEP 05.
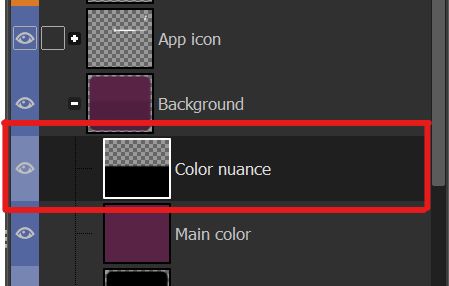
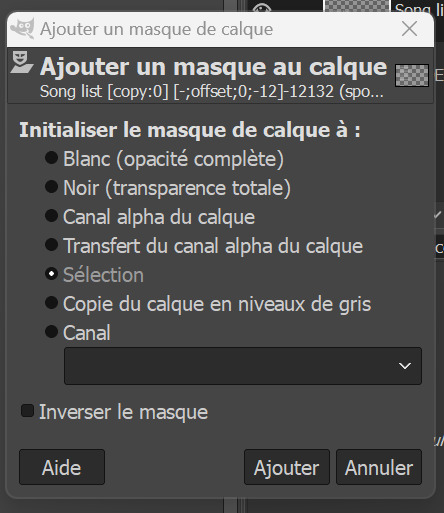
We are now going to add a mask to the "Song list" layer to avoid seeing the title songs where we shouldn't see them. See that obnoxious orange layer "GUIDE MASK SONG LIST FOR GIF"? Yes, it is its time to shine.
Right click on the "GUIDE MASK SONG LIST FOR GIF" layer and choose "Alpha to Selection". (Well in French it's Alpha vers Sélection.)
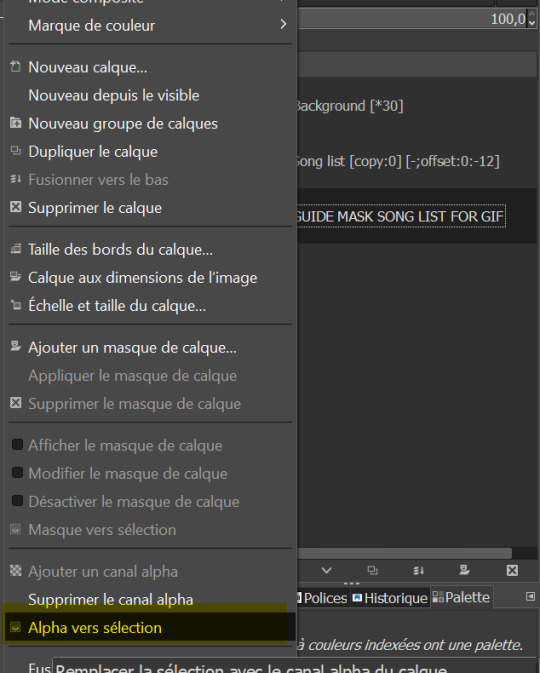
Now, we are going to use that selection to create a layer mask on the "Song list" layer.
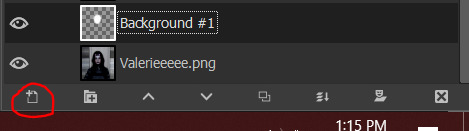
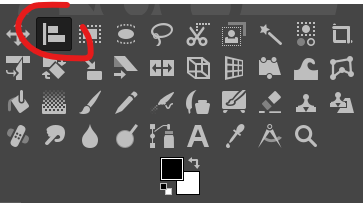
Right click on "Song list" and choose "Add a layer mask". /!\ Your selection must still be active. (Well in French it's "Ajouter un masque de calque" but you can see the icon right? By the way, you can also add a layer mask by clicking on the icon in the layer window, see circled icon in red.)

Now, choose Selection for the creation of the layer mask.
If you don't have the above results for the mask, it might be that you foreground and background colors are not the same as mine, meaning black and white respectively.

If you don't have the same colors as me above, click on the small pair of squares the blue arrow I draw is pointing to. It will default your foreground and background colors to black and white. Keyboard shortcut is D. (I don't think I changed it.)
And now, we don't need the orange guide mask layer anymore, so you can delete it.
STEP 06.
Last check before process: make sure you have no area selected (or you will get a weird result). Cancel all selection with Selection > None.
STEP 07.
We now begin the AnimStacks tags process.
In Filters > Animation, find "Process Animation Tags" and click on it.

The process might take a while depending on the number of frames you have.
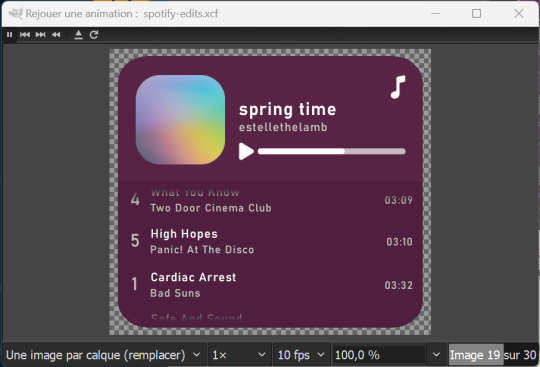
If everything is correct, you should have something similar to that. Now, we can check if the gif is correct and if we liked the number of frames and y parameter by previewing the animation in Filters > Animation > Playback...
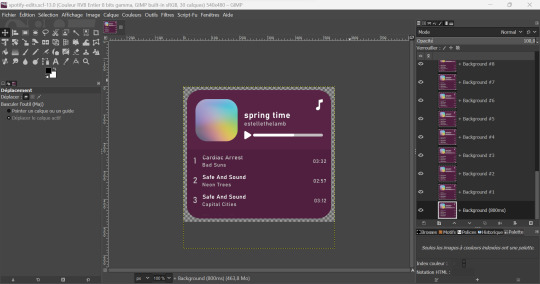
STEP 07.
This step is optional but you might want to change the time of our first frame to be longer so people have time to read the beginning. Do so by changing the layer group name by adding (800ms) to it. This means the frame corresponding to that layer group will be 800ms.
You can check if it's long enough by doing the playback again.
STEP 08.
Now, we have to flatten all layer groups if we want to export to a GIF. In order to do so, we will just use the same trick as the beginning: Image > Flatten Layer Groups.
STEP 09.
Optional, but good to do: to make our gif lighter, we are also going to optimize the gif. In order to do so, do Filters > Animation > Optimize (for GIF) I don't know personally the difference with the other optimization method. Choose either you'll have similar results it's a difference in the implied algorithm I guess.
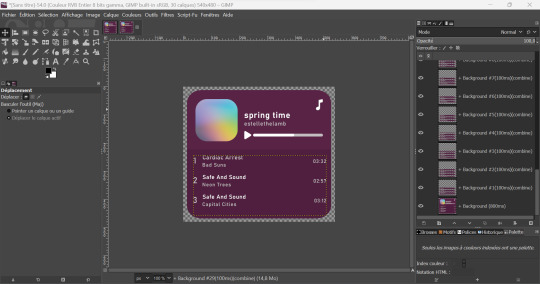
This step might take a while, but it's ok. When it's done processing you should have a new image created with the same results as me above. You can playback to check if everything is correct but here our job is done! We will now export the GIF.
STEP 10.
You can now export to GIF! Go to File > Export as..., choose the name of your file and end it with the .gif extension.
If you get an error message because some layers are not cropped, no worries: just choose the "crop" option (but you should not with the optimization).
Now, don't forget to check "as animation" when saving the GIF, if you haven't done the optimization, choose the delay between frames (the first frame will still be of 800ms), and choose "replace".
WITHOUT OPTIMIZATION:
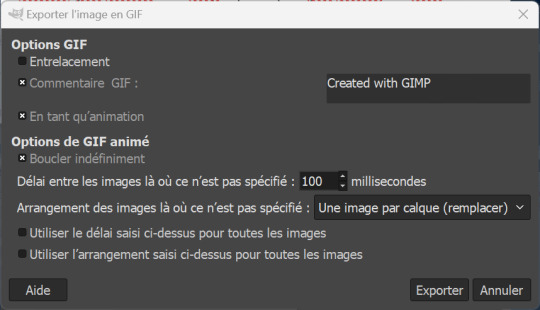
(With the optimization process, all layers already have delay and animation replacement type thingy specified.)
AND VOILA, YOU HAVE YOUR GIF! If you mess around more with AnimStacks, you can do cool stuffs with it!
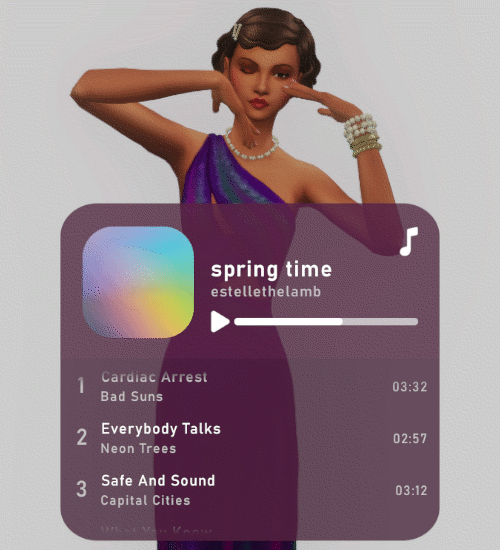
Now, how do you pronounce the G in gif? Also shh, don't say you saw the mistake I made when changing the title's songs in the tutorial, I wanted to write Everybody Talks by Neon Trees.
9 notes
·
View notes
Text
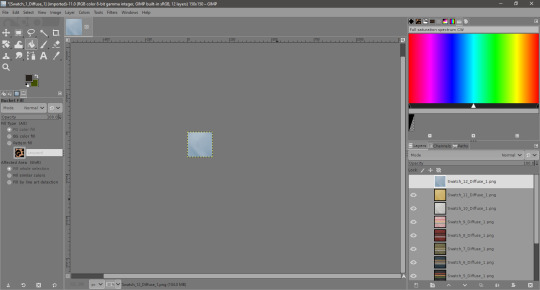
Fast Swatching Tutorial
Inspired 100% by @goatskickin's recent swatching tutorial, here's my method for super fast swatches in GIMP.
Open all of your textures as layers on the same image. (You know how to do this, right?)
If it's a 4t2 conversion, open the PNG's you exported from S4S. No mipmap dialog each time, like with the DDS's.
Click "Image > Canvas Size" and set it to the size and area you want.

I go with 150x150. If I want a very specific area, I'll do 300x300 first, because it's easier to pick the exact 150x150 from that smaller area.
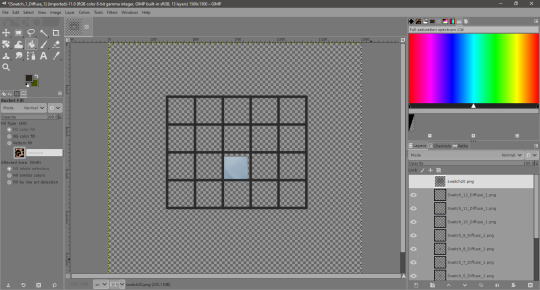
This crops all your layers to the same size, same area instantantly.
But now there's no extra room, just the tiny crop. Back to Canvas Size!

1500x1500 and center it.

Now there's a stack of swatches in a nice big workspace. If you don't want a border, just line those swatches up and you're basically done.
I like a border, and I have mine saved (you can have them too, if you want), so I only have to open it as a new layer.
Once that's in, I move the swatches to their slots and crop away any unneeded cells.

And then "Image > Crop To Content" to cut away the excess workspace.

With everything lined up, I fill any empty cells with the border color.
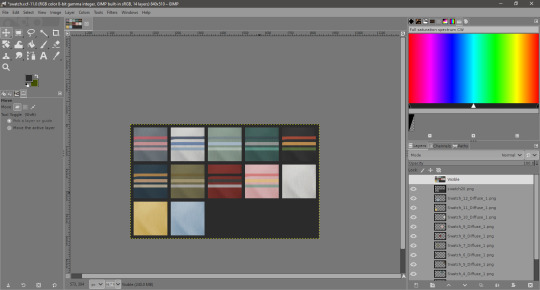
Once that's done make a new layer from Visible (Layer > New From Visible), and it's ready to export as a PNG.
Super fast, super easy.
31 notes
·
View notes
Photo

Here’s how to get the popular stained glass text effect (I don’t know what’s really called) using GIMP.
Things you need:
GIMP
Animstack
How to make gifs
1. Import your frames (File > Open as Layers). Then resize, crop, and edit them how you want the gif to be as usual.
Here’s mine:

2. So over here, I have my texts. One layer is just going to be a normal white colored font. And the other layer will have the glass effect. I suggest you use a color for the font instead of white or black.
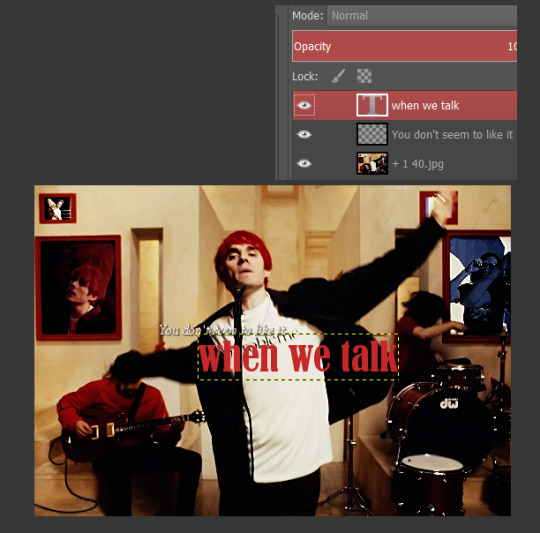
3. Duplicate the text layer. Now, I’m going to change the layer mode of both “when we talk” text layer as such:

Put an [fg] to the name.
4. Run Animstack (Filters > Animation > Process Animstack Tags). You will get them to be in layer groups like this. Sometimes depending on the color you have picked, you can stop here when the stained glass look is achieved.

5. If don’t like how the colors look, you can continue. Pick your two colors of the gradient that you want to be used in the gradient map in your color swatches. Here, I’ve picked these two colors.
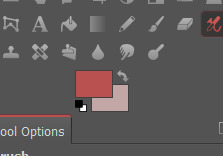
Select the first “Hardlight” layer and go to Colors > Map > Gradient Map. This will add the gradient map to that layer.
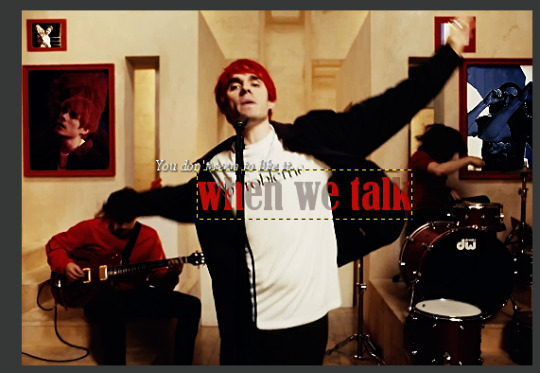
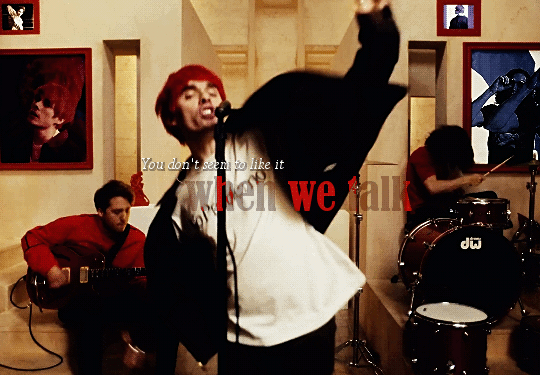
6. Now, do the same for the rest of the Hardlight layers. Once you’re done, you can playback and export your gif!
16 notes
·
View notes
Note
Hi! I was just wondering if you use Reshade (Or Gshade?) when playing Sims 2? I've never used either and I'm worried if Sims 2 could handle it? Your Sims 2 posts are so pretty and I'm wanting my own to look at least half as good! Thank you so much!
Hey Anon! I hope you're doing well!
Unfortunately I don't actually use Reshade or Gshade for either Sims 2 or Sims 4. I just play a normal, boring, unsaturated game. I'm sorry I can't help you with that part. But I'm still gonna try to help! Don't worry!
Everything you see on Simblr is done through the power of editing... Here's a quick tutorial (It wasn't actually quick, it took me hours to reply to this) if you'd like to learn more on how I get my screenshots to look the way they do.
I use Gimp which is 100% free, as opposed to Photoshop's monthly fee. At this point I'm way more comfortable with Gimp so I wouldn't make the switch even if I had the money to spare.
Saving Templates as xcf Files
I’m not a tech or graphic design genius so correct me if I’m wrong, but I’m guessing xcf files are the equivalent of psd files. These are the types of files you need to open if you want all of your layers to show up. When you have all of your layers ready, you need to do “save as” and then make sure you’re saving your project as a .xcf.

Using xcf files I made reusable templates for my screenshots so everything is already saved when I want to edit. I just have to open up the screenshots as new layers into the xcf templates and it's done! It literally takes two minutes to do!
Sims 4 is a bit more complicated because I add moodlets, notifs and icons, but the process is generally the same.
Before & After:

Above are two images edited differently depending on the lighting. The image on the left uses the 25% opacity layer while the image on the right uses the 75% opacity one. You can definitely see the difference. They're way brighter and crispier.
My Layers:
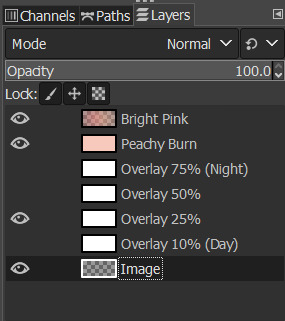
This is what my layers look like. I renamed some of them for your convenience so don't be confused when the images below have different names.
Top Layer (Bright Pink)
The pink-peach gradient is what makes my images bright and pink. I love that it removes the bluish glow from Sims images. The mode is "overlay" and the opacity is set to 60%.
2nd Layer (Peachy Burn)
This layer makes the image crispier. It's a little darker and the contrast is better in my opinion. It's super touchy though so you barely have to have any opacity at all for it to work. The mode is "burn" and the opacity is only 15%.
Layers 3 to 6 (Brightness)
So these are the layers that REALLY make all the difference. Depending on the lighting in the original screenshot I use a different layer to brighten up my images even more.
If it's bright and my sims are outside I'll likely use the 10% one since I don't need to lighten up the image much. If it's really dark I'll likely go for the 75% one.
For most indoor screenshots I will use the 25% opacity one which is the one that's already toggled on when I open up the template.
Layer 7 (The Image)
This is more or less just a placeholder. I usually put my screenshots between this layer and "Overlay 10% (Day)". You don't have to do anything with it. If all of your layers are toggled on properly then the image should already look edited the moment you add it to the template.
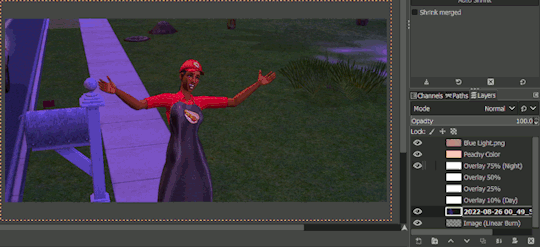
Previews
This is what it looks like when I open a random screenshot as a new layer. As you can see, I'm using the 25% opacity layer. Every other opacity is toggled off, which you achieve by clicking on the little eye icon at the left of the layer.

This is the original image with every other layer turned off. It's what I see in-game when I play.

As you can see, it's very dark and unappealing. What can we do to change that?
Here's me turning on every single layer in gif form. You can clearly see the difference the "Overlay ##%" layers do to help brighten up the image. You can also see why I'd choose 75% over 10%.
A final note or two:
If you've read this far and found this tutorial useful (it literally took me hours to do so I hope someone took away something from it LOL) then you're welcome!
I'm just gonna low-key add the link to my Ko-Fi here in case this post gets a lot of views and anyone would like to donate. 😂😂 I'm having a hard time financially so it'd really help. No pressure though, especially if you're also struggling to pay the bills.
28 notes
·
View notes
Text
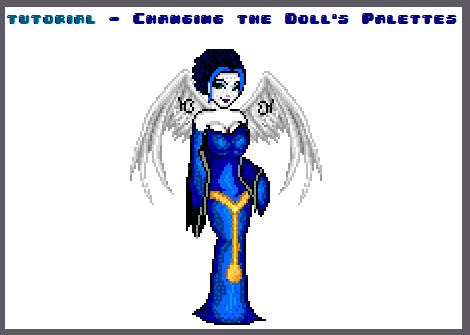


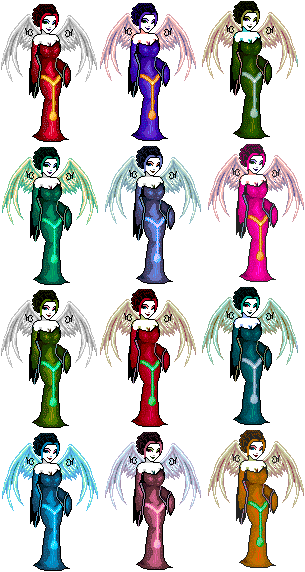
download Gimp here.
this doll was made on Dollzmania Gothmaker.
#tutorial#gimp#editing tutorial#tips#dollmaker#dollz#art tips#art tutorial#gimp tutorial#dollzmania#goth#pagedoll#edit#mspaint#paint#colorful#colors#rainbow
5 notes
·
View notes
Text
Quick basic GIMP tutorial
Cutting out text bubbles/anything with rounded corners from messy backgrounds! Particularly useful for Sims, but I’ll post it here and reblog it on @nephaelia-sims
Just because I literally just figured it out myself lol (and I’ve been using this for how long??? lol)
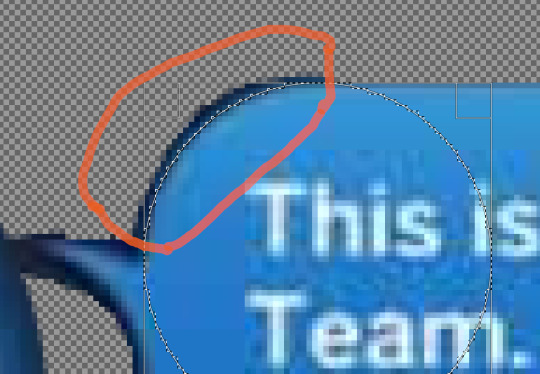
So I already cut the background out for the most part (using the magic wand select tool, eraser, etc), but I got these funky corners left which can be hard to smooth out since the text bubbles are originally shaded in-game, and I always end up cutting half the shading out with the background. This corner is not the worst one, it’s just one of the only ones I had left after figuring this out lol

So you want to use the ellipse select tool. You should check to see that the mode (on the lefthand side, lower panel, right under where it says “ellipse select”) is set to either the first or second one from the left- I don’t think it matters for this step which of the two. (I had the wrong one selected because I just finished another corner.) Don’t use a fixed aspect ratio, because you just want to match the curve of the corner- don’t worry about anything outside the orange circle (below:)
Once you’re happy with your curve, hit enter. Now, go up to Select and click “Invert selection.”

Next, change the Ellipse Select mode to the 4th option (intersect with the current selection), and make an ellipse that will select the stuff you want to remove. Don’t worry if it cuts into the text bubble, we’re not done. Hit enter, but don’t go cutting anything yet.

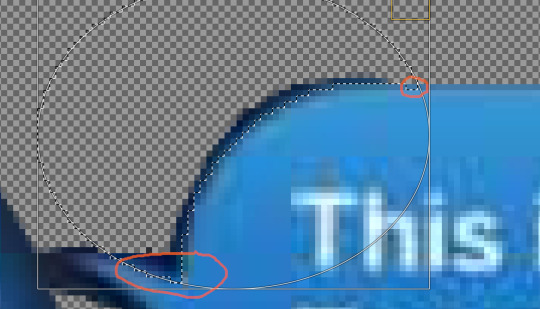
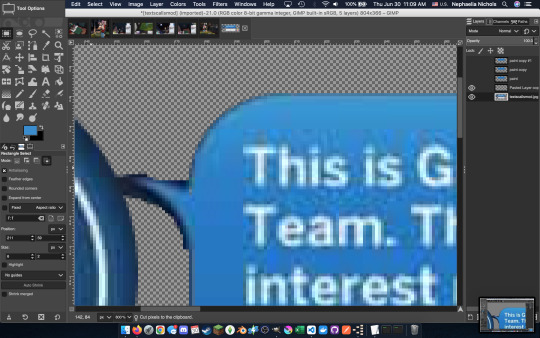
In my case, I ended up having a couple little spots I wanted to keep. The small orange circle shows where it had caught a couple pixels of the text bubble itself, and the large one is a part I’m not sure what I want to do with yet (the tail thingy on the bubble) so I’m keeping it until I do know). For fixes like this, we can use a variety of selection tools: Rectangle, ellipse, and lasso (idk if that’s the actual name lol) are all good options, depending on the shape, size, and level of detail you need for your corrections. On any of the select tools, the third mode option is “subtract from current selection”, which is what you want now. I think I just used rectangle select for both parts of mine, and here’s the final selection before I cut it:

Now cut the selection (cmd+x, ctrl+x, whatever it is for you), and you have a nice smooth corner!
Just wanted to share this, it’s very basic stuff but I didn’t realize the use for the overlapping selection tool until literally an hour ago, and I’ve been using this program for over 10 years (though tbf not professionally or super regularly). I always wanted the functionality but never knew how to look for it.
#gimp#gimp tutorial#photo editing tutorial#screenshot tutorial#editing tutorial#tutorial#ts4 tutorial#ts4 screenshots#digital art tutorial
6 notes
·
View notes
Text
Digital Flower (Krita or Gimp)
As per the title, it is possible to practice this tutorial in both Gimp and Krita. There are slight differences: in Gimp you can use guides for centering; in Krita this is more difficult. The opacity of layer modes varies between the two programs and centering the selection circle is easier in Gimp. Here are the links:
• Tutorial in english - in Krita Artists forum;
• Tutorial em português brasileiro - em meu blog / no fórum comunidade do Hardware.

2 notes
·
View notes
Text
Retro Gaming Scripts For Gimp
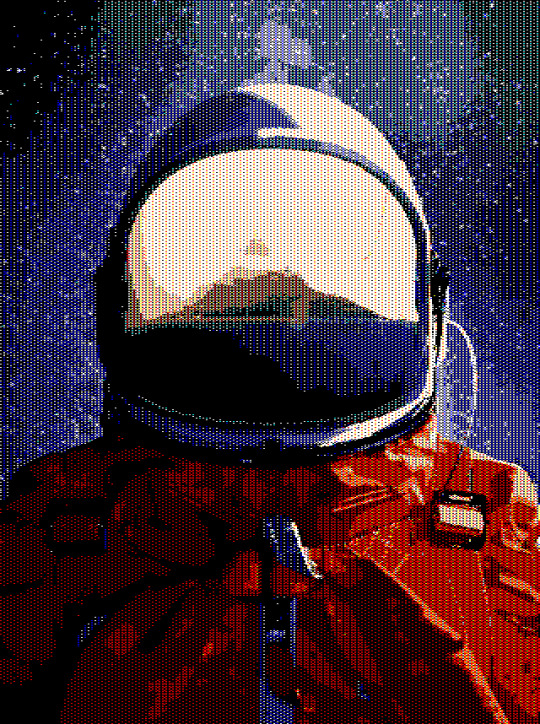
The retro gaming scripts for Gimp manipulate images to give them, naturally enough, a retro gaming look. Or to describe them from another perspective, these scripts add different styles of dithering to your images.
Altogether there are eleven different scripts, and each one imitates the style of various retro computers. For instance, there are three scripts dedicated to retro Amstrad graphics, four to the old BBC computers, and others that adopt the graphic styles of the ZX Spectrum, Commodore, as well as a few others.
To find out more including how to download, install and use these scripts visit the Lusus-Studio blog.
#gimp#gimp tutorial#gimp tutorials#gimpart#secondlifeblogger#slblog#secondlife#slblogging#secondlifeblog#slblogger#second life#gimp scripts
0 notes
Text
#gimp tutorial#gimp art#digital art#digital drawing#dreamcore#trippyart#mixed media#trippy#vsco#ukartist#abstract#psyart#psychedelic edit#psychedeloscope#neo-psychedelia#dreamscape#soundscape#immersive art#immersivesoundexperience"#immersiveexperience#immersive daydreaming#daydreaming again#the backrooms#twisted wonderland#wonderland
0 notes
Text
GIMP is the handy free alternative to Photoshop that does everything Photoshop can do except it’s a complete fucking pain in the arse, requires 12 unneccessary steps and requires you to google “how to do x in GIMP” for even the most basic of tasks like puting a stroke around text. Fuck GIMP, just pirate Photoshop, shit’s unusable.
0 notes
Text
GIMP - Basic Recoloring - Curves
When I described a possible “quick tutorial” yesterday, I should have known better. I decided to break it up into three minis, each about a specific method. In this first part, we’ll be looking at Curves.
Curves can be used as GIMP’s equivalent of Photoshop Actions. You’ll want to download some Curves first. There’s a treasure trove of them by @iakoasims here. Someday, I’ll learn how to make more, to round out the selection of the usual TS2 color palettes, but Iakoa’s selection is substantial. Go get a few.
This tutorial miniseries will ONLY teach you the GIMP part of recoloring. It assumes you already know how to extract a texture, make your recolor file, and then import a DDS. It will work for clothes, objects, makeup, hair, etc. If you need beginner’s level help, you’ll need to find a tutorial for whatever type of project you’re doing. You’ll also need GIMP installed. Go get it, if you haven’t yet.
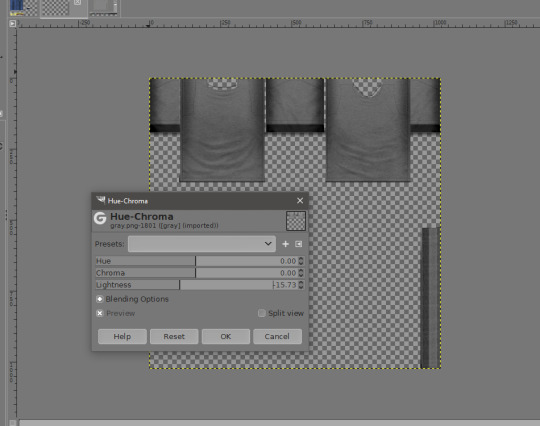
Since this is a basic tutorial, I’m using a simple texture we all know and love. Trapping’s separated Fanseelamb PJ tee. It’s all one color, and it comes in gray.

Curves are best used on a gray base. (At least for everything I’ve ever recolored.) If there’s no gray texture already, you can use the Color > Desaturate > Desaturate tool to turn everything gray. You should probably run it on grays too, just to be sure there aren’t any funky pixels that might go weird when you recolor. This texture starts out a little lighter than we want, so let’s darken it. I like the Color > Hue-Chroma tool for darkening. It’s gonna be part 2, but for now we’re just using it to darken the texture to a mid-gray.
Click “OK”. Now for the Curves! Click Color > Curves to bring up the tool.
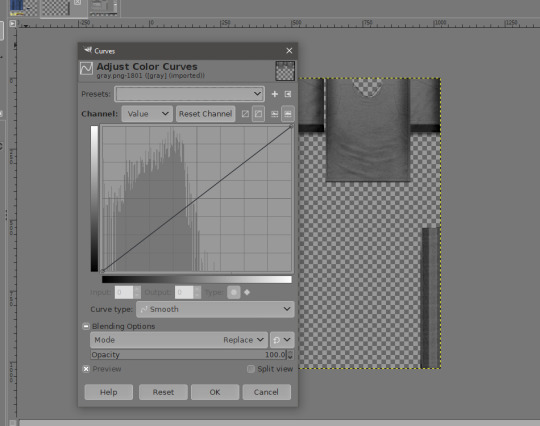
To apply a preset curve (the ones you downloaded and unzipped somewhere easy to find), you’ll click the little backwards play button looking thing next to the presets dropdown menu. It will bring up a file opening dialog. Pick a Curve to use, and apply it. (I probably should have gotten a screenshot of that, but you know what picking a file looks like, right? I might come back and circle that button, because tinytiny.)

If you like the result, click “OK”. If not, click “Reset” at the bottom. It will revert to dark gray, but the Curves tool will stay open, and you can pick another Curve. Some curves do need a lighter base, mostly pastels. If your results aren’t right, try adjusting the lightness of the texture. If you get bright or dark spots, adjust the contrast with the Color > Brightness/Contrast tool.
That’s it. It’s that simple. Once you like a result, File > Export will let you export it as a DDS file for importing into SimPE. This method is great for making stuff match. It’s what I used to do pretty much all of my recolors that are in a popular Sims 2 (or 4) color palette.
I learned how to use Curves from Iakoa’s tutorials. My tutorial is very condensed, and uses a more recent, English language version of GIMP. Hers are still very much worth a look. This one will teach you the basics, and this one will help you in way more depth if your results aren’t turning out right.
In the next mini-tutorial, I’ll show you what I use when I want -exactly- the color I want.
Let me know if anything here needs clarification.
39 notes
·
View notes
Photo


Here’s a very late tutorial request. 😆 Read more to find out how to make this torn paper gif edit using GIMP.
Things you need:
GIMP
Torn paper PNGs
Animstack
Layer Effects plugin (Save this to user>.gimp-2.8>plugins)
How to make gifs
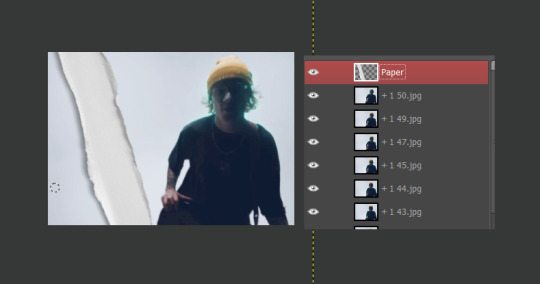
1. Import your gif frames and resize, crop and color them as usual. This will be the gif I’m using:

2. Next, drag in your paper png image and position it where you want it. My png already has a drop shadow to it but if you need to add it, you can use Layer Effects and add it to yours.
3. Add in the text you want to be appearing from the ‘torn’ section.
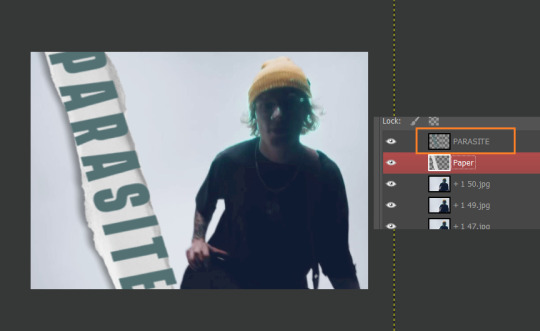
To clip the layer, select the paper layer and pick “Alpha To Selection”. Then, select your text layer, right click on it and pick “Add Layer Mask > Selection”.
Now, the text should only appear inside of the torn paper layer and nothing outside.
But you have to look at your paper layer and see how it looks like. Sometimes, there’s the part of the text that goes over a ‘folded’ or ‘curled’ part of the paper and it won’t make sense. So just use a black brush and select the mask of the text layer and paint over that part you want to erase.
4. After this is done, you can merge down the text layer onto the torn paper layer so it becomes one layer. Rename it to [fg].

5. Run Animstack (Filters > Animation > Process Animstack Tags). And you’re pretty much done. You can add in more texts outside of the torn layer like you normally would for a normal text on a gif, if you’d like!
13 notes
·
View notes
Text
Be BOTH Team Bonnie & Team Monty
There is no wrong way about this. If you enjoy both characters, good! I love that, I adore both as well. Both are fictional characters, both are comfort characters.

#FNaF#glamrock bonnie#glamrock monty#fnaf monty#monty gator#monty fnaf#montgomery gator#five nights at freddy's#userboxes#fnaf security breach#five nights at freddys#fnaf sb#fnaf sb ruin#fnaf sb dlc#fnaf sl#userbox#hopefully the tags are to be read. so to avoid confusion for those that never been on the internet before#you can right click the image above using your mouse and save the image#it will show up Save Image As. You can also make your own userbox as well. I've used freebie program called GIMP#on a site called youtube. you can learn plenty of tutorials on how to use GIMP. don't think version matters so much? just mess around
91 notes
·
View notes
Text
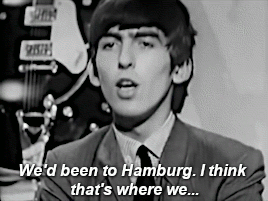


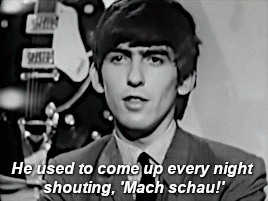
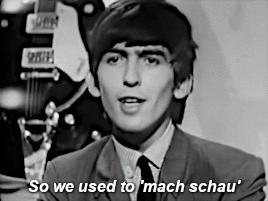
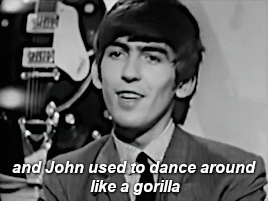
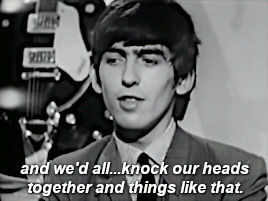
Anyway, we got back to Liverpool, and all the groups there were doing the sort of Shadows type of stuff. And we came back, leather jackets, and jeans and funny hair, 'mach-ing schau,' which went down quite well. —George Harrison
From the Beatles interview in The Mersey Sound, filmed August 28, 1963 at BBC's Dickenson Road studio in Manchester
#george harrison#the mersey sound#thebeatlesedit#mach schau#hey hey bug tumblrinas i finally figured out a way to make semipassable gifs ahhhhh#VLC + GIMP i knew there had to be a way but dang that was more complicated than every tutorial ever suggested#i blame my SFF vidding post i really really wanted to get the movement of that vid#and then got fixated on the paint pouring#but it was this video that got me realizing my problem the frames were backwards#haha i got excited getting two done and then looked at it like 6 more#started it for the gorilla comment and georges little mach schau impression#but its adorable how unpolished he is for tv still here squinty and looking all over the place#hamburg era#young george#my gifs#1963#gorilla suit#george speaks
164 notes
·
View notes
Text
Saving Filters Settings in Gimp / Salvando Configurações de Filtros no Gimp

Sometimes you need to use a certain Gimp filter setting multiple times or certain filters have too many configuration options… and it's hard to remember them all. To make it easier, you can save these settings. Find out how in this tutorial!
Algumas vezes, você precisa usar uma determinada configuração de filtro do Gimp várias vezes ou certos filtros tem muitas opções de configuração… e é difícil lembrar de todas elas. Para facilitar, você pode salvar essas configurações. Veja como, neste tutorial!
• Tutorial in english - available here for download in Mediafire.
• Tutorial em português brasileiro - disponível on-line em meu blog e no fórum Comunidade do Hardware.
0 notes
Last Seen Blogs

hallowoods-art
Hallowoods Art Blog
royalsy-queen
Royalsy-queen
algidasombra
Sin alas
monachopsis-people
Life Is Shit, Then U Die
mchllcx-bionicmanleemajors
Six Million Dollar Man