#sims 2 tutorial
Text
A Complete Guide on how to Fix & Optimize The Sims 2 on Windows 10/11
I've made a video tutorial and written guide on everything you need to know on how to Fix & Optimize The Sims 2 on Windows 10/11, with Performance, Stability, and Graphics Enhancements.
Watch the Video Tutorial on YouTube:
youtube
Read the Written Guide on my Website
#sims 2#the sims 2#ts2#sims 2 2024#sims 2 windows 11#sims 2 windows 10#fix sims 2#graphics rules maker#sims 2 RPC#sims 2 4gb patch#Empty standby list#empty standby memory#sims 2 shadow fix#sims 2 George#Sims 2 Settings#Sims 2 Ultimate Collection#Sims 2 Resolution Fix#Sims 2 tutorial#Sims 2 help#Sims 2 crash fix#Sims 2 error fix#Sims 2 video#BellaDovah#Youtube
162 notes
·
View notes
Note
Hi Lamare! First of all just wanted to say thank you for all your amazing mods and hard work! I'm not sure if you take requests but I'll ask anyway as I think this is more of a question than a request per-se and you're way more tech-saavy than me so maybe you can point me in the right direction. I absolutely love the fact that we can order photos from the computer with Bon Voyage to hang around our sims' houses, but I hate that it only allows photos taken with the camera by another sim. Is there any way that you know of to move gameplay screenshots to a specific folder to have them show up in the ordering menu also? I've dug around seemingly everywhere in the files and can't figure out where the game stores those dang Bon Voyage camera photos to be able to move mine to that directory. It must be storing them somewhere and it's driving me crazy! I can't seem to find any other people asking about this online either.
Hi Ali!
Bon Voyage camera photos are stored in the neighborhood Storytelling folder, as well as screenshots, for example:
Documents\EA Games\The Sims™ 2 Ultimate Collection\Neighborhoods\N001\Storytelling
The key difference is naming. Regular in-game screenshots are called something like this (two files for each):
snapshot_727938eb_527938ec.jpg
thumbnail_727938eb_527938ec.jpg
Sim-taken photos would be called:
nsnapshot_9014dbd3_b2a57631.jpg
nthumbnail_9014dbd3_b2a57631.jpg
To have screenshots show up as camera photos and be available in the ordering menu, add an "n" to the filename. They'll change right away, without you restarting the game!
172 notes
·
View notes
Text
Quick GUID Checker for Sims 2
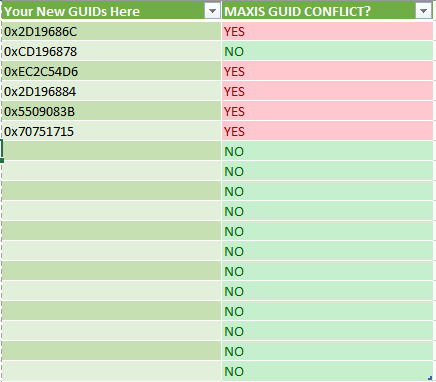
This is an expansion on @picknmixsims Microsoft Excel sheet available here. It is a table I made that is incredibly lazy but effective and quick at searching for searching for Maxis GUID conflicts when you create new GUIDs. It's a little easier to use since the GUID Database has been down for a long time and you can add your own GUIDs onto the list and update the formula if you're savvy enough in Excel.
DOWNLOAD SFS
DOWNLOAD MEGA
182 notes
·
View notes
Text
How to Divide an Object into Multiple Subsets in Milkshape 3D
i made my very first ever tutorial!! on how to divide an object into more than one group or subset in milkshape. this is v handy for when an object originally has one subset, but you want to make two recolorable subsets. 💕
is this helpful to anyone?? idk i hope so lol.
i did a quick written doc too, if that's more up your alley. it's more simplified than the video, but you still get the gist i think.
youtube
#sims 2#ts2#ts2 tutorial#sims 2 tutorial#creator resources#posts this and runs tf away LMAO#this makes me feel perceived and i hate it sdfmnsdfd#but idk if there's a recent tutorial on it? idk i hope its helpful to someone out there#Youtube
74 notes
·
View notes
Text

Grid-Adjuster Tutorial: How to Attach a Garage to a Lowered Foundation
Tutorial now available on Simblr, and MTS, and my Blog.
The house built in this tutorial is here, on Tumblr.
Enjoy! 🦚
#sims 2#ts2#catherinetcjd#sims 2 download#sims 2 cc#sims2cc#ts2 download#ts2 lot#sims 2 lot#ts2 cc#grid adjuster tutorial#sims 2 tutorial
133 notes
·
View notes
Text
It is up! It is up! It is up!

84 notes
·
View notes
Text

this was requested by... me! who was struggling with manual bone assignments close to midnight and finally said 'fuck it' 😅 after remembering that a maxis mesh with a somewhat similar shape to this warlock outfit existed, i just had to write a tutorial on how to use such meshes as clothing references for others 😌
this tutorial covers both bone assignments as well as morphs, just bear in mind the latter may not always turn out as well as the former. i'm working on a database of extracted maxis clothing meshes as wso's for future reference, but for now, do enjoy @withlovefromsimtown's wso templates masterlist and this tutorial as guidance.
TUTORIAL: GOOGLE DOCS | PDF 👔
if there are any tutorials that you need and feel i can provide, lmk! i'm still learning myself, so there's probably a lot of easier ways to do the things i do than my ways 🥰
from that, to this... a big improvement!!
58 notes
·
View notes
Text

Hi guys! I uploaded a tutorial today with all my best tips for using pose boxes, overlay boxes, animation boxes, etc. Please check it out and let me know what you think!
Things I cover include:
- how to have sims walk and do animations at the same time
- how to layer face overlays to change expressions while retaining sims talking mouths
- how to use pose boxes to change animations and remix them to your heart's content
- how to use omsp's to change up animations and get more options
I hope that this can be helpful for someone! I am no expert and have zero idea how poseboxes work lmao so don't expect too much technical know-how, but I think hopefully you will be able to learn something new! Watch here
246 notes
·
View notes
Text

I was looking for some poseboxes and came across THIS very helpful post!
It catalogues the vast variety of facial expressions you can make using Custom Modeling Poses Overlay Hack V2 w/Face Overlays.

COOL RIGHT
105 notes
·
View notes
Text
Making your own career/NPC outfits (and attaching them to custom and default careers)
Tutorials I’ve used that helped me understand this a little bit more:
SuperFly’s „Attaching custom clothes to careers”
@rio-sims „Adding extra options to NPC and Career Outfit Templates”
@itsdiamondeyesuniverse mini-tutorial on random clothes and hair
and some general knowledge from Hat’s Simpe Tricks
I’m just compiling them and adding results of my own experimenting. It will be pretty long, so everything is under the cut.
Download Template files [SFS] or [Google Drive]
First step is to understand what makes an outfit template.
Looking at my empty template (OutfitTemplate-Empty.package), you can see 4 files. You don’t touch the BHAV and OBJf, they control the behaviours and functions and such. Good practice is to change the name of the OBJD and NREF to something unique. For custom outfits, you will have to change the GUID in the OBJD, but I will touch on that later in the tutorial.
But that’s just an empty template to fill with your own outfits. Every variation of an outfit is made of 2 files:
3IDR (3D ID Referencing File) - This one contains skeleton resource and hair/clothes property sets.
AGED (Age Data) - This one pretty much contains instructions on how to read the 3D ID.
In my 3D ID template files you can see the first line is a Resource Node - that’s the skeleton. It always has to be there, don’t delete it. Second line is a property set - that’s the outfit that you will be replacing. 3D ID can have many lines of property sets in particular order, depending on what Age Data is saying.
(My SimPE shows Age Data in CPF, which reads hexadecimal, but sometimes can also show it in XML, which reads decimal. If some lines are different in decimal, I will put it in brackets.)
If you open up any of my Age Data templates, you can see a lot of lines that may make sense intuitively, and some that make no sense at all. Here are lines that are actually useful and how to change them:
AGE
2 - Child (also 2 in decimal)
4 - Teen (also 4 in decimal)
40 - Young Adult (64 in decimal)
8 - Adult (also 8 in decimal)
48 - Young Adult + Adult (72 in decimal)
10 - Elder (16 in decimal)
58 - Young Adult + Adult + Elder (88 in decimal)
I think it’s better to always include Young Adults with Adults. If for example you don’t use mods that enable jobs for YA, then nothing happens and nothing breaks. But if you do, then your YA can wear their job uniform.
GENDER
1 - Female
2 - Male
3 - Unisex (only for children!)
STRETCH
It’s only important in teens - they use adult skeleton, but smaller. For adults/elders stretch will say 1, for teens - 0,94. Children use their own skeleton, so their stretch is also 1.
VALIDPARTS
3e4 - If you want to add hair to your outfit (996 in decimal)
3e0 - If you don’t want hair in your outfit (992 in decimal)
LISTCNT
Number of elements in your 3D ID. Technically counts from 0, but as the first item is always a skeleton, for ease of counting - it’s the number of property sets used. For only fullbody outfits it will be 1, fullbody + hair or top + bottom = 2, hair + top + bottom = 3.
SKELETONKEYIDX
Position of the skeleton in the 3D ID. Always 0, as it’s the first item, counted from 0.
LS, LK, LE
All 3 needed together. They are counted from 0. So the first 3 lines will be named ls0, lk0 and le0_0. If you add another item to your outfit (eg. hair + fullbody clothes), next 3 lines will be named ls1, lk1 and le1_0, then ls2, lk2 and le2_0 etc.
LS
Always 1.
LK
The numbers are already in decimal, so the same in CPF and XML. From what I’ve tested and I’m sure of:
65537 = Hair/hat
65544 = Fullbody
65540 = Top
65552 = Bottom
LE
Which line in 3D ID corresponds with this item, counting from 0. As line 0 is always a skeleton, and dealt with in the „skeletonkeyidx” line, you can just count property sets.
If you use my Age Data templates - you don’t have to worry about all that, but I made this tutorial only because I really wanted to know that. So maybe someone else would want to know too :P
Now that you can understand what makes a working outfit, lets make one! This will be split into 4 parts: part 1 - making a new, custom outfit; part 2 - replacing existing outfits; part 3 - attaching outfits to careers; part 4 - testing if it works.
Part 1 - Making a custom outfit
In this example I will make an outfit for adults only, for the sake of shorter tutorial :P
First step: Open „OutfitTemplate-Empty.package” in SimPE. I will change my OBJD and NREF names. In the OBJD you have to change the GUID (the one with all zeroes in the template) - how to make a GUID? Click here to generate 8 random characters in hexadecimal (refresh for a new string), delete any spaces, then put „0x” at the start. Then check with this spreadsheet if it conflicts with any Maxis objects. My new GUID will be 0x1234ABCD (only for tutorial purposes, yours should be more random to avoid clashing with CC objects too). Save the file as a copy.
Now we’re going to add actual outfits. First, one for female adult sims. You have to add a 3D ID template (in this case for teens/adults/elders) and an Age Data template that includes your preferred combo. For this one, I will get AF-Hair-Fullbody.
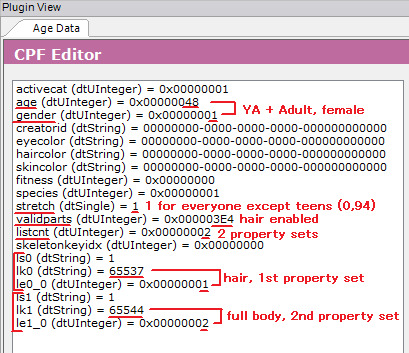
If you look at the Age Data, you can see here that it’s for Young Adult and Adult female sims (age = 48), it has hair (validparts = 3e4) and contains 2 property sets in 3D ID (listcnt). In the ls/lk/le lines you can see that it contains hair (65537) in the first property set and full body (65544) in the second one. (Though the order of the property sets is in the names of the template files, so you don’t have to check every time!)
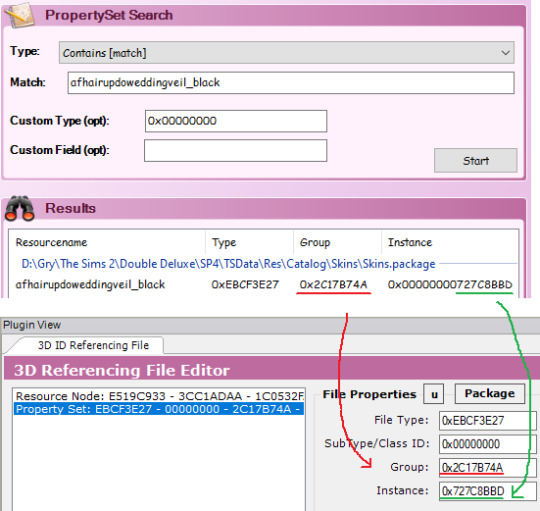
Now we go to the 3D ID. If you want to attach Maxis clothes or hair, use Scenegraph Resource Finder. Set it to Property Set Search and type your hair/clothes name there (found through the default database or the debug mode in CAS). I’ve chosen afhairupdoweddingveil_black. Doesn’t matter if you choose _black, _blond, etc, your sim will automatically wear the hair in their own hair colour (for CC hair - only if it was binned correctly). Let it search. When you’ve found what you’re looking for, note the group and instance. Now open the 3D ID. Select the property set in it and change the group and instance to the ones of your chosen hair/clothes. Commit and save.
For the fullbody outfit, I’m gonna use CC clothes (AF Lolita Dress and Boots by animera at MTS). First, make sure you have a mesh and a recolour in your Downloads folder so the game can access it. Then open the recolor and find the corresponding property set. Write down group and instance and close the file. Open up your outfit template file again and go back to your 3D ID. Click on the property set line that you set up before and click „add” to clone that line. Now change the group and instance as you did before. Commit and save.
Remember that any hair and clothes used in an outfit has to be enabled for Everyday!
That’s all for the female sim, now onto the male sim.
As before - add the 3D ID template and Age Data template. I will choose AM-Hair-Fullbody.
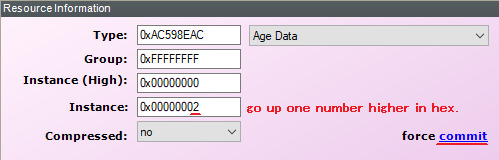
As you can see, my new 3D ID and Age Data have the same instance as the previous ones - they will clash. So we have to change each new 3D ID and Age Data’s instance to one higher. So change instance to 2 and click force commit on both.
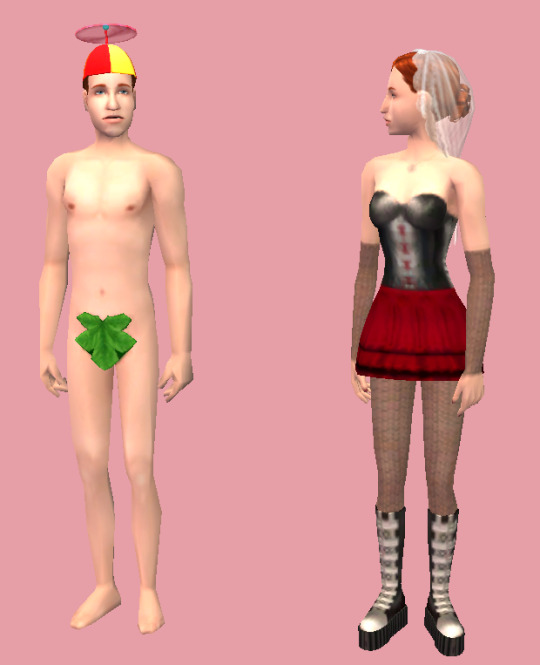
Next steps are the same as before - add property sets. I’ve added a propeller hat and a fig leaf, classy! Commit and save.
That’s pretty much it. If you want to add other age/gender combos? You can, just each new 3D ID and Age Data pair need to change their instances to one higher. You want to add like 20 options for every age and gender? You sure can, same thing as before - instance number goes up (remember, it’s hexadecimal so after 9 you got A - F, then 10 etc). You can have one outfit with hair, other without hair, one top and bottom and one full body, one for female adult and 10 for male adult, doesn’t matter, all combos work, as long as the property sets in the 3D ID are in the same order as in corresponding Age Data.
But right now, my custom outfit is done.
Part 2 - Default replacing existing outfits
While you can attach custom outfit to any career, default replacing outfits is the only (known to me) way to change NPC outfits without digging into BHAVs (which I don’t understand lmao).
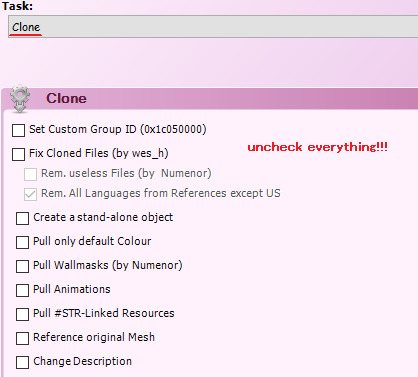
First step is to clone the outfit you’re replacing. Open Object Workshop, click Start and wait a bit as it loads. Then go to Other > Outfits and find your chosen outfit. I’ll use „Outfit_NPC_Maid_test”. Click Next. Then if it says Recolour, change it to Clone. Uncheck every box!!! Click Next. Save the file.
If you look into the Age Datas and 3D ID - they almost always look like a mess, so we’re going to replace them entirely.
Doesn’t really matter which age/gender combo you replace with which, but I’m going to check. In my example, instance 1 is for an adult female, instances 2, 3 and 4 are for an adult male.
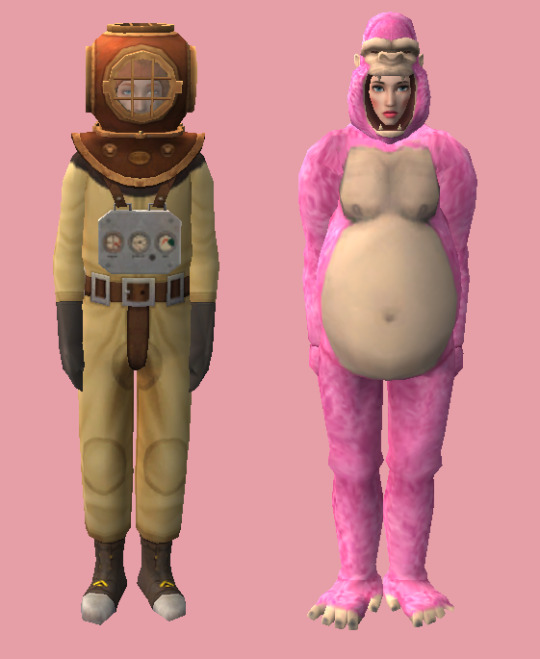
Right click on the 3D ID, instance 1, then click „Replace” and choose my 3D ID template. As you can see, group and instance remained unchanged, this is very important! Now right click on the Age Data, instance 1. Replace it with an Age Data of your choice. I will use AF-Hair-Fullbody. As I explained the process in part 1, I won’t go into detail here. I will also replace instance 2 with a 3D ID template and Age Data AM-Hair-Fullbody. I will replace female outfit with pink gorilla suit and male outfit with diver suit, because why not.
If you want to add more options: as stated in part 1 - when you add new 3D ID and Age Datas, instance numbers go up, but in this case you also need to change the group to the same as your default (in my case, the maid outfit has group 0x7FE81E93).
Maid outfit has 1 version for an adult female and 3 for an adult male. Of course you can add more, but what if it has more, and you want less? I want to have only 1 version for each gender. How to go about that? You need to replace all of the 3D IDs and Age Datas, but nobody said some of them can’t be identical. So I will replace my instances 2, 3 and 4 with the same outfit - diver suit. If I only replaced instances 1 and 2, I would have a chance to get a diver sut man maid, but also a chance to get 2 variations of vanilla man maids. Now I have 3 variations for male sims but they are identical, so all of them will spawn in diver suits.
You don’t need the OBJD, OBJf, NREF and BHAV, as we didn’t edit anything there. You can delete them from your package.
Save the file and you’re done!
Part 3 - Attaching outfits to custom and Maxis careers
If you replaced a default career or NPC outfit, you don’t need to do anything else, it just works. But for a new, custom outfit - you need to attach it to a career.
Remember the GUID that you set in the OBJD? Mine was 0x1234ABCD. Write down yours somewhere.
For a custom career, open it up in SimPE and open Bidou’s Career Editor. Choose the level you want. On the bottom left, under the description, you can select some of Maxis outfits, or just type your own GUID. Do that, and your selected outfit name will change to Other. Close the Career Editor and save your file. You’re done :P

For a Maxis career, use Object Workshop. Choose Other > Sim Type, then select your career. Be sure to pick the one you need, as most careers have an Adult and Teen/Elder version, and in Object Workshop it just shows 2 identical names. I’m choosing the adult version of a Criminal career and clone it (with all boxes unchecked!!!). Save the file!! Now the steps are identical as in custom careers - open up Bidou’s Career Editor and change the outfit GUID for your chosen level to your own GUID. Close the Editor, but don’t save the file yet. Now you can see one little file that has been changed, as indicated by the italicised name. This file is named „Outfit GUIDs” and it’s the only file we need - delete the rest. Save the file and you’re done!
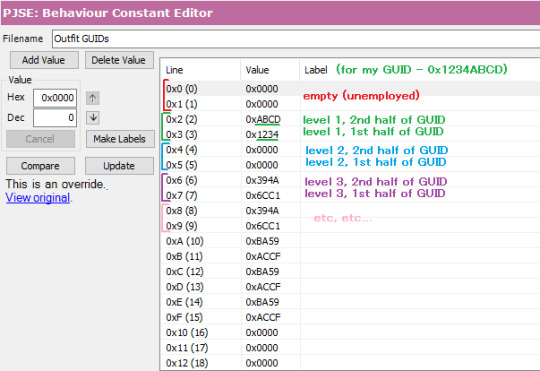
You can also edit the „Outfit GUIDs” file manually (if you, for example, don’t want to clone a career and start from scratch every time you need to make an edit). Lines 0x00 and 0x01 have to stay empty (0x0000), as they are reserved for Unemployed. Level 1 is represented by lines 0x02 and 0x03. You put your GUID there, but split in 2 halves and in reverse order. My GUID was 0x[1234][ABCD], so it will look like this:
Line 0x02 - 0xABCD (level 1, 2nd half of GUID)
Line 0x03 - 0x1234 (level 1, 1st half of GUID)
Next lines work the same - 0x04 (2nd half) and 0x05 (1st half) for lvl 2, 0x06 (2nd half) and 0x07 (1st half) for lvl 3 etc.
Part 4 - Testing!
When all your needed files are in your Downloads folder, open the game and choose a testing hood. Make sure your boolprop cheat is on! Open a lot with at least 1 sim (we will be spawning more of them).
For testing careers, make sure you have enough sims to see your desired results. My career outfit had 1 version for adult females and 1 for adult males, so I only need 2 sims. If your outfit has more variations for the same age/gender combo, you will have to spawn a lot of sims to make sure you will get all of them! As you know, this game is famously not very good at being random, so you can have two variations of an outfit and you can get 10 sims with the first version and only the 11th will spawn with the second :P For spawning new sims, shift click on a sim and select Spawn > Tombstone of L and D. I clicked „New Adult Male” and got a random dude.
Now to get them jobs easily, I shift click on a newspaper and choose a job. You can also set their job level. For my sims, I need to test Criminal career level 1.
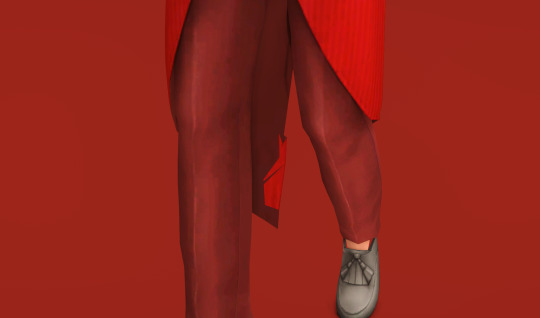
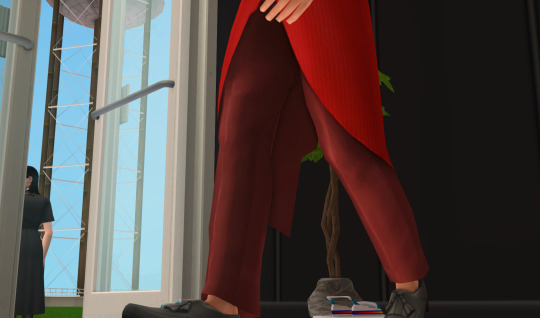
Now give them a wardrobe (or a few, if you have a lot of sims to change) and make them dress for work. As you can see - my sims are wearing their new pretty outfits! (Excuse my "I use lowest possible graphical settings so my laptop doesn't explode" ass screenshots)
To test NPC outfits, shift click on a sim and select Spawn > NPC and Townie Maker. First choose a gender, then find the EP of the NPC you want to create, in my case it’s the basegame, so I select Make NPC > Maid. It will spawn a random NPC of your chosen gender. You can cycle it a bit, clicking on the NPC maker again and selecting Repeat Last. If your outfit has many variations, cycle as many times as needed to make sure all your options appear correctly. When you’re done, click on the NPC maker and choose Kill. Now choose the other gender and repeat. Cycle as many times as needed. I only needed to see 1 female maid in a gorilla suit, but I needed to cycle a bit to see if nothing slipped through the cracks with the male maids. Everything works great and they were all divers :P
After all that testing we’re done! Have fun with making all of the outfits your heart desires! ♡
48 notes
·
View notes
Text
Sims 2 Render Tutorial
Welcome to yet another sims 2 render tutorial; this one aims to be comprehensive like bruised-pixel’s, yet easy to understand for those who are not so familiar with blender like I was when I started out. This is also for those who would like to follow along a written (with pics ofc) tutorial if following visually is way too daunting. My information comes from my own experience, my good friend @simminglytimeladies’ tips she’s handed to me along the way and various Youtube videos.
Best of luck to those who choose to follow my tutorial :D
103 notes
·
View notes
Note
Hi Lamare, can you share with us how one can make a visible OMSP invisible in Live Mode, just like what you did with your Invisible Kitchen Counter Surface?
Hi! I wrote it on MTS for better formatting
Object Turning Invisible In Live Mode
Tutorial
69 notes
·
View notes
Text
Did anyone else realise that if you install lots using sims2clean installer while the game is open, if you exit then re-enter a hood they appear in the lot bin!
I thought they wouldn’t show until next time you open the game - this is so useful while replacing maxis lots with others makeovers 😍
297 notes
·
View notes
Note
Hi! Could you recommend some good retexturing tutorial? I've been eyeing the Afterglow system for a while now and I'd really like to learn how to retexture in the correct way, like how to make hairs look shiny in right places and stuff
I made this tutorial a little bit ago !
youtube
You'll want to check out the hair database and use hairs that already have shine placements as a base. Pooklet, Sunshine, and Io textures are easier to follow than something shineless like poppet. Simgaroop has faint shines.
I hope this helps ! If you want me to check out anything you make, I can certainly do so !
25 notes
·
View notes
Photo

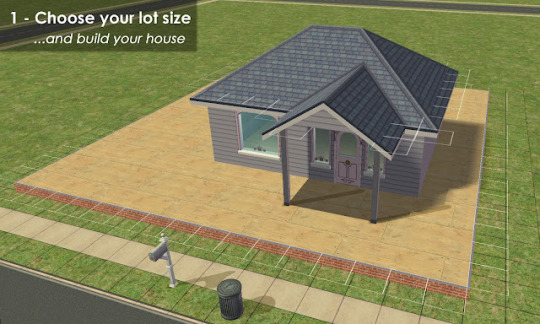
2-Step Foundation DIY Starter Pack
~ 7 Lot Sizes To Build On, Already Grid-Adjusted For You ~
Have you ever wanted to build your own house with a cute little 2-Step Foundation, but didn't want to use the Grid-Adjuster? Well... now you can! No CFE or Grid-Adjusting necessary.
This DIY Starter Pack has 7 different house-sized lots, for you to build-your-own house on. Each lot is oriented so the sun is in front. They can also be used for Apartments, Community, and other lots too, if you rezone them with the cheat: changeLotZoning.
See more »


WARNING: Be very careful when removing the foundation. The "undo" button is your friend! If you remove a section of the foundation, then decide later that you want it back... you will need to use the Grid-Adjuster to do so. Also, do not remove the foundation while CFE is activated.
Remember - Large dogs are going to need Simler90's Stair Mods to be able to access these 2-Step foundations.
Download as installable sims2pack files/SFS
- Install these 7 sims2packs as you would normally install a downloaded lot.
Download as LotCatalog files/SFS
- Unzip and place these lot files in your Lot Catalog folder. There they'll be available for you to use over and over again.
Also available on MTS.
#sims 2#ts2#sims 2 lots#2 step foundation#2 click foundation#how to build a 2 click foundation#sims 2 tutorial#CatherineTCJD#empty lots
336 notes
·
View notes
Text
Mini Tutorial - Using Unweld Radial to Fix Merging Errors
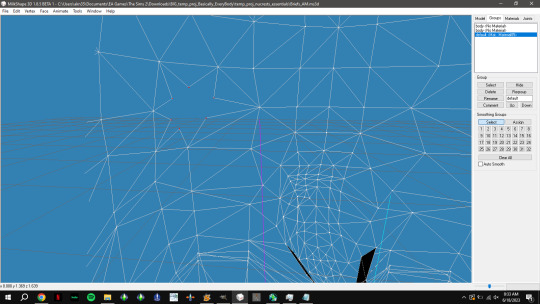
If you do any meshing, you've probably merged vertices and accidentally picked up an extra one from another part of the mesh that you didn't mean to merge. When this happens, you get a weird looking "tunnel" from one side of the mesh to the other.
From the outside of the mesh, it can be hard to notice. It looks like a crater or pit. Here's an example that's pretty easy to notice, because it's a lower poly mesh.

In the case of this mesh, a vertex from the back of the mesh was accidentally merged with one from the front. That's why there's a hole/crater/pit/dent looking spot on the butt.
From the inside of the mesh, you can see the accidental merger better.

If you notice it right away or soon after it happens, you can just undo it. If not, then what? That's when I use "Unweld Radial".
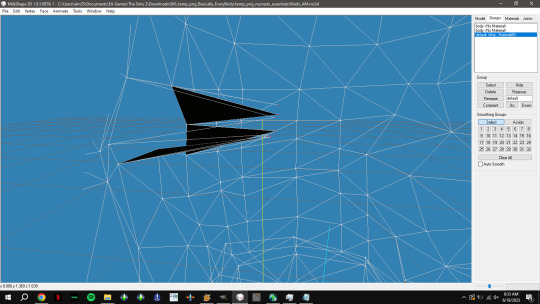
It's one of the options in the Vertex menu. With the accidentally merged vertices selected, click Unweld Radial.
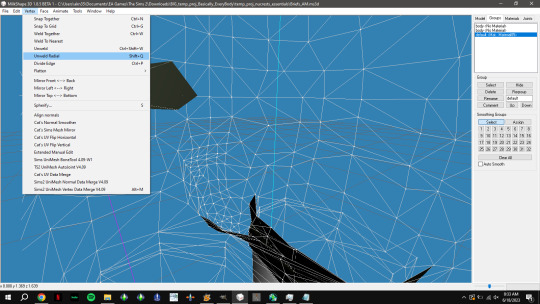
It "explodes" the vertices apart from each other, in a circle.
From there, the right ones can be merged back together.

Then the same can be done with the vertices on the other side.
It's still awkwardly misshaped...
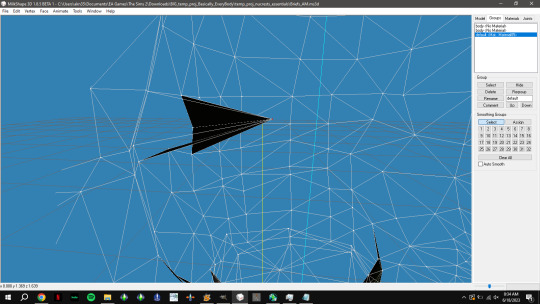
That's easy to fix though, by either moving it manually or using Extended Manual Edit.
Once that's done, there's no more pit/tunnel/thing looking all weird.
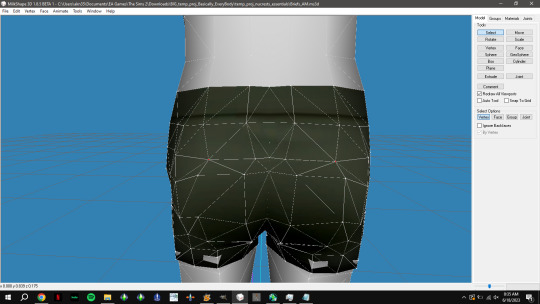
I don't know if this is THE way to fix it, but it's the fastest, easiest way I've found.
49 notes
·
View notes
Last Seen Blogs

mysterious8976
StarLabsLv600

lelaloly
Lela

antho-logy
anthology_

buns-up-sunshine
Brain tired
deer-baozi-frvr
Luminhism