#acidic grout cleaners
Text
Five common tile cleaning mistakes you must avoid
When you clean your tiles there are some mistakes are made, and you must be careful to beware of them. These tile cleaning mistakes do more than make your tile look dirty , but also lower the overall lifespan for your tiles.
So, what do these errors mean? The experts from our team list them in this blog. Take a look and make sure that you don't duplicate them if you are already making them.
Important tile cleaning mistakes to avoid
Find out about the top tile cleaning errors that are essential to avoid cleaning the tiles below.

1. Utilizing a dirty mop: Of course, it is something that is obvious, yet many homeowners make this mistake. Many homeowners employ the mop with a dirty smudge while cleaning their tiles. This simply creates a mess for them.
Hence, make sure that you do not use a dirty mop by any means while cleaning the tiles. Make sure to use a clean mop and water to clean your tiles efficiently.
2. Using too much water: Do not make use of too much water when cleansing your tiles. The porous nature of the grout will absorb the dirt and water, thereby reducing the effectiveness of cleaning. Therefore, ensure that you do not use too much water at all times when cleansing your tile.
3. Irregular cleaning of tiles: In order to keep your tiles appear clean, regular cleaning of tiles is a must. Regular cleaning of tiles is not going to be beneficial to your tiles. Be sure to deep-clean your tiles at least once a month. Of course, daily or weekly vacuuming is essential.
4. Using vinegar: Many people believe that vinegar cleans the tiles efficiently. However, the truth is on the other side. The acid in the vinegar is able to fade the color of the tiles, thereby reducing the overall look for the tiles.
5. Employing harsh chemicals: Many homeowners utilize cleaners with harsh chemicals to clean their tiles. This is a grave error that they make. These chemicals can not only alter the looks of tiles, but also make them less durable tiles. Hence, make sure that you don't use cleaners with harsh chemicals at all.
These are some of the big tile mistakes that homeowners make. If you've committed any of them, make sure that you don't repeat the same mistakes in the future.
If you'd like more information, or if you are seeking the best tile cleaning in McKinney, you don't need to seek out our experts. Our knowledgeable team of professionals assures you of the top tile cleaning services. To get in touch with our tile cleaners contact us at 469-216-2462.
To know more, visit https://www.hbcleaningmckinney.com/tile-grout/
Top reasons why you require yearly upholstery cleaning. Click here to know more.
#Tile cleaning#professional tile cleaning#tile and grout#Tile Cleaning Services#Tile and Grout Cleaning#Tile Cleaning Frisco#Tile Cleaning Service
27 notes
·
View notes
Text
Find an Expert Tile Cleaning in Melbourne
Do you want to transform your floors with professional care? Approaching Melbourne Cheap Cleaning will be wise solution. !
Avoid Damage from Common Cleaners: Say no to acidic cleaners that harm porous tiles. Trust us for gentle yet effective cleaning methods.
Stop the Scrubbing and Rubbing: Forget about manual labor. Our professional team restores your tiles' beauty without the backbreaking work.
Professional Deep Clean: Mopping only goes skin deep. We reach into every crevice for a thorough and lasting clean.
Address Stubborn Dirt: Kitchens, bathrooms, patios – wherever your problem areas are, we tackle them all with precision cleaning techniques.
Affordable Solutions: Keep your tiles in pristine condition without breaking the bank. Melbourne Cheap Cleaning delivers quality service at competitive rates.
Don't wait until it's too late! Contact us today https://melbournecheapcleaning.com.au/services/tile-grout-cleaning-melbourne/
and see the difference professional tile cleaning can make in your home.
0 notes
Text
From Kitchen to Bathroom: Understanding the Household Cleaners Market Landscape
Household Cleaners: Essential Products for a Clean Home
They come in a wide variety of forms to fulfill different cleaning needs around the home. Whether it's all-purpose cleaners for general surfaces, bleach for disinfecting, or glass cleaners for shiny windows, there are effective product options available.
All-Purpose Cleaners
A staple in many households is the trusty all-purpose cleaner. These multi-use formulas can be applied to surfaces throughout the home like countertops, appliances, floors, and more. All-purpose cleaners are generally designed to cut through grease, food particles, and everyday dirt and grime. They often contain surfactants that allow the cleaner to cling to vertical surfaces for optimal cleaning results. When choosing an all-purpose cleaner, consider if you need one with disinfecting abilities or just basic cleaning power. Fragrance is also a personal preference.
Specialty Cleaners
While all-purpose cleaners can handle a variety of tasks, there are also focused cleaners formulated for specific applications. For example, glass cleaners contain strong streak-free formulas that dry clear, leaving windows and mirrors sparkling. Bathroom cleaners are typically more acidic to break down soap scum, hard water stains, and mildew. Appliance cleaners are gentle enough for sensitive surfaces like refrigerator doors yet effective on food spills. Other specialty cleaners target jobs like cleaning wooden furniture, removing stains, disinfecting surfaces, cleaning grout, stripping floors, and more.
Greener Cleaning Products
In recent years, many household manufacturers have responded to consumer demand for eco-friendly alternatives. Multiple "green" cleaner lines now exist made of plant-based, biodegradable, and non-toxic ingredients. These safer options may contain ingredients like citrus, vinegar, baking soda, essential oils, and natural surfactants. Common green products include multipurpose cleaners, dishwasher detergents, laundry detergents, and personal care items like hand soaps. Look for third party certifications on green cleaners guaranteeing their sustainability claims. While these earth-friendlier products perform well, some users report they may not clean as heavily soiled surfaces as aggressively as conventional cleaners. However, they provide a healthier choice for families focused on reducing toxic chemical exposure.
Proper Use and Storage of Cleaners
To get the best results from household cleaners and protect family health, it's important to follow some basic safety guidelines. Only use cleaners as directed on product labels, which recommend specific quantities, test areas, protective equipment if needed, ventilation during use, and more. Never mix cleaners together as dangerous chemical reactions could occur. Store all cleaners, especially those under sink and ones containing bleach, out of reach of children and pets in their original containers. Be sure to replace caps tightly after use. Dispose of cleaning wipes in the trash instead of flushing. Proper use and storage helps cleaners last longer and perform as intended without posing safety risks.
Soft Surfaces and Upholstery Cleaning
Keeping soft surfaces like upholstery, carpet, and curtains looking fresh requires dedicated cleaners. For routine maintenance between deep cleanings, use an upholstery spray or foam to quickly lift dirt, dust, and stains. Look for plant-based or enzyme-based formulas that are colorfast and won't saturate fabrics. For more stubborn issues or a deeper clean, rent or purchase an upholstery cleaner for professionally cleaning furniture and flooring. These machines use hot water extraction to thoroughly rinse away embedded grime. Test cleaning solutions in hidden areas first to avoid damaging delicate fibers or intricate patterns on furnishings. Let all fabrics dry completely before use to prevent mold growth. Periodically cover furniture to protect against accumulations of airborne dirt and allergens too.
0 notes
Text
Is Expert Grout Cleaning In Scottsdale AZ A Good Investment
Grout Cleaning is a daunting task. This is not a DIY task that requires special products and equipment. Grout is a porous material that attracts dirt and dust over time. It makes the grout look dirty. Ignoring this cleaning process can damage your grout. Here, considering expert Grout Cleaning in Scottsdale AZ can be the most effective choice.

Professional Grout Cleaning Services In Scottsdale AZ Is A Smart Investment-
People often think of professional cleaning as an expensive affair. However, it is a myth. Expert cleaners not only offer affordable grout cleaning but also ensure superior customer satisfaction. It leaves your home grout clean and fresh.
Licensed and insured grout cleaners always use dedicated cleaning tools and solutions to clean the tile floor and grout lines. They will first assess the grout area carefully and start this process with overall vacuuming or sweeping and mopping.
They use a high-pressure cleaner to loosen the dirt or debris from the grout lines. Then they will scrub the grout by using a brush or sponge. They will not only seal the grout after the cleaning process but also handle any grout haze or discoloration. Moreover, expert cleaners know how to deal with grout cleaning efficiently.
Key Benefits-
Prevents the growth of mold and mildew
Enhances grout’s lifespan
Prevents slips and falls
Prevents allergies
Improves your indoor air quality
Save you money
The Cost Of Grout Cleaning Influences By-
When it comes to the pricing of grout cleaning, it can be impacted by several factors such as-
Size of the Room and Tiles
Condition of Tiles and Grouts
Process of grout cleaning
The range of services offered by professional cleaners
These are the common factors. However, it is advisable to contact a professional grout cleaning team for an estimate. Set your budget for cleaning and find a team accordingly. Compare the pricing of this cleaning process, offered by different cleaning companies. Additionally, do not compromise with the quality cleaning that can leave a lasting impression.
Professional Cleaning and Maintenance-
Undoubtedly, expert grout cleaning is important to remove stubborn stains or deeply ingrained dirt from your grout. It keeps your grout condition pristine for years to come. Make sure about the experience, skills and certification of a cleaning team when hiring them.
Our affordable tile and Grout Cleaning in Scottsdale AZincludes alkaline cleaning, acid wash cleaning and dual-process cleaning which are the best approaches for this purpose. We scrub, rinse, extract all water, and apply eco-friendly chemicals to lift the dirt properly. Visit www.scottsdaleazcarpetcleaner.com today!
0 notes
Text
Prepare Your Home to Sell by Kicking Spring Cleaning Into Overdrive
Florida’s scorching real estate markets raise the bar for home sellers. Spending a fortune on extravagant upgrades is ill-advised because you’re unlikely to recoup 100% of your expenses. What you must do is make your house presentable enough to grab the attention of buyers with plenty of tantalizing property options to choose from.
Deep-cleaning your home and fixing minor structural and aesthetic issues this spring can increase its perceived value and outshine comparable residences. Learn how to do it correctly to build considerable sweat equity in your house before listing it.
How to Properly Clean Room by Room
Most living areas have unique cleaning needs. Here’s how to make various rooms spotless and functional.
Living Room
Making this space immaculate mainly involves these cleaning tasks, including:
Scrubbing the baseboards, walls and ceiling: Dust these overlooked and inaccessible areas from the top down with a vacuum connected to a bristled brush hose attachment. Afterward, use a microfiber cloth damped with an all-purpose cleaner to wipe them down.
Vacuum and mop the floor: Fire up your vacuum to remove dirt and crumbs. Then, use a mop to finish the job and get rid of stubborn grime.
Wash rugs and carpets: If you have natural rugs, powder them with baking soda to deodorize them, let sit for a few minutes and shake them off. Vacuuming works wonders, too. If you have synthetic furnishings, send those without backings to a professional cleaner. You need rotary shampoo and hot water extraction machines to scrub waterproof ones properly.
Buff hardware: Use pastes, creams and liquid polishes to reinvigorate medium- and heavy tarnished metal door, window, cabinet and drawer fixtures — such as knobs, handles, hinges, locks and pulls.
Wax wooden surfaces: Use a soft cloth with mild dishwashing liquid and water to cleanse the wood. Once it has no dirt, wax it with a cotton rag a few feet at a time. Shine the covered area with a clean cloth when the wax dries.
Dust cooled-off lights: Switch off and unplug lighting fixtures to let their surface temperatures decrease before cleaning them.
Machine-wash throw pillows: Clean pillows with mild detergent and warm water in a front load washer on a delicate cycle. Check their fabric care labels to know which ones you must air-dry or put in a dryer with no heat.
These tasks are universal, so do them when deep-cleaning your other rooms.
Kitchen
Making this space move-in ready can be demanding because stubborn substances soil its contents. These duties are essential in a thorough kitchen cleanup:
Degrease your cabinetry with soapy, warm water.
Empty the pantry, wipe down its items and reorganize everything.
Rid appliances of spills and splatters with vinegar — which contains 5% acetic acid — and baking soda from the inside out.
Your refrigerator needs extra attention. You must move it to dust its coils and vacuum and mop the area behind it. Take out its contents and then wash its inside and outside surfaces. If your freezer has no auto-frost functionality, defrost it first to thaw the ice buildup.
If you have a kitchen hood, remove grease from its filters, body, vent and fan blades. Soak non-dishwasher-safe filters in hot water or mix 1 tablespoon of baking soda with an equal amount of lemon juice.
If any of your kitchen appliances malfunction, repair them or buy new ones. There’s no telling when a buyer comes along after putting your house on the market. Getting replacements allows you to continue enjoying your kitchen while you wait for offers.
Bathroom
Declutter your bath and throw away expired beauty products. Update your first-aid kit and replenish your toiletries. Disinfect your tub, shower area, toilet and sink with a potent germ-killing solution. Read the product’s instructions for guidance.
Moreover, wash bath mats and shower liners. Replace old towels and linens with fresh ones.
Apply new grout to repair gaps and cracks one line at a time. Removing stains and mildew with vinegar is safe and eco-friendly while scrubbing grime with a toothbrush dipped in soapy water gets the job done.
Apply a penetrating grout sealer slowly and deliberately, then remove excess material with a cloth before it dries. Let it sit for as long as the manufacturer recommends before applying another coat.
Bedroom
Clean out dressers and closets. Toss garments you don’t need to help you organize your wardrobe.
Follow these eight steps to clean your bed:
Remove and wash bedding and pillows.
Flip your mattress over.
Let it get as much sunlight as possible to allow ultraviolet radiation to work its magic as a bacteria killer.
Vacuum debris before sprinkling it with baking soda to remove any unpleasant odor.
Let baking soda deodorize for at least 15 minutes before vacuuming it again.
Wipe it generously with a sponge damped with a gentle dishwashing soap.
Allow it to dry completely.
Clean under your bed frame.
Garage
Regardless of how you use your garage, you must clear away its contents to free up the floor and coat it with epoxy. It will improve your space’s appearance, make it resistant to oil and render it maintenance-friendly.
After applying an epoxy coating, sealing the gaps beneath your garage door must be your priority. Installing rubberized strips will make it airtight upon closing, preventing outside air from seeping in, maintaining low indoor humidity levels and keeping pests at bay.
Put a premium on organization when putting your stuff back in. Sort your belongings by category first to know which storage solutions to buy. Bulky equipment can go into stackable bins. Hazardous substances belong in lockable cabinets. Small items can fit in clear jars. Label everything accordingly to find your supplies more quickly.
Vertical shelving can maximize your garage’s height for storage. About 54% of Gen Xers, 51% of baby boomers and 40% of millennials rent or plan to rent self-storage solutions. One of the primary reasons is inadequate room at home. Addressing this need with additional storage space in the garage can make your house stand out.
Spring Cleaning Is Home Staging
Deep-cleaning your Florida home this spring sets the stage for open houses during the busiest real estate season. It’s backbreaking work, but this activity is worth the trouble to ensure your property is in good condition and give it one last deep-cleaning before handing over its keys to the new owner.
0 notes
Text
The Comprehensive Guide to Selecting, Installing, and Maintaining Travertine Tiles

Travertine tiles are a popular choice for homeowners and designers alike, prized for their natural beauty, durability, and timeless appeal. However, to ensure their longevity and maintain their aesthetic appeal, proper selection, installation, and maintenance are crucial. In this guide, we'll delve into each aspect to help you make informed decisions and preserve the beauty of your travertine tiles for years to come.
Selecting the Right Travertine Tiles:
Grade and Quality: Travertine tiles come in different grades, ranging from commercial to premium. Opting for higher-grade tiles ensures better quality and fewer imperfections. Inspect the tiles for cracks, holes, and variations in color and texture before making a purchase.
Finish: Travertine tiles are available in various finishes, including polished, honed, brushed, and tumbled. Each finish offers a distinct look and texture, so choose one that complements your design aesthetic and functional requirements.
Color and Veining: Consider the color and veining patterns of the travertine tiles to harmonize with your overall design scheme. Whether you prefer warm earth tones or cool neutrals, select tiles that enhance the visual appeal of your space.
Size and Shape: Travertine tiles come in a variety of sizes and shapes, from standard squares to rectangular planks and intricate mosaics. Assess the scale of your space and choose tiles that create a balanced and visually pleasing layout.
Installing Travertine Tiles:
Surface Preparation: Proper surface preparation is essential for a successful tile installation. Ensure that the substrate is clean, level, and free of any debris or contaminants. Use a suitable primer or mortar to create a stable base for the tiles.
Adhesive Selection: Select a high-quality adhesive specifically designed for natural stone tiles. Follow the manufacturer's instructions for mixing and application to achieve optimal bonding strength.
Grouting: Choose a grout color that complements the hue of your travertine tiles. Avoid using sanded grout, as it may scratch the surface of the tiles. Apply the grout evenly and remove any excess before it dries to prevent staining.
Sealing: Prior to grouting, seal the travertine tiles with a penetrating sealer to protect them from moisture and stains. Reapply the sealer periodically to maintain its effectiveness and prolong the life of the tiles.
Maintaining Travertine Tiles:
Regular Cleaning: Sweep or vacuum the travertine tiles regularly to remove dirt and debris that can scratch the surface. Use a neutral pH stone cleaner and a soft mop or cloth to clean the tiles gently. Avoid abrasive cleaners or acidic substances that can damage the finish.
Stain Prevention: Wipe up spills immediately to prevent them from seeping into the porous surface of the travertine tiles. Place coasters or mats under glasses and hot pans to protect the tiles from potential stains and heat damage.
Avoidance of Abrasive Materials: Refrain from using abrasive cleaning tools such as steel wool or abrasive pads, as they can scratch the surface of the tiles. Instead, opt for soft brushes or cloths to remove stubborn stains and grime.
Regular Maintenance: Periodically inspect the travertine tiles for any signs of wear or damage, such as cracks or chipping. Address any issues promptly to prevent further deterioration and maintain the integrity of the installation.
By following these guidelines for selecting, installing, and maintaining travertine tiles, you can enjoy their timeless beauty and durability for years to come. With proper care and attention, your travertine tile flooring or wall covering will continue to enhance the aesthetic appeal of your space while providing lasting functionality.
1 note
·
View note
Text
HG Mould Spray, Effective Mould Spray & Mildew Cleaner, Removes Mouldy Stains From Walls, Tiles, Silicone Seals & More - 500ml
HG Mould Spray is a revolutionary solution designed to combat the persistent presence of mould and mildew in your living spaces. Formulated with a potent blend of ingredients, this highly effective mould spray offers a convenient and hassle-free way to eliminate mouldy stains from various surfaces, including walls, tiles, silicone seals, and more. With its powerful action, it penetrates deep into porous materials to eradicate mould at its source, leaving your surfaces clean, fresh, and mould-free.

At the heart of HG Mould Spray is its advanced formula, meticulously crafted to deliver outstanding results. Unlike traditional cleaning products, this mould spray harnesses the power of cutting-edge technology to target mould and mildew with precision. Each ingredient is carefully selected for its mould-fighting properties, ensuring maximum efficacy without compromising on safety.
One of the key features of HG Mould Spray is its versatility. Whether you're dealing with stubborn mould stains in the bathroom, kitchen, or any other area of your home, this mould spray is up to the task. It works wonders on a wide range of surfaces, including painted walls, ceramic tiles, grout, PVC window frames, and silicone seals, providing comprehensive mould removal wherever it's needed.

Using HG Mould Spray is a straightforward process that requires minimal effort. Simply spray the solution directly onto the affected area and allow it to work its magic. The fast-acting formula gets to work immediately, breaking down mould and mildew stains on contact. For best results, leave the spray to soak in for a few minutes before wiping away the residue with a damp cloth or sponge. With just a few spritzes, you can say goodbye to unsightly mould stains and enjoy a cleaner, healthier living environment.

What sets HG Mould Spray apart from other mould cleaners on the market is its long-lasting effectiveness. Unlike temporary solutions that only address surface-level mould, this powerful spray penetrates deep into porous materials to eliminate mould at its roots. By targeting the source of the problem, it helps prevent mould from regrowing, keeping your surfaces mould-free for longer periods. BUY FOR CLICK HERE
Furthermore, HG Mould Spray is designed with user safety in mind. It contains no harmful acids or bleach, making it safe to use in enclosed spaces with adequate ventilation. The gentle formula is non-abrasive and non-corrosive, ensuring that it won't damage delicate surfaces or cause harm to the environment. Additionally, the convenient spray bottle makes application a breeze, allowing you to tackle mould stains with ease.
In conclusion, HG Mould Spray is a must-have solution for anyone seeking an effective and convenient way to remove mould and mildew from their living spaces. With its potent formula, versatile application, and long-lasting results, it offers a superior mould cleaning experience that you can rely on. Say goodbye to stubborn mould stains and hello to a cleaner, healthier home with HG Mould Spray.
#amazing body#curvy body#cutie w a bootie#garnetfox ocs#booklr#mi ok#alizera62#books#digipet#copernicus
1 note
·
View note
Text
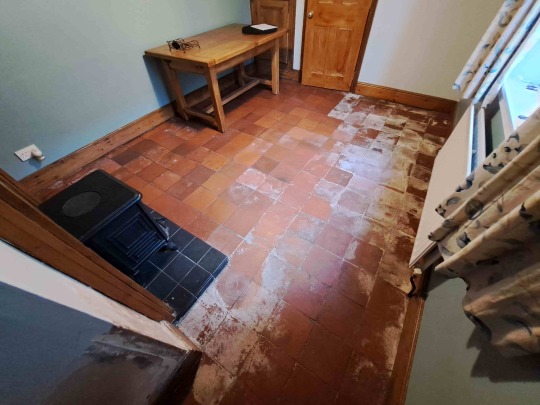
Birmingham Expert Reveals the Solution to Efflorescence Staining
A client from Great Barr in North Birmingham discovered a leak in a water pipe, which had been running in to the Quarry tiled living room for some time. The leak was repaired but had resulted in a lot of water soaking into the quarry tiles. This led to a significant amount of efflorescence appearing as the floor dried out leaving them in a poor condition.
I paid a visit to the property to see the condition of the tiles for myself and conducted a few tests to work out the best method to remove the efflorescence and restore the appearance of the quarry tiles. From this I worked out a quote which was submitted to my client’s insurance company.

The job was then put on hold for a couple of months until the client’s insurance company agreed the claim. This as it turns out was not such a bad thing, as the floor needed time to dry out completely (aided with dehumidifiers) before work began.
Cleaning a Quarry Tiled Living Room Floor
On the first day I started by taking moisture readings from the floor, which were quite low, and confirmed the floor had indeed dried out. Next, I gave the floor a general clean using Tile Doctor Remove & Go, I used a strong dilution and sprayed it onto the floor allowing it to soak in for ten minutes. Then I went around the edges and corners with a piece of black scrubbing pad to get the awkward areas clean first. I then used a 120-grit carbide silicone pad fitted to a rotary machine to loosen up the dirt.
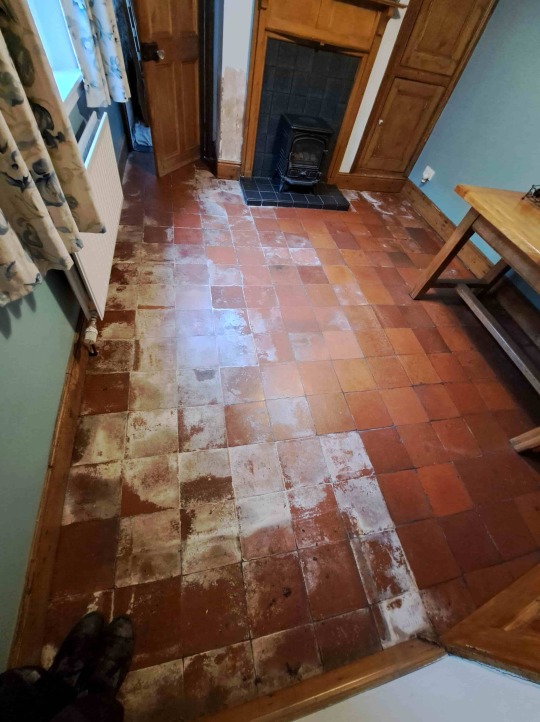
The floor was then rinsed with an air flex pro machine which applies water at high pressure to the floor and then simultaneously extracts the dislodged dirt with a built-in wet vacuum.
To deal with the efflorescence I applied Tile Doctor Grout Clean-up and worked it in with a 240-grit carbide pad as before. This product is acidic and is perfect for dissolving the alkaline salts that form efflorescence. The solution was then rinsed off and extracted as before, and I set up a couple of air movers to aid drying the floor, for a couple of hours.
Sealing a Quarry Tiled Living Room Floor
Before leaving for the day I applied a coat of Tile Doctor Stone Oil and let that soak in for twenty minutes before towelling off the excess, the floor was then let to dry off fully overnight, again I left a couple of air movers in place to assist with the drying.
The next day I applied two coats of Tile Doctor X-Tra Seal, leaving an hour between coats to dry. The Stone Oil and X-Tra Seal will give great protection going forward and give the quarry tiles a slight sheen which really lifts the appearance of the tiles. Another benefit of the sealer is it improves the colour of the tiles and being fully breathable it will allow moisture still in the floor to rise through and evaporate at the surface.

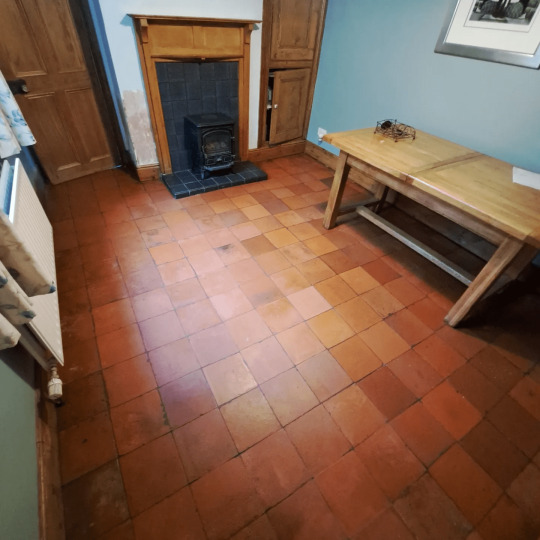
Finally, I buffed the Quarry tiles with a white pad to bring up their appearance even further. My client was very happy with what was a complete transformation to the floor and left the following review.Very helpful insurance repair. Visited whenever necessary to give advice and helped with ongoing maintenance suggestions.
Before leaving took time to discuss aftercare cleaning for which I left them with a complimentary bottle of Tile Doctor pH Neutral Tile Cleaner.

Source: Efflorescence Staining Solutions in Great Barr Birmingham
#Quarry Tiles#Floor Tiles#Stained#Efflorescence#Water Leak#Insurance Claim#Great Barr#Birmingham#Remove and Go#Grout Clean-Up#Stone Oil#X-Tra Seal#Neutral Tile Cleaner
0 notes
Text
Best Tips for Grout Cleaning and Sealing
Tiles decide how your bathroom or kitchen walls will look. With usual cleaning, your tiles shine bright. But grout? When it comes to grout cleaning and sealing, we all must have tried and tested many things. Here are some tips that will give you a cleaner grout every day.
1. Regular Cleaning
Regular cleaning for your grout will save you from extensive cleaning in the future. This will also help you avoid fast discolouration and dirt buildup.
2. Be Careful with Cleaners
Avoid using strong or acidic cleaners. They can harm your grout and make its colour fade. Stick to gentle, grout-friendly cleaners with a neutral pH to keep your grout safe and sound.
3. Don’t Overclean
Going crazy on cleaning the grout may cause more harm than good. Go for mild cleaners and soft and gentle strokes to clean it.
4. Never Forget to Seal your Grout
Sealing protects against stains and moisture. This step is extremely critical, especially in areas where spills occur frequently. Also, consider grout colour sealing for added protection and a burst of colour!
5. Don't Rush the Drying Process
Allow your grout to cure completely after cleaning before sealing it. Rushing through this step may compromise the sealer's effectiveness.
6. Grout Colour Sealing
Remember, grout colour sealing is super important. This is something you must consider if you want the vibrancy of your grout to last longer. It not only protects your grout lines but also keeps the paint looking fresh.
Conclusion
Avoiding these frequent blunders ensures that your grout cleaning and sealing efforts are successful, leaving your living spaces clean and bright. It's like putting up a little effort today to get big benefits tomorrow!
For More details on Grout Colour Sealing Please visit our website: unitedwaterproofing.com.au
0 notes
Text
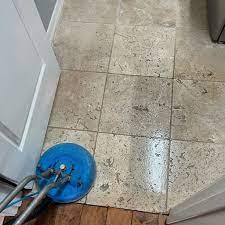
Routine Care for Marble Showers – Daily, Weekly, Monthly

Marble showers add a touch of luxury to any bathroom, but maintaining their pristine appearance requires a thoughtful and consistent care routine. In this guide, we'll explore a comprehensive routine for marble shower care, covering daily, weekly, and monthly tasks to ensure your marble continues to shine.
1. Daily Maintenance:
To preserve the luster of your marble shower daily, start by wiping down surfaces with a soft, damp cloth. This routine helps remove soap scum and water spots promptly, preventing them from becoming stubborn stains. Avoid acidic cleaners that can damage the marble; instead, opt for a mild, pH-neutral cleaner specifically designed for natural stone surfaces. Incorporate squeegeeing after each use to prevent water buildup, maintaining a cleaner and drier surface.
Ensure to schedule professional marble polishing services annually to address any wear and tear, restoring the brilliance of your shower surfaces.
2. Weekly TLC:
On a weekly basis, delve deeper into marble care by giving the shower a thorough cleaning. Use a marble-safe cleaner to eliminate any accumulated grime. Pay special attention to grout lines, where mold and mildew may develop. A soft-bristled brush can be effective for scrubbing grout without scratching the marble.
To enhance the longevity of your marble and address minor imperfections, consider professional marble polishing services. These services can refine the surface and bring back its original luster.
Conclusion:
Maintaining a marble shower's beauty involves a combination of daily vigilance and periodic professional care. Share your marble care tips or ask questions in the comments below. We'd love to hear about your experiences with marble maintenance!
0 notes
Text
Tile and Grout Cleaning: Strategies for Tackling Mould and Mildew
Mould and mildew in tile grout diminish surfaces' aesthetic appeal and pose health concerns. Effective cleaning strategies encompass both prevention and remediation. Here, we explore comprehensive approaches to address these issues and maintain a pristine tile and grout appearance.

Prevention Measures:
1 Proper Ventilation:
Ensuring adequate ventilation in spaces prone to moisture accumulation is fundamental. Proper airflow discourages the growth of mould and mildew. Consider installing exhaust fans or keeping windows open during and after activities that generate moisture.
2 Grout Sealing:
Applying a high-quality grout sealer creates a protective barrier, reducing the porosity of grout and minimising water absorption. This preventative measure is crucial in moisture-prone areas like bathrooms and kitchens.
3 Regular Cleaning Routine:
Establishing a consistent cleaning routine prevents the buildup of grime and moisture, thwarting the conditions conducive to mould and mildew growth. Regularly wipe down tiles and grout lines with a mild cleaning solution.
Remedies for Existing Mould and Mildew :
1. Vinegar and Baking Soda Paste:
Create a paste using equal parts vinegar and baking soda. Apply it to the affected grout, scrub gently, and let it sit before rinsing. The natural acids in vinegar combat mould, while baking soda is a mild abrasive.
2. Hydrogen Peroxide Solution:
Mix hydrogen peroxide with water (1:1 ratio) and apply it to mouldy grout. Allow it to sit for 10-15 minutes before scrubbing. Hydrogen peroxide is effective in eliminating mould and lightening stubborn stains.
3 Commercial Tile and Grout Cleaners:
Utilise commercial cleaners specifically designed for tile and grout cleaning. Ensure the product is suitable for removing mould and mildew. Follow the manufacturer's instructions for optimal results.
Maintaining pristine tile and grout involves a combination of preventive measures and targeted cleaning solutions. These strategies ensure a clean, mould-free environment, from proper ventilation and grout sealing to employing effective remedies like vinegar and hydrogen peroxide. Regular attention to tile and grout cleaning enhances aesthetics and contributes to a healthier living space.
0 notes
Text
Tile and Grout Cleaning in Penrith
Grout is an extremely porous sand based material that over time absorbs dirt, mildew and mould. This can make tiles appear dull and dingy even after regular cleaning.
All porous tiled surfaces should be sealed after cleaning. This will prevent contamination & help to maintain a fresh new look.
Grout Colour Sealing
If your Tile and Grout cleaning in Penrith is dirty and discoloured we can colour seal it for a new fresh appearance. After a thorough cleaning a special coloured Grout sealer is applied by hand to your grout giving it a consistent colour and protective layer. This helps to resist future staining from food, drink and everyday cleaning products.
Grout sealers are a great way to keep your grout clean and stain free for months or even years. It prevents stains, dirt, grime, mildew and moisture from penetrating the grout lines of your tiles.
The product is milky in appearance and it can be purchased from many DIY stores for you to use as a "Do it yourself" project. But it's important to note that you need to thoroughly clean your tile and grout before applying the sealer (even in new situations). You should also read the instructions on the product to ensure you're sealing correctly. The wrong application can cause the grout sealer to peel and uplift causing permanent damage.
Tile Regrouting
Regrouting is an easy and effective way to freshen up tiled areas. It involves removing existing grout and applying new grout to the joints between the tiles, floor and walls. Grout can discolour, deteriorate and even crack over time. Regrouting prevents water damage and keeps tiled surfaces in good condition for longer.
Prepare the area for regrouting by covering all surfaces with a plastic sheet and vaccuuming the surface to remove any dust. You may also want to cover any baseboards or shoe molding with tape to protect them from the grout dust.
Work quickly to avoid disturbing the newly-applied grout. Use a sponge that is barely dampened to wipe off the excess grout from the tile faces, working in a diagonal motion.
Once you have removed all the old grout, apply a penetrating sealer to protect the freshly-grouted surfaces and extend their lifespan. Allow the sealer to dry completely before using the space again.
Efflorescence Treatment
Grout is very porous and as such attracts bacteria, mould and germs. These then become ingrained in the grout and can cause all sorts of health issues. Regular athome cleaning programs won’t remove these.
Efflorescence is a white chalk-like substance that appears on bricks, stone and cement-based products. Although it isn’t dangerous it can be a sign of problems such as moisture damage.
Efflorescence can be removed by using water-based cleaners such as vinegar.
However, this isn’t a permanent solution. It is best treated with a product such as Aqua Mix Eff-Ex which can be used on natural stone, Tile and Grout cleaning in Kellyville. This product is non-acidic and doesn’t react with the surface of the product but eats into the salts leaving them dissolved. Afterwards, the surface is rinsed off with fresh water. This product prevents future build up of the salts preventing further damage and staining. The surface can then be colour sealed if required.
Tile Repairs
Porous grout lines attract dirt, dust and grime which can result in unsightly marks and patches. Mould, mildew and lime scale can also build up leaving behind an unattractive and unhealthy environment.
If your tiles or grout have become a breeding ground for grime, then the first thing you should do is clean the surface with a mild cleaner. We recommend using a pH balanced cleaner such as Oxiclean, which is safe for most surfaces, especially tile and grout.
It is recommended to clean tiles in bathrooms once a week and kitchens bi-weekly. This will help prevent the buildup of dirt and grime which can cause tiles to look dull and lifeless.
After cleaning your tiled area we can colour seal the grout lines giving it a consistent appearance and protecting against future staining. Alternatively we can replace the grout completely.
0 notes
Text
Experts for Spotless Tile Cleaning Services in Melbourne
Looking for affordable yet professional tile cleaning in Melbourne? Discover Melbourne Cheap Cleaning – where state-of-the-art cleaning meets unbeatable prices. Do away with the damage done by acidic cleaners and the hassle of scrubbing your floors. With our specialised services, your tiles and grout will be rejuvenated.
Our expert team uses advanced, non-damaging techniques that preserve the integrity of your tiles and bring out their best look.
Bring Back the Beauty of Your Tiles
Tile cleaning Melbourne experts at your service
Advanced techniques for deep cleaning, beyond mopping and sweeping
Preserving the lifespan of your tiles with non-acidic solutions
Why Choose Melbourne Cheap Cleaning?
Stop the damage from regular acidic cleaners
Professional tile renewal, prevents discolouration and dirt accumulation
Cleaning services tailored for showers, kitchens, bathrooms, and more
Inclusive care for patios, laundries, pool surrounds, and driveways
Expertise in cleaning deep within tile ridges
Enhanced techniques to tackle stubborn gaps and dirt issues
Complete engagement to deliver meticulous and thorough cleaning
Unlock the true potential of your tiled surfaces with Melbourne Cheap Cleaning. We don't just superficially clean; we rejuvenate and protect. Say goodbye to the age-old woes of tile maintenance and hello to effortless, lasting results.
Book Us Today for Your Space’s Tile Transformation
Discover a world where your tiles look as good as new, day after day. With us by your side, you're not just hiring a service; you're investing in the enduring beauty of your home. Contact us now https://melbournecheapcleaning.com.au/services/tile-grout-cleaning-melbournefor a pristine tile and grout cleaning experience in Melbourne.
0 notes
Text
Revitalize Your Home The Ultimate Guide to Choosing the Best Tile Cleaner
Tiles are a popular choice for flooring and walls due to their durability and aesthetic appeal. However, over time, dirt, grime, and stains can dull the beauty of your tiles. To keep your home looking its best, it's essential to invest in a high-quality tile cleaner. In this guide, we'll explore the key factors to consider when choosing a tile cleaner and recommend some top products to help you achieve sparkling, pristine surfaces.
Understanding Your Tile Type:-
Not all tiles are created equal, and different materials require specific cleaning solutions. Before purchasing a tile cleaner, identify the type of tiles in your home. Whether it's ceramic, porcelain, natural stone, or glass, knowing your tile type will ensure you choose a cleaner that is both effective and safe for your surfaces.
pH Balance Matters:-
Maintaining the pH balance of your tile cleaner is crucial to prevent damage to the tiles and grout. Alkaline cleaners are generally effective against grease and dirt, while acidic cleaners work well on mineral deposits and stains. Neutral pH cleaners are a safe bet for everyday cleaning without risking damage to your tiles.
Versatility:-
Look for a tile cleaner that can multitask. A versatile cleaner that can handle various surfaces and stains will save you time and effort. Check the product label for information on whether the cleaner is suitable for countertops, bathroom surfaces, and other areas in your home.
Grout-Friendly Formulas:-
Grout can be a challenging area to clean, but neglecting it can lead to discoloration and deterioration. Choose a tile cleaner with a grout-friendly formula that can penetrate and lift dirt from between tiles without causing damage.
Eco-Friendly Options:-
For environmentally conscious consumers, there are plenty of eco-friendly tile cleaner options on the market. These products are designed to be biodegradable, non-toxic, and safe for both your home and the planet. Consider making a sustainable choice without compromising on cleaning power.
Top Recommended Tile Cleaners:-
a. [Product Name]: This tile cleaner is renowned for its powerful cleaning formula that cuts through grime and leaves surfaces sparkling. Its pH-balanced formula ensures the safety of your tiles, and it's suitable for various tile types.
b. [Product Name]: For those who prefer an eco-friendly option, this tile cleaner combines effectiveness with a commitment to sustainability. It's tough on stains but gentle on the environment.
Investing in a quality tile cleaner is essential to maintain the longevity and appearance of your tiles. By considering factors such as tile type, pH balance, versatility, grout-friendliness, and eco-friendliness, you can choose the perfect cleaner for your specific needs. With the right tile cleaner in hand, you can enjoy a cleaner, fresher home with minimal effort.
FOR MORE INFOMATION:-
Tile Cleaner
0 notes
Text
5 Expert Tips For Tile & Grout Cleaning In Scottsdale AZ
Tiles and grouts are commonly used in homes. However, they accumulate dirt and stains that can spoil the look of your home. You don’t need to live with it. A reliable Tile & Grout Cleaning in Scottsdale AZ can be a good choice.
Looking to make your home tile and grout spotless? There are certain tips to follow for cleaning grout and keeping them in top condition.

Top 5 Tips for Tile & Grout Cleaning in Scottsdale AZ-
Regular Cleaning- Regular cleaning is vital to remove the accumulated dirt and stains. Homeowners should consider this point to keep their grout in good condition. Make sure you use a safe cleaner for a safe result. Different tools you can use like a toothbrush, or involve sweeping or vacuuming to remove loose dirt and debris. You can vacuum or sweep your floor at least once a week.
Strategic Sealing- Use the best sealant for tile and grout maintenance. Sealants are durable and easy to clean. The tiles are not completely resistant to damage. They can be stained or cracked over time. Also, the grout can crumble. Applying a sealant can serve as a barrier that prevents liquids, stains and dirt from the grout and tiles.
Mindful Mopping- Mopping can be a reliable method for Tile and Grout cleaning. Homeowners can apply mopping carefully for cleanliness. However, excess water should not be left on the surface as it leads to discoloration and mold growth.
Avoid Harsh Chemicals- Do not use harsh chemicals for Tile and Grout cleaning, including bleach, ammonia and other harsh cleaners. It can damage the protective layers of tiles and degrade grout. It includes. Go with the best cleaning solution such as vinegar or baking soda, safe for epoxy grout.
Prompt Stain Removal- Spills are expected on your floor, be it water, juice or wine. They can quickly turn into stains. This is why removing them immediately can avoid permanent stains. You can use a clean cloth or sponge for it and also may use a tile cleaner to eliminate any residue.
Professional Tile & Grout Cleaning in Scottsdale AZ-
Many homeowners find it challenging to clean their tiles and grout. Expert cleaners have the training and experience for better cleaning. They use suitable tools and cleaning methods.
At Scottsdale AZ Carpet Cleaners, we use alkaline cleaning, acid wash cleaning and dual-process cleaning which are the best approaches for this purpose. We also scrub, rinse, extract all water, and apply eco-friendly chemicals to lift the dirt properly. Use our Tile & Grout Cleaning in Scottsdale AZ. Visit www.scottsdaleazcarpetcleaner.com today!
0 notes
Text
What Maintenance Tips Can Keep Your Kitchen Tile Splashback Looking Fresh and Clean?
Your kitchen is the heart of your home, and the tile splashback is its unsung hero. However, to keep it looking fresh and clean, regular maintenance is essential. In this article, we'll explore some valuable tips to ensure your kitchen tile splashback maintains its brilliance.

Understanding the Importance of Kitchen Tile Splashback Maintenance
Your kitchen tile splashback not only enhances the aesthetic appeal of your space but also serves a crucial practical purpose. It protects your walls from damage and against splashes, stains, and grease. Incorporating routine maintenance into your cleaning regimen is key to ensuring longevity and keeping your kitchen pristine.
1. Daily Wipe Down: A Quick and Effective Routine
A daily wipe down is one of the simplest yet most effective maintenance practices for your kitchen tile splashback. After each meal preparation, take a few minutes to wipe away any splatters or stains using a soft cloth or sponge. This prevents the accumulation of grime over time, making your regular cleaning sessions more manageable.
2. Choosing the Right Cleaning Solutions
Only some cleaning solutions are suitable for some surfaces. For your kitchen tile splashback, opt for mild, non-abrasive cleaners. Harsh chemicals can damage the tiles or the grout, diminishing their appearance and longevity. A mixture of warm water and a gentle dish soap is often sufficient for regular cleaning. Additionally, vinegar and water solutions can effectively remove stubborn stains, but be cautious with acidic substances, as they may affect certain types of tiles.
3. Grout Care: The Often Overlooked Detail
While the tiles garner much attention, the grout is critical to your kitchen tile splashback. Over time, grout can accumulate dirt and discoloration, affecting the overall appearance. Regularly scrub the grout lines using an old toothbrush or a grout brush, and consider applying a grout sealer annually to prevent stains and moisture infiltration.
4. Avoiding Abrasive Tools: Gentle Cleaning for Lasting Beauty
When dealing with stubborn stains, it's essential to approach them with care. Avoid abrasive tools such as steel wool or harsh scouring pads, as they can scratch the surface of the tiles. Instead, use a soft-bristle brush or a melamine sponge for a gentle yet effective cleaning process. This ensures that your kitchen tile splashback remains pristine without compromising its integrity.
5. Regular Inspections: Identifying Issues Early
Regularly inspect your kitchen tile splashback to identify any issues before they escalate. Look for cracks, loose tiles, or signs of water damage. Catching these problems early allows for timely repairs, preventing further damage and ensuring the longevity of your splashback.
Preserving the Elegance: Long-Term Strategies for Kitchen Tile Splashback Maintenance
While daily routines are crucial, adopting long-term strategies contributes significantly to preserving the elegance of your kitchen tile splashback.
6. Proper Ventilation: Minimising Moisture Buildup
Moisture is a common adversary in kitchens, and excessive humidity can impact your tile splashback. Ensure proper ventilation in your kitchen by using exhaust fans or opening windows during cooking. Controlling moisture levels helps prevent mould growth and preserves the appearance of your tiles.
7. Mindful Cooking Practices: Minimising Splatters
Prevention is often the best form of maintenance. Be mindful of your cooking practices to minimise splatters on your kitchen tile splashback. Use splatter screens when frying, and adjust burner heat to reduce the likelihood of messy spills. This proactive approach can significantly reduce the frequency and intensity of cleaning sessions.
8. Regular Professional Maintenance: A Wise Investment
Consider periodic professional maintenance to thoroughly clean and inspect your kitchen tile splashback. Professional cleaners have the expertise and tools to address stubborn stains and ensure your splashback is in optimal condition. This investment can extend the life of your tiles and keep them looking as good as new.
In summary, maintaining the freshness and cleanliness of your kitchen tile splashback involves a combination of daily routines and long-term strategies. By incorporating these tips into your kitchen cleaning regimen, you can ensure that this often-overlooked feature continues to shine, enhancing your kitchen's overall beauty and functionality.
0 notes
Last Seen Blogs

jenivi7
Randomsom

eternalgyu
hannie

arcticmisthios
Arctic Misthios

calligraphers-journal
The Calligraphers - Journal

clearnutgarden
Untitled