#amazon rds snapshot export to s3
Text
Amazon Relation Database Service RDS Explained for Cloud Developers
Full Video Link - https://youtube.com/shorts/zBv6Tcw6zrU
Hi, a new #video #tutorial on #amazonrds #aws #rds #relationaldatabaseservice is published on #codeonedigest #youtube channel.
@java @awscloud @AWSCloudIndia @YouTube #youtube @codeonedig
Amazon Relational Database Service (Amazon RDS) is a collection of managed services that makes it simple to set up, operate, and scale relational databases in the cloud. You can choose from seven popular engines i.e., Amazon Aurora with MySQL & PostgreSQL compatibility, MySQL, MariaDB, PostgreSQL, Oracle, and SQL Server.
It provides cost-efficient, resizable capacity for an industry-standard…
View On WordPress
#amazon rds access from outside#amazon rds aurora#amazon rds automated backup#amazon rds backup#amazon rds backup and restore#amazon rds guide#amazon rds snapshot export to s3#amazon rds vs aurora#amazon web services#aws#aws cloud#aws rds aurora tutorial#aws rds engine#aws rds explained#aws rds performance insights#aws rds tutorial#aws rds vs aurora#cloud computing#relational database#relational database management system#relational database service
1 note
·
View note
Text
How to choose the best disaster recovery option for your Amazon Aurora MySQL cluster
There are many different ways to achieve disaster recovery objectives based on business requirements, but finding the best option for a particular situation can get overwhelming. The innovation and commercial-grade features that come with Amazon Aurora MySQL-Compatible Edition expands these options even further. This post outlines options available to customers running Aurora MySQL, and evaluates the pros and cons of the most common routes to take when developing the database portion of your disaster recovery (DR) plan. While formulating a DR solution, you need to ask several questions. Performing this due diligence up front can help ensure the success of a DR event and prevent costly over-engineered solutions. First is to define your scope—what applications and services need protection? Development, testing, and staging environments typically have lower uptime requirements than production. Failure modes are also important to consider. What is the effect if a critical instance has a hardware failure? What if a data center experiences a power issue? Or the unlikely event that a natural disaster affects a large geographic region? DR plans are measured by a Recovery Point Objective (RPO) and Recovery Time Objective (RTO). An RPO is the amount of data you’re willing to lose during a disaster, and an RTO is the amount of downtime acceptable if a disaster were to strike. You should consider what the RTO and RPO are for the applications in scope. After you define these pieces, an architecture can begin to take shape and offer protection against these failures. To keep this post focused, I only discuss the options available for Aurora MySQL. The data-focused portion of a DR plan is often the most challenging, but the best practices discussed here can help you evaluate and formulate an appropriate plan. Review the Reliability Pillar of the Well-Architected Framework for more DR best practices. In this post, I first highlight the built-in durability and availability that comes native with Aurora MySQL. Then I review cases where business, compliance, or legal requirements dictate further protection, and discuss options including cold backups, Amazon Aurora Global Database, and cross-Region read replicas. Built-in availability and durability All AWS Regions are built with availability at the forefront by utilizing multiple Availability Zones. Each Availability Zone in a Region contains a grouping of one or more physical data centers connected together with redundant, high-throughput, low-latency network links. Availability Zones are also isolated from each other, allowing you an easy way to build highly available applications within a Region. Aurora has a unique architecture that separates out the storage and compute layers. The storage layer uses a highly distributed virtual volume that contains copies of data across three Availability Zones in a single Region. The data is automatically replicated to provide high durability and availability. If a problem affects a copy of the data, other copies remain available to serve requests from the database instances. Aurora uses a quorum-based approach for I/O requests, which doesn’t require all data copies to be available in order to process reads and writes. Consequently, the cluster can maintain read and write availability even if an entire Availability Zone becomes unavailable. The three-AZ data storage and replication is provided by every Aurora cluster, regardless of the number or Availability Zone placement of database instances within the cluster. An Aurora cluster’s compute layer can be comprised of two types of database instances: a primary instance that supports read and write operations, and a replica instance, also called a reader, that supports only read operations. Each cluster has one primary instance and can have up to 15 readers. When a problem affects the primary instance, an available reader can automatically take over as the primary. This mechanism, known as failover, allows the cluster to quickly regain write availability without waiting for the recovery of the original primary instance. A cluster that contains two or more instances in at least two different Availability Zones is known as a Multi-AZ cluster. Multi-AZ clusters can maintain high availability even in the case of a AZ-wide issue, and they’re backed by a 99.99% SLA. If the cluster contains multiple instances but all of them are located in the same Availability Zone, it’s a Single-AZ cluster. You can still use failovers to recover from localized issues (such as a hardware host failure), but you can’t improve availability in the case of AZ-wide issues. Single-AZ clusters aren’t covered by the SLA above. A failover isn’t possible if the cluster doesn’t contain any readers (such as a cluster with one instance), or if none of the readers are available. In such a case, a problem affecting the writer instance renders the cluster unavailable until the problem is resolved. A failover happens with no data loss (RPO of zero), and typically completes within 30 seconds. The cluster DNS endpoints are updated automatically to reflect the instance role changes. Knowing how Aurora is architected within a Region is important. While defining failure modes in a DR plan, it should be specified what it’s protecting against—a localized hardware failure, a data center failure affecting an Availability Zone, a widespread geographic issue affecting a Region, or something else. Now let’s explore options that provide more availability and durability than a single Aurora cluster can provide. Cold backups with snapshots Cold backups are the lowest cost option, but come with the longest RTO and RPO. You need to take a backup and restore it to a new instance before the database is back online. The amount of data being backed up affects how quickly a restore can happen. You can consider a couple different options: service-provided automated backups, manual volume snapshots, and self-managed logical backups (data dumps). Aurora backs up your cluster volume automatically and retains restore data for the length of a backup retention period, which is configurable from 1–35 days. Aurora backups are continuous and incremental, so you can restore to any point within the backup retention period with 1-second granularity. In addition to the point-in-time restore (PITR) functionality, the service performs an automated storage volume snapshot for each day within the configured retention period. When a cluster is deleted, the continuous PITR backup data is removed, but you have the option to retain the daily snapshots. To restore using PITR, on the Amazon Relational Database Service (Amazon RDS) console, choose Databases in the navigation pane. Select the cluster DB identifier to be restored and on the Actions menu, choose Restore to point in time. On this page, you can configure the restore time and cluster properties. You can also take manual snapshots of an Aurora cluster. The manual snapshots are retained indefinitely unless you delete them. Both automated and manual volume snapshots are stored with 99.999999999% durability in Amazon Simple Storage Service (Amazon S3). These types of backups use an internal, physical storage format and can’t be used outside of Aurora. To protect from a Regional issue, after a snapshot is taken, you can copy it to another AWS Region by using the Amazon RDS console, the AWS Command Line Interface (AWS CLI) command copy-db-snapshot, or the AWS SDK command CopyDBSnapshot. For an additional layer of protection against account compromise, these snapshots can also be copied to another AWS account. Once in the other account, it can also then be copied to another region – in turn protecting from a regional disaster and an account compromise. AWS Backup can automate this copy process by configuring schedules and copies of manual snapshots. To get started, on the AWS Backup console, choose Backup Plans and then choose Create Backup Plan. The provided templates don’t copy snapshots to a different Region, so select Build a new plan and provide details such as the schedule and when to expire backups. The Generate copy configuration instructs AWS Backup to copy the snapshot to a different Region. If required, you can choose multiple destination Regions. After you create a backup plan, you can assign resources to it. Using AWS Backup takes a lot of the undifferentiated heavy lifting away. It’s also inexpensive—you only pay for the backup storage used, and in the preceding use case, a cross-Region data transfer fee. The amount of time it takes to replicate to another Region depends on the size of the database. The RPO depends on the time of the latest available snapshot, and the RTO is the amount of time it takes to bring up a new instance based off of that snapshot. This is good for applications that can tolerate a restore time in the order of hours while the DR plan is run. Cold backups with database dumps A logical database backup (also referred to as a database dump) is an export of the database contents in a format such as SQL statements, flat files, or a combination thereof. You can use logical data exports to insert the data into another database, whether or not it’s an Aurora cluster. This is most helpful when wanting to use the data outside of Aurora, such as a self-managed MySQL-compatible database. You can complete this process with the mysqldump utility, one of the oldest and most common tools database administrators use to export data from MySQL. This solution has downsides: you’re responsible for all configuration, storage, and management of the backups. Scale can be problematic; mysqldump is a single-threaded process and larger databases take additional time to complete. To work around this, you need to orchestrate multiple streams or use alternative solutions such as mysqlpump or mydumper. In case of large exports, it’s best to avoid creating logical backups from active clusters under load. Instead, use the cloning or PITR features to provision a copy of the cluster, then export the data from the copy. Using a copy ensures consistency of the backup, and avoids any negative performance impact that the export might have on the ongoing workloads. The following sample mysqldump command exports all data from the database into a dump file in a MySQL-compatible SQL format: $ mysqldump --all-databases --single-transaction -uadmin -p -hMyCluster.cluster-identifier.MyRegion.rds.amazonaws.com > mydb.$(date +"%Y-%m-%d").sql You can run this command from any instance that has access to the database; a dedicated backup or utility server usually works well. Although you can use cold backups for cross-Region disaster recovery, the RTO and RPO of a backup-based approach might not be acceptable. Next, we explore solutions using multiple clusters and continuous data replication. Physical replication with Aurora Global Databases Many business-critical applications require fast and consistent replication, and engineering teams want an easier way to fail over in the event of a disaster. Aurora Global Database helps you overcome these challenges—for both disaster recovery and multi-Region deployments. Rather than relying on backups or snapshots to make data available in another Region, a global database takes the proven storage-level physical replication technology of Aurora and applies it across Regions. This enables low-latency global reads and provides fast recovery from an unlikely event that could affect an entire Region. An Aurora global database has a primary DB cluster in one Region, and up to five secondary DB clusters in different Regions. The primary cluster supports read and write operations, whereas the secondary clusters are read-only. The global database provides very low cross-Region replication lag, typically under a second, even under heavy workloads. The low lag translates to a low RPO for cross-Region disaster recovery. You can monitor replication lag with the Aurora Global DB Replication Lag Amazon CloudWatch metric. It’s also easy to set up. On the Amazon RDS console, select your Aurora cluster. On the Actions menu, choose Add AWS Region. With the wizard that follows, set your global database identifier and the secondary Region along with a few other configuration parameters to get started. In the event of a disaster, you need to remove the DR cluster from the global database and promote it to a standalone cluster. To remove the DR cluster from a global database, select it on the Amazon RDS console and choose Remove from global database on the Actions menu. This process typically takes less than a minute (RTO) while replication is stopped and the selected cluster’s writer endpoint becomes active. The process is often referred to as promotion, because the cluster is promoted from a secondary role into a standalone, independent entity capable of handling read and write traffic. For more information, see Disaster recovery and Amazon Aurora global databases. Promoting a cluster stops cross-Region replication into that cluster permanently. You can’t reattach that cluster to an existing global database, but you can add a new global database with this cluster as the primary. You can do this by selecting the newly promoted cluster and choosing Add AWS Region on the Actions menu. Due to the requirements of physical storage-level replication, all clusters within the global database must be running the same supported major version (such as Aurora 1.x or Aurora 2.x). You’re charged for the Aurora cluster in the DR Region along with replicated write I/O to that Region. Replicating to non-Aurora MySQL instances with physical replication isn’t supported, but you can set up logical replication from an Aurora global database cluster to a non-Aurora cluster. You can test DR failure and failback by utilizing the Aurora Global Database managed planned failover feature. This feature allows the primary writer’s Region to change with no data loss, and without breaking the global replication topology. This feature is intended for controlled environments, such as DR testing scenarios, operational maintenance, and other planned operational procedures. Managed planned failover is designed to be used on a healthy Aurora global database. To recover from an unplanned outage, follow the “detach and promote” process described above and further detailed in Recovering an Amazon Aurora global database from an unplanned outage. Aurora Global Database also comes with an optional feature called write forwarding. When enabled, read queries sent to a database endpoint in the secondary Region get run there, but supported write queries are forwarded to the primary Region. Aurora Global Database provides the lowest consistent RTO and RPO option while requiring the least management overhead. Logical replication with Cross-Region read replicas MySQL’s binary log (also referred to as a binlog) replication has been around for quite some time. It’s based on recording changes in a binary log on the primary database, and replaying those changes on replica databases. The changes are recorded and replayed in a logical form—in other words, the replicas are redoing the work that was originally done on the primary database. This is different from physical storage-level replication in Aurora that modifies storage contents directly without having to redo the work at the database level. You can set up cross-Region logical replication in two different ways: using the cross-Region replica feature in Aurora, or manually. Both methods require that binlogs are enabled before starting. You can do this by changing the cluster parameter group. A restart of the cluster is required before the change goes into effect. After the binlogs are enabled, the cross-Region read replica feature is the easiest way to get started. The setup process performs all steps required, including creating the destination Aurora cluster. On the Amazon RDS console, select the Aurora cluster and on the Actions menu, choose Create cross-Region read replica. This brings up a wizard to select the destination Region and other common cluster configuration options. When it’s complete, a snapshot is taken of the instance, replicated to the destination Region, and binlog replication is set up to the destination cluster. If a database is encrypted, the setup process also handles this. We recommend setting the read_only MySQL global parameter on this DR cluster to ensure it doesn’t get out of sync with the primary writer due to inadvertent write activity on the replica. This replica can also serve read traffic for users closer to that cluster, however the read splitting logic to make this happen falls on application owners. One of the challenges of the logical replication approach is that write-intensive workloads can lead to substantial replication lag, something that you need to monitor closely in the context of disaster recovery use cases. To view how far behind a replica is, use the SHOW SLAVE STATUS SQL query, focusing on the Seconds_Behind_Master value. CloudWatch also monitors this with the Aurora Binlog Replica Lag metric. Another consideration is that binlog replication requires resources on the source and destination, and this can cause performance bottlenecks in write-intensive databases. In the event of a disaster, you can promote the cross-Region replica to a standalone database. If possible, first check the replica lag in CloudWatch or with the SHOW SLAVE STATUS query to determine the RPO of the data. Then proceed by going to the Amazon RDS console, selecting the DR cluster, and on the Actions menu, choosing Promote. This stops the cross-Region replication and reboots the DB instances. When that is complete, update the read_only cluster parameter to false, and set the application to the new cluster endpoints. As an alternative to using the managed cross-Region read replicas, you can manually configure an Aurora cluster or a MySQL-compatible database to replicate from an Aurora source using binary logs. As a general rule, Aurora and MySQL support replication from one major release to the same major release, or next higher release. For example, you can replicate from Aurora MySQL 5.6 (1.x) to Aurora MySQL 5.6 (1.x), Aurora MySQL 5.7 (2.x), MySQL 5.6, or MySQL 5.7. Review Replication Compatibility Between MySQL Versions before setting up replication between different major versions. To manually set up binary log replication into an Aurora cluster, use the mysql.rds_set_external_master stored procedure on the destination. This is useful when setting up cross-account replication to protect against an AWS account compromise. To set up replication into a non-Aurora destination, use the CHANGE MASTER TO SQL statement on the destination. This is commonly used to establish replication to a self-managed MySQL database in Amazon Elastic Compute Cloud (Amazon EC2), or an on-premises MySQL server. Logical binary log replication can be considered a middle-of-the-road option. It provides greater configuration flexibility than physical replication (Aurora Global Database) at the expense of RTO and RPO. The RTO and RPO vary based on workload because they depend on the replica keeping up with the change records being sent from the primary database. None of the options discussed here automatically fail over a database to another Region; this decision and action remains in your control. Conclusion Whether the defined failure protection modes cover a hardware failure or a natural disaster, with an RTO and RPO of seconds, hours, or days, Aurora offers flexible options to meet the requirements. In this post, we reviewed the five most common options AWS can help you build; deciding which route to go largely depends on the requirements defined for the application: Aurora MySQL (single Region) – Provides fully managed in-Region protection with a highly distributed storage layer, and quick automatic in-Region failover. RPO is zero and RTO is typically 30 seconds to a few minutes, providing protection against hardware failures and Availability Zone-specific problems. Cold backups with Aurora volume snapshots – Provide an easy and cost-effective option to durably store data, while also allowing for cross-Region copies. RPO in-Region is as low as a few minutes with PITR, and RTO can be minutes up to a few hours dependent on cluster volume size. This option protects best against accidental data deletion, with a path to restore a cluster to a different Region. Cold backups with database dumps – A manual option most useful on small databases. RTO and RPO are longer and dependent on manual processes. This is best used to restore a backup to MySQL running on Amazon EC2 or an on-premises server. Physical replication with Aurora Global Database – Provides a fully managed cross-Region option with consistent replication throughput by utilizing dedicated infrastructure that handles the replication rather than the source and destination instances required to do so in logical replication. This provides for an RPO of typically less than a second, and an RTO of a few minutes. Protects against natural disasters affecting a Region and allows for easier building of multi-Region applications. Logical replication – Managed and unmanaged options available that utilize MySQL’s built-in binary log replication technology. RPO is as low as a few seconds, but this can be highly dependent on the database workload. RTO is typically a few minutes, but also dependent on replication delay. You can replicate to a different AWS account to protect against account compromise. A database is only one portion of a complete disaster recovery solution. It’s also important to practice a DR plan by running each step in it. By running a DR plan in a controlled fashion, you can learn about what works and what doesn’t so if a disaster strikes, you’ll be ready and able to meet the RTO and RPO set out by the business. Comment and let me know what options align most with your DR objectives. About the author Joe is a Sr. Solutions Architect with Amazon Web Services. He primarily serves AWS EdTech customers, providing architectural guidance and best practice recommendations for new and existing workloads. Outside of work, he enjoys going on new adventures while traveling the world.
https://aws.amazon.com/blogs/database/how-to-choose-the-best-disaster-recovery-option-for-your-amazon-aurora-mysql-cluster/
0 notes
Text
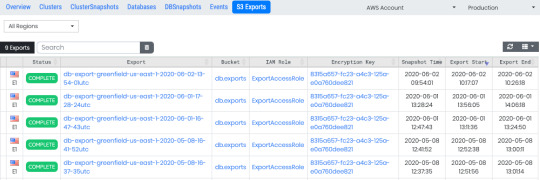
Scheduled RDS exports to S3
You can now easily schedule the export of RDS DB snapshot data to an Amazon S3 bucket from Ylastic. The exported data from RDS is stored in Apache Parquet format that is compressed and consistent, as well as encrypted using a KMS key provided by you for S3 server-side encryption.

Easily export multiple instances by specifying a tag based filter when you create a scheduled task.

View and access all your S3 exported backups easily and aggregated across all regions in one page.
0 notes
Photo

Post has been published on http://muawia.com/building-data-lakes-and-implementing-data-retention-policies-with-amazon-rds-snapshot-export-to-amazon-s3/
Building data lakes and implementing data retention policies with Amazon RDS snapshot export to Amazon S3
0 notes
Text
Announcing RDS/Aurora Snapshot Export to S3
https://aws.amazon.com/about-aws/whats-new/2020/01/announcing-amazon-relational-database-service-snapshot-export-to-s3/
Comments
0 notes
Link
Amazon RDS 스냅샷, Parquet 포맷 기반 Amazon S3 내보내기 기능 출시
0 notes
Text
2020/01/20-26
*AWS初心者にIAM Policy/User/Roleについてざっくり説明する
https://dev.classmethod.jp/cloud/aws/iam-policy-user-role-for-primary-of-aws/
> IAM Policyは できること/できないこと を定義し、UserやRoleに紐づけて使う
> IAM Userは、Policyを紐付けて、ユーザーができることを定義する
> IAM Roleは、Policyを紐付けて、誰か/AWSのサービス ができることを定義する
*ECS と EKS
https://yohei-a.hatenablog.jp/entry/20200123/1579758201
>レジストリ : Amazon Elastic Container Registry
>コントロールプレーン : ECS, EKS
>データプレーン : EC2, Fargate
*RDSのCA証明書を最新版の「rds-ca-2019」に更新する手順
http://blog.serverworks.co.jp/tech/2020/01/21/upgrade-rds-ca-certification/
>ページ最下部の[次へ]ボタンをクリックすると確認画面が出てきますので、
>変更のスケジュールを「すぐに適用」を選択してインスタンスの変更を
>クリックします。「すぐに適用」を選択するとRDSの再起動が始まるため
>一時的なダウンタイムは発生しますが、再起動は通常2分以内に完了する
>ので更新作業が正常に完了したかをすぐに確認することができます。
>更新作業は以上で完了です! 今回の検証では10秒程度で再起動が終了
>したので一瞬で完了しました!
*[新機能]RDSのスナップショットがS3にエクスポートできるようになりました。
https://dev.classmethod.jp/cloud/aws/rds-snapshot-s3-export/
>Parquet形式なので、エクスポートしたデータは分析などに利用
>することが多いと思います。
>せっかくなので、Glueを使ってAthenaでクエリを投げてみました。
*GlueのクローラでS3のCSVデータを検出し、Athenaでクエリを実行する
https://dev.classmethod.jp/cloud/aws/glue-crawler-athena-tutorial/
>クロール先として設定したS3パスごとに1つのテーブルしか検出しないか
>どうかを設定できます。 デフォルトでは、S3パスごとにスキーマや
>ファイルフォーマットなどいくつかの類似性を検証し、複数のテーブル
>を検出を行います。このオプションを有効化する事で、カラムなど
>スキーマに違いがあるけど同一テーブルとして扱いたいといった場合に
>便利です。
>クロールによってスキーマの変化を検出した場合の挙動を設定でき
>ます。設定内容は次の三種類です。
*EKSクラスターの利用料金が一気に半額になりました!
https://dev.classmethod.jp/cloud/aws/eks-cluster-fee-has-been-reduces-by-half/
0 notes
Link
Article URL: https://aws.amazon.com/about-aws/whats-new/2020/01/announcing-amazon-relational-database-service-snapshot-export-to-s3/
Comments URL: https://news.ycombinator.com/item?id=22139914
Points: 7
# Comments: 1
0 notes
Text
What is AWS Aurora?
Amazon Web Service more commonly known as AWS offers and develop AWS Aurora, a relational database service. AWS Aurora is compatible with MySQL and PostgreSQL databases. These services are built for the cloud.
AWS Aurora combines performance and availability of traditional large databases with a cost-effective and simple open-source database.
Amazon RDS manages AWS Aurora and fully automates time-consuming tasks like database setup hardware provisioning, backups, and patching.
Is AWS Aurora a database?
The clear answer is YES. AWS Aurora is a database.
For those of you who do not know a relational database, it is a set of data in tables format (hence database table). That data can be accessed and reassembled in various ways without reorganising the database table.
In simpler term, a structure to organise data in tables with rows and columns.
This database contains:
· one or more data categories in columns sometimes called attributes
· and rows also called a record or tuple
Each row contains a unique data, or key, for the columns.
Both row and column comprise a table.
Each table has a unique primary key which identifies the information in a table.
A foreign key, a key coming from a different table, can be set to link on the primary key of another table. This builds the relationship between tables.
How is AWS Aurora compared to MySQL and PostgreSQL?
Amazon Aurora is surprisingly faster than standard MySQL databases up to five times.
To regular PostgreSQL databases it is three times faster.
Amazon Aurora provides security, reliability, and availability of commercial databases at 1/10th of the price.
Amazon Aurora has 99.99% availability increasing both MySQL and PostgreSQL performance.
It integrates the database engine with an SSD backed virtual storage layer for its workloads.
This storage is self-healing, distributed, and fault-tolerant. The repair on disk failures never loses the available database. AWS Aurora detects database crashes automatically and restarts without the need to rebuild the database cache or crash recovery.
Aurora auto-scales up to 64TB per database instance, if an instance fails, Amazon Aurora will automatically recover to one of fifteen low-latency read replicas. It will backup continuously to Amazon S3 and replicates on three Availability Zones (AZs).
Summary of Benefits:
· High Performance and Scalability
o faster than commercial databases, easily scale database deployment up and down from small to large instances
· High Availability and Durability
o designed to offer greater than 99.99% availability, replicates and backup on different storages, with global database quick recovery is fast
· Highly Secure
o Amazon provides multiple levels of security:
§ using Amazon VPC, it can bring network isolation
§ create and control encryption at rest using keys through AWS KMS (Key Management System),
§ use SSL to transit data encryption
· MySQL and PostgreSQL Compatible
o You can easily migrate MySQL or PostgreSQL databases to Aurora using standard snapshots or import/export tools
· Fully Managed
o Amazon Relational Database Service gives you worry-free database management tasks such as hardware provisioning, software patching, setup, configuration, or backups
· Migration Support
o Amazon Aurora is the best for database migrations to the cloud since its compatible with MySQL and PostgreSQL.
0 notes
Text
Original Post from Amazon Security
Author: Tracy Pierce
In this post, I’ll show you how to migrate an encryption wallet for an Oracle database installed on Amazon EC2 from using an outside HSM to using AWS CloudHSM. Transparent Data Encryption (TDE) for Oracle is a common use case for Hardware Security Module (HSM) devices like AWS CloudHSM. Oracle TDE uses what is called “envelope encryption.” Envelope encryption is when the encryption key used to encrypt the tables of your database is in turn encrypted by a master key that resides either in a software keystore or on a hardware keystore, like an HSM. This master key is non-exportable by design to protect the confidentiality and integrity of your database encryption. This gives you a more granular encryption scheme on your data.
An encryption wallet is an encrypted container used to store the TDE master key for your database. The encryption wallet needs to be opened manually after a database startup and prior to the TDE encrypted data being accessed, so the master key is available for data decryption. The process I talk about in this post can be used with any non-AWS hardware or software encryption wallet, or a hardware encryption wallet that utilizes AWS CloudHSM Classic. For my examples in this tutorial, I will be migrating from a CloudHSM Classic to a CloudHSM cluster. It is worth noting that Gemalto has announced the end-of-life for Luna 5 HSMs, which our CloudHSM Classic fleet uses.
Note: You cannot migrate from an Oracle instance in
Amazon Relational Database Service (Amazon RDS) to AWS CloudHSM. You must install the Oracle database on an Amazon EC2 instance. Amazon RDS is not currently integrated with AWS CloudHSM.
When you move from one type of encryption wallet to another, new TDE master keys are created inside the new wallet. To ensure that you have access to backups that rely on your old HSM, consider leaving the old HSM running for your normal recovery window period. The steps I discuss will perform the decryption of your TDE keys and then re-encrypt them with the new TDE master key for you.
Once you’ve migrated your Oracle databases to use AWS CloudHSM as your encryption wallet, it’s also a good idea to set up cross-region replication for disaster recovery efforts. With copies of your database and encryption wallet in another region, you can be back in production quickly should a disaster occur. I’ll show you how to take advantage of this by setting up cross-region snapshots of your Oracle database Amazon Elastic Block Store (EBS) volumes and copying backups of your CloudHSM cluster between regions.
Solution overview
For this solution, you will modify the Oracle database’s encryption wallet to use AWS CloudHSM. This is completed in three steps, which will be detailed below. First, you will switch from the current encryption wallet, which is your original HSM device, to a software wallet. This is done by reverse migrating to a local wallet. Second, you’ll replace the PKCS#11 provider of your original HSM with the CloudHSM PKCS#11 software library. Third, you’ll switch the encryption wallet for your database to your CloudHSM cluster. Once this process is complete, your database will automatically re-encrypt all data keys using the new master key.
To complete the disaster recovery (DR) preparation portion of this post, you will perform two more steps. These consist of copying over snapshots of your EC2 volumes and your CloudHSM cluster backups to your DR region. The following diagram illustrates the steps covered in this post.
Figure 1: Steps to migrate your EC2 Oracle TDE database encryption wallet to CloudHSM
Switch the current encryption wallet for the Oracle database TDE from your original HSM to a software wallet via a reverse migration process.
Replace the PKCS#11 provider of your original HSM with the AWS CloudHSM PKCS#11 software library.
Switch your encryption wallet to point to your AWS CloudHSM cluster.
(OPTIONAL) Set up cross-region copies of the EC2 instance housing your Oracle database
(OPTIONAL) Set up a cross-region copy of your recent CloudHSM cluster backup
Prerequisites
This process assumes you have the below items already set up or configured:
Oracle database with TDE encryption on an EC2 instance
CloudHSM client and command line tools installed on the EC2 instance
An original hardware or software encryption wallet
A CloudHSM cluster with at least one HSM for your new encryption wallet
A Crypto User (CU) on the new HSM cluster to own and manage the TDE master encryption key
A database user with either the ADMINISTER KEY MANAGEMENT or SYSKM privilege
Deploy the solution
Now that you have the basic steps, I’ll go into more detail on each of them. I’ll show you the steps to migrate your encryption wallet to a software wallet using a reverse migration command.
Step 1: Switching the current encryption wallet for the Oracle database TDE from your original HSM to a software wallet via a reverse migration process.
To begin, you must configure the sqlnet.ora file for the reverse migration. In Oracle databases, the sqlnet.ora file is a plain-text configuration file that contains information like encryption, route of connections, and naming parameters that determine how the Oracle server and client must use the capabilities for network database access. You will want to create a backup so you can roll back in the event of any errors. You can make a copy with the below command. Make sure to replace /to/> with the actual path to your sqlnet.ora file location. The standard location for this file is “$ORACLE_HOME/network/admin“, but check your setup to ensure this is correct.
cp /to/>sqlnet.ora /to/>sqlnet.ora.backup
The software wallet must be created before you edit this file, and it should preferably be empty. Then, using your favorite text editor, open the sqlnet.ora file and set the below configuration. If an entry already exists, replace it with the below text.
ENCRYPTION_WALLET_LOCATION= (SOURCE=(METHOD=FILE)(METHOD_DATA= (DIRECTORY=)))
Make sure to replace the with the directory location of your destination wallet. The destination wallet is the path you choose for the local software wallet. You will notice in Oracle the words “keystore” and “wallet” are interchangeable for this post. Next, you’ll configure the wallet for the reverse migration. For this, you will use the ADMINISTER KEY MANAGEMENT statement with the SET ENCRYPTION KEY and REVERSE MIGRATE clauses as shown in the example below.
By using the REVERSE MIGRATE USING clause in your statement, you ensure the existing TDE table keys and tablespace encryption keys are decrypted by the hardware wallet TDE master key and then re-encrypted with the software wallet TDE master key. You will need to log into the database instance as a user that has been granted the ADMINISTER KEY MANAGEMENT or SYSKM privileges to run this statement. An example of the login is below. Make sure to replace the and with your administrator user name and password for the database.
sqlplus c## syskm Enter password: Connected.
Once you’re connected, you’ll run the SQL statement below. Make sure to replace with your own existing wallet password and with your own existing wallet user ID and password. We are going to run this statement with the WITH BACKUP parameter, as it’s always ideal to take a backup in case something goes incorrectly.
ADMINISTER KEY MANAGEMENT SET ENCRYPTION KEY IDENTIFIED BY REVERSE MIGRATE USING “” WITH BACKUP;
If successful, you will see the text keystore altered. When complete, you do not need to restart your database or manually re-open the local wallet as the migration process loads this into memory for you.
With the migration complete, you’ll now move onto the next step of replacing the PKCS#11 provider of your original HSM with the CloudHSM PKCS#11 software library. This library is a PKCS#11 standard implementation that communicates with the HSMs in your cluster and is compliant with PKCS#11 version 2.40.
Step 2: Replacing the PKCS#11 provider of your original HSM with the AWS CloudHSM PKCS#11 software library.
You’ll begin by installing the software library with the below two commands.
wget https://s3.amazonaws.com/cloudhsmv2-software/CloudHsmClient/EL6/cloudhsm-client-pkcs11-latest.el6.x86_64.rpm
sudo yum install -y ./cloudhsm-client-pkcs11-latest.el6.x86_64.rpm
When installation completes, you will be able to find the CloudHSM PKCS#11 software library files in the directory, the default directory for AWS CloudHSM’s software library installs. To ensure processing speed and throughput capabilities of the HSMs, I suggest installing a Redis cache as well. This cache stores key handles and attributes locally, so you may access them without making a call to the HSMs. As this step is optional and not required for this post, I will leave the link for installation instructions here. With the software library installed, you want to ensure the CloudHSM client is running. You can check this with the command below.
sudo start cloudhsm-client
Step 3: Switching your encryption wallet to point to your AWS CloudHSM cluster.
Once you’ve verified the client is running, you’re going to create another backup of the sqlnet.ora file. It’s always a good idea to take backups before making any changes. The command would be similar to below, replacing /to/> with the actual path to your sqlnet.ora file.
cp /to/>sqlnet.ora /to/>sqlnet.ora.backup2
With this done, again open the sqlnet.ora file with your favorite text editor. You are going to edit the line encryption_wallet_location to resemble the below text.
ENCRYPTION_WALLET_LOCATION= (SOURCE=(METHOD=HSM))
Save the file and exit. You will need to create the directory where your Oracle database will expect to find the library file for the AWS CloudHSM PKCS#11 software library. You do this with the command below.
sudo mkdir -p /opt/oracle/extapi/64/hsm
With the directory created, you next copy over the CloudHSM PKCS#11 software library from the original installation directory to this one. It is important this new directory only contain the one library file. Should any files exist in the directory that are not directly related to the way you installed the CloudHSM PKCS#11 software library, remove them. The command to copy is below.
sudo cp /opt/cloudhsm/lib/libcloudhsm_pkcs11_standard.so /opt/oracle/extapi/64/hsm
Now, modify the ownership of the directory and everything inside. The Oracle user must have access to these library files to run correctly. The command to do this is below.
sudo chown -R oracle:dba /opt/oracle
With that done, you can start your Oracle database. This completes the migration of your encryption wallet and TDE keys from your original encryption wallet to a local wallet, and finally to CloudHSM as the new encryption wallet. Should you decide you wish to create new TDE master encryption keys on CloudHSM, you can follow the steps here to do so.
These steps are optional, but helpful in the event you must restore your database to production quickly. For customers that leverage DR environments, we have two great blog posts here and here to walk you through each step of the cross-region replication process. The first uses a combination of AWS Step Functions and Amazon CloudWatch Events to copy your EBS snapshots to your DR region, and the second showcases how to copy your CloudHSM cluster backups to your DR region.
Summary
In this post, I walked you through how to migrate your Oracle TDE database encryption wallet to point it to CloudHSM for secure storage of your TDE. I showed you how to properly install the CloudHSM PKCS#11 software library and place it in the directory for Oracle to find and use. This process can be used to migrate most on-premisis encryption wallet to AWS CloudHSM to ensure security of your TDE keys and meet compliance requirements.
If you have feedback about this blog post, submit comments in the Comments section below. If you have questions about this blog post, start a new thread on the AWS CloudHSM forum.
Want more AWS Security news? Follow us on Twitter.
Tracy Pierce
Tracy Pierce is a Senior Cloud Support Engineer at AWS. She enjoys the peculiar culture of Amazon and uses that to ensure every day is exciting for her fellow engineers and customers alike. Customer Obsession is her highest priority and she shows this by improving processes, documentation, and building tutorials. She has her AS in Computer Security & Forensics from SCTD, SSCP certification, AWS Developer Associate certification, and AWS Security Specialist certification. Outside of work, she enjoys time with friends, her Great Dane, and three cats. She keeps work interesting by drawing cartoon characters on the walls at request.
#gallery-0-5 { margin: auto; } #gallery-0-5 .gallery-item { float: left; margin-top: 10px; text-align: center; width: 33%; } #gallery-0-5 img { border: 2px solid #cfcfcf; } #gallery-0-5 .gallery-caption { margin-left: 0; } /* see gallery_shortcode() in wp-includes/media.php */
Go to Source
Author: Tracy Pierce How to migrate your EC2 Oracle Transparent Data Encryption (TDE) database encryption wallet to CloudHSM Original Post from Amazon Security Author: Tracy Pierce In this post, I’ll show you how to migrate an encryption wallet for an Oracle database installed on…
0 notes
Link
Amazon Web Services (AWS) Certification – Best Cloud Computing Training Center in Bangalore
Upshot Technologies provide Best AWS Training in BTM Layout,Marathahalli Bangalore. Learn AWS Training in BTM Layout, Marathahalli from the Cloud Experts. Our Amazon Web services (AWS) training in Bangalore, BTM, Marathahalli Trainers are working in Cloud computing for more than 5+ Years. Our AWS Training Courses completely Based on Live Projects. AWS training is one of the top cloud certification courses in the industry over the years, needs to grab in the right way and for that Upshot Technologies is the right place to take up the AWS course training as you will get the opportunity to learn and grow with new ideas of Amazon Web Services. The syllabus we follow here is designed to train you about all the major components in AWS technology. Each and every topics we follow is as per the updated AWS syllabus, and the best features of the industry. Best Aws Training Syllabus includes Amazon Compute & Networking Services , Amazon Storage Service & Content Delivery, Amazon Database Services , Amazon Application Development & Identity Access Management with practical exercises and live examples with real-time experience.
Call +91-8095558008 to know more about AWS Training in Bangalore BTM Marathahalli and Free Demo
Amazon Web Services Training in BTM Layout,Marathahalli Bangalore is an outstanding Online and corporate training center. We provide a number of AWS workshop programs for small, medium along with big organizations in Bangalore and across India. The trainers at Upshot Technologies are subject specialists and industry professionals who provide you with an in-depth study of the AWS course. The students who tend to complete their AWS certification course in BTM Layout, Bangalore tend to have a lot of job opportunities in the industry. We also provide flexible timings with regard to the student’s request. Upshot Technologies is best AWS Training Institute in Bangalore, BTM, Marathahalli provides the top-class facilities that help you avail a successful AWS certification and training from us.
If you are searching for the best AWS training in Bangalore, you have come to the right place, Upshot technologies in BTM Layout and Marathahalli, Bangalore. We are the Best AWS certification training centre in all of Bangalore.
About Amazon Web Services:
Platform to provide on-demand cloud-computing services on a paid subscription basis.
Launched in 2002 as a simple platform and officially re-launched in 2006 with S3 and EC2.
Subscribers have a full-fledged virtual cluster of computers at their disposal 24/7 through the Internet.
Charges are based on the usage, features chosen by the subscriber, required availability, security and service.
Provides round-the-clock services and operates on 16 different geographical regions.
Offers more than 90 services currently such as storage, computing power, networking, database and analytics, developer tools, deployment and management.
Used by government agencies, Non-Governmental Organisations (NGOs) and Multi-National Corporations (MNCs).
Course Description:
Upshot Technologies is one of the premier training institutes in BTM, Marathahalli Bangalore and has been providing the best AWS training for a long time. We are the best training institute to learn AWS considering our teaching prowess and highest placement ratio. Some of the unique features of our AWS training are given below:
Syllabus
Designed to prepare the students as perfect candidates that the companies expect.
Wide-ranging with the basics of Amazon S3, EC2, RDS and VPC and also other services of AWS.
Prepared by a team of experts after surveying the recruitment trends and the problems faced by the industry.
Includes many small real-time projects for practice.
Faculties
Certified Experts with optimum skillset and vast experience.
Have comprehensive knowledge of AWS, its working and its services.
Zealous teachers with excellent soft skills and dedication.
Help our students both technically and emotionally whenever the need arises.
Take special doubt clarification sessions or feedback sessions if required.
Infrastructure
State-of-the-art computer lab with AWS subscription.
Smart classrooms with projectors for live demos of concepts and working of AWS.
Video-conferencing enabled halls for webinars by world’s leading experts in AWS.
Sophisticated and staffed labs to help our students practice after classes.
Free High-speed Wi-Fi to help our students learn more from internet.
Placement care
Assured employment for all the students who had completed our training.
Dedicated team working tirelessly to help our students get placed immediately.
Help our students to prepare a top-quality resume.
Offer a lot of study materials for technical interviews.
Conduct mock tests and interviews to boost the confidence of our students.
Arrange campus-drives and direct interviews with the help of our Alumni.
There are also other advantages in choosing the Best AWS training in BTM, Marathahalli Bangalore such as
Various batch timings suitable for college students, freshers and working professionals.
Affordable fees structure with concessions and installment schemes for our students.
Simple, clear and reliable study materials to avoid confusion with class notes and ambiguity.
Access to numerous online resources about AWS and its services.
Special 1-to-1 training and Corporate training can be arranged if informed earlier.
Syllabus:
Amazon Web Services Course Syllabus
SECTION 1 : Linux Fundamentals
SECTION 2 : Installation and Initialization:
Installation, Package Selection
Anatomy of a Kick start File, Command line
Introduction to Bash Shell
System Initialization, Starting the Boot Process: GRUB.
SECTION 3 : Boot and Package Management:
Configuring services to run at boot,
Securing single-user mode (su login),
Shutting down and rebooting the system,
RPM Package Manager, Installing and Removing Software, Updating a Kernel RPM,
Yum Command set, Install packages by using yum.
Apt-get command set, Apt-cache package management
SECTION 4 : User Administration:
Understanding different types of groups and creation of groups
Creation of users in different groups
Understanding Passwd, Shadow Files
Understanding passwd aging
Creation of quotas for users, groups and file systems
Understanding users security files
The different commands for Monitoring the users
TROUBLESHOOTING
Automation of jobs – Cron , at
SECTION 5 : Run levels:
Understanding the different types of run-levels
Understanding different types of shutdown commands
Understanding run control scripts
Understanding the different types
SECTION 6 : Overview of the Service Protocols:
FTP
DHCP
DNS
Apache
Samba
LVM
SECTION 7 : AWS Sysops Administrator Certification
Cloud Computing
Introduction to Cloud Computing
Why Cloud Computing?
Benefits of Cloud Computing
Types of Cloud Computing
Public Cloud
Private Cloud
Hybrid Cloud
Community Cloud
Software as a Service
Platform as a Service
Horizontal vs vertical scaling
Cloud Computing Issues
Security
Costing Model
SECTION 8 : What is virtualization?
Virtualization and cloud computing
Types of virtualization
Virtualization terminologies
Hypervisor
Benefits
Vendors
SECTION 9 : AWS Platform
Introduction to AWS Elastic computing
Introduction to the AWS products
Regions and Availability Zones
Signing up for AWS
AWS Free usage tier
Introduction AWS management console
SECTION 10 : EC2 Instances
Understanding AMI
Launching your first AWS instance
On-demand Instance pricing
Reserved Instance pricing
Spot instance pricing
Setting up security
Security groups
Choosing & Creating a new AMI
Public and Private IP’s
Deploying a new instance from the created AMI
Key Pairs
Elastic IP’s
ELB(Elastic Load Balancer)
SECTION 11 : Load Balancing
Introduction to Scaling
Components and types of load balancing
SECTION 12 : Auto scaling
Get Started with Auto Scaling Using the Console
Maintain a Fixed Number of Running EC2 Instances
Dynamic Scaling
The lifecycle of auto scaling
Policies of auto scaling
SECTION 13 : EBS (Elastic Block Storage)
Create EBS volumes
Delete EBS Volumes
Attach and detach EBS volumes
Mounting and unmounting EBS volume
Creating and deleting snapshots
Creating volumes from snapshots S3(Simple Storage Service)
SECTION 14 : Storage in Cloud
S3 durability and redundancy
S3 Buckets
S3 Uploading Downloading
S3 Permissions
S3 Object Versioning
S3 Lifecycle Policies
Storage Gateway
Import Export
S3 Transfer Acceleration
Glacier storage
SECTION 15 : Cloud Front
Use of cloud front
Creating a cloud front distribution
Hosting a website of cloud front distribution
Implementing restrictions
Configuring origins and behaviors
SECTION 16 : Route53
Creating zones
Hosting a website
Understanding routing policies
Weighted simple and failover policies
SECTION 17 : Identity Access Management (IAM)
Creating Users and Groups
Applying policies
Password Policy
Roles
SECTION 18 : AWS Security Management
Security Practices for Cloud Deployment
AWS Responsibilities and Securities
Cloud Trail
Trust advisor
SECTION 19 : Amazon Virtual Private Cloud (VPC)
Introduction to Amazon Virtual Private Cloud (VPC)
VPC Advantages
Default and Non-default VPC
Components of VPC
Direct Connect
Describe, create, and manage Amazon Virtual Private Cloud
Amazon VPC, Private Subnet and Public Subnet
AWS Networking, Security Groups and Network ACLs
Configuration and management of VPN connectivity
Subnet and Subnet Mask
SECTION 20 : Relational Database Service (RDS)
Introduction to RDS
Different database services of AWS: Amazon RDS, Dynamo DB, Redshift etc.
Configuring the database
Configuring backups
Configuring the maintenance windows
Connecting to the database
SECTION 21 : Dynamo DB
Creating a dynamo dB
Configuring alarms
Adding data manually
SECTION 22 : Management Tools
Cloud watch dashboard
Configuring Monitoring services
Setting thresholds
Configuring actions
Creating a cloud watch alarm
Getting statistics for ec2 instances
Monitoring other AWS services
Configuring Notifications
Integrating cloud watch with Auto scaling
Cloud Trail
SECTION 24 : Application Services
What is SNS
Creating a topic
Create subscription
Subscribed to the subscription
SQS
SES
SECTION 25 : AWS Troubleshooting
Troubleshooting EC2 instance
Troubleshooting using Cloud watch
Troubleshooting using ELB
Troubleshooting by using Cloud trail
Troubleshooting by using Cloud front
SECTION 26 : AWS Architecture and Design
Backup and Disaster Recovery
How to manage Disaster Recovery and Backups
Best Practice for DR and Backups
AWS High availability Design
SECTION 27 : Troubleshooting and Price Calculator
AWS Best Practices (Cost +Security)
AWS Calculator & Consolidated Billing
SECTION 28 : Devops Fundamentals
An understanding of Devops and the modern Devops toolsets
The ability to automate all aspects of a modern code delivery and deployment pipeline using:
Source code management tools – CVS, Git
Build tools – Apache ant, Maven
Test automation tools – JUnit
Continuous Integration Tools – Jenkins, Team city
Configuration management tools – Chef, Puppet, Ansible
Monitoring tools – Nagios
Certification:
Amazon.com offers a variety of Certifications related to AWS. They are classified on the basis of role and level of expertise. Apart from them, there are two specialty certificates namely AWS certified Big Data and AWS certified Advanced Networking. The list of AWS related certificates is given below:
AWS certifications and their level of expertise
Solutions Architect (Professional, Associate)
DevOps Engineer (Professional)
Developer (Associate)
SysOps Administrator (Associate)
Cloud Practitioner (Foundational)
We will provide guidance on how to apply, prepare and clear the exam and obtain your certification. However, these certifications are not mandatory to get a job in AWS domain because you will get your joining letter in a company of your liking as soon as you had completed our AWS training.
Learning Outcomes:
After the completion of our AWS training, a ton of job opportunities will be opened to you in India and abroad. Some of the designations you can apply for, are listed below:
AWS Developer
AWS Cloud Architect
Cloud Solution Architect – AWS
AWS Engineer
AWS Administrators
There are also other career choices available such as promotions, switching the job to a MNC and even teaching AWS at institutes or online platforms.
0 notes
Text
Orchestrating database refreshes for Amazon RDS and Amazon Aurora
The database refresh process consists of recreating of a target database using a consistent data copy of a source database, usually done for test and development purposes. Fully-managed database solutions such as Amazon Relational Database Service (Amazon RDS) or Amazon Aurora make it incredibly easy to do that. However, database administrators may need to run some post-refresh activities such as data masking or password changes, or they may need to orchestrate multiple refreshes because they manage several databases, each of them with more than one environment. In some cases, refreshes have to be performed frequently, even daily. In this post, we describe the features of a serverless solution that you can use to perform database refresh operations at scale, with a higher level of automation. This solution can be deployed and tested using the instructions available in the GitHub repo. In the next section, we go over what you’re going to build. Potential use cases The solution described in this post enables you to do the following: Refresh an existing database (or create a new one) using one of the four options available: Latestpoint – The data is aligned to the latest point in time. torestorepoint – The data is aligned to a specified point in time. fromsnapshot – The data is aligned at the snapshot creation time. fast-cloning (only for Aurora) – The data is aligned to the latest point in time, but it’s cloned using the fast-cloning feature provided by Aurora. Refresh an existing encrypted database (or create a new one). A cross-account use case has the following considerations: The only options available are fromsnapshot or fast-cloning (only for Aurora). The AWS Key Management Service (AWS KMS) primary key (managed by the source account) must be manually shared with the target AWS account before launching the refresh. Perform a cross-account refresh of an existing database (or create a new one). As a pre-requisite, the source account has to share with the target account the Amazon RDS or Aurora snapshot or the source Aurora cluster, before launching the refresh process. Run post-refresh SQL scripts against the new refreshed database (only available for Amazon RDS for MariaDB, Amazon RDS for MySQL and Aurora MySQL) to perform the following: Clearing, masking, or modifying sensitive data coming from the source production database. Deleting unnecessary data or removing unnecessary objects coming from the source production database. Customize the solution by adding or removing steps to orchestrate operations for those applications that have different requirements, using the same state machine. Keep the history of all the database refresh operations of your applications, in order to answer questions such as: When has my database last been refreshed? Does my application have all its non-production databases refreshed? Is the refresh that I launched yesterday complete? Prerequisites The solution implemented focuses on a time-consuming administrative task that DBAs have to deal with: the database refresh. The process consists of recreating an existing database. Typically, this is a copy used for test and development purposes whose data has to be “refreshed”. You can use a backup or the last available image of the related production environment to refresh a database. The solution can also be applied to scenarios when you create a new environment from scratch. The process can involve additional steps to apply different settings or configurations to the new refreshed database. The following diagram illustrates the process. The backup can be either logical (a partial or full export the source dataset) or physical (a binary copy of the database, which can be full, incremental, whole, or partial). The solution described in this post allows you to use physical backups (Amazon RDS or Aurora snapshots) during the restore process or the Aurora cloning feature in order to copy your databases. Solution overview The solution uses several AWS services to orchestrate the refresh process: Amazon Aurora – A MySQL-and PostgreSQL-compatible relational database built for the cloud. The solution uses Aurora snapshots or the fast cloning feature to restore Aurora database instances. Restores are performed using APIs provided by RDS and Aurora. Amazon DynamoDB – A fully-managed key-value and document database that delivers single-digit millisecond performance at any scale. We use it to keep track of all the refresh operations run by this solution. Amazon Elastic Compute Cloud – Amazon EC2 provides secure, resizable compute capacity in the cloud. The solution uses it in conjunction with AWS Systems Manager to run SQL scripts against your restored databases. AWS Lambda – Lambda lets you run code without provisioning or managing servers. You pay only for the compute time you consume. Lambda functions are used to implement all the steps of a database refresh. AWS Step Functions – A serverless function orchestrator that makes it easy to sequence AWS Lambda functions and multiple AWS services into business-critical applications. This is the core service of the solution, used to orchestrate database refreshes. Amazon RDS – A fully managed relational database solution that provides you with six familiar databases. The solution uses Amazon RDS snapshots to restore RDS databases instances. Restores are performed using APIs provided by RDS and Auroras. Amazon Simple Notification Service – Amazon SNS is a fully managed messaging service for both systems-to-system and app-to-person communication. We use it to notify users about the completion of refresh operations. Amazon Simple Storage Service – Amazon S3 is an object storage service that offers industry-leading scalability, data availability, security and performance. We use it to store the SQL scripts that the solution allows you to run against new restored databases. AWS Secrets Manager – Secrets Manager helps you to securely encrypt, store, and retrieve credentials for your database and other services. We use it to manage the access credentials of the databases involved in your refreshes. AWS Systems Manager – Systems Manager organizes, monitors and automates management tasks on your AWS resources. With Systems Manager Run Command, you can optionally run SQL scripts stored on Amazon S3 against your restored databases. This solution may incur costs; check the pricing pages related to the services you’re using. Architecture The architecture of the solution proposed is shown in the following diagram. The pre-restore workflow has the following steps: The end user prepares the refresh file (described later in this post) by configuring which steps have to be performed (including the optional creation of a Secrets Manager secret). If necessary, the end user can also prepare SQL scripts, stored on Amazon S3, to run as post-refresh scripts. The restore workflow has the following steps: The end user initiates the refresh process by starting the Step Functions state machine (the refresh process could be initiated automatically, if needed). The state machine manages each step of the database restore by invoking Lambda functions that are part of this solution The post-restore workflow includes the following steps: When the restore is complete, the state machine runs the post-restore SQL scripts. It provides two options: The state machine can run the scripts, stored on Amazon S3, through a Lambda function. If configured, you can use Secrets Manager to store and manage the database credentials. The state machine can run the scripts, stored on Amazon S3, using an EC2 instance, through Systems Manager Run Command. The state machine uses a DynamoDB table to store information about the process and its status. The state machine notifies the end user about the process final status using Amazon SNS. Steps of a database refresh Before describing in more detail what the solution looks like and how it works, it’s important to understand at a high level the main steps that are part of a database refresh: A backup of the source database is created. If the target database already exists, it’s stopped or, in most of the cases, deleted. The target database is re-created through a database restore operation, using the backup from Step 1. Post-restore scripts are run against the new restored target database. The Step Functions state machine implemented for this solution is composed by several states; most of them are related to specific steps of a database refresh operation. In particular, some states are required only for Amazon RDS, others only for Aurora, and others are required for both. The following table lists the main steps related to a refresh of an RDS DB instance performed by our solution. Step # Step Name Description 1 delete-replicas Deletes the existing read replicas of the target database 2 stop-old-database Stops the existing target database 3 perform-restore Performs the restore 4 delete-old-database Deletes the old target database 5 rename-database Renames the new target database 6 fix-tags Updates the tags of the new target database 7 create-read-replicas Re-creates the read replicas previously deleted 8 change-admin-pwd Changes the admin password of the new target database 9 rotate-admin-pwd Rotates the admin password within the secret for the new target database 10 runscripts Runs SQL scripts against the new target database 11 update-dynamodb Updates a DynamoDB table with some information about the refresh completed 12 send-msg Sends an SNS notification (e-mail) about the completion of the refresh The following table lists the main steps related to a refresh of an Aurora cluster performed by our solution. Step # Step Name Description 1 delete-replicas Deletes the existing read replicas of the target database 2 perform-restore Performs the restore (it only creates the cluster) 3 create-instance Creates a new instance within the cluster restored at Step 2 4 delete-old-database Deletes the old target DB instance 5 delete-old-cluster Deletes the old target cluster 6 rename-cluster Renames the new target cluster 7 rename-database Renames the new target database 8 fix-tags Updates the tags of the new target database 9 create-read-replicas Re-creates the read replicas previously deleted 10 change-admin-pwd Changes the admin password of the new target database 11 rotate-admin-pwd Rotates the admin password within the secret for the new target database 12 runscripts Runs SQL scripts against the new target database 13 update-dynamodb Updates a DynamoDB table with some information about the refresh completed 14 send-msg Sends an SNS notification (e-mail) about the completion of the refresh The graphic representation of the Step Function state machine that contains all the states mentioned above is available on the GitHub repo. You can use it on RDS DB instances, Aurora clusters, or both. The job poller strategy One of the main challenges of implementing an orchestrator with serverless services is to manage their stateless nature. When a certain operation is performed by a Lambda function against a database, how can we know when the operation is complete? The job poller strategy is a good solution. The following image is an extract from the solution showing this mechanism: For most of the steps that are part of a database refresh, we implement the same strategy: Step Functions invokes a Lambda function that performs a certain operation (such as restore a database). Step Functions waits a certain number of seconds (you configure) using the state of “Wait”. Step Functions invokes a Lambda function that checks if the operation has completed (if the database has been restored and its status is “available”). Step Functions verifies the results of the previous check using the state type “Choice”. Step Functions goes to the next state if the operation has completed; otherwise it waits again (returns to Step 2). Configuring your database refresh The steps of the database refresh are orchestrated by a Step Functions state machine based on an input file provided – the “refresh file”. It’s a JSON document containing all the input parameters for the state machine (in particular for the Lambda functions associated to the state machine states) which determines the characteristics of the refresh. A refresh file contains information about a specific refresh, so ideally for a single production database with two different non-production environments (one for development and one for test), a DBA has to prepare two refresh files. After these files are defined, they’re ready to be used and the related refresh can be scheduled or automated. The following code is the high-level structure of a refresh file: { "comment": "", "": { "": "", "": "", "": "", [..] "wait_time": , "check": { "": "", "": "", "checktodo": "", "torun": "true|false" }, "torun": "true|false" }, "": { "": "", "": "", "": "", [..] "wait_time": , "torun": "true|false" }, [..] } The file contains an element for every state machine’s state that needs an input. For more information about defining it, see the GitHub repo. Keep in mind the following about the refresh file: Not all the elements are required; some of them are related to steps that you may not want to run during a database refresh. Some elements are only related to Amazon RDS, others only to Aurora. Each element has a “torun” attribute that you can set to “false” in case you want to skip the related step. Each element has a “wait_time” attribute that determines for how long the state machine has to wait before checking whether the related operation or step is complete. Some elements have a “check” section that contains the input parameters for the Lambda function that verify whether a certain step completed successfully. This section has a “torun” parameter as well. Within an element, some parameters are required and others are optional. Within an element, some parameters are related to each other; if one has a value, the other one will become is also required. In this post, we show you three examples of elements related to three different steps of a database refresh. The following code shows a refresh of an RDS DB instance to the latest point: [..] "restore": { "dbservice": "rds", "source": "mysqlinstp", "target": "mysqlinstd", "restoretype": "latestpoint", "application": "app1", "environment": "development", "port": 3307, "subgrp": "db-sub-grp-virginia", "iamdbauth": "False", "cwalogs": "audit,error,general,slowquery", "copytagstosnap": "True", "dbparamgrp": "default.mysql5.7", "deletionprotection": "False", "secgrpids": "sg-03aa3aa1590daa4d8", "multiaz": "False", "dbname": "mysqlinstd", "dbclass": "db.t3.micro", "autominor": "False", "storagetype": "gp2", "wait_time": 60, "check": { "dbservice": "rds", "dbinstance": "mysqlinstdtemp", "checktodo": "checkrestore", "torun": "true" }, "torun": "true" } [..] The preceding section of the refresh file indicates that an RDS for MySQL DB instance “mysqlinstp” must be used as the source for the refresh to the latest point of the DB instance “mysqlinstd”. The section includes other information about the new database to be restored, including the security group ID, the storage type, the DB instance class. The state machine verifies every 60 seconds whether the restore operation is complete. In the “check” section, you can notice that a database is always restored with a name ending with the suffix “%temp”. This suffix is removed later with another step. The following code illustrates how to rename an RDS for MySQL DB instance once restored: [..] "rename": { "dbservice": "rds", "dbinstance": "mysqlinstdtemp", "wait_time": 10, "check": { "dbservice": "rds", "dbinstance": "mysqlinstd", "checktodo": "checkrename", "torun": "true" }, "torun": "true" } [..] The preceding section of the refresh file indicates that the new restored RDS DB instance “mysqlinstdtemp” must be renamed to “mysqlinstd”. The state machine verifies every 10 seconds whether rename operation is complete. The following code runs post-refresh SQL scripts against a new restored RDS DB instance: [..] "runscripts": { "dbservice": "rds", "dbinstance": "mysqlinstd", "engine": "mysql", "access": "secret", "secretname": "/development/app1r/mysqlinstd", "method": "lambda", "bucketname": "awsolproj", "prefix": "rdsmysql/mysqlinstd", "keys": "00test.sql,01test.sql", "wait_time": 10, "check": { "dbservice": "rds", "bucketname": "awsolproj", "prefix": "rdsmysql/mysqlinstd", "checktodo": "runscripts", "torun": "true" }, "torun": "true" } [..] The preceding section of the refresh file indicates that the scripts “00test.sql” and “01test.sql” stored on Amazon S3 in the bucket “awsolproj” must be run through Lambda against the RDS for MySQL DB instance “mysqlinstd”. Database credentials are retrieved using Secrets Manager, and the status of the operation is verified every 10 seconds. Managing secrets At the end of the restore, the new database has the same passwords for all the users within the database, including the primary user. This situation could represent a problem from a security standpoint, and for this reason the Step Functions state machine includes the following two states: change-admin-pwd and rotate-admin-pwd. With change-admin-pwd, the password of the primary user is automatically changed with a new one specified in the refresh file. If a Secrets Manager secret is configured for that database, the secret can be synchronized as well. See the following code: [..] "changeadminpwd": { "dbservice": "rds", "dbinstance": "mysqlinstd", "temppwd": "temppwd123", "secret": "true", "secretname": "/development/app1/mysqlinstd", "wait_time": 15, "check": { "dbservice": "rds", "dbinstance": "mysqlinstd", "checktodo": "checkpwd", "torun": "true" }, "torun": "true" } [..] With rotate-admin-pwd, if a Secrets Manager secret is configured and it has the rotation settings enabled, the secret containing the primary user password is rotated: "rotateadminpwd": { "dbservice": "rds", "dbinstance": "mybetainstd", "secretname": "/development/gamma/mybetainstd", "wait_time": 15, "check": { "dbservice": "rds", "secretname": "/development/gamma/mybetainstd", "temppwd": "temppwd123", "checktodo": "rotatepwd", "torun": "true" }, "torun": "true" } The solution allows you to run post-refresh SQL scripts in two ways: Using Lambda Using Systems Manager Run Command and EC2 The first option is more suitable if you’re more familiar with Lambda and want to keep the solution’s infrastructure completely serverless. Otherwise, DBAs who are used to directly managing SQL scripts on a server can easily manage them through Systems Manager: scripts are downloaded from Amazon S3 to the EC2 instance that is part of the solution and run from there. In both cases, you have to store the scripts on Amazon S3. The following code is the section of the refresh file related to the “run-script-” state: "runscripts": { "dbservice": "aurora|rds", "cluster": "", "dbinstance": "", "engine": "aurora-mysql|mysql|mariadb|oracle|aurora-postgresql|postgresql", "access": "pwd|secret", "temppwd": "", "secretname": "", "method": "lambda|ec2", "bucketname": "", "prefix": "/", "keys": ",,", "wait_time": , "check": { "dbservice": "aurora|rds", "bucketname": "", "prefix": "/", "checktodo": "runscripts", "torun": "true" }, "torun": "true" } Within a SQL script, you can run SELECT, DDL (Data Definition Language), DML (Data Manipulation Language), and DCL (Data Control Language) statements. As of this writing, this feature is available only for MySQL-related databases (Amazon RDS for MySQL, Amazon RDS for MariaDB, and Aurora MySQL) Tracking and troubleshooting your database refresh Keeping track of database refreshes is important especially when you have to manage hundreds of production databases plus the related non-production ones. This solution uses an encrypted DynamoDB table to record information about databases refreshes, giving you the ability to quickly answer questions like the following: Which date is the data of this database aligned to? When was the last time we refreshed this database? From which source did this database copy? Did the refresh of this database run successfully yesterday? Considering the production database, what’s the status of the refreshes of its non-production databases? The current structure of the DynamoDB table is the following: Table name – dbalignement-awssol Partition key – dbinstance Sort key – restoredate Additional attributes – appname,environment,recordingtime,restoretype,snapshot,source,status As of this writing, the solution doesn’t provide any local secondary index (LSI) or global secondary index (GSI) for the table, but you can easily add new GSIs to increase the number of access patterns that can be satisfied based on your needs. If a database refresh fails for any reason, you can use different services to understand the reasons. You can easily monitor the runs of your state machines through the Step Functions API or through its dashboard. The graph inspector can immediately tell you at which state there was a failure or at which state the state machine got stuck. If you choose a state, you can also take a look at the related input and output. You can also monitor the output of the Lambda functions associated with the states of the solution. Lambda logs information about its runs in Amazon CloudWatch Logs, from which you can get more details about what happened during a certain operation. Get notified or verify the database refresh completion The solution uses Amazon SNS to send emails about the success or failure of the database refreshes performed. In case of success, some details about the database just refreshed are included in the message sent. The following code is the section of the refresh file related to the “sendmsg” state: "sendmsg": { "dbservice": "aurora|rds", "application": "", "environment": "", "dbinstance": "", "source": "", "restoretype": "fromsnapshot|restorepoint|latestpoint|fastcloning", "topicarn": "", "torun": "true|false" } This feature is optional. What’s next The solution could be improved in some aspects, especially in the submission of the information about the database refresh. As of this writing, the input to provide must be manually prepared, but in the future we’re thinking about providing a user interface through which you can create the related JSON files and immediately perform some pre-checks that can validate the information provided. Notifications are sent to users via Amazon SNS but another option could be to use Amazon Simple E-mail Service (Amazon SES) to get more detailed information about the refreshes performed by sending formatted e-mails with additional information attached about the new database just restored. As of this writing, the solution doesn’t support Amazon RDS for SQL Server, and running post-refresh SQL scripts is available only for MySQL-related engines. We’re working to include those features in the remaining engines. Conclusion In this post, we showed how you can automate database refresh operations using serverless technology. The solution described can help you increase the level of automation in your infrastructure; in particular it can help reduce the time spent for an important and critical maintenance activity such as database refreshes, allowing DBAs to focus more on what matters when they manage their Amazon RDS and Aurora databases on AWS. We’d love to hear what you think! If you have questions or suggestions, please leave a comment. About the Authors Paola Lorusso is a Specialist Database Solutions Architect based in Milan, Italy. She works with companies of all sizes to support their innovation initiatives in the database area. In her role she helps customers to discover database services and design solutions on AWS, based on data access patterns and business requirements. She brings her technical experience close to the customer supporting migration strategies and developing new solutions with Relational and NoSQL databases. Marco Tamassia is a technical instructor based in Milan, Italy. He delivers a wide range of technical trainings to AWS customers across EMEA. He also collaborates in the creation of new courses such as “Planning & Designing Databases on AWS” and “AWS Certified Database – Specialty”. Marco has a deep background as a Database Administrator (DBA) for companies of all sizes (included AWS). This allows him to bring his database knowledge into classroom brining real world examples to his students.
https://aws.amazon.com/blogs/database/orchestrating-database-refreshes-for-amazon-rds-and-amazon-aurora/
0 notes
Link
via Recent Announcements https://ift.tt/31Uzw8n - mua hàng trên amazon UniShipping - mua hàng trên ebay UniShipping - mua hàng trên jomashop UniShipping - website mua hàng mỹ UniShipping Địa chỉ: K134/, 44 Lê Hữu Trác, An Hải Đông, Sơn Trà, Đà Nẵng 590000 Điện thoại: 0945308830 Website: https://unishipping.vn/
https://go.aws/37ov1oK - mua hàng trên amazon UniShipping - mua hàng trên ebay UniShipping - mua hàng trên jomashop UniShipping - website mua hàng mỹ UniShipping
0 notes
Link
Amazon Web Services (AWS) Certification – Best Cloud Computing Training Center in Bangalore
Upshot Technologies provide Best AWS Training in BTM Layout,Marathahalli Bangalore. Learn AWS Training in BTM Layout, Marathahalli from the Cloud Experts. Our Amazon Web services (AWS) training in Bangalore, BTM, Marathahalli Trainers are working in Cloud computing for more than 5+ Years. Our AWS Training Courses completely Based on Live Projects. AWS training is one of the top cloud certification courses in the industry over the years, needs to grab in the right way and for that Upshot Technologies is the right place to take up the AWS course training as you will get the opportunity to learn and grow with new ideas of Amazon Web Services. The syllabus we follow here is designed to train you about all the major components in AWS technology. Each and every topics we follow is as per the updated AWS syllabus, and the best features of the industry. Best Aws Training Syllabus includes Amazon Compute & Networking Services , Amazon Storage Service & Content Delivery, Amazon Database Services , Amazon Application Development & Identity Access Management with practical exercises and live examples with real-time experience.
Call +91-8095558008 to know more about AWS Training in Bangalore BTM Marathahalli and Free Demo
Amazon Web Services Training in BTM Layout,Marathahalli Bangalore is an outstanding Online and corporate training center. We provide a number of AWS workshop programs for small, medium along with big organizations in Bangalore and across India. The trainers at Upshot Technologies are subject specialists and industry professionals who provide you with an in-depth study of the AWS course. The students who tend to complete their AWS certification course in BTM Layout, Bangalore tend to have a lot of job opportunities in the industry. We also provide flexible timings with regard to the student’s request. Upshot Technologies is best AWS Training Institute in Bangalore, BTM, Marathahalli provides the top-class facilities that help you avail a successful AWS certification and training from us.
If you are searching for the best AWS training in Bangalore, you have come to the right place, Upshot technologies in BTM Layout and Marathahalli, Bangalore. We are the Best AWS certification training centre in all of Bangalore.
About Amazon Web Services:
Platform to provide on-demand cloud-computing services on a paid subscription basis.
Launched in 2002 as a simple platform and officially re-launched in 2006 with S3 and EC2.
Subscribers have a full-fledged virtual cluster of computers at their disposal 24/7 through the Internet.
Charges are based on the usage, features chosen by the subscriber, required availability, security and service.
Provides round-the-clock services and operates on 16 different geographical regions.
Offers more than 90 services currently such as storage, computing power, networking, database and analytics, developer tools, deployment and management.
Used by government agencies, Non-Governmental Organisations (NGOs) and Multi-National Corporations (MNCs).
Course Description:
Upshot Technologies is one of the premier training institutes in BTM, Marathahalli Bangalore and has been providing the best AWS training for a long time. We are the best training institute to learn AWS considering our teaching prowess and highest placement ratio. Some of the unique features of our AWS training are given below:
Syllabus
Designed to prepare the students as perfect candidates that the companies expect.
Wide-ranging with the basics of Amazon S3, EC2, RDS and VPC and also other services of AWS.
Prepared by a team of experts after surveying the recruitment trends and the problems faced by the industry.
Includes many small real-time projects for practice.
Faculties
Certified Experts with optimum skillset and vast experience.
Have comprehensive knowledge of AWS, its working and its services.
Zealous teachers with excellent soft skills and dedication.
Help our students both technically and emotionally whenever the need arises.
Take special doubt clarification sessions or feedback sessions if required.
Infrastructure
State-of-the-art computer lab with AWS subscription.
Smart classrooms with projectors for live demos of concepts and working of AWS.
Video-conferencing enabled halls for webinars by world’s leading experts in AWS.
Sophisticated and staffed labs to help our students practice after classes.
Free High-speed Wi-Fi to help our students learn more from internet.
Placement care
Assured employment for all the students who had completed our training.
Dedicated team working tirelessly to help our students get placed immediately.
Help our students to prepare a top-quality resume.
Offer a lot of study materials for technical interviews.
Conduct mock tests and interviews to boost the confidence of our students.
Arrange campus-drives and direct interviews with the help of our Alumni.
There are also other advantages in choosing the Best AWS training in BTM, Marathahalli Bangalore such as
Various batch timings suitable for college students, freshers and working professionals.
Affordable fees structure with concessions and installment schemes for our students.
Simple, clear and reliable study materials to avoid confusion with class notes and ambiguity.
Access to numerous online resources about AWS and its services.
Special 1-to-1 training and Corporate training can be arranged if informed earlier.
Syllabus:
Amazon Web Services Course Syllabus
SECTION 1 : Linux Fundamentals
SECTION 2 : Installation and Initialization:
Installation, Package Selection
Anatomy of a Kick start File, Command line
Introduction to Bash Shell
System Initialization, Starting the Boot Process: GRUB.
SECTION 3 : Boot and Package Management:
Configuring services to run at boot,
Securing single-user mode (su login),
Shutting down and rebooting the system,
RPM Package Manager, Installing and Removing Software, Updating a Kernel RPM,
Yum Command set, Install packages by using yum.
Apt-get command set, Apt-cache package management
SECTION 4 : User Administration:
Understanding different types of groups and creation of groups
Creation of users in different groups
Understanding Passwd, Shadow Files
Understanding passwd aging
Creation of quotas for users, groups and file systems
Understanding users security files
The different commands for Monitoring the users
TROUBLESHOOTING
Automation of jobs – Cron , at
SECTION 5 : Run levels:
Understanding the different types of run-levels
Understanding different types of shutdown commands
Understanding run control scripts
Understanding the different types
SECTION 6 : Overview of the Service Protocols:
FTP
DHCP
DNS
Apache
Samba
LVM
SECTION 7 : AWS Sysops Administrator Certification
Cloud Computing
Introduction to Cloud Computing
Why Cloud Computing?
Benefits of Cloud Computing
Types of Cloud Computing
Public Cloud
Private Cloud
Hybrid Cloud
Community Cloud
Software as a Service
Platform as a Service
Horizontal vs vertical scaling
Cloud Computing Issues
Security
Costing Model
SECTION 8 : What is virtualization?
Virtualization and cloud computing
Types of virtualization
Virtualization terminologies
Hypervisor
Benefits
Vendors
SECTION 9 : AWS Platform
Introduction to AWS Elastic computing
Introduction to the AWS products
Regions and Availability Zones
Signing up for AWS
AWS Free usage tier
Introduction AWS management console
SECTION 10 : EC2 Instances
Understanding AMI
Launching your first AWS instance
On-demand Instance pricing
Reserved Instance pricing
Spot instance pricing
Setting up security
Security groups
Choosing & Creating a new AMI
Public and Private IP’s
Deploying a new instance from the created AMI
Key Pairs
Elastic IP’s
ELB(Elastic Load Balancer)
SECTION 11 : Load Balancing
Introduction to Scaling
Components and types of load balancing
SECTION 12 : Auto scaling
Get Started with Auto Scaling Using the Console
Maintain a Fixed Number of Running EC2 Instances
Dynamic Scaling
The lifecycle of auto scaling
Policies of auto scaling
SECTION 13 : EBS (Elastic Block Storage)
Create EBS volumes
Delete EBS Volumes
Attach and detach EBS volumes
Mounting and unmounting EBS volume
Creating and deleting snapshots
Creating volumes from snapshots S3(Simple Storage Service)
SECTION 14 : Storage in Cloud
S3 durability and redundancy
S3 Buckets
S3 Uploading Downloading
S3 Permissions
S3 Object Versioning
S3 Lifecycle Policies
Storage Gateway
Import Export
S3 Transfer Acceleration
Glacier storage
SECTION 15 : Cloud Front
Use of cloud front
Creating a cloud front distribution
Hosting a website of cloud front distribution
Implementing restrictions
Configuring origins and behaviors
SECTION 16 : Route53
Creating zones
Hosting a website
Understanding routing policies
Weighted simple and failover policies
SECTION 17 : Identity Access Management (IAM)
Creating Users and Groups
Applying policies
Password Policy
Roles
SECTION 18 : AWS Security Management
Security Practices for Cloud Deployment
AWS Responsibilities and Securities
Cloud Trail
Trust advisor
SECTION 19 : Amazon Virtual Private Cloud (VPC)
Introduction to Amazon Virtual Private Cloud (VPC)
VPC Advantages
Default and Non-default VPC
Components of VPC
Direct Connect
Describe, create, and manage Amazon Virtual Private Cloud
Amazon VPC, Private Subnet and Public Subnet
AWS Networking, Security Groups and Network ACLs
Configuration and management of VPN connectivity
Subnet and Subnet Mask
SECTION 20 : Relational Database Service (RDS)
Introduction to RDS
Different database services of AWS: Amazon RDS, Dynamo DB, Redshift etc.
Configuring the database
Configuring backups
Configuring the maintenance windows
Connecting to the database
SECTION 21 : Dynamo DB
Creating a dynamo dB
Configuring alarms
Adding data manually
SECTION 22 : Management Tools
Cloud watch dashboard
Configuring Monitoring services
Setting thresholds
Configuring actions
Creating a cloud watch alarm
Getting statistics for ec2 instances
Monitoring other AWS services
Configuring Notifications
Integrating cloud watch with Auto scaling
Cloud Trail
SECTION 24 : Application Services
What is SNS
Creating a topic
Create subscription
Subscribed to the subscription
SQS
SES
SECTION 25 : AWS Troubleshooting
Troubleshooting EC2 instance
Troubleshooting using Cloud watch
Troubleshooting using ELB
Troubleshooting by using Cloud trail
Troubleshooting by using Cloud front
SECTION 26 : AWS Architecture and Design
Backup and Disaster Recovery
How to manage Disaster Recovery and Backups
Best Practice for DR and Backups
AWS High availability Design
SECTION 27 : Troubleshooting and Price Calculator
AWS Best Practices (Cost +Security)
AWS Calculator & Consolidated Billing
SECTION 28 : Devops Fundamentals
An understanding of Devops and the modern Devops toolsets
The ability to automate all aspects of a modern code delivery and deployment pipeline using:
Source code management tools – CVS, Git
Build tools – Apache ant, Maven
Test automation tools – JUnit
Continuous Integration Tools – Jenkins, Team city
Configuration management tools – Chef, Puppet, Ansible
Monitoring tools – Nagios
Certification:
Amazon.com offers a variety of Certifications related to AWS. They are classified on the basis of role and level of expertise. Apart from them, there are two specialty certificates namely AWS certified Big Data and AWS certified Advanced Networking. The list of AWS related certificates is given below:
AWS certifications and their level of expertise
Solutions Architect (Professional, Associate)
DevOps Engineer (Professional)
Developer (Associate)
SysOps Administrator (Associate)
Cloud Practitioner (Foundational)
We will provide guidance on how to apply, prepare and clear the exam and obtain your certification. However, these certifications are not mandatory to get a job in AWS domain because you will get your joining letter in a company of your liking as soon as you had completed our AWS training.
Learning Outcomes:
After the completion of our AWS training, a ton of job opportunities will be opened to you in India and abroad. Some of the designations you can apply for, are listed below:
AWS Developer
AWS Cloud Architect
Cloud Solution Architect – AWS
AWS Engineer
AWS Administrators
There are also other career choices available such as promotions, switching the job to a MNC and even teaching AWS at institutes or online platforms.
0 notes
Link
Amazon Web Services (AWS) Training Course Content SECTION 1: CLOUD COMPUTING INTRODUCTION History of Cloud Computing Concept of Client Server Computing Distributed Computing and it’s Challenges What is Cloud Computing Why Cloud Computing? Advantages of Cloud Computing SECTION 2: CLOUD COMPUTING DEPLOYMENT MODELS What is Private Cloud What is Public Cloud What is Hybrid Cloud SECTION 3: CLOUD DELIVERY/SERVICE MODELS What is Software as a Service (SaaS) What is Platform as a Service(PaaS) What is Infrastructure as a Service (IaaS) SECTION 4: BASICS OF LINUX Basic Linux Commands Basic Linux Administration SECTION 5: INTRODUCTION TO AWS SERVICES Amazon Elastic Compute Cloud(EC2) Amazon Simple Storage Service (S3) Elastic Block Storage (EBS) Elastic Load Balancing (ELB) Amazon Relational Database Service (RDS) Amazon DynamoDB Auto Scaling Amazon ElastiCache Identity and Access Management (IAM) Virtual Private Cloud (VPC) loud Formation Simple Email Services (SES) Simple Queue Services (SQS) Simple Notification Services (SNS) Server less computing (Lambda) Import/Export (Snowball) Code Commit Cloud Trail Elastic Beanstack Cloud Front Route-53 Glacier Key Management Service (KMS) SECTION 6: INTRODUCTION TO AWS RSubscription – AWS AWS Management Console SECTION 7: NEED OF ELASTIC COMPUTE CLOUD (EC2) Regions and Availability Zones Amazon Machine Images (AMI) Working with AMIs Choosing the AMI Deciding / Finding an AMI EC2 instances – Pricing model On-demand, Reserved, Scheduled, Spot instances, Dedicated Hosts Elastic Cloud Computing Reserved Instance Marketplace Importing and Exporting EC2 Instances SECTION 8: ELASTIC CLOUD COMPUTING INSTANCES Building an Elastic Cloud Computing Windows instance & Linux Instance Bootstrapping with user-data Security Set up Security with Key Pairs Working with Security Group Different IPs assigned to an Elastic Cloud Computing instance Assigning Elastic IPs Login/Access to EC2 instance Creating your own custom AMI, Registering & Granting access to AMI Placement groups EC2 instance protection Instance Roles Elastic Network Interfaces(ENIs) Resources and Tags Accessing Meta-Data & use cases. SECTION 9: ELASTIC BLOCK STORE (EBS) What is Elastic Block Store (EBS) EBS Volume Types What is EBS Encryption EBS Performance Instance Store volumes Instance Stores Available on Instance Types Instance Store Usage Scenarios Adding Instance Store Volumes to an AMI How to Optimize the Disk Performance How to Create and delete volumes How to Attach and detach volumes How to Mount and Unmount the attached volume How to Increase the volume size How to Create snapshots How to Create Volumes & AMIs from Snapshots. Cross-Region snapshot copy & use cases. SECTION 10: ELASTIC LOAD BALANCER (ELB) What is ELB How ELB Works Types of ELB How to Create load balancer What is Internal & External Load balancers Load balancing protocols What is Listener Configurations What is SSL Negotiation Configurations How to Attach & Detach Subnets How to create Security groups for the load balancer How to Configure health check for the load balancer How to Add multiple instances to the load balancer What is Custom Domain Names What is Cross-Zone Load Balancing What is DNS Failover Sticky Sessions How to perform Monitoring and Logging What is Connection Draining ELB traffic logging SECTION 11: AUTO SCALING Introduction to auto scaling Auto scaling components Advantages of auto scaling Launch configuration Prerequisites How to Create launch configuration. How to Create Auto Scaling Groups (ASG) How to Attach & Detach EC2 Instances in ASG How to configure auto scaling policies based on the Load on EC2 instances. How to Use Auto scaling with Elastic Load balancer (ELB). Removing the Instances Temporarily Suspend and Resume Process Shut Down – Auto Scaling Process Monitoring – Auto Scaling Instances Health Checks Getting Notifications When ASG Changes SECTION 12: SIMPLE STORAGE SERVICE (S3) How to Create and delete buckets How to Add objects to buckets Getting the objects Deleting the objects What is Notifications S3 storage and it’s usage How to Work with Permissions of S3, Access Control, Bucket policy Types of S3 Data encryption S3 Objects Enable Versioning and Logging S3 Lifecycle rules Accessing the Simple Storage Services with Tools How to Host a Static Website Cross-Origin – Resource Sharing Cross-region – replication AWS CloudTrail – Audit Logging SECTION 13: GLACIER STORAGE How to Create Vaults Working with Archives How to Access the Glacier vault using tools Backups using Glacier What is Job Operations What is Data Retrieval Policy Operations SECTION 14: IDENTITY AND ACCESS MANAGEMENT (IAM) How to Create user accounts How to Set up multi factor Authentication (MFA) IAM Roles IAM Groups How to Delegation of User Permissions How to Create of custom policies for delegation How to Use Identity Providers Accessing Cross-Account Account settings What is Credential Report Encryption – Key Management Service (KMS) SECTION 15: VIRTUAL PRIVATE CLOUD (VPC) Setting up the different types of networks in AWS How to Create custom VPC What is NACLs & Security Groups How to Create Internet Gateway(IGW) How to Connect to instances in the gateway What is Subnets, Route Tables & Association NAT Instances & NAT-Gateways DHCP Options Sets & DNS VPC Peering Overview of VPN and its components SECTION 16: ROUTE 53 How to Configure Amazon Route 53 as Your DNS Service How to Register a Domain Name and Configure Amazon Route 53 as the DNS Service DNS Service Migration for an Existing Domain to Amazon Route 53 How to Create a Sub domain that Uses Amazon Route 53 without Migrating the Parent Domain How to Work with Public Hosted Zones How to Work with Private Hosted Zones How to Work with Resource Record Sets Health Checks and DNS Failover Health Checks – Creation, Updation, and Deletion How to Transfer a Domain from a Different AWS Account or Registrar How to Use IAM to Control Access to Amazon Route 53 Resources SECTION 17: CLOUD WATCH Debugging cloud issues AWS Service Health Dashboard Monitoring Cloud watch Monitoring How to Get statistics for a specific EC2 instance How to Get aggregated statistics Metrics for other AWS Services and related namespaces How to Set up notifications SECTION 18: SIMPLE NOTIFICATION SERVICES (SNS) How to Create a topic How to Subscribe to topic via Email How to Set notification for EC2 instance changes SECTION 19: SIMPLE QUEUE SERVICE (SQS) How to Create a queue How to Send messages to the queue Sending Simple Notification Services to Simple Queue Services Retrieving messages from Simple Queue Services SECTION 20: SIMPLE EMAIL SERVICES (SES) How to Set up email domain Limits of Simple Email Services Test Email setup SECTION 21: ELASTIC BEANSTALK How to Create Web-App using Elastic Beanstalk How to Build a sample application using Beanstalk How to modify the properties of deployment. SECTION 22: RELATIONAL DATABASE SERVICE (RDS) What is DB Instances How to Select the DB-Engine How to Configure the Database Server How to Create the Database How to Set up automatic backups, snapshots & restores Authorizing access to the DB with RDS Security Groups DB Instance Replication Security: Using IAM to Manage Access to Amazon RDS Resources What is RDS Limits How to Manage MySql Database server DB Instance Life Cycle: How to Rename a DB Instance How to Delete or Reboot a DB Instance How to work with Storage Types How to Upgrade a DB Instance How to work with Option Groups & DB Parameter Groups How to work with Reserved DB Instances What is Monitoring What is Database Log Files SECTION 23: CLOUD FRONT How Cloud Front Delivers the Content How to Work with Distributions How to Work with Web Distributions How to Work with Objects Request and Response Behaviour How to Serve Private Content through Cloud Front Accessing Objects using HTTPS Connection How to Use IAM to Control Access to Cloud Front Resources How to Monitor Cloud Front Activity Using CloudWatch SECTION 24: ELASTICACHE Introduction to ElastiCache Terminology and Concepts How to take Backup and How to Restore What is Clusters Explanation ( Memcached and Redis ) Cloud Watch Metrics with ElastiCache How to Manage ElastiCache How to Manage Replication Groups DNS Names and Underlying IP SECTION 25: CLOUD FORMATION How to Build AWS infrastructure as a code Sample templates – Utilization JSON – Introduction SECTION 26: USE CASES Cloud Architecture and its Best Practices How to Optimize the Cost Security Considerations How to Calculate the Cost AWS CLI & use case to check instance, ELB, EBS states How to Build a simple web application in the AWS cloud Certification Track & guidance Contact Info: Know more about AWS [email protected] New # 30, Old # 16A, Third Main Road, Rajalakshmi Nagar, Velachery, Chennai (Opp. to MuruganKalyanaMandapam) BOOK A FREE DEMO +91 9884412301 | +91 9884312236
0 notes
Text
Building data lakes and implementing data retention policies with Amazon RDS snapshot export to Amazon S3
Amazon Relational Database Service (RDS) helps you easily create, operate, and scale a relational database in the cloud. In January 2020, AWS announced the ability to export snapshots from Amazon RDS for MySQL, Amazon RDS for PostgreSQL, Amazon RDS for MariaDB, Amazon Aurora PostgreSQL, and Amazon Aurora MySQL into Amazon S3 in Apache Parquet format. You can now make data available from production databases to downstream reporting and analytical applications without impacting your main transactional applications. Database administrators and data owners constantly receive requests to provide access to database tables from builders of business intelligence reports, machine learning developers, or enterprise dashboard creators. The challenge here is to provide access to data in a way that does not impact the business-critical applications that operate on the data. Creating read replicas is one solution, but you still have to maintain provisioned compute capacity to serve the downstream application requests. To make matters more complex, some reporting systems require a copy of data as of a previous timestamp. The only way to accomplish this previously was to create new RDS instances by restoring from a snapshot and making the new instance accessible to the reporting system. With the launch of Amazon RDS snapshot export to Amazon S3, you can simply create a process to export the requested tables from an appropriate snapshot to an S3 bucket and provide access to the Parquet files to the downstream applications. This post shows how to create an export file in Amazon S3 from an Amazon RDS snapshot, which you filter to specific tables, and how to query the dataset in Amazon Athena. Solution overview The following diagram shows how you can set up delivery streams for data to downstream applications without impacting the business-critical applications that perform read/write operations on the primary RDS instance. In this architecture, data is replicated into a read-only target (read replica) set up through the Amazon RDS console. A duplicate copy of the entire database is maintained here, which continuously runs provisioned database compute resources to serve the data to analytics and data lake build crawlers. The advantage of maintaining the extra resources this way is that it keeps the production database isolated from the load other than the critical applications themselves. With Amazon Aurora, the readers use the same clustered storage resources as the primary instance, but additional compute capacity is still provisioned to enable the read replica serve data for the analytics applications. There are multiple factors to consider when you use read replicas in this way: The entire database is duplicated in the read replica. You must take special care to make sure that downstream applications are authorized only for the part of the data they need to access. Applications only have access to live data because it is continuously duplicated. Read replicas can’t present data to readers that require them from a specific snapshot in time. Analytical queries may require index structures that might not be available in the read replica resulting in poor query performance and heavy resource usage. The following diagram is an alternative architecture in which you create a process to export either the whole database or parts of it by using already existing snapshots. This method doesn’t impact the production database or creates additional resources for a read replica. In the preceding use case, as an alternative to maintaining a read replica, the BI analytics application takes advantage of Athena to query the Apache Parquet dataset in an S3 bucket created through the snapshot export feature. The Parquet format is up to two times faster to export and up to six times less storage in Amazon S3 compared to text format. The AWS Glue crawlers that feed the data lakes access the files directly and don’t need to perform a query download and any subsequent formatting that may be required to feed data into the lake. To optimize the performance of your snapshot export, you should create your tables with auto-incrementing primary keys—especially for larger tables. It is generally a good design practice to avoid using composite keys for primary keys and clustered indexes, but in this scenario, it becomes especially important because the export process is much faster with auto-incrementing primary keys. Creating a snapshot export In the following use case, you use an existing snapshot of an Amazon RDS database and extract data from it to an S3 bucket by using the export feature. To accomplish this, you filter the export to a specific table. You then create and run an AWS Glue crawler, which extracts the schema from the export and creates a table. The advantage of this approach versus manually defining the table in Athena is that crawlers can infer schema definitions, which eliminates the effort to identify the columns and its data types. Lastly, you query the exported Parquet file using Athena. To create a snapshot export, complete the following steps: On the Amazon RDS console, choose Snapshots. You can run the export from automated backups, a DB snapshot you create manually, or snapshots you create in AWS Backup. Select the snapshot to export. From the Actions drop-down menu, choose Export to Amazon S3. For Export identifier, enter an identifier for the export. For Identifiers, specify the filtering conditions for the data to export; for example, a table in a schema. You always export the data in Apache Parquet format. For this post, you export a table that contains information about major league baseball players. For S3 bucket, choose the S3 bucket to which you want to export the data. As an optional step, for S3 prefix, specify a subfolder with a prefix. For IAM role, choose an IAM role that has access to create the export and write to the S3 bucket you specified earlier. Optionally, you can create a role with the required access. To protect the exported data, it is encrypted with an AWS KMS key specified. For Encryption, enter your key ARN. Choose Export to S3. If you are pre-creating the role and granting the access, complete the following steps: Create the role with the following CLI command: aws iam create-role --role-name S3rdsexportrole --assume-role-policy-document '{ "Version": "2012-10-17", "Statement": [ { "Effect": "Allow", "Principal": { "Service": "export.rds.amazonaws.com" }, "Action": "sts:AssumeRole" } ] }' Create a policy with the following code: aws iam create-policy --policy-name ExportPolicy --policy-document '{ "Version": "2012-10-17", "Statement": [ { "Effect": "Allow", "Action": [ "s3:ListBucket", "s3:GetBucketLocation" ], "Resource": [ "arn:aws:s3:::*" ] }, { "Effect": "Allow", "Action": [ "s3:PutObject*", "s3:GetObject*", "s3:DeleteObject*" ], "Resource": [ "arn:aws:s3:::your-s3-bucket", "arn:aws:s3:::your-s3-bucket/*" ] } ] }' Attach the policy to the role you created earlier. Use the policy-arn from the policy you created. See the following code: aws iam attach-role-policy --policy-arn your-policy-arn --role-name S3rdsexportrole Add the role as a key user for the KMS key you are using to encrypt the export. The export dashboard shows the new export process with the status Starting. Wait for the status to change to Available. After the export process is complete, create an AWS Glue crawler to crawl the exported data, extract the scheme from the export, and create a table. On the AWS Glue console, choose Crawlers. Choose Add crawler. The crawler requires the following parameters (at a minimum): Name Source type – Choose data stores because, for this use case, you need AWS Glue to scan the data and create a table. Data store – Choose Amazon S3 and provide the bucket name you chose for the Amazon RDS snapshot export. IAM role – Use this role to run the crawler process (the role is different from what you used to run the snapshot export). It should have access to run the crawler, S3 bucket with the export, and the KMS key you used to encrypt the export. Optionally, you can create a new role for the crawler to use. For information about tailoring policies to attach to a role, see AWS Glue Access Control Policy Examples. A schedule for the crawler – Configure the crawler to run on demand or at a specified frequency. Output – Define a database to host the tables (or create a new database) and any prefixes to use for table names. Run the crawler and wait for it to create the table. After the crawler is complete, it updates its status to Ready and displays a message with the number of tables it created or updated. You can also choose Logs in the crawler’s dashboard to view the Amazon CloudWatch Logs it wrote and make sure that all the steps in the process are complete. Querying the table To query the table, on the Athena console, choose the database you created earlier. The following screenshot shows the query output from the MLB player data. You can also use Athena to run analytical queries against the tables in Amazon RDS by using the Amazon RDS snapshots to Amazon S3 feature. For example, to run a query regarding the distribution of left-handed and right-handed pitchers across different teams, enter the following query: The following screenshot shows the query output. Pricing The Amazon RDS snapshot export to Amazon S3 feature incurs charges per GB of the snapshot size. For more information, see Amazon RDS for MySQL Pricing and choose Snapshot Export. Pricing is based on the full size of the snapshot, even if you only run a partial export (for a schema or a table). The other components of the process—AWS Glue and Athena—run in serverless mode, so you pay only for the actual compute capacity you use. The storage pricing component of the export is pay per use. For more information, see Amazon S3 pricing. You can optimize this cost by moving infrequently accessed data to Amazon S3 Glacier. Conclusion The ability to export data directly from snapshots is an excellent tool for data owners, administrators, and analysts to give access to data without impacting the performance and availability of production databases. You can make data available in a secure, reliable, and performant way without maintaining read replicas that require consistent compute and storage allocations. More importantly, you can recover the original database because you can access partial data and data from a previous time by using snapshots you already created. For more information about creating, querying, and scheduling snapshot exports, see Amazon RDS Snapshot Export to S3 on YouTube. About the Author Prasanth Kollarath is a Sr. Technical Account Manager with Amazon Web Services.
https://probdm.com/site/MjM5MDU
0 notes
Last Seen Blogs