#but closer to the horizontal axis and maybe middle to the vertical
Text
something like the jock-nerd, prep-goth graph but it’s for “short” idols and I put hongjoong and mj in opposite corners at the top of the graph.
#alison speaks?#for legal reasons this is a joke#i hope absolutely nobody’s sees this lmao#please don’t ask me what the ranges of the axes are#just trust me lmao#like they both have little gremlin energy but not the same little gremlin energy#jinjin arguably would go in the middle#or suga…..#woozi is bottom corner opposite of hongjoong#jimin is with the remain quadrant but not in the corner… actually maybe jimin middle#taehyun is on the axis right inbetween hongjoong and woozi#changbin is hongjoong quadrant#but closer to the horizontal axis and maybe middle to the vertical#idk more short idols unfortunately#idk how tall sunoo is relative to the rest of enha but if he’s ‘short’ he can have the bottom corner opposite of woozi i think#also also there’s a side point separate labeled scoups and that’s bc he has ‘short’ idol vibes but he isn’t#well ‘short’ vibes#who else is tiny#yeonjin i feel like is somewhere between mj and jimin but closer to the horizontal axis and origin#that’s all my knowledge#please don’t take this seriously
3 notes
·
View notes
Note
The dot?
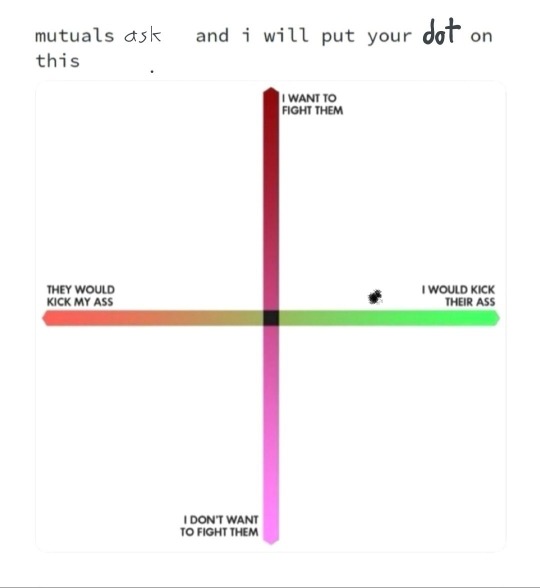
[ID: a chart with two axes. Captions at the top reading "mutuals ask and i will put your dot on this". The vertical axis is labelled "I want to fight them" to "I don't want to fight them". The horizontal axis is labelled "they would kick my ass" to "I would kick their ass". There is a dot placed closer to the “I would kick their ass” end, and in the middle of the axis. End ID]
I could be persuaded one way or the other on fighting you. If I was challenged I would do it. And maybe I’m just feeling too confident today but I think I’d be able to beat you too
1 note
·
View note
Text
Dark Chocolate and Sponge Cake (14)
Rolling along, in the past few days I’ve been continuing to chip away at the fabrication of various components on the top and bottom frameworks of this futon storage cabinet.
Some readers will likely recall from earlier posts that the panels in this cabinet are from Honduran Mahogany, aka ‘Genuine’ Mahogany, and came from some exceptionally wide stock. I had obtained a couple of boards which were 48″ wide, and from that material I was able to produce panels for this cabinet which are nearly entirely quartersawn. That’s quite unusual and, in my view, highly desirable. Quartersawn panels, in a wood as stable as mahogany is already, will hardly move at all with seasonal humidity shifts, and this direct practical benefit in that it enables me to keep the expansion gaps between panel and frame smaller than otherwise.
A lot of woodworkers who put panels into frames know to leave expansion gaps for the panel to move, however the tendency is to fall prey to the hobgoblin of making everything uniform, and thus the panels are fitted with the same gap all around. I no longer follow this approach, though I have done it in the past. The thing is, the panel is only going to swell and shrink appreciably in one axis, crosswise to the run of the grain – in the other direction the movement is so slight as to be considered a non-factor. I think the expansion gaps have primarily a functional purpose, with aesthetics decidedly a secondary concern. So, when I fit panels to frames, I make the gaps only on the two sides of the panel that require gaps, while making the gaps against the end grain of the panel very small.
OMG, the panel reveal is uneven! I should be running around and wailing, perhaps with some strong hand-wringing gestures, or kneeling in atonement maybe, but I’ve managed to sail on through without apparent consequence. The world goes on it seems, and I’m happy in the position I have staked out even if it is a concern which will animate but a few folks.
This ‘differential reveal’ approach has an added benefit with frame and panel units which are in a vertical position, as the panel will not have a tendency to drop down with movement, and, more importantly, the panel can also act akin to a post, in that the end grain of the panel can bear some load from the frame. thus, is the horizontal frame were to sag in the middle of a run, as it could potentially do with thinner frames especially, then it would have nowhere to go with a panel fitted close at those top and bottom positions. That said, I do this treatment for the gaps on horizontally oriented frame/panel units as well. Consider that the assembly of dovetailed battens and panel can act like a shear-resisting diaphragm, anchored to the frame via the batten’s end tenons, and having two frame members also in close contact to the panel via removal of gaps should slightly improve stiffness against racking in this direction a bit further. We can hope at least.
Of course, the above strategy also associates to the logic of rectangular panels in that one places the run of the grain in such a panel oriented along the long axis of the rectangle, and therefore the crossgrain width across the narrower dimension, which therefore makes the panel narrowest where it is most prone to movement, and this orientation therefore minimizes movement the most. I imagine every woodworker knows that, and I make the above sort of comment, which otherwise may be overly obvious, in light of the fact that there are many readers here who are not woodworkers.
With veneered work, it is sometimes the case that the apparent run of the grain, whether in a panel or in a frame member, is completely opposite to what would be correct/sensible in solid wood. It’s one of the reasons I look askance at veneered work – the loss of connection with what would be correct/wise use in the very material it ostensibly imitates, and I think this may lead to a loss of understanding among consumers that there is any actual consequence as to which direction grain runs in a piece. It treats something that is already masquerading as something it is not (solid wood) more like it is paint or wallpaper. I happen like wood in all it’s quirky and somewhat unpredictable ‘woodness’, and could care less about paint and wallpaper for the most part. I like things that are what they are, and are not pretending to be something they are not.
So, back to these panels. As they come out of freakishly wide and pretty much irreplaceable material, I must exercise considerable caution as I execute the various steps in fabrication pertaining to the panels. As the count of layout and cutting steps mounts upward, I grow increasingly cautious, if not outright terrified at times. One could say that this terror lessens with time and more projects, but it never goes away completely and isn’t it the case that a lot of mistakes happen when you make assumptions and plow blithely along? Anticipating the mistakes that one is likely to make and has made in the past is half the battle, and the other half seems to be anticipating/checking for things that are not mistakes as such, but can lead to disaster all the same, like a collet which is worn and allows a router bit to creep downwards in a cut, or a DRO which malfunctions during travel and gives an erroneous reading, for but a couple of examples. You can’t anticipate everything, so one is left to hope for luck when something unexpected occurs.
Just cutting a tongue and groove joint is a case in point. The panels have already been trenched for the sliding dovetailed battens, and trimmed to the required width and depth, and finish planed, so there is some work investment in there. With hand or power planing of a board comes some very slight variances in the thickness here and there, an amount which may vary up to 0.01″ (0.25mm) at times, though I aim to get it more like 0.005″, or better, from the final dimension. I use my shaper for cutting the edge rebates as I think it gives the best results.
If I were to cut the rebate on the board edge with the cutter situated below the panel, more or less buried in the table, I would sink the rebate into the surface which is against the shaper table, and thereby any variation in panel thickness transfers through to produce a tongue which also varies in thickness. Not what one might be looking for at any rate.
To work around this problem, the strategy I use is to place the cutter above the panel and cut the rebate on the upper surface of the panel instead. With the stock feeder doing its thing, the panel is kept evenly pressed to the surface and what results, hopefully, is a tongue which is consistent in thickness.
As mentioned above, I make the reveals different between panel ends and sides, and this requires two different fence settings on the shaper to complete the processing of the tongues, which are of different lengths, sides relative to ends. To preclude tear-out when exiting the cutter off of the end grain edges, I use a handsaw to trim a small corner off of each of the four corners of the board, to the approximate rebate depth. Then, I cut the end grain rebates first, at one fence setting (taking several test cuts with scrap ahead of time to dial the cut in), and then follow that with a second fence setting for the portions along the panel’s long edges:
The panels for the top and bottom of this cabinet happen to be identical, so I tackled them first. One reason I am very glad to have done some test cuts is I discovered that the tongue which was milled in those panels was thin enough to be able to slide under the lowest finger in the Aigner ‘integral’ fence, and the board would get pushed by the feeder into that space after the board left the registration of the infeed fence. Once I saw the issue, I recalled that I have an Aigner insert plug piece which goes into the bottom of the outfeed fence for just this very problem, and once that was in place, things went smoothly.
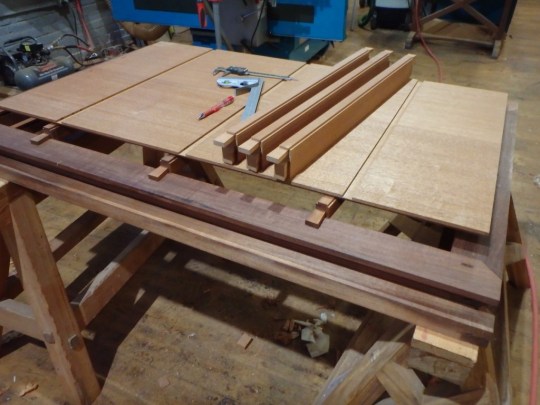
Here is the first two battens for the top panel sitting pretty, just dovetailed to the point at which they will begin to slide into their trenches, and all other joinery and finishing complete otherwise:
One more little detail: though it might otherwise seem logical to make a dovetail batten trench about half the thickness of the panel, in this case that would have made the trench depth the same dimension as the tongue on the panel, and if cut to that depth would therefore expose a portion of the dovetail batten to view from the other side right at the tongue, which might be visible at times. So I make the dovetail trench a bit less then half the thickness so that the upper surface of the panel tongue is left completely intact and will always be able to cover the batten dovetail regardless of panel movement.
A closer look at the end of the batten, showing both sliding dovetail male and crosswise half dovetail tenon:

Today I fabricated the battens for the bottom frame and floor panel of the cabinet. These battens are also used to tie the sill into the cabinet, so they are taller sections and incorporate an additional dovetail:
Also visible below the panel and battens are the two frames, the upper one being the top cabinet frame, and the lower being the bottom frame. Chocolate and spongecake – is it not the perfect combination?
Here’s a look at those three battens from one end:

These battens I fabricated out of quarter- to rift-sawn Honduran mahogany. Though the rest of the framework is all Cuban Mahogany, these three pieces are underneath the cabinet, surrounded by the sill, and cannot be viewed at all unless one turns the cabinet upside-down, so it made sense to use the Honduran Mahogany in what is a new role, historically perhaps: a secondary wood.
Another view:

Those are done save for chamfering, and seem to be very close to target numbers for all dimensions, which I find agreeable.
The next horizontal panel is the middle shelf in the cabinet which is a glue-up of two quart
0 notes
Last Seen Blogs

avalonglobal
Untitled

munozmarketing101
Muñoz Marketing

riyat845
Untitled

casepansy41
The Love of Aarup 809

bakerwing7
Без названия