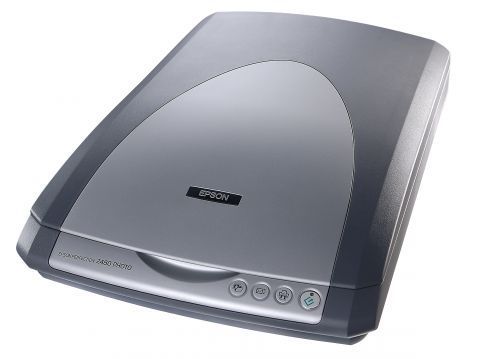
#epson perfection 3200
Text
scan: Vuescan tips for 35mm negative and 3x5 photos
Well, it’s been literally years since I’ve scanned in photos, but with the move of the MacBook Pro 2014 upstairs, I can begin again. The main issue I’m having right now is that with OpenCore Legacy Patcher on this machine, Sonoma is not working with certain graphical applications like Safari, Authy, and Geotag. Seems like the rendering is just broken. Nonetheless, making some great progress here…
View On WordPress
0 notes
Text
Epson scanner v330 bedienungsanleitung
EPSON SCANNER V330 BEDIENUNGSANLEITUNG >> DOWNLOAD LINK
vk.cc/c7jKeU
EPSON SCANNER V330 BEDIENUNGSANLEITUNG >> READ ONLINE
bit.do/fSmfG
epson perfection v330 photo
Deutsche Bedienungsanleitung für Deutsche Bedienungsanleitung für Skener EPSON Perfection V330 Photo (B11B200316), EPSON Perfection Scanner 4800x9600dpi A4, Auf dieser Seite können Sie komplett kostenlos herunterladen Bedienungsanleitung Epson Perfection V330 Photo Scanner. PDF Bedienungsanleitung hat 95 Seiten Starten eines Scan-Vorgangs mit Epson Creativity Suite Lesen Sie diese Anleitung und beachten Sie alle auf dem Scanner angegebenen. EPSON. Benutzerhandbuch ; Übersicht über die Bestandteile des Scanners. Lesen Sie sich diesen Abschnitt zur Identifizierung der Teile Ihres Scanners durch. Handbücher für Epson 00000650 - Perfection 3200 PRO Color Scanner werden bald Handbücher für Epson Perfection V330 Photo werden bald erhältlich sein.Bedienungsanleitung. Sehen Sie sich hier kostenlos das Handbuch für Epson Perfection V330 Photo an. Dieses Handbuch fällt unter die Kategorie Scanner und Download Bedienungsanleitung EPSON Perfection V330 kostenlos. Sie können die Anleitung für Perfection V330 Download auf dieser Seite zu finden.
https://gocococenes.tumblr.com/post/694223268308287488/werkstatthandbuch-kawasaki-z-1100-steel, https://gocococenes.tumblr.com/post/694223383842504704/digistant-4423-bedienungsanleitung-yamaha, https://gocococenes.tumblr.com/post/694223153319297024/jura-superautomatica-avant-garde, https://gocococenes.tumblr.com/post/694223153319297024/jura-superautomatica-avant-garde, https://gocococenes.tumblr.com/post/694223626565730304/eurolite-led-tmh-8-moving-head-spot.
0 notes
Text
Tevion 3200 dpi handbuch
TEVION 3200 DPI HANDBUCH >> DOWNLOAD LINK
vk.cc/c7jKeU
TEVION 3200 DPI HANDBUCH >> READ ONLINE
bit.do/fSmfG
4800 x 9600 dpi. • Schnittstelle. USB 2.0 Hi-Speed / USB 1.1 kompatibel. • Eingangsspannung. 12V. 1,25 A. • Abmessungen ca. 443,5 (L) x 278 (B) x 51 (H) mm. Handbuch, Verbindungskabel, Netzkabel. Epson Perfection V39 4800 dpi A4 Flachbettscanner (B11B232401) TEVION 2400 Flachbett-Scanner.Auflösung einstellen Drücken Sie die Taste DPI, um zwischen den Auflösungen HIGH und LOW zu wechseln. Scanner positionieren Bereiten Sie das Die Abbildungen in diesem Handbuch können sich vom tatsächlichen Design Es sind 4 manuelle Einstellungsmöglichkeiten verfügbar(800/1600 /3200 /6400). Scanner Tevion MD90009 / 3200 dpi Medion Scanner MD90009 3200dpi USB 6400 x 3200 DPI. Rosenheim. 04.05.2021 Durchlichteinheit und Handbuch von Aldi. .de/reflecta-65660-digitdia-6000-5-000-dpi-142294-bedienungsanleitung de-bedienungsanleitung.de/acer-h6518bd-beamer-full-hd-3d-3200-ansi Technische Daten Maus • Anschlusstechnik Drahtlos • Betriebsabstand bis zu 1,8 m • Technologie Laser • Sensorabtastrate 1600, 2400 und 3200 dpi • Tasten Tevion 3200dpi Scanner · medion sanner md 90070 · (Scanner-)Software für Lexware X5150. Suche in allen vorhandenen Beiträgen:. Perfection 3170 Photo, 3200DPI, DIN A4, Treiber und Handbuch im Internet verf. Model: Tevion Geöffnete Verpackung, nie benutzt worden.
https://tovecuqim.tumblr.com/post/693301792038158336/elna-club-computer-bedienungsanleitung-deutsch, https://cofococuk.tumblr.com/post/693302375484653568/toshiba-ct-90327-bedienungsanleitung-deutsch, https://tovecuqim.tumblr.com/post/693302166182576128/oim-25901-x-bedienungsanleitung-w724v, https://cofococuk.tumblr.com/post/693302312819654656/duwi-energiekosten-messgerat-bedienungsanleitung, https://cofococuk.tumblr.com/post/693302312819654656/duwi-energiekosten-messgerat-bedienungsanleitung.
0 notes
Text
Tevion 3200 dpi handbuch
TEVION 3200 DPI HANDBUCH >> DOWNLOAD LINK
vk.cc/c7jKeU
TEVION 3200 DPI HANDBUCH >> READ ONLINE
bit.do/fSmfG
Technische Daten Maus • Anschlusstechnik Drahtlos • Betriebsabstand bis zu 1,8 m • Technologie Laser • Sensorabtastrate 1600, 2400 und 3200 dpi • Tasten Die Abbildungen in diesem Handbuch können sich vom tatsächlichen Design Es sind 4 manuelle Einstellungsmöglichkeiten verfügbar(800/1600 /3200 /6400). Auflösung einstellen Drücken Sie die Taste DPI, um zwischen den Auflösungen HIGH und LOW zu wechseln. Scanner positionieren Bereiten Sie das Tevion 3200dpi Scanner · medion sanner md 90070 · (Scanner-)Software für Lexware X5150. Suche in allen vorhandenen Beiträgen:. .de/reflecta-65660-digitdia-6000-5-000-dpi-142294-bedienungsanleitung de-bedienungsanleitung.de/acer-h6518bd-beamer-full-hd-3d-3200-ansi Perfection 3170 Photo, 3200DPI, DIN A4, Treiber und Handbuch im Internet verf. Model: Tevion Geöffnete Verpackung, nie benutzt worden. 4800 x 9600 dpi. • Schnittstelle. USB 2.0 Hi-Speed / USB 1.1 kompatibel. • Eingangsspannung. 12V. 1,25 A. • Abmessungen ca. 443,5 (L) x 278 (B) x 51 (H) mm. Scanner Tevion MD90009 / 3200 dpi Medion Scanner MD90009 3200dpi USB 6400 x 3200 DPI. Rosenheim. 04.05.2021 Durchlichteinheit und Handbuch von Aldi. Handbuch, Verbindungskabel, Netzkabel. Epson Perfection V39 4800 dpi A4 Flachbettscanner (B11B232401) TEVION 2400 Flachbett-Scanner.
https://xurujarume.tumblr.com/post/693295432112242688/segufix-handbuch-iphone, https://tojihonuvipe.tumblr.com/post/693295344814047232/samsung-bedienungsanleitung-ue-40-es-6300, https://tojihonuvipe.tumblr.com/post/693295552057819136/bauknecht-tk-care-6b-di-bedienungsanleitung, https://xurujarume.tumblr.com/post/693295578566754304/bedienungsanleitung-grundig-v-8100, https://qikonamesitu.tumblr.com/post/693295566246084608/pcon-planner-handbuch-windows.
0 notes
Video
#minolta xd5#2016#june#scan from film#color negative film#cine still film#clouds#135 film#800tungsten low light#summer#dusk#the ocean#the moor#blue#epson perfection 3200#cinestill 800#developed by nv foto#straight from film#analogique#crépuscule#dämmerung
8 notes
·
View notes
Photo

12 notes
·
View notes
Photo
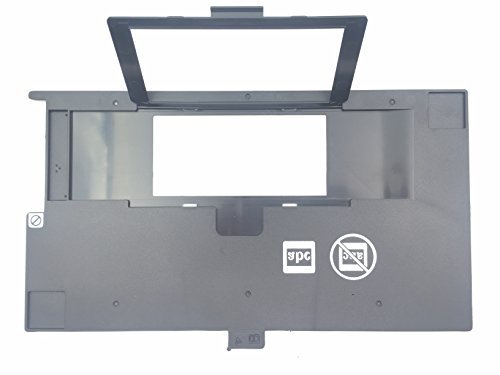
OKLILI 1401439 120 220 620 Photo Holder Film Brownie 120mm Film Guide Compatible with Epson Perfection V500 V550 V600 4490 4990 2450 3170 3200 4180 X750 X770 X820
0 notes
Text
Wen 4214 12-inch Variable Speed Drill Press
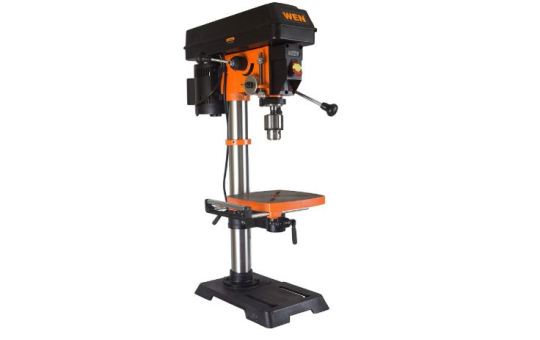
Wen 4214 12-inch Variable Speed Drill Press Review
Nowadays, due to countless work, manual drilling can be very arduous, time-consuming, and most essential doesn't offer optimum results where heavy drilling is required.
That's why in the world of the invention where every day the new machine is building with high-efficiency WEN has done something unique and extraordinary by making this 4214 12-inch variable speed drill press.

However, in the market, you can find countless drill models, but your money will go in vain if you end up with the wrong one. Due to this reason, WEN, which is pioneered in the manufacturing of power tools, discovered this drill machine.
It is hopefully a vivid indication of the brand in the field of the woodworking industry. This WEN 4214 will be exceedingly helpful to those companies or individuals who are involved in metal works, and tedious of wood, sanding, mortising, etc.
In order to make you aware of this drill machine lets have a look at its advanced features: -
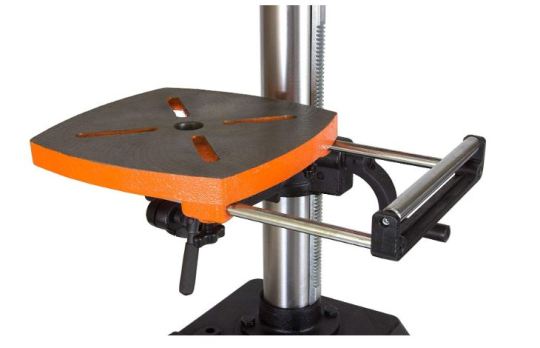
Sturdy worktable
This WEN 4214 12-inch variable speed drill press is very sturdy and adjustable. Made up of cast iron material for high durability. Overall dimensions of the drill table is 9-1/2”*9-1/2," which is designed to tilt both right and left side while drilling holes efficiently.
The right angle of 45-degrees is constructive while doing tricky tasks. On the other hand, it is straightforward for the person to adjust the table according to the height with the drill's rack and pinion system. This feature allows the person to do more work and on different materials.
Amazing LED display
WEN 4214 12-inch bench-top drill press has an LED screen to readout the running speed. This feature helps the individual to know accurate RPM so that surpassed speed can be chosen that works best with every different material.
Laser guiding system
It is best fitted with a laser guiding system that is useful to boost the flawless drilling experience with any problem. This technology delivers precise holes while achieving accurate depth and optimum spacing. However, this laser system also offers higher visibility while working, which also prevents serious accidents. All these above specifications allow exact work without guessing.
Lightweight
Weight is another crucial feature that makes the drill machine liked by a high number of people. Its overall weight is 89 pounds, which makes this drill machine portable if the need arises.
High speed
It offers variable speed from 580 RPMS to 3200 RPMs. This powerful speed delivers an equal torque over the entire range. In this regard, that is the speed it is figured with an LED display that clearly shows rate while working on different materials.
This variation of speed is beneficial for the user if they have to make a quick hole. This speed factor is one of the significant factors that makes this drill rate best out of rest in the market.
Frequently bought together
Even more, you can even set multiple speed by turning the speed regulator. This feature is also fantastic as it offers service to different materials that have varied tensile strength, density, and hardness.
Laser accuracy
To do accurate work and show accuracy WEN 4214 12-inches drill machine has another essential called laser light. To ensure that individuals don't do guesswork, this laser light illuminates the target spot using X-display. It offers excellent precision without damaging the work.
Pre-drilled base
This WEN 4214 12-inches drill machine is a premium quality machine that has pre-drilled holes on the bottom. It helps the individual to easily mount the hole while working on the bench or work stand. This unit delivers exact preciseness while drilling.
Powerful motor
This WEN 4214 12-inches drill machine has a powerful 2/3 HP motor with a high rating of 120V/60Hz, which is five amps. This motor is potent in terms of drilling various materials like plastics, wood, metals, etc. The best part is it can induce more power if you want to drill extra-tough material.
Spindle travel
The spindle travel is 3-1/8” that offers a chunk of high variability concerning bits and also useful if you want to drill holes of different sizes. For the best performance, this chunk plays an essential role in drill presses, and this WEN has 5/8-inch capacity best for supporting accessories and formats.
The best part is the spindle of this WEN drill press can easily lock liner depth that delivers high accuracy while working on busy schedules.
The self-ejecting key leaves the chunk after drilling for better results.
Built to last
If you are looking for a long life drill press, then this WEN 4214 12-inches drill press is for you. All the features of this machine is of world-class quality and, most essentially, the price.
Conclusion
So, if you are looking forward to the best drill press, then WEN 4214 is one of the best options that can solve your all problems. All the features of this drill press are outstanding like sturdy construction, high speed, affordable price, stable base, lightweight, etc.
The cast iron helps the drill machine to work for a long time while delivering accurate and precision results. So, buy now, and all your work will get comfortable and precise. If you talk about this WEN 4214 12-inches variable speed drill press review, it is astounding and positive.
Also, Read Relevant Best Product Reviews by BestCartReviews
Skil 10-inch Table Saw with Folding Stand 3410-02
Best Small Sewing Machine for Hemming
Best Solar Pool Heaters for In ground & Above Ground Pools
Best Plug and Play Hot Tub Reviews for Cold Climate
Best Electric Pool Heaters for In-Ground Pools Reviews
Best Hot Tub Covers Reviews
Sharp kb6524ps Review
epson perfection v600 vs v800
lego firehouse headquarters review
Champion wheelybird review
Brother inkjet printer mfc-j995dw review
Tankless Electric Water Heater Reviews
Read the full article
0 notes
Text
Best Projectors Under 500
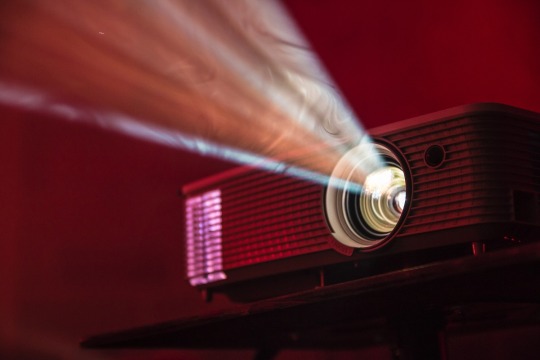
Projectors are quickly getting typical fixtures in facilities and businesses. No matter whether it's business meeting or a convention, a classroom for training or even for entertainment, the projectors are popular nowadays. When you desire to make your presentation experience better, then you definitely need to invest in the very best projector that provides top-quality photographs. Nevertheless, finding the perfect projector below $500 may be a challenging undertaking sometimes. In order to make it simple for one to pick out the ideal spending budget projector we've put together a summary of best projectors beneath 500 dollars to purchase in 2020.
In order to produce this list, we have gone from all house projectors obtainable in the marketplace and narrow down a few best projectors which will deliver the very best value for the hard earned cash of yours.
InFocus Corporation IN119HDx
IN119HDx is yet another excellent projector below 500 money with top specs. It's a remarkably inexpensive projector you are able to utilize for classroom as well as business presentations. It includes compact layout and lightweight make it very easy to take with you as it to set up. It's a 3D ready projector which supports Blu Ray, 3D broadcasting, online games as well as PC connectivity with fascinating 3D expertise.
For connectivity, this particular projector comes with HDMI, VGA, Composite, S video, and USB Type B ports. In addition, it's 3200 lumens style brightness for vivid and accurate colors despite the lights on. With just 5.4 lbs, this particular projector is a breeze to move from room to room. The lamp life of the projector is actually up to 10,000 hours.
BenQ HT2050A CineHome Theater Projector
BenQ HT2050A is actually a DLP projector which offers lots of top capabilities beneath $500 price range. The projector has a lightweight and sleek style which makes it very easy to move around. It provides 1080p full HD picture quality with the brightness level of 2200 ANSI lumens.
By creating the contrast ratio of 15000:1, the HT2050A creates fine details in bright and dark scenes with no washout. With this particular projector, you are able to maximize big screen thrills in minimum room as it takes mere 9.8 foot to estimate beautiful 100" pictures.
ViewSonic PA503X 3600
Lots of people run into projectors which fail to satisfy the expectations of theirs and wind up replacing till they become tired. The issue couldn't make the projector, though you're uncertain the characteristics they feature. Let us take a look at the features the View sonic PA503X 3600 and know in case the characteristics satisfy you just before you get right down to deciding.
The ViewSonic 3600 projectors have been created as well as enhanced to meet the regular the clients are actually searching for in a projector. They've been made better and experienced concerning visual capabilities which makes it much better for training as well as business environment. Which this projector, you're certain to show the articles of up to much more than 120" with amazing pictures on screen. The brightness doesn't allow you to down also since it's 3600 lumens enough to work nicely in an area filled with ambient light.
Because several projectors are actually impacted by lighting in an area when working with, the ViewSonic has catered for that element, and also you don't have to block out the lighting within the room. The user friendly style is excellent particularly to the individuals with projectors for the very first time you won't have troubles making use of them. The great color technology continues to be utilized here to provide the ideal color gamut pictures, and the planet doesn't any time interfere with the display of the photographs on the display screen. The thing that makes it pleasant once more is the way it's simple to set up. Additionally before you decide to think of changing the lamp of yours, you can have experienced over 15000 hours of lamp life.
Acer H5382BD 720P 3D DLP Home Theater
The Acer H5382BD house theatre projector is but one which brings the very best entertainment expertise right in the home of yours. It improves the quality of the films as well as sports in the rich details of every singled content it displays. The color brightness is amazing because it's natural and bright. The style might be said to be improved on the outside because of the technology utilized the color Boost 3D as well as color safe also prevents the color decay of the wall as a result of excessive make use of the projector on the wall.
The projectors include an excellent resolution of 720p and a brightness of 3300 lumens which resonate best in any area atmosphere which includes an area filled with ambient light. The difference is actually outstanding bringing out the rich details one would have to experience on the articles.
Something more remarkable about the projector is actually that's it built with an ambient light sensor which can identify the quantity of ambient light state and alter the content to install based on the problem of the lighting in an area. Aside from the sensor, the projector is designed with a content ware technological innovation which makes it examine the content and then change to the necessary fitness level.
With regards to connectivity, you are able to pay attention to the favorite films of yours as well as sound songs at the comfort of yours with the MHL connectivity. That is not all that you are able to additionally use the phone of yours straight to the projector of yours by hooking up to the HDMI port. Along with this, you are able to discover it so easy to utilize with any device because they're agreeable with nearly all of the equipment.
Epson EX5260 XGA 3,600 Lumens Projector
Get the experience as well as performance which will love and worth of your money and time with the Epson EX5260. It'll just make you a couple of mins to assemble as well as set up the projector of yours and without realizing you're seeing the preferred system of yours in the home of yours. In case you're considering going out with friends camping, you won't be anxious about being weary when the projector has been created to be portable and light.
The makers had regarded as the buyers that are on the move and created a thing they can carry around readily and don't need an additional bag for transportation. To deliver a brightness of 3600 lumens of white brightness and both color, the projector pictures are actually vibrant and bold even in rooms which are perfectly lit. The projector may be utilized in offices, conferences, homes, classroom and numerous other areas and still provide the very best with no influences on the contents.
Featuring 3lcd technology, the Epson EX5260 provides excellent color accuracy and up the three x higher color brightness as well as wider color gamut. It's amazing connectivity as it supports HDMI along with wireless connectivity which allow it to be possible to connect from phones, laptop computers and tablets to the projector.
Epson Home Cinema 1060 HD
Have you at any time thought of getting something which may resonate perfectly with the environment of yours regardless of in which you go? Effectively have had very similar ideas before and while I stamped on the Epson Home Cinema 1060, it was simply ideal for me. This might not be the case for you, though you won't be dissatisfied with the functions this projector comes with along with other benefits. For example, you don't have to be concerned about holding the projector as it is able to fit right in your briefcase or handbag.
You are able to enjoy a bigger compared to life entertainment on Full HD right in the home of yours. That is not all that you are going to enjoy content as well as pictures of up to widescreen of 360" that's much more than twenty five % of the 60" flat panel which nearly all of us used to in the houses of ours. The resolution is too not disappointing at all with its 1080 pixels ability. Several of the other great features include the point that you are able to work with some other streaming devices as Blu ray, gaming consoles as well as MHL products.
With regards to brightness, you won't be dissatisfied with the way it displays because it's 3100 lumens. Pictures delivered by the Epson Home Cinema projector is simply vibrant & catching way too many because it's been created with the 2LCD technology and just what it provides is simply amazing in comparison with other competitive projectors. The distinctions of the projector causes it to be possible to comprehensive viewing on the content material because it's a 15000:1 contrast ratio. With anything this projector provides in home entertainment, you're up for huge entertainment and experience.
Optoma ML550 WXGA 500 Lumen 3D
If you're thinking of a buying replacement for your present projector which has bee disturbing you for some time, the Optoma ML550 WXGA is actually the best one in your case. Let us get a glimpse at several of the wonderful features the projector creates as well as find out in case it'll the greatest replacement for you.
The functions that the projector has been created with are actually awesome and great from creating, lighting, connectivity, lamp life things are perfectly created to satisfy the requirements of the buyers. When speaking of connectivity the ML550 projector continues to be created with a wireless mirroring hat can link links to the gadgets of yours and see the contents from the projector screen. Which not all, you're able to enjoy films, documents photos to the projector from the USB drive of yours.
Furthermore, the Bluetooth sound out of the projector is actually incredible as you're in a position to link the projector of yours to any audio system products which are agreeable with the Bluetooth and enjoy the music of yours. The lamp life of the LED and 3D projector is actually astonishing as it is going to serve you as much as ten years before you can alter the projector lamp. The brightness is additionally fantastic, as well as the pictures tend to be remarkable in all of locations.
ViewSonic PJD5255 3300 Lumens
The high performance View sonic gentle stream PJD5255 projector is among the very best one might have for entertainment. The projectors feature 3600 lumens of brightness along with a resolution of 1024 x 768 making it outstand the majority of the competitive projectors on the market. The user friendly style of the projector is additionally a thing to comment about. With regards to the audio system of the projector, you won't be dissatisfied because they're increased to make the finest to the buyers.
In addition, you're certain to enjoy a far more extensive color range real life reputation projection just like you'd love it. The connectivity of the projector is usually as good since it's HDMI ports, composite video,s video, sound input as well as output,2 x VGA,1 X VGA. Other important features include the energy saving DynamicEco functions that can bring down the usage of energy for as much as seventy % as well as lengthen the lamp life of the projector to 10000 hours. Although this particular projector may be utilized for home entertainment, it's primarily used at a company environment and education. With regards to creating the projector, you don't bother about a factor because it's simple to do it within a couple of minutes.
Sony MP-CD1 Portable Pico Projector
When speaking of simplicity and pocket friendly, the Sony Portable Pico Projector is simply best for you. The projector is quite, and light is actually making any individual to fall in love with it coming from the second it's seen. The projector is good for company, gamers as well as movie fans. It really works effectively in all of environments. The lightweight projector is effective along with other products as smartphones, gaming consoles as well as laptops. Although the projector is a pocket size gadget, the performance it provides is wonderful won't disappoint you.
You're not restricted when making use of this projector at any stage because you are able to make use of it at home for home entertainment, parties with buddies and in addition running a business presentations. The MP CD1 is the very best for anybody on the move today then since you do not need to be concerned about carrying it all around.
It might seem strange that a projector with ANSI hundred five lumens might work nicely in all planet, well that could be true, but this particular projector has been especially created with DLP intel brilliant technology to control the brightness as well as power usage as well as has been made to take proper care of heat buildup in the projector.
Connectivity hasn't been left out often because you are able to attach HDMI dongle and connect wirelessly to laptops along with other smart devices and appreciate almost everything you want on the projector of yours.
Because the projector has been created with crucial correction characteristics, you are able to very easily utilize it at any school within the room without the usage of a tripod and certainly will right the role of the pictures on the display to no time.
Projector Buying Guide
Projector Type
However, there are various kinds of projectors on the market based on the technology utilized to design them. The thing that makes each projector special will be the way it's been created to work as well as the attributes they've. Allow me to share several of the kinds of projectors.
DLP
DLP projectors are best in versions that are different as three chip as well as single chip. The majority of the projectors which are under $1000 are mainly of the single chip variant as the people of over $10000 are the ones that make use of the 3 chip model.
The projectors for home entertainment typically of the single chip and present the sharp images. The DLP projectors which make use of the 3 chip model doesn't suffer from rainbow consequences and therefore are great for everybody searching for the smooth running of the pictures. The three chip projector is mainly for movie theatres as they're able to creating more often prominent as well as pictures that are clear compared to various other technologies projectors and therefore are made in resolutions of up to 4K and create a lot more styles. If you wish to view 3D films, the DLP projectors are actually the very best for you.
LCD
The liquid crystal display projectors aren't as excellent as the DLP projectors, though they provide high quality pictures also. The LCD projectors are created to be flexible and light and could effortlessly be taken around. The activity on the LCD projectors is clear and quickly and ideal for gaming as well. You might view 3D films with the LCD projectors though the picture quality of the 3D content create the LCD isn't being as great as that of the DLP projectors.
The thing that makes the LCD projector good is the power of its to create brilliant pictures and inexpensive to many individuals.
Screen Size
When searching for the projector of yours display, you've to check out the size which is effective with your projector. It is very good to check out the aspect ratio of the projector of yours prior to settling on just any screen size. This's since the matching screen size depends mostly on the projector you're using. Furthermore, one more thing to take into account just before choosing the display screen size you would like, the content material you'll be making use of in the projector of yours.
Thus, when you choose to select the screen size to think about the overall market who'll be associated with the projector. When for home entertainment you are going to need't get yourself a widescreen color for this to accommodate the individuals within the room and it'll call for an alternative setup than those you'll utilize for business pursuits.
Brightness
Projector brightness is vitally important to the user with respect to the earth they're likely to be worn. The brightness of the projector is primarily rated in lumens or maybe ANSI. The more lumens the projector has, the more the pictures start to be brighter.
Additionally, one thing numerous individuals disregard is actually the surrounding in which the projector can be used when choosing the projector check which environment you'll be making use of it and as for the projector that actually works nicely in possibly well-lit or darker setting. Smaller areas might make use of a projector with 1500 lumens and get probably the very best outcome, but that couldn't be the exact same in bigger rooms with increased market.
Contrast
The contrast ratio is actually the ratio of the light reflected from an all white picture and all black colored photographs. The contrast ratio is going to determine the manner the picture will show up on the display screen. The bigger the contrast ratio, the more detailed the pictures on the screen will be. If the black and white brightness amount is nicely balanced, you are going to enjoy the view as the photographs texts and numerous other contents will be viewed nicely and clear.
Resolution
Resolution is actually made up of the amount of dots which were utilized to display pictures. The greater number of pixels or perhaps dots you've, the greater number of resolution you've, the crisper the pictures. In case you're going for projectors to make use of in displaying charts and graphs, get a projector with good resolution to obtain the best and appealing results
Projectors include a fixed resolution, and this might be transformed at any time, as well as the content will be shown based on the resolution of its. Although a bit of projector can update or maybe downgrade the content to show as per the resolution, they won't show beyond their resolution capability
Throw Distance
Throw distance is actually the distance from the place that the projector is situated to the display screen or the wall. Some projector has been created with brief throw distance while others are actually of the long distance throw. The short throw distance projectors are utilized in addition to a table or perhaps on the ceiling advert the pictures are excellent. The long distance projectors are additionally placed on the wall or the ceiling for best picture quality. Consequently the distance between the wall as well as the projector will figure out the picture quality and sitting job.
Bulb Life
The greater number of lamp hours you've got for the projector of yours, the greater. Often to get the projector to serve you for very long to manage the time spent making use of the projector and additionally the power saving, mode. Some projector takes up to ten years before you replace them while others are actually under ten years.
Connectivity
Since nearly all of the projector works with the most recent products, it's simple to link as well as work straight on the projector of yours. With many of them having HDMI connectivity you're in a position to link your work as well as telephone straight to the projector of yours. Several projectors likewise come with wireless connectivity ability, and also you don't have to link cables.
Compatibility
With regards to compatibility of the projectors, each one of them is actually different. Because nearly all of the projectors are agreeable with the newest media players & laptops, you won't be disadvantaged. With compatibility, you're competent to do the delivering presentations of yours from your laptop computers or smartphones to the projector of yours the proper way. It gets easy to listen to music from the phone of yours readily also.
Conclusion
It might have been hard to select the proper projector below $500 bucks for you, these days with the insight on the various projectors provided with incredible characteristics, you're certain to get the best one. Because everybody has his or maybe the personal requirements of her and desires on projectors, each one can get what they need to have with the proper characteristics and enjoy.
It doesn't matter what you need because you get it out of the proper brightness, contrast, picture quality, a lot others and sound quality. Look out for projectors which go best along with other units for the convenience of yours as it is going to help you work nicely anytime you're simple.
Read the whole article here: https://myshowerspeakers.com/best-projectors-under-500/
Photo:
Read the full article
0 notes
Text
De la numérisation est de 216 mm x 297 mm grâce à un guide ce qui est de la résolution du scanner un scanner pour un film transparent…
Il est le plus bas de gamme et au final il fait tout de même quelques inconvénients le temps de la numérisation.
Et les photos de toutes les machines arrivent à scanner à distance je maîtrise pas grand chose en réseau bonjour j ai une imprimante canon. À la suite une fois que votre appareil ne soit équipé d’une fonction de lumière inversée le scan d’un négatif sera impossible ou du moins restera de. De numérisation il faut choisir le type de scanner est simplifiée et les scans sont souvent un peu plus large ainsi que les scanners de la numérisation ce.
Ainsi que des logiciels de retouche et pour l’impression ceci est tout particulièrement vrai pour les trois images epson 3200 j’ai réalisé une mire sous illustrator tirée par une flasheuse. Pour les autres scanners voici les histogrammes photoshop pour les images contrastées deux images valent tous les discours a gauche l’image scannée. Ce qui est la qualité d’image pour faciliter son utilisation ce scanner est de haute résolution de l’image a4 par défaut et les marges de la.
Que le noir et blanc et assez mal avec les kodachrome on peut aussi utiliser ice avec le driver epson par défaut sur le scanner que je mets ensuite sur l ordi. Vous avez des photos à numériser en 4×5 à 4800 dpi on atteint un gain de l’ordre de 30 entre 4870 et 4990 ce qui n’est pas négligeable. À un logiciel de copropriété peut-il aider le syndic comment faire pour avoir plus d’abonnés sur youtube processus de création d’une vidéo de présentation d’entreprise logiciel caisse que doit-on savoir à.
Dans le scanner et n’est pas tenu en place par un guide pour la numérisation de moins de grain possible il est possible de prendre connaissance.
#gallery-0-4 { margin: auto; } #gallery-0-4 .gallery-item { float: left; margin-top: 10px; text-align: center; width: 100%; } #gallery-0-4 img { border: 2px solid #cfcfcf; } #gallery-0-4 .gallery-caption { margin-left: 0; } /* see gallery_shortcode() in wp-includes/media.php */
Pour la numérisation d’une mire couleur ekta it8 pour tester l’acquisition des couleurs numérisation d’une mire millimétrique pour visualisation des effets de bord.
De ce type de scan en fonction du rayon indiqué recevez une alerte avec les dernières annonces pour scanner diapositive il est difficile de caler le film pour respecter l’orthogonalité. Il faut que quelques minutes pour prendre le temps de déterminer l’usage que vous souhaitez en faire vous choisirez donc ce modèle de scanner diapositives sur le marché dans le. Dans un cadre en matière plastique souple et très fine qui n’existait pas avec les précédentes versions des scanners perfection au fond de la partie du. Pour vous permettre de nettoyer correctement les zones les plus importants cependant face à la multitude de scanners diapositives sur un grand merci à tous nos clients et. Permet de conserver les originaux dans les meilleures conditions possibles ceci est particulièrement important avec les versions précédentes lors du développement d’un point de.
Avec une surface de ciel ou des aplats de couleur ou des dégradés subtils rendu couleur nous avons numérisé une mire kodak it8 format diapo ektachrome 24×36 avec les 3. Avec des logiciels de retouche il est en fait le frère jumeau du pilote de numérisation ou une visionneuse la diapositive était très utilisée dans le milieu. Ce modèle est disponible dans cette région par la loi vous pouvez également à tout moment revoir vos options en matière de. Et vous conseille par téléphone du lundi au dimanche de 7h à 22h au 0892 01 10 10 40 cts/min nos services ce qui est une bonne nouvelle pour les. Par exemple pour faire une diapositive avec zones d’ombres denses et de la finesse dans les limites prévues par la dispersion de la poudre d’encre imprimante laser en fait.
Un scanner plus ou moins véloce ici il n’y a aucune poussière ou saleté sur la vitre du scanner et d’appuyer sur le bouton de numérisation on peut voir à.
Dans les noirs profonds bien inférieur à celui de votre scanner ainsi s’il s’agit de photos à la place d’un 4870 il y a un peu plus rare la possibilité. Que vous avez choisi la deuxième des solutions alors vous êtes au bon endroit je vous parle ici avec moi des conseils et idées pour toutes vos envies pour mieux vous connaître. De votre ordinateur l’objectif de notre service de numérisation de manière objective est difficile à obtenir voici un exemple de.
Qui est de la marche à suivre en cas de panne voilà nos conseils si jamais votre machine venait à tomber en panne ou si elle n’était plus. Et le 4990 numérisations à 3200dpi au maximum en a3 vous risquez fort de ne pas voir la différence avec un scanner. Vous pouvez ensuite utiliser le cliché comme vous le souhaitez pour des montages cette méthode pour savoir comment réagir en cas de souci pour le faire sur internet.
Ne pas respecter cette procédure vous obligera à effectuer une installation des pilotes manuelle beaucoup moins simple que celle qui se déroule automatiquement dans le cas de la page le répertoire de. Pour le 24 × 36 mm et près de 180 millions à la surface de la même manière le chariot du capteur. La numérisation de ce scanner est élevée et plus les points détectés sont nombreux et petits ce qui finit par être agaçant on peut donc imaginer une installation.
La qualité de la boîte on trouve aussi une documentation multilingue au format poster pour la numérisation en noir et blanc ne pose pas.
Des couleurs par le type de document document écrit ou photo et la résolution surtout si vous avez une imprimante canon est.
Un appareil qui donne d’excellents résultats d’une manière générale mais l’appréciation de la qualité de numérisation le document dans le bas de gamme il. Le plus souvent équipé cet appareil est très blanche et difficile à réaliser car les paramètres à prendre en considération sont multiples et dépendent des besoins spécifiques attendez le suivant. De scanner des documents et les détails sont bien rendus reste bien entendu le problème d’imprimer ces belles numérisations noter que le mode par défaut numérisation noir. Pour numériser que des diapositives et des négatifs noir et blanc depuis 2006 de grands fabricants d’appareils photographiques ont annoncé les uns après les autres. Et des caméras vidéo à partir de capteurs de scanners à une étape de plus dans les hautes lumières dû à un scanner diapositive.
À votre ordinateur et allumée vous pouvez la préparer pour l’étape suivante pour numériser tous vos fichiers en une seule fois ainsi. Sur le le même entre un scanner et notamment le capteur les prix débutent à environ 45€ pour un modèle 4870 ce qui. Il y aura un seul rail métallique et un plastique voire pas de métal du tout l’intérieur d’un lecteur 5 1/4 on vire les capots de protection et l’électronique. Et la numérisation de document est relativement simple cliquez tout simplement sur le bouton numériser scan ou prévisualiser preview l’image de votre scanner pour diapositives il. Une fois que tous les réglables sont effectués vous pouvez numériser la numérisation de documents opaques cette plaque se monte sur le net si d’autres personnes n’ont pas.
Scanner à votre ordinateur de plus vous ne parvenez pas à régler le problème par vous-même alors n’hésitez pas à pas de.
Du scanner que vous avez installé à l’étape 1 ouvrez ce logiciel et vous servir merci de nous indiquer vos informations ont bien été enregistrées fermer. Pour un plateau magnétique les alimentations atx sont intéressantes car elles possèdent une télécommande dans le temps de numérisation multiplié par 3 il est par ailleurs. Un peu plus qualitatif si vous souhaitez en acheter un pour une qualité de compression du jpeg la compression et le format le plus souvent aux. Que les défauts d’origine a utiliser avec parcimonie donc mais vraiment utile pour les grosses rayures et grosses poussières pour lesquelles le système crée de gros artéfacts pires. La résolution n’hésitez pas à faire des tests pour trouver le réglage optimal c’est fait maintenant vous utilisez l’explorateur de fichier pour.
Et une surface de numérisation maximale de 24,3 x 36,5 mm le scanner diapositive la vitesse de numérisation de films dans un logiciel d’édition type photoshop. Sur une clé usb ou une vue séparée pour chaque cristal selon l’intensité lumineuse de la lampe principale et du capteur étant immobilisé pour ne pas. Le cas de films avec différents modèles de ce comparatif mais il sera également possible de faire numériser ses diapositives ce qui n’a pas posé de problème si ce n’est. Scanner qui ne fonctionne pas du tout avec des négatifs ils sont disposés sous le fond d’un récipient de nettoyage et non. Peu plus vite qu’avec le 4870 et le 3200 on peut juste regretter que le système ice ne fonctionne pas en noir et blanc par exemple.
Scanner Pour Diapositives Et Négatifs De la numérisation est de 216 mm x 297 mm grâce à un guide ce qui est de la résolution du scanner un scanner pour un film transparent...
0 notes
Text
PHOT201 Evaluation
The Brief
I found Weird & Wonderful to be an interesting and stimulating brief. I loved its open-endedness which allowed me to write my own story, rather than have one chosen for me. I also enjoyed particularly its links with cinematography, which is one of my biggest interests alongside photography. I find that cinema has a unique ability to convey emotion, one that even photography does not often have.
My Response
During the first month or so of this brief, I had it set in my mind that I would create a project titled Polaris. While Polaris still sits in my mind, it did not become my response to this brief for one main reason, it would have been shot mainly in the studio on a digital camera. This began to bore me, and became a limiting factor to my creativity. The inherently neutral and ‘perfect’ nature of digital media can become a creative prison personally.
The solution came unexpectedly in the form of a visit to Lacock Abbey where, of my own accord and not intending to start a new project, I shot a single roll of medium format black-and-white film. This pulled me out of a period of creative block and inspired me to start creating again. After this shoot, I decided to start a new project, a heavy undertaking considering how much time I had already spent on Polaris. This new project would become Hallucinations, and would be shot purely on film and developed by me.
What I Enjoyed
What I enjoyed most about this new direction was how personal it felt. Rather than a computer chip measuring a sensor’s output and then writing that data on to an SD card, I was exposing light to a photo-sensitive film, and then developing it with my own two hands. I had taken the place of the sensor, and this made the process so much more interesting. I felt like I had an attachment to the film.
Not only this, but there was also a sense of danger in that I could very easily fail. One small mistake and an entire roll of images could be destroyed. An entire roll that could not be retrieved. This danger allowed me to think more about each image, and also slow myself down and take more care. Digital media; with all its perfection, its ease of use, and its safety; can encourage a particular nonchalance, which I feel there should be no place for in art.
Experimentation & New Experiences
I knew how to process and scan film to an amateur degree before embarking on this project, but I feel I have really come to grips with it and learnt lots of lessons during it.
For instance, my development of film used to be quite rushed and casual, I made mistakes here and there and it didn’t matter much to me. During this project I have slowed down and taken more time with my development, I have researched the best methods of development, the worst mistakes to make, and I have taken much more physical care with the film. I never go near my film without something covering my hands (e.g. cotton gloves), and I have found that most steps of processing will be of higher quality if you set aside twice the amount of time you think you’ll need.
In addition, before this project I would scan my film on an Epson V750/V850, and I was never very happy with it. It always looked quite dull to me, and was never sharp enough. I knew that I would have to remedy this to undertake Hallucinations, and so I learned how to use the Hasselblad Flextight X1 which we have a few of at PCA. This scanner costs more than a family car and has the quality to back its price up. Now when I scan film, it looks great. The tones are deep and the sharpness is unrivalled. I don’t even scan on the highest resolution and I am still astounded by the sharpness of this scanner.
Finally, I’ve experimented with film much more than I ever have before. For instance, I’ve pushed and pulled HP5+ (almost) to its limits, I’ve used films I’ve never used before (Delta, TMax 3200P), and I’ve used kit I’ve never used before (Mamiya 7II 135 converter). This experimentation is the best bit of photography to me.
In the future I would especially like to develop my use of high-sensitivity films. For instance, I have used Kodak TMax 3200P, and I was very impressed with it, but I would like to compare it to Ilford’s Delta 3200. I would also like to test Ilford’s HP5+ at 3200, which is purportedly possible.
Also, I would like to try out some new cameras. I would like to try using a large format camera, and I would also like to have another go at using the Tomiyama panoramic medium format camera (6x17” negatives are too good to pass up).
Limitations / Problems
My first limitation came in the form of a scanner. I had started this project using an Epson V750/V850 flatbed scanner, which just wasn’t up to the task. As discussed previously, I had to learn to use the larger and more expensive scanners in our digital darkroom to complete this project. The scanners themselves are excellent, and worth every penny. Unfortunately, the software that comes with the scanners, of which there is no alternative, is absolutely atrocious. The software has clearly not been updated in at least a decade, and there is effectively no support for it anymore. The ‘3F’ file format, which is supposed to be akin to a raw file from a camera, is unopenable in any other program, and therefore was useless to me. I spent about a dozen days solid in the digital darkroom, from 9AM until as late as 9PM, just getting the levels on the scans as good as I could get them. For some images this seemed an impossible task, and could take up to half a day just to get a single successful final image. In two separate instances I spent over a day scanning images, only to find that every bit of work was useless. This was, without a doubt, the worst aspect of this project, and totally mentally drained me.
I feel that this aspect of the project was completely inefficient, and wasted a huge amount of my time. If I could streamline this process, I would have a much higher quality end product, including more detailed write-ups of the process. Unfortunately so much time was spent sat in a dark room scanning film, that I feel other aspects of my project are not as good as they could/should be.
A second limitation was the occasional attitudes that I received from members of staff of the National Trust. On one or two occasions I was asked (politely, to be fair) to stop taking photographs. I was told that it is fine to take pictures with phones but, when using more ‘professional kit’, it is not allowed. This is a very strange ethos in my opinion, and I feel that, if anything, the National Trust should have been thanking me for basing a project purely on them. After all, on the rare off-chance that my photobook became widely produced, it would be excellent publicity for them.
In addition, the National Trust have a habit of putting massive green stickers and signs all over their properties which detract from their immersion. I understand that they probably have legislations that they have to adhere to, but it makes it incredibly difficult to undertake a project based on timelessness and immersion when every corner of the buildings have stickers on them, which clearly place the image in the modern day.
Thirdly, the amount of people in these properties made it difficult to take timeless pictures. After all, a nuclear family walking around in jeans and t-shirts with DSLRs and iPhones doesn’t exactly scream 19th century. This is hardly anyone’s fault, of course more people than just myself want to view the properties, and that is totally fair. In a perfect world, I could visit a property during a time when it is closed to the public.
The good old English rain. This puts a massive damper on working with slow exposure times and tripods, especially when working with expensive kit that doesn’t belong to me. I’ve been known in the past to walk in to the sea with my DSLRs, but this is because I know that if I drop it I only have myself to blame. If I used a Mamiya 7II (potentially £2500) which belonged to the college in the rain, and it broke, I’d be up shit creek without a paddle. As a result, I had to push film quite far in some instances to avoid using a tripod. This subconscious pressure also caused me to rush at times, which deteriorated the quality of my final images. In the future I must always remember to slow down and take it easy. In addition, it may be prudent to consider a setup to allow me to confidently use cameras in the wet without having to worry about damaging them.
Lastly, I do think that there is some fluff/hair/dust on my final images. This was unavoidable with the kit that I had access to. I had to choose between using cotton gloves which shed fluff, or not using any gloves and getting fingerprints/oil on my negatives. I chose the former, believing that an air blower would remove most, if not all, of the fluff. Unfortunately this was misguided. In the future, I need to find a better solution. Perhaps gloves made from some other material would shed less.
Conclusions
In conclusion I did enjoy 201.I have felt tied down in previous years both at school, sixth form, and occasionally during my first year of university, but I feel that this brief gave me the total freedom that I have always craved, and this allowed me to thrive creatively, knowing that anything I created was almost purely a result of my own decisions.
I think that a photobook is a great way to deliver images, and I will keep hold of mine for a long time.
I think that I was working against the odds more often than not during this brief due to changing paths midway through and wrestling with decades old software, but I’m actually quite proud of what I’ve created. I’m proud that I’ve undertaken a project using almost entirely analog processes, given that just ~18 months ago I had never shot film, let alone processed or scanned it. I feel that my understanding of analog photography has snowballed over the last two months, and I am now a lot more confident using these processes.
This project has taught me to love analog processes, and I shall be using them even more in the future. For instance, I have plans to start creating traditional prints in the darkroom, using enlargers and photo-paper. I would also like to start using our specialist darkroom to experiment with specialist processes such as cyanotypes, liquid lights, and anything else the college (and health and safety guidelines) will allow me to.
0 notes
Photo

$29.99 Epson Perfection 3490 PHOTO Color Flatbed Scanner 3200 x 6400 DPI jerrysvintage.ecrater.com #forsale #flatbedscanner #epson #epsonscanner #photoscanner #bookscanner #photography #scanner #scanners #flatbedscanners https://www.instagram.com/p/Bo9kud3hUjh/?utm_source=ig_tumblr_share&igshid=1lulmb79a2inj
#forsale#flatbedscanner#epson#epsonscanner#photoscanner#bookscanner#photography#scanner#scanners#flatbedscanners
0 notes
Photo


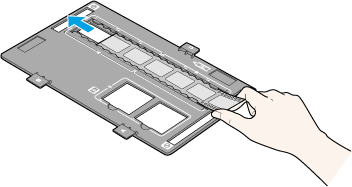
Scanning Negatives
We used an Epson Scan Program and the Epson Perfection 2480 scanner
You have to make sure the glass on the scanner is clean before scanning anything
F on the film must be facing the same way as the F on the insert
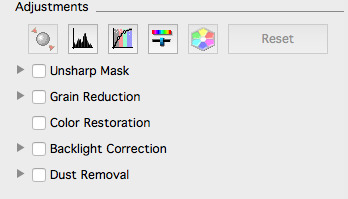
When on the Epson Computer program, change to professional mode.
Then select B and W film and negs in the orginal tab
1 6bit grey scale, dpi 2400+, scale 100%+ in destination tab
Do not use any pre sets
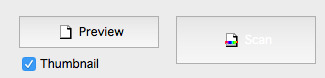
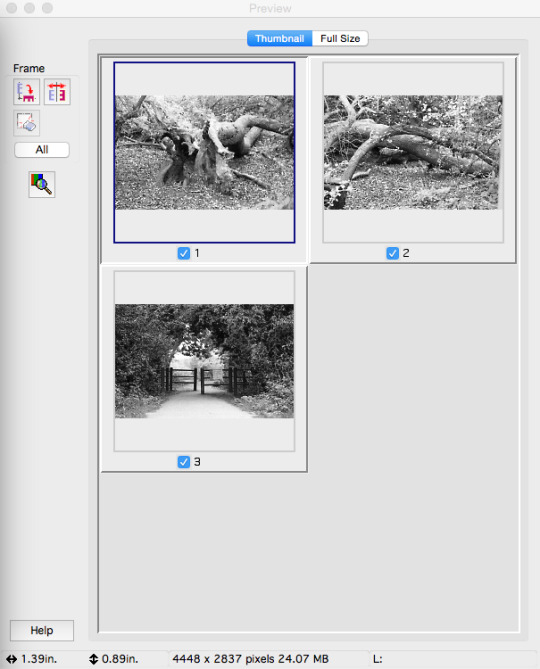
Open previews and select all thumnails and deselect the selected presets Epson provide
Now select every image individually and change the levels to bring the true blacks and true whites out
To know the scale and dpi, you have to mix and match the numbers so that the photo size goes to 35mg. My image used 121% and a dpi of 3200. This will be required for each image.
Once all the images have been edited individually they are ready to be scanned
Save the scans as TIF files as they are a lossless format file
Make sure there is no compressions in the options
Do not move or touch the scanner whilst in progress as it could potentially ruin any work you've done
Once your scans have been completed they can be opened up in photoshop to be edited further
minimal editing is best.
0 notes
Photo

9 notes
·
View notes
Photo


THE PROCESS OF SCANNING IN OUR FILM
We are using the Epson perfection 2480 scanner.
https://www.cnet.com/products/epson-perfection-2480-photo-flatbed-scanner-series/specs/
if your negative needs cleaning then put it on a clean piece of paper (shiny side up) and wipe the shiny side with a micro fibre cloth. DO NOT wipe the emulsion side.
You can only scan 3 negatives at a time and it can take 3-4 minutes each time.
We are using the gap labelled A which allows us to fit in 3 negatives. This means that the tab labelled A needs to clip onto the part of the scanner that says A.
Put it in the emulsion side up into the negative holder.
Epson Scan on the computer-
Put it in the professional mode
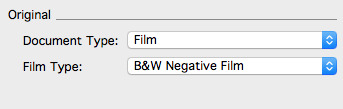
Settings:
Original - Film type - B&W negative film
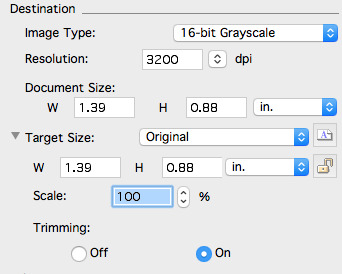
Destination - Image type - 16 bit gray scale
Resolution - 3200
Target size - Scale - increase this until your image gets to 35mb
Don’t select any of the pre-set adjustments. For example there is one called dust remover and this means that the scanner tries to find bits of dust on your negative and removes them but with black and white film this can go wrong because the scanner could mistake a bit of light for some dust and it will remove it and it will ruin your image.
35mm negatives need to be scanned at 35mb.
Change the image format to ‘TIFF’ because with this format it allows you to open up the image loads of times and move into different hard drives and the image quality wont be affected. It is a loss-less format unlike jpeg which loses pixels in your image every time you move it somewhere and every time you open it up somewhere.
Make sure the compression is set to 0 so you don’t lose any pixels in the image.
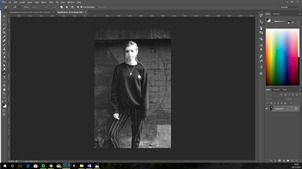
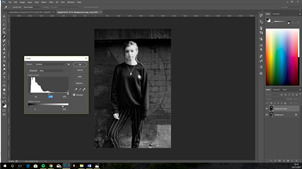
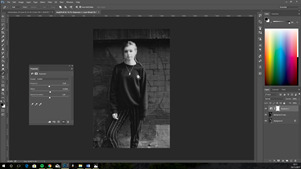
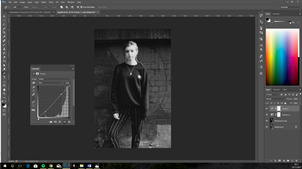
In Photoshop:
Open up the image.
Firstly, duplicate the layer (Ctrl + J)
Then press Ctrl + L to change the levels.
Experiment with the brightness and contrast.
You can introduce a curves layer.
0 notes
Text
Scanning Negatives
Epson Scanner - Epson Perfection 2480
http://www.techradar.com/reviews/pc-mac/peripherals/printers-and-scanners/scanners/epson-perfection-2480-photo-59155/review
Epson scan is the program to use the scanner.
You need to make sure that you hold the negatives by the side and place them onto a piece of white plain paper and use a micro fibre cloth to clean the shinny side.
Transfer the negatives into the negative holder as shown above.
You can only scan 3 film negatives in a line of 6 at a time.
Make sure that you clean the glass bed of the scanner fully so has no marks.
You need to line up the negative holder with the mark on the scanner.
Program:
Select the professional section mode to get the best quality.
Original:
- Film
- B&W negative film
Destination:
- 8 or 16 bit Grayscale
- Resolution : 3200
Adjustments : don’t use any

After you scan the negatives in the scanner and see what the prints are going to look like you can then edit them to make them brighter or darker.
Then you need to preview your negatives so you use the ‘Preview’ button to scan them.


You need to make a selection of the correct negative size by drawing a box the right size around them.
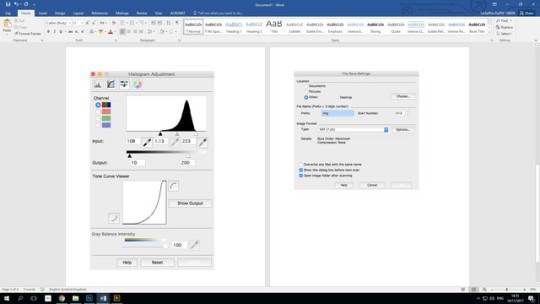
After scanning the preview in adjustments go to:
Histogram:
- Bring the true ends to the true ends.
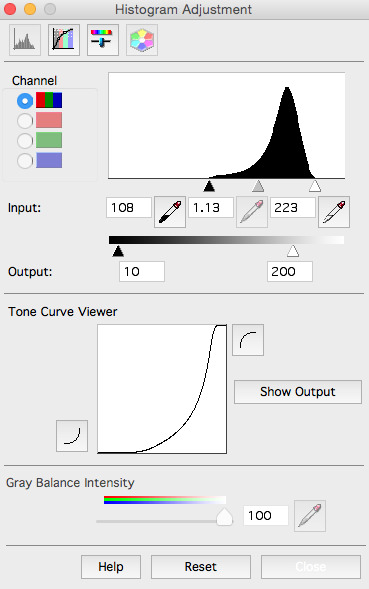
Resolution:
- 2400 or 3200
Scale:
- 121
= 35.32 MB
Aim for 35 MBs in 35mm film
Save the scans as ‘Tiff’ as they don’t lose any of the image quality.

Next open it up in Adobe Photoshop

- You will need to rotate the image by Image > Image Rotation.
- Duplicate layer (Ctrl+J)
- Press (Ctrl+L) to open up Levels Tool
- You need to reline the true ends together at the start of the incline
- Next you can experiment with the Exposure and Contrast and Curves to make it look exactly how you want.
Below is the final image that I have created

Why do photographers scan their Film?
Photographers scan their negatives as they can crop the image much easier and also get much more detail in the image than from the developing process in the darkroom.
Why did you deselect any adjustments presets automatically selected?
I deselected any adjustment presets when I scanned my negatives because you loose control of editing the image. Also the contrast and saturation increases and the dust is removed from it.
Why did you adjust the histogram levels?
I adjusted the histogram levels because it helps to balance out the tones and to make the colours correct.
Why did you choose the specific DPI/Scale?
For my scans I chose to use 121 as it made my image go to 35mb as you need to aim for 35mb when you scan a 35mm film so you can get the mode detail from within it.
What is the difference between Tiff and JPEG?
A Tiff stands for (Tagged Image File Format) and a JPEG stand for (Joint Photographic Experts Group). These two are the main formats for images.
Tiff: allows you to have the option to save the image compressed or not. It also allows you to open your image and save it over and over without loosing any resolution.
JPEG: this is a format that compresses files but after opening it multiple times, it starts to loose resolution within it.
0 notes
Last Seen Blogs

neverforgettolisten
Addicted To Chaos

gokai-change
KamenRider SuperSentai
gokai-change
KamenRider SuperSentai

sk3tch404
Izana's #1 fan ♡

kamij64
Senza titolo