#i found a tutorial for homemade stickers a while back
Text
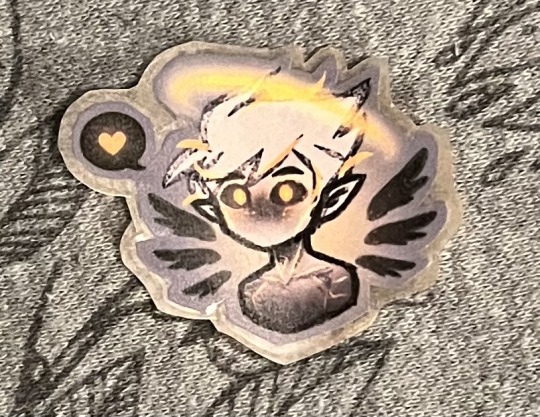
made my tiny alien dirk into a little sticker :3
#dirk strider#homestuck#my art#alien dirk#i found a tutorial for homemade stickers a while back#using parchment paper and packing tape#so i can make whatever stickers i want >:3#he’s so cute…#little guy
80 notes
·
View notes
Photo
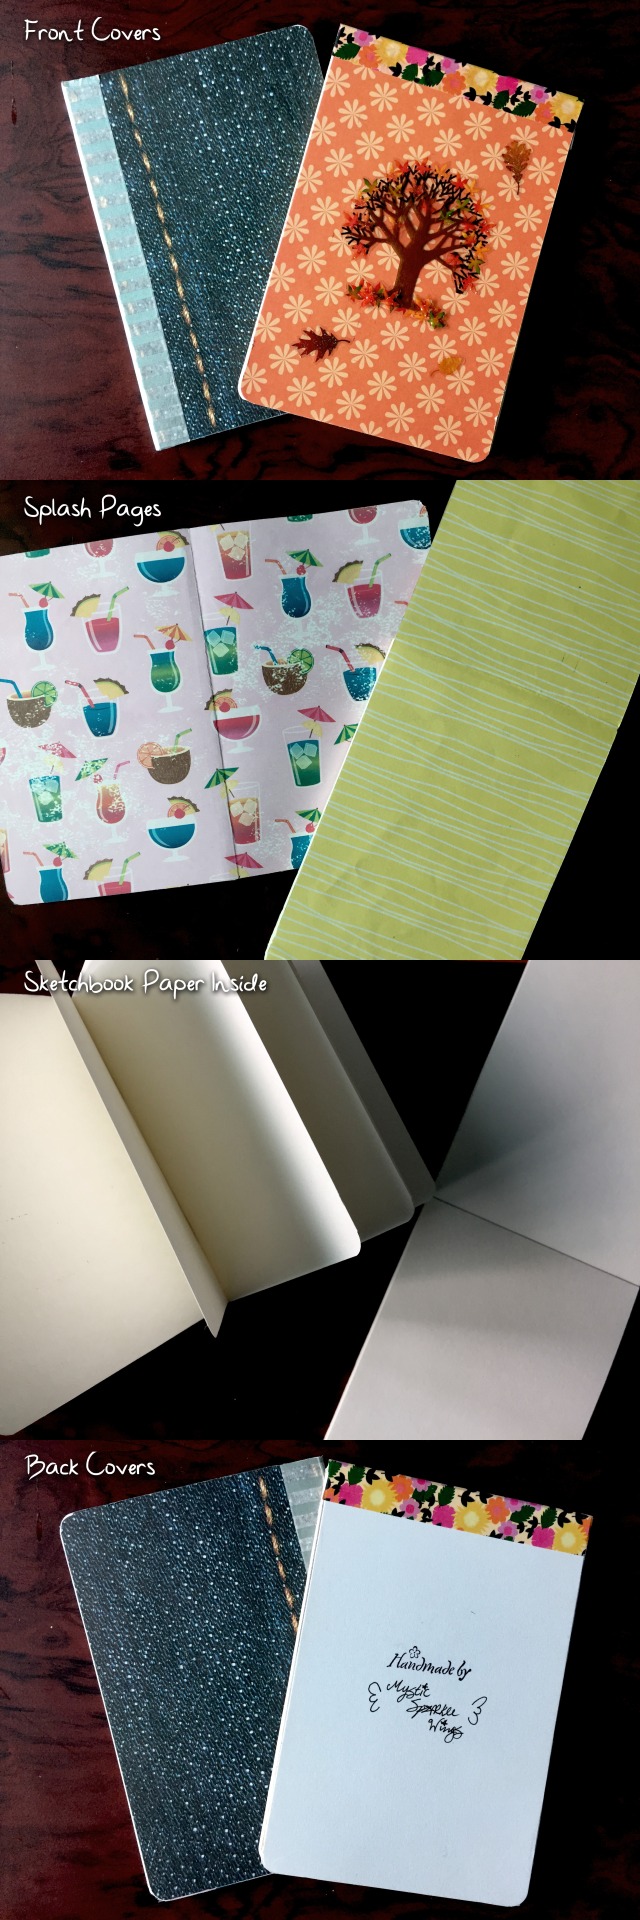
Homemade Mini Sketchbooks!
More of a crafty thing today, but hey at least I'm still taking a break from all the swatch chart stuff
I've watched a few different videos over the past few months talking about bookbinding and making your own custom sketchbooks and artwork storage/organizing, etc. And at some point it just kind of clicked that I wanted to give those sorts of things a try, just to see what I could do and make my book/paper organization life a little more interesting than just the store-bought stuff.
Not pictured here: I recently acquired a disc-bond planner/notebook to try out, since disc binding seems like a great hybrid system between a spiral-bound notebook and a binder for someone like me who prefers spiral-bound stuff but likes the option of taking pages in and out or moving them around. The only problem is disc binding stuff is kinda expensive, so it'll be a while before I've built up a small collection of supplies/options to pick from.
I also purchased some book rings and extra folders and stuff from DollarTree a while back and have since used a combination of those things and some old divider pages and pieces from old notebooks to put together a sort of makeshift custom binder/book that I keep all my swatches and reference pages for my various art supplies in. It's kinda neat, but not so fancy that I feel like showing off photos of it.
These little roughly 4"x6" sketchbooks were pretty much testers to see what I could do with what supplies I have. I made two to try out two different binding directions (side/right bound and top-bound) and two different kinds of glue: Elmer's CraftBond Tacky Glue, and Aleene's Original Tacky Glue. Neither is necessarily "preferred" glue for bookbinding (as you can get specific PVA glue just for bookbinding) but they dry flexible, are made for crafty/paper things, and one was on clearance for $1.97, the other came from DollarTree, so I figured I'd give them a shot before investing in more expensive glue.
I'll run down my process in a second, but I do just want to say the main thing I felt like I really needed a proper supply for/could have done better had the urge to finally make some books not struck me in the middle of the night was a press to hold my block of individual pages for the inside together while applying the glue. Traditionally, this is done with a fancy-looking contraption called a book press, but I don't have one of those and they are also surprisingly expensive. So my option was to stack a bunch of books together, and I admittedly didn't do as good of a job with that as I could have, but now I know better for next time. But because of this and the odd hours I was keeping, the pages aren't aligned super nicely, a couple are a little loose, and I did have one page fall out of the top-bound/orange cover book.
That said, I made these at roughly the same time, going over the same steps for both and working on one while I waited for the other to dry, etc.
I started with the covers by taking some metallic cardstock I have and cutting it down to the 4"x6" size I wanted, and then for the front and back covers on the blue book and the front cover on the orange book I grabbed some scrapbook paper I had and cut that down to size and used double-sided tape to attach the paper to the pieces of cardstock (yes, the blue one that looks like denim/jeans is actually paper and not fabric! I got a pad of paper like that from DollarTree because I thought it might come in handy, and it does look pretty cool for a book cover!). I purposely left the back cover on the orange book blank/as just the plain cardstock just to see how it looked.
Alternatively, I could've used just paper (which I thought would be too thin/easily messed up) or chipboard--that brownish cardboard stuff that makes up the back part of a lot of store-bought sketchbooks--for the covers, but A. I didn't have any individual pieces and B. I didn't feel like chopping up the back of any existing sketchbooks I had. Not for just these testers, anyway. I also could have used glue to attach the decorative paper, but gluing paper like that tends to make it warp/wrinkle/boil/bubble if you're not careful, and also once the glue is stuck down it is STUCK, and so I figured I'd have a little more room to breathe in getting the paper placement right with the tape.
Funnily enough, the tape ended up being way more forgiving than I thought, but I'll talk about that in a bit.
Once I had the covers decorated with the paper the way I wanted, I moved on to the most tedious/longest part of the process: The paper on the inside.
I recently picked up a cheap sketchbook with paper I'm not super-duper crazy about, and I had pretty much already decided that would be the paper I used for these little tester books. It's still usable, it's just not my more expensive favorite paper. And there's plenty of it, so I didn't mind "wasting" it on these books.
I ripped out 20 pages from the sketchbook, expecting to get two smaller pages for the books I was making out of each larger page, but I actually ended up getting three smaller pages out of each, and so instead of 20 pages for each of the minis, I ended up with 30. This was a good thing since it gives the books a bit more weight/thickness and made the binding steps a little easier as a result.
I stacked all of the pages for each book together and got one edge as even as possible--although I could've done better and gone through and lined up a few pages at a time to get them a little bit more flush together--and then very carefully placed the stack between some heavy books to hold them together and handle them still so I could apply the glue to bind the pages together.
I unscrewed the tops of each kind of glue and applied it to the spines/paper stacks with a brush. Each book got three coats of glue total, just to make sure things were nice and secure. (Or you know as secure as possible for homemade in the middle of the night)
While I was waiting for each coat of glue to dry, I took the covers and some more scrapbook paper and measured out the splash pages--just double the width of the cover so it can be folded over into two pages--to make the books feel a little fancier. (I'm not totally sure that's what they're called but that's what I'm calling them--I mean the interior pages between the book covers and the actual book pages). Then I used the double-sided tape again to attach the paper to the inside of each cover, and I found out by accident that while the double-sided tape is nice and sticky, it is actually repositionable! It doesn't totally rip up the paper if you try to unstick it! (Well, as long as you're kinda careful, anyway). And so I was able to reposition the splash pages until I felt like they were as straight/aligned as they were going to get.
And while I was still waiting just to make sure the glue was dry before moving on, I decided to add some stickers to the orange book cover just to jazz it up a little. The plain flower print was fine, but I felt like it needed something and I was probably never going to use the stickers for anything else (I'm a sticker collector/hoarder), so on the book they went!
By this time the blocks of paper were ready, and so I removed them from the stack of books and one at a time, pulled off a piece of wide washi tape for the spine of each and then very carefully aligned the covers to the blocks of paper and used my desk to help fold the tape around the spine as crisply as possible. (This step could have also been done on the splash pages and the covers attached afterward to hide the tape, but my tape is pretty so I'm okay with it being exposed).
Now, I could have left the books just like that, but I wanted to be just a little bit fancier and used a paper punch to round the exposed corners of the covers and pages. This added a LOT of polish to the final look since as I mentioned earlier my pages weren't aligned super evenly.
And just to be cheeky I did use a stamp and signed my name on the back cover of the orange book too. I'm honestly not sure which of the two I like better in the end--they both came out better than I was expected for my first tries!
Honestly, this is more of a time-consuming task than it is difficult or expensive (at least the way I did it, you could very easily make this a SUPER expensive thing based on the materials and equipment you use, but the absolutely essential stuff can all be purchased pretty cheaply; a lot of it even just from the dollar store for $1!) and so it was pretty fun, and the end result is really satisfying because, "oh, yeah, I made this book!" And you don't have to stick with a small size like I did--you can make full-size sketch/notebooks this way too! Or you can use these methods to just upgrade existing sketchbooks and stuff that you have to covers or sizes you like better.
I haven't quite decided what I'm going to attempt next, but I do want to play around with making more of my own books like this, and I'll likely post them here to share when I do.
Also, let me know if you guys would be interested in a more in-depth/picture/video tutorial of some kind for the process of how I made these and if there's enough interest I'll see what I can do!
Also I promise I'm going to respond to my correspondence soon I've just been really busy the past few weeks and haven't been able to sit down and give it my full attention--but I do read everything as it comes in, rest assured!
____
Artwork © me, MysticSparkleWings
____
Where to find me & my artwork:
My Website | Commission Info + Prices | Ko-Fi | dA Print Shop | RedBubble | Twitter | Tumblr | Instagram
0 notes
Last Seen Blogs

nhinguyen95
V.I.P SEVENTEEN'FAN ARMY IGOT7 BABY ⭐LIGHT

thatonefrustratedwriter
I seldom speak up, I pour my heart on paper

atomicwitchdreamer-blog-blo-blog
Senza titolo

wh0is-vera
ᯓ★ ˙ ̟🐇 !!

dumbgaybabylmao
Gone Too Far Cant Go Back