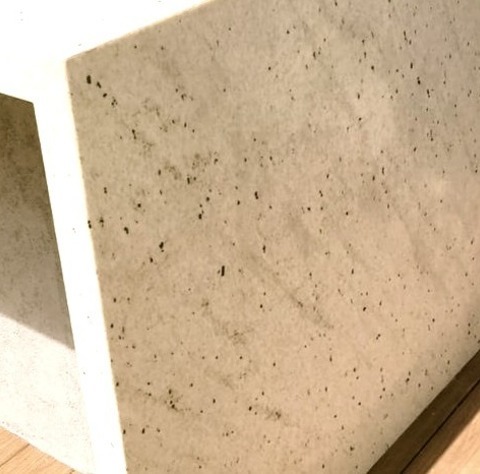
#mitered build up edge
Text
Contemporary Patio - Outdoor Kitchen

Example of a large trendy backyard patio kitchen design with decking and no cover
#granite countertops#granite waterfall#mitered build up edge#outdoor kitchen#outdoor kitchen countertops#pitaya leather granite
0 notes
Text
Contemporary Patio - Outdoor Kitchen

Example of a large trendy backyard patio kitchen design with decking and no cover
#granite countertops#granite waterfall#mitered build up edge#outdoor kitchen#outdoor kitchen countertops#pitaya leather granite
0 notes
Text
Contemporary Patio - Outdoor Kitchen

Example of a large trendy backyard patio kitchen design with decking and no cover
#granite countertops#granite waterfall#mitered build up edge#outdoor kitchen#outdoor kitchen countertops#pitaya leather granite
0 notes
Text
Contemporary Patio - Outdoor Kitchen

Example of a large trendy backyard patio kitchen design with decking and no cover
#granite countertops#granite waterfall#mitered build up edge#outdoor kitchen#outdoor kitchen countertops#pitaya leather granite
0 notes
Text
Contemporary Patio - Outdoor Kitchen

Example of a large trendy backyard patio kitchen design with decking and no cover
#granite countertops#granite waterfall#mitered build up edge#outdoor kitchen#outdoor kitchen countertops#pitaya leather granite
0 notes
Photo

Contemporary Patio - Outdoor Kitchen
Example of a large trendy backyard patio kitchen design with decking and no cover
#pitaya leather granite#outdoor kitchen#mitered build up edge#granite countertops#granite waterfall#outdoor kitchen countertops
0 notes
Photo
Outdoor Kitchen Outdoor Kitchen in New York
a sizable, modern image of a backyard patio kitchen with decking and no cover
#pitaya leather granite#outdoor kitchen countertops#outdoor kitchen#mitered build up edge#granite waterfall#granite countertops
0 notes
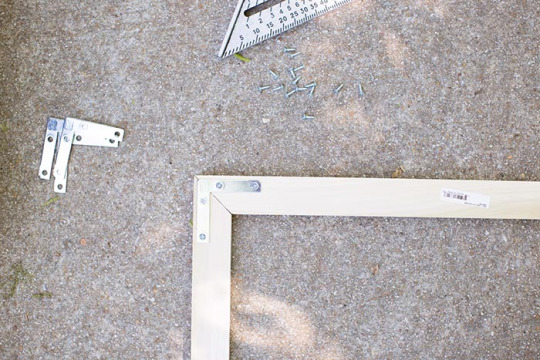
Text
DIY Large-scale Picture Frame

Project by Erica Loesing:
Tools + Materials
-Large print/photo/something pretty to frame (see tips below!)
-White illustration board (make sure it’s thick/dense enough to stand without waving)
-Acrylic sheet (such as Plexiglass, I used a 32 x 44 inch sheet)
-Spray mount
-Straightedge + utility knife
-4 wood boards (I chose 1/2” x 2” Poplar – you won’t want much narrower than this)
-Pencil
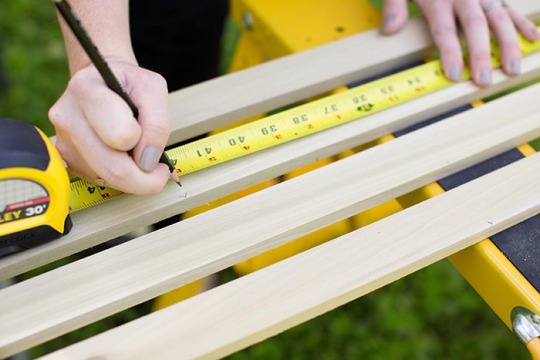
-Tape measure
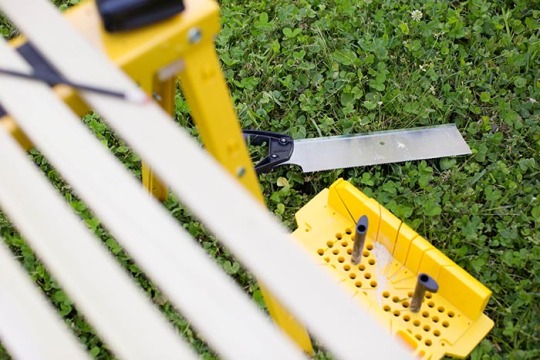
-Saw + miter box
-Fine sandpaper or sanding block
-4 corner braces (I used 1/2” x 2.5″), + tiny screws that won’t puncture the face of your wood frame
-Drill + Phillips bit (could use a manual Phillips screwdriver, too!)
-Square tool
-Wood glue (I like Elmer’s)
-Paint or stain (I used a black satin spray paint)
-Turn buttons (I used nylon)
-Large picture hook (you may need a hammer to attach this)
Notes
Somewhat of a secret is that most office store print shops (I used Staples) offer something called an “engineer print.” Large-scale prints for only a few dollars! So that’s what I did here. I had this super cute pear illustrated and then printed nice and big in a matter of hours for only a few dollars. (I have also seen people print photos using this process and have great results!) The paper is pretty thin and the print isn’t necessarily photo quality, but I think it works so great for this application and would totally recommend it if you’re mindful of your costs and feel it wouldn’t compete with the aesthetic of your project.
Now I want to mention a few constraints here. Of course there will be a maximum print size at your local print shop (most likely 36 x 48 inches). But the largest acrylic I could find locally was 33 x 44 inches. So I sized my print to be no larger than this, choosing 33 x 40 inches. And here are the reasons I chose acrylic over glass — while it does have more size restrictions (yet you can typically buy larger pieces of acrylic than glass at a basic hardware store), the acrylic is very lightweight (and I didn’t want to have to build a frame within my frame to support glass), you can cut it with a knife (and they’ll also cut it down for you in the store, typically for free!), and it won’t shatter. I just didn’t have the courage to handle such a large sheet of glass. The downsides are that it is, well, plastic and not glass, and I think it tends to have a bit more of a glare. I don’t love that you can tell it’s acrylic, but again, I was trying to be mindful of costs, time, and my low skill level. And honestly, I never notice it now that it’s hanging on the wall.
How-to
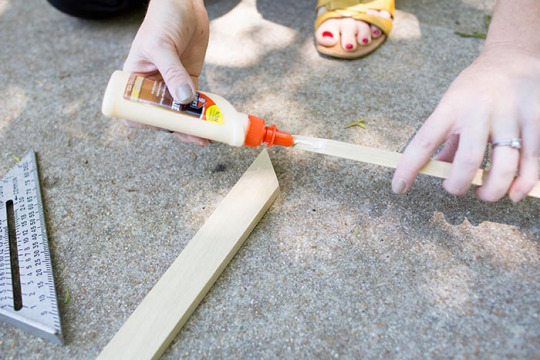
First, spray mount your print to a board. Since my print was on thin paper with a lot of negative space and you could sort of see through it, I used a white illustration board to back it. You want to use something that isn’t too thick (the thicker this backing is, the further from the wall your frame will rest), but also something dense enough that can stand on its own without waving or warping. This will be the backing of your frame. I first tried sandwiching everything together without mounting, but since my paper was so thin it looked terrible behind the glass (since it’s so large and gravity wants to pull it to the bottom). Also, if you are using something thin like I was, be extra careful for bubbles and other ugly errors when spray mounting. I may or may not have had to redo mine the first time around…
You can now trim the mounted print down to whatever size you’d like it to be, keeping in mind the size constraints of the acrylic. Measure your print. You want your acrylic to be about the same size as your mounted print. Again, you can have this cut exactly to size at your hardware store. Or, if you’re feeling up to it, acrylic sheets can be cut at home with a utility knife and a straightedge! You don’t even have to worry if your edge isn’t perfect because it will be hidden behind the frame.

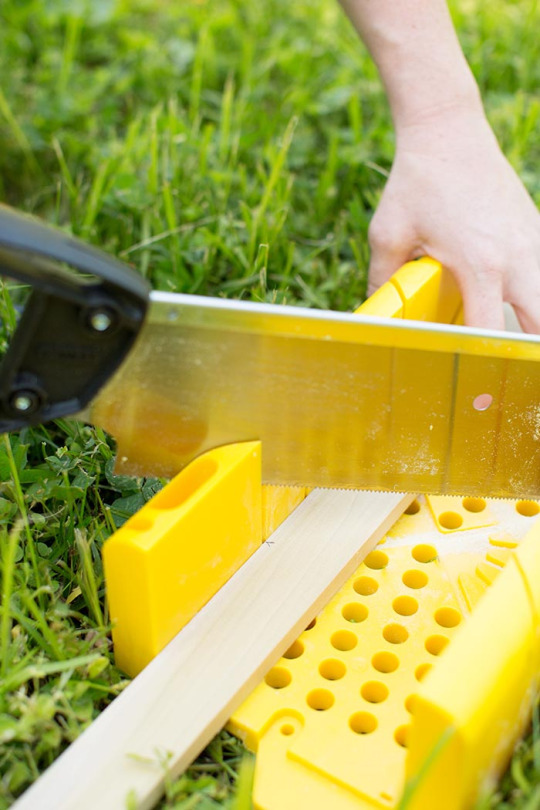
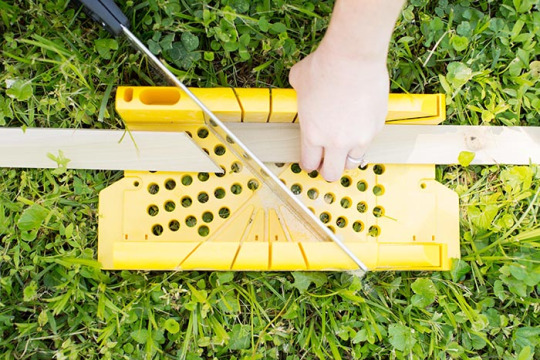
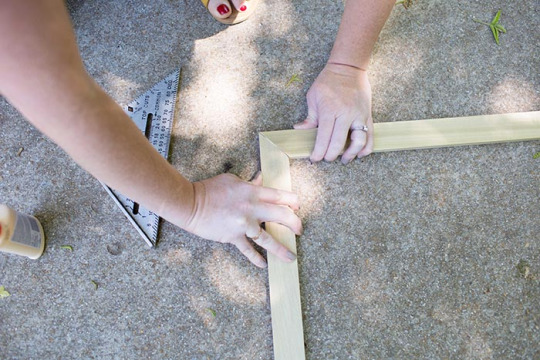
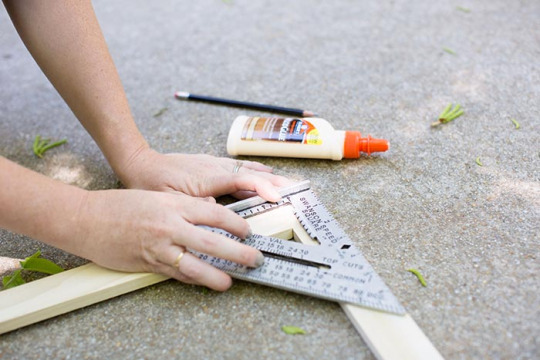
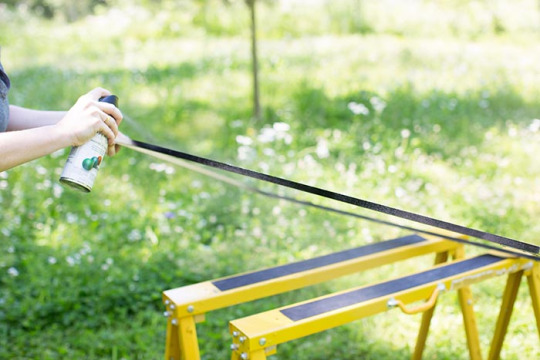
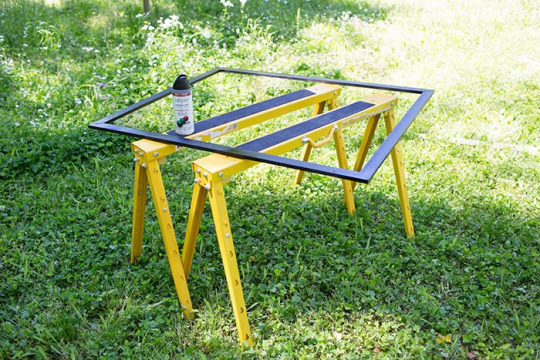
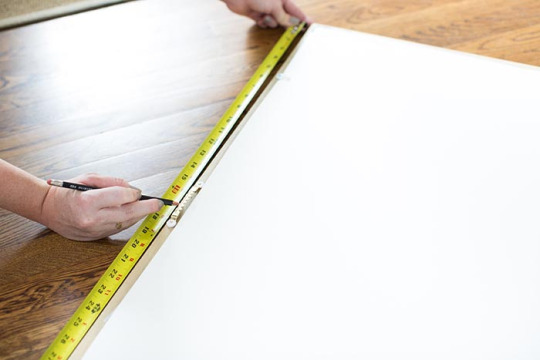
Moving onto the frame. All you need for this step is a pencil, a tape measure, a saw, and your four wood boards. (For this step I set up my wood on sawhorses in my backyard, but the sawhorses aren’t necessary. I just prefer working at table height.) I created mitered corners for my frame, which is typical for framing, so I also used a miter box for accuracy, which came with my saw. I love that I can get the exact angle I need, and everything will fit together nicely without needing any fancy tools or causing extra frustration. Of course you could opt for square corners and skip this step! Or use a power saw, or a handy friend! There are a bunch of ways to achieve the look you want.
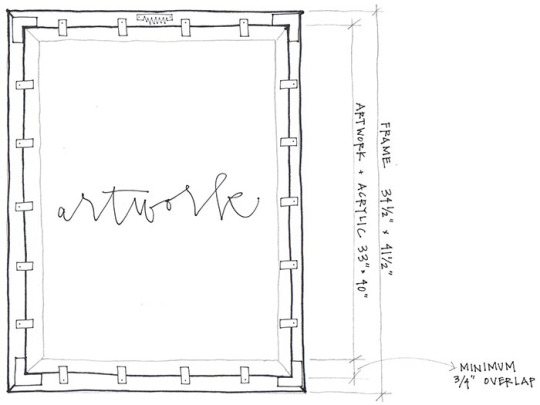
When measuring your boards, first consider the size of your mounted print + plexiglass. Then consider the size of your corner braces and how much space you’ll need to leave for them. (I would sketch this out. See below for the sketch I did for my project, based on the measurements I was using.) Obviously, you want the interior measurement of your frame to be overlapped by your plexi/print, and I recommend planning for a solid 3/4” on all sides.
Using your saw, cut your measured boards down to size, at 45-degree angles. You want your frame to be as square as possible, which means cutting equal angles and equal lengths. I always check mine after each cut to be sure.
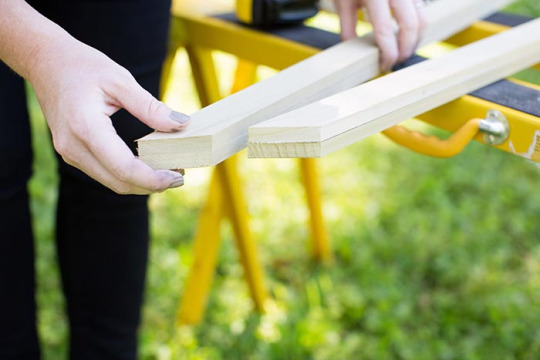
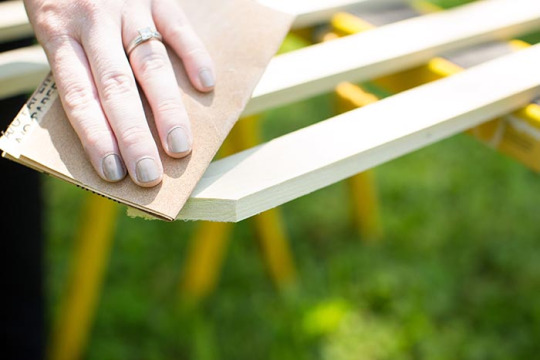
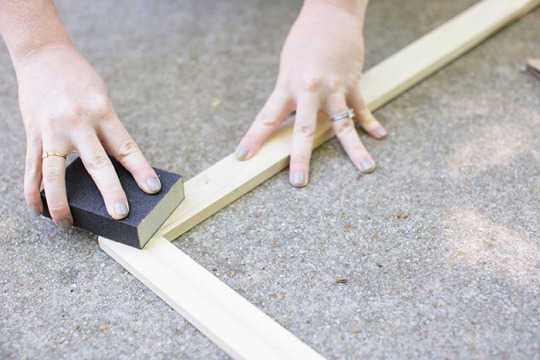
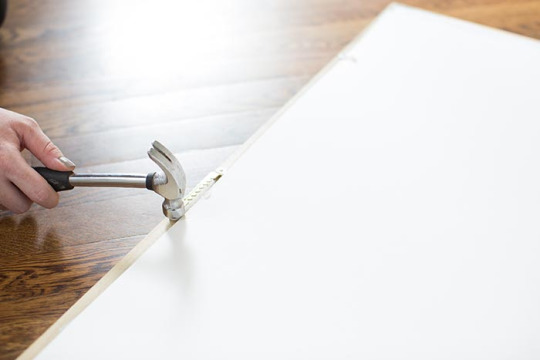
Once all four boards are cut to equal size, use a fine sandpaper or sanding block to sand the rough edges.
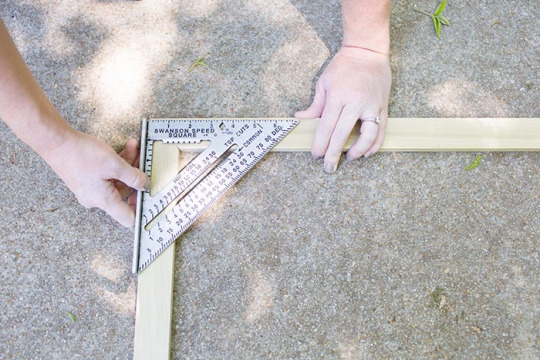
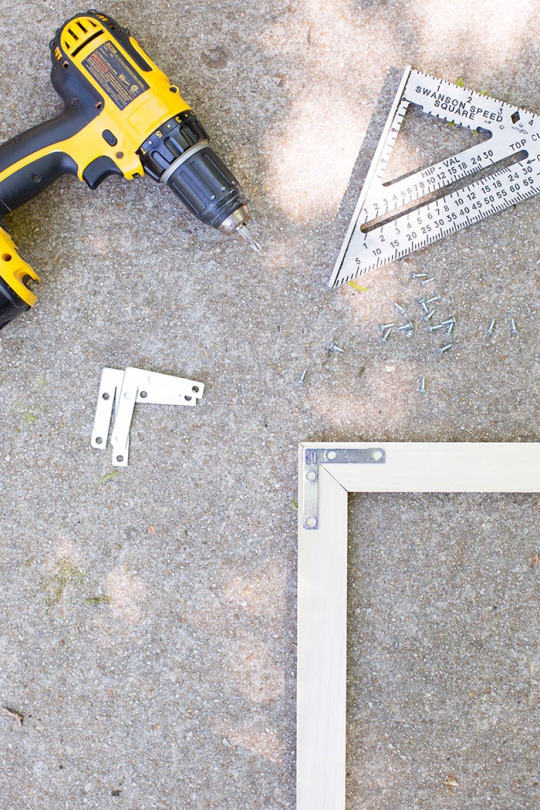
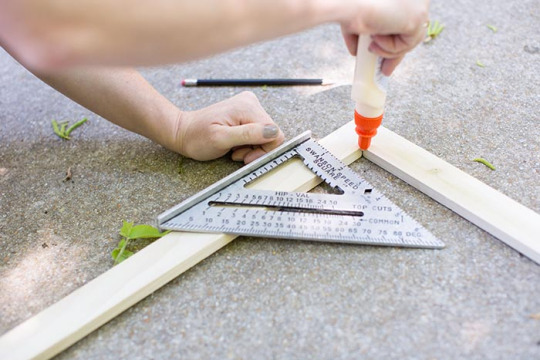
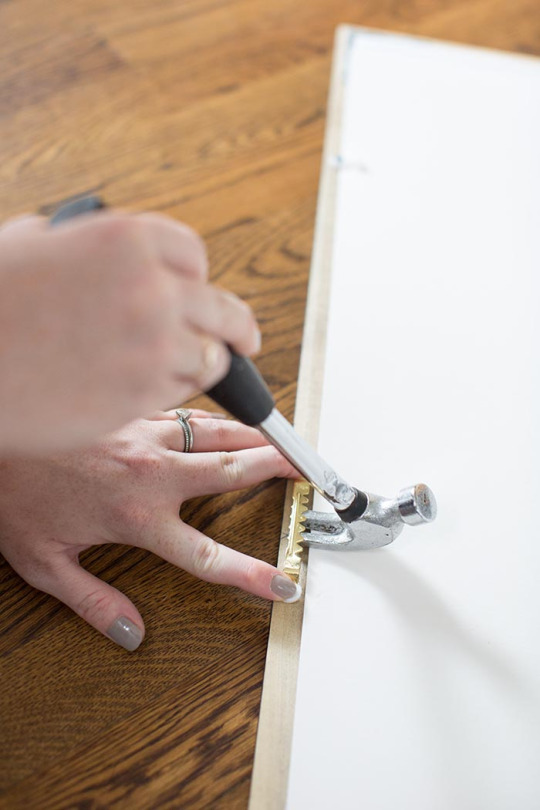
Now we are ready to assemble! For this step you need wood glue (I love Elmer’s), and I also like to use a square tool to check that the corners meet up nice and, well, square. Apply wood glue to each mitered end, and join your frame together, checking your corners with the square as you go. Give the glue a little bit of time to dry. Now, you could choose to stop here. Depending on the size of your frame and how tight your mitered edges meet, maybe you don’t need the corner braces. While the wood glue is surprisingly strong, I still chose to use the braces, just for peace of mind that my frame would stay together when it was all said and done.
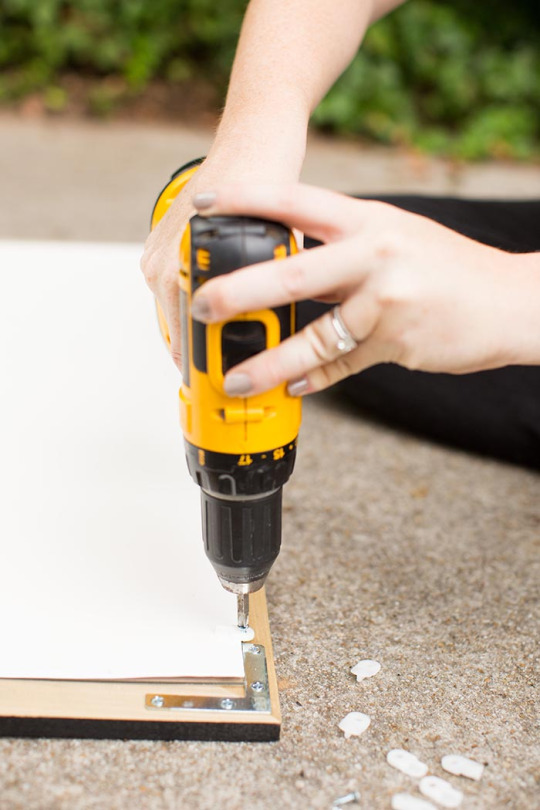
The corner braces are as simple as screwing them into place, one at each corner. (Be sure to choose screws that will not poke through the front face of your frame. I had to buy smaller screws than the ones that came with the braces.) It is helpful to place your print/acrylic sheet on the glued frame at this point to use as a guide; be sure there is enough space for the braces to be screwed outside the outer edges of your acrylic. The braces make a nice little shelf on the bottom for the print to rest upon, too! (I recommend marking the location of each of your four braces with your pencil.) Once the brackets are screwed into place, flip the frame over and use your square to once again check your corners. If everything looks good, hooray! As a final detail I like to use a little bit of the wood glue to fill any open spaces where the corners meet on the front face of the frame, especially if you will be painting over it. This is the last step using the wood glue. Once this dries, use your sandpaper to lightly sand all of your faces and edges that will be visible when displaying your frame.
Time to paint! I chose to spray paint my frame in a black satin. You could choose to leave the wood bare, stain it, or paint it any color of the rainbow.
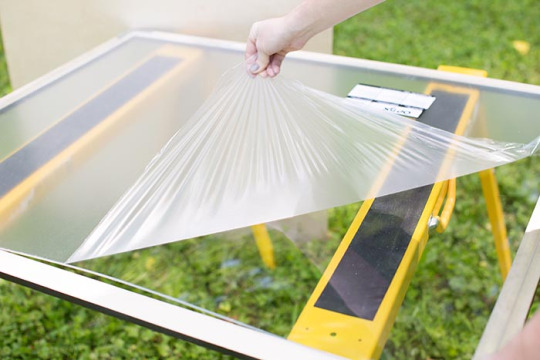
Once your paint is dry, flip the frame over and set your print + acrylic into place. During this step I finally removed the protective coating from my acrylic. I like to keep it on as long as possible to prevent any scratches. Note that the acrylic is extremely attractive to any bit of dust or dirt or whatever may be nearby. (In hindsight, I would have done this step inside on a clean surface.) Time to install your turn buttons. Just like the corner braces, these are as easy as simply screwing in place. They are the same as you’ve probably seen used on a wall mirror. Again, check the length of screw you’re using given the thickness of your wood frame. For the size of my frame I used five turn buttons up the sides, then four at the top and bottom. (Avoid placing one in the center of the top, since a picture hook will eventually go here!)
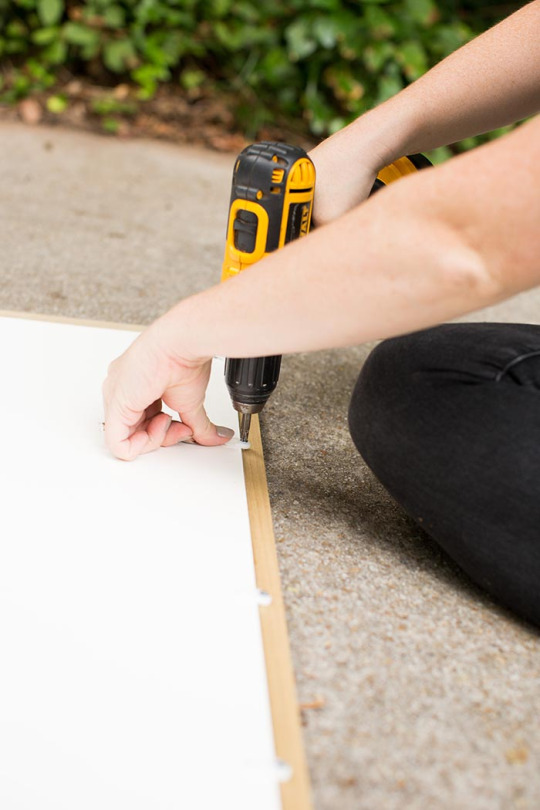
It will be so tempting to flip your frame over and call it a day, but there is one more tiny step! Measure across the top of your frame and mark the center point. Use this mark to install a picture hook if you plan on hanging your frame (probably using a hammer). I chose the largest picture hook I could find to accommodate the thickness of the backing. If you choose too small of a hook, the frame may not hang flush on the wall, but instead protrude out at the bottom. Even though I used a really large picture hook I still went back and used the back of my hammer to bend it slightly outward to accommodate the board + turn button thickness.
VOILA! My frame is hung and I am just so pleased with the result. It’s large and cool and makes such an impact for only a little bit of cost + skill. And I was glad to spend a pretty day outside working with my hands and building something I could show off on my otherwise big, blank wall. I hope you will be able to follow my instructions and learn from my many mistakes on my first go-round, but please don’t hesitate to ask if you have any questions!

7 notes
·
View notes
Text
Which Are the Types of Components to Buy from Gutter Accessories Suppliers?
Roof gutters and downspouts are not only functional necessities; they protect our homes' foundations and exteriors and can be decorated with various accessories. These elements can add beauty, enhance effectiveness, and improve your building's curb appeal and resale value.
Various parts of the gutter system work together smoothly to efficiently lead rainwater away from your property. A single malfunctioning piece can only disrupt this harmony and render the complete system ineffective, so let's dive into the details surrounding rain gutter components so you can better understand how they work together and what happens when they break. Always source them from reliable gutter accessories suppliers.

Types of gutter accessories:
A functional gutter system consists of multiple parts and accessories, each of which plays a unique role in diverting rainfall away straight from your home. Let's examine this anatomy more closely.
Gutters channels
Gutter channels are the central part of the gutter system that you see. They typically appear as half-pipe or box-like structures affixed along the edge of your roof. They primarily catch falling precipitation from the ceiling, protecting your walls and roof from the destruction by directing it towards a specific drainage area through other gutter accessories.
End caps
End caps function like the sealed ends for gutters, preventing water spillage from the non-drainage-designed points. Usually created from aluminum or vinyl, they fit securely at the other end of the gutter line.
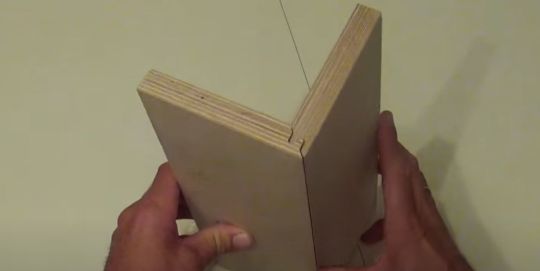
Miters
You can visualize miters as the corner pieces on the gutter system that connect two linear segments at the various angles (typically 90°). Many homes incorporate roofs with sharp angles, so having custom-angled miter joints to permit the uninterrupted movement of water around corners is crucial.
Elbows
Elbows act as connectors between various sections within your overall gutter set-up. Primarily arching simply at right angles, they help when you need to change direction abruptly within your gutter system, such as channeling accumulated rainfall through downspouts.
Gutter Spikes and Ferrules
Gutter spikes are extra-long nails driven through the entire gutter system, holding everything right in place and securely attaching it to the walls. The included ferrules also prevent the gutters from deforming under heavy rainfall or even surviving damage from a ladder's weight. However, this is an old method of hanging in gutters, and some homes may lack these components.
Gutter Hangers
This is a modern way of attaching a gutter system to your home. They fasten to the eaves while being relatively concealed from sight, offering a seamless appearance. If necessary, they can work alongside spikes and ferrules to deliver additional structural integrity.
Downspouts
Downspouts serve one primary purpose: They channel the rainwater collected by the gutters to the ground in a much controlled manner. Without them, rainwater would spill over the edge of your gutters, causing potential damage like soil erosion and basement flooding. Additionally, these gutter parts prevent unorganized spillover that can lead to stains on the siding around your property.
Downspouts are typically tube-shaped and very vertically oriented. They attach to the end portion of gutters through an accessory called an elbow – another critical component of your gutter accessories.
Pipe Cleats
Paired with downspout brackets, these simple metal strips secure downspouts onto walls. With pipe cleats, the stability and functionality of your gutter system will be protected, and your home will not be able to manage rainwater effectively.
0 notes
Text
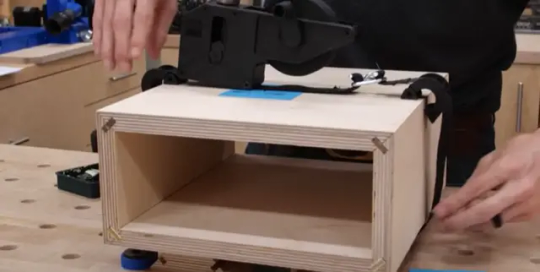
How to Cut Miter Joints: Master the Perfect Angles Effortlessly

To cut miter joints, measure and mark the desired angle on the workpiece, then use a miter saw or a miter box and handsaw to make the cuts. When it comes to cutting miter joints, having accurate and precise cuts is essential for a professional finish.
Miter joints are commonly used in woodworking for creating clean and seamless corners, such as in picture frames, molding, or furniture. By following a few simple steps, you can easily achieve perfect miter joints. Start by measuring and marking the desired angle on the workpiece.
Then, using a miter saw or a miter box and handsaw, carefully make the cuts. Taking your time and ensuring accuracy will result in tight-fitting joints that are both visually appealing and structurally sound. Mastering the art of cutting miter joints will open up endless possibilities for your woodworking projects.
Basics Of Miter Joints
Miter joints are created by cutting two pieces of material at an angle to form a corner. To cut miter joints, use a miter saw or a miter box with a handsaw. Always measure accurately and set the cutting angle correctly for a precise fit.
What Are Miter Joints?
A miter joint is a type of joint where two pieces of material are cut at an angle and joined together to form a seamless 90-degree corner. This joint is commonly used in woodworking, especially for projects that require precise angles and clean finishes. Miter joints are often used in the construction of frames, molding, and furniture.
Common Uses
Miter joints are widely used in various woodworking projects due to their versatility and aesthetic appeal. Some common uses of miter joints include:
- Picture frames: Miter joints are commonly used to create clean and seamless corners in picture frames. This adds a professional touch to the finished piece.
- Trim and molding: Miter joints are essential in achieving seamless corners and tight joints in trim work and molding installation.
- Furniture making: Miter joints are often used in furniture making, particularly for constructing corners in cabinets, tables, and other pieces of furniture with angled edges.
- Decorative accents: Miter joints are also employed in creating decorative accents such as cornices, crown moldings, and baseboards, where clean and precise angles are desired.
By understanding the basics of miter joints and their common uses, you can confidently incorporate this technique into your woodworking projects. Whether you're building your own picture frames, adding elegant trim to your home, or constructing custom furniture, miter joints offer a versatile and visually appealing solution.
Tools And Materials
Cutting miter joints requires the use of specialized tools and materials like a miter saw, measuring tape, and clamps. Proper techniques and careful measurements are essential for achieving precise and seamless joints in woodworking projects.
Cutting miter joints with precision requires the right tools and materials. Whether you're a beginner or a seasoned woodworker, having the essential tools for the job is crucial. Additionally, using quality materials will ensure a strong and durable joint that stands the test of time.
Essential Tools
To achieve accurate miter joints, you'll need the following essential tools:
- A miter saw: This power tool is the cornerstone of any miter joint cutting project. It allows you to make precise angled cuts effortlessly.
- A miter box and backsaw: If you don't have access to a miter saw, a miter box and backsaw combination can do the job. The miter box guides the saw to ensure accurate cuts.
- A measuring tape: Accurate measurements are crucial when cutting miter joints. Using a measuring tape enables you to mark the correct angles and lengths for a seamless fit.
- A drafting square: This tool helps ensure your miter cuts are perfectly square, resulting in tight and seamless joints.
- A pencil or marking knife: Marking the angles and lengths on your workpieces is essential for precise miter cuts.
- A clamp: A clamp is useful to hold your workpieces securely in place while cutting the miter joints.
- Safety equipment: Always prioritize safety when working with power tools. Wear safety goggles, ear protection, and a dust mask to protect yourself from any possible harm.
Recommended Materials
Choosing the right materials for your miter joints can significantly impact the overall quality and longevity of your project. Here are some recommended materials to consider:
- Wood: Selecting high-quality wood is paramount for achieving strong and durable miter joints. Hardwoods like oak, maple, and walnut are often preferred for their stability and strength.
- Wood glue: Using wood glue in combination with your miter joints provides additional strength and stability to the joint. Look for a reliable wood glue that is designed for furniture and woodworking projects.
- Screws or nails: Depending on the project, you may choose to reinforce your miter joints with screws or nails. Ensure they are the appropriate size and type for the wood you're working with.
- Sanding materials: After cutting your miter joints, sanding the edges and surfaces will give your project a smooth and professional finish. Use sandpaper or a sanding block to achieve the desired result.
- Finish: Applying a finish to your miter joint project not only enhances its appearance but also adds another layer of protection. Consider using varnish, stain, or paint to suit your desired aesthetic.
With the right tools and materials on hand, you're well-equipped to embark on your miter joint cutting journey. Remember to prioritize accuracy, take your time, and enjoy the process of creating beautiful and structurally sound miter joints.
Understanding Angles
Understanding angles is crucial when it comes to cutting miter joints. To achieve a precise fit, it's essential to grasp the concept of angles and how it applies to this woodworking technique. Let's explore the importance of accuracy and how to calculate angles for immaculate miter joints.
Importance Of Accuracy
In woodworking, precision is paramount. Miter joints demand exactness to ensure a seamless connection. Even the slightest inaccuracy can lead to gaps or misalignments, compromising the joint's strength and aesthetic appeal.
Calculating Angles
When cutting miter joints, understanding how to calculate angles is pivotal. It's crucial to measure and cut the angles accurately to achieve a perfect fit. Here's a simplified process to calculate miter angles:
- Measure the angle for the joint.
- Divide the angle by 2 to determine the miter angle for each piece.
- Set your miter saw to the calculated angle and make your cuts.
Cutting Techniques
When it comes to cutting miter joints, there are a few different techniques you can use. The method you choose will depend on your tools and personal preference. In this section, we will explore two popular techniques: using a miter saw and hand-cutting methods.
Using A Miter Saw
If you have access to a miter saw, it can be a quick and efficient way to cut miter joints. Here's how to do it:
- Measure and mark: First, measure and mark the angles of your miter joint using a protractor or a miter gauge. Make sure to mark the correct angles on both pieces of wood.
- Set up the saw: Set the miter saw to the desired angle. Most miter saws have pre-set stops for common angles like 45 degrees.
- Position the wood: Place the first piece of wood flat on the saw's base against the fence, making sure the marked angle aligns with the blade.
- Make the cut: Lower the saw's blade and make a smooth, steady cut through the wood. Repeat this step for the second piece of wood, making sure the angles align correctly.
- Check the fit: Once you have made the cuts, test the fit of the two pieces together. They should create a tight, seamless joint.
Hand-cutting Methods
If you don't have a miter saw or prefer a more traditional approach, there are hand-cutting methods you can use to achieve miter joints. Here are a couple of techniques:
- Backsaw and miter box: A backsaw and miter box is a simple and precise way to cut miter joints by hand. The miter box holds the wood securely while the backsaw cuts at the desired angle.
- Hand plane and shooting board: If you are skilled with a hand plane, you can use a shooting board to achieve perfectly square and accurate miter cuts. This method requires patience and practice.
These hand-cutting methods may take more time and practice to perfect, but they can yield excellent results. Whichever technique you choose, remember to measure carefully, use sharp tools, and practice on scrap wood before cutting your final pieces.
Troubleshooting And Tips
While cutting miter joints may seem challenging at first, with practice and the right techniques, you can achieve excellent results. However, it's not uncommon to encounter some issues along the way. In this section, we will address common mistakes and provide pro tips for achieving perfection in your miter joints.
Common Mistakes
Creating flawless miter joints requires precision and attention to detail. Here are some common mistakes beginners may encounter and ways to avoid them:
- Not properly measuring the angles: Ensure that you accurately measure the angles for the miter joint. A slight deviation can lead to misaligned joints.
- Incorrect blade tilt: Make sure to set your saw blade at the correct angle before making any cuts. A misplaced tilt can result in uneven joints.
- Poor-quality blades: Investing in high-quality, sharp blades is essential for achieving clean, precise cuts. Dull blades can cause tear-out or uneven edges in your miter joints.
- Inadequate clamping: Failing to secure the pieces tightly together during cutting can result in distorted joints. Use clamps to hold the material firmly in place.
- Not checking for squareness: Before making your cuts, verify that your saw and workbench are properly squared. Ignoring squareness can lead to inaccurate angles and ill-fitting joints.
Pro Tips For Perfection
To ensure impeccable miter joints, consider the following expert tips:
- Double-check your measurements: Take the time to measure twice and cut once. Double-checking your angles and dimensions will save you from costly mistakes.
- Use a miter sled: A miter sled is a valuable tool that helps stabilize your workpiece and provides additional support during cutting. This reduces the chance of errors and produces better results.
- Use a zero-clearance insert: When cutting delicate materials, incorporating a zero-clearance insert on your saw table can minimize tear-out, resulting in neater miter joints.
- Practice on scrap pieces: Before tackling your actual project, practice cutting miter joints on scraps of the same material. This allows you to perfect your technique and make any necessary adjustments before moving to the final work.
- Perform test cuts: When adjusting your saw's settings or trying out a new blade, always perform test cuts on sacrificial pieces. This ensures that you have the right setup and prevents mistakes on your final work.
By avoiding common mistakes and following these pro tips, you'll be well on your way to creating impeccable miter joints. Remember to always prioritize accuracy and practice regularly to refine your skills.
Frequently Asked Questions For How To Cut Miter Joints
How Do You Cut A Mitre Joint?
To cut a mitre joint, follow these steps:
1. Measure and mark the angle you want on the workpiece.
2. Set your miter saw or table saw to the corresponding angle.
3. Position the workpiece against the saw fence and hold it securely.
4. Make the cut, ensuring a straight and clean edge.
5. Repeat the process for the second piece, ensuring a precise fit when joining the two together.
How Do You Cut A Perfect 45 Degree Angle?
To cut a perfect 45-degree angle, use a miter saw and adjust the angle to 45 degrees. Secure the board, make the cut, and double-check the angle for precision.
How Do You Find The Angle Of A Miter Cut?
To find the angle of a miter cut, measure the length of the piece you're cutting and the width of the surface you're joining it to. Use a miter saw or protractor to determine the angle that will create a tight joint between the two pieces.
How Do You Cut A Perfect Miter Joint On A Table Saw?
To cut a perfect miter joint on a table saw, follow these steps:
1. Set the miter gauge to the desired angle.
2. Position the workpiece securely against the fence.
3. Make sure the blade is aligned with the desired angle.
4. Slowly push the workpiece through the blade, keeping a steady hand.
5. Double-check for accuracy before removing the cut piece.
Conclusion
Mastering the art of cutting miter joints requires practice and patience. By following the proper steps and using the right tools, you can achieve seamless and precise miter joints for your woodworking projects. Incorporating these techniques will elevate the quality of your craftsmanship and bring your projects to the next level.
Practice, dedication, and attention to detail are key in perfecting this essential woodworking skill.
Read the full article
0 notes
Text
Essential Woodworking Tools for Beginners
Embarking on a woodworking journey is an exciting endeavor, but having the right tools is crucial for success. As a beginner, building up your toolkit doesn't have to be overwhelming. Here are some essential woodworking tools to get you started:
Circular Saw: Perfect for straight cuts, a circular saw is versatile and user-friendly. It's an excellent choice for breaking down large sheets of plywood.
Chisels: Chisels are indispensable for carving and shaping wood. Invest in a good set of varying sizes to cover different woodworking tasks.
Miter Saw: Ideal for making accurate crosscuts, a miter saw is a must-have for any woodworking shop. It's efficient for tasks like framing and molding.
Router: Routers are fantastic for adding decorative edges to your projects and hollowing out areas of wood. They come in both hand-held and table-mounted varieties.
Drill and Bits: A power drill is a woodworking essential. It's used for making holes and driving screws. Make sure to have a selection of drill bits suitable for wood.
Random Orbital Sander: Achieving a smooth finish is crucial in woodworking, and a random orbital sander helps you do just that. It's versatile and can handle various grits for different stages of sanding.
Wood Glue: Quality wood glue is the unsung hero of woodworking. It's essential for joining pieces securely and creating sturdy projects.
Clamps: You can never have too many clamps. They hold your pieces together while the glue dries, ensuring a tight bond.
Tape Measure: Accurate measurements are vital in woodworking. Invest in a quality tape measure for precision in your projects.
Safety Gear: Last but certainly not least, prioritize safety. Safety glasses, ear protection, and a dust mask are essential when working with wood.
Remember, quality over quantity is key when building your tool collection. Start with these essentials, and as your skills grow, you can expand your toolkit accordingly.
1 note
·
View note
Text
Essential Woodworking Tools for Beginners
Embarking on a woodworking journey is an exciting endeavor, but having the right tools is crucial for success. As a beginner, building up your toolkit doesn't have to be overwhelming. Here are some essential woodworking tools to get you started:
Circular Saw: Perfect for straight cuts, a circular saw is versatile and user-friendly. It's an excellent choice for breaking down large sheets of plywood.
Chisels: Chisels are indispensable for carving and shaping wood. Invest in a good set of varying sizes to cover different woodworking tasks.
Miter Saw: Ideal for making accurate crosscuts, a miter saw is a must-have for any woodworking shop. It's efficient for tasks like framing and molding.
Router: Routers are fantastic for adding decorative edges to your projects and hollowing out areas of wood. They come in both hand-held and table-mounted varieties.
Drill and Bits: A power drill is a woodworking essential. It's used for making holes and driving screws. Make sure to have a selection of drill bits suitable for wood.
Random Orbital Sander: Achieving a smooth finish is crucial in woodworking, and a random orbital sander helps you do just that. It's versatile and can handle various grits for different stages of sanding.
Wood Glue: Quality wood glue is the unsung hero of woodworking. It's essential for joining pieces securely and creating sturdy projects.
Clamps: You can never have too many clamps. They hold your pieces together while the glue dries, ensuring a tight bond.
Tape Measure: Accurate measurements are vital in woodworking. Invest in a quality tape measure for precision in your projects.
Safety Gear: Last but certainly not least, prioritize safety. Safety glasses, ear protection, and a dust mask are essential when working with wood.
Remember, quality over quantity is key when building your tool collection. Start with these essentials, and as your skills grow, you can expand your toolkit accordingly.
0 notes
Last Seen Blogs

caiozini
Caio Zini

skaikkru
Priori Incantatem

bicth-romantic
florisbela

oixys-blog
› sentience ‹

gleamandgrowgothel
Gothel