#sewingforwomen
Photo
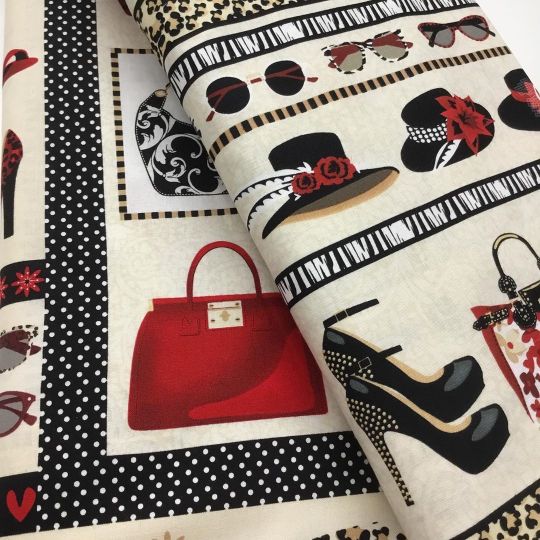
Shoe Love is True Love Panel and border panel and centre piece panel, don’t miss these 👠#sewingproject #sewingforme #sewingforgirls #sewingforwomen #quiltingfabric #shoeloveistruelove #craft #sunnysidefabricsuk #instasew #instalove #instaquilt (at Sunnyside Fabrics UK) https://www.instagram.com/p/B3-deacHnd6/?igshid=1athlbzm4gosf
#sewingproject#sewingforme#sewingforgirls#sewingforwomen#quiltingfabric#shoeloveistruelove#craft#sunnysidefabricsuk#instasew#instalove#instaquilt
0 notes
Photo
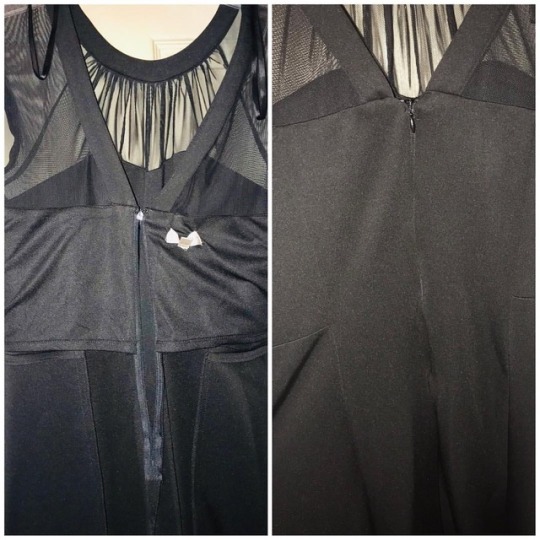
Hummm...should I offer alterations? Zipper installation by me @sewrussia! • • IG: @sewrussia FB: Making It Homemade with Sew Russia YT: youtube.com/c/makingithomemade • • #sewingaccessories #sewingpatternreview #sewingforwomen #sewingvlogger #sewingboundaries #sewingstudio #sewingbloger #sewingstorage #sewinglab #sewingworld #sewingmachinelamp #SewingIsSexy #sewingfordolls #sewingweekend #sewingforteens #sewinginschool #sewingrecipe #sewingbird #SewingSamples #sewingeconomics #sewingandcrafting #sewingseeds #sewingchronicles #sewingsessionsleeds #sewingwithliberty #sewingcamp2018 #sewingskills #sewingcompetition #sewingpatternforsale #sewing (at Baton Rouge, Louisiana) https://www.instagram.com/p/BtCeZydHFKV/?utm_source=ig_tumblr_share&igshid=14gqmdhqwuvwg
#sewingaccessories#sewingpatternreview#sewingforwomen#sewingvlogger#sewingboundaries#sewingstudio#sewingbloger#sewingstorage#sewinglab#sewingworld#sewingmachinelamp#sewingissexy#sewingfordolls#sewingweekend#sewingforteens#sewinginschool#sewingrecipe#sewingbird#sewingsamples#sewingeconomics#sewingandcrafting#sewingseeds#sewingchronicles#sewingsessionsleeds#sewingwithliberty#sewingcamp2018#sewingskills#sewingcompetition#sewingpatternforsale#sewing
0 notes
Text
Bow cardigan step by step tutorial part 2 Werkbeschrijving vestje met strik deel 2


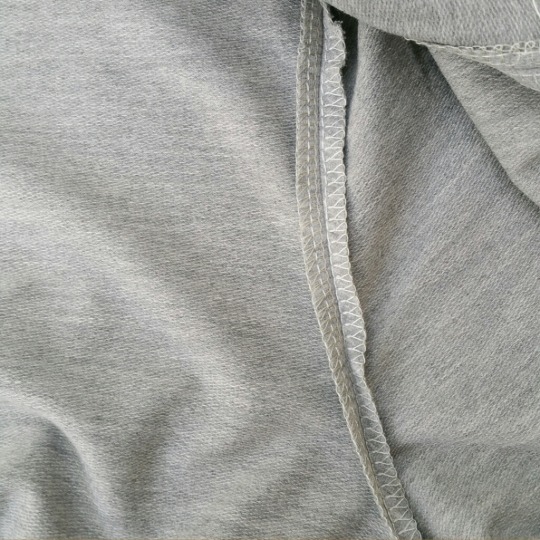
The bindings can now be attached to the front parts of the cardigan. Use an overlocker/serger or zigzag stitch. When using a serger it is a good idea to lift the foot, move the piece you want to sew as far to the front as possible so the first stitch will get directly in to the fabric. ( so don’t sew a few stitches first without the fabric) The first few stitches I sew using the hand wheel instead of the footpedal to have precise control where my first stitches will go.
De knoopbiezen kunnen nu aan de voorpanden worden gestikt. Doe dit met de lockmachine of zigzag. Ik til altijd het voetje op, schuif het te naaien stuk zover mogelijk naar voren zodat de eerste steek direct in de stof komt. (dus niet eerst een stukje naaien en dan pas de stof invoeren. De eerste steken draai ik even aan het handwiel zodat je het eerst stukje heel precies kunt naaien.
This is what the binding looks once sewn at the top.
Als de bies is aangenaaid ziet de halskant er zo uit.
To get a nice sharp line place a stretch stitch next to the overlock/zigzag.
Voor een mooie strakke lijn kun je nog een extra stretch stiksel naast het lockstiksel plaatsen. Als je de zigzag hebt gebruikt moet je dat zowieso doen.

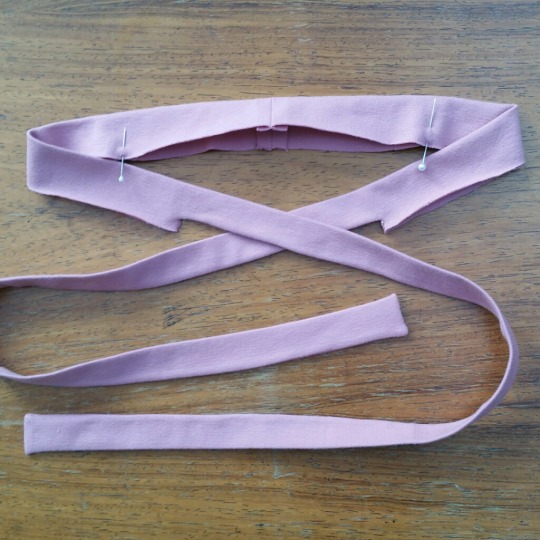
Now the neckbinding/bow.
Sew the two parts of the binding together.
Fold the binding in half width wise and start stitching from the mid front mark you put on the binding earlier. Also close the ends.
Use a stretch stitch as this is sturdy enough to turn the binding inside out without breaking the thread.
The part that is still open will be attached to the neck later. You also marked the shoulder points earlier with a pin.
Cut away the excess fabric and clip the corners.
Nu de halsbies/strik:
Stik de twee delen aan elkaar. Het naadje komt straks middenachter.
Vouw de bies dubbel en stik dicht vanaf het middenvoor teken (het teken dat je eerder op de bies hebt gezet ) De uiteinden ook dichtstikken.
Je kunt hiervoor ook het beste een stretch steek gebruiken dan gaat het naadje niet kapot als je het omkeert.
Het stuk dat open is komt straks langs de hals, je hebt als het goed is ook een tekentje voor het schouder punt aangegeven.
Knip de overtollige stof weg tot je ong. 1 a 2 mm. overhoudt en knip de hoekjes weg.
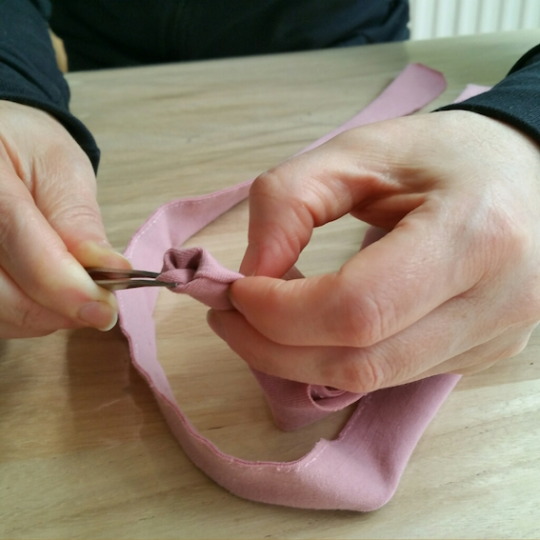
Now turn inside out.
I always use those pointy tweezers you get with your serger/overlocker to thread your needle with.
Nu binnestebuiten keren.
Tip: Ik gebruik hiervoor altijd de kromme, puntige pincet die je bij je lockmachine hebt gekregen.
Press and your binding will look like this
Even platpersen en de bies ziet er zo uit.
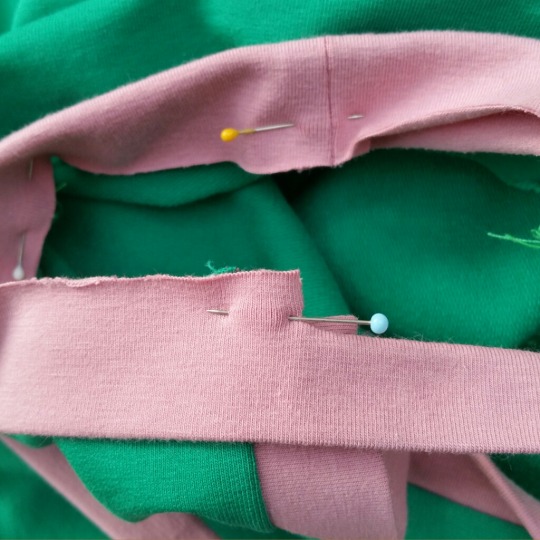
Now pin the binding to the neck. The seam of the binding goes midback of the neck, the markings for the shoulder on the shoulderseams and the midfront mark of the binding goes on the midfront mark of the front binding (see photo).
Speld nu de bies langs de hals. Het naadje op middenachter, het schoudertekentje op de schouder en het middenvoor tekentje op het middenvoor punt van de knopenbies.
Stitch the binding with a stretch stitch on to the neck. Do this before you finish the edges as this allows you to precisely fit the two midfront points together.
Het is het handigste om eerst de hals te stikken met een stretch stiksel en daarna pas afwerken met lock/zigzag. De middenvoor punten moeten precies op elkaar komen en dat is lastig met de lockmachine.
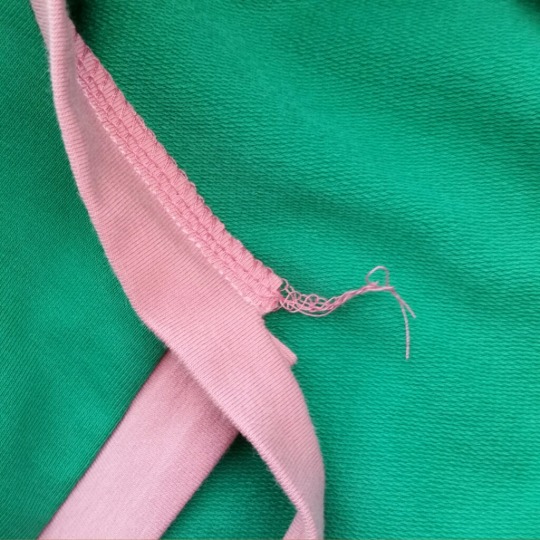
Handsew the corner of the midfront/binding point. This will also allow to hide some loose threads from the overlock seam.
Het beginpunt even vastzetten met een paar steekjes. Kun je ook mooi het lockdraadje wegwerken.
Neat right? Now you can tie the bow right in the middle.
Mooi he? Nu kun je een strik maken precies in het midden!

To secure the neckseam, topstitch the neck.
Om de halsnaad en lockstiksel netjes op z’n plaats te houden kun je de hals nog even doorstikken
3 notes
·
View notes
Video
youtube
Sewing classes in Houston. Sew-To-Fit by A.D. Lynn Scheduling Page Link https://sewtofit.as.me/ 👚How to sew a Shirt or blouse 👚 👗How to sew a dressform 👖How to sew pants (sewing trousers) ONLINE.CLASSES- http://bit.ly/2prj52A #learntosew #sewingforwomen #sewingadressform #dressform by SewToFit
0 notes
Photo
I make and sell handmade Mens, Womens and Childrens Clothing from unique and limited fabric. Check out my page for more information, buy items in stock and follow my progress. https://www.facebook.com/ecklecticfashion/ Or my etsy to purchase items seen below and more: http://etsy.me/2HJdlrs #yeg #Edmonton #fashion #yegsewing #stonyplain #localbusiness #kidsfashion #customknits #ecklecticfashionboutique #customorderswelcome #clothingboutique #cottonlycra #customknitfabric #sewingforwomen #sewingforkids #sewingforgirls #sewing #sew #buymyclothes #clothesforsale #clothingforsale
0 notes
Photo
Es geht weiter... Nach langer Pause und neuer Nähecke geht’s endlich weiter mit eigenen Projekten. #nähzimmer #nähenmachtglücklich #sewingforme #sewingforwomen #pregnantstyle #lmv #schwangerschaftsmode #sonnenzimmer #einenganzentagfrei
#sewingforme#nähzimmer#sewingforwomen#schwangerschaftsmode#nähenmachtglücklich#einenganzentagfrei#pregnantstyle#sonnenzimmer#lmv
0 notes
Photo
Wow! Over 13000 likes this year! Thank you so much for your support in 2016! 👏🏼😍 2017 is going to be very exciting! We have many many wonderful new sewing patterns already waiting for you! Enjoy a wonderful New Years Eve 🍾🥂🎉 and HAPPY NEW YEAR! Your Zierstoff Team Ilka - Joanna - Julie #newyear #newyeareve #2017 #sewing #sewingprojects #sewingprojects2017 #sewcialists #bloggers #bloggerstyle #sewingforkids #sewingforwomen #fashion #fashionblogger #happysewing #zierstoff #zierstoffpatterns #pdf #pdfsewingpattern
#fashion#fashionblogger#sewingforwomen#zierstoffpatterns#sewingforkids#bloggerstyle#sewing#happysewing#sewingprojects2017#zierstoff#bloggers#newyeareve#newyear#pdf#sewingprojects#2017#sewcialists#pdfsewingpattern
1 note
·
View note
Text
V-neck cardigan step by step tutorial part 1

This version of the cardigan is a long sleeved one with a v-neck and pockets. But there are many possibilities. Buttons on the pockets or made in a print or jaquard knit fabric, striped cuffs, short sleeves..
Deze versie van het vestje is met lange mouw, v-hals en zakken. Maar je kunt er ook mee varieëren. Knoopjes op de zakken bijvoorbeeld. Of maak 'm in een leuke print of jaquard tricot, gestreepte boorden, korte mouwen.. heel veelzijdig dus!
Fabric advise:
Use a heavy knit like French terry. (a light, unbrushed sweat fabric). Use a ribbed knit suitable for cuffs and a lighter knit (tshirt weight) for the bindings .
Yardage/ meters needed:
Main fabric: about 19 1/2″/ to 23 1/2″ (50/60 cm (depending on the size) for the short sleeve version and 27 1/2″ to 29 1/2″(70/75cm) for the long sleeve version.
Ribbed knit suitable for cuffs: This knitted fabric is often tubular and 13″ to 14,5″ (33 to 37 cm) wide. Some are more elastic than others so it is hard to give a precise indication. Measure the width on your pattern. If you have fabric that is about 14,5″ (37 cm) wide than you can cut it once for size 6 and 8 . Because it is one piece there will be no side seams. Larger sizes need to cut the band 2x and put side seams in. To cut once (plus cuffs) you will need about 15 3/4″/ 19 1/2″ (40-50 cm) If you need to cut twice you will need an extra 12″(30cm)
Cotton/elastan t-shirt weight: approx. 10″
Lightweight cotton jersey: small piece/ scrap
Stof advies: French terry of een gebreide jaquardstof voor de body, boordstof voor de boorden en katoen lycra of katoen elasthan (tshirt stof) voor de biezen.
Hoeveelheid stof nodig:
Stof body: 50/60 cm voor de korte mouw versie en 70/75 cm voor de lange mouwversie.
Boordstof: boordstof is vaak rondgebreid en is 33-37 cm breed. Sommige boordstof is vrij los, andere weer heel elastisch. Meet op je patroon hoe breed het patroondeel is voor de boordstof. Heb je boordstof van 37 cm die niet te elastisch is dan kun je voor maat 36 en 38 waarschijnlijk het boord 1 x knippen zonder zijnaad.Je hebt dan ong. 40-50 cm nodig. Voor de overige maten moet het boord waarschijnlijk met zijnaadjes. Je knipt dan 2 x het boordpatroon en je hebt 30 cm meer nodig.
Katoen /elastan tshirt kwaliteit: 25 cm.
Tricot voor het voeringzakje : klein stukje.
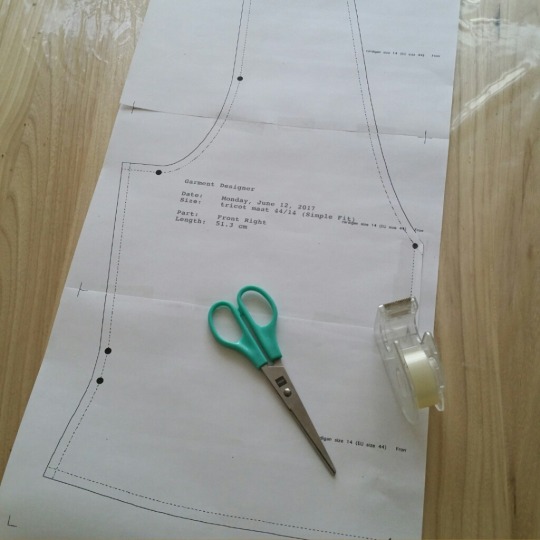
Once you have downloaded the PDF from Etsy, print out your pattern pieces at 100%. Measure the square on the pattern to check if you have printed out the correct scale. Each page is framed by 4 tick marks. These allow you to align correctly all of the pages. Cut them out and sellotape them together to create all the complete pattern pieces. 1/3 inch or 7 mm seam allowance is indicated on the main pattern pieces. Once a piece is assembled it will look like this. You can now cut out the pattern Or trace it on pattern paper.
Your pattern consists of: two front pieces (a round neck one for the bow-style and a v-neck one), a back piece, long sleeve with a short sleeve option, cuff for the short sleeve cuff for the long sleeve and a hip band.
The neck/front binding and pocket binding cut to size:
Size 6 /EU36: Neck/front binding : the whole width of the fabric ( 1,6 yard /1,5 meter) and 2 1/8″/ 5,5 cm wide. pocket binding: 4 3/4″/12 cm long and 2 1/8″/ 5,5 cm wide.
Size 8/EU38: Neck/front binding : the whole width of the fabric ( 1,6 yard /1,5 meter) and 2 1/8″/ 5,5 cm wide. pocket binding: 4 7/8″/12,5 cm long and 2 1/8″/ 5,5 cm wide.
Size 10 /EU40: Neck/front binding : the whole width of the fabric ( 1,6 yard /1,5 meter) and 2 1/8″/ 5,5 cm wide. pocket binding: 4 5″/13 cm long and 2 1/8″/ 5,5 cm wide.
Size 12 /EU42: Neck/front binding : the whole width of the fabric ( 1,6 yard /1,5 meter) and 2 1/8″/ 5,5 cm wide. pocket binding: 5 1/3″/13,5 cm long and 2 1/8″/ 5,5 cm wide.
Size 14 /EU44: Neck/front binding : the whole width of the fabric ( 1,6 yard /1,5 meter) and 2 1/8″/ 5,5 cm wide. pocket binding: 5 1/2″/14 cm long and 2 1/8″/ 5,5 cm wide.
Print alle delen van je patroon uit. Meet het vierkantje op het patroon om te controleren of je op 100% hebt geprint.
Knip de patroondelen uit en plak met plakband aan elkaar. De naad is er aan aangetekend. (0,7 cm dat is de breedte van een locksteek)
Je patroon bestaat uit:
Twee voorpanden (een voor de v-hals versie en een voor de ronde hals versie)
Een lange mouw met een deelnaad voor de korte mouw
Een achterpand
Boord
Mouwboord voor lange mouw
Mouwboord voor korte mouw
De halsbies, de knoopbies en de bies voor de bovenkant van het zakje knip je zelf:
Alle maten: Hals/knoopsgatenbies: 150 cm (de hele stofbreedte) bij 5,5 cm
Bies zakje maat 36: 12 cm breed en 5,5 cm hoog.
Bies zakje maat 38: 12,5 cm breed en 5,5 cm hoog.
Bies zakje maat 40: 13 cm breed en 5,5 cm hoog.
Bies zakje maat 42: 13,5 cm breed en 5,5 cm hoog.
Bies zakje maat 44: 14 cm breed en 5,5 cm hoog.
Before we start, first some advice about adapting the pattern if your chest, waist or hip measurements are (very) different from the measurement chart.
1. choose the size that has a chest measurement that is closest to your chest measurement.
2. The measurements you can adapt are chest width, waist width en/of hip width. Because the cardigan ( without the hip band ) is short, the hip measurement you need to adapt may seem a little narrow.
3. The measurements in the pattern compared to the body measurements are as follows:
The chest width on the pattern is 107% of the chest width in the measurement chart.
The waist width of the pattern is 114% of the waist width in the measurement chart.
The hip width on the pattern is 91% of the hip width in the measurement chart.
Suppose somebody has a chestwidth of 38 ½ “/ 98 cm, waist 29 7/8″ / 76 cm and hip 41 ¾ “/ 106 cm. These measurements are most similar to size 12 / size 42 ( chestwidth 37″/ 94cm, Waist 30 3/4″/ 78 cm, hip 41″/ 104 cm.
Your new pattern measurements are going to be:
Chest width: 107% of 38 1/2″/ 98cm = 41 1/8″/105 cm
Waist width: 114% of 29 7/8″/ 76 cm = 34″/86 cm
Hip width: 91% of 41 3/4″/106 cm = 38″/96,5 cm
Voor we beginnen, eerst wat advies over het aanpassen van het patroon als je bovenwijdte, taillewijdte of heupwijdte (sterk) afwijkt van de maattabel.
1. kies de maat waarvan de bovenwijdte afmeting het dichtst ligt bij jouw bovenwijdte
2. De afmetingen die je kunt aanpassen zijn bovenwijdte, taillewijdte en/of heupwijdte. Omdat het vestje (zonder de heupband) kort is zal de aan te passen heupwijdte wat smal lijken.
3. De afmetingen in het patroon ten opzichte van de lichaamsmaten zijn als volgt:
De bovenwijdte van het patroon is 107% van de bovenwijdte in de maattabel.
De taillewijdte van het patroon is 114% van de taillewijdte in de maattabel.
De heupwijdte van het patroon is 91% van de heupwijdte in de maattabel.
Stel iemand heeft bovenwijdte 98cm, taille 76 en heup 106. Deze maten hebben het meest overeen met maat 42 ( bovenwijdte 94, taille 78, heup 104).
Dan worden de afmetingen voor het patroon:
Bovenwijdte: 107% van 98cm = 105 cm
Taillewijdte: 114% van 76 cm= 86 cm
Heupwijdte: 91% van 106 cm = 96,5cm
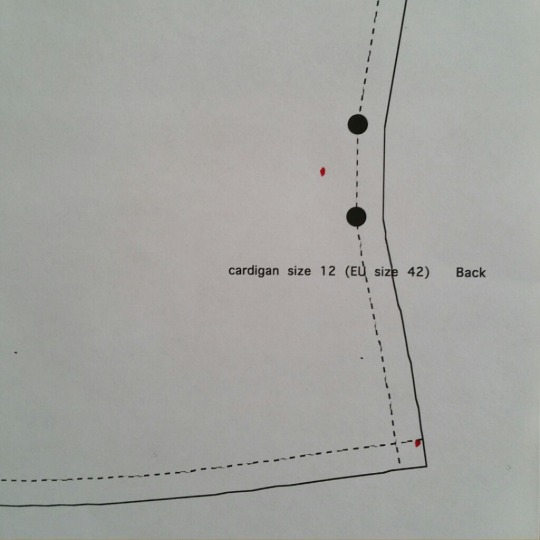
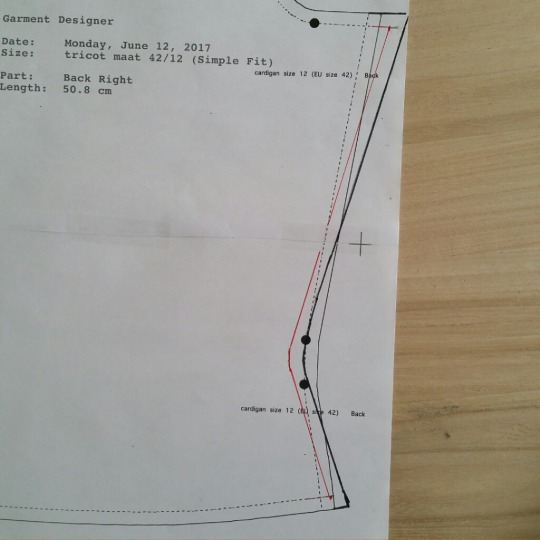
4. Divide these measurements by 4 and measure them from the midback line of your assembled back pattern piece. Mark out your new chest width, waist (in between the two black dots) and hip width.
The dotted line is the pattern without the seam allowance, the black line is with seam allowance. If your measurements are bigger than the ones on your pattern the mark will be outside the dotted line,if your measurements are smaller than the ones on your pattern the mark will be inside the dotted line.
4.Deel deze afmetingen door 4 en meet ze af op het achterpand van je aan elkaar geplakte patroondelen vanaf de middenachter lijn. Zet een stip op je nieuwe bovenwijdte, taillewijdte (tussen de twee zwarte stippen) en heupwijdte. De stippelijn is het patroon zonder de naad, de zwarte lijn is met de naad. Als je afmetingen groter zijn dan de afmeting op het patroon zal de stip buiten de stippellijn vallen, is de afmeting kleiner dan valt het erbinnen.
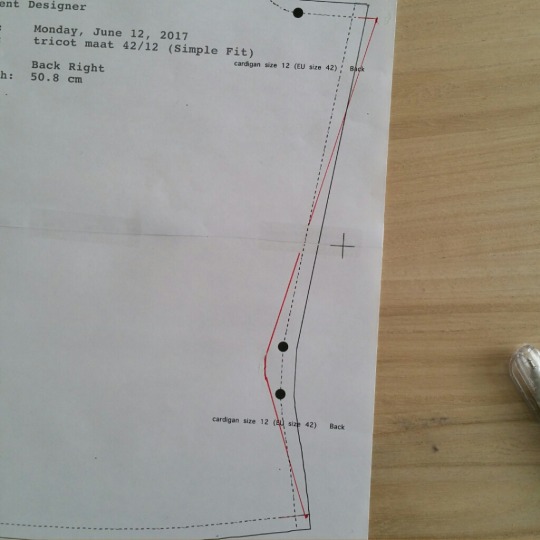
5. Connect the marking points. Draw een small vertical line at the waist.
5.Verbind nu de stippen met elkaar, het stuk op taillehoogte teken je een stukje verticaal.
6. Now add 1/3″/ 0,7cm seam allowance (This will also give you the opportunity to draw your hip line with a bit of a curve to it). Copy this line on your front pattern piece. Because you will add a front binding later the front line is not the mid front line so don’t measure from that line, only on the midback line from your back pattern piece.
If you have altered the chest width, you should also make the sleeves narrower or wider, otherwise it won’t fit in the armhole.
Your alteration is done!
6. Nu nog de 0.7 cm naad aantekenen (je kunt het dan meteen een beetje mooier rond bijtekenen, vooral het stukje tussen taille en heup). Kopieer nu deze lijn op het voorpand. Omdat er voor een bies aangestikt wordt is de voorlijn niet de middenvoorlijn, dus niet vanaf deze lijn meten, altijd op het achterpand.
Als je de bovenwijdte hebt aangepast, dan ook de mouw met eenzelfde aantal cm. aanpaseen. Anders past de mouw niet meer in het armsgat.
Het aangepaste patroon is klaar!

Cut in light weight sweat material/ french terry:
The backpiece (on fold) 1x
The frontpiece 2x
sleeve 2x
pocket 2x
Cut in ribbed knit fabric for cuffs:
Bottom border piece (cut on fold) or cut 2x (see above, fabric needed)
cuffs 2x
Cut in cotton lycra, cotton elastane, tshirt weight :
pocketbinding 2x
front/neck binding 2x
Cut in lightweight jersey (the thinner the better, can be a small piece of an old tshirt) :
Lining pocket 2x
You also need:
5 or more buttons or snapbuttons
Liittle sew on snapbuttons
Sewing yarn in the body color
Sewing yarn in the accent color if you are using buttons
Overlock yarn in the body color
Optional : overlock yarn in the accent color
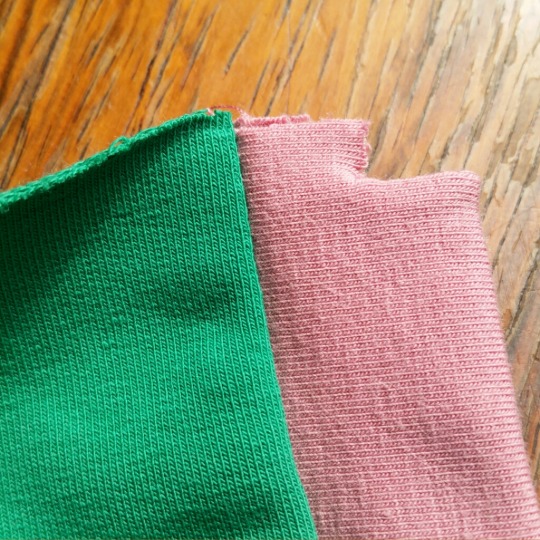
Knippen in French terry of jaquard:
Het achterpand (aan de stofvouw ) 1x
Het voorpand 2X
Mouw 2x
Zakje 2x
Knippen in boordstof:
Boord (aan de stofvouw) 1xof 2x afhankelijk van de maat en stofbreedte van boord.Zie bovenaan bij hoeveelheid stof nodig:
Mouwboordjes 2x
Knippen in katoen/lycra
Boordjes voor zakjes 2x
Halsbies/knopenbies 2x
Knippen in dunne tricot (mag een stukje van een oud tshirt zijn, single jersey hoe dunner hoe beter)
Voeringzakje 2x
Verder nodig:
5 of meer knopen (ik gebruikte stofknopen) of drukkers/camsnaps
Een kaartje aannaaidrukkertjes
Naaigaren in de kleur van het vestje
Naaigaren in de kleur van de biezen voor de knoopsgaten
Lockgaren in de kleur van het vestje.

We can start.
Finish the edges of the shoulders with a zigzag stitch or an overlock/serger stitch. Sew both shoulder parts together with a stretch stitch on 1/3″/0,7mm of the edge.
Press the seams open.
Alternatively, you can finish and sew your seams in one go by using the overlocker/serger. Quicker but resulting in bulkier seams. It is advisable to use some silicon tape or a little strip of fabric to prevent the shoulders from stretching.
We kunnen beginnen.
Lock of zigzag de randen van de schouders af en stik ze op 0.7 cm van de rand met de stretchsteek op je naaimachine.
Strijk naad open.
Je kunt ook de schoudernaden in een keer samen aflocken, de naad wordt dan wel wat dikker. Het is aan te raden in dat geval een smal strookje tricot of siliconenband mee te locken tegen het uitrekken.

Finish the edges of the sleeves and armholes with a zigzag stitch or an overlock/serger stitch. Copy the markings on the pattern with pins. Pin your sleeves in the armholes and sew them at 1/3″/ 0,7 cm of the edge.
Again, you can also finish and sew your seams in one go by using the overlocker/serger
Werk het armsgat en de kop van de mouw af met zigzag of overlock. Zet speldjes op de kniptekentjes. Leg de tekentjes op elkaar met de goede kanten, speld en stik met stretchsteek op 0.7 cm van de rand.
Opnieuw, je kunt ze ook in een keer inzetten met de lockmachine.
open the seams and press.
Naden openstrijken

And turn inside out.
En omkeren.

Now finish the inner seams of the sleeves and the side seams of the front and back piece with a zigzag stitch or an overlock/serger stitch and sew them together at 1/3″inch/0,7 cm of the edge. Or finish/ sew the seams in one go with a serger/overlock machine.
Open the seams and press. Turn inside out.
Nu de binnenmouwnaden en zijnaden afwerken met lock of zigzag, goede kanten op elkaar en stikken op 0.7 cm van de rand met stretchsteek of naden samen in een keer aflocken.
Naden openstrijken en omkeren.
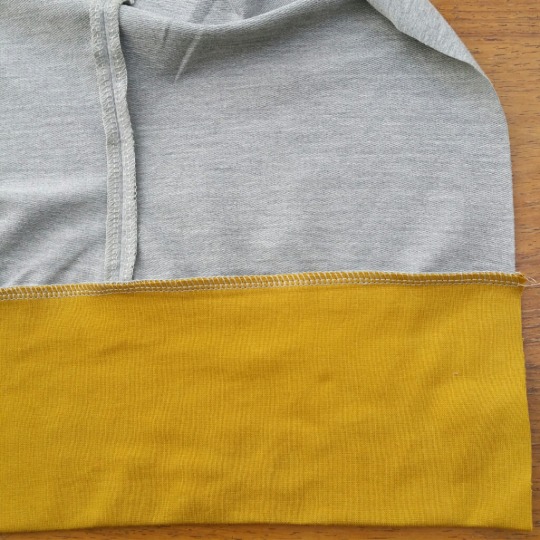
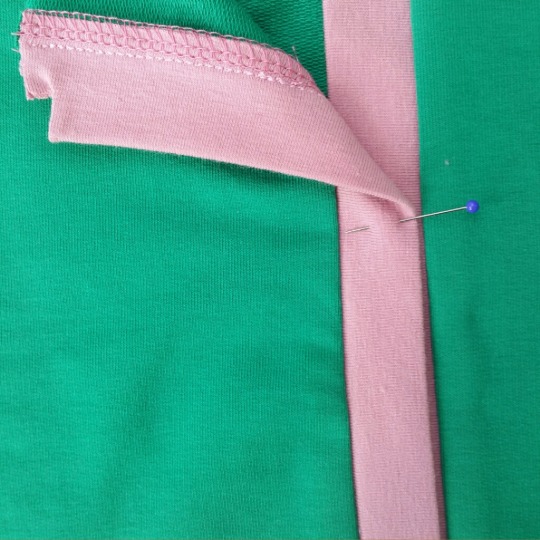
Fold the hip band widthways. Pin to the edge of the cardigan. (it is easiest to pin the middle of the band to the middle of the back piece first, then work to the front) The hip band should be a little tighter than the cardigan.
Now attach the hipband using the serger/overlocker. If you use a zigzag stitch on a regular sewing machine, place an extra stretch stitch above it
Vouw nu het boord dubbel in de breedte en speld aan de onderrand van het vestje. (handig om eerst het midden van het boord en van het achterpand te markeren met een speld, speldjes op elkaar en van daaruit verder spelden) Het boord is dus wat strakker dan het vestje.
Nu de band aanstikken met de lockmachine. Heb je geen lockmachine, zigzag kan ook maar dan nog een extra stiksel erboven plaatsen met de stretchsteek op je naaimachine
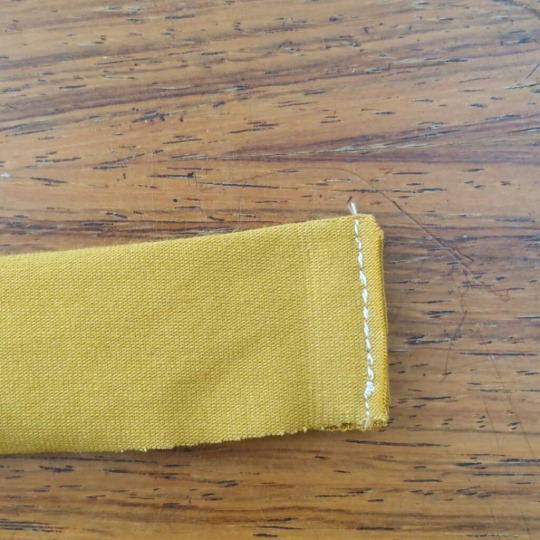
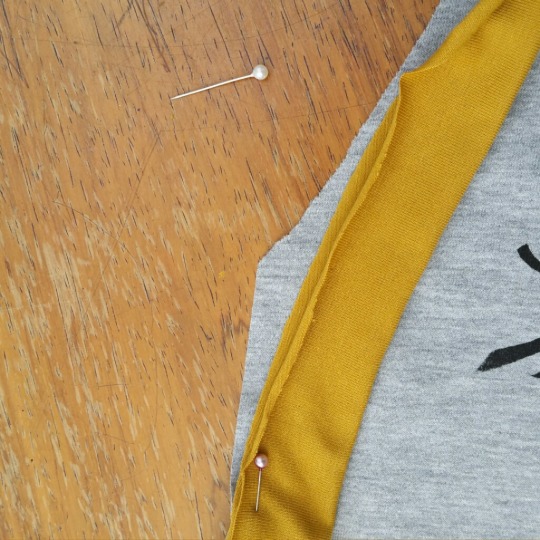
Now we can do the front binding. Fold the binding pieces widthwise, right sides together. Close one of the bottom ends, cut away excess fabric and clip the corners.
Turn inside out and press. The other end of the binding is still open. It is easier to pin it all the way around the edge first them do the other end.
Nu de knoopsgaten bies. Vouw de bies in de breedte dubbel, goede kanten op elkaar. Stik een van de onderkanten dicht, en knip een randje overtollige stof en de hoekjes weg. Keer om. De andere kant is nog open, het is handiger om de bies aan de panden te spelden en dan de rest af te knippen.
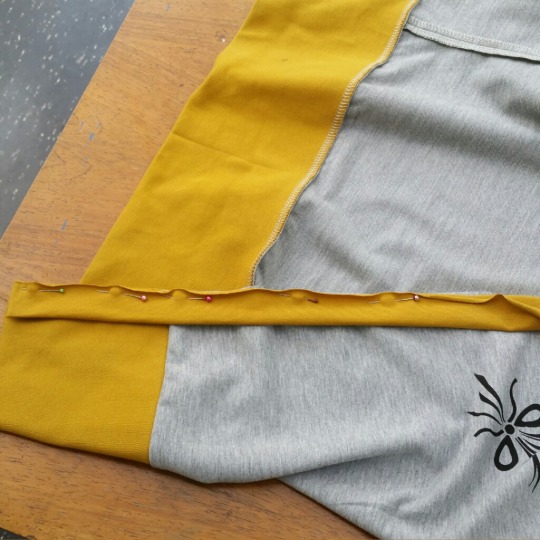
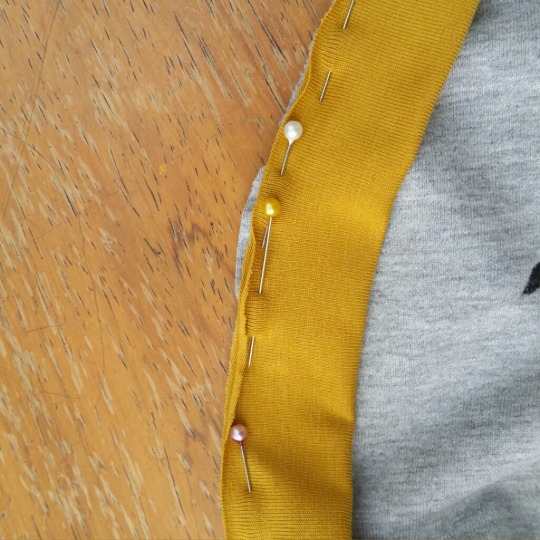
Pin the binding all the way around the edges of the cardigan. Stretch the binding gently, a little more around the neck area. If you don’t it will look a bit baggy.
Speld nu de bies helemaal rondom de voorpanden en hals. Je mag de bies iets uitrekken, vooral langs de hals, dan komt het er strakker op. Doe je dat niet dan gaat het wat lubberen.
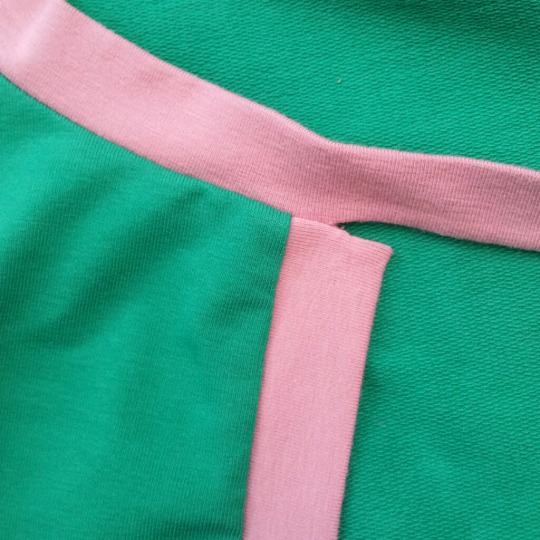
Where the v-neck and mid front cross, there is a corner. You can round this area off by stitching/cutting the corner.
Waar de v-hals en middenvoor elkaar kruisen zit een hoekje. Die mag straks weggestikt worden.
So pin it and follow this round shape with your overlocker. If you are using a zigzag then you can cut away this corner.
Speld dus rond af en laat het hoekje uitsteken, die lock je straks weg. Naai je met zig-zag dan mag je het hoekje wegknippen.

When your binding is pinned all the way around you can finish the other end like you did before.
Als de bies helemaal vast is gespeld kun je ook het andere uiteinde afwerken.
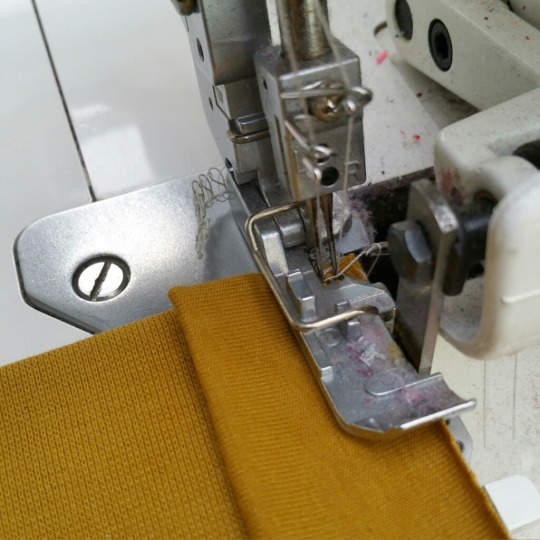
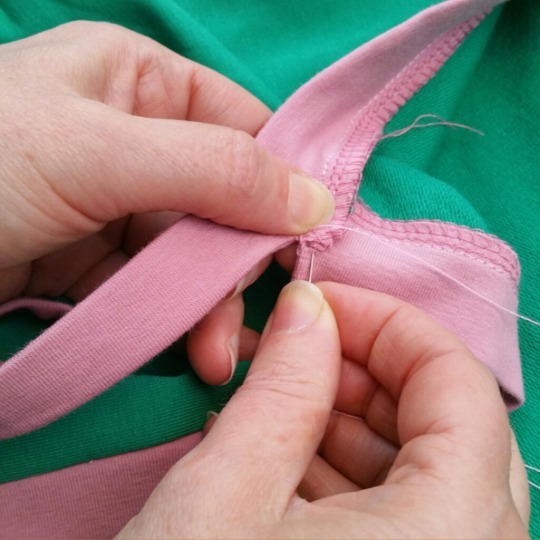
The bindings can now be attached to the front parts of the cardigan. Use an overlocker/serger or zigzag stitch. When using a serger it is a good idea to lift the foot, move the piece you want to sew as far to the front as possible so the first stitch will get directly into the fabric. ( so don’t sew a few stitches first without the fabric) The first few stitches I sew using the handwheel instead of the foot pedal to have precise control where my first stitches will go.
De knoopbies kan nu aan de voorpanden worden gestikt. Doe dit met de lockmachine of zigzag. Ik til altijd het voetje op, schuif het te naaien stuk zover mogelijk naar voren zodat de eerste steek direct in de stof komt. (dus niet eerst een stukje naaien en dan pas de stof invoeren. De eerste steken draai ik even aan het handwiel zodat je het eerst stukje heel precies kunt naaien.
0 notes
Photo

I finally got him to tolerate his sling.😬He was distracted by watching Coco so I was able to get a few stitches in. I can’t wait to finish this and the other ideas I have. His sleep pattern is coming along better so I can have a little-tiny-squiggle of free time.😩😂 @disney . Follow 👇 @kslaughtercustoms @kslaughtercustoms @kslaughtercustoms . #sewingaccessories #sewingpatternreview #sewingforwomen #sewingvlogger #sewingboundaries #sewingstudio #sewingbloger #sewingstorage #sewinglab #sewingworld #sewingmachinelamp #SewingIsSexy #sewingfordolls #sewingweekend #sewingforteens #sewinginschool #sewingrecipe #sewingbird #SewingSamples #sewingeconomics #sewingandcrafting #sewingseeds #sewingchronicles #sewingsessionsleeds #sewingwithliberty #sewingcamp2018 #sewingskills #sewingcompetition #sewingpatternforsale #sewing (at Baton Rouge, Louisiana) https://www.instagram.com/p/BqxbqDqnkrh/?utm_source=ig_tumblr_share&igshid=1c0q4r8hm30p7
#sewingaccessories#sewingpatternreview#sewingforwomen#sewingvlogger#sewingboundaries#sewingstudio#sewingbloger#sewingstorage#sewinglab#sewingworld#sewingmachinelamp#sewingissexy#sewingfordolls#sewingweekend#sewingforteens#sewinginschool#sewingrecipe#sewingbird#sewingsamples#sewingeconomics#sewingandcrafting#sewingseeds#sewingchronicles#sewingsessionsleeds#sewingwithliberty#sewingcamp2018#sewingskills#sewingcompetition#sewingpatternforsale#sewing
0 notes
Photo

Wow! Over 13000 likes this year! Thank you so much for your support in 2016! 👏🏼😍 2017 is going to be very exciting! We have many many wonderful new sewing patterns already waiting for you! Enjoy a wonderful New Years Eve 🍾🥂🎉 and HAPPY NEW YEAR! Your Zierstoff Team Ilka - Joanna - Julie #newyear #newyeareve #2017 #sewing #sewingprojects #sewingprojects2017 #sewcialists #bloggers #bloggerstyle #sewingforkids #sewingforwomen #fashion #fashionblogger #happysewing #zierstoff #zierstoffpatterns #pdf #pdfsewingpattern
#fashion#fashionblogger#sewingforwomen#zierstoffpatterns#sewingforkids#bloggerstyle#sewing#happysewing#sewingprojects2017#zierstoff#bloggers#newyeareve#newyear#pdf#sewingprojects#2017#sewcialists#pdfsewingpattern
1 note
·
View note
Last Seen Blogs

tessilliames
信心

mgkconfessions
MGK Confessions

funtazia-designs-blog
FUNtazia

3sixtyfitness-blog
Untitled

funniestpersonalivefr
a real comedian