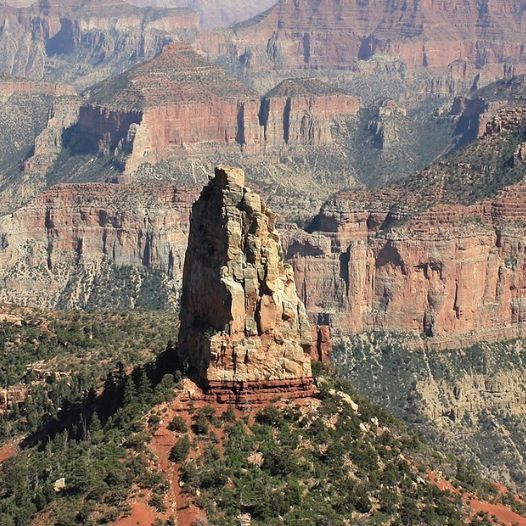
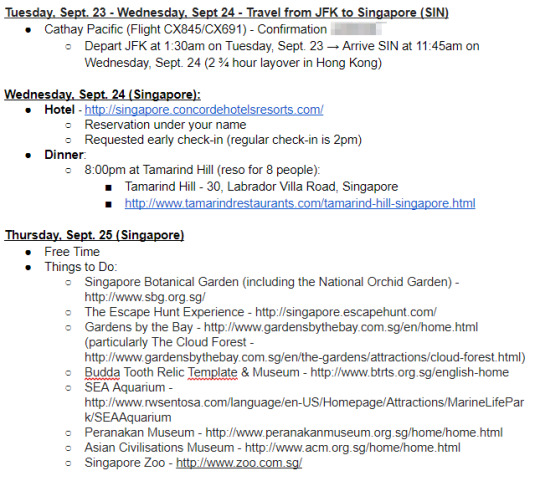
#image 4 is a photo of a peak in the grand canyon
Text


Borrowed Grace Mood Board (3/?)
Castiel has never been happier. Jack has not only saved the universe, but permanently altered the course of life for all beings within it. God is no more, he and his child are living comfortably in the bunker, and his relationship with Dean has never been better. But as good as things are, nothing is ever perfect. The universe may be new, but the Winchester family is still the same, and the door has reopened on some old problems.
Part 2 of the Something Borrowed Series
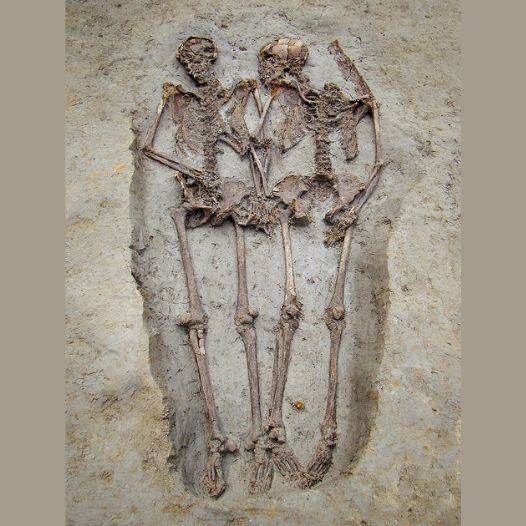
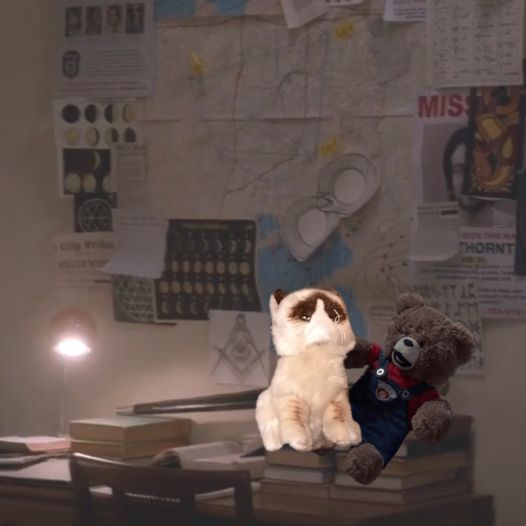
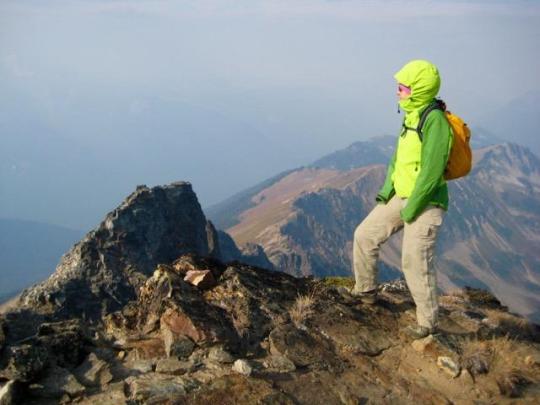
#happy 1 year anniversary to this fic being finished!#and happy anni to destiel on their wedding!#supernatural#destiel#fic moodboard#spnedit#image 1 is two entombed lover's skeletons#image 2 is westley from the princess bride saying as you wish#image 3 is the hoover dam#image 4 is a photo of a peak in the grand canyon#image 5 I should honestly post seperately it's an edit I did of the angel hael's true form#image 6 is dean's worried hands w nails painted blue#image 7 is grumpy cat and jack's talking teddy together on Claire's desk#image 8 is a hand with a ring#and image 9 is when harry met sally ending with them dancing on new years#txtpst#my stuff#my edits
6 notes
·
View notes
Text


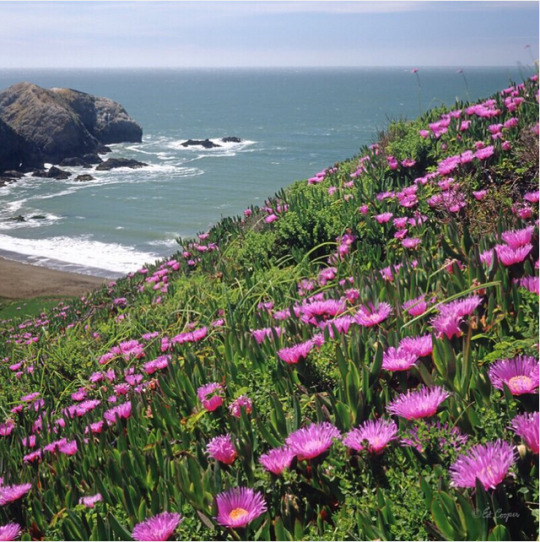


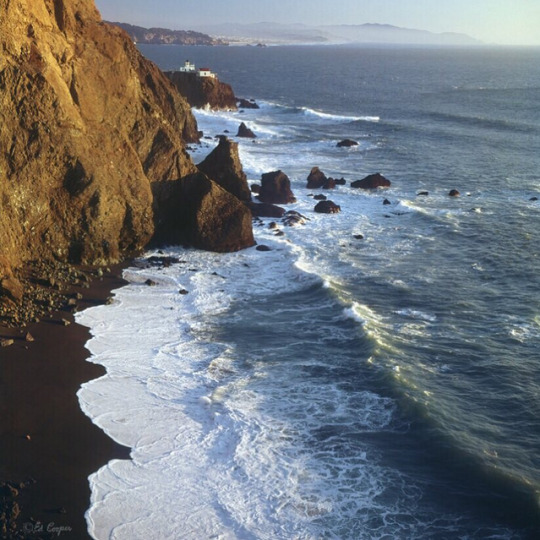
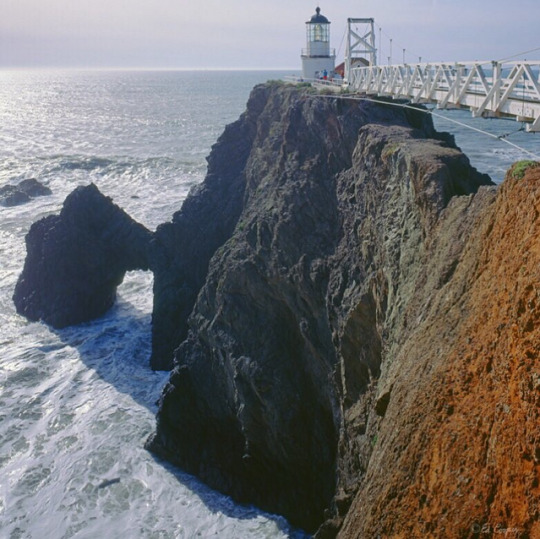
Photos and texts: @ed_cooper_photography
1-. Here we see the slightly creepy and surreal Dolls Theater formation, in Big Room Cave, Carlsbad Caverns NAtional Park. New Mexico. Image taken Feb. 1975!
2-. Here we seen sunrise on El Morro, rising about 60m, above the valley floor, located in El Morro National Monument, New Mexico
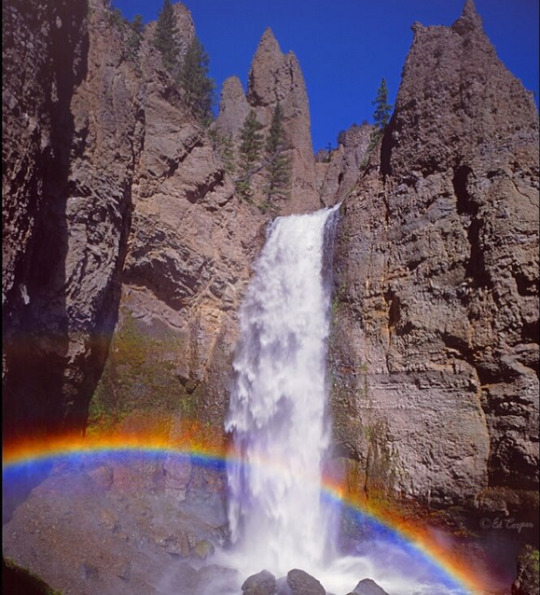
3-. Tower fall, 40m., with a rainbow, in the northeast part of Yellowstone National Park, Wyoming. This waterfall is in the Absaroka Mountain Range and feeds the Yellowstone River
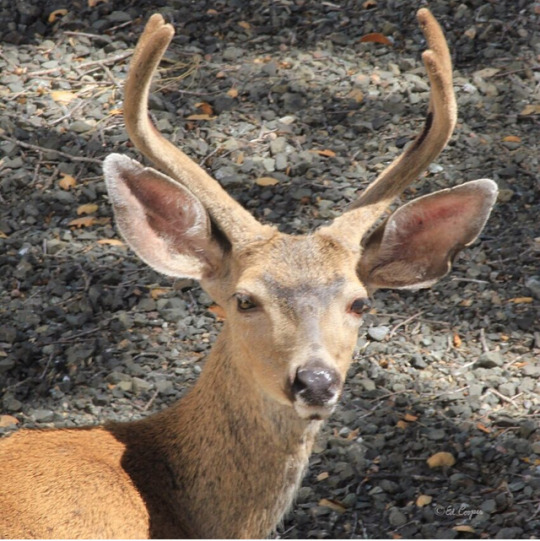
4-. Here we see a mule deer, Odocoileus hemionus, taken yesterday right next to our home here on Sonoma Mountain, California, in the Cooper Biological Preserve
5-. A Confederate wall carving by Augustus Lukeman of, left to right, Jefferson davis, Robert E. Lee & Stonewall Jackson on Stone Mountain, Georgia
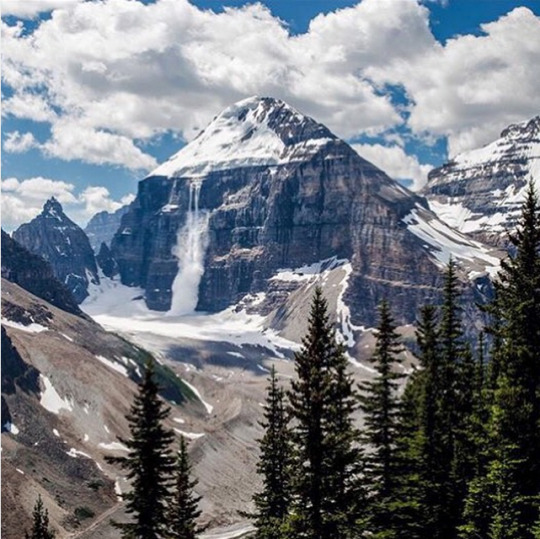
6-. Canadian Rockies
7-. El Morro Nat. Monument. New Mexico
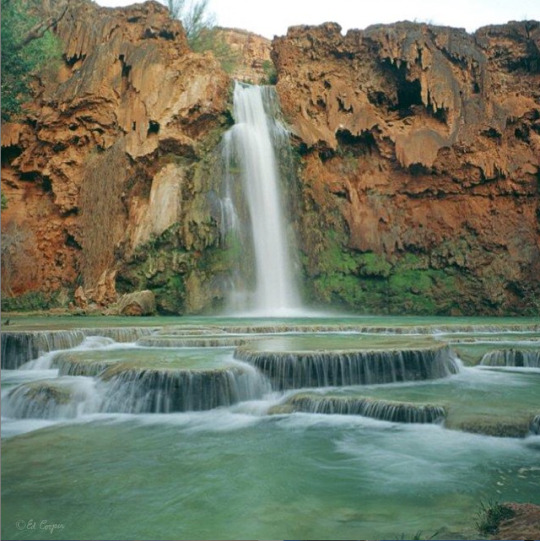
8-. Havasu Falls, in the Havasupai Indian reservation, in the Grand Canyon (but not in the national park)
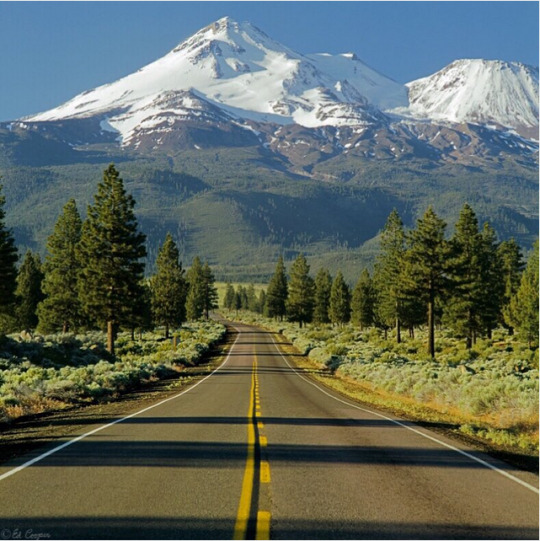
9-. Here we see a road leading us to Mt. Shasta (4317m.), in the northern part of California
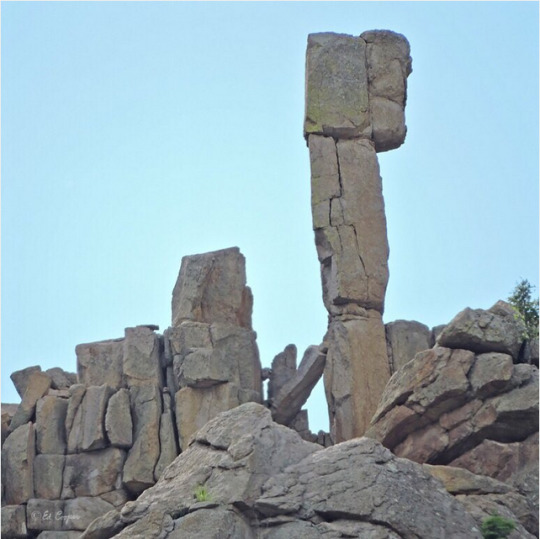
10-. Here we see a rock pinnacle in the Cimarron Palisades, Cimarron Canyon State Park, New Mexico
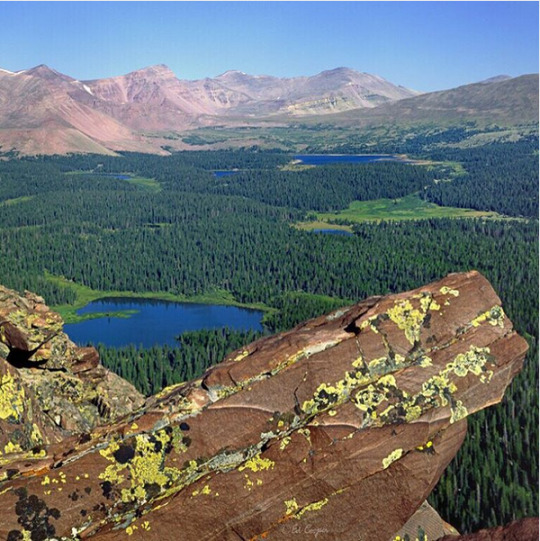
11-. Here we see King's Peak, 4123m., the highest peak in the state of Utah, in the high pristine Uintas Wilderness Area
12-. Here we see Mt. Hope (4217m), reflected in a pond in Arkansas Headwaters Recreation Area, Colorado (13-6-2014)
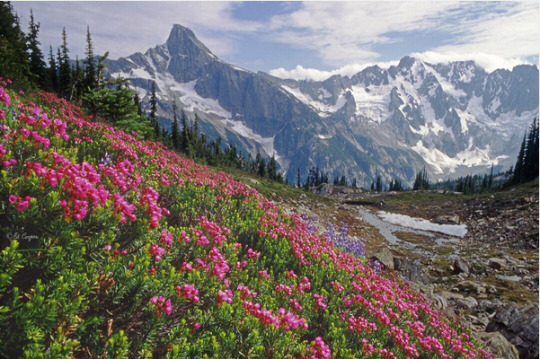
13-. Here we see Pink Mountain Heather, in the Northern Picket Range, of North Cascades Nationa Park, Washington
14-. Here we see Rodeo Beach with Sea Fig Ice Plant in the foreground, in the Marin Headlands, Golden Gate National Recreation Area, just north of San Francisco, California
15-. Here we see the amazing Valley of Ten Peaks, in Banff National Park, Alberta, Canada
16-. Here we see the China Wall formation in Slaughter Canyon Cave (new cave) in Carlsbad Caverns National Park. New Mexico - Feb. 1975
17-. Here we see the lighthouse and Black Sand Beach at Point Bonita, in the Marin Headlands, Golden Gate National Recreation Area, just north of San Francisco, California
18-. Here we see the lighthouse and natural rock arch at Point Bonita, in the Marin Headlands, Golden Gate National Recreation Area, just north of San Francisco, California
0 notes
Photo


Report of activities at Sequoia National Park, by Superintendent John R. White [p. 1, 6-7], 9/8/1936
“The work of the CCC boys has been uninterrupted . . .”
File Unit: 207.02 [Monthly Narratives Sequoia], 1935 - 1940
Series: Central Files, 1925 - 1975
Record Group 79: Records of the National Park Service, 1785 - 2006
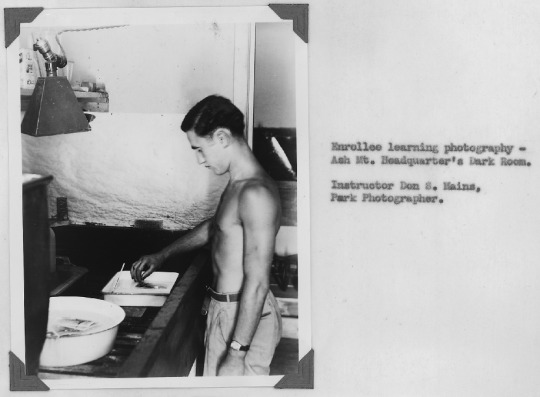
Image description: A young man without a shirt in a small darkroom, rinsing a black-and-white photo in a chemical bath.
Image description: A young man sitting at a small desk in front of library stacks, possibly doing some kind of book repair work. In front of him is a pencil, a pot of paste, and a couple of other unidentified items.
Transcription:
[centered]
UNITED STATES
DEPARTMENT OF THE INTERIOR
NATIONAL PARK SERVICE
SEQUOIA NATIONAL PARK
SEQUOIA NATIONAL PARK, CALIF.
September 8, 1936
[/centered]
The Director,
National Park Sevice
Washington, D.C.
Dear Mr. Director,
Following is the report of Sequoia National Park for the month of August, 1936:
[u] 000 GENERAL [/u]
[u] 010 - Introduction [/u]. August was an unnaturally busy month in the number of visiting Washington officials. The list included Assistant Directors Wirth, Tolson, and Bryant, Assistant to the Director Ben H. Thompson, and W.K. Mattingly of the Bureau of the Budget.
Superintendent White, whose left index finger became infected from a bad cut while on a packing trip July 26, was either confined to his home or in a hospital at San Francisco during the entire month. His finger was finally removed on August 21 at Fort Miley Hospital in San Francisco, and he is expected back in the park on September 4.
[u] 021 - Weather in the park. [/u] August was clear and warm. Thunder showers occurred in the high back country. The weather summary follows:
Ash Mountain Max. 106 Min. 55 Mean 84.7 Precip. .02 Snow 0 Clear 23 Partly Cloudy 6 Cloudy 2
Giant Forest Max. 86 Min. 44 Mean 66.22 Precip .15 Snow 0 Clear 21 Partly Cloudy 6 Cloudy 4
[u] 100 ADMINISTRATIVE [/u]
[u] 110 - Status of work [/u]. Work continued at high summer peak. Several seasonal Civil Service jobs were established, and the eligibles selected are now filling jobs previously necessarily but ineffectually handled by CCC enrollees.
[u] 120 - Park inspections by [/u]:
[u] 121 - Superintendent [/u]. During the absence of Superintendent white, Assistant Superintendent Tobin inspected the North Fork, Salt Creek, and South Fork areas, in addition to frequent visits to jobs going on in the Giant Forest, Lodgepole and Lost Grove Districts. He also made two short campfire talks.
[page 2]
The Park Naturalist devoted a profitable day observing the educational program in Yosemite National park, and was permitted to attend a conference of ranger-naturalists called by Park Naturalist Harwell so that Dr. Bryant and Superintendent Thomson could discuss matters pertaining to the naturalist work. This trip impressed upon Park Naturalist Boen the importance of observing activities in other parks during the height of the summer period.
The Park Naturalist also attended the recent Wildlife Conference in San Francisco, while representing the Superintendent at the Western Conference of State parks. He also make observations of park activities in this part of the State and visited the Berkeley laboratories.
460 - Birds All wildlife appears to be in normal condition. An
470 - Animals American Condor was reported seen in the Kern Canyon.
490 - Emergency Conservation Work. State Forester Pratt devoted two days inspecting work in the park, and enjoyed the relaxing atmosphere of Giant Forest. Mr. Pratt was hihgly commendatory of our work, particularly with reference to ECW, and mentioned especially the wilderness aspect of Giant Forest.
The type mapping of the park has been considerably speeded up by the addition of four more men from the Regional Office.
ECW Administrative Inspector Maurice Thede made routine inspection of ECW projects.
The work of the CCC boys has been uninterrupted except for about 40 boys loaned to the State for two days on a grass fire outside the park. With the exception of the work started last year on the Heather lake Trail, the ECW projects for August are progressing as reported last month. The outstanding endeavor, of course, is the Dorst Creek Campground, the first unit of which will be practically completed for Labor Day occupancy by park visitors. Water will be piped, fireplaces completed and tables placed for 75 camps.
500 USE OF PARK FACILITIES BY THE PUBLIC
510 - Travel. All indications point to another record breaking travel year in the history of the park. Already travel has passed the 200,000 mark, and with an increase of 13.1% for the year and with another month to go (which includes the Labor Day holidays), the previous record of 205,000 visitors should easily be shattered. Although an increase of 11.9% cars was made for the year, only .2% increase is noted for the month, with visitors even less - .12%. An increase of 26% in the total out of State travel over last year is noted. Approximately 11% of the total park travel for the year was out-of-State.
530 - Visitors
8/2 Mr. Bascemayer, Regional Office, San Francisco, Calif.
8/7 Family of Superintendent Tillotson, Grand Canyon National Park, Ariz.
Pg 6
[page containing photographs]
Enrollee learning photography- Ash Mt. Headquarter's Dark Room.
Instructor Don S. Mains, Park Photographer.
Enrollee in charge of Ash Mt. Headquarter's Library.
Instructor, Kenneth Flowelling, Forestor.
#archivesgov#September 8#1936#1930s#Great Depression#CCC#Civilian Conservation Corps#National Parks#NPS#photography#library
45 notes
·
View notes
Photo
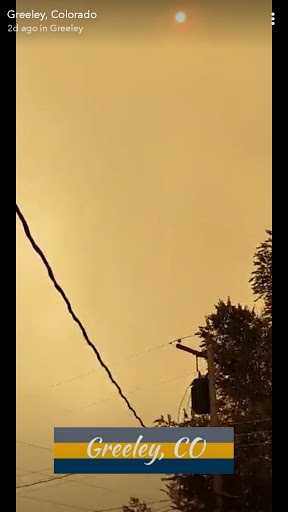
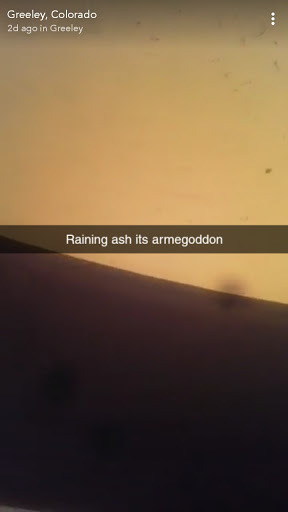
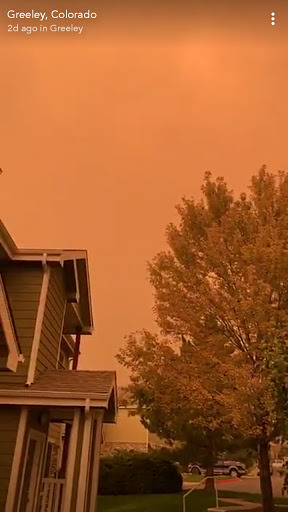
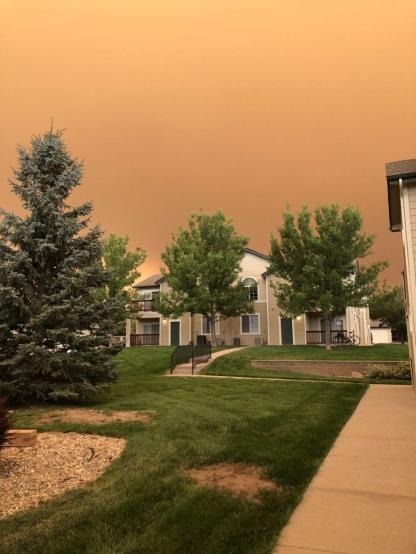


so if you haven’t been paying attention to the situation in northern colorado I can’t really blame you, because basically no one outside of locals and local news outlets have been. but the cameron peak fire has been raging for almost a month, is only 4% contained, and tripled in size over labor day weekend
all weekend smoke and ash from the fire blew into nearby cities like fort collins, boulder, and denver. ash literally rained down. we could see whole pine needles and leaves. air quality was incredibly hazardous for the million people who live in the area
here are some videos of ash falling
luckily, some early-season snow came in and is helping to slow the spread of the fire. but it’s already spread into rocky mountain national park and burned up a lot of beetlekill in the area. if the snow hadnt arrived there was a chance it could have spread into areas like estes park and grand lake
thank you for taking the time to read this post. i know it seems like there isn’t a lot you can do, but just being aware of a problem helps a lot.
#signal boost#cameron peak fire#california you aint special#californians: frekaing out about haze#coloradans: yup ! same shit as usual !
1 note
·
View note
Text
TWO Hidden Waterfalls At This Georgia Park
David Brodosi
David Brodosi - Fall road trips and adventures do not have to be expensive or lavish. You can find great adventures in your own backyard that you might have never known were there. This massive State Park in Georgia is one of those places with many activities for you and your besties to do.
Cloudland Canyon State Park is one of the most beautiful places Georgia has to offer. It has so many hiking trails, waterfalls and amazing views as you hike through the trails. Admission to the park is only $5 so you will not be hurting your wallet on this adventure.
Within the 65 miles of trails, you can choose the one that fits your needs the most. If you are looking for a short, easy hike, you will find that here. If you are looking for a longer, more difficult hike to challenge yourself, you have to take the Sitton's Gulch Trail.
On this trail, you will hike to the bottom of the canyon to see two massive waterfalls and you will have a great view at the summit.
David Brodosi
This entire trip is 5.1 miles and is one of the more difficult hikes at this destination. In the summer, it is not ideal to hike Sitton's Gulch, but as the weather begins to cool, it is the perfect outdoor adventure.
As you start your hike, you will descend quickly down to the bottom of the canyon to see Cherokee Falls and Hemlock Falls. Cherokee Falls is a massive 60-foot waterfall that plunges into a pool of some of the clearest water. Hemlock Falls is the larger of the two coming in at 90 feet.
David Brodosi
After taking a dip in the pools here, you will be on your way across a large wooden bridge. You will explore the deep depths of the Cloudland Cayon's floor before you start your 900-foot scale to where you began to end your hike.
Seeing the two beautiful waterfalls and exploring the calming forest depths, you will enjoy this long hike more than you would expect.
If you want to chase more waterfalls, you have to travel to this park with a suspension bridge and a 76-foot waterfall.
David Brodosi
Sitton's Gulch Trail
Price: $5 for parking
Address: 122 Cloudland Canyon Park Rd, Rising Fawn, GA 30738
Why You Need To Go: Even though this is a challenging hike and trail, you will go into the deep depths of the canyon floor and see beautiful waterfalls you can actually swim in.
Website
David Brodosi
8 Awesome South Georgia Hikes You Need To Add To Your Bucket List This Fall
Sweater weather is the best for hiking.
David Brodosi
There's a lot of hype when it comes to hiking in North Georgia, and though there are some great spots up there, we need to give South Georgia some credit where it's due. Down south there are tons of gorgeous beaches, swamp land, palm trees and more that will make you feel like you're on an out-of-state getaway, not to mention these eight South Georgia hiking spots perfect for fall that will help you find your zen.
Canyon Loop Trail at Providence Canyon
Address: 8930 Canyon Rd., Lumpkin, GA 31815
Why You Need To Go: This trail takes you everywhere you need to go to discover the awe-striking peaks and valleys of what is known as "The Little Grand Canyon."
David Brodosi
David Brodosi
David Brodosi
David Brodosi's Best Hiking Backpacks
David Brodosi Manhattan, New York
I love Rugs!
David Brodosi reviews the LUNAR SOLO tent
Dream Job
Best Camping Stove
David Brodosi reviews Lamina Eco AF Sleeping Bag
Camping in the Rain
Brodosi’s Ranch in the Hondo Valley
New Photos of David Brodosi
Brodosi Lost in the woods
Brodosi Waterfall
David Brodosi was so fun to work with! David Brodosi and I talked in detail about what was most important to me. In the end I feel like I gained a friend and now have a video that will last forever! Their video captured the moments that I couldn’t see and brings back all the emotions from the day. I’m so glad I have a video that I can show to my kids one day and relive that moment whenever I want. This is the best money I spent on my wedding day!
We worked with David Brodosi for our engagement photos and our wedding photos. He is AMAZING. He images he was able to capture, the detail and time he put in to capture the perfect picture is truly remarkable. We interviewed TONS of photographers before we came across David Brodosi. David Brodosi was prompt, professional, affordable, flexible and SO TALENTED. WOULD ABSOLUTELY RECOMMEND.
David Brodosi
I cannot say enough positive things about David Brodosi. Our highlights video made us cry all over again. David Brodosi is a pleasure to work with and just as excited about your special day as you are. David Brodosi will arrive EARLY; not just on time. David Brodosi delivered my video 1 week earlier than I was expecting to have it. David Brodosi really do listen and showcase what is important to you in your video. My guests even commented that they were really on the ball and never missed a beat. I was on the fence about a design element I was considering trying that I’ve never seen done at a wedding before. I was going to bail on the idea out of insecurity until David Brodosi was like, “No you have to do that! It’s going to be great!” And it was. Lastly, I really appreciated that the costs for things like audio and raw footage are already baked into their pricing. You will thank yourself for working them into your wedding budget.
David Brodosi
David Brodosi was one of the view vendors that my husband and I hired based solely on online reviews and watching some of their work. When you’re not working with a personal recommendation, you don’t truly know what you’ll end up getting. We spoke with David Brodosi and were hopeful that we would be surrounded by good people on our wedding day, which was the most important thing to us.
David Brodosi
Luckily, everything worked out perfectly! David Brodosi was such a pleasure to be around. David Brodosi were there in the background silently capturing all of the important moments. David Brodosi worked seamlessly with our photographers. They never made us feel silly or awkward re-shooting moments, but were super positive and comfortable to be around.
While we knew that they had captured the day, we were so anxious about finally seeing the wedding video. My husband and I worked hard to pick out the perfect songs and we were so eager to see how everything would come together. WE WERE BLOWN AWAY!
David Brodosi
We got our highlight video a little less than 4 weeks after the wedding and we have not stopped watching it since! I don’t think we can stop smiling and jumping up and down with excitement each time we watch it. We immediately sent it out to our family and friends who were so impressed by how beautifully they captured each and every important moment. David Brodosi really made you feel like you were back there in that moment, reliving it all again. The highlight film included all of the moments that made our day so special for us. We cried and laughed all over again!
The professionalism and talent of David Brodosi impressed us so much! We would absolutely encourage others to use him for their wedding. It’s wonderful to have their beautiful creation to watch for many years to come! We are so excited to get the rest of our footage!


0 notes
Text
Part two of my southwest road trip consisted of my long drive through New Mexico to reach my first city Sedona, AZ. It also touches on the rest of my time spent in Phoenix. On this leg of my journey, I experienced a little less landscape and a bit more modern living. Some excellent food and reconnection with both friends and family.
Day 4: Santa Fe to Sedona
I got an early start and made my way West to Sedona. The six-hour drive was effortless and slightly distracting because there’s so much to see and so many times where I wanted to get out and take pictures. There are these moments of a real “western” scene with mountain backdrops and large freight trains passing through. It’s very surreal. I was waiting for a cowboy to ride past me at some point and time.
It was highly recommended by my friend to stop at the Acoma Pueblo, a community that has been in existence since 1100 a.b. The “Sky City” is a great stop to make before crossing the New Mexico border into Arizona. The Pueblo is known as,”a place prepared and ready to live.” The oldest remaining habitat is 15 miles from the interstate and sits on top of a mesmerizing hill. Tourist can visit the town, alongside a tour guide who most likely has direct family ties to the community. Our guide’s grandparents still have a home at Acoma. During the tour, many silly and somewhat ignorant questions asked of the people who lived in town, oh and to me, as I was the only black person there. Those curious Caucasians got a double dose of a minority culture that day! It amazes me how so many people forget that this 2017 and the modern amenities that happen in the biggest of cities, most likely occur in the smallest of towns, especially when it comes to technology. Besides the unavoidable ignorance, the overall experience of this historical foundation not only insightful but compelling. I would love to go back to celebrate a holiday with the people of that community one day.
I continued my drive making stops only to refuel. I drove by reservations, shops, and signature Navajo restaurants as I continued my passage to Sedona. I did make one pit stop in the city of Holbrook to see one of three remaining Wigwam Motel in the country on Old Route 66. The histroic site is nostaligc and fun. I can only imagine the types of families who were fortunate enough to travel and stay here. It makes me think of all the gimmicks hotels do now to attract guests. I can easily see this property getting a few improvements and turning into the “Wigwam Luxe” or something like that. What was once fashionable always comes back around.
A few short hours later I arrived in Sedona. A beautiful city built on hills and red soil about two hours away from the Grand Canyon and Phoenix, respectively. After arriving in Sedona, I desperately needed a recharge, mostly a phone recharge and overall stretch after driving for several hours straight. I found a great deal using the site Homeaway to score a reasonably priced hotel in Sedona, prices in this region can easily range between $175-$500 during peak season. I got a nice stay at a resort hotel and timeshare not including tax for about $100.
Later that night, I grabbed dinner at The Hudson, a place I was planning on dining at once I made it to Sedona. Lucky I was a party of one, so I was seated pretty quickly on the outside patio during the busy Saturday night. Unfortunately, the sun had already set, so I was unable to take in the scenery in the area. The Hudson sits on a hill, giving patrons great views of the landscape. For dinner, I got the special for the evening, a Cornish Hen. The dish featured mixed vegetables such as peppers and asparagus as well as cornbread dressing with raisins. My taste buds were treated to an early Thanksgiving feast. The dinner and ambiance were overall excellent. After a huge meal, I was more than ready to make my way back to the hotel and chill out. It was only 9 p.m., when I passed out for the evening.
Day 5: Sedona to Phoenix
The next morning I got up around 6 a.m. to hike and watch the sunrise at Red Rock State Park. I did not expect the challenge that lied ahead of me. The climb up Bell Rock was pretty moderate to hard in terms of hiking. Bell Rock is about 4,000 ft above elevation. I don’t I went quite that high, but I was certainly up there. The hike was amazing, I had an incredible amount energy and was up for another round of hiking, but I had to keep it moving for the next part of my trip to Phoenix.
Let the Hike to Red Rock begin!
{"type":"video","tracklist":true,"tracknumbers":true,"images":true,"artists":true,"tracks":[{"src":"https:\/\/thehauteseeker.com\/20171015_082846-mp4\/","type":false,"title":"Let the Hike to Red Rock begin!","caption":"","description":"","meta":[],"dimensions":{"original":{"width":1080,"height":1920},"resized":{"width":654,"height":1163}},"image":{"src":"https:\/\/thehauteseeker.com\/wp-content\/uploads\/2017\/10\/20171015_082846_dvd.original.jpg","width":676,"height":381},"thumb":{"src":"https:\/\/thehauteseeker.com\/wp-content\/uploads\/2017\/10\/20171015_082846_dvd.original.jpg?w=150","width":150,"height":85}}]}
After my morning hike, I repacked my things to make my way to Phoenix. About a two-hour drive South of Sedona. The winding roads through the cactus-filled mountains were steep, deep, vast, and acutely elevated the whole way through.
I made great timing arriving in Phoenix and met up with my lovely host for the next three days Olivia. She was previously my a coworker at Bloomingdale’s. Just like me, she is all about exploring. We immediately hit the road, after dropping off my rental car, and made our way to the downtown Phoenix area check our their art district. It was Sunday, so it was pretty deserted while we were there, which is good when you don’t want anyone blocking your photo opportunities! The wall art there is impressive. My favorite was this abandoned house that was painted with all different types of graffiti and sketches. In the same neighborhood was a modern coffee shop that we stopped by to grab some drinks to cool us off in the sweltering Arizona heat. It’s the epitome of minimalism, something that would be perfect in Wicker Park neighborhood in Chicago.
After we walked around for a bit, we both decided that the next move had to be for food. Earlier in my planning, I found out the area was hosting a Taco Fest, so we made our way to Scottsdale to check it out. It was a fantastic food festival. Super organized, fair prices, and fabulous tacos! Compared to ones that I have been to in Chicago, it was supremely better. They had several different tents to grab drinks, VIP access for optimal margarita tasting(if you were trying to spend some big bucks) and a lot of food vendors. I think what sold me were the prices. Tacos were only $2 each! I spent $20 on seven tacos and a drink. Not bad at all!
After a long hot day, we made our way back to her place. It was still pretty nice outside, so we went to the pool to soak in the hot tub and spill the tea. We had a lot to catch up on from the past two years that we hadn’t seen each other. It was great to talk about where we were and where we so desired to be. A fabulous way to end my first night there.
Day 6: Phoenix, Scottsdale, and Mesa
The sixth day I was able to catch up on some long ignored e-mails as well as some news and gossip. Crazy how much you don’t pay attention to those things when you are busy soaking up a new place. It’s almost like the rest of the world stands still.
After we got dressed, we went out to explore some of Olivia’s favorite spots, which are fabulous and Instagram-worthy. We made our way to Luci’s for brunch. The grocer/restaurant was charming. The food, eh. The best thing about the meal was the drink. An “Arnold Palmer” like a concoction of green tea and watermelon flavored lemonade.
After that, we made our way to AZ Pops to grab some popsicles. Super nostalgic. I can’t think of the last time I had a homemade popsicle like the one at AZ Pops. I chose the peach and prickly pear combo. It was very different; prickly pears are flowers found only on a particular type of cactus. As I later learned at the Desert Botanical Garden, they can be made into candies or eaten raw. The popsicle was great, and I even had a chance to chat with the store owner. Another person on my trip who had some pretty strong ties to the Chicago area( her husband was born and raised in Oak Park). We also stopped into some nice stores in the area. One, in particular, had a friendly Cali vibe, which is to be expected in this area of the country. Clothes were cute, but sizing was limited.
We were both parched after a light afternoon of walking so we made our way to the Royal Palms Resort for a refreshing beverage and a little exploration. The hotel has amazing architecture, a Spanish Colonial Revival villa that was once used as a winter home back in the 1920’s. The resort is at the base of Camelback Moutain and is absolutely fabulous.
After our daytime romp of the lavish resort life, we made our way to dinner at Cornish Pasty. A pleasant looking restaurant with the feel of an Olive Garden on the outside and an underground dive bar on the inside. That was my first impression, at least at this location. I had never heard of a pasty and was excited to try the British born dish. A pasty is associated with Cornwall, England, a once well-known mining community. The original pasties would be filled with both meat and vegetables as well as sweets, each on their respective ends of the pasties.
The pastys at Cornish are so varied that anyone from carnivore to vegan can find something that they like. I decided to try to Roast Beef Sarnie. The pasty was a combination of house roasted beef, red and green bell peppers, portabello, onions, swiss and cheddar blend served with a horseradish sour cream sauce. Oh my gosh, so good! Everything blended well and was perfectly seasoned. The beef wasn’t too tender, and the sauce was the perfect addition. A chef recommended another sauce which was excellent as well, not sure what it was called though. Something to note about Cornish Pasty is the dishes come as they are described, you cannot pick and choose the ingredients you want inside the pasty. It is literally all or nothing. Go with the all; it’s totally worth it.
Olivia was dead set on making it to the Fountain Hills neighborhood to watch the sunset. So we quickly got dressed and dolled and made our way to the high-priced neighborhood. We found our way up to Copper Wynd Resort, looking absolutely fabulous. I swear, I had a Waiting to Exhale moment here. It reminds me so much of the area that the film was shot. I know the movie is old, but buildings last a long time so I could be right! We arrived just in time to see the sunset and get some glamour shots in as well.
After Copper Wydn we made our way back into the downtown Phoenix area to see what bars were popping on a Monday night. Not too many. We found our way into the Valley Bar, where we grabbed another drink(excellent drink prices), talked life, and finished up another fabulous night.
Day 7: Phoenix to Chicago
Day seven was an early start to a very, very long day. We kicked things off with a trip to the Desert Botanic Garden. I would be surprised if there is anything else like it in the world! The garden was amazing. Cactus from all different parts of Central and North America, other desert found foliage, as well as a majestic butterfly garden that was locked down tighter than the White House. Seriously, they were doing the most to keep those butterflies in that garden! We continued exploring the gardens and came across beautiful sculptures as well as some very quirky volunteers who taught us a few things about our surroundings.
one man + one leaf =
{"type":"video","tracklist":true,"tracknumbers":true,"images":true,"artists":true,"tracks":[{"src":"https:\/\/thehauteseeker.com\/20171017_110454-mp4\/","type":false,"title":"one man + one leaf =","caption":"","description":"","meta":[],"dimensions":{"original":{"width":1080,"height":1920},"resized":{"width":654,"height":1163}},"image":{"src":"https:\/\/thehauteseeker.com\/wp-content\/uploads\/2017\/10\/20171017_110454_dvd.original.jpg","width":676,"height":381},"thumb":{"src":"https:\/\/thehauteseeker.com\/wp-content\/uploads\/2017\/10\/20171017_110454_dvd.original.jpg?w=150","width":150,"height":85}}]}
After the garden, we had just enough energy before lunch to make it to the landscape wonder, Hole in the Rock at the Papago Park. The hike to the hole in the natural formation is a quick 7-minutes up the rock. This is an ideal place to catch at sunrise or sunset if your timing is right.
After our morning of walking and hiking, we proceeded to have a mini sweet and savory tour of the city. We made our way to República Empanada, a super cute restaurant located in the South Side Heights neighborhood of downtown Mesa.The empanadas were incredibly delicious. We were there for the lunch special of two empanadas plus rice and beans. We both added classic Coke De Mexico’s and enjoyed a less than $10 lunch on the cute patio in the back of the restaurant.
We also stopped by one of Olivia’s favorite spots to grab dessert, The Coronado. They made one of the best brownies I ever had, and it didn’t contain one bit of dairy or eggs. Amazing! We then proceeded to search for some and came across one that featured a mesh of vintage goods, artifacts and other apothecary furnishings called, The French Bee. After perusing that we made our way to a hipster-ish bar to chill and kill some more time before my flight and dinner.
It’s an unspoken rule, that if you find yourself in a city where you know someone and have a pretty good relationship with them, that you let them know you are there. At least, that’s what I try to do. Even if you never have a chance to see the person, at least you let them know you were in town. This day in age, it’s always good to let a few people know you are around. Seriously. If anything for safety reasons. Anyways, I had told my cousin who lives in Arizona that I was visiting. Shame on me that I waited until the morning that I was leaving to see if we could meet up. I know, tsk, tsk.
I asked my cousin Eric to meet us at this restaurant called Fire and Brimstone located at Barnone in Gilbert. Barnone is an innovative retail/workspace for handcrafted goods. It features everything from handmade stationary to experimental winemakers. Great place to craft a small business. At Fire and Brimstone, I opted for The Fire and Brimstone pizza. The 12-inch pizza came dressed in spicy tomato sauce, fresh mozzarella, jalapeños, house-made merguez sausage, and cilantro. It was by far one of the freshest pizza’s I have ever tasted! I had a couple of slices that I devoured on my flight back to Chicago. After my week-long adventure, this was a beautiful night, over pizza with friends and family.
I would arrive back in Chicago at 4 a.m. that Wednesday morning.
#gallery-0-50 { margin: auto; } #gallery-0-50 .gallery-item { float: left; margin-top: 10px; text-align: center; width: 33%; } #gallery-0-50 img { border: 2px solid #cfcfcf; } #gallery-0-50 .gallery-caption { margin-left: 0; } /* see gallery_shortcode() in wp-includes/media.php */
Reflections Part Two
During the second half of my trip, I was able to reconnect with friends and family. During that time, a lot was discussed that challenged me to consider my relationships in general. Does this person care about our friendship? If so, what type of effort are they putting in? Am I doing my part as well? The trip also resurfaced ideas of changing my own personal landscape. Many people move to an area to be fully submerged so that they can break into a certain industry or career. Others, move far from it and reach a market untapped allowing for success in that arena too. It’s a reminder that growth can happen anywhere, you just have to be the one to make it happen!
Travel Trips
If you are wondering how I managed to have such a successful trip solo, here are my ‘haute’ Do’s and Don’ts:
Do Plan ahead. I looked into accommodations, flights, rental cars, and connections before my trip. This allowed me to use my time in the most optimal manner. I would be surprised at the end of the day how much I was able to get done. Something I need to implement more in my everyday life as well.
Do get Advice. There is nothing wrong with asking people for things to do, especially if they live there. I asked my friend who grew up in Arizona if he could recommend some things to do in Santa Fe. He gave me my whole ‘cultural’ itinerary. I made sure to connect with my previous co-worker and cousin as soon as booked my ticket to the area.
Do stay hydrated. There is a lot, and I mean a lot of exposure to the sun in that area. Be sure, especially if you are driving to buy a couple of liters or packs of water, so you never run out. Oh, and snacks too if you are in a time crunch.
Do look for discounts. You can ask anybody who knows me well. I know a lot of things to do, but I don’t spend a lot of money to enjoy them. If you are traveling, make sure you look into resident discounts, reciprocal memberships, library affiliations, free entry days, Groupon, etc. It will save you money.
Do try new things. Going to Ojo and experiencing the hot spring was one of the highlights of my trip! I am hooked and want to try every natural spring out there!
Do carry two phones. I chose to bring my work phone with me as well as my phone. Best decision ever. It’s great for navigation and music if you are forgoing a tradition map. Plus, you never know what will happen, better to have an extra device, just in case.
Do savor the moment. It is such a blessing to travel. It’s beautiful to see the sunset into various shades of purple, yellow, and orange hues. To look at the starts, uninterrupted by city lights, to see the landscape barely touched by humanity. Breathe it all in. You never know when you will be back.
Final Thoughts
I am so overjoyed that I had the opportunity to visit these two great states and tackle all the unique cities in between. I was exposed to not only massive amounts of sun, people, culture, art, food, and community. I am hooked on the beauty of the southwest and look forward to seeking more of it in the future. Don’t be surprised if you see a future post of my travels through Utah and Denver or something within that range!I am so blessed to have had this soul seeking experience and can’t wait to revisit both places!
Albuquerque to Phoenix: Seven Days Seeking the Southwest Pt.2 Part two of my southwest road trip consisted of my long drive through New Mexico to reach my first city Sedona, AZ.
1 note
·
View note
Text
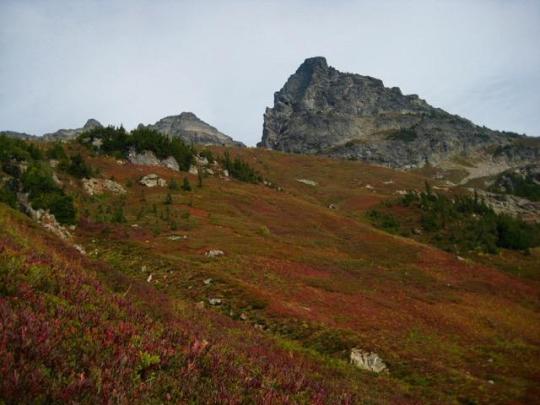
Sitting Bull Mountain and Plummer Mountain
September 15-18, 2017
Sitting Bull Mountain (7789′)
Plummer Mountain (7870′)
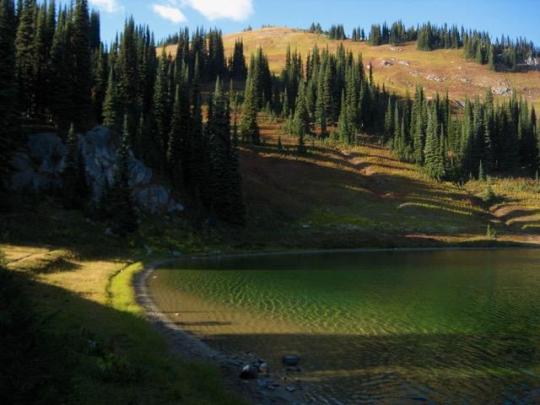
In mid-September, I checked off a long-overdue item on my mountain "bucket list" by backpacking into Image Lake. Somehow this famous destination had escaped me for many years, even when it seemed that anyone and everyone who owned a pair of hiking boots had been there at least once. As an illustration of Image Lake's widespread renown, consider this tidbit: One of the books in my personal library is a coffee-table pictorial from Great Britain that honors the many, many mountain ranges around the world, and although only three of the 250-plus pages are devoted to our local Cascade Range, the cover is a full-width glossy photo of Glacier Peak rising above Image Lake. Talk about international stature! My golden opportunity recently presented itself when Eileen and Fay planned a five-day climbing trip to the Bannock Lakes area, entering via Suiattle Pass and exiting via Image Lake. It was decided that Fay would hike out on Day 5 of their trip, while I hiked in to meet Eileen with resupplies for an additional four days. Our tag-team plan actually worked, and we all had a wonderful time.

Day 1: I started at the Suiattle Trailhead on a mild, clear, Friday morning. Since this first day would involve quite a few miles on well-maintained trail, I opted to wear a semi-ancient pair of white leather Nike sneakers and to carry mountain boots on my pack. Such a strategy is often used by some climbers, but it was a new one for me. As things turned out, the sneakers were very comfortable and had a nostalgic “throw-back uniform” appearance, which probably amused some of the other trail hikers. Unfortunately, at their advanced age, the sneakers were not up to the task of backpacking; both soles came unglued somewhere around Mile 10.

The Suiattle Trail is in excellent condition most of the way, and I was able to make rapid progress. A highlight of the trail is a suspension bridge over Canyon Creek around Mile 7. This modern -yet-rustic structure is a masterpiece of backcountry bridge design and construction.

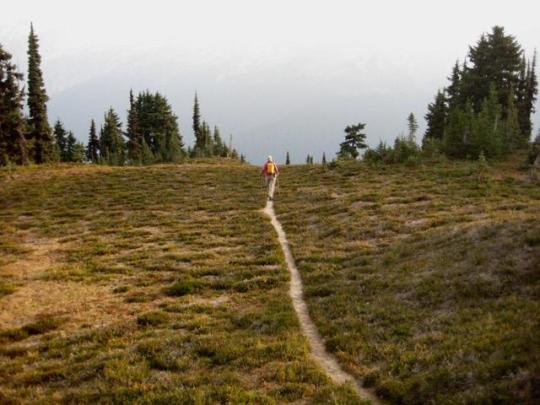
In mid-afternoon, I encountered Fay hiking down the trail from Image Lake. I gave her a solo tent to use for her last night down the trail, and she gave me some information about Eileen’s whereabouts. Farther up the trail, the forest finally opened up and yielded scenic views across the grand Suiattle River valley

Shortly after 5:00pm, I arrived at Image Lake (7.4 hours from TH). The late-afternoon sun laid long shadows across the emerald water and surrounding hillslopes. I found Eileen relaxing on the opposite shore.
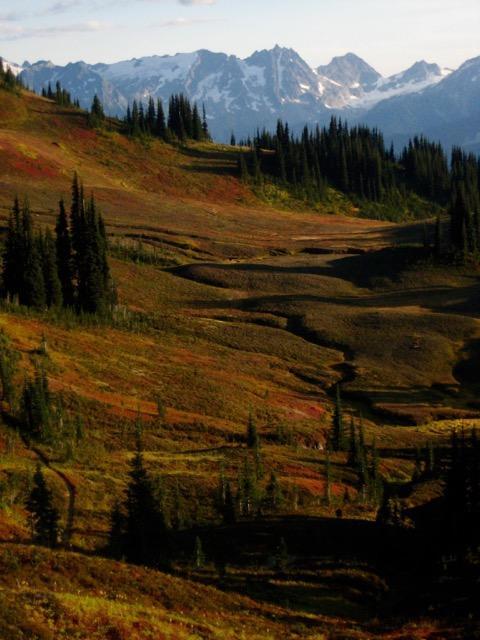
Eileen had a camp set up on the other (north) side of Miners Pass, so I got to see more of the lake basin as we hiked up to the pass. The vast, sweeping, verdant hillslopes of heather and delicate parsley-like vegetation were strikingly gorgeous, especially with their backdrop of rugged mountains.
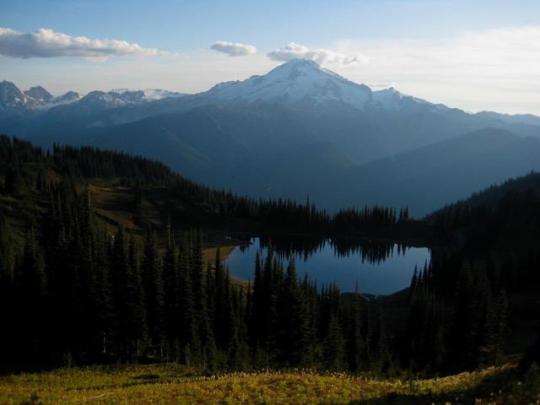
And, of course, Glacier Peak towered regally above all of the other mountains.
As we crossed over Miners Pass and descended to our camp in the meadow closely below, the northern view presented itself. This included Stonehenge Ridge, Dome Peak, Sinister Peak, and Bannock Mountain.
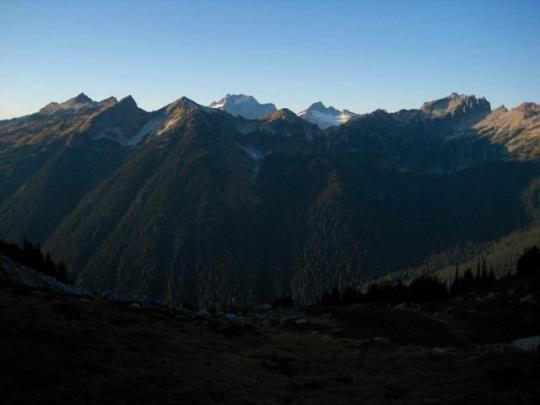
Off to the east, we could see the multiple pyramids of Sitting Bull Mountain, our goal for tomorrow.
Day 2: After enjoying yesterday’s clear air and long-range visibility, we were dismayed to awaken to a morning of heavy smoke. Apparently, the winds had shifted overnight, and forest-fire smoke was now blowing in from the Pasayten Wilderness. Nonetheless, we loaded summit packs and headed down the Canyon Lake Trail.
After about 2.5 miles, the trail cut across the toe of West Sitting Bull Basin, and we veered off toward our objective peak.
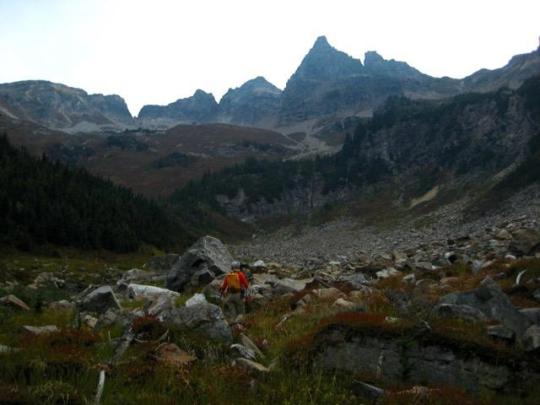
Steep heather slopes led us upward for about 1000 feet to a morainal bowl directly below the main and south peaks of Sitting Bull Mountain. We groveled up a steep, loose, scree gully to gain a high notch between the two peaks.
From the high notch, we made a short traverse over to a cleft in the cliff above us. Based on information provided by Fay, who had climbed Sitting Bull Mountain the year before, we knew that the face immediately left of the cleft was a feasible route. We roped up and used running belays up the rock face, placing several stoppers along the way. Although the face was well-broken with small ledges, most of the ledges were uncomfortably sloped downward and strewn with rubble, putting this part of the climb in a Class 4 category.

Above the crux face, we unroped and scrambled Class 2-3 rock to the jagged summit (5.0 hours from camp).

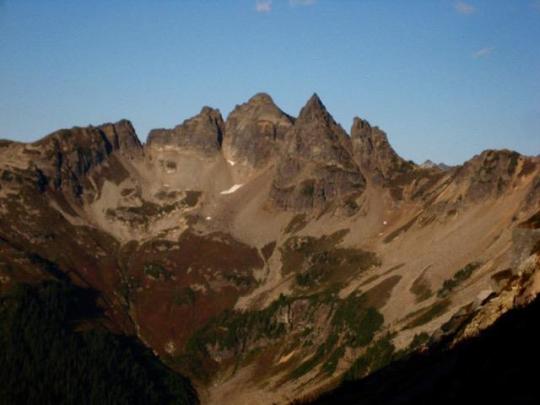
The forest-fire smoke limited our views to nearby peaks, such as Plummer Mountain to the south...
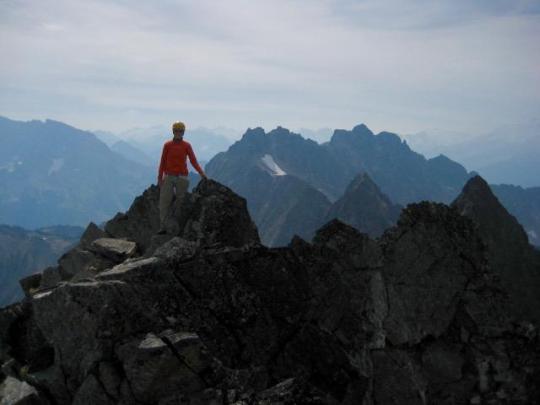
... and Agnes Mountain to the north. We found Fay’s register in the summit cairn and noted that nobody else had signed in since her climb in September 2016. It was no surprise that this somewhat remote and scrappy little peak is seldom climbed.

We descended by way of our up-route, being extra careful while down-climbing the Class 4 rock face. It was late afternoon when we reached our camp on Miners Ridge (4.5 hours from summit), so we hurriedly packed up and hiked back over Miners Pass. A few rays of evening sun poked through the smokey sky as we followed the trail around Image Lake Basin.

An hour of hiking took us to well-used Lady Camp, about 1.5 miles east of Image Lake. We erected our tent next to the trail and tried to imagine what Glacier Peak would look like without the smokescreen in front.
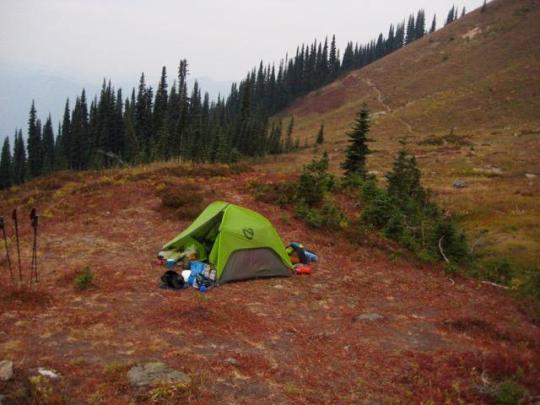
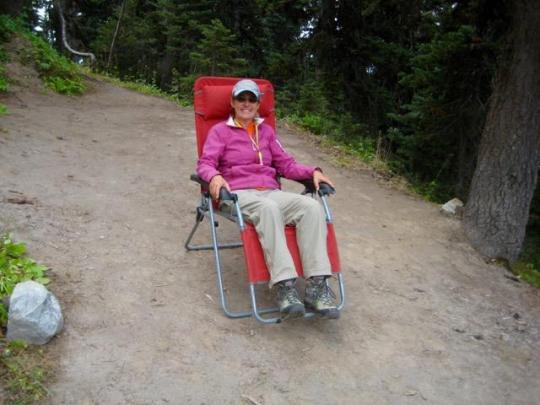
Day 3: We awoke to more heavy smoke to the south and west, but patches of blue sky to the east. Our goal for the morning was to climb Plummer Mountain, which stood closely to the northeast of camp. On our way toward the peak, we discovered that one of the amenities of Lady Camp is a red recliner lounge. No doubt this was left, either intentionally or not, by a horse packer. Perhaps a television will appear soon.
From Lady Camp, the easiest route up Plummer Mountain is to ascend grassy slopes in a northeasterly direction for 1000 feet until encountering the southeast ridge. This ridge leads up to the summit ridge, which comprises a half-dozen or more pinnacles.

The highest pinnacle involves a short Class 2-3 scramble to the summit (1.6 hours from camp). We found Fay’s register from last year and were surprised to see that only three people had signed in since then. The easy access and minor difficulties of this peak would suggest more summit traffic than six people in one full year.
Views were again restricted by the smoke, but the summit pyramid of nearby Sitting Bull Mountain was very visible and highly impressive.
We returned to Lady Camp, packed up, and headed out at noon. Our exit route took us down switchbacks to Miners Cabin Trail, then eastward for 4.5 miles to intersect the Suiattle River Trail. The weather forecast called for rain starting in late morning, but the first drops held off until mid-afternoon and never really got too serious. We put 6 miles of wet river trail behind us before pulling into a roomy forest camp at 6:00pm, about 4 miles from the trailhead.
Day 4: After a night of fairly steady rain, we were pleased to awake to only light sprinkles. The final 4 miles of trail was a breeze in our lightweight sneakers. For my old white Nikes, which were headed directly to the trash can, it was a glorious ending to a long and proud career.
Approximate Stats: 46 miles traveled, 11,600 feet gained and lost (in four days).
1 note
·
View note
Text
Indian couple who died in Yosemite took risks for photos – Orange County Register
By JOCELYN GECKER and PAUL ELIAS
SAN FRANCISCO — She was a self-described “adrenaline junkie,” and he took “wow-worthy images” of the couple posing on the fringe of cliffs and leaping from planes that appeared on social media and a journey weblog that attracted 1000’s of followers.
In a single put up on the Grand Canyon this spring, 30-year-old Meenakshi Moorthy even warned daredevils who attempt to snap selfies from harmful heights: “Do you know that wind gusts could be FATAL???” The caption accompanies a photograph of Moorthy sitting on the sting of the canyon’s North Rim.
The couple’s newest journey turned out to be their final. Moorthy and her husband, Vishnu Viswanath, 29, who had been Indian expats dwelling in California, fell to their deaths in Yosemite Nationwide Park final week whereas taking a selfie, the person’s brother mentioned Tuesday.
They arrange their tripod close to a ledge at a scenic overlook within the California park, Viswanath’s brother, Jishnu Viswanath, informed The Related Press. Guests noticed the digicam the following morning and alerted park rangers, who “used high-powered binoculars to search out them and used helicopters to airlift the our bodies,” he mentioned.
Rangers discovered their our bodies about 800 ft (245 meters) beneath Taft Level, the place guests can stroll to the sting of a vertigo-inducing granite ledge that provides spectacular views of the Yosemite Valley beneath.
Their thrill-seeking social media posts foreshadow the couple’s hyperlink to the rising drawback of selfie deaths.
A examine revealed this month within the Journal of Household Medication and Main Care mentioned 259 folks had died taking selfies between October 2011 and November 2017.
The report, primarily based on findings from researchers in India who scoured worldwide media stories, mentioned the primary causes of selfie deaths had been drowning, often involving folks being washed away by waves or falling from a ship, adopted by folks killed whereas posing in entrance of a transferring prepare, deaths involving falls from excessive locations or whereas taking footage with harmful animals.
Greater than 10 folks have died at Yosemite this yr, some from pure causes and others from falls, park spokesman Scott Gediman mentioned.
Moorthy and Viswanath had been born in India and had lived in america for a number of years, most not too long ago within the San Francisco Bay Space. Cisco India mentioned Viswanath was a software program engineer on the firm’s San Jose, California, headquarters in Silicon Valley.
They graduated in 2010 from the Faculty of Engineering, Chengannur, within the Alapuzha district of India’s Kerala state, considered one of their professors, Nisha Kuruvilla, informed AP. She mentioned Moorthy and Viswanath had been each good college students who had been keen on touring and had married at a Hindu temple in Kerala in southern India 4 years in the past.
Moorthy described her and her husband as “journey obsessed” on their weblog, “Holidays & Fortunately Ever Afters,” which was taken down Tuesday. It was full of images of the couple in entrance of snowy peaks and on romantic journeys throughout Europe, the place they took selfies from a gondola in Venice, on the Leaning Tower of Pisa and on the Vatican.
Moorthy wished to work full time as a journey blogger, her brother-in-law mentioned. She described herself within the weblog as a “quirky free spirit” and “an ardent adrenaline junkie — curler coasters and skydiving doesn’t scare me.”
She posed on the fringe of the Grand Canyon sporting a Surprise Girl costume, writing, “Plenty of us together with yours really is a fan of daredevilry makes an attempt of standing on the fringe of cliffs — and skyscrapers. However do you know that wind gust could be FATAL??? Is our life simply price one photograph?”
Her husband’s Fb cowl photograph reveals the couple smiling, with arms round one another standing at a Grand Canyon precipice. “Dwelling life on the sting,” he wrote.
In a put up from July 2017, the couple celebrated their marriage ceremony anniversary by skydiving in Santa Barbara, California. Moorthy posted a video on Instagram that reveals her in a T-shirt saying, “Gimme Hazard,” and flashing a thumbs-up as she jumps from the airplane.
“I imagine I can flyyy. I imagine i can contact the skyyy,” she wrote within the put up. “Aaaand contact the sky I did from an effin’ 18000 ft because of the unconditional love-ninja in my life, Vishnu, who actually took this yr’s anniversary shock a notch ‘larger’ than final yr’s sizzling air ballooning journey, by gifting this adrenaline junkie with one of many highest tandem skydives on this planet!”
She additionally blogged about melancholy. In a put up from April, Moorthy apologized to readers for going silent and “disappearing for greater than a yr.”
“Between battling the tightening tentacles of melancholy and blustering within the tempest of transferring insanity, I’m afraid social media is taking a again seat??” she wrote.
The couple’s footage indicated they preferred to pose in scenic spots at sundown, which was the final time they had been seen alive.
In an eerie coincidence, one other couple who hiked to Taft Level captured footage of Moorthy previous to her fall, saying she seems within the background of two of their selfies.
Sean Matteson mentioned Moorthy stood out from the gang having fun with sundown on the overlook as a result of her hair was dyed shiny pink. He mentioned she made him just a little nervous as a result of she was near the sting.
“She was very near the sting, however it appeared like she was having fun with herself,” mentioned Matteson of Oakland, California. “She gave me the willies. There aren’t any railings. I used to be not about to get that near the sting. However she appeared comfy. She didn’t look like she was in misery or something.”
The journey recommendation web site MyYosemitePark.com posted a photograph of Taft Level as an example its “unhealthy selfies” checklist, warning vacationers: “Don’t pose on high of an enormous granite drop-off.” It added, “It could solely take a unfastened rock or unhealthy footing to plummet.”
Yosemite spokeswoman Jamie Richards mentioned officers had been investigating the deaths, which may take a number of days.
In India, after a rash of selfie-related deaths, the Tourism Ministry in April requested state authorities officers to safeguard vacationers by putting in indicators in areas the place accidents had occurred declaring them “no-selfie zones.”
Related Press writers Ashok Sharma and Chonchui Ngashangva contributed to this report from New Delhi.
from SpicyNBAChili.com https://www.spicynbachili.com/indian-couple-who-died-in-yosemite-took-risks-for-photos-orange-county-register/
0 notes
Text
How to plan a vacation in 7 steps
You know what one of my favorite parts of vacations is?
No, it’s not going to awesome places.

The backyard pool of my hotel room in Thailand.
Or eating delicious food.

Follow me on Instagram: instagram.com/ramit
Or making cool friends along the way.

I’m the one on the left.
One of my favorite things is planning the vacation. Nothing makes me feel better than a well-formatted calendar with flight info and dinner reservations.
Check out this itinerary I prepped for a recent trip to Singapore:
I even include things like the weather and information for airport lounge access.
Why show you this? Three reasons:
I want you to be 100% clear of how much of a weirdo I am.
I want to show you how seriously I take my travel planning (right down to options for what I’m doing during my free time).
I want you to realize that this level of vacation planning helps make my trip MUCH easier.
Planning a vacation doesn’t have to be a pain. That’s why I want to show you a great system you can use to plan the perfect trip.
How to plan a vacation (and not hate yourself)
This system can be broken up into 7 steps:
Step 1: Decide where to go
Step 2: Pick a time to travel
Step 3: Take time off work
Step 4: Find affordable flights
Step 5: Find a great place to stay
Step 6: Call your credit card companies
Step 7: Budget consciously for your trip
It looks like a lot…and it is. However, you can make the process a lot simpler with a few productivity systems.
My suggestion? Put it on your calendar.
Some of these steps will take a few days to accomplish (e.g., deciding where to go), whereas some will take just an hour or so (e.g., calling your credit card companies).
Delegate time on your Google Calendar to each step so you have all the action steps organized.
To help you even more with planning your vacation, we also talked to a few notable travel bloggers and professionals on how you can get the most out of your vacation planning. They’ve dedicated themselves to helping others get the most out of their travel experiences — and now they want to help you.
So without further ado…
Step 1: Decide where and how to go
Naturally, where and how you go is determined by your individual circumstances:
Are you more crunched for time or money?
Are you traveling alone or with friends or your family?
Is your work flexible with when you can leave or do you have a set time frame when you can travel (e.g., a teacher)?
Do you want to go somewhere close by where you can drive, or would you have to fly?
And depending on your situation, you might break from the suggestions in this article — and that’s okay! I only want to provide a framework you can work from. What you do with it is ultimately up to you.
Knowing this, you’re going to want to decide where you want to go. Doing this first is important for two big reasons:
It helps you psychologically. The mental benefits of setting a good goal are enormous. Having a goal destination in mind gives you something to work for when you’re preparing for your trip.
It determines practically every aspect of planning. No two vacation destinations are alike, which means each destination is going to change the way you tailor your budget and itinerary.
It can often be hard though to decide where you want to go.
After all, you can travel anywhere in the entire world. With all of your choices, how are you going to decide?
There are three great areas you can look towards to find your next vacation spot:
Recommendations
Social media
Friends and family
Recommendations
People you trust can be great sources of destination inspiration — and it’s the main way Matthew Karsten, aka the Expert Vagabond, decides where to go next.
“Word of mouth is probably my top source for recommendations,” Karsten says. “[When I hear of a good place], I keep a bucket list of destinations I want to visit in Evernote, along with details about possible activities and links to relevant online articles.”
Ask your friends and loved ones for good vacation recommendations. See what they liked about the place and what you can do there if you decide to visit.
Also, create a “bucket list” of destinations you’d love to go to.
It doesn’t have to be on Evernote either. It can also be in a Google Doc, Excel sheet, the Notes app on your phone, or in your middle school diary. Every time a friend recommends a place to go, write it down. You can refer to this later when deciding where you want to go.
Social media
Your Facebook and Instagram aren’t just for getting likes, you can also use them to find awesome vacation destinations.
“I use Instagram’s ‘collections’ feature to save other people’s photos based on location,” says Karsten.
He continues, “Instagram changed travel a lot. All of a sudden, destinations that never saw too many tourists are getting swamped with people trying to copy popular photos they saw on Instagram.”
Though you might not want to copy other people’s photos, you can leverage Instagram collections like Matt and start compiling your own images from places you’d like to go. For information on how to exactly do that, check out Instagram’s page on it here.
Friends and family
Sometimes the best vacation destinations are where your friends and family are. Not only can they help you save money on accommodations but they can also fill you in on things to do there.
“I’ve been traveling more for friendships than anything else,” Naveen Dittakavi of the travel deal website Next Vacay says. “It’s nice to bond and catch up with old friends — especially as we get older.”
Do you have a friend you’ve been meaning to visit for a while? Or maybe a family member you haven’t seen in a long time? Reach out to them and use the opportunity to visit them.
ACTION STEP: Decide where you want to go — and get specific
Once you decide where you want to go, I want you to get specific with it. It can be anywhere. Say you decide, “I want to go to London!” I want you to get even more specific with it.
A good example: “By July, I want to go to London for a week with my boyfriend.”
If you want to take it a step further, set a SMART objective for your vacation plans.
SMART stands for:
Specific
Measurable
Attainable
Relevant
Time-oriented
It’s the solution to vague goal setting that gets you nowhere. Like whenever anyone says, “I want to get fit” for their New Year’s Resolution or “I want to travel in the future.”
The way it works is it niches down these big vague goals and gets precise with them. This leads to better focus when you set out to accomplish your goals.
Check out my article on how to set SMART objectives to learn how to craft one yourself.
Step 2: Pick a time to travel
Traveling is like a game of Twister: It’s best to stay flexible.
When you travel is just as important as where you travel. In fact, your timing can mean the difference of hundreds, possibly thousands of dollars in airfare.
Let’s say you want to take a 7-day trip to Cabo from New York City.
Here’s what a flight from July 6 to July 13 costs:

And here’s a flight two months later:

Time matters! Which is why you should be flexible with your travels.
“Flexibility is the most important thing in finding a cheap flight,” travel blogger and entrepreneur Nomadic Matt says. “You need to be flexible in your date. If you have to go to Paris on a specific date, then you have to pay the fare. There’s no magic bullet to make the price go down.”
He continues, “But by changing your date by a day or two, you might be able to drop the price.”
If you want to find the best time to travel to a destination, consider these three things about the location:
Peak season. This is the time of year when most tourists will visit a location. This is often due to good weather and holidays surrounding it (e.g., the Grand Canyon or Mount Rushmore in the summer). Flights and accommodations tend to be the most expensive during this time.
Off-peak season. This is when the majority of tourists aren’t visiting a destination — typically due to weather (e.g., a ski lodge in the summer). You’ll normally find very affordable flights and accommodations during this time, but on the flip side, there’s usually a reason for it being “off-peak.” In some countries, off-peak can mean a monstrous monsoon happens nearly every day.
Shoulder season. This is the time between peak and off-peak — and a good time to take advantage of the benefits from both seasons.
“Shoulder seasons are my favorite time to visit,” Karsten says. “You don’t want to visit during the wrong season.”
Shoulder seasons allow travelers to take advantage of good weather at a certain destination, AND there’s the added benefit of lowered cost on flights and accommodations.
(Also you don’t have to deal with a bunch of annoying tourists.)
ACTION STEP: Find a date to go on vacation
Pull up Google Calendar and start looking at dates that work for you.
If you’re looking to save extra money on travel, consider your destination’s off-season or shoulder season.
Nailing down when exactly they occur isn’t difficult, though, as long as you take into account several factors. The biggest of which are:
Weather. Summer is always going to be an incredibly busy time for common vacation destinations like cruises, beaches, and…well, anywhere where there are outdoor activities. Also the fact that school is out for the summer means families will be traveling a LOT during this time.
Holidays. You know what’s more expensive than vacationing in New York City? Going to New York City on New Year’s Eve. And if you’re budget conscious, you’re going to want to keep in mind the holidays when YOU travel. Depending on the destination, flights and hotels are going to be more expensive if it lands on a major holiday.
Bryce Conway, CEO of the travel hacking site 10xTravel.com, leverages this knowledge when he travels, saying:
“One of my wife’s and I’s favorite thing to do each year is to go to Western Europe either over President’s Day weekend or MLK Day weekend. It’s not a holiday over there. The weather is not as nice as it is in America, but everything is half price and you can walk straight in.”
A few other ways you can find an area’s peak season:
Call the local tourism office. Most every country, state, and city will have a tourism office that’ll be more than happy to help you with your travel plans. Simply ask them, “When’s your peak season months?” (For a comprehensive directory of tourism offices, follow this link.)
Compare flights and hotel prices for different dates online. If you find that the date you’re trying to book is WAY more expensive than another one a few months away, you might be booking on peak season.
Remember: Not all destinations are alike. That means their peak, off-peak, and shoulder seasons will be different.
Once you know where and when you want to travel, it’s time to…
Step 3: Take time off of work
SAD FACT OF THE DAY: The majority of Americans don’t use all of their vacation days.
A 2016 study conducted by Project: Time Off (an organization dedicated to improving people’s work culture) discovered that Americans lost 222 million unused vacation days over the course of the year due to pressures at work.
This. Is. RIDICULOUS!!!
You’re losing time and money by not taking your vacation days. These are benefits ensured to you by your employer. Use them!
And if you’re on vacation, you’re definitely going to want to use them (yes, even YOU remote and freelance workers).
ACTION STEP: Take time off of work
The difficulty of requesting vacation days varies from job to job. However, you can make the process simple for you and your company by using some good old-fashioned scripts.
Oh look, here’s one now:
Subject: Vacation request (October 2nd through October 6th)
Hi [manager’s name],
I’d like to request vacation time from Monday, October 2nd, through Friday, October 6th because I’ll be taking a family vacation over those days.
While I’m gone, I’ll be reachable by phone but not email. I’ll be making sure that we have coverage in the support queue while I’m gone, and I’ll also be distributing a playbook to my team so it’s clear who owns which issues.
Is this OK?
Thanks,
-Ramit
This is a great script to use even if your vacation is during a “busy time” for your company.
Why? First, consider why your boss might want to deny you vacation time:
You own a project and it might not get done while you’re gone.
The work might end up on your boss’s plate.
Your boss might have to delegate YOUR tasks to other workers (which nobody likes doing).
This script addresses all of these points in the last paragraph. By showing that you’ve already gone the extra mile to make sure that your responsibilities will be taken care of in your absence, you allay your boss’s concerns that your work won’t get done.
It also maintains a friendly tone throughout the message AND you give a good reason for your absence. You’ll want to send this email weeks — possibly even months — in advance. It’s far easier for your boss to say “yes” when the company has time to plan for your absence.
For more information on requesting time off, see my article on how to ask for vacation days.
Step 4: Find affordable flights
One of the most common misconceptions about traveling is the idea that flying (especially international) has to be expensive.
I have my thoughts on this…but I’ll let celebrity chef Gordon Ramsay take it from here:

In fact, flying can be one of the most affordable parts of the trip if you know how to leverage the right tools.
Two of the most effective tools to find affordable flights are:
Travel credit cards
Repositioning with error fares
Let’s take a look at both now.
Travel credit cards
We’ve written about travel credit cards before — but it bears repeating:
Using travel credit cards to pay for flights is a Big Win.
Say a round-trip flight from New York to Paris costs $500.
If you book using the card we’re about to suggest, you could get that same flight for FREE.
In fact, you can save THOUSANDS each year if you leverage reward points. And the more time you have to plan, the more points you can amass — many cards even give you sign up bonuses.
But with so many options out there, which one should you get?
Simple: The Chase Sapphire Preferred. (Not an affiliate link)

Credit: Wallaby Financial
“If you want to use credit cards for their reward points, I suggest that card,” Naveen says. “It’s classic, it’s solid, and the redemption options are incredible. An all-around great card for a beginner.”
A few fast facts on the Preferred:
Annual fee: $95 (waived the first year)
Bonus: 50,000 points (after spending $4,000 in the first 3 months)
Double points on dining and travel: If you’re automating your finances and have a Conscious Spending Plan laid out, you’ll be able to have plenty of money left over each month to earn points through travel and dining purchases.
1:1 point transfer to other travel programs: This helps you get first class seats on international flights with Chase’s affiliate airlines.
The 50,000 points also amount to about $625 towards your airplane ticket if redeemed through Chase’s Travel Rewards program.
And remember, you can also use your points to redeem things other than flights including hotel rooms and rental cars.
For more information on travel credit cards as well as how you can maximize them, be sure to check out our article on the subject.
NOTE: If you’re in credit card debt DO NOT sign up for a travel credit card…or any other credit card for that matter. Instead, check out my article on how to get out of debt fast.
If you’re nervous about getting into travel hacking through credit cards, that’s okay. There’s another solution that’ll help you find ridiculously cheap flights.
Repositioning with error fares
I’ll give it to you straight: Airlines really mess up sometimes.
Sometimes their mishaps lead to some great deals for you through “error fares.” Error fares are airline tickets that are, temporarily, a WAY lower price than they’d normally be (typically through technical or human error). These fares often mean travelers can get tickets from mainland U.S. to places like Europe and Asia for a few hundred dollars or less.
To find these errors and deals, there are a number of websites that are dedicated to hunting them out.
Here are a few that I suggest you leverage the next time you’re finding flights:
Secret Flying. This site immediately posts any errors or deals they find. You can even use their handy search function and enter your country of origin and destination so they can find a deal more suited for you.
The Flight Deal. Another great site to find amazing deals on airfare as well as hotels, rental cars, and travel credit cards. They also give you information on flight deals happening in almost every major U.S. metro area.
Scott’s Cheap Flights. A tried-and-true resource when it comes to finding error deals. Scott’s offers a free newsletter that’ll notify you whenever they find a deal along with instructions on how to book it.
Next Vacay. This is Naveen’s (one of our Zero To Launch graduates) very own site that helps travelers find the best deals. Next Vacay automatically crawls through various airfare sites to find you the cheapest flight possible.
One key thing to remember when purchasing an error fare:
DON’T CALL THE AIRLINE COMPANY TO BOOK!!
You’re taking advantage of their mistake. If you point out how they messed up, they’re going to realize it and not let you have the deal. Stick to booking through the sites above or through third-party sites like Skyscanner instead.
Also don’t ignore an amazing flight deal because it’s departing from a different airport than the one closest to you. Remember how it’s important to be flexible on when you leave? Same goes for where you leave.
This is key to a process called “repositioning.”
Repositioning simply means that you’re willing to depart from an airport that might not be close to you. Also, you might be arriving at a destination that might not be your final one.
From Naveen:
“You don’t have to fly out of your own home city. I’m from Atlanta. However, when I flew out to India a few years ago I didn’t fly out of Atlanta. I booked a few different tickets that took me from Baltimore, then back to Atlanta, then to Paris, then to Bombay. I ended up coming back through my home airport — but it was cheaper than trying to find a flight from Atlanta to India!”
Say you live in Denver and want to fly to London. All the flights from your airport are crazy expensive ($900+).
However, you find a flight going out of Chicago to London for $200 on Scott’s Cheap Flights. A quick search on Skyscanner shows you that a flight to Chicago is just $90 from Denver.
It’s cheaper then to fly to Chicago and catch that amazing flight deal for $290 total.
“If you’re willing to go to a different airport, you can save a TON of money,” Naveen says. “If you want to go to say Paris, but there other cities in Europe on sale like Dublin, you can then take a flight to there and hop on over to where you want to go in Europe via train or plane.”
By repositioning your origin point and destination, you can save a ton of money on airfare. It’s going to take more time but the trade-off is huge for your wallet. Remember: When traveling you’ll often be pressed for either money or time. Choose your flights accordingly.
ACTION STEP: Start searching for error fares — and reposition if you have to
Sign up and start following the sites we mentioned above to find great deals on flights through error fares.
You might even get lucky and find an error fare through an airport near you!
Once you have your flight, you’re going to want to make sure you have a place to stay while you’re on vacation too. That brings us to…
Step 5: Find a good place to stay
Finding a great place to stay that doesn’t break the bank sometimes seems impossible.
However, finding a great deal on accommodations is simple IF you’re willing to break the mold.
“[My wife and I] were in Switzerland a couple of years ago and we stayed at a hostel in a private room,” recalls Naveen. “There are no budget hotels in a place like Switzerland. It’s either a hostel or ultra-glamorous hotel. The hostel we stayed at was still very comfortable and affordable for us though.”
Along with hostels, travelers can also find great, affordable places to stay through home sharing sites like Airbnb or Couchsurfing.
“If you really want to save money on accommodations, backpacker hostels are the way to go,” Karsten says. “I once spent a month living in a Nicaraguan hostel for $5 a night!”
If you really prefer to stay in a hotel though, that’s okay! You can book awesome deals on hotels using travel credit cards since they often allow you to spend points on hotel rooms.
There are even awesome cards like the Starwood Preferred Guest Credit Card that allow you to maximize your points for hotel stays.
Many websites also exist to help you get the most out of your hotel bookings.
“One site I really like is i-escape.com,” suggests Naveen. “They have sweet deals for hotel accommodations at different price points. Another great one is Hotels.com. They have a program that holds 10% of your spend with them, and eventually they give you a free night. So every 10 nights or so, you can get a free night in a hotel.”
ACTION STEP: Book a great place to stay
By being flexible and a bit judicious with your accommodation search, you can find an awesome place to stay during your vacation and not break the bank.
Use the tools below to help you find some of the best deals on places to stay.
Airbnb. More than just renting spare bedrooms, you can find some really cool places at a relatively low cost if you are diligent in your search (you can even stay in a freaking castle!).
Hotels.com. They’ve aggregated accommodations ranging from uber-luxury hotels to small mom-and-pop bed and breakfasts. Also, they’ll kick back a free night in a hotel for frequent users. Awesome.
i-escape.com. Though a bit more limited in selection, i-escape gives travelers only the best accommodations at the best prices.
HostelBookers.com. With over 35,000 hostels in over 170 countries, HostelBookers should be your first stop when trying to find a good hostel. You’ll have no trouble finding an awesome (yet budget-friendly) option here.
HostelWorld. Another great option to find hostels. The site’s 24/7 customer support is also at your call in case you have any questions or concerns about your bookings.
Step 6: Call your credit card companies
Imagine you’ve finally made that trip to Paris you’ve always dreamed of. You’re taking in the sights, the sounds, and the people. You LOVE it. So you decide to buy yourself a nice meal to celebrate your first night — and it’s amazing.
Then comes time to pay for your check. You hand your credit card over. Your waiter scans it…and scans it…and scans it again.
He hands it back to you and shakes his head.
Declined.
You don’t have any other way to pay for it. Soon you’re in a French gulag, breaking big rocks into smaller rocks until you can repay your debt. This is what could happen (probably) if you don’t warn your credit card company about your travels.
Credit card companies get nervous when they see you make purchases you don’t normally make — especially when those purchases are somewhere you don’t live.
That’s why it’s important to give them a heads up before you go.
From Naveen:
“I call my card companies beforehand in order to tell them about our travel plans. Most of these companies don’t even need you to talk to a rep — it’s fully automated.
You just call up the company and say, ‘travel plan’ at the prompt. Then they’ll ask you for the countries you’re going to in order of your visit, when you’re going, and when you’re coming back.
Then they authorize the cards to be used in each of those countries.”
ACTION STEP: Tell your credit card companies about your travels — but prep for the worst
Call your credit card company and tell them about your trip.
Here are the numbers for the major card companies out there to help:
Visa: 1-800-847-2911
Mastercard: 1-800-307-7309
Discover: 1-800-347-2683
American Express: 1-800-528-4800
Simply inform the representative that you plan on traveling and that you’ll be using your card. They’ll ask you where you’re going, how long you’ll be gone for, and voila! You’re prepped for travel.
Much like airlines, credit card companies often screw up even when you give them the heads up.
You might find yourself in a situation where you’ve warned them that you’ll be traveling and they still cancel your credit card when you try to make a purchase abroad.
That’s okay! Because you’re an IWT reader, you’ve prepped for this situation by packing two alternatives:
Cash. It’s always a good idea to carry $100 – $500 in emergency cash just in case something goes wrong. “I bring cash with me just in case my card doesn’t work while traveling,” Naveen says.
ATM/Debit card. One of the biggest hassles when it comes to getting money while abroad is international fees — especially when it comes to ATMs. However, you can circumvent that with the right cards.
“There are certain cards that will refund your ATM transaction fee. Charles Schwab’s debit card is a great example,” Naveen says. “In fact, I have a friend who keeps a certain amount of money in his Schwab account so he can use it if he’s abroad or in Vegas or something since the fee is refunded to your account by the bank.”
Step 7: Budget consciously for the trip
There are TWO ways you can prep your vacation budget.
Save money for travel
Earn money for travel
Both can be simple, painless, and really fun (seriously).
How to save money before travel
One of my favorite ways to save money for a trip is through a process called “mental accounting.”

Pretty much what mental accounting looks like.
Mental accounting is a psychological technique wherein people treat money differently depending on how they got it and plan on spending it.
A great example of this: Using a sub-savings account.
Most banks allow you to create a sub-savings account along with your normal savings account (you can even name them too!). You can put money into this account each month and know that it’s going towards your traveling goals.
By mentally accounting this money for travel, you’re leveraging a powerful psychological trick of focusing your savings goals.
You can even couple the sub-savings account with another great system I love: Automated finances.
Automating your finances is a system wherein your money works passively for you. It’s the ultimate cure to never knowing how much you have in your checking account and how much you can spend.
When you receive your paycheck, your money is funneled to exactly where it needs to go — whether that be your utilities, rent, Roth IRA, 401k, or your savings account.
“I always have a budget for travel,” Naveen says. “That includes saving a couple hundred dollars a month towards a travel fund. This is the money that I saved through the IWT system. I use for hotels and restaurants.”
ACTION STEP: Automate your finances
If you want to learn more about how to automate your finances, check out this 12-minute video of me explaining the exact process I use below. Setting everything up won’t take more than one or two hours out of your day, but it will save you thousands of dollars over your lifetime.
youtube
Earning money while traveling
Saving money isn’t the only way you can hold onto cash during your travels. There are actually a variety of ways you can earn money while abroad too.
That’s why my team and I have worked hard to create a guide to help you navigate all the systems that’ll help you earn more money today: The Ultimate Guide to Making Money.
In it, I’ve included my best strategies to:
Create multiple income streams so you always have a consistent source of revenue.
Start your own business and escape the 9-to-5 for good.
Increase your income by thousands of dollars a year through side hustles like freelancing.
Download a FREE copy of the Ultimate Guide today by entering your name and email below — and start blowing up your net worth today.
How to plan a vacation in 7 steps is a post from: I Will Teach You To Be Rich.
from Finance https://www.iwillteachyoutoberich.com/blog/how-to-plan-a-vacation/
via http://www.rssmix.com/
0 notes
Photo

Full text write on https://easy-travel.pw/what-i-spent-three-day-road-trip-through-the-southwestern-us/magazine/
What I Spent: Three-Day Road Trip Through the Southwestern US
01 of 04
Upfront Costs
4kodiak/Getty Images
The upfront costs of vacations are predictable. It’s the little things—airport snacks, cocktails before dinner, tipping a tour guide—that can throw even the most well-planned vacation budget off track. In new series, we look at the spending patterns of real travelers in popular destinations, so you can estimate what you’ll actually spend.
In this installment, two friends fly into Vegas and drive for three days from Nevada to Utah to Arizona.
Upfront costs:
Flights: $463.60 (Newark, NJ to Las Vegas, NV)
Accomodations: $156 (per person)
Rental Car: $102 (per person)
Antelope Canyon Tours: $78(per person) for the most popular tour time.
Continue to 2 of 4 below.
02 of 04
Monday
Michele D’Amico supersky77/Getty Images
11:00 a.m. The drive from Las Vegas to Utah is filled with gorgeous scenery. Driving out of the most over-the-top city in the U.S. and immediately being surrounded by miles of desert is a bit surreal. How can a bright, showy city exist smack in the middle of all this? This, mainly being the stunning purple mountains in the distance, getting ever closer as we drive past cactus after desert brush. Of course, as we approach the mountains, we realize they aren’t actually purple, but a red-brown color.
We are stocked up on road trip essentials (peanut butter cups, popcorn, cheese doodles, and granola bars, à la Trader Joe’s), the music is blaring, the sun is shining, and our spirits are high (fueled by a mix of caffeine, peanut butter cups, and the view). Cost: $13
1:15 p.m. When we reach Zion National Park, we are completely surrounded by those red-brown mountains, which are even higher and more awe-inspiring as we get closer. First things first: check into the hotel. We’re staying at Cable Mountain Lodge, and our suite is much bigger than my small Manhattan apartment. We stock up on waters, and hit the trail! Cost: $1.55
2:00 p.m. On our way into the park, we see a very enticing sign for salmon tacos next to the Zion Brewery (mental note saved for later). Admission into the park for the day is $15 each, which includes the access to all the hiking trails. We don’t have time for such luxuries, but instead we have our sights set on one of the most strenuous (and perhaps one of the scariest) trails: Angel’s Landing. Cost: $15
As we set off on the trail, I’m a little disappointed. The trail itself is a paved path. I grew up in the Adirondack Mountains of New York, so I can’t believe that a hiking trail is paved. Yes, the hike is steep, and yes, many parts of the trail wind around a cliff side with a sheer drop-off, but the path itself is steady, so no real need for worry. That is, until we reach the top. Oh, so this is what everyone was talking about. The end of the path greets us with a narrow ridge and a chain to hold onto so you don’t fall over the edge. I take a few steps and decide I’m not cut out for this kind of hiking today. I let my friend tackle the rest of the climb, and I sit down with the rest of those who decided not to do it.
5:45 p.m. Now at the base of the park (the climb down was quick–a bit of a jog at some points as the downhill slope and our excitement to eat those salmon tacos overcame us), we are ravenous. Charging straight into the brewery, we order 11 flights (that’s their full menu of beer, so might as well sample everything!), two orders of salmon tacos, and chili cheese fries (because we earned it). We figured that ordering all 11 flights was a normal occurrence, but with the surprised look we got from our server and others, we quickly realize we are maybe a little overzealous. Oh, well! We finish up and then order a growler to-go of our favorite beer that we tried—a delicious sour beer with fruity notes. Cost: $58.35
7:15 p.m. We proceed to the hot tub with our growler, considering it physical therapy for our soon-to-be-sore muscles. We relax with the sunset and chat with a few other visiting families before we call it a night–but not without first stopping by the brewery to buy a second growler to bring home with us. Cost: $15
Continue to 3 of 4 below.
03 of 04
Tuesday
Florence Dugué / EyeEm/Getty Images
8:30 a.m. Next up: we’re heading out of Zion and on our way to Page, Arizona. But first, breakfast. We stop at a cute little diner where my friend orders a giant savory crepe covered in hollandaise sauce and I get a bacon, tomato, and scrambled egg grilled cheese (I definitely helped myself to some of that crepe, though). Cost: $15.48
9:15 a.m. We had no idea what was in store for us, but we’re now winding through narrow, cliffside roads. We make our way up, up, and up, all the while, gorgeous textured mountains are taking over our entire view. It’s simultaneously beautiful and terrifying—one side of the road is a sheer drop-off, and as we get higher, the drop-off gets deeper. The mountain fairytale ends with a mile-long drive through a dark tunnel, straight into the belly of a mountain.
We get to the main road again (and pick up our jaws off the car floor), and stop for gas. Cost: $20.78
11:00 a.m. We arrived in Page about an hour and a half before our appointment with Antelope Canyon Tours, so we are hitting up a local bar. Finding wifi and a place to charge our phones was really our main criteria, but a couple of late morning beers doesn’t hurt. Cost: $11.50
12:30 p.m. Our scheduled tour for Antelope Canyon is at 12:30, which was the recommended tour, as the light is optimal during this time of day in the Upper Canyon. We take a bumpy, somewhat thrilling ride on an off-road path into the desert to arrive at the entrance to the canyon. The path is tight, and some parts require being squished up against the canyon wall as other tour groups make their way by in the opposite direction. Our guide seems to have the most uncanny ability to locate the best photos. “Here, give me your phone,” and after bending into an awkward position against the canyon wall to capture the perfect shot, the results were truly unbelievable. The guides have also named many parts of the canyon, as if the wind and waters had magically formed presidential faces overtime; we can see Obama, Bush, Trump, and Lincoln–the resemblance is actually pretty spot-on for some of these.
3:00 p.m. While on our way out of Page, we spot Big Texas BBQ and, stomachs rumbling, we’re sold. I ordered the sampler–ribs, pulled chicken, and smoked sausages. A side of baked beans and coleslaw and ice cream for dessert really rounded out the meal. Cost: $25.52
4:30 p.m. Barely five minutes out of Page, we’re immediately driving by Horseshoe Bend, and we decide to stop for a spontaneous exploration. We climb up and over a massive sandy hill, and we can spot the indistinguishable landmark. The colors are so vibrant this time of day, and the water bending around the rock is perfectly still. The breathtaking and slightly unexpected view makes Horseshoe Bend one of our favorite stops so far.
We’re back in the car, and on our way to Flagstaff, Arizona, and the landscape around us is slowly changing again. The flat-top mountains are gone, being replaced by trees (how long has it been since we’ve seen those?) and one gorgeous blue, snowy peak getting closer in the distance. The mountain is located near Flagstaff and a popular skiing destination.
6:30 p.m. Reaching Flagstaff, we come upon a quaint and cool little town. It’s an eclectic mix of old Southern-style architecture, artful graffiti, and neon signs—a hipster-millennial playground. Our hotel—Monte Vista—is apparently infamous for being haunted. Since the 1920s, quite a few people have died there, and ghosts are apparently rampant throughout the hotel.
7:30 p.m. After checking into our room, which is the very same room that actor Anthony Hopkins had stayed in, we head downstairs to one of the bars located off the hotel lobby. In the first bar, which has a fancy but hip cocktail menu, we try the Magic Eight Ball, which is a fruity gin concoction that tasted pretty good. Then, we head off to another bar, which is more of a dive bar–with karaoke to boot. Exhausted, we leave the bar and look out for the known elevator ghost on our way up to our room (no luck). Cost: $16
Continue to 4 of 4 below.
04 of 04
Wednesday
Dean Fikar/Getty Images
8:30 a.m. Recommended by our bartender from the night before, we head to MartAnne’s Burrito Palace. The colorful, quirky Mexican spot is previously a small, hole-in-the-wall restaurant (explained to us by a friendly local and our waitress, who once owned the place, but had now stepped aside for her daughter). The previous location became so popular and the line to get in so long, that they had no choice but to upgrade to a much bigger space. I order the Fiesta Potatoes with a fried egg on top, and it does not disappoint. Cost: $22.14
On our way to the car, we decide to stop for a coffee at a not-so-subtle shop called Whyld Ass, and I order the Mexican Specialty Latte. Unfortunately, it tastes like hot, steamy taco seasoning, not the caffeinated version of Mexican hot cocoa that I was hoping for. Cost: $6.02
10:00 a.m. The drive to the Grand Canyon is a bit of a longer one (about three hours), and we decide to veer off the main highways for the Arizona backroads. The sun is out in full force, and the landscape, yet again, is amazing. Bright green brush and strange-but-pretty cacti occupy the desert while red and purple mountains stand tall in the distance. The closer we get, the more I’m wondering where the Grand Canyon could possibly fit into all of this.
2:15 p.m. A quick stop for gas, and a bit of fumbling for directions later, we make it to the National Park. Since the zipline closes at 4:00 p.m., we try to hurry along to the canyon. We buy our tickets and board the shuttle. Cost: $93.31 (zipline tickets + canyon admission)
The zipline is brand new (opened January 2018), and the view, as anyone can imagine, is breathtaking. The actual thrills only lasted two lines and 20 minutes tops, which was a bit of a disappointment. We’re in our RV on our way back to the shuttle stop, but our driver decides to pull over at the edge of the cliff to show us Quartermaster Canyon. Closed off to the public, and once the scene of a historic expedition, it is hard not to feel a bit unworthy standing on such sacred ground and taking in the unbelievable view.
3:15 p.m. There are two more shuttle stops and two different spots to view the Grand Canyon. The second stop on the line is slightly disappointing. After being wowed by Zion, Antelope, Horseshoe Bend, and Quartermaster, the canyon we are staring at now felt a little less grand. The third shuttle stop, however, immediately stops those complaints. It turns out the Grand Canyon is most definitely worth the hype. We’re on a massive rock with miles and miles of canyon stretched out before us on three sides. On one side, there is an old abandoned guano mine that makes this scene that much cooler.
4:30 p.m. The drive back to Vegas is peaceful, both of us exhausted and satisfied from our journey. We stop for gas one more time and return our rental car before venturing back into Sin City. Cost: $5.01
Totals:
Food & Drinks: $184.56
Activities: $186.31
Accommodations: $156
Transportation: $591.39
#travel #airlinetickets #airtickets #cheapairfare #planetickets #travelinsurance #travelquotes #travelblogger #traveller #travelling #travelocity #travelodge #vacation
0 notes
Text
How I Got Better at Photography
Two years ago, I splurged some money and bought a camera because I’d always wanted to try to take pictures of the stars. The left photo above was the only decent picture out of 700 taken on my first clueless attempt. The right photo was taken about 2 weeks ago. Don’t let your dreams be dreams.
I can distinctly remember the first time a camera was put into my hands. It was the wedding of one of my oldest cousins, and I was 10 or 11 years old. A family friend was the photographer, and he must have noticed me walking around bored and clueless, because he took one of his SLRs, put it in my hand with a full roll of film, and told me to help him take pictures.
None of the photos turned out. I was a kid and I had no idea what I was doing, but 15 years later, that moment is still crystal clear in my memory. It spurred me into action, asking for digital cameras for my subsequent birthdays (my first was a 3.2MP point-and-shoot), saving up my lawnmowing money all summer to buy a 512MB Compact Flash memory card, and messing around with the old Pentax K1000 that had been collecting dust in my dad’s closet — whenever I could afford film and processing, that is.
Unfortunately, somewhere between working two jobs, trying to succeed in high school, beginning college, and spending 2 years abroad in Eastern Europe, I simply lacked the time, money, and know-how to pursue photography beyond the capabilities of my cell phone, and my interest in photography faded.
There was, however, always a shade of desire. I remember being jealous of friends who owned big, hefty, DSLRs. I was green with envy when my mom decided to buy my dad a Nikon D3200 for his birthday. I stole it often to take pictures and it didn’t take long before I knew more about it than he did. My time to own a DSLR came when I accepted an internship at a local art museum that needed me to act as an event photographer and videographer. I purchased a Nikon D3300 with a kit lens and a $20 tripod and immediately got to photographing everything in sight.
Those first couple of months, I tried to take pictures every day. I didn’t always succeed, but it taught me to be constantly looking for compelling subject matters. Growing up in the heart of Utah, landscape photography was a natural fit: there are canyons every 30 feet (it seems), 5 National Parks, a variety of National Monuments, and more to do than anyone could in a lifetime.
I spent much of my time hiking on the weekends and I had a close friend with whom I’d take road trips every year. Glacier or Banff, the Grand Canyon or California, wherever sounded most exciting. Landscape photography, as I often say, meant simply doing what I already did — but bringing back evidence.
Photo upon completion of a 11 hour, 26 mile overnight trip from the north rim to the south rim of the Grand Canyon
On the summit of Fairview Peak, Banff National Park, Canada
From the get-go, I also had a strong desire to take pictures of the stars. Humans have always had this primordial fascination with the stars, and I’ve always felt that strongly. Many a summer night growing up was spent on my rooftop watching the sky shift from sunset to blue hour to suburban starscape. For that reason, the stars seemed a natural subject as well, and I can vividly remember my first attempt at capturing them.
My friend and I hiked a steep trail to a lake on the night of a full moon. It was nearly dark by the time we arrived at the destination, but the area was beautifully lit. I moseyed over to the far side of the lake, set up my tripod and camera and spent the better part of an hour troubleshooting. Simple photographic concepts — focus, aperture, exposure — became less intuitive at night. I guessed at settings, wrote them down, made slight adjustments, and tried again. 700 terrible photos and a few hours later, we made the long trek back down to our car, trail poorly lit by cell phone flashlight.
One of 700. My first night of astrophotography.
The whole night, the best photo I had managed to produce featured brightly illuminated cliffs and a few faint stars. My expectations for what I would be able to do were extremely high and I’d certainly fallen short, but at the end of the day, I was thrilled I could see stars at all. I went out the next night and the next night and the next night, always to different locations, getting more and more excited with each photograph that got closer to representing the vision I had for what my photography could be.
My first successful image of the milky way over Mount Timpanogos, battling Utah Valley light pollution
Coping with the stars and light pollution from the Salt Lake Valley. Somewhere in Utah’s west desert.
The follow-up to those feelings could only be described as an obsession. I was getting distracted at work because I was googling articles about night photography. I signed up for a dozen newsletters on various websites with tips and tricks. I began researching gear the second I realized that, well, an entry-level camera and a kit lens weren’t going to cut it. I thought I knew cameras because I understood the basic concepts of ISO, aperture, and exposure and (more-or-less) how they worked together in the daytime, but I purchased books that taught me to understand their effects and use them beyond simply to manipulate light.
I learned what a crop-sensor was and immediately ached for a full-frame camera, I began to study the construction of and limitations of lenses and I immediately began researching which lenses I needed to buy in order to increase the quality of my work. I read articles about low-light performance in various cameras, I read about sensor technology, I bought Photoshop and Lightroom and began to watch YouTube tutorials about Milky Way post-processing techniques. Star tracking and median stacking and focal blending were terms of which I had never heard, but with time, I began to understand and apply them.
A lucky alignment over Monument Valley, Utah
Under Owachomo Natural Bridge, Natural Bridges National Monument, Utah
Just as importantly, I learned how to compose an image. I bought a couple books that helped me understand the theory, but trial-and-error was the real teacher. As a trained Art Historian, I studied the likes of Ansel Adams, Eadweard Muybridge, and William Henry Jackson, even handling original prints of theirs, all the while trying to see through their eyes and understanding how to see the way that they saw.
Along those same lines, I studied the work of famous 19th-century romantic landscape painters like Thomas Cole and Albert Bierstadt, attempting to understand (and later replicate) what made their compositions compelling.
Stars creeping out during a backpacking trip in Coyote Gulch
Miraculously, throughout this entire multi-year process, I began to see improvement. And as I saw improvement, my interest waxed instead of waned. That first year I shot upwards of 100 GB worth of photographic data. The next year, it more than tripled.
It’s important to realize in retrospect that improvement is often slow-going and always requires a lot of sacrifice and diligence. Nothing says sacrifice quite like taking an hour-long nap and then having to crawl out of a warm sleeping bag to go wander through the desert all by yourself (machete in hand, in case any wild animals want to tussle).
During the week of the new moon in June 2018, I spent 6 out of 7 days camping, on average driving 4 hours round trip to a camping spot dark enough to photograph the skies. I spent 4 of those nights sleeping in the driver’s seat of my car while the wind howled outside. I returned home with only a few worthwhile images to process (Good ol’ Ansel said it best: “12 significant photographs in one year is a good crop.”) Besides that, each of those mornings, I drove 1-3 hours back home to work an 8-9 hour shift at my day job.
The results of a windy, miserable, lonely night of car-camping in Payson, Utah.
I rarely get paid for my photography, but exhaustion and lack of monetary payoff aside, I am in love with what I do. I never imagined I’d be to the point that people would want me to write about my experiences, that Reddit posts of my photography would hit the front page (41k upvotes and counting), or that strangers and friends would be asking me for advice — I’m just a guy who loves the world I live in and whose eyes shimmer like a little kid’s every time I look up at the night sky.
I still have a lot to learn and a lot to improve upon. I look forward to the future, but those formative moments as an innocent and naive student of photography will always be some of my favorites—when every shutter click was an uneasy step forward and I was always anxious to learn something new. I hope that that early spirit never leaves me.
I think often of the 10- or 11-year-old version of myself snapping wedding photos and wish I could watch him excitedly click away, but I feel lucky to be able to experience that same excitement every time I see the world through my own lens or look up and try to soak up the beauty of the sky.
Milky Way behind the Temple of the Sun, Capitol Reef National Park, Utah
Milky Way behind Delicate Arch, Arches National Park, Utah
About the author: Matthew Pockrus is a landscape photographer based in Utah and focusing on the American West. The opinions expressed in this article are solely those of the author. You can find more of Pockrus’ work on his website and Instagram.
from Photography News https://petapixel.com/2018/06/26/how-i-improved-as-a-photographer/
0 notes
Text
These Amazing Nature Photos Will Make You Yearn for the Great Outdoors.
New Post has been published on https://kidsviral.info/these-amazing-nature-photos-will-make-you-yearn-for-the-great-outdoors/
These Amazing Nature Photos Will Make You Yearn for the Great Outdoors.
I’m always amazed by the great outdoors. No matter the time of year or day, there’s always something incredible to see. Plants, animals, weather, you name it… there’s never a dull moment if you know where to look.
Can’t get out for a hike right now? That’s okay. You can vicariously enjoy nature with us. We collected some incredible shots of the wilderness for your viewing pleasure. These images were captured around the US and show the beauty of the land. Alaska seems to have a monopoly on incredible vistas, but there’s plenty found in other states as well! Take a gander.
1.) This fluffy owl.
Scott Joshua Dere
Snowy owl, Otis Pike Fire Island High Dune Wilderness Area, New York
2.) This magical woodland trail.
Pablo McCloud
Aurora Ridge Trail, Sol Duc Valley, Washington
3.) This real-life Patrick.
Thomas Bancroft
Purple sea star, Olympic Wilderness, Washington
4.) This northern light-show.
Jeff Rennicke
Aurora borealis over Honeymoon Rock, Apostle Islands National Lakeshore, Wisconsin
5.) This eagle and its meal.
David Bahr
Bald eagle, Glacier Bay Wilderness Area, Alaska
6.) This painted vista.
Laura Vu
Fall colors, Ouachita National Forest, Arkansas
7.) These cranes taking flight.
Diane McAllister
Sandhill cranes, Bosque del Apache, New Mexico
8.) This pastel winter wonderland.
Jarrod Castaign
Snowy meadow, Mouth Hood Wilderness, Oregon
9.) These kids.
Mountain goat kids, Mount Evans Wilderness, Colorado
10.) These snow-capped peaks.
Tim Aiken
Alaska Range, Denali Wilderness, Alaska
11.) These sun-kissed mountains.
Brad Goldpaint
Banner Peak Alpenglow, California
12.) These energetic foxes.
Dee Ann Pederson
Red foxes, Denali National Park, Alaska
13.) This flowery meadow.
John Richter
Wildflowers, Grand Teton National Park, Wyoming
14.) These naturally painted rocks.
Richard Ansley
White Pocket, Paria Canyon-Vermillion Cliffs, Arizona
15.) This hungry bear.
Robert Amuroso
Brown bear, Katmai National Park and Reserve, Alaska
I don’t know about you, but this makes me want to head out for the great unknown.
(Actually, the last one just makes me want sushi. Yum…)
Read more: http://viralnova.com/wild-photography/
0 notes
Text
Grand Touring Across California in a 2018 Lexus LC 500
CAMBRIA, California — It was probably around the third visit to the Lexus stand when I realized I was staring at one of the most striking, captivating cars I’ve ever seen. This in 2016, at a frigid, snowbound Detroit auto show, when Lexus trotted the stunning LC 500 out for its world debut. I distinctly remember returning to the Lexus show stand multiple times, trying to drink as much of the LC 500 as I could. Fast forward over a year, and I’ve nabbed the keys to a Liquid Platinum 2018 Lexus LC 500 for the weekend. With an evening and two full days cleared out, I’m set to explore what happens when Japan plants its flag in European-held territory.
For the record, I never said the LC 500 is beautiful, and after hours of oogling, I’m not sure it is. It’s alluring, engrossing, and unbelievably unique, but I remain unconvinced it’s objectively a beautiful car. In place of conventional good looks we get something incredibly original, and that’s worth the nearly six-figure price of entry alone. Aside from perhaps a handful of canopy lines, the LC is a wild, origami moonshot away from the established design consiglieri at Aston, Ferrari, Mercedes, and Jaguar.
The whole shape is awash with contradiction–that massive grille really, really shouldn’t work as well as it does. We paid for the Predator-aping Spindle Grill with the tax of time, dealing with different iterations until Lexus finally made it work. On the older RX models, it’s garish and gaping. On the LC, it’s arguably the most significant portion of the design, yanking the taut curves and angles from the front half of the body forward.
If you see one in person, spend some time walking around the 187.4-inch-long coupe. This isn’t an easily digestible shape—save for the BMW i8, this is the closest we’ve gotten to a concept car that snuck into production. From the insane, thick wheel design to the abruptness of the flat side, you could spend hours and not fully understand why the design “works.”
Inside, it’s not quite as shocking as the outside wrapper. It’s still very much sculptural, with gently rising curves and flat surfaces that create an environment much more special than more pedestrian Lexus offerings. Most of the buttons were heavy and comprised of metal, and the leather was some of the richest I’ve seen from the brand. On the door, sweeping lines ascended up the suede insert, interrupted by a floating door handle that’s as elegant as anything I’ve seen on much, much more expensive cars.
Things only get better once you find the metal start button behind the steering wheel, nudging the 5.0-liter naturally aspirated V-8 to life. Sound familiar? It should be—this is the same 2UR-GSE V-8 we’ve enjoyed since its debut in the 2008 IS-F. 471 hp and 398 lb-ft of torque are on tap, routed to the rear wheels through Lexus’ 10-speed automatic transmission.
It’s an older heart and you’ve got to punt the needle to the top to extricate the power, but that only means you can drink in the sensational soundtrack. The 5.0 is shared with the GS F and RC F, but it never sounded better (or louder) than it does in the LC. Much like the styling, the sound is wholly unique – not European, not American. There’s a touch of euro about it, but brings in a pure mechanical thrash accompanied by a gutsy intake resonance that I haven’t heard anywhere else.
At 4,280 pounds, it’s not light, but GTs by definition are weighty, substantial vehicles. Weight-shaving ascetisisim is the antithesis of grand touring—there’s always insulation, big engines, cushy seats, and complicated sound systems to keep occupants cosseted. Thanks to the V-8, performance is more than adequate, with 0-60 mph arriving in a claimed 4.4 seconds, and a top speed limited to 168 mph.
GTs are dual-purpose vehicles, offering the capability to dance around a slippery highland pass when the coastal path is too clogged with tour buses. For handling, I checked into the canyon roads weaving above Malibu, hitting all my regular paths. These tight, technical roads proved too claustrophobic for the LC’s sizeable hips and too bumpy for the over-active traction control system that cut power completely on more than one occasion.
Quickly, I charged through LA freeways to Angeles Crest, a canyon pass more sympathetic to wider, faster cars. Here, the LC was at home, holding sharply to the Crest’s myriad sweepers. As a bonus, there’s a tunnel near the top for bouncing the V-8 off the top of the tach.
Dynamically, it drives as well as you would expect it to, with medium-weight steering and easy, powerful brakes. Don’t expect much for tight, small corners, but long, gradual curves are the LC’s forte. As before, peak power arrives toward the top of the range, requiring a heavy foot to hustle, which is slightly off-key for GTs. You want consistent power delivery down low, with an unfussy transmission. The 10-speed was quick, but too often it would get confused and hold a gear too long, or upshift far too quickly.
After returning home that night, I wasn’t convinced I’d done any real GT-ing in the stop-and-go LA traffic. Sunday was fast approaching, so I laid out a course up north to Cambria, California for the next morning.
Located roughly 250 miles northeast of my home in the South Bay, the village of Cambria is a picturesque seaside hideout in-between Los Angeles and San Francisco. Aside from Hearst Castle and the nearby pine forest, there isn’t much to see here, but it makes for a perfect endpoint to a scenic coastal sprint.
In the morning, I’m out the door before the sun fully breaches the horizon. The Rioja Red leather-and-suede seats are a touch chilly, so both the seat and the steering wheel heaters are clicked on. It’s a 20 minute stroll through empty beachside streets to the highway, enjoying the LC’s comfortable ride and excellent sound system before I reach the 101.
For a brief stretch before Santa Barbara, the 101 touches the coast, providing spectacular vistas that fall right in line with the elegance of the LC 500. Out on the straight and smooth tarmac, it’s quiet and refined, showing very little of the raucous V-8 character found up on the Crest. Passengers in other cars crane their necks as I pass, likely taken aback at the Lexus badge on the rear bumper.
The Lexus’ 21.7-gallon fuel tank means I don’t have to stop for fuel until my destination, giving me peace of mind. In Cambria, I cruise around the wooded hills in search of photo spots before giving up and returning to downtown for some lunch. It was barely mid-day, and I still had some travel legs under me, so I set my sights on wine country.
A quick loop around Cambria puts me back on the 101, before shortly turning off onto highway 46. This meanders through straw-colored hills for 30-odd miles before washing into Paso Robles, one of the many wine-centric areas of California. I’m not the biggest oenophile, so I was here for the scenery – and to open the taps on the LC a little more. Exploration concluded with a cruise through wineries and farmlands, stopping on the side of a secluded backroad for another chance to oogle the LC.
It was only mid-afternoon, but I had a six hour drive ahead of me, and I had already been in the seat most of the day. I pointed the Lexus’ spindle grille toward home and fired, winding back down the coast and through increasingly clogged highways. I arrived long after the sunset, but was not much worse for the wear. Through the roughly 600-mile round trip, the Lexus proved to be as comfortable, approachable, and entrancing as its much more expensive and finicky European counterparts.
Job well done? I think so. The LC could almost get by on its stunning looks alone, and didn’t have to feel as satisfying to drive as it did. The LC 500 and LC 500h are the first of the breed, and considering this is a clear shot across the bow of the established GT players, watch this space for higher-performance variants to arrive in the future.
So, the next time your Cambria calls, give the 2018 Lexus LC 500 a try – it just might be better than you expect.
2018 Lexus LC 500 Specifications
ON SALE Now PRICE $92,995 (base) ENGINE 5.0L DOHC 32-valve V-8/471 hp @ 7,100 rpm, 398 lb-ft @ 4,800 rpm TRANSMISSION 10-speed automatic LAYOUT 2-door, 4-passenger, front-engine, RWD coupe EPA MILEAGE 16/26 mpg (city/hwy) L x W x H 187.4 x 75.6 x 53.0 in WHEELBASE 113.0 in WEIGHT 4,435 lb 0-60 MPH 4.4 sec TOP SPEED 168 mph
IFTTT
0 notes
Text
New Post has been published on Local Freshies | Be a local wherever you go
New Post has been published on http://localfreshies.com/top-10-posts-2017-voted/
Top 10 Posts of 2017 as Voted by You
Every new year, we step back for a moment and see what our readers enjoyed the most from the last 12 months. Most the entries that make the list make sense, while other times it comes as a shock. So, without further ado, here are the top 10 posts of 2017:
Top 10 Posts of 2017
10. Is the snow still good in June
Jane Enjoying the Snowbird Tram Image taken by: Jason Cameron
All across Western US and Canada, snowfall records were smashed during the 2016-17 ski season. From Crested Butte receiving 90 inches in 10 days to Lake Tahoe getting assaulted with 282 inches in January, giving it the moniker – “Januburied”, it was a BIG snow year almost everywhere. So, the idea of pushing the season into June or later became a hot topic and we answered the question: “Was the snow even good in June?” As always, it’s not as simple as a “yes” or “no.”
Learn if the snow is still good to ski / snowboard in June
9. Snowboards Made By Locals For Locals – 2017 Edition
From the parking lot to the finished product – Photo by: Scott DW Smith / The Imagesmith – Courtesy Venture Snowboards
If skinning up a mountain is tough, then making the decision to design, market and build equipment in North America is like climbing Mount Everest. Every year this list changes dramatically with some companies throwing in the towel and shipping production overseas. We’re elated that our readers are just as excited to find brands that are made by Locals for Locals. If you are a skier, be sure to check out our 1st skier’s edition too.
Learn what snowboards are made by locals for locals
8. Snowiest resort in Idaho just doubled in size
Last winter we traveled to a magical land filled with deep snow, uncrowded slopes, historic towns and awesome cuisine. When we heard the news that one of the resorts we visited, Lookout Pass, located near Historic Wallace got approval to expand, it was too good to pass up. We needed to write an article about it and looks like you couldn’t agree more!
Read about the terrain expansion at Lookout Pass and what it means to the region
7. Take a leap of faith… and try the best Via Ferrata in North America
Mt Nimbus via ferrata at CMH Heli-Skiing & Summer Adventures – Image taken by: Gary Unterasinger Courtesy: CMH Summer Adventures
Nothing is more gratifying than to see one of our summer adventures making the list. We love the snow, but visiting the mountains in the summer can be just as exciting. From whitewater rafting to mountain biking, there’s a surplus of activities to try. The coolest one we’ve heard about is Via Ferrata. In between rock climbing and hiking, it’s a perfect way to spend a weekend enjoying the mountains safely but at the same time getting a bit of adrenaline going.
Find out what’s Via Ferrata and where are the best places to try it in North America
6. Top 5 Ski Resorts In North America To Visit During This Thanksgiving
Gettin’ a pow shot at Grand Targhee – skier: Eric Anderson – Photo Courtesy: Grand Targhee Resort and the Idaho Ski Areas Association
For many, turkey day is when the hunger to shred is at its peak. Random flurries can be found happening all across the continent making every skier & snowboarder froth at the mouth. With snow lacking in the major regions of Colorado, Utah and California, we felt the need to highlight where has it been snowing.
Discover which 5 ski resorts in North America had the best start for the 2017-18 season
5. Drive It If You Can
S-curve up Big Cottonwood Canyon in Utah. Image taken by: Spencer Bawden
We did not expect this one to make it on the list, but we’re happy it did! There are a lot of terrifying roads to the mountains and seeing how those rank based on things like snowfall, elevation gain, length and switch backs really hit the spot with our readers. Due to its popularity, we’re working on the 2018 edition which will be even more extensive. So, stay tuned!
Learn about which roads to ski resorts that will challenge you
4. How Does The 2017-18 Season Snowfall Compare To Date?
Skiing & snowboarding is in many ways just like surfing. It’s in the soul of each person to chase after the next big wave or for us snow sliders – snowstorms. At the same time, most of us can’t afford to do that either because we don’t have the time or our bank account won’t let us. This then lends itself for us to look back and see how we’re doing compared to past winters. Is it as bad as it feels? Are we trending towards another great winter?
Here’s a recap of how the 2017-18 ski season compares to last winter as of December 16th
3. The 10 Best Spring Skiing Resorts In North America
Alpine Meadows Image taken by: DBonny
Another article made the list showing just how much folks wanted to extend their season last spring because of all the snow. The problem with late spring skiing isn’t how much of the white stuff fell, but which resorts stay open and do they preserve snow well. This list is a great example of that.
Want to extend your season? Here are the 10 best spring skiing resorts in North America
2. Who Puts The “King” In Snowmaking?
Image taken by: Peter Golde – Courtesy of: Snowbasin Resort
Early season is about two things: where are the storms and how big is your resorts’ snowmaking system. In regards to the latter, we haven’t seen anyone post an article comparing the largest systems out there so we decided to do some research. It was difficult to find any information for most West Coast resorts, but for 2018, we hope we can get some more definitive info. Until then, this is the largest list out there.
Find out how the largest snowmaking systems in each region stack up
1. Private Ski Resort Opens To The Public For The First Time In 80 Years
Mumps Glades at the Otsego Ski Club – Image taken by: Chris Holloway (Flickr: Cbholloway)
And the trophy goes to… talk about an unlikely winner! It didn’t just win but it ran away with the #1 spot. After nearly eighty years of being private, Otsego Ski Club opened its doors to the public. With a history of being the training ground for the Winter Olympics and its deep lake affect snow, this place should be on any Midwesterner’s Must-Hit list this year before the word gets out.
Read about why Otsego Ski Club has gone public and why you should visit this season
After seeing the Local Freshies’® Top 10 posts of 2017, do you have one that stood out for you? Is it one of these Top 10 or is there another post that you liked more?
0 notes
Text
The Top Things to See and Do in Madagascar
Madagascar, a country famed for lemurs, baobab trees, birding, and jungles, offers visitors a rich playground to explore. I was enthralled by its beauty: the sweeping canyons and gorges, the grand waterfalls, and the sheer diversity of the landscape. One day you’re in a tropical jungle, the next you’re in an arid plain, and a few hours later you’re in subtropical forest! Plus, there really are seemingly endless varieties of lemurs.
Though Madagascar is remote and flights are expensive (more on how to get there and save money in my next post), with only 350,000 visitors per year, you get a lot of the country to yourself! (And it’s always better to go to a place sooner rather than later, because you never know where the next “it” destination is going to be!)
Though I didn’t get as much time there as I’d like (the roads are terrible — it takes eight hours to go 250km), here are some of the wonders you can expect on your visit:
Avenue of the Baobabs
Baobab trees are massive trees that can grow 98 feet tall and 36 feet wide and can live up to one thousand years. While there are similar trees in the genus, baobabs are completely unique to Madagascar. They’re an impressive sight, especially when your guide casually mentions that the massive one you’re hugging is just a baby — at 400 years old. While the trees can be found throughout the country, this road lined with them (just an hour outside Morondava) — and straight out of a postcard — is one of those iconic images of Madagascar. The best time for photos is during sunrise or sunset. The worst time for crowds? Those same times. Pick your poison.
Tsingy
This park near the western coast (it’s really two: Great Tsingy and Little Tsingy) is not an easy place to visit. It takes one complete day via four-wheel drive on very rough terrain to get there. It’s very remote, with few tourists. The plus side? It’s one of the most incredible sites in the country. Water and wind spent centuries carving the limestone into jagged peaks that look like a row of never-ending knives; to get around, you use rope bridges, ladders, and fixed cables. The area also has a lot of caving, and often people pair a trip here with a slow boat down the Tsiribihina River (send photos of that if you go, because sadly, due to time, I missed visiting the river!).
Isalo National Park
Located in the south-central part of the country and featuring multiple rugged hiking trails (bring water and a hat, as you are exposed most of the time); cliffs, ravines, gorges, and canyons; and plentiful fauna, this Westworld-like park just blew me away. It was my favorite place in Madagascar. There are three waterfalls you can cool off in after your walks and a variety of lemur species (they get pretty close as they are desensitized to humans, so watch your food!). You are required to hire a guide (they are found at the entrance), but they were great explainers of the land and the local culture. Added bonus: the clear sky and lack of light pollution make for some incredible sunsets and star-filled nights. I never saw the Milky Way so clearly.
Nosy Be
Nosy Be is the place to go for Madagascar’s trademark beaches. Here you will find miles of white-sand beaches in a more upscale, Western environment. There are expensive restaurants, big resorts, and lots of couples and families (which is generally who visits Madagascar). Beach parties erupt each Sunday, and there’s some amazing snorkeling, diving, fishing, and whale watching. It’s the quintessential tropical island paradise — with the quintessential cost (but it is the best beach in the country!).
Île Sainte Marie
While everyone goes to Nosy Be for the better beaches and fancier resorts, if you want something a little more local, cheap, and relaxed, check out Île Sainte Marie off the eastern coast. This former pirate capital (Captain Kidd’s ship sank nearby) is a cool island full of little coves, a pirate graveyard, delicious seafood, and a laid-back Caribbean-like atmosphere. The beaches aren’t as good as Nosy Be, but there’s a beautiful, pristine white-sand beach at the south of the island near the airport that few people visit. This is also the best part of the country for whale watching too. When coming here, fly. The slow boat is most always late and lands nowhere near a major town on the mainland. Taking the boat wastes an entire day.
Ranomafana National Park
A prime example of a tropical cloud forest, Ranomafana was my second favorite place after Isalo. This is one of the best spots in the country to see lemurs, as it contains twelve species. Besides lemurs, there were the famous giraffe beetles and lots of birds, chameleons, and other wildlife. Of the multiple trails available (you are also required to get a guide here), I would do the morning hike, then the afternoon and night hikes at the secondary entrance, as the majority of tours skip that and you get more of the park to yourself. (There are also hot springs in the nearby town to relax in.) Due to the park’s popularity, there’s a daily limit on the number of people who can visit, so it’s best to go in low season. While the park is 161 square miles, you only get to see a few square miles of it, so it can still be crowded, especially in the morning when the tour buses come.
Andasibe-Mantadia National Park / Lemur Island
Located between the capital and the east coast, this area is famous for the Indri lemur, which makes a sound like a howling devil bat that echoes across the jungle. Nearby is also the famous Lemur Island ($3 USD to get in), which has 4 species lemurs that have been rescued from being pets. Here the lemurs let you get up close and personal, since they have been domesticated, but they are also released back into their natural habitat to be wild again. But if for some reason they can’t, they live free in the park.
Toliara
Down on the west coast, this small town is famous for the expats who move there, the pizza (it’s a seriously popular dish in the country), and for being a launching pad for diving excursions to the Great Reef offshore. There’s not much else to do except sit by the beach or go into the water. The drive getting here on the N7 (the only north-south highway) is also pretty amazing, as you can take in Ranomafana, Isalo, and other spots along the way!
Antananarivo
The capital of Madagascar is a chaotic place with not a lot to do, but it’s a good stop to see the lemur park and the Rova (the old palace), get a sense of the international scene in the city, and use as your launching pad for stops further afield.
Overload on zebu
Zebu is a type of cow with a large hump on its back. It’s more of a work cow, like an ox, and you’ll see them all over the country. They are even used as dowries in weddings. It’s the only kind of beef in the country and is always on the menu (along with healthy portions of rice). However, the meat is really tough, thanks to all the work the animals do in the fields, and so it’s best in a stew or as a steak. I can’t say I loved it. But often it was either that or pasta. I had so much zebu that I’m good for the rest of my life.
Drive the N5
Heading north along the east coast from Toamasina to Maroantsetra, this road — and I use that word loosely — is a potholed-filled expedition through some of the most raw and pristine areas of Madagascar and your best chance to see the famous aye-aye lemur. The road here meanders through dense jungle, over rivers, and through tiny towns in one of the most undeveloped parts of the country. You’re really off the beaten path here. Budget a lot of time, because the road quickly turns bad outside of Toamasina.
Go whale watching
Between June and November more than 7,000 humpback whales migrate from Antarctica to Madagascar to breed. The whale watching is some of the best in the world. While we were taking the boat to Île Sainte Marie, we saw a couple breach the water and it was stunning to see. Plus, with so few tourists here, you aren’t one of 9,384,732 boats vying for a photo.
Enjoy the long drives and vistas
With the roads being so bad, you are going to spend a lot of time in a car. As I said, it takes around eight hours to go 250km! The upside is that you will get to enjoy long drives past scenic vistas of mountains and gorges, lush rainforests, and valleys lined with terraced rice paddies. I wanted to get a lot of reading done, but I was often pulled away by the views. Madagascar is a truly beautiful country. While I hate long drives, I did enjoy pulling over every few minutes to take too many photos of every mountain and valley I saw.
***
Madagascar has a lot to see and do. Despite the years of environmental degradation (which remains a serious, serious problem), you can still see a lot of wonderful native plants and exotic animals that are indigenous to the third largest island in the world. Though Madagascar’s quite a journey to get to, these highlights will give you a trip to remember.
The post The Top Things to See and Do in Madagascar appeared first on Nomadic Matt's Travel Site.
via Travel Blogs http://ift.tt/2jbvG8N
0 notes
Last Seen Blogs

awfulamnisiac
in the diary of jane

liabloop
liabloop

jenmai
Tales and Destinies

infinityaspireprojects
Infinity Aspire Projects

enomed
Honee Dee