#lovelive school idol festival
Text
Love Live School Idol Festival is shutting down on March 31st.
This is very upsetting news because this game is where I met amazing friends, and where I got my name from (Eli). They're doing a send-off for the game that everyone can participate in. Check it out here.

14 notes
·
View notes
Text

not to be taken lightly
#love live#love live school idol festival#llsif#nico yazawa#maki nishikino#hanayo koizumi#rin hoshizora#traditional#sketchbook#fanart#lovelive
281 notes
·
View notes
Text

Halloween cat rina!
#rina tennoji#lovelive#love live school idol festival 2 miracle live#love live nijigasaki#fanart#my art
139 notes
·
View notes
Text

Source
#nozomi tojo#nozomi toujou#lovelive#lovelive!#love live#love live!#love live school idol festival#cute#anime#kawaii#beautiful#fanart#fan art
842 notes
·
View notes
Photo

nozomi bday 💜💜💜💜💜💜
wish i had time to draw smth better but unfortunately im currently in essay writing hell :,)
#i tried to draw this as quickly as possible and it shows 😭😭#love live#nozomi tojo#nozomi toujou#tojo nozomi#toujou nozomi#love live fanart#llsif#love live!#llas#love live school idol project#love live school idol festival#idol anime#llsip#lovelive#µ's#Lily White#anime fanart#anime girl#fanart#fan art#digital art#clip studio paint#artists on tumblr#art on tumblr#art blog#my posts#artsy stuff
55 notes
·
View notes
Text


I made old lovelive UR Cards using myself in cosplay. Something something noooo don't make me into collectible ultra rarest!! Nooo!!!
#i had to make the templates transparent aka the stars and symbols etc#love live#school idol festival#school idol project#llsif#klab sif#sif#rin hoshizora#cosplay#lovelive cosplay#rin cosplay#hoshizora rin#muse lovelive#shadow the hedgehog#sonic#sonic series#sega#shadow sonic#shadow sega
17 notes
·
View notes
Photo

Redraw of a old You drawing!
#you watabane#lovelive#love live school idol festival#fanart#yuu-bun#art#anime#sif#sifas#sif2#love live sunshine#my art#artists on tumblr
39 notes
·
View notes
Text
CHASE

#setsunayuki#chase#lovelive#love live#love live! school idol festival#nijigasaki#love live nijigasaki#ll#artists on tumblr#fan art#darukee#setsuna yuki
17 notes
·
View notes
Text
WE JUST GET A CHANCE TO PLAY SIF2 GL SERVER FOR 3 MONTHS ONLY ?!
"Announcing the release date and EOS date at the same time?!"🤣🤣

6 notes
·
View notes
Text


˚₊꒷꒦︶︶︶︶︶꒷꒦︶︶︶︶︶꒦꒷‧₊˚⊹ʚ♡ɞ ☁︰ʚʚ⸝⸝ my edits ɞɞ♡ ﹆˚₊꒷꒦︶︶︶︶︶꒷꒦︶︶︶︶︶꒦��‧₊˚⊹
#love live school idol all stars#love live sunshine#cute#kawaii#kawaiicore#love live school idol festival#love live school idol project#lovelive#cutecore#u's#honoka kousaka#kotori minami#umi sonoda#maki nishikino#nico yazawa#rin hoshizora#hanayo koizumi#nozomi tojo#eli ayase
21 notes
·
View notes
Text
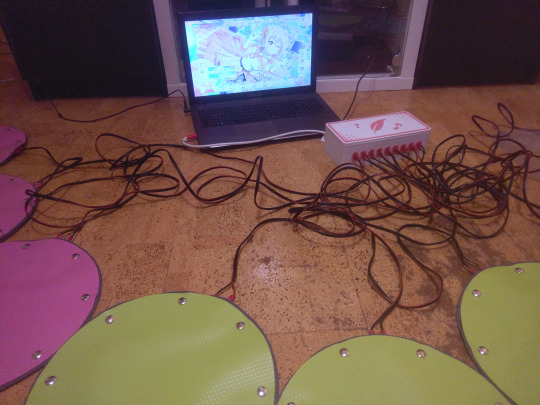
Making BIG SIF2 (Part 3)
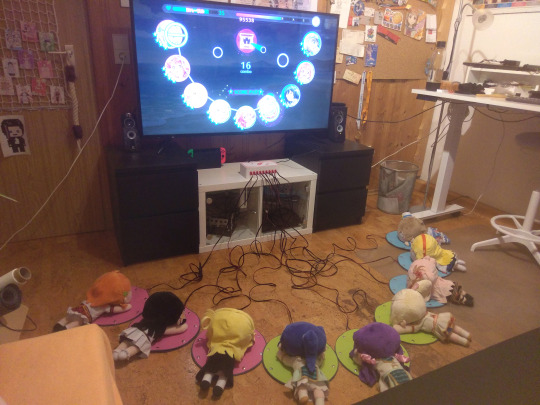
Hi! I'm back, and my BIG SIF setup is complete! That's not to say I'll never touch anything about it ever again, but it works great, and it also looks great now. Almost as if it's not just a pile of jank and bodges!
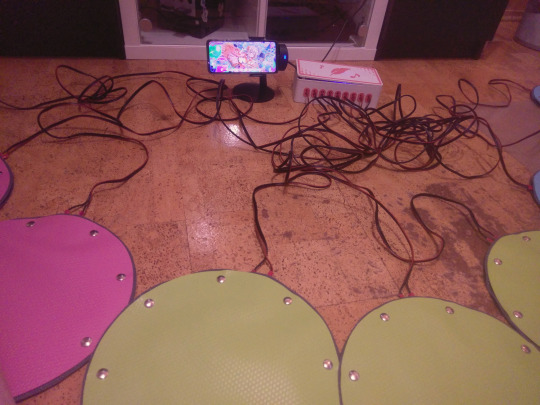
If you missed part 1 and part 2, the tl;dr is: I recreated an old SIF event where you stomp on big old floor buttons with eight other players to play songs together as a team. The other two posts talk about how the switches work, and various details about how it's all connected respectively, in case you are interested!
This post is another write-along of me working on stuff, and this time, it's about just finishing off the last few problems and to-dos - making a case for the electronics, and thinking about reliability and portability. Because of how many topics I want to cover, everything will only be covered relatively briefly. But if you want to know more about something specific, drop me an ask and I'll write more about that topic.
And just to have this important bit above the fold: I'm bringing the setup to Connichi on Saturday next weekend, in case you are there and want to play. More about that at the bottom of the post - but let's get started!
First off, an admission: I lied to you. Last time I said I made eight more floor switches. But that was not quite the truth:
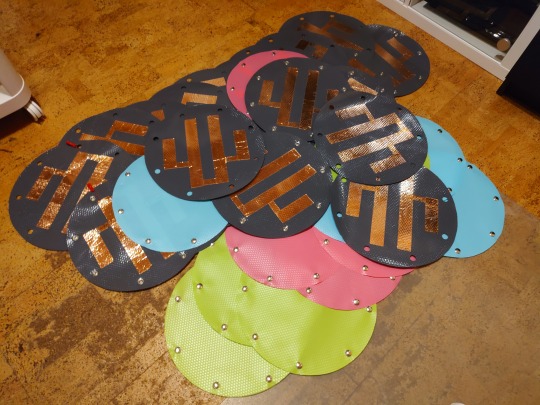
It was eleven.
So multiply everything I said last time by 1.33 - 12 total switches, with 36 shelf liner layers, 24 of those copper taped and soldered, 144 holes cut into 12 rug pad layers, 192 snap caps pressed by hand, 48 cables crimped with bullet connectors by hand. Needless to say, I have been taking it easy to give my wrist a break...
The first question is probably "why?" - it's not like there's a 12-spot mode or something. That's true, I'll never use more than nine of the switches at the same time. The reason these extra three buttons exist is reliabilty: there can be three backup floor switches on standby, to swap in if something breaks.
The switches are probably fairly easy to fix if something goes wrong - just need to re-solder a connection or repair some copper tape, at most. But that will still be a problem when actually playing with the controller system, because it will always take some time, during which the game will not be playable. Having more switches on standby means you can swap out the faulty button to diagnose and repair it, while the game can go on!
But the main thing is that I will not be having the means to repair switches in most locations in the first place. I'm not going to bring my screwdrivers, soldering station, multimeter, extra copper tape, cable and everything else to wherever we're playing! And there's a good chance there's no power or space for a repair station, anyways.
That's why I went with three backup buttons, so the game can go on even longer even if I I'm unable to do repairs right away. We'll just keep playing, and I'll repair the broken switches when I'm back home. And technically, because all the buttons are modular and I can swap out the separate layers, the system doesn't become unusable until four of the same part break!
That should be more than enough reliability for almost any situation, especially since it probably won't be used for more than a couple hours at a time.


Next up: let's hide all of the work I did.
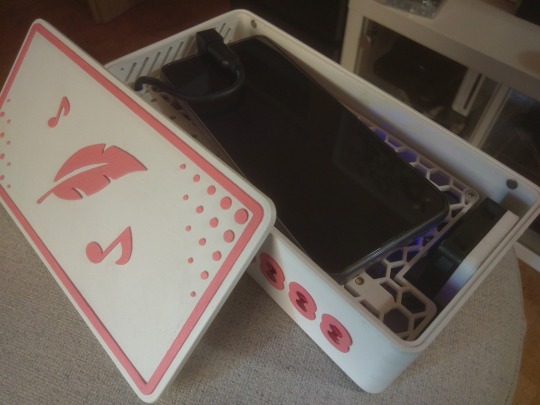
Having the wiring visible is a little ugly, so let's just put everything in a box. Building an enclosure also makes transporting and setting up everything a lot easier, since I can already connect everything inside the box ahead of time, and then just have to plug in and place the switches on the floor. And the easiest way to make a bespoke enclosure is 3D printing it!
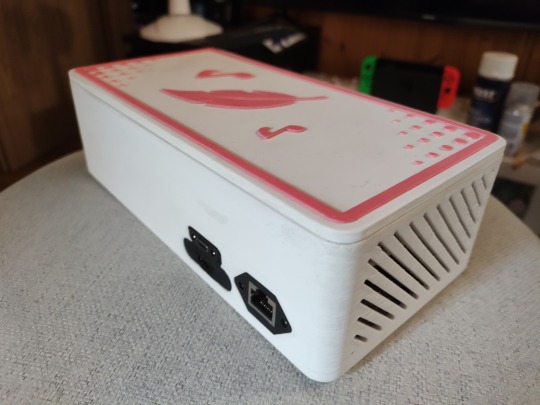
What I'll need - besides the obvious "places to put all of the adapters and the phone" - is some way to access the sockets and board from outside so I can plug all the cables in. Also, even though SIF2 isn't that demanding, it's still a closed box, so I'll probably want to add a fan. But that sounds doable, most of these won't be any problem. I can draw a box with some holes.
I decided to go for OpenSCAD for this project instead of FreeCAD - while it would have been nice to have FreeCAD to plan cable routing and be able to set constraints and everything, I just didn't need all of these complicated features. Again, it's just a box with holes, and I can do that real fast in OpenSCAD.
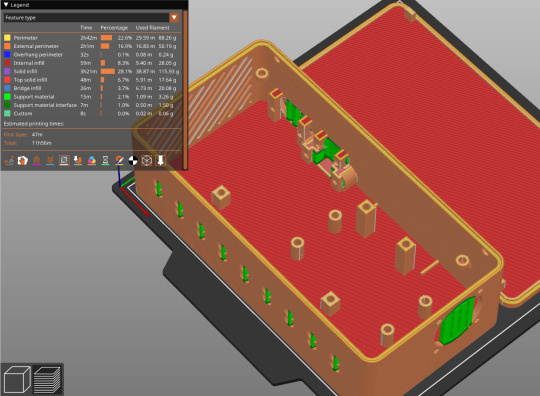

To make sure I get the box right the first try, I implemented every component as a seperate module in OpenSCAD, so I could print them seperately - for example, I could easily test print only the part of the wall that would house the Ethernet socket, to make sure that it fits perfectly before printing the whole box - and then adjust their position easily without messing up the rest of the components.
For the adapters without screw holes, I used threaded inserts that you melt in the plastic. I've never used them before, but since self-tapped holes wear out after a few times of putting screws in and out, I wanted to try out a more reliable method. These ones will last probably forever, and hold the screws in real tight. They were surprisingly easy to use, I assumed they would be harder to get straight... With this, I can use pillars with threaded inserts and some clips to screw in to keep the adapters in place, no matter how much the box gets thrown around.
These threaded inserts can also be used to mount the arcade controller board and the fan. The fan even gets power right from the arcade board, which has 5V pins meant for LEDs - but they work just fine for anything else that needs power, too. I did add a resistor on the wire though, to turn down the fan speed and noise. Finally, to access the adapter sockets easily without having to open the box, I found panel mount extension cables for all the sockets that needed to be accessible outside - HDMI, Ethernet and USB-C (power delivery).
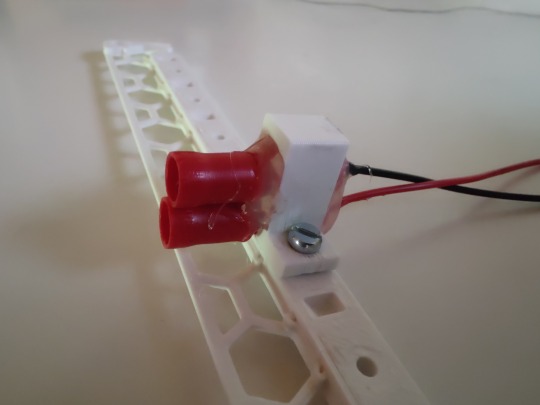

One difficulty was the sockets for the button cables. These are not some standardized kind of plug, after all, so I can't buy a panel mount cable like the others - I have to figure out how to mount these flush with the outside wall myself, and they have to stay in place, both when inserting and pulling out the cable.
In this case, I was able to use the middle shelf I already had, that mainly exists to hold the phone, since it's placed right above the cable holes. I hot glued the sockets for the cables to some small clips, which can be screwed into the shelf with screws. Finally, the shelf can be aligned with the holes in the wall when placing it in the box, all the sockets being inserted at once. There's even a bit of a taper on the button cable holes, so the sockets self-align with them!
All that's left then is just jamming all the cables in there somehow. The only real awkward cable was the USB-B-to-A cable for the arcade board connection - the one that came with it was two metres long, far too much to fit in there. So I just cut it up and soldered it back together, reducing the length down to just 20 cm. That way, all the cables actually fit in there quite nicely, and there's plenty of space left for the board connector cables, so the middle shelf can lock everything in place!
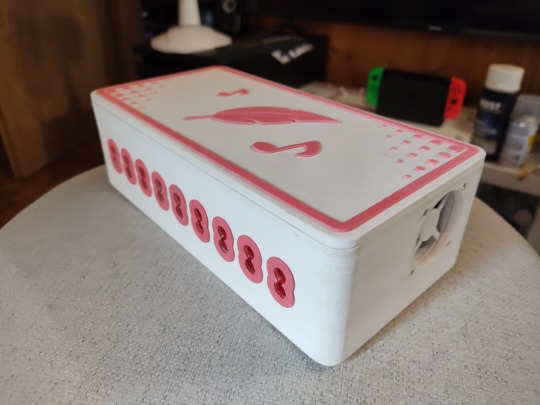
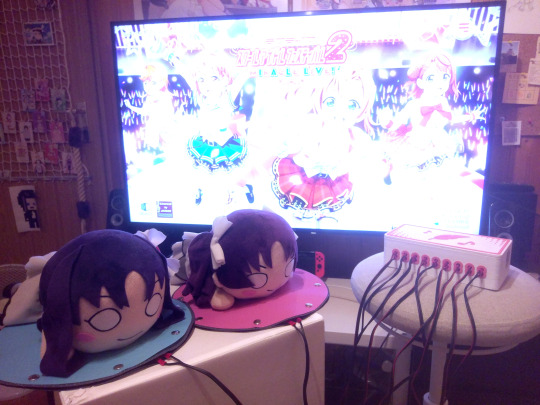
And here's the finished box! That's a good box, right?
As one little last addition, I worked on some decorations. A plain white box would look a little boring, after all, so I added some accents and icons on the front and top. While it would have been super easy to do by printing the lid in one go and changing to a pink filament for just the decoration layers, I thought I'd be smart and not buy an entire spool of filament just for that. Instead, I printed everything seperately in white filament, and then painted it all with pink acrylic paint instead.
That made the decoration only cost half - but it was such a pain. Between all the coats of paint needed to get a result that didn't look completely awful, having to glue on all of the little dots on the lid by hand, and then the clear coat, which kept getting tiny bits of dust getting stuck in it which are painfully noticable on a white background... I should have paid the extra price for the filament, it would have been less work and looked much better. Hindsight is 20/20. At least it looks okay from "standing on the floor switches" distance, I guess.
To close up the box securely, I also ended up adding some magnets I had around, glued into holes in the lid and the box walls. This way, to set up the game, I don't need any tools - all the cabling in the bottom department can be done far ahead of time, and then, at the location, I just open up the magnetic lid to place my phone into it, plug the floor switch cables into the sockets, connect the output cable on the back of the box, and it's good to go!
This was an important step for the project - instead of a nest of wires openly sitting next to the TV, it looks nice and properly finished now. It probably could have been done way easier by just grabbing a shoe box, punching some holes into it and just having extensions cables hang out, but I wanted to try doing it "right", and I think the result is absolutely worth it.
One more note: I tried to reduce printed waste by just printing small parts to test and only doing the full box print once I was sure everything would work - but all those test prints shown above are still waste of course. This is sadly something that cannot be avoided, but I can at least make sure to reduce the impact it has.
The test prints are not getting thrown into the trash, but will eventually make their way to the Recyclingfabrik. If you've never heard of them, they're a company based here in Germany that makes 100% recycled 3D printer filament! That way, my useless prints won't get burned or end up in a landfill, but can instead be reused in the future. (Also, they make some really cool filament colours, I highly recommend checking them out!)
Alright, now that we made a really good box, it's time to get back to something questionably janky.
With everything in the box running off of the phone battery, the system already is completely portable! Imagine being able to set up a quick BIG SIF game wherever you are, at cons or something… but in order to do that, there's still one massive component missing, and that's a screen to play on. Obviously, playing the game on a 15cm phone screen while standing on buttons up to two metres away is not a good time. You need something bigger!
The coolest thing would be to buy a battery powered projector. That would give you a giant picture and be easy to set up anywhere - I'll probably get one sooner or later, but I'm not pulling the trigger on that purchase just yet. It'll be a lot pricier than the rest of this project, and choosing an outdoor projector seems hard, anyways… (I've been looking for comparisions of images from projectors with different Lumen amounts in different light conditions, but that doesn't seem to exist. Maybe some of you know something similar?)
There's also portable monitors. These are mainly meant as a simple second screen for laptops when working, but they would be a good fit for this situation as well, since they only need a USB connection for power. Something like that could work if I could find a screen that is large enough, and it would also be quite easy to carry around with the setup, as these are usually pretty thin. But again, good ones are usually in the "costs more than this entire project in total" range.
But the thing is, technically all we need is a screen and a battery. I think if we bodge things a little, we can use another device that has a screen and a battery, and is made for being portable: your laptop.
Let me introduce you to scrcpy, which is pretty much the best thing since sliced bread. If you want your Android screen on your PC screen, it is hands down the best way to do it. All you need is an USB cable - no app needed, no massive latency due to WiFi, and no need to send all your video data through some provider's remote server. scrcpy has almost no delay, you can use your PC keyboard and mouse, and you can even play phone audio on your PC with the newer versions. It's incredible, and I use it almost every day.
So, plug the USB cable into the phone, and you can have SIF2 on the laptop screen! A luxurious 40cm screen, and speakers included, no emulators needed! But wait... now that the phone is directly connected to the laptop, I can't connect the other adapters in the box. It doesn't make sense to have the video on the laptop if I can't use the floor switches. Those are the entire point of the project! So, I can't use an USB connection.
But remember that Ethernet adapter I added? The main use for it was to be able to wire up to get a good and stable internet connection when the wireless one is too weak. But by using a special Ethernet crossover cable, two devices can communicate without needing a router or switch, and can create their own network just between them! scrcpy doesn't work just over USB, a network connection works, too - and I can set up that connection with just that cable.
The video stream to the laptop is back up, and the board can still be connected! And now, we have a solution for a portable screen - it shows the game, it has it's own battery, and it's easy to transport! This approach is obviously not perfect - it's pretty janky, and "almost no delay" is still a delay - but for a quick spontaneous game of BIG SIF, this is a fine way to play.

The final hurdle to take is the internet connection the game needs. This is still a massive weak point in the portability, because, as every con-goer knows, it's basically impossible to use mobile internet at cons, as it is immediately overloaded by the amount of people there (or at least German con-goers know, idk if other countries are as bad).
Unless you are have a provider that uses the higher tier mobile networks, it's either extremely slow or just unavailable. If the connection is laggy, that should still be enough to play, as you'd only have to fetch song info at the start of a Live - but SIF2 makes it difficult, due to how the game handles assets, specifically, the music files.
Every time the game loads a new song, it needs to download a file from the servers. That's the reason why, if you scroll through the song list quickly or hit the Random button a lot, the preview music doesn't play for a while: The game has to load all the server files for all the songs you stopped on...
The song files are on your phone, but they are not complete. There's parts missing, and that file that has to be downloaded contains those missing parts. Without being able to download these server parts, the game would not be able to reassemble any song files, and could not play any music.
And this is why a stable internet connection is so important for this project. We'd have no music at all without one, because every file must download it's missing parts from the servers! If only there was a way to keep the missing parts files, and store them on the phone so we wouldn't have to download them every time...
Trying to avoid too much technical details, here's the idea in a nutshell: I made an app that runs in the background while SIF2 is open, and whenever the game contacts the asset server, we trick it into instead requesting the missing parts file from that app. The app will handle the download instead, but in addition to delivering the file to the game, it will also save it on the phone. And if the same file is requested again, we just take it from storage instead of downloading it from the server again!
The code for it is surprisingly simple, but the difference it makes is massive - it's noticable even with a stable and fast WiFi connection, because the delay between selecting a song and the preview starting is completely gone! So I'll probably keep using this app even when playing normally, but most importantly, this is going to work wonders on mobile connections! Maybe, that's enough to play the game even with things slow down... I won't know for sure until we get there.
And hey, while I already made an app, I also added a bunch of buttons to make setting up easier without having to use the shell. Everything that's needed to do a BIG SIF, on a single screen!
Anyways, we've come to the end! That's all for this project for now! Thank you for reading all the way to here!
If you're planning to make a BIG SIF setup for yourself and have any questions, or are just interested in more details on anything I've talked about, feel free to drop me a ask/message and I'd be happy to answer! If you want to come play with me on this setup though, that'll probably be a little harder for most people reading this due to distance, sadly :) But you could try checking my Mastodon, where I might be talking about any cons I'll be bringing it to!
Just to mention it again, I'll be bringing everything to Connichi in Wiesbaden next Saturday (September 2nd)! I won't have a proper setup location, but if you have a group who's up to play, keep an eye out for the GenYoha!Kanan cosplayer - assuming I finish the cosplay in time, otherwise, look for a nesoberi-laden Lanzhu. If we can find a place where we don't annoy others, and the mobile internet connection plays nicely, maybe we can play a few rounds - so, see you there, possibly?
And as the last last last topic, here's some final thoughts - on things I'd like to change, or that you can consider changing if you make something like this yourself!
One obvious part of the project you could change is how the buttons work. I like the copper tape approach - it seems robust, is easy to build and fix in case of problem, and works reliably. But as long as you can make something that can close an electrical circuit, anything could work! One obvious choice would be contact sensor, but personally, I feel that's just a big point of failure, but maybe there's some cool approaches out there I didn't think of...
One thing that I want to try though is replacing the rug pad with some light foam, about 1cm thick or so. As it is right now, the switches are lacking some kind of physical response, you don't feel much of a press. Maybe the foam would allow the button to have a "travel", being able to feel the switch depress and bottom out could be nice.
And regarding the caching app for the sever files, maybe I should just go all the way with that idea? Because ideally, I'd extend this concept to not just the missing part files, but generally all server communication. The app would just replay responses from when I logged in earlier instead, and have infinite plays without a connection! But I'm not sure whether I want to go down the private server rabbit hole...
The big thing I'd love to do though is improve the menuing. SIF2 is just not meant to be played with buttons - it's made for a touchscreen! And the keyboard solution I have right now works, but it's not a great solution. The floor switches will still be functional on the menus and mess around there, and the keys will also be usable on the screens they're not meant for. It's definitely not something I can just pass to someone and say "here, have fun".
But what would the better approach be? The base requirement for any better interface would be to be able to track which screen the game is on, which is already a major problem. One thing I was able to come up with was making a helper app record certain regions of the screen, and doing image comparison - as in, "if this button is visible, the app must be on that screen". But that would be a whole different project, probably worth a full post in itself...
Okay, I'm stopping for real now. Too many ideas, not enough time, as always. byeee
#lovelive#love live#ラブライブ#school idol festival#sif2#スクフェス#i sure hope i can actually play this someday with someone#because con season is kind of about to be over#bad timing i guess haha#update january 2024: lol#lmao even
13 notes
·
View notes
Text
I feel like rin okumura would like argonavis
#This is about close to a post only for me I can make#Also I mean Argo the franchise not the band#Like if he were rhythm game band#Argonavi#Shima plays bandori#Izumo plays proseka#She seems like she would be an enstarrie also#Sorry#Everyone else doesn't Play rhythm games#Mephisto plays lovelive#Rip love live school idol festival#If you've never heard of argonavis YOU'RE IN LUCK#WE'RE COMIJH OUT OF A DROUGHT KIMISUTE IN 5 DAYS!!!!!!!#🥺🥺🥺🥺🥺🥺🥺#Check it out for me#argonavis#From argonavis#argopro#blue exorcist#ao no exorcist#bandori#proseka
2 notes
·
View notes
Text

i’ve been doing more writing than drawing lately so i started this princess karin maybe a couple months ago?? just for funsies
(pls pretend like the background looks good)
#art warmup#karin asaka#love live#lovelive#nijigasaki#nijigaku#love live art#fanart#love live school idol festival#llsifas
27 notes
·
View notes
Text

Kanon
#shibuya kanon#love live superstar#lovelive#love live school idol festival 2 miracle live#love live sifas#fanart#my art
104 notes
·
View notes
Text

Source
#dia kurosawa#kurosawa dia#lovelive#lovelive!#love live#love live!#love live school idol project#love live school idol festival#love live sunshine#lovelive sunshine#cute#anime#kawaii#beautiful
145 notes
·
View notes
Text
ROUND 1: Hajimari wa kimi no sora VS. Poppin up


#tournament#poll#showdown#LoveLive#llsif#love live school idol festival#love live superstar#love live Nijigasaki school idol club
4 notes
·
View notes
Last Seen Blogs

lrs-productions-blog
LRSproductions

steamedbuns69
new pron blog bc deleted old one

marinakomani27
FOOD LIFE

launchprocesscoffee-blog
Launch Process

sweetbabypigg
Letsgetstuffing