#taper candles
Text
Dragon's Blood & Ochre Beeswax Tapers (SOLD OUT)


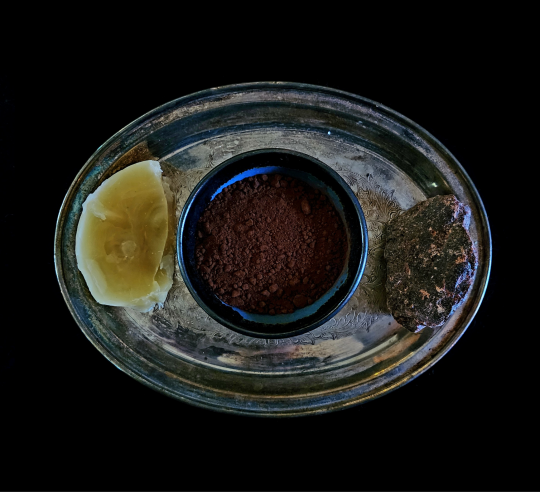

The latest offering from Wending Wares Occult Parlor is a very limited supply of 10 specialty Ritual Candles, devised to empower and/or strengthen any magical working that makes use of them. Use them as the backbone of a simple spell, or incorporate it into other spellwork for extra oomph.
Each handmade beeswax taper has been hallowed under the auspices of the Dragon Star, Eltanin, and imbued with the virtues of Red Ochre, ethically sourced Dragon's Blood resin, and my homemade Wisefool's Oil (a highly potent Ritual Oil devised for all manner of sorcerous empowerment.)
Each candle is approximately 4 inches/10 centimeters long and burns for approximately 30 minutes. Each order comes with a small carrying bag.
Please handle open flames safely!
#candles#tapers#taper candles#candles for sale#candle magic#witchraft aid#magical aid#ritual aid#ritual tools#dragon's blood#ochre#beeswax#wending wares#Eltanin
38 notes
·
View notes
Photo

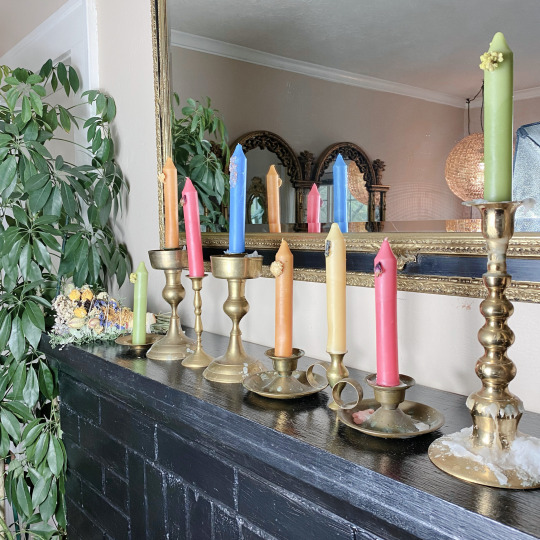
~ Pastel Palette ~
55 notes
·
View notes
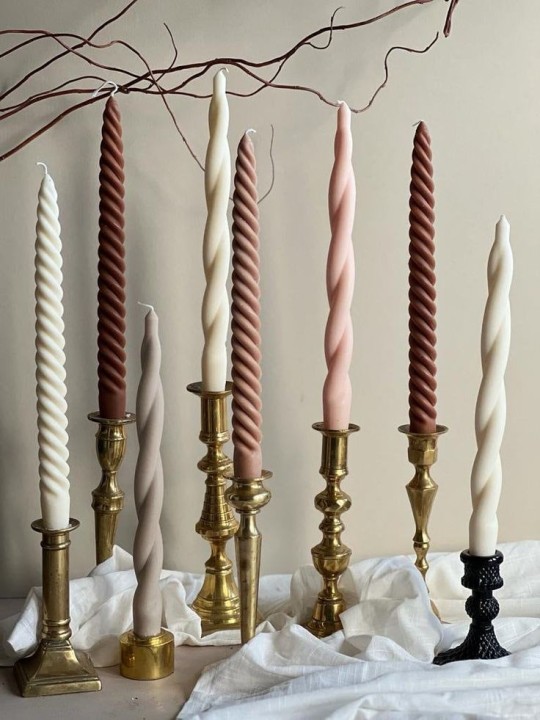
Text

The prettiest beeswax candles you will ever have.
119 notes
·
View notes
Text
MaisonBohiti
#candles#soft twisted#pillar candles#taper candles#tall#candlesticks#elegant#decorative#ambience#hygge
5 notes
·
View notes
Text
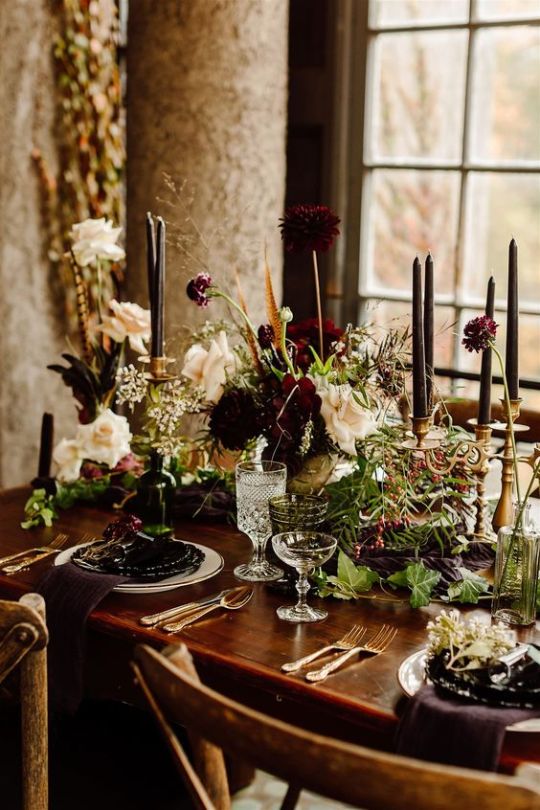
Autumn table setting
Photo by Karen Obrist
#autumn#fall#table setting#vintage#goblets#candlesticks#taper candles#dinnerware#gold#black#brown#dark#accents#elegance#chic#old
14 notes
·
View notes
Text
#Scented Candles#Soy Candles#Beeswax Candles#Jar Candles#Taper candles#Pillar Candles#Gift Set Candles#Wooden Wick Candles#Essential Oils#Perfume Oils
0 notes
Text
#etsyseller#etsyshop#etsyartist#etsyfinds#etsysale#glitterartist#handmade#shopsmall#etsy#kraftymckrafterson#best seller#custom candles#taper candles#holiday lights#holiday candles
0 notes
Text
How to Make Your Own Taper Candles at Home | Domainelumiere
Making your own taper candles at home
Here's a step-by-step guide on how to make your own taper candles:
Materials Needed:
Candle wicks
Candle wax (paraffin wax or beeswax)
Candle dye (optional)
Candle fragrance (optional)
Heat-resistant container for melting wax (e.g., double boiler or metal pitcher)
Thermometer
Taper candle molds
Mold release spray (optional)
Pencils or dowels for centering wicks
Scissors or a wick trimmer
Wax paper or parchment paper
Step 1: Prepare the Candle Wicks Cut the candle wicks to the desired length for your taper candles, leaving a few inches extra on each end for handling. If using a mold with a hole at the bottom, thread the wicks through the holes and knot them at the bottom to secure them. If using a mold without a hole, attach the wicks to the bottom of the mold with a small piece of tape or adhesive putty, and ensure they are centered.
Step 2: Melt the Candle Wax Melt the candle wax in a heat-resistant container using a double boiler or a metal pitcher placed in a pot of boiling water. Use a thermometer to monitor the temperature and ensure the wax is melted at the appropriate temperature, usually around 160-180°F (70-80°C) for paraffin wax or 140-160°F (60-70°C) for beeswax. If desired, you can add candle dye or fragrance to the melted wax at this stage, following the manufacturer's instructions for the appropriate amount.
Step 3: Prepare the Candle Molds Spray the Taper Candle molds with mold release spray if desired to facilitate easy removal of the candles once they are set. Place the molds on a flat surface lined with wax paper or parchment paper to catch any drips.
Step 4: Pour the Wax into the Molds Carefully pour the melted wax into the taper candle molds, filling them up to the desired height. Keep the molds steady and avoid moving them until the wax has completely cooled and solidified.
Step 5: Cool and Set the Candles Allow the candles to cool and set for several hours or overnight, depending on the type of wax and the size of the candles. Avoid disturbing the molds or the candles while they are setting.
Step 6: Remove the Candles from the Molds Once the candles have fully set, gently tap the molds or flex them to release the candles. If needed, you can use a pencil or dowel to help push the candles out of the molds from the bottom.
Step 7: Trim and Finish the Candles Trim the excess wick from the top of the candles to the desired length using scissors or a wick trimmer. You can also smooth out any rough edges with your fingers or a warm knife. Optionally, you can further decorate or finish the candles with additional coloring, embellishments, or a final polish.
And that's it! You have successfully made your own taper candles at home. Remember to always exercise caution when working with hot wax and follow proper safety precautions, such as using heat-resistant containers, working in a well-ventilated area, and keeping a fire extinguisher nearby. Enjoy your handmade taper candles and the warm ambiance they can bring to your home!
0 notes
Text
where I’ll be the rest of this rainy Saturday
#just screaming at this deranged show#justice for Rhett always#in my tapered candle era#rhett abbott#outer range
16 notes
·
View notes
Text

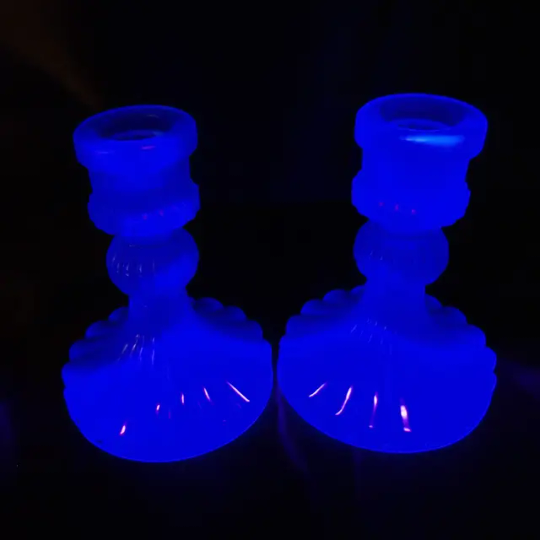
#handmade#resin#candle holders#candlestick holders#taper candle holders#neon#neon blue#uv fluorescent#home decor#sharkyswaters
5 notes
·
View notes
Photo
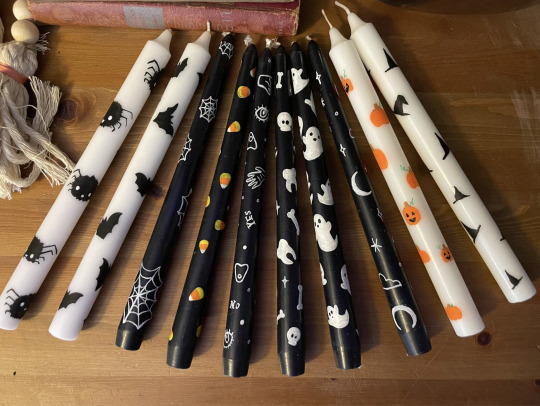
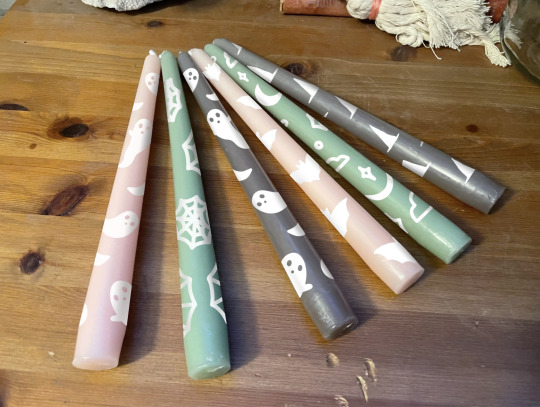
Halloween Candles from MickeeMariee
x / x
95 notes
·
View notes
Text
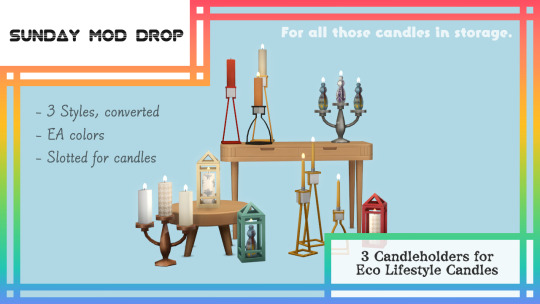
HAPPY SUNDAY! It's mod time. 😎
Those eco lifestyle candles were looking lonely again. 👇🏼
In the DL you will find:
The candle cage from Perfect Patio
A contemporary City Living candle holder
The candelabra from Get Together
✨ All made slotty for your candles and craftables. ✨
(These don't need Eco Lifestyle, so feel free to use with your favorite cc candles.)
Have the link: 💝
#I am out of town rn but I'll be back on Monday if there are glitches I don't know about#Candle recolors coming soon#I was going to link the taper recolors but they look a little silly with these ngl#ts4 custom content#ts4 object#ts4 cc#ts4 objects#sims 4 cc#sims 4 custom content#GumdropCC
13 notes
·
View notes
Text
I got this candle holder on sale from big lots <3
#c#I should've bought some candles when I went to target a few days ago#they had some taper candles on sale there#I'll just check out the dollar store
10 notes
·
View notes
Text
Nobody likes boring candles, make sure you get these ones instead.
128 notes
·
View notes
Text
i do really think that 98% of the time when i have people staying with me i am good at making sure they like, have everything they need regardless of what they packed, call me king of spare toothbrushes and excessive towels etc. and then. one of them will look me in the eye and ask for a hairdryer
#genuinely forget how Anti Any Product Ever i am when it comes to beauty stuff or rather i forget that that's very much abnormal on my part#i've never met a self care product in my life. soap + shampoo Only type household. what do you mean a hairdryer. time does this for you#making fun of myself here btw!!!!! my friend who needs a hairdryer is innocent#im not even a minimalist that's the worst of it? no i don't have a hairdryer but perhaps these 23 colourful taper candles will help
11 notes
·
View notes
Text
'Do it halfway' doesn't apply to everything. For the best results in certain cooking, sanitation, and safety you will have to use your whole-ass or you will really fuck things up.
#Broke a glass taper candle holder because I 'better than nothing'ed the bowl of sand I was SUPPOSED TO USE#And I absolutely could've started a fire if the wick slid out with the wax#Pure luck that I didn't and I mean that
4 notes
·
View notes
Last Seen Blogs

davey-k
Afro Vat Dyke
nootdraws
Newt

vkdroid
Untitled

fangirl-plus
Fangirl Plus

terrabet17462
안전공원 테라사이트