#this is basically the process for everything i do. sometimes i get lazy adding texture and make it look rly sloppy
Note
your art is like my dream style of artwork !! i love it sm - what program do you use and brushes/coloring for the look you achieve? sorry if you've been asked before! 🤍
hiii thank you so much!!!! i’m so flattered you like my work :’) my process is pretty simple and straightforward and grew from me doing everything possible to not have to shade or render (i am very lazy and only care about linework) i mostly use procreate on a very old ipad pro! for bigger pieces i often finish them in photoshop. i use a lot of brushes from True Grit Texture Supply, including free packs and a paid pack. i would highly recommend this website, i love their halftone and textured line brushes so much
and i’ll put a quick walkthrough of my process for anyone who’s interested under the cut!
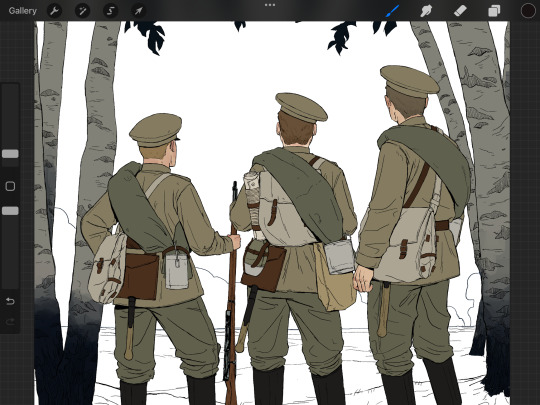
so basically i start out with flat colors. this part is just coloring in the lines lol. its often different shades of beige that are all really close in tone/color but i kind of dig that look. i’ll exaggerate some to keep a bit of visual separation but only just enough so they don’t all blend together
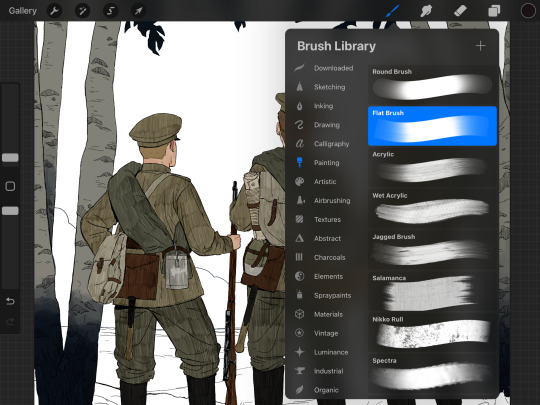
and then i… shade? add texture? idk what to call this part. i take the default flat brush, make it very small, pick a color, then set the layer to multiply and make a million tiny tiny scribbles. direction sometimes matters but often i don’t really care and just go up and down. neatness isn’t really important
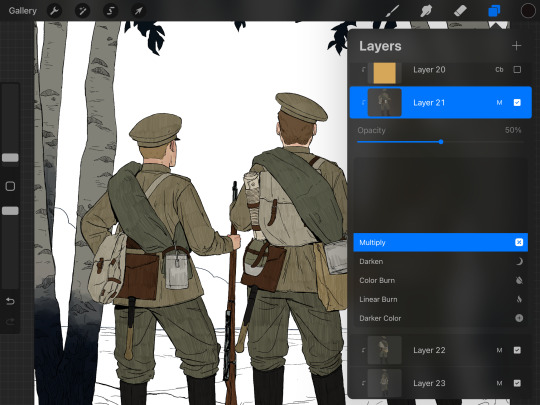
then you drop the layer opacity down to like 30-50%
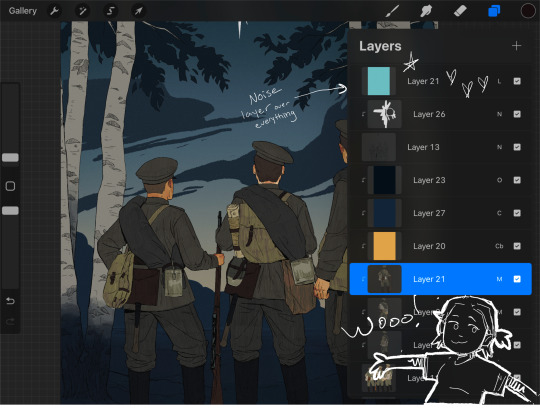
then you add a shit ton of color correction layers because you didn’t think about lighting/color earlier and need to fix your mistakes. and VERY IMPORTANT is the noise layer that goes over everything. it helps even everything out. sorry to just jump to the finished piece also lol i’m not smart enough to do color theory im just winging everything until it looks kind of alright
and then you’re done! the lineart takes the longest time, then it’s just coloring inside the lines and scribbling and adding overlay layers. very easy breezy (does any of this make sense??????)
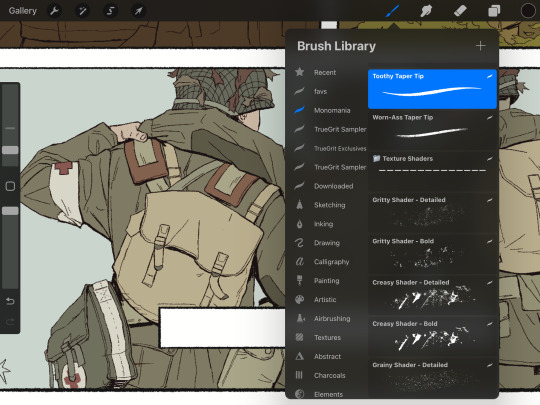
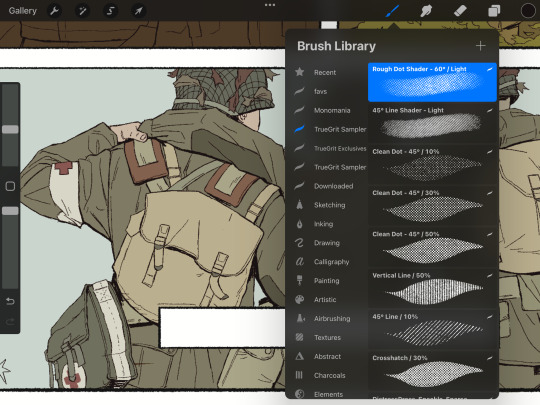
here are some other brushes i like/use a ton + a baby preview of a piece for a zine im in. if you’ve gotten this far please know i love you.
#asks#my art#reference#luvbugbitez#this is basically the process for everything i do. sometimes i get lazy adding texture and make it look rly sloppy#in this piece it’s a lot more deliberate and neat. but for sketches i rly don’t care haha
19 notes
·
View notes
Note
How do you make the manga caps transparent?
oh, i have been waiting for this question.
before i start, i’d like to say that i make all of my transparents on my iPhone. my tool of choice? my finger, and the app ibispaint x. i’m sure there are quicker and better ways to make transparents (scratch that: i know there are quicker and better ways to make transparents), but this way is fun for me. feels a bit like i’m coloring a coloring book.
the tutorial is under the cut because i go into quite a bit of detail!
alright, here we go!!
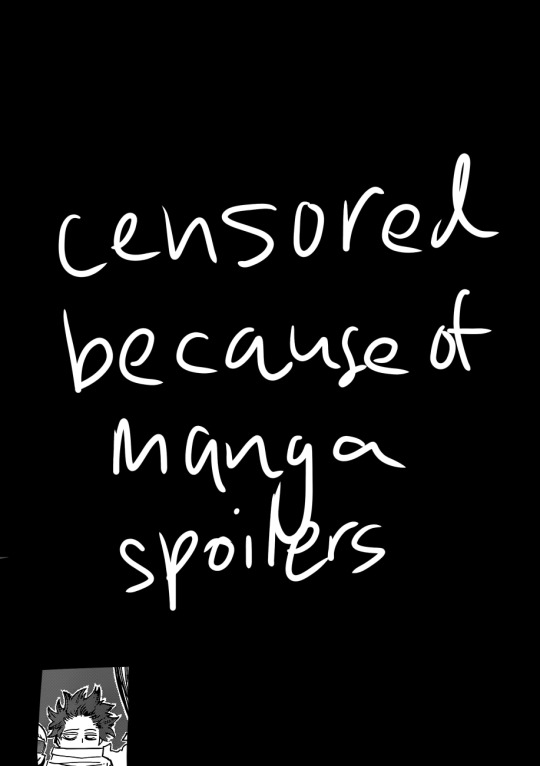
(i blocked out everything in this image outside of the part that we actually care about, because this is a page from a recent chapter.)
STEP 1: alright, so we got a page from the manga with this adorable little shinsou, which we’re going to make transparent. ideally, get a page that has solid black lines, and that doesn’t have little stray fuzzy bits outside of the lines. otherwise your life just becomes a whole lot harder. the reason i prefer not to do earlier chapters is because the website that i use to get pages doesn’t have good quality images of the first hundred or so chapters, and i’m too lazy to find another website. so what we’re gonna wanna do is…

STEP 2: crop the manga page to the part you actually care about! you can also do this in the app that i’m going to use, but i just prefer to do with the photos app. nice and easy.

STEP 3: when you open ibispaint x, there’ll be three options, “my gallery”, “collection”, and “online gallery”. pick “my gallery”, and it’ll take you to a screen that looks something like what’s pictured above. click that fancy little plus button indicated in the image to start a new canvas!
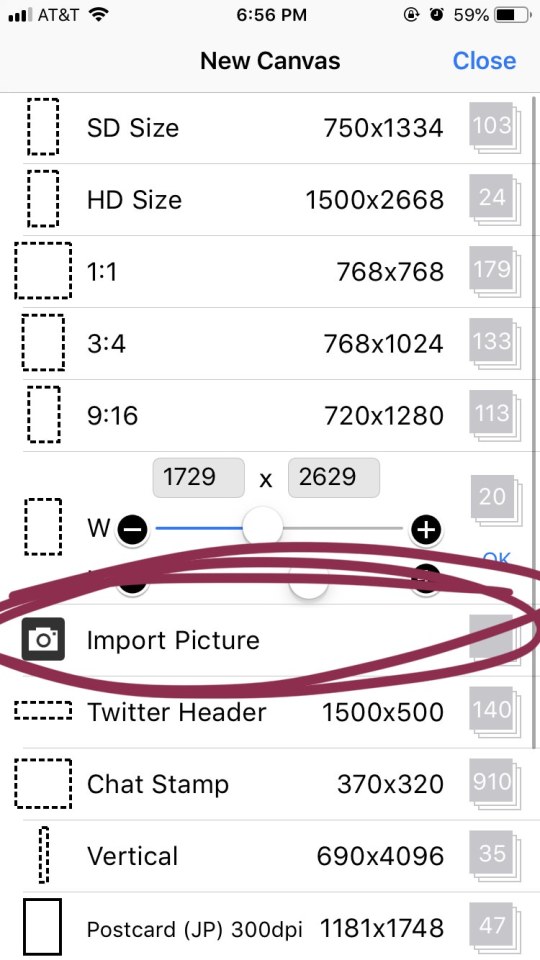
STEP 4: the option you want to pick is import picture.
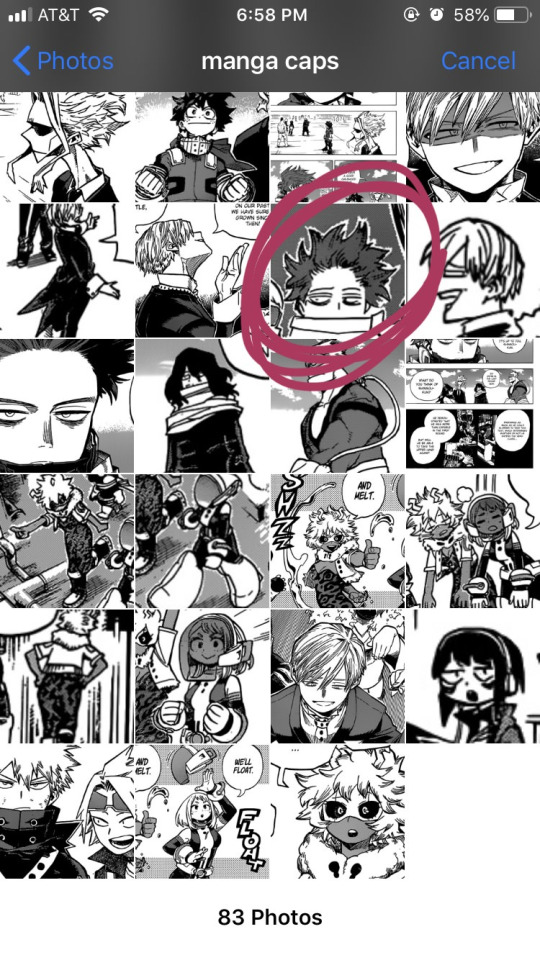
STEP 5: alright, there’s our shinsou! we’re just gonna click on him, pretty easy, right? also yes, i have an album on my phone dedicated solely to manga caps that i plan to make transparent.
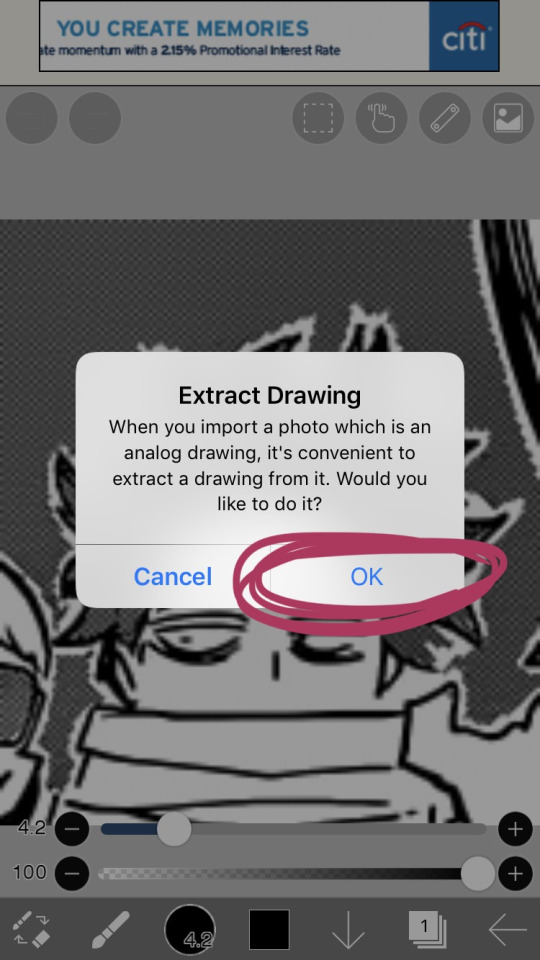
STEP 6: the moment you click the image, it’ll take you to a canvas and ask if you want to extract the drawing. you’re going to hit “OK”, because extracting the drawing makes it so that all the white areas in the image become transparent, leaving only the black and grey.
NOTE: this won’t quite work properly if the background isn’t pure #ffffff white! if you are making a transparent from someone else’s manga cap, make sure that the manga cap has pure white values. if it does not, there will be a very light, barely detectable film of nearly transparent grey values, but it isn’t full transparency. this means if someone uses your transparent over something like…say, a solid colored background, the colored background will appear darker in the final image. there’s a way to get rid of this film, but it’s hard to explain, so please ask me if you want to know how to do this. heroacacaps is a very popular blog that editors get their manga caps from, but their images do not have a pure white background. (it’s kind of funny, i can often spot when someone made their transparents using a manga cap from heroacacaps.)
OPTIONAL STEP: if you are using ibispaint x for importing anything that you don’t want to make transparent, then 99% of the time, you are going to want to hit “cancel”. also, this ONLY works well for black and white images, and trying it on a colored image with make the image turn monochrome. you can still use it on some colored images with white backgrounds, but it you need a few extra steps to make it work (hint: clipping layers, if you know how to use those. duplicate the extracted layer until it is completely black without creating black values outside of the lines, and merge the layers down into one layer. clip the original image over this layer. ask me if you ever want me to go further into detail!)
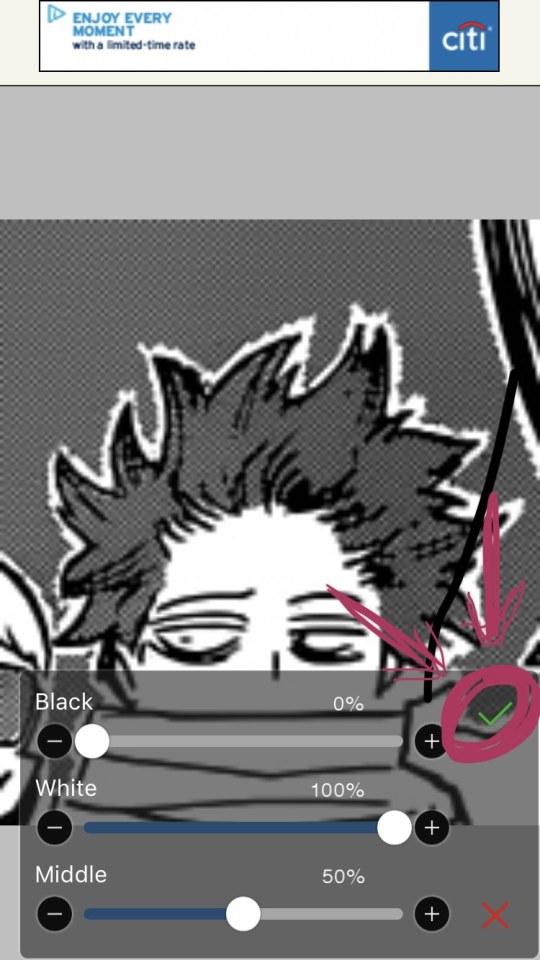
STEP 7: once you hit “OK”, this will pop up!! if you are using a good image where the lines are solid black values, the default option will be perfect for you.
click the green checkmark once you’re satisfied with the appearance of the image!
OPTIONAL STEP: you can manipulate these numbers if you need to. i find this useful for making the lines on sketches clearer. increasing the black percentage makes middle grey values appear darker, and decreasing the white percentage makes middle grey values appear lighter. the white percentage cannot be lower than the black percentage. i’m…not quite sure how to explain what the middle percentage manipulates, but you can mess around with it and see what happens.

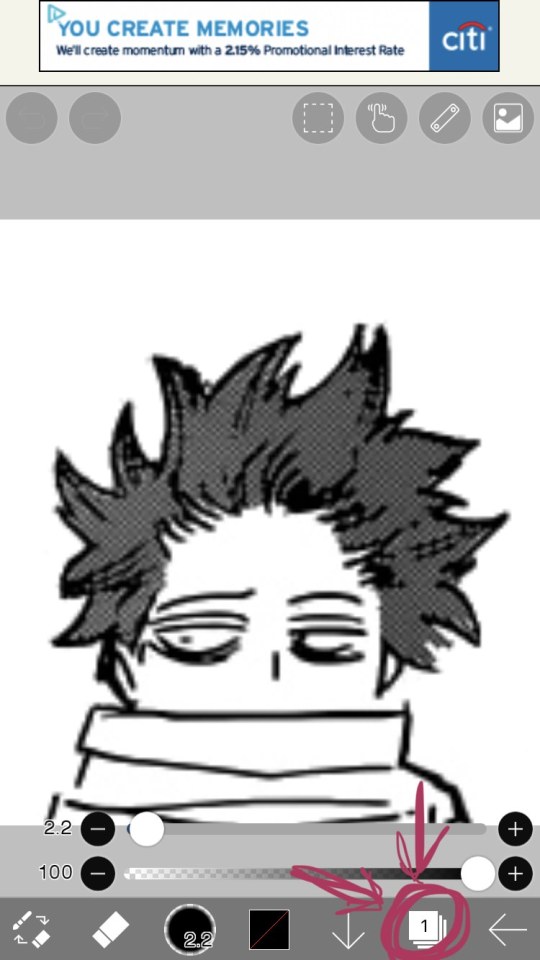
STEP 8: so we’ve got the image on the canvas, but now we have a bunch of stuff in the background. to get rid of it, hit the little brush icon, and click the eraser icon. if you’re not sure what the eraser icon looks like, the next image has an image of it in the location where the brush icon was.
next, just…use your finger (or a stylus if you’re fancy) and erase away all of that outside stuff!
OPTIONAL STEP: some manga caps require the extra step of drawing any parts that were covered by things like text bubbles and other characters. it’s sometimes the most tiring part of the whole process, and i can’t really tell you how to do it. you just have to experiment with the available tools. there are lots of brush options you can try to imitate the way the lines look, if you click the button to the right of the brush icon, and there are also (painful and tedious) ways to replicate more complicated textures. i often have to do this step which is why i have an entire goddamn tag dedicated to transparents i needed to patch up.
if there was only one reason i had to pick for why you should respect the people who give you manga caps without backgrounds for you to use in their edits, it’s because a lot of times, they patch up manga caps without any comment. some replicate the actual style so well that you’ll have never realized that the person you got the manga cap from added in their own bits. here’s an example. this transparent? it took an hour. just look at the original, and consider how many different areas are covered by text. imagine how many different textures and lines that have to be replicated.
STEP 9: alright! now we’re ready to actually make this sucker a proper transparent image. this image is actually just lines, and if you stop here, you’ll only have the outline of the image! what we’re going to have to do is take parts that we don’t want to be transparent, and color them white. unfortunately, this is the bulk of the work, most of the time. to do this while still keeping the outline intact, we’ll have to use layers. hit the button with the rectangles stacked on top of each other to open the layers menu.
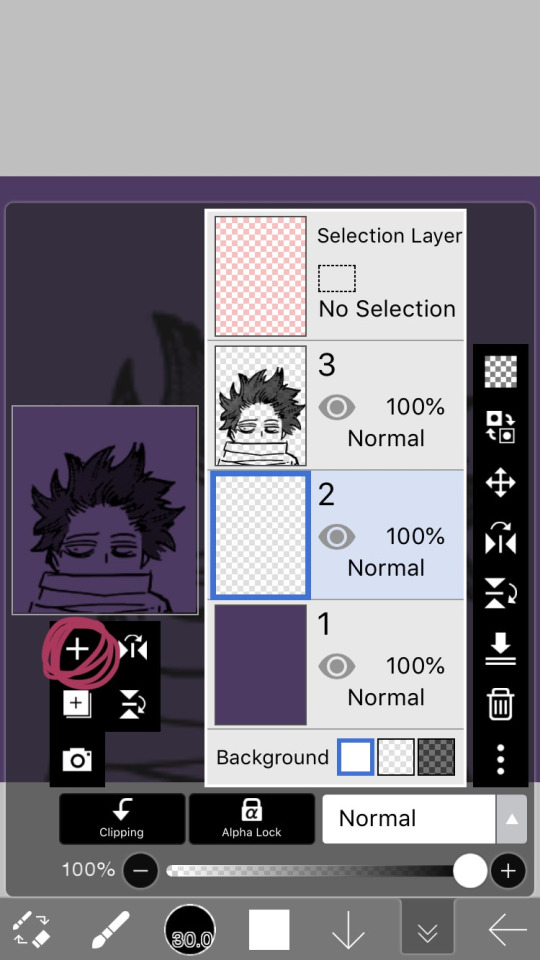
STEP 10: hit the plus button to create a new layer, and make sure to move it underneath the layer with the manga cap. i actually like to make two layers, with the lowest one having a color that’s dark, but not too dark. this added layer makes it easier for me to see what i’m coloring, and i really recommend it. if you don’t do this, you’ll have to hit one of the checkerboard patterns next to the word “Background” located underneath the layers. ideally the darker one, it’s easier to see the white on it.
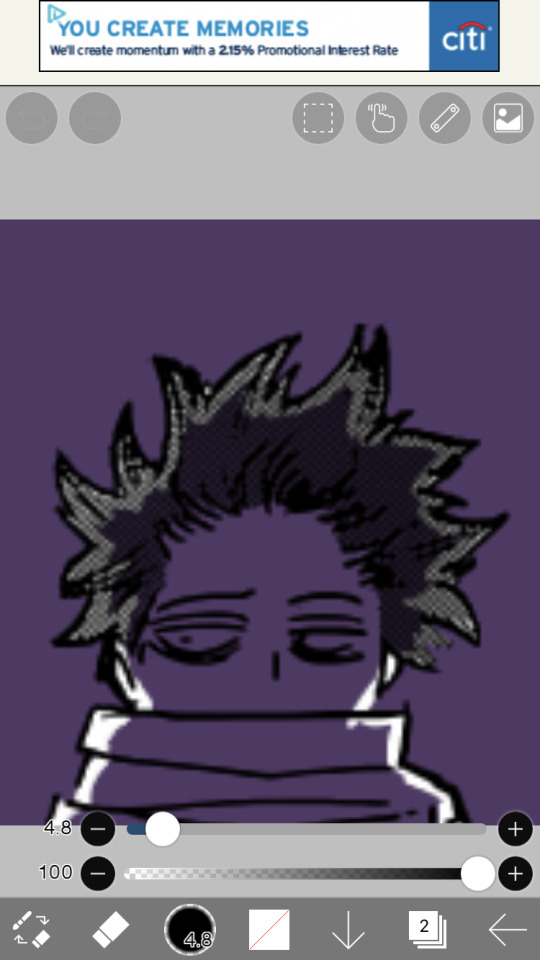
STEP 11: hit the eraser icon and click the brush icon again to be able to draw! and now, it’s just simple coloring. if you’ve ever used a coloring book, then this might evoke feelings of nostalgia within you, because this is basically just a glorified digital page of a coloring book.
i like to color the parts closest to the line first with a small brush size capable of getting in corners (use the little slider next to the text that says “4.8″ in the image to change the brush size). it’s not that helpful for a transparent as simple as this, but more complicated transparents with lots of corners to color make this step a blessing. or maybe that’s just me.
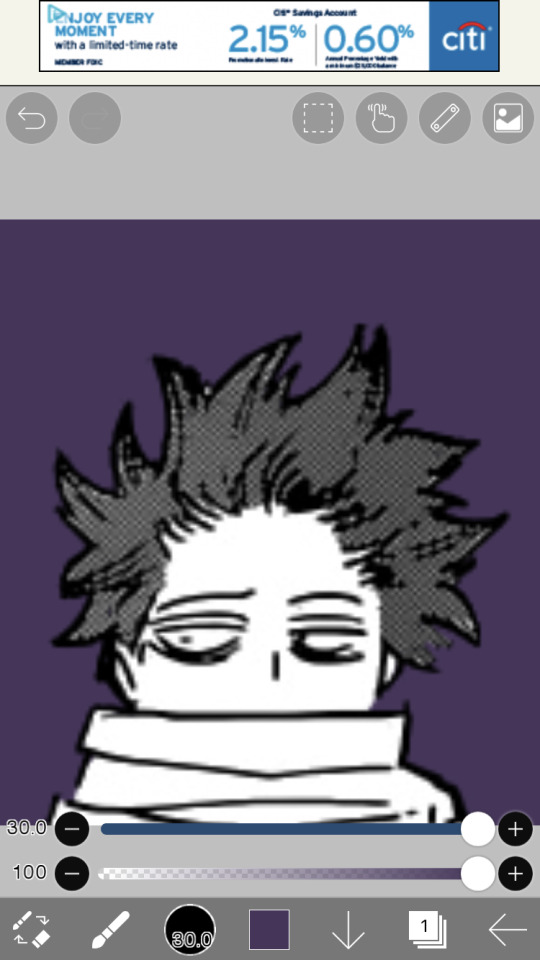
STEP 12: aaaaand finish coloring all of it, with a bigger brush size. if you colored near the lines first like i mentioned in the previous step, then this will feel a lot more like using a coloring book than the previous step.
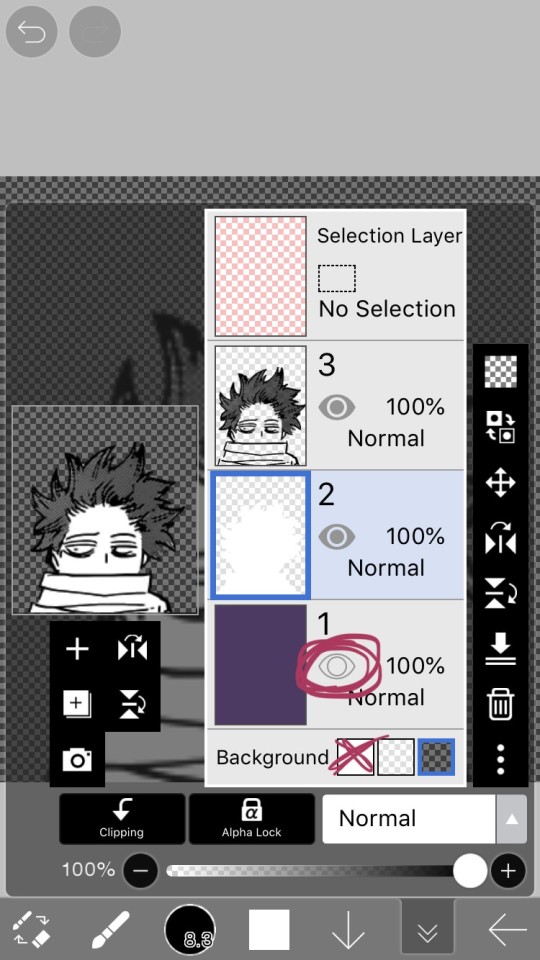
STEP 13: alright! if you used a colored layer underneath to help you see the white, then you’re going to want to hit the little eye button on the colored layer to make it invisible. after all, we do want the image to be transparent.
STEP 14: next, there are three background options underneath the list of layers, next to the word “Background”. if you want your image to actually be transparent, do not pick the solid white option. pick either of the checkerboard options, both will give you a transparent image.
STEP 15: you’re done! now just to save the image. click the little arrow pointing left on the bottom right of the screen. this will exit you out of the canvas, and back to your gallery.
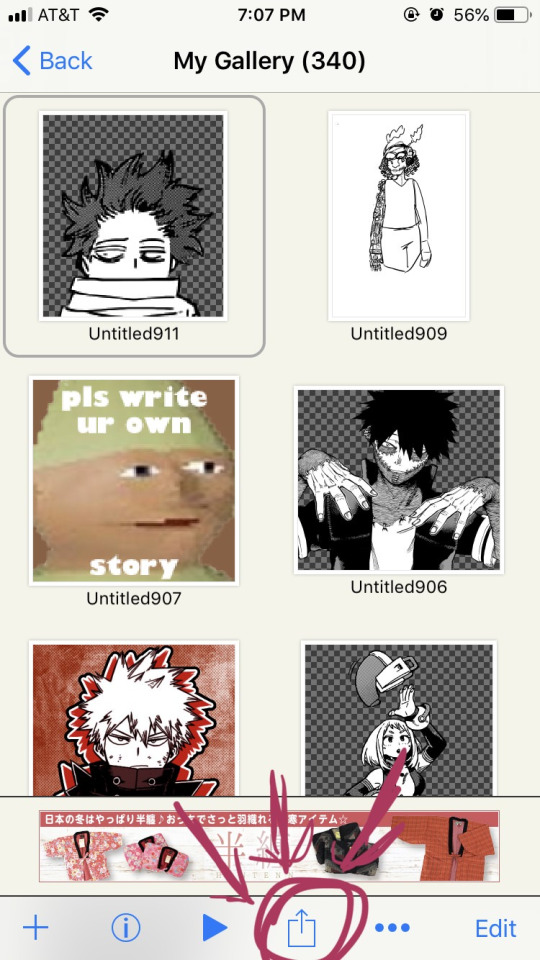
STEP 16: click the button indicated in the above image.
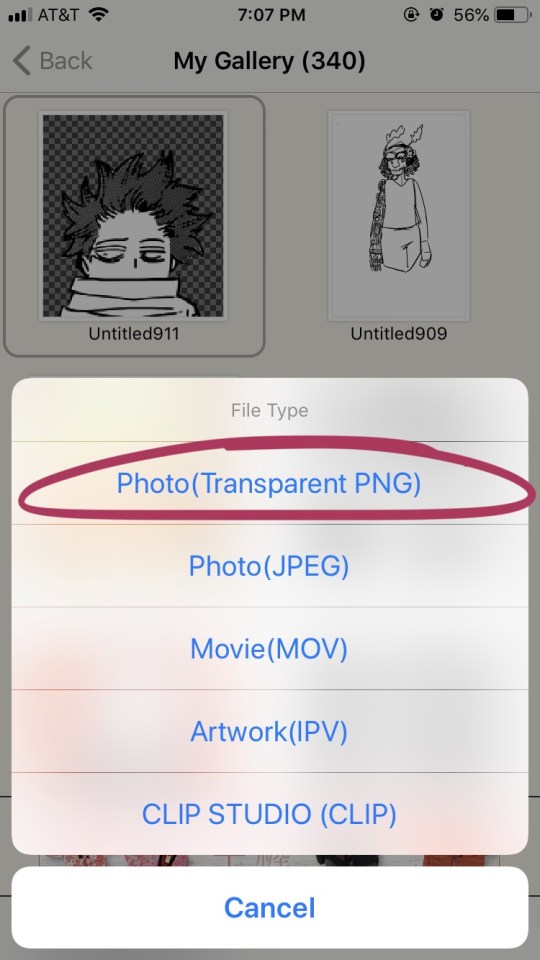
STEP 17: the above will pop up, click “photo (transparent png)” to save the image as a transparent image.
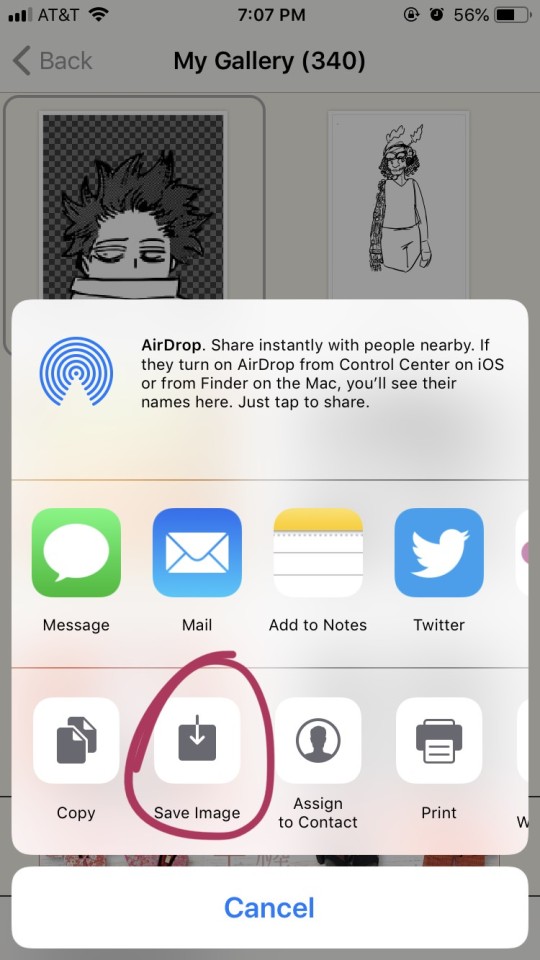
STEP 18: click save image!
and that’s it. you should have yourself one gorgeous transparent in your photos. i would probably suggest checking the image to make sure that it isn’t transparent in areas that you don’t want it to be.
208 notes
·
View notes
Text
26 beauty tips Makeup Routine: Beauty hacks for Busy Moms

Life as a working mom has motivated me to undertake out plenty of beauty hacks for busy moms over the years, and I’ve come up with some quick and dirty beauty tips to form myself look good in less time. Whether I stay awake too late binge-watching my favorite shows on Netflix, press the snooze button one too repeatedly, forget to pack my daughter’s lunch the night before, or another disaster strikes, mornings are always hectic in our household, and these beauty hacks help me look and feel more put together than I am.
How to Prolong a Hair Wash
A collection of beauty hacks for busy moms wouldn’t be complete without tips and tricks to combat greasy, dirty hair. Why? Fortunately, there are certain belongings you can do to assist make dirty hair look clean in record-breaking time. Here are 3 of my favorites!
Use dry shampoo before bed: most of the people use dry shampoo within the morning, and while that strategy helps take in hair oils, I’ve found it far more effective.
Brush and blow-dry: If you would like to stretch your hair wash even further, you'll be got to apply a touch extra dry shampoo once you awaken. provides it a touch of favor together with your hand blower.
Embrace the messy bun: I even have friends who can go 3, 4, and sometimes 5 days in between shampoos, but I’m not that lucky. My hair is just too light and shows grease like nobody’s business. the great news is that I’ve mastered the messy bun, which offers a wonderful (and stylish) alternative when dry shampoo just won’t cut it.
How to Hide Gray Hair
I recently celebrated my 40th birthday and decided to treat myself to my first set of blonde highlights to cover all of the silver streaks that have haunted residence on my head. But before this momentous event, I had quite a few tricks I wont to hide gray hair which was relatively successful. Here are the three hair hacks I swear by:
Change your hair part: Sounds too easy to be true, I know, but parting your hair on the other side of your head, or embracing a messy part, can sometimes help hide gray hair. I find this strategy also goes an extended way in prolonging a hair cut because it adds a touch of change and helps hide split ends!
Touch up with eyeshadow: If you’re thanks to getting your roots dyed but don’t have time to form it to the salon, apply a matte eyeshadow an equivalent shade of your hair to your part employing a makeup brush. Works wonders!
Invest during a good touch-up product: If your gray strands and roots are unresponsive to a replacement hair part and/or a touch eyeshadow, consider investing during a good touch-up product. There are tons of great ones out there, but my hairstylist and that I prefer the COLOR WOW Root cover because it adheres to the hair without feeling oily or sticky and it's very natural.
How to Hide Puffy Eyes and Minimize Wrinkles
Chronic sleep deprivation and parental worry combined with plenty of tickling and laughter mean one thing: puffy eyes with many wrinkles. Seems pretty unfair, I know, but there are many belongings you can do behind the scenes to form your blinkers look younger.
Apply copra oil before bed: We all know copra oil is sweet for practically everything (right?), and it seems it's anti-aging properties also. Massage a little portion into the world around your eyes to assist reduce the looks of crow’s feet, fine lines, and dark under-eye circles.
Reduce puffiness with tea ice cubes: The anti-inflammatory benefits of tea can do wonders for hiding puffy eyes. Simply brew a batch of concentrated tea and pour into cube trays, then wrap a few of frozen cubes with a dish towel and apply to tired, swollen eyes for fast relief.
Moisturize before makeup: As an additional safeguard, invest during a good under eye moisturizer and apply it underneath your concealer to scale back swelling, smooth skin, and stop your concealer from getting trapped within the fine lines around your eyes. I swear by La Roche Posay’s Hydraphase Hyaluronic Under Eye Puffiness Cream.
Use a hydrating concealer: When it involves hiding under-eye circles and minimizing the looks of wrinkles, not all concealers are created an equivalent. Find a moisture-rich formula like Estee Lauder’s Waterproof Extreme Concealer and gently pat it onto your under-eye area using your annualry for max coverage.
How to Get Beach Waves Fast
While beach waves appear as if a fast and straightforward hairstyle for lazy summer afternoons, learning the way to get perfect waves may be a process in and of itself. the great news is that there are plenty of belongings you can do to urge sexy beach waves without the fuss. Here are 3 simple things that have helped transformed my hair during the summer months:
Invest during a good texturizing spray: Contrary to popular belief, the key to sexy beach waves has nothing to try to to with technique. the simplest curling wand within the world won’t be supplying you with perfectly imperfect tousled hair unless you prep your locks with one important product: texturizing spray. Perfect for creating volume and lovely waves that last, a product like Bumble and Bumble’s Surf Spray may be a game-changer when it involves sexy summer hairstyles.
Learn the scarf technique: This no-heat technique leads to gorgeous curls that look professionally done. All you've got to try to do is place a headscarf on your head and twist strands of your hair around the headband. Leave it certain a couple of hours, or maybe better, roll in the hay it like that overnight. inspect the Cosmos Stretchy Cotton Sports Headbands – they’re cheap and cheery and obtain the work done!
Try braiding your hair then pressing your flat iron over the top of the braid(s) to hurry up the ‘curling’ process. It’s surprisingly effective!
Nail Hacks Every Girl Should Know
There’s nothing like getting to the salon to urge a mani. It’s relaxing, fun, and you get to be pampered and primped, but it’s also time-consuming and expensive, and much of the moms often skip this luxury altogether. the great news is that there are plenty of great nail hacks you'll use to urge an ideal DIY polish application from the comfort of your house.
Prep nails with white distilled vinegar to form polish last: Before you apply your base coat, clean your nails with white distilled vinegar. Not only will it last longer, but your polish also will continue smoother for flawless looking nails.
Cover cuticles with Elmer’s Glue: Sounds crazy, I know, but if you apply non-toxic Elmer’s Glue to your cuticles before applying polish, you'll remove all imperfections post-polish to make sure a particular application every single time.
Prevent chips by applying an additional topcoat: Before applying your topcoat everywhere your nails, apply a layer just to the ideas for added protection as that’s the part of your nails that tends to chip most. Sally Hansen’s Insta-Dri Chip-Resistant Top Coat always seems to last the longest with my nails.
If you would like your polish to dry super fast, dip your nails in cold water post-polish. It works!
How to Draw Perfect Eyebrows Every Single Time
The “in” shape may change, and one year they could be bushier and thicker than others, but one thing is for sure: perfectly shaped eyebrows can make an enormous difference for your face, and everybody has taken notice. inspect these eyebrow hacks for perfectly defined brows!
Get the right eyebrow arch using the spoon trick: If you struggle to draw natural-looking eyebrows, this eyebrow hack is for you. Place the spoon bowl-side down underneath your eyebrows with the tip of the spoon pointing towards your nose, and use the sting of the spoon as a guide to assist draw your eyebrows with an outlined makeup just like the ANASTASIA Beverly Hills Brow Whiz. Genius!
Hide imperfections with concealer: If your brows didn’t end up precisely the way you wanted them to, or you’re overdue for an eyebrow wax, you'll hide imperfections with a touch little bit of concealer and a little makeup brush (I find the Sigma Beauty Flat Definer E15 brush works perfectly). I find this method gives away a more defined look, which is ideal for an evening on the town with the women.
Make them pop with white liner: If you would like to offer your brows an additional lift, add a touch white eyeliner above and below your brows and blend. Don’t have a white liner, or find it too bright? BENEFIT COSMETICS offers a good better alternative with their High Brow Glow pencil.
Smooth unruly eyebrows with Vaseline: if you’re pressed for time and can’t attract your brows, you'll still give them a refined look with a dab of Vaseline followed by an honest comb together with your favorite eyebrow spoolie.
While the daytime smokey eye may be a look many folks would like to sport on the daily, few folks have that sort of your time (or skill). the great news is that there are plenty of eyeshadow hacks you'll use to form your eyes pop with little to no effort. Here are 5 of my favorites:
Prime your eyes: Before you apply eyeshadow or eyeliner to your lids, apply an honest eyeshadow primer (I swear by Urban Decay’s Eyeshadow Primer Potion) for a smoother application and all-day wear.
Invest within the right brushes: If you struggle to duplicate all of the eyeshadow looks you see on YouTube, it’s probably because you don’t have the proper brushes. While drugstore brands get the work done, high-end brushes allow better product application and blending for a flawless, professional-looking finish. The Sigma Beauty Basic Eyes Kit may be an excellent spot to start – it's all of the essentials at an honest price!
when you’re short on time but still want to seem presentable.
Applying white or nude eyeliner to your lower waterline will make your eyes look bigger and more awake.
Learn the eyelash curler trick for perfect eyeliner: If you struggle to use eyeliner, Wayne Goss has you covered together with his eyelash curler trick. It takes a touch of practice, but you’ll be happy once you master it!
0 notes
Text
20 foods that seem healthy but aren't
Brittany Smith Today
The health and fitness craze that's swept our nation in the last decade can be seen quite literally across every supermarket and storefront. "Fit foods" emblazoned with "organic," "low-fat," "no sugar added," and best of all, "all-natural" marketing jargon are, for the most part, just marketing jargon.
A lot of the foods we snack on or eat as part of our everyday diet aren't the beacons of health and wellness we think they are if you take a look at their labels or dive more into what's actually in the food under the label. Take a look through our list of the worst offenders; these are some of the most common foods we think are healthy but really aren't. Avoiding these eats can make the difference between slight definition and eight-pack-with-sex-lines abs.
20 foods that seem healthy but aren't
1 of 20
Energy bars
Nearly every energy and protein bar boasts lofty health claims, but many times they have nutritional profiles more similar to candy bars than fit foods. Literally. Some bars have as much sugar as candy. That’s not to say you should banish them all, but take special care to look at the amount of sugar, calories, and ingredients. (Check out these Men's Fitness-approved healthy protein and snack bars instead.)
Diet soda
A soda a day can increase a man's risk of prostate cancer by 40 percent, compared to a man who never touches the stuff, according to a study published in the American Journal of Clinical Nutrition. And diet soda? It’s no better. In fact, it may actually be worse. The artificial sweeteners in diet soda fool your body into thinking you’re eating real food and causes a spike in insulin sent to regulate your levels (since artificial sweeteners are so much sweeter than actual sugar), which can turn into stored fat, according to a Purdue University study. Research shows soda consumption increases your risk of heart attack and stroke, makes you eat more, and, well, see for yourself…
Flavored instant oatmeal
We’ve said it before, we’ll say it again, and we’ll keep on saying it: Instant oatmeal doesn’t do your health any justice. Flavored, single-serving packets have way too much added sugar, and therefore, way too many unnecessary calories. Stick with the giant tub of instant oatmeal if you like the convenience factor, and add fruit and spices like cinnamon and nutmeg to maximize flavor without minimizing any health benefits. Steel-cut oats are even better; they’ll provide you with long-lasting energy, help promote weight loss, and lower your risk of heart disease.
Bran muffins
Oh, the power of words and associations. “Bran” sounds healthy, albeit a little boring. And it is: Bran is the outer layer of grains like wheat, rice, and oats that offers a healthy dose of fiber, protein, vitamins, and low-glycemic carbs. But bran muffins tip the scale toward not-so-great for you because most portions triple what you should be eating and may contain more wheat flour than bran itself. Store-bought muffins are often loaded with sodium and sugar to combat the dry, tasteless flavor of bran, too. To put things into perspective, a Honey Bran Raisin Muffin from Dunkin’ Donuts has 40g of sugar, 410mg of sodium, and 120 calories, while a Chocolate Frosted Cake Donut has 20g of sugar, 340mg of sodium, and 170 calories. Bake your own at home to control the ingredients and portion size.
Packaged Turkey
Using leftover turkey to make a sandwich for lunch is an excellent choice for a quick, simple dose of protein. But this lean sandwich staple can turn into a sodium-saturated disaster when it's store-bought. That’s because packaged meats are often loaded with salt and preservatives. Opt for brands that don’t have more than 350mg of sodium per 2 oz serving.
Dried Fruit
Dried fruit seems like an innocent snack; it’s fruit, after all. But companies use sulfur dioxide to preserve freshness and add sugar to sweeten the flavor (cranberries and pineapple among the worst), making dried fruit more akin to candy. Though you’re still getting a good source of vitamins, minerals, and fiber, it’s incredibly easy to overeat. That chewy addition to trail mix and yogurt isn’t as healthy as you think, wish, hoped it was.
12 Healthy Foods and Drinks That Can Make You Fat >>>
Wraps
Wraps are thinner than hoagies, buns, and bread, so they’ve gotta be healthier, right? Eh, sometimes, but most restaurants and to-go shops wrap all your sandwich fixings in a 12-inch wrap that can pack twice the amount of calories as plain old bread. Plus, spinach, tomato, and whole grain wraps don’t contain nearly as much veggies and whole grains as you’d think; more often than not, they’ve got additional coloring and flavoring. The problem with pre-made wraps, too, is you can’t control what’s in them. The bacon, ham, and ranch dressing can’t be taken out once they’re rolled up, and odds are you’re not getting additional veggies to add to your mix.
Five Fast Lunches to Build More Muscle >>>
Pretzels
They may be your go-to snack because they’re fat-free, but pretzels don’t really have any nutritional value. They’re made with white flour, which quickly converts to sugar in your body, spiking blood sugar and causing your hunger levels to rise (that's why you can polish off an entire bag and still be hungry). Pretzels should be avoided as a desk-side or late-night snack; go for foods that are high in protein and fiber instead.
25 Foods You Shouldn't Eat >>>
Sports drinks
Sports drinks are a lot like Kool Aid—they’re basically just sugar water and artificial food coloring. Their big selling point, electrolytes, are easily restored with natural foods and drinks like coconut water and bananas, so skip the artificial recovery drink. A study published in the journal Obesity even found individuals who drink one or more sports drinks every day gained more weight over a three-year span than those who don’t.
Agave nectar
Producers slap the word “natural” on nearly any food product because that term helps convince people it’s healthy. Agave nectar has been hailed the natural substitute to evil artificial sweetener, but it has more fructose than any other common sweetener, including high fructose corn syrup. Sure, it’s low on the glycemic index, but that’s not a free pass to drench your oatmeal and drown your iced tea with the stuff.
Everything You Need to Know About Today's Most Popular Sweeteners >>>
Yogurt-Covered Snacks
We’re going to let you in on a secret: Yogurt-covered snacks sometimes aren’t covered with yogurt. Those tubs of pretzels and raisins are likely just covered in sugar (and fat). More specifically, a ¼-cup serving of yogurt-covered raisins has about 150 calories, a third of which comes from fat, while the rest comes from carbs. Want an easy fix? Top your raisins with plain Greek yogurt.
Protein Power: 6 Easy Ways to Eat Yogurt >>>
Skim/low-fat milk
Skim milk is skimping on a lot of the factors that make whole milk so healthy. Yes, you’re getting rid of the fat, but you’re also stripping away essential vitamins (as well as texture and flavor). To combat this, skim milk is fortified with synthetic vitamins in an attempt to replace the protein and calcium lost in processing. Overall, there’s really little benefit to buying fat-free dairy products. You want to keep the processing and denaturation to a minimum.
20 Foods an Athlete Would Never Eat >>>
Margarine
Margarine is the inexpensive butter substitute that took the late 1800s by storm when chemists learned how to harden liquid oils. Nutritionally speaking, it has less saturated fat than butter because it’s made from vegetable oils, not animal fat; all in all it depends if you want to rely on cows or chemists. But that tub of I Can’t Believe It’s Not Butter! you have in your fridge today is scarier than it seems. Vegetable oil is extracted from corn, soybeans, or safflower seeds, then steamed to remove impurities (along with vitamins and antioxidants), hydrogenated to make it semi-solid (producing a lumpy, grey grease), emulsified to remove lumps, bleached to remove the grey color, steamed again to remove chemical odors, and then synthetic vitamins and colors are added in the end. Does your “healthier" butter seem so healthy now?
The 8 Absolute Worst Foods You Can Pump Into Your Body >>>
Fruit juice
Most packaged fruit juices are sugar-packed; not the health elixirs we so desperately want them to be. Fruit in its whole form has healthy fiber in its flesh and vitamins and nutrients in its skin that’s lost in juice form. Plus, you’re not chewing the liquid, so all the fructose-laden sugar is rocketed to your liver where it can be lodged and stored as fat. If you want a glass for breakfast, opt for tart cherry or grape juice (unsweetened) to get a recovery boost after tough workouts.
8 Power Fruits For Better Health >>>
Flavored yogurt
That tiny cup of yogurt you eat for breakfast (that doesn’t fill you up and leaves you rummaging for more food) is packed with more sugar than you’d ever suspect. Most brands have close to 15g per 6oz serving. Stop wasting your money and ruining your diet; make the switch to plain Greek yogurt. You’ll feel more satisfied and have a dose of protein to really start your day right.
Canned soup
Canned soup is the solution for last-minute lunch or dinner laziness. The problem is that you’re overloading your system with sodium (some have 400mg per cup) and some cans’ plastic linings have BPA. Make a giant homemade batch over a weekend and freeze it in smaller portions to get you through the colder seasons.
10 Pumpkin Recipes You Can Eat on The Shred >>>
Pita chips
Nearly all pita chips are made with enriched wheat flour (a refined grain that doesn’t have nearly the fiber or nutrients found in whole-grain flour) or white flour, oil, and salt. It may not seem that bad, but a study published in Current Atherosclerosis Reports found a diet full of refined grains and starches increases a person’s risk for heart disease, diabetes, weight gain, even cancer. Plus, they may not be that greay, but they still pack a caloric punch and it's hard to stop after eating just a handful.
Healthy Snack Alternatives For Every Craving Type >>>
Granola
It’s an amazing yogurt add-on, great with a splash of milk, and even a filling snack on its own, but nearly all granola brands add sugar and oil during the cooking process. Some are loaded with seeds, nuts, and dried fruit, which up the fat content, too. Opt for brands that have a blend of oats, whole grains, and other natural ingredients.
10 Gluten-Free Breakfast Recipes >>>
Fruit and vegetable chips
Surprise! Fruit and veggie chips actually contain very little fruits and vegetables because of how processed they are. What’s more, most of the nutrients are destroyed because of this, as well. What you end up with is a chip that’s artificially colored and flavored to look and taste like a vegetable or fruit.
8 Vegetables For Guys Who Hate Greens >>>
Fruit cocktail
Fruit cocktail is an appealing snack whether you eat it from the can or those little portable cups. The issue is one cup has about 110 calories and over 25g of sugar (In. One. Small. Cup.). They’re often packaged in syrup, which isn’t doing you any favors either. Grab a pear, peach, apple, or any other piece of fruit instead; they’re just as portable and way more nutritious.
9 Foods That Should Be in Every Diet >>>
20 photos
Carb foods
from Men's Fitness http://www.mensfitness.com/nutrition/what-to-eat/20-foods-seem-healthy-arent
0 notes
Last Seen Blogs

cringefortress2
Cringe TF2 OCs for my soul

do-it-for-the-fandom
Do it for the Fandom
tiassamiura
Miu-Miu

hauntedghostmoss
the moss within is haunted
