#totorocake
Photo

Cake de chocolate relleno de arequipe . . . . . . . . @sweetdreams_ec #sweetdreams_ec #workingfromhome #pastry #pastrylove #pastrylife #totoro #totorolover #totorothailand #totoroart #totorocake #fondant #fondantcake #birthdaycake #guayaquil #ecuador #picoftheday #followme #likeforlikes #chocolate #chocolatecake (en Guayaquil, Ecuador) https://www.instagram.com/p/CiDbau2rjSE/?igshid=NGJjMDIxMWI=
#sweetdreams_ec#workingfromhome#pastry#pastrylove#pastrylife#totoro#totorolover#totorothailand#totoroart#totorocake#fondant#fondantcake#birthdaycake#guayaquil#ecuador#picoftheday#followme#likeforlikes#chocolate#chocolatecake
0 notes
Photo

Totoro cream puffs! 🌱You have to come early in the morning to get these as once they sell out for the day, that’s it! 🍃They are so cute and it’s totally worth the visit!! #japan #tokyo #totoro #totorocake #creampuff #food #foodporn #dessert #shimokitazawa (at Shirohige's Cream Puffs, Tokyo) https://www.instagram.com/p/BuJsOANjZvS/?utm_source=ig_tumblr_share&igshid=1v6cs4reegyxm
4 notes
·
View notes
Photo
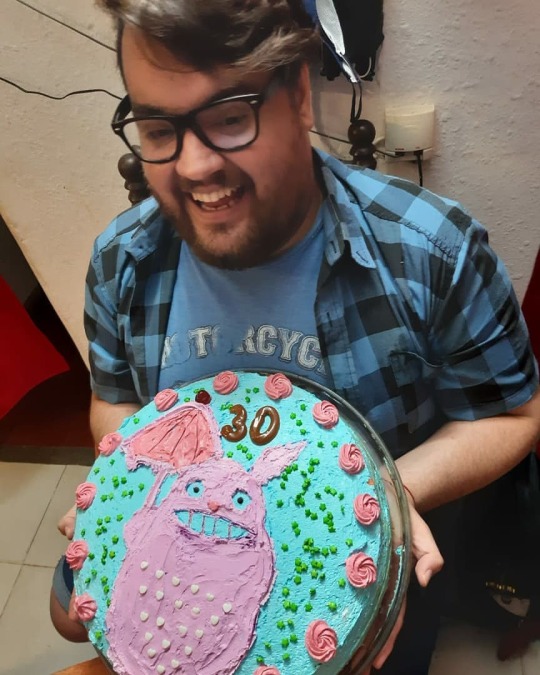
The totoro cake! 🥳🥳🤤🤤🤤 PATROCINADO POR @chococat.formosa #thecake #totorocake #treintas #torta #tortadetotoro #totoro #ghibli #chococatformosa #cumpleaños #birthday #bday #chubbyboy #chubbyman #bearboy #bearman #beardboy #redbeard #sohappy (en Barrio Guadalupe) https://www.instagram.com/p/CMZZ-2kjst7/?igshid=w9emcegxcktk
#thecake#totorocake#treintas#torta#tortadetotoro#totoro#ghibli#chococatformosa#cumpleaños#birthday#bday#chubbyboy#chubbyman#bearboy#bearman#beardboy#redbeard#sohappy
1 note
·
View note
Photo
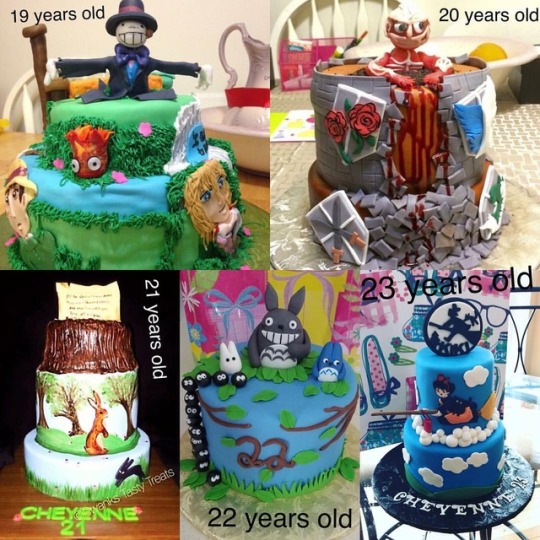
For the past five years my dad has bought these awesome cakes from #swankstastytreatsandcustomcakes The first one was when I was 19 #howelsmovingcastel Next when I was 20 #attackontitan Then one movie I grew up on and my dad constantly quoted #watershipdown oh then my favorite #miyazaki movie #myneighbourtotoro Finally we reach 23 and it’s #kikisdeliveryservice ! I loved all of these cakes! Very creative and memorable 💕 #animecake #cake #birthdaygirl #howelsmovingcastelcake #attackontitancake #watershipdowncake #totorocake #kikisdeliveryservicecake #totoro #animefans #animefandom #miyazakimovies #birthdayfun #birthdaycake #creative ##memorable #fatherdaughtertime
#attackontitancake#kikisdeliveryservicecake#howelsmovingcastelcake#myneighbourtotoro#animefans#miyazaki#cake#birthdayfun#birthdaycake#memorable#miyazakimovies#creative#totorocake#kikisdeliveryservice#animecake#howelsmovingcastel#watershipdown#watershipdowncake#fatherdaughtertime#animefandom#swankstastytreatsandcustomcakes#birthdaygirl#attackontitan#totoro
1 note
·
View note
Photo
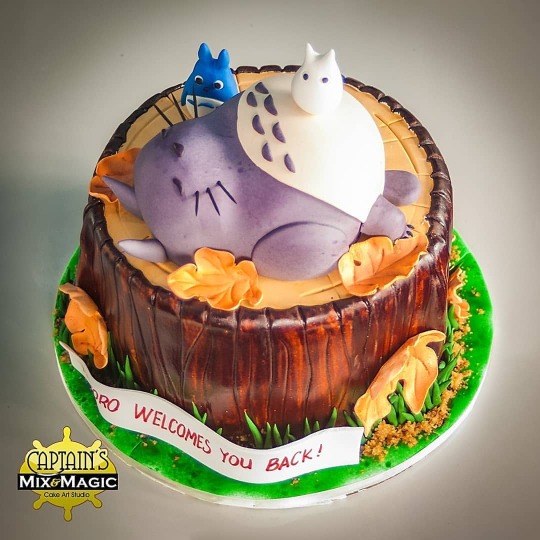
http://captainsmixandmagic.com/main/2020/06/19/totoro-is-sleeping-cake/ #captainsmixandmagic #mixandmagic #baking #cakes #custommadecakes #customcakes #fondantcake #cakeporn #sugarart #madetoordercakes #sweettooth #ilovecake #dessert #teal #myneighbortotoro #totorocake Custom made cakes from Captain's Mix & Magic Paranaque City, Metro Manila, Philippines * 2 weeks or earlier for cake reservations * Confirmed and Fully paid 30 days before delivery date and get a 10% discount * Minimum order of PhP4000 worth of cake and pastries contact us at email: [email protected] phone: +63(916)303-6212 Support us at: https://www.patreon.com/join/2694946? Follow us at https://www.facebook.com/CaptainsMixandMagic https://www.instagram.com/captainsmixandmagic https://twitter.com/CaptMixandMagic https://captmixandmagic-blog.tumblr.com/ https://www.pinterest.ph/captainsmixnmagic/ Official Website: http://captainsmixandmagic.com (at Captain's Mix and Magic) https://www.instagram.com/p/CBmUUt9J7ru/?igshid=gcaha0v33kk1
#captainsmixandmagic#mixandmagic#baking#cakes#custommadecakes#customcakes#fondantcake#cakeporn#sugarart#madetoordercakes#sweettooth#ilovecake#dessert#teal#myneighbortotoro#totorocake
0 notes
Photo
TOTORO! I had such a blast making this today over at @whistleandflute’s beautifu… TOTORO! I had such a blast making this as we speak over at @whistleandflute's stunning dwelling. Teddy partied onerous with Aki and Archer, banging drums, taking part in OG Tremendous Mario and sword fights ...
0 notes
Photo


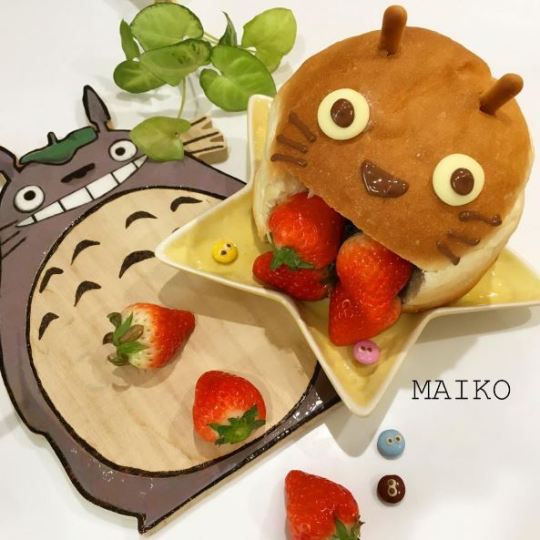
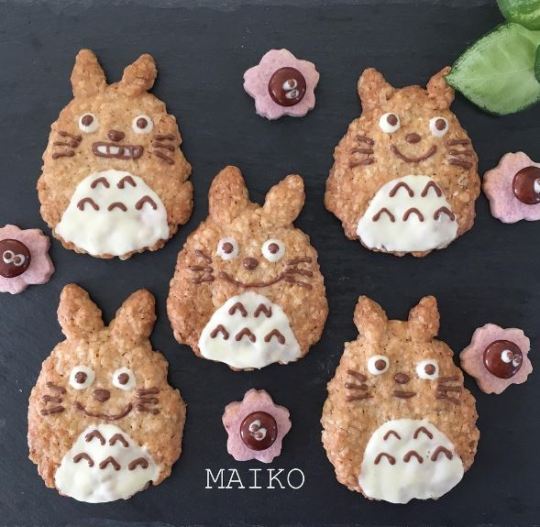
Weekend is almost here! 😍 Celebrate it with our lovely friend Totoro and add some Ghibli magic to your party! ✨Make toasts, pancakes, biscuits or cakes.🍪🍰 The friendly forest spirit fits there as well too! 💕
►https://www.instagram.com/inumaiko/
#japancandybox#kawaii#kawaiifriday#kawaiikitchen#kawaiifood#totoro#totorotoasts#totorobiscuits#totoropancakes#totorocake#totorofood#kawaiiyummy#bakingtime#cookingtime#kawaiilifestyle
119 notes
·
View notes
Text
Totoro Cake
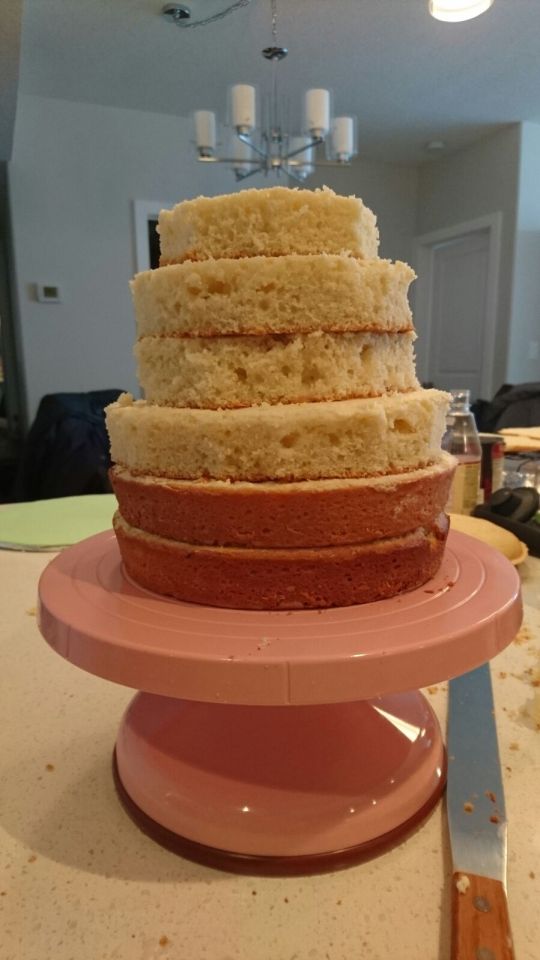
It’s been a while since I’ve posted anything but this is a good place to start again! It was my friend’s birthday recently and I’ve always wanted to try to create a fondant cake so I thought I’d give it a go! Both she and I love Totoro so it was an easy decision but a complicated cake when considering the logistics. After much (more like some...) research, I stumbled upon All About Ami’s post and her experience making a Totoro cake. I will attempt to take you guys through the process... and all the lessons we learned along the way. Here was my final product:
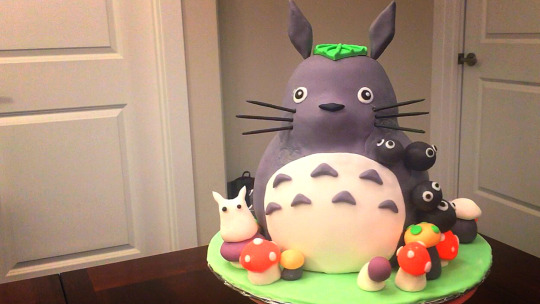
Note: Through watching many episodes of Cake Boss, Ace of Cakes and researching what I could online, we knew that we needed a dense cake (like pound cake) rather than an airy cake (like chiffon cake) so that it could support the weight of the design which would help prevent cracking.
Total Servings: Approximately 25-30 people (ish...)
Cake Time: 2 Hours (access to several ovens)
Assembly Time: 6 Hours
Total Time: 10 Hours (including 4 other people helping me, waiting for the cake to cool, and lots of struggles etc etc). Pre-making the cakes (on a different day or earlier that day) may be helpful so you don’t need to sit and wait so long for them to cool.
THINGS YOU’LL NEED:
(that you may/may not usually have in your home)
Buttermilk
Fondant (we purchased 10 lbs white and 1.5 lbs black at Michaels and used 4-5 lbs including our throwout fondant and extras. See the ‘Assembly’ portion to read about our struggles)
Shortening
Lemons
Lots of eggs
Gel food coloring
THE CAKE
We ended up using Once Upon a Cake’s lemon pound cake recipe with slight modifications. We made this recipe 3 times to make two 9″ round cakes and two 9″x13″ rectangular sheets.
Ingredients:
3 cups all purpose flour (leveled ish)
1/2 teaspoon baking soda
1/2 teaspoon salt (do not add if you’re using salted butter...)
2 sticks (1 cup) unsalted butter, softened
2 cups granulated sugar
A splash of vanilla (approximately 1 tsp)
3 large eggs
1 cup buttermilk
2 tablespoons grated lemon zest, packed (approximately 3 lemon’s worth of zest)
2 tablespoons fresh lemon juice (approximately 1 lemon’s worth of juice)
Instructions (Taken from Once Upon a Cake’s instructions and slightly modified. Also, look at their link for photos):
1. Preheat the oven to 325°F and set an oven rack in the middle position. For extra assurances, we lightly oil the pan (or non-stick cooking spray works too), dust with flour, then cut out a piece of parchment paper to line the bottom of the pan.
2. You will need 3 main mixing bowls (2 smaller bowls and one large mixing bowl or Kitchenaid bowl).
Bowl 1: add the dry ingredients (flour, baking soda and salt)
Bowl 2: add the ‘liquid’ ingredients (buttermilk, lemon zest, and lemon juice)
3. In the large mixing bowl, cream the softened butter using an electric mixer or a wooden spoon. After adding each ingredient, mix/cream well and scrape down the sides of the bowl. Add the sugar, then one egg at a time and vanilla.
4. With your mixer on low, start by adding 1/3 from bowl 1 and alternate adding 1/2 of bowl 2 until you end with adding the last 1/3 of bowl 1. Remember to scrape down the sides throughout. By the end, the batter will be fairly thick (similar to muffin batter consistency).
5. Scrape and level the batter into your pan(s).
Note: Try to push the edges of the cake onto the wall of the pan so there’s almost a divot in the batter (kind of looks like a shallow U). This is because cakes tend to rise in the middle and if the batter is able to cling onto the walls of the pan, theoretically, the cake would be less dome-y and more level once it’s done baking.
6. Place pans in the oven for about 1 hour. We rotated the pans in the middle for a bit more even baking but it really depends on your oven. To check if your cake is done, stick a toothpick or something similar in the middle and at different angles. If it is done, there should be no crumbs or batter that stick to the toothpick.
7. Let the cake stand and cool for about 10-20 minutes before removing the cake from the pan, let the cake rest and cool completely before moving onto the assembly portion.
THE ICING
After some googling of what type of icing would be best, we decided on Swiss Buttercream... though looking back, a regular buttercream would have been just as effective and less work... We used Gretchen’s Bakery’s recipe and added some lemon juice.
Ingredients:
180 g or 6 large Egg Whites
300 g or 1 1/2 c Granulated Sugar
240 g or 2 c Confectioners Sugar
170 g or 3/4 c Vegetable Shortening
454 g or 2 c Unsalted Butter
15 mL or 1 tbsp Vanilla Extract
2-3 tbsp lemon juice (or to taste)
Instructions (Copied from Gretchen’s Bakery)
Over a double boiler, in a large metal bowl whisk together the granulated sugar and the egg whites stirring constantly until the mixture reaches approximately 115 degrees F and the sugar grains have dissolved and are not longer gritty to the touch.
Pour this mixture into the metal bowl of the stand mixer with the WHISK attachment and whip on high speed until it is thick, glossy and white in color. The peaks should be as firm as firm can be.
In the meantime you can sift your confectioners sugar, and once you have achieved STIFF peaks meringue, add the confectioners sugar all at once with the mixer on very low speed to avoid having a snow shower of sugar all over your kitchen!
Once all of the sugar has been incorporated you can turn the mixer speed to med-high until it is all nicely mixed in.
Be sure your butter and shortening are at room temperature and they are the same consistency. Add it in about 2-3 additions, but FAST Additions.
Add vanilla extract
Switch to the paddle attachment and blend on low speed until smooth
Note: This recipe made about 6 cups of icing which was just enough (with about 1/2 cup extra). Make accordingly based on your cake filling needs and preferences!
ASSEMBLY
We used a variety of images as the model for the cake such as:

Once the cakes are cooled, level them off. Cut one of the rectangular sheets in half (below will be called half cake). Cut the other rectangular sheet at about 60/40 ratio (below will be called ‘60′ and ‘40′ cakes). You may also find that cutting off the corners of the new rectangle sized cakes may help too!
Note: We used a leveler that I got from IKEA a while back to help!
Making the Cake Base
1. We assembled the cakes largest to smallest. So, in the following order starting from the bottom: 2 round cakes, the ‘60′ cake, half cake, half cake, and lastly ‘40′ cake. Between each layer, add a thin layer of lemon swiss buttercream.
Note: We used my friend’s cake spinner thingy which definitely helped but it’s okay if you don’t have one either...
2. We then examined the stack of cakes and what seemed to look better and marked out the general locations for where the nose and arms etc. would be using toothpicks.
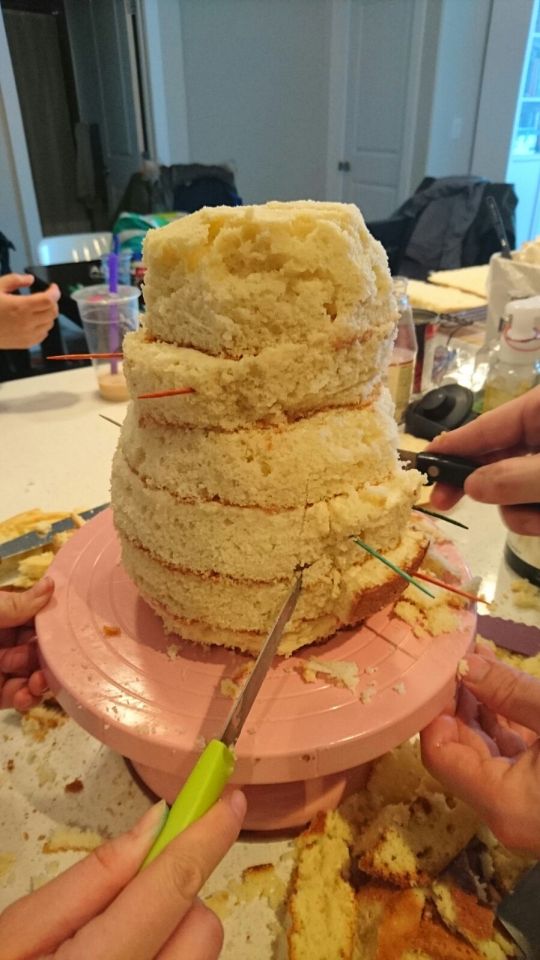
3. We then carved the arms and ‘built up the nose’ portion so that it was more rounded and pointed upwards a little bit (like a bear).
Note: doesn’t the cake look like it could be a seal or a dog or a penguin??
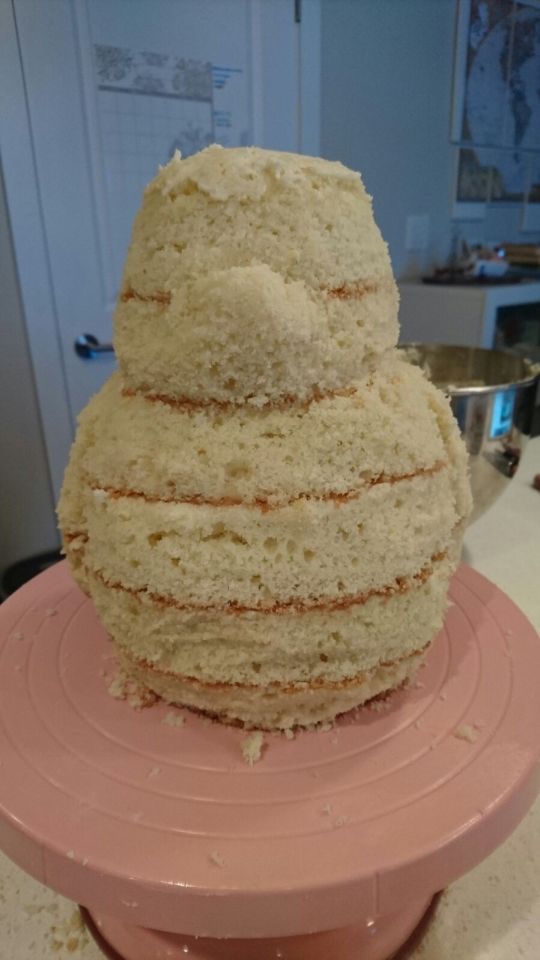
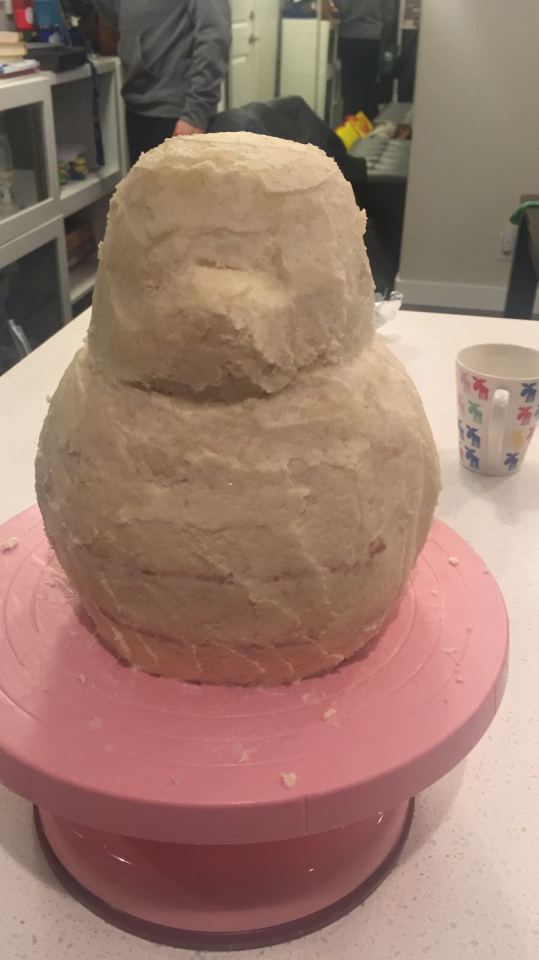
4. ‘Dirty coat’ the cake. Place a thin layer of buttercream all around the cake so that the crumbs don’t fall off (I think that’s why...). Refrigerate for 30-45 minutes.
5. Make a tail (about a tennis ball size) and the blue Totoro using the excess cake and repeat the process above.
Using the Fondant:
Here comes the fondant portion of the post....
I found these links the most helpful (to learn about fondant) and not helpful (because we weren’t making a simple shaped cake)...
http://www.gretchensbakery.com/covering-cakes-with-fondant/
https://www.bbcgoodfood.com/videos/techniques/how-cover-cake-fondant-icing
As mentioned above, we bought 10 lbs of white vanilla (2 packs of white (5 lbs each) and the second pack of white was just for insurance because we had never done this before and weren’t sure how much we would need. We bought black fondant because black is always a hard colour to mix and we knew that Totoro would be grey... all the other colours could be derived from here using gel food colouring (it’s what I had... not sure if you can add regular food colouring or not...).
1. Knead fondant (like you would with dough) for 5-10 minutes or until softened (easily rollable). I would start by kneading about 2-3 lbs of white. Use icing sugar (aka confectioners sugar) to prevent sticking to your countertop and later on, to your rolling pin.
Note: If you live in a dry place like I do or just find that your fondant has dried out, use vegetable shortening to help revive your fondant. Knead in about 1 tsp at a time until you get the right consistency.
2. Take a generous cups worth of white and add green food colouring until desired for the ‘grass’. Roll this out to about 1/4″ thick and place it on your cake base. Trim around the base. SAVE excess green for later (wrap tightly in saran wrap-as airtight as possible!). Note: place a bit of water under the fondant to help it stick to the cake base (we used a Q-tip to make sure we didn’t put too much water for glue).
Note: I used 12″ cardboard cake circles from Michaels. I ‘glued’ two of them together so that they would support the cake better by covering them with tinfoil, cutting the edges into strips towards the middle (so they look like sun rays), folding the strips under and taping them onto the cardboard.
3. For Totoro, knead about 2 lbs of white and 1/5 to 1/4 of your black (approximately 1 cups worth or so... if it’s not enough, you can always knead more later on) .
4. Start mixing the grey by taking approximately 2 cups of white (feel free to eyeball these amounts!) and 1 tbsp of black. Add the black into the white by kneading them together. Add additional white or black until it is the grey that you want.
Note: It is best to add LESS black than you think you’ll need and then slowly incorporate it as needed... otherwise you’ll have a lot of fondant left over... like us... oops!
Note number 2: After some trial and error, below is the ‘technique’ that we used. Read: we tried it twice and had to ‘de-fondant’ the cake twice because he was too wrinkly... a thinner layer of fondant is better for a cake this size as the fondant is quite heavy and you will start to see cracks. Let me know if you have any better ideas/suggestions please!
5. Roll out your dough in an oval shape, until a generous 1/4″ thick. This portion will be for the head, arms and back of Totoro only (kind of like a cape). See image or confusing explanation below...
Lengthwise, it should be long enough to go from the base of the cake, over the arm, head, down the other arm, to the base of the other side.
Widthwise, it should be long enough to go from the base of the neck in the front, over the head, down the back to the base of the cake.

6. Place the oval on the head (in the middle lengthwise and off centred with the shorter side for the face (enough to go to the base of the neck)
7. Start by pressing down and smoothing the face FIRST, then the back of the head and the back of the body, slowly coming forwards towards the arms and front. Cut off excess fondant and in the tummy portion, trim the fondant into a circular shape. Cut out a circle of white fondant (underlayer) that will roughly fit into the tummy space. Refrigerate for 30-60 minutes for the buttercream to stay firm and the fondant to adhere well to the cake (this part is just what we did... not sure if it’s legit or not).
Note: this method worked for us because we knew the stomach would be covered by white anyway so it didn’t matter if there was extra wrinkles in that area... that being said... the less wrinkly, the better. Most of it was pretty smooth, but there were a few problem areas near the front neck area...like in the image below...though, most pictures don’t show these wrinkles (phew!)
8. Roll about 1/3 cups worth of white fondant into 1/4″ thick. Cut into a circle that will cover up the seams of the ‘underlayer tummy’. Stick onto the cake with water (just a little bit will do!).
9. Cover the tail with grey fondant.

9. At this point, we moved him to the cake base/grass.
10. It’s time to make his features! (We made some of these earlier when we were waiting...).
Grey: make ears and chest markings (we made 7 markings with 3 on top and 4 on the bottom).
Black: eyes, nose, claws (we forgot to make claws... oops!), and whiskers (we rolled fondant around a toothpick earlier and let it dry a bit).
Green: leaf on his head (we added more green food colouring to make the leaf more vibrant).

Other Features:
With inspiration from All About Ami and to help hide our boo-boos, we added some mushrooms, the white baby Totoro, and Susuwatari (soot sprites).
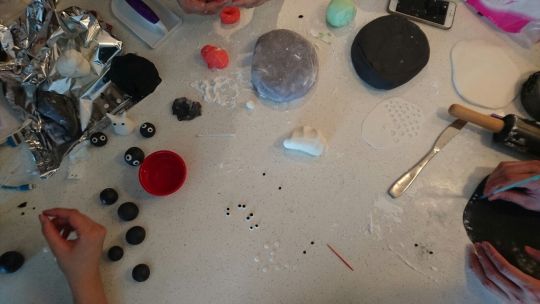
Note: we found random tools around the kitchen to help us make these... e.g. various sized straws, and thermometer case...
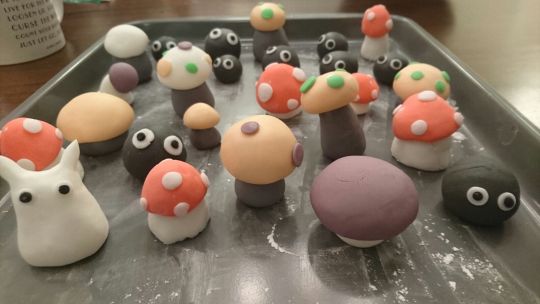
We glued the mushrooms and soot sprites on using glue and/or toothpicks.
And here is our final cake!
youtube
Happy Birthday MPo!
2 notes
·
View notes
Photo

lifepointofview:
Faves.
2 notes
·
View notes
Photo

Look at this adorable little Totoro tart from @bibbleandsip ! . . . . . . . . . . #foodlover #photooftheday #delicious #yummy #dessert #foodie #totorocake #totoroart #totoroworld #ghibli #macaroons #totoro #food #macaroon #totoroishere #foodporn #totorostuff #instafood #totorofan #totorolover #cake #studioghibli #love #totorolove #tart #cookies #totorocase #instagood #myneighbortotoro #totorolovers (at Bibble & Sip) https://www.instagram.com/p/BsA-PVGH1C3/?utm_source=ig_tumblr_share&igshid=fm4qtosl7cmu
#foodlover#photooftheday#delicious#yummy#dessert#foodie#totorocake#totoroart#totoroworld#ghibli#macaroons#totoro#food#macaroon#totoroishere#foodporn#totorostuff#instafood#totorofan#totorolover#cake#studioghibli#love#totorolove#tart#cookies#totorocase#instagood#myneighbortotoro#totorolovers
0 notes
Photo
Happy X'mas with Totoro cake ψ(`∇´)ψ #christmascake #totoro #totorocake #xamsparty #jaytsujimura #ghibli #tokyo #happyholidays #yummy (JAY TSUJIMURA) https://www.instagram.com/p/BrumLsIgBHL/?utm_source=ig_tumblr_share&igshid=1uajaclb4ofcx
0 notes
Photo

Most awesome pre-birthday cake from the best girlfriend 😍😘😊 #totoroishere #totoro #totoro_society #myneighbortotoro #totorocake #cake #blueberries #strawberry #kinderbueno #birthday #birthdaycake #chocolate #food #foodblog #foodstagram #foodporn #foodgasm #foodblogger #chocoholic #toomanyhashtags #buttercream #ghibli #miyazaki https://www.instagram.com/p/BlylxqND9it/?utm_source=ig_tumblr_share&igshid=3uxt5jakpgsa
#totoroishere#birthdaycake#cake#chocoholic#totoro_society#foodstagram#totorocake#chocolate#toomanyhashtags#strawberry#birthday#ghibli#totoro#kinderbueno#foodblogger#miyazaki#myneighbortotoro#foodporn#buttercream#foodgasm#blueberries#food#foodblog
0 notes
Photo

Totoro Cake. TQSM to Uma. #cake #fondant #fondantcake #totoro #totorocake #dwenujang #prettyyummythings (at PrettyYummyThings)
0 notes
Photo
Omg please enjoy the cuteness of this pink Totoro cake with buttercream flower c… Omg please benefit from the cuteness of this pink Totoro cake with buttercream flower crown, as requested by a really particular now-eight 12 months previous woman named Saya...
0 notes
Photo


Have an adventure with the adorable Totoro this weekend and bake a cute Totoro cake! 🍰💖✨ You can find the tutorial here ► http://cococakeland.com/tutorials/totoro-cake-tutorial/
#japancandybox#kawaii#totoro#myneighbortotoro#studioghibli#ghibli#totorocake#toocutetoeat#kawaiicake
29 notes
·
View notes
Last Seen Blogs

georgedaniel10
Untitled

scentedsteamedhams
Steam Hamlet

l3titbeme
Let It Be Me

redpelis
RedPelis

tokiyoh-wj
minor ship syndrome.